If you’re utilizing a third-party access point, this step is mandatory; however, it’s unnecessary if you’re utilizing a Kloudspot gateway. In this section, we’ll guide you through the process of configuring a captive portal with various third-party access point platforms, ensuring that your users can seamlessly access the internet while adhering to your network’s terms and security protocols.
There are three available access points: Cisco Wireless LAN Controller, EnGenius Platform, and Meraki. Let’s explore how to configure them in the upcoming sections.
It necessitates a splash page URL, which will be provided upon the successful completion of your purchase. For detailed information on the different purchase options available, please refer to the Installation section.
Table of content
Subsections of Configure Kloud portal with 3rd party Access point.
Cisco Wireless Lan Controller
In this section, we will guide you through the process of configuring captive portal with the Cisco Wireless LAN Controller access point, ensuring seamless and secure internet access for your users.
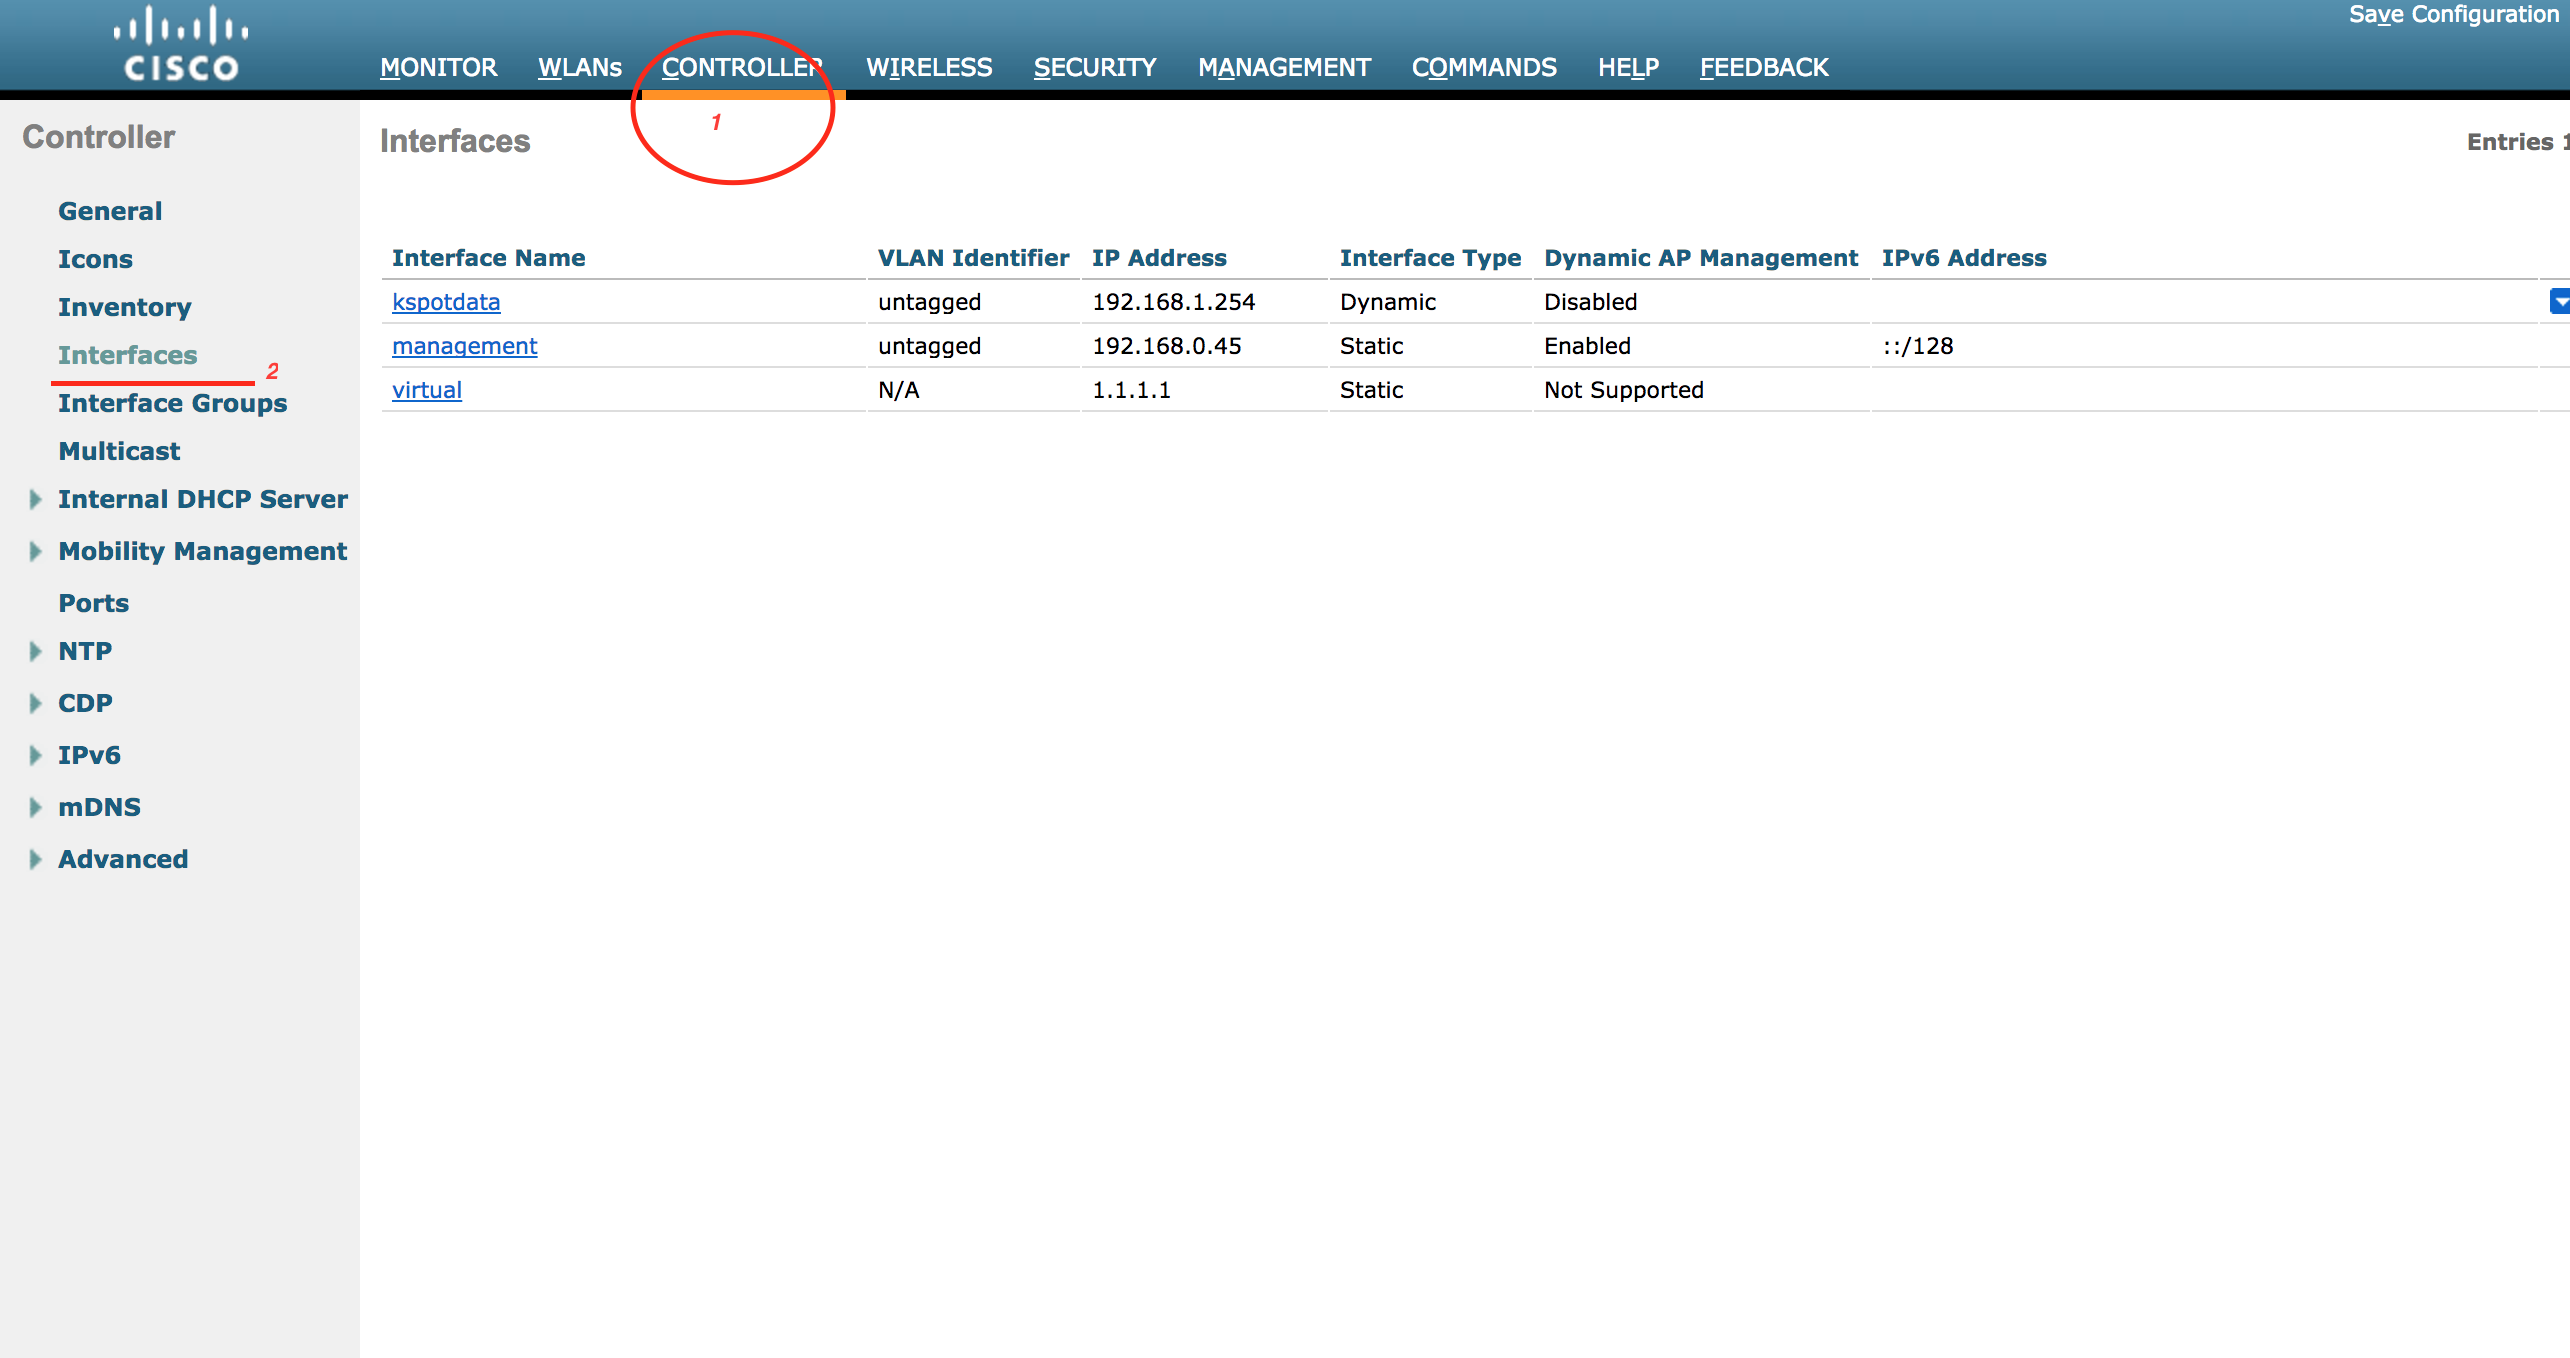
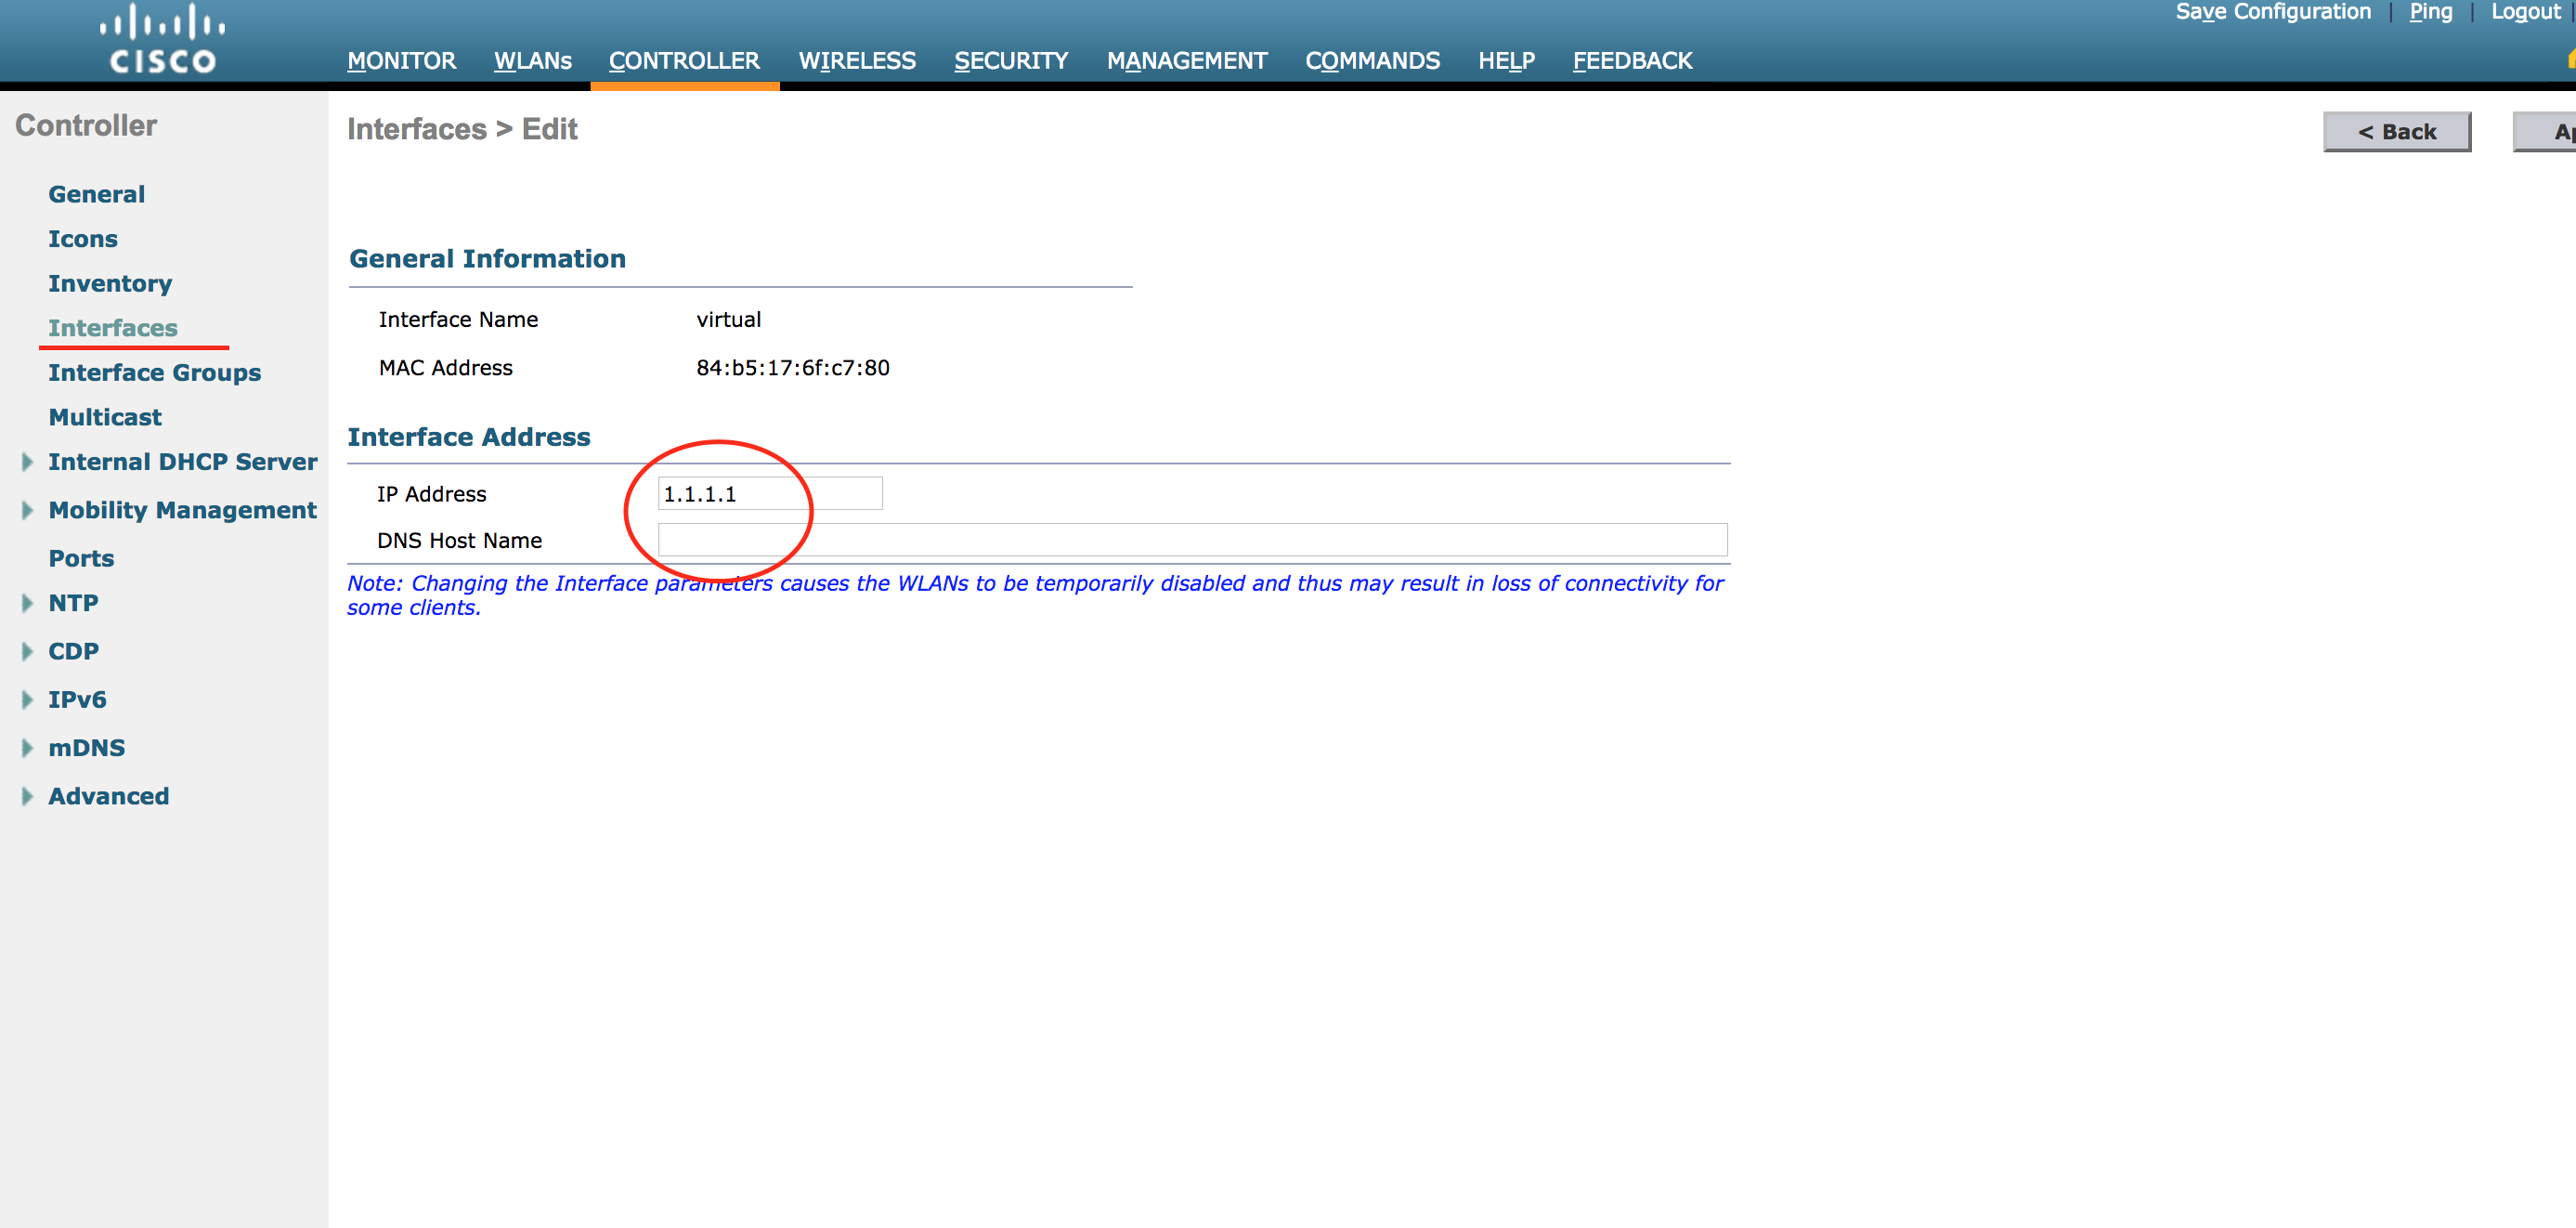
1. Configure Virtual Interface.
2. Configure the External Guest portal URL and redirection page.
3. Enable AccessControls for the external guest portal.
4. Guest WLAN settings.
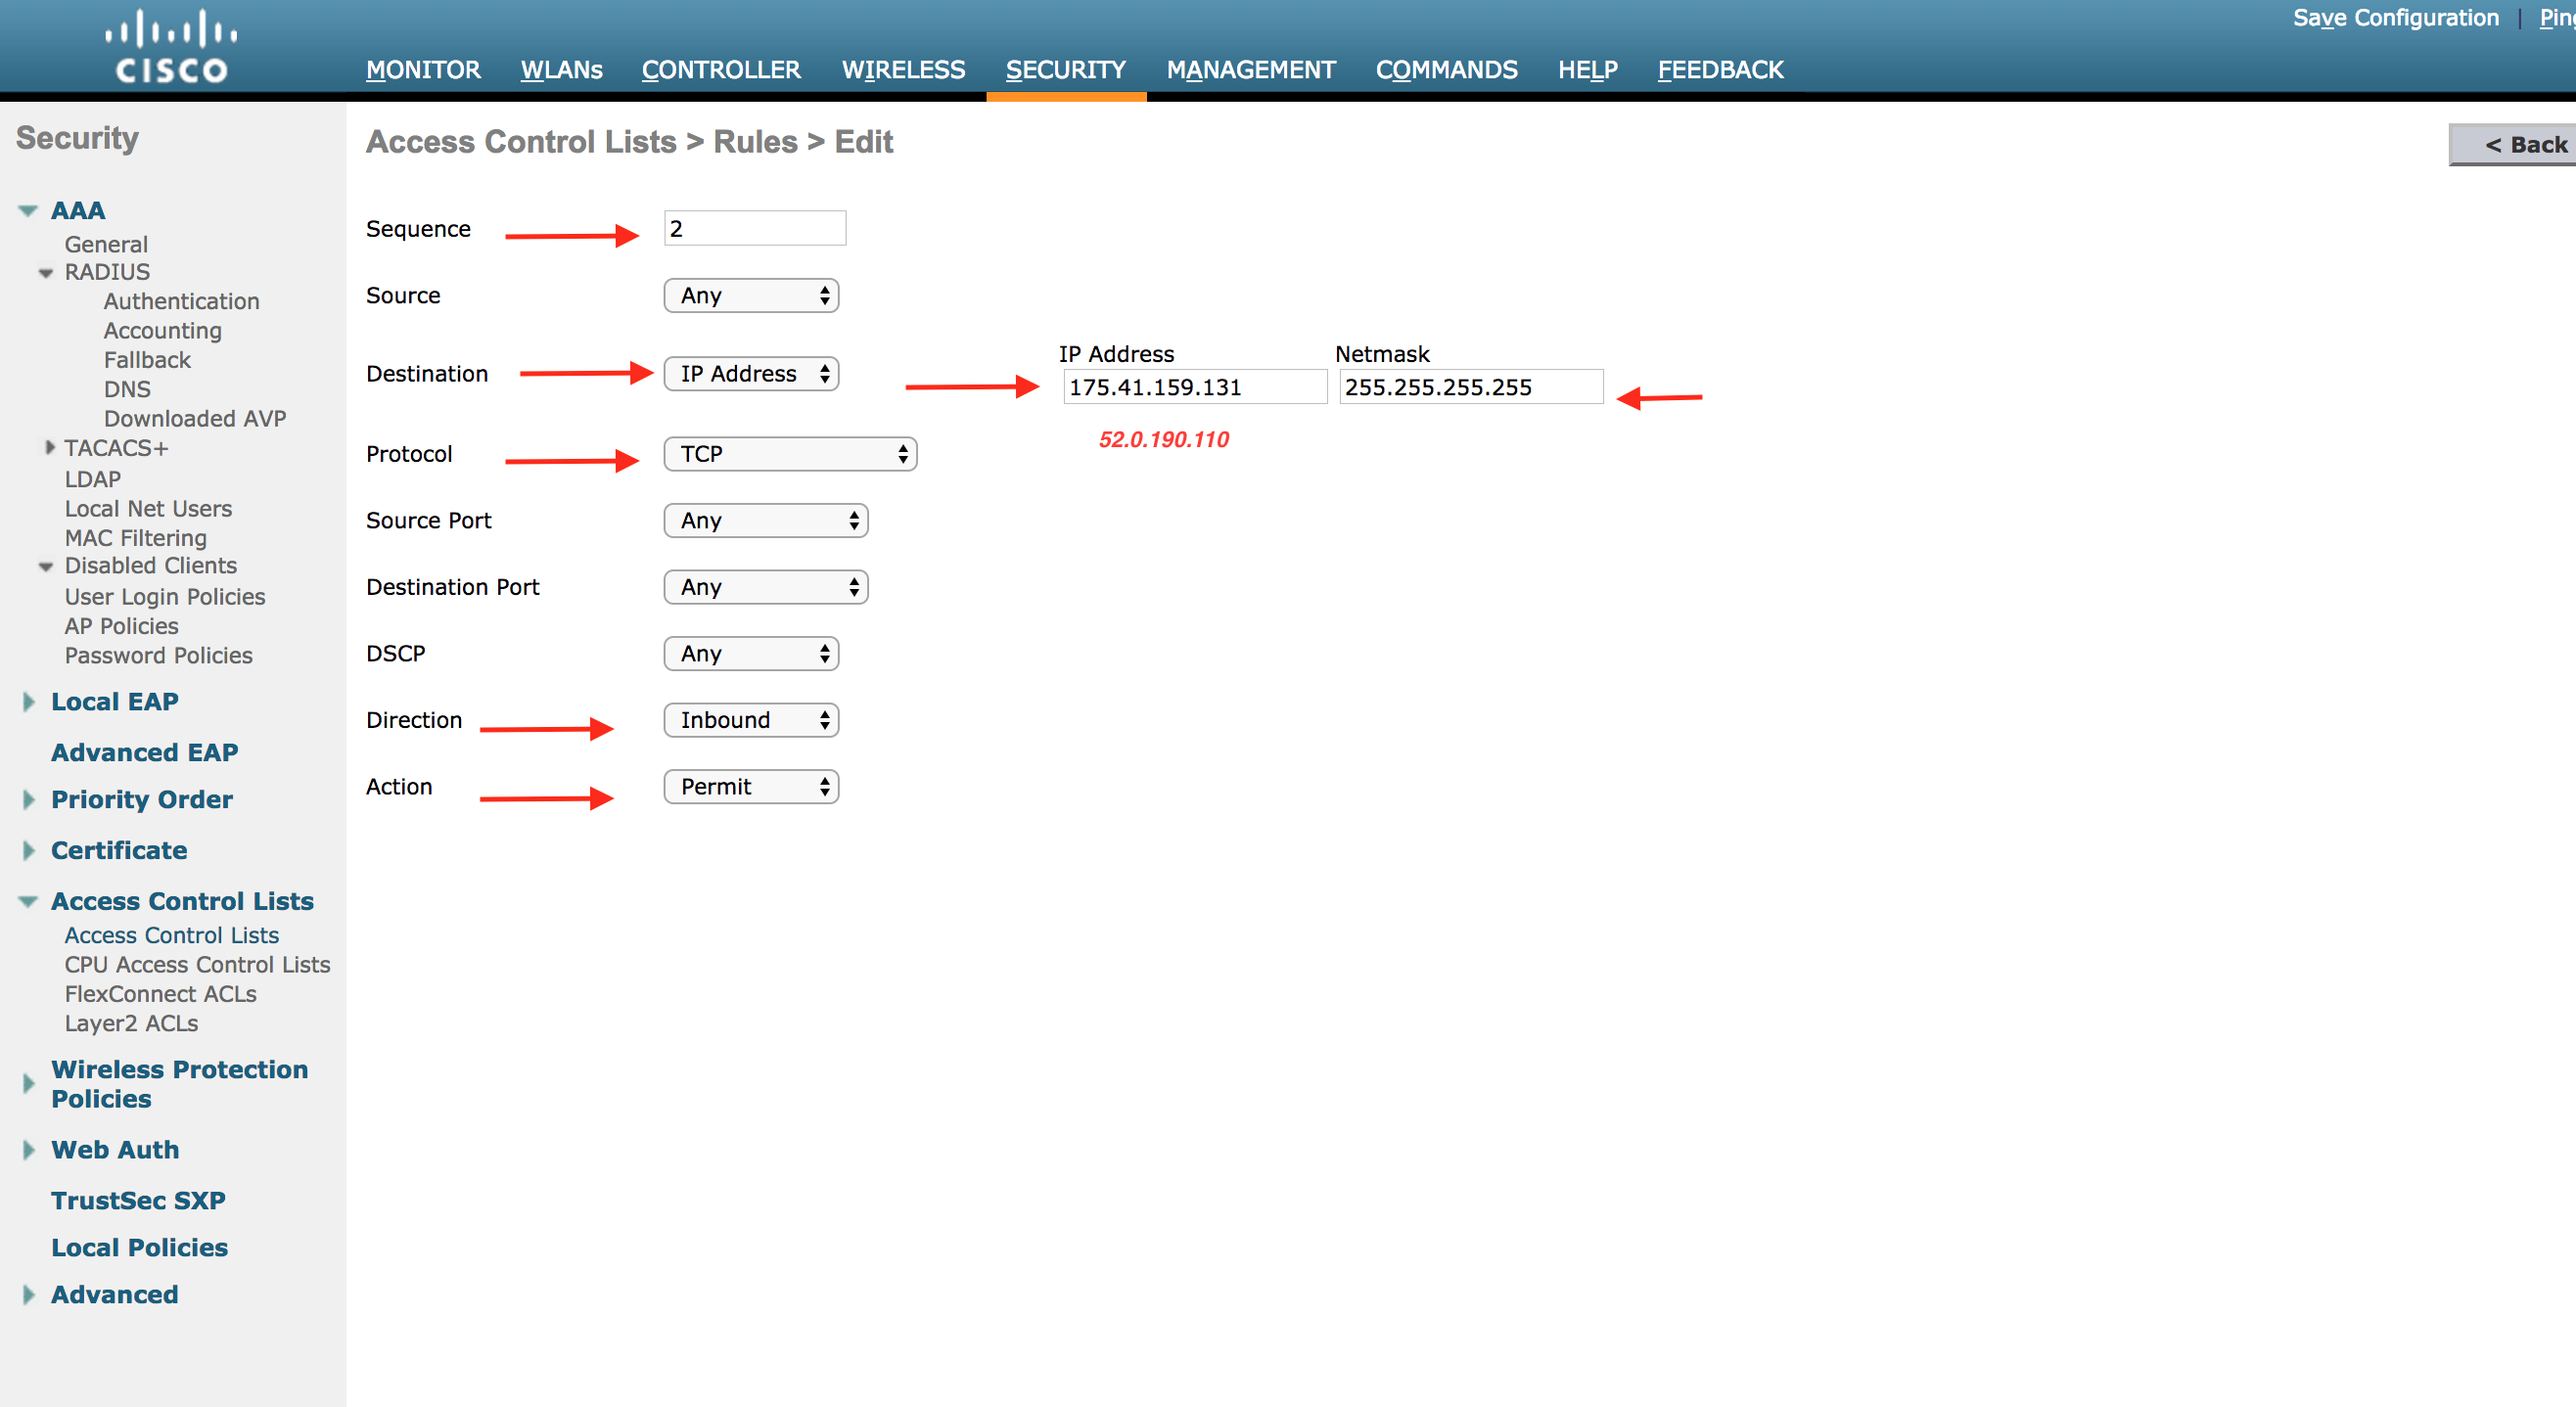
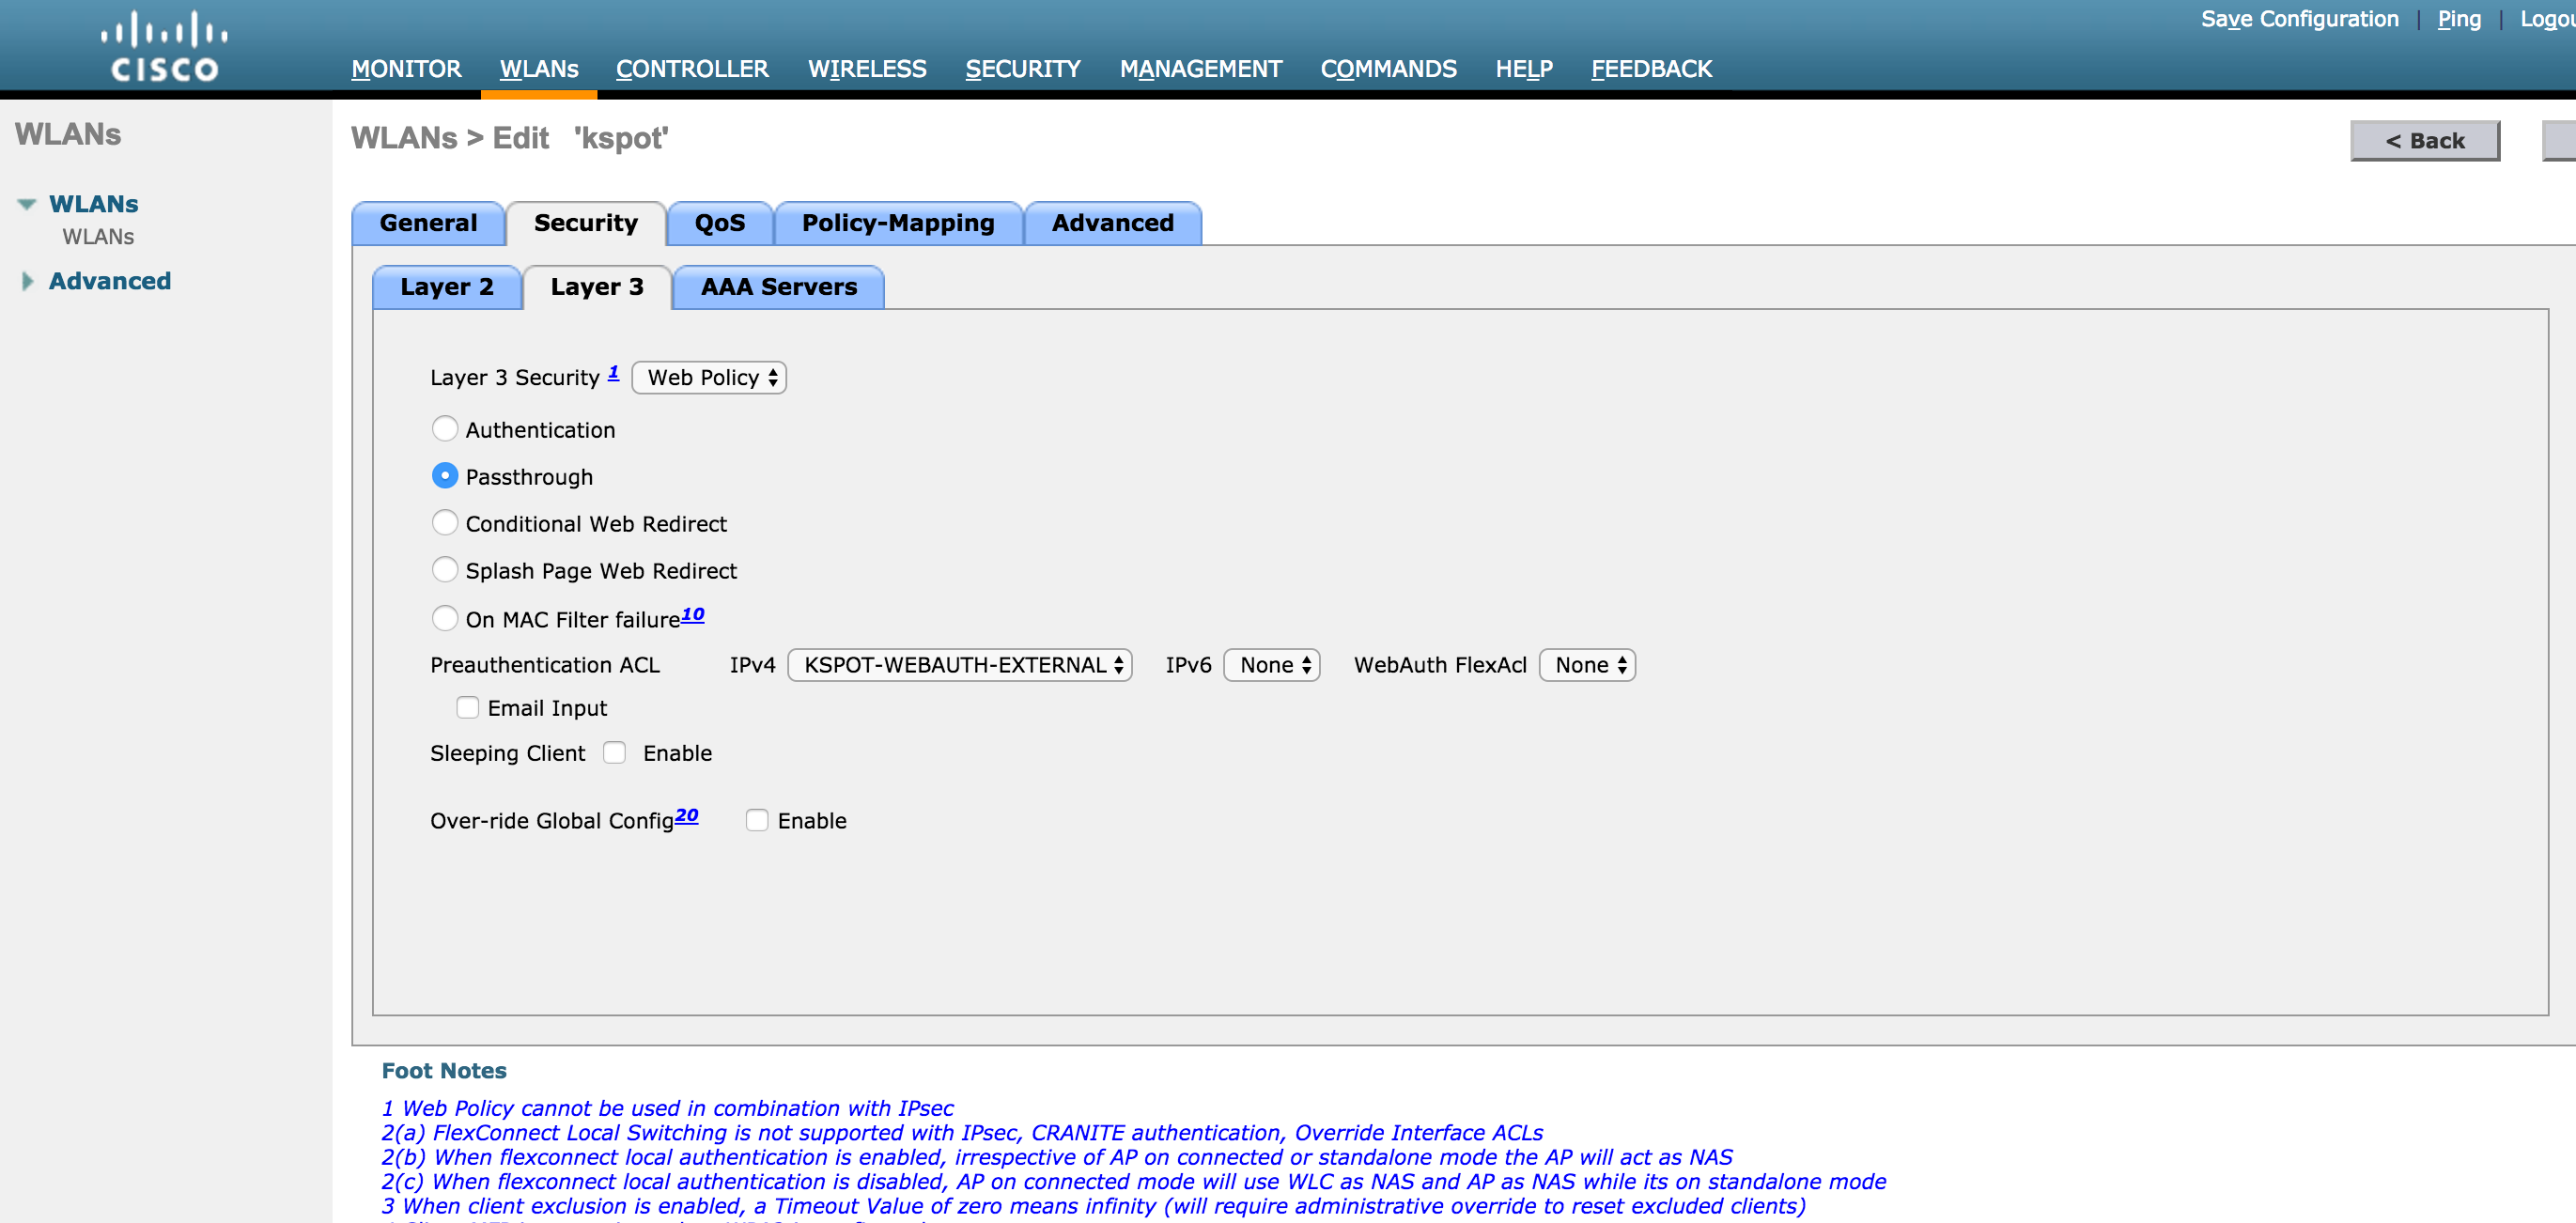
Configure the External Guest portal URL and redirection page
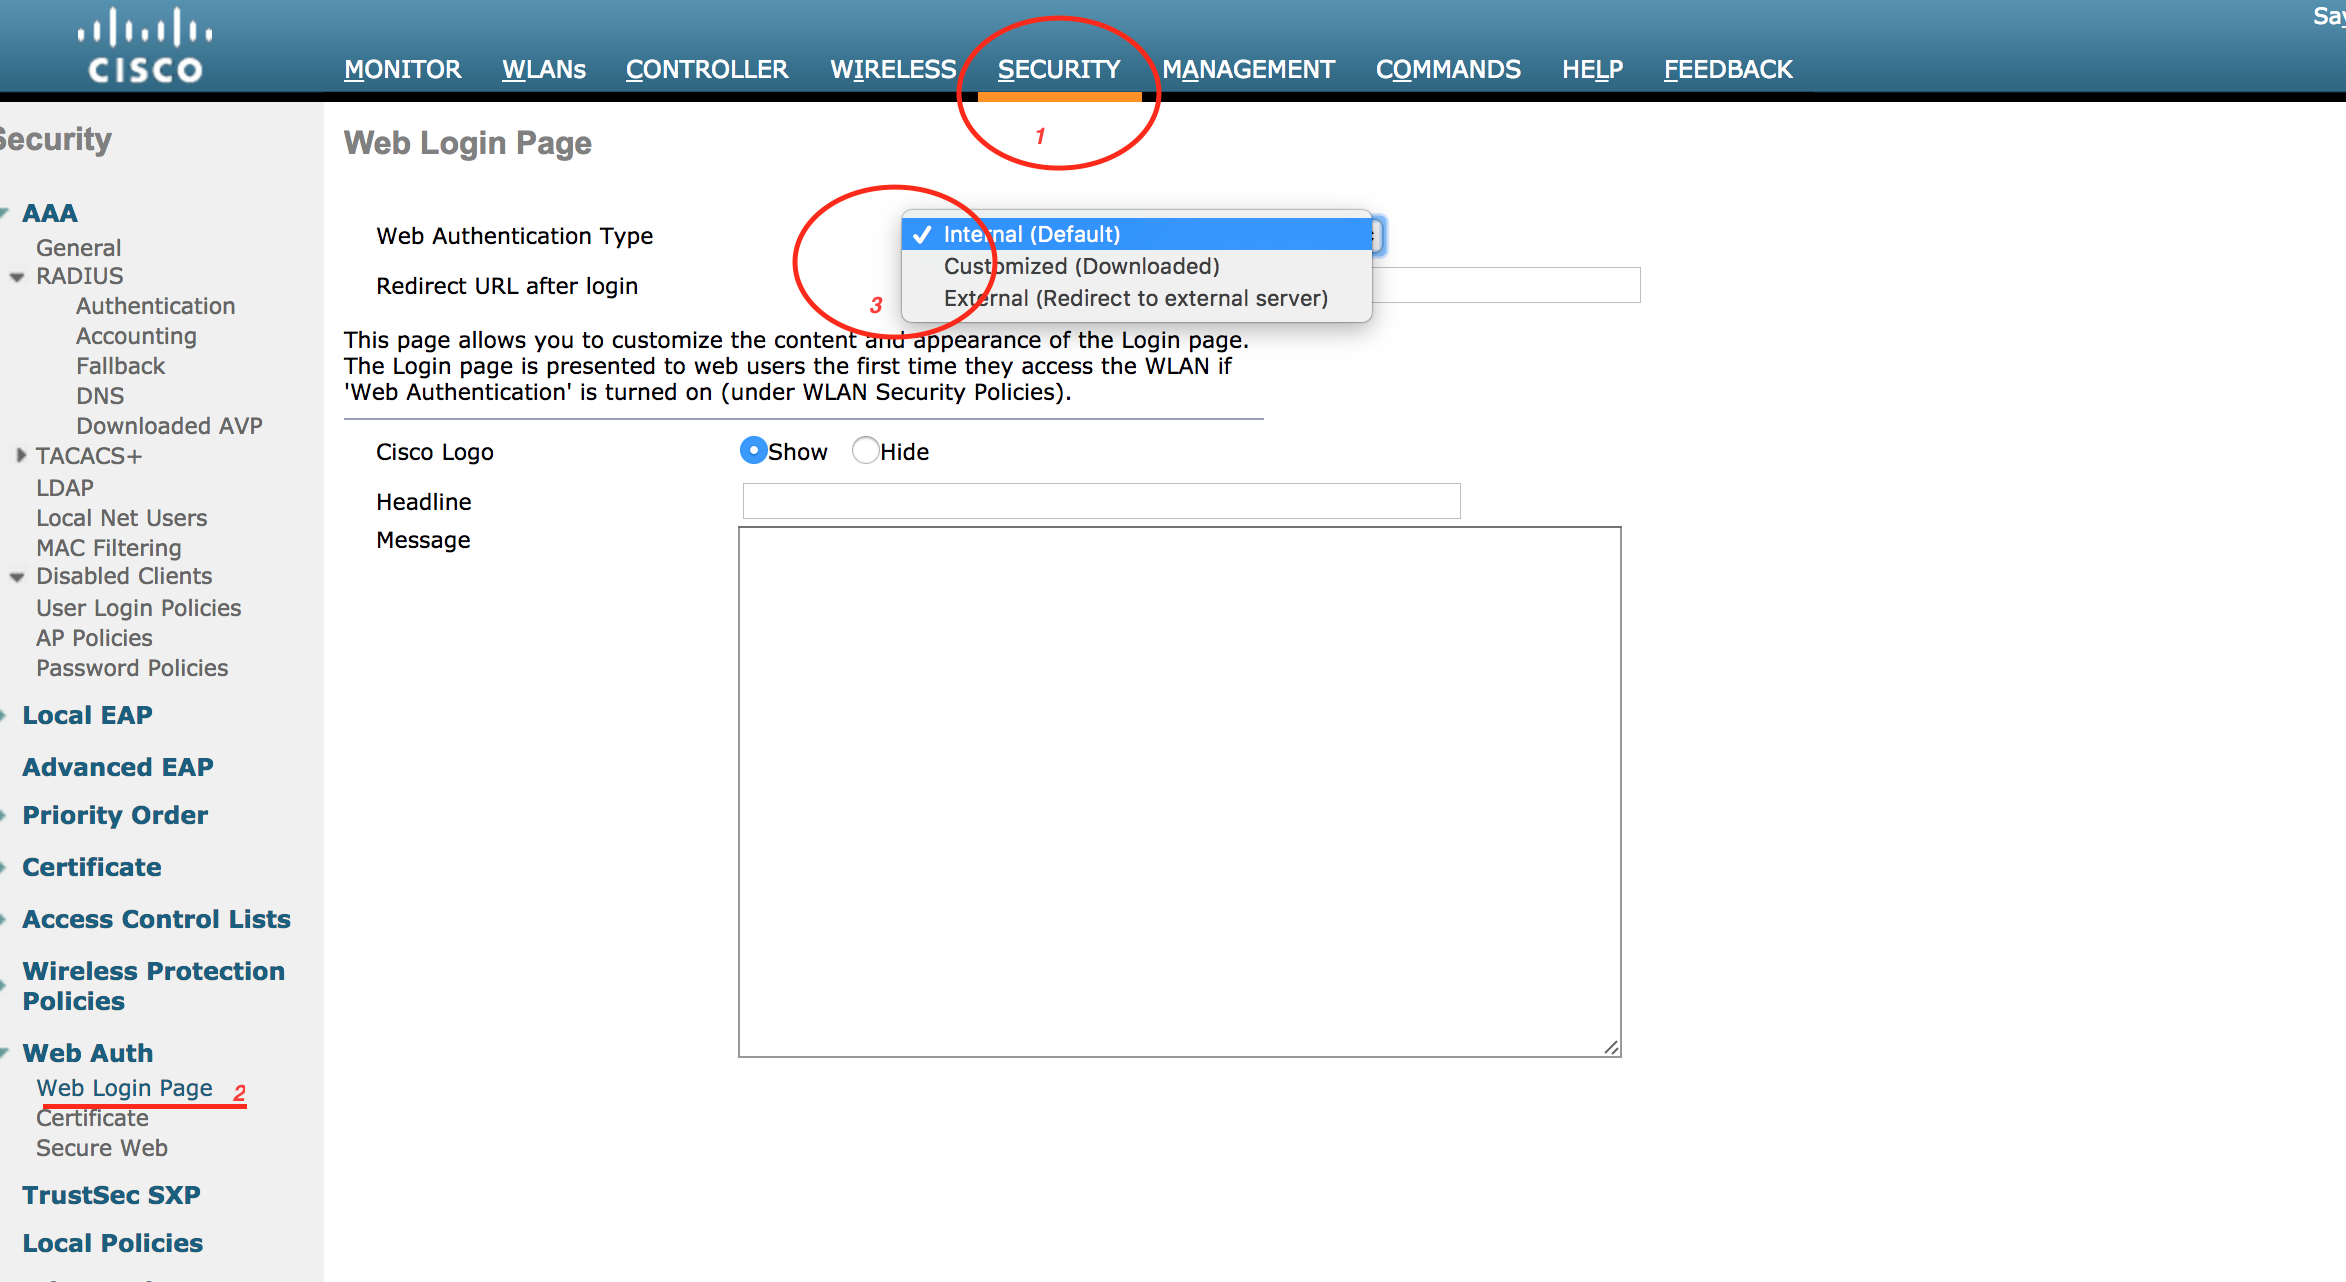
1. Select ‘External (redirect to external server)’
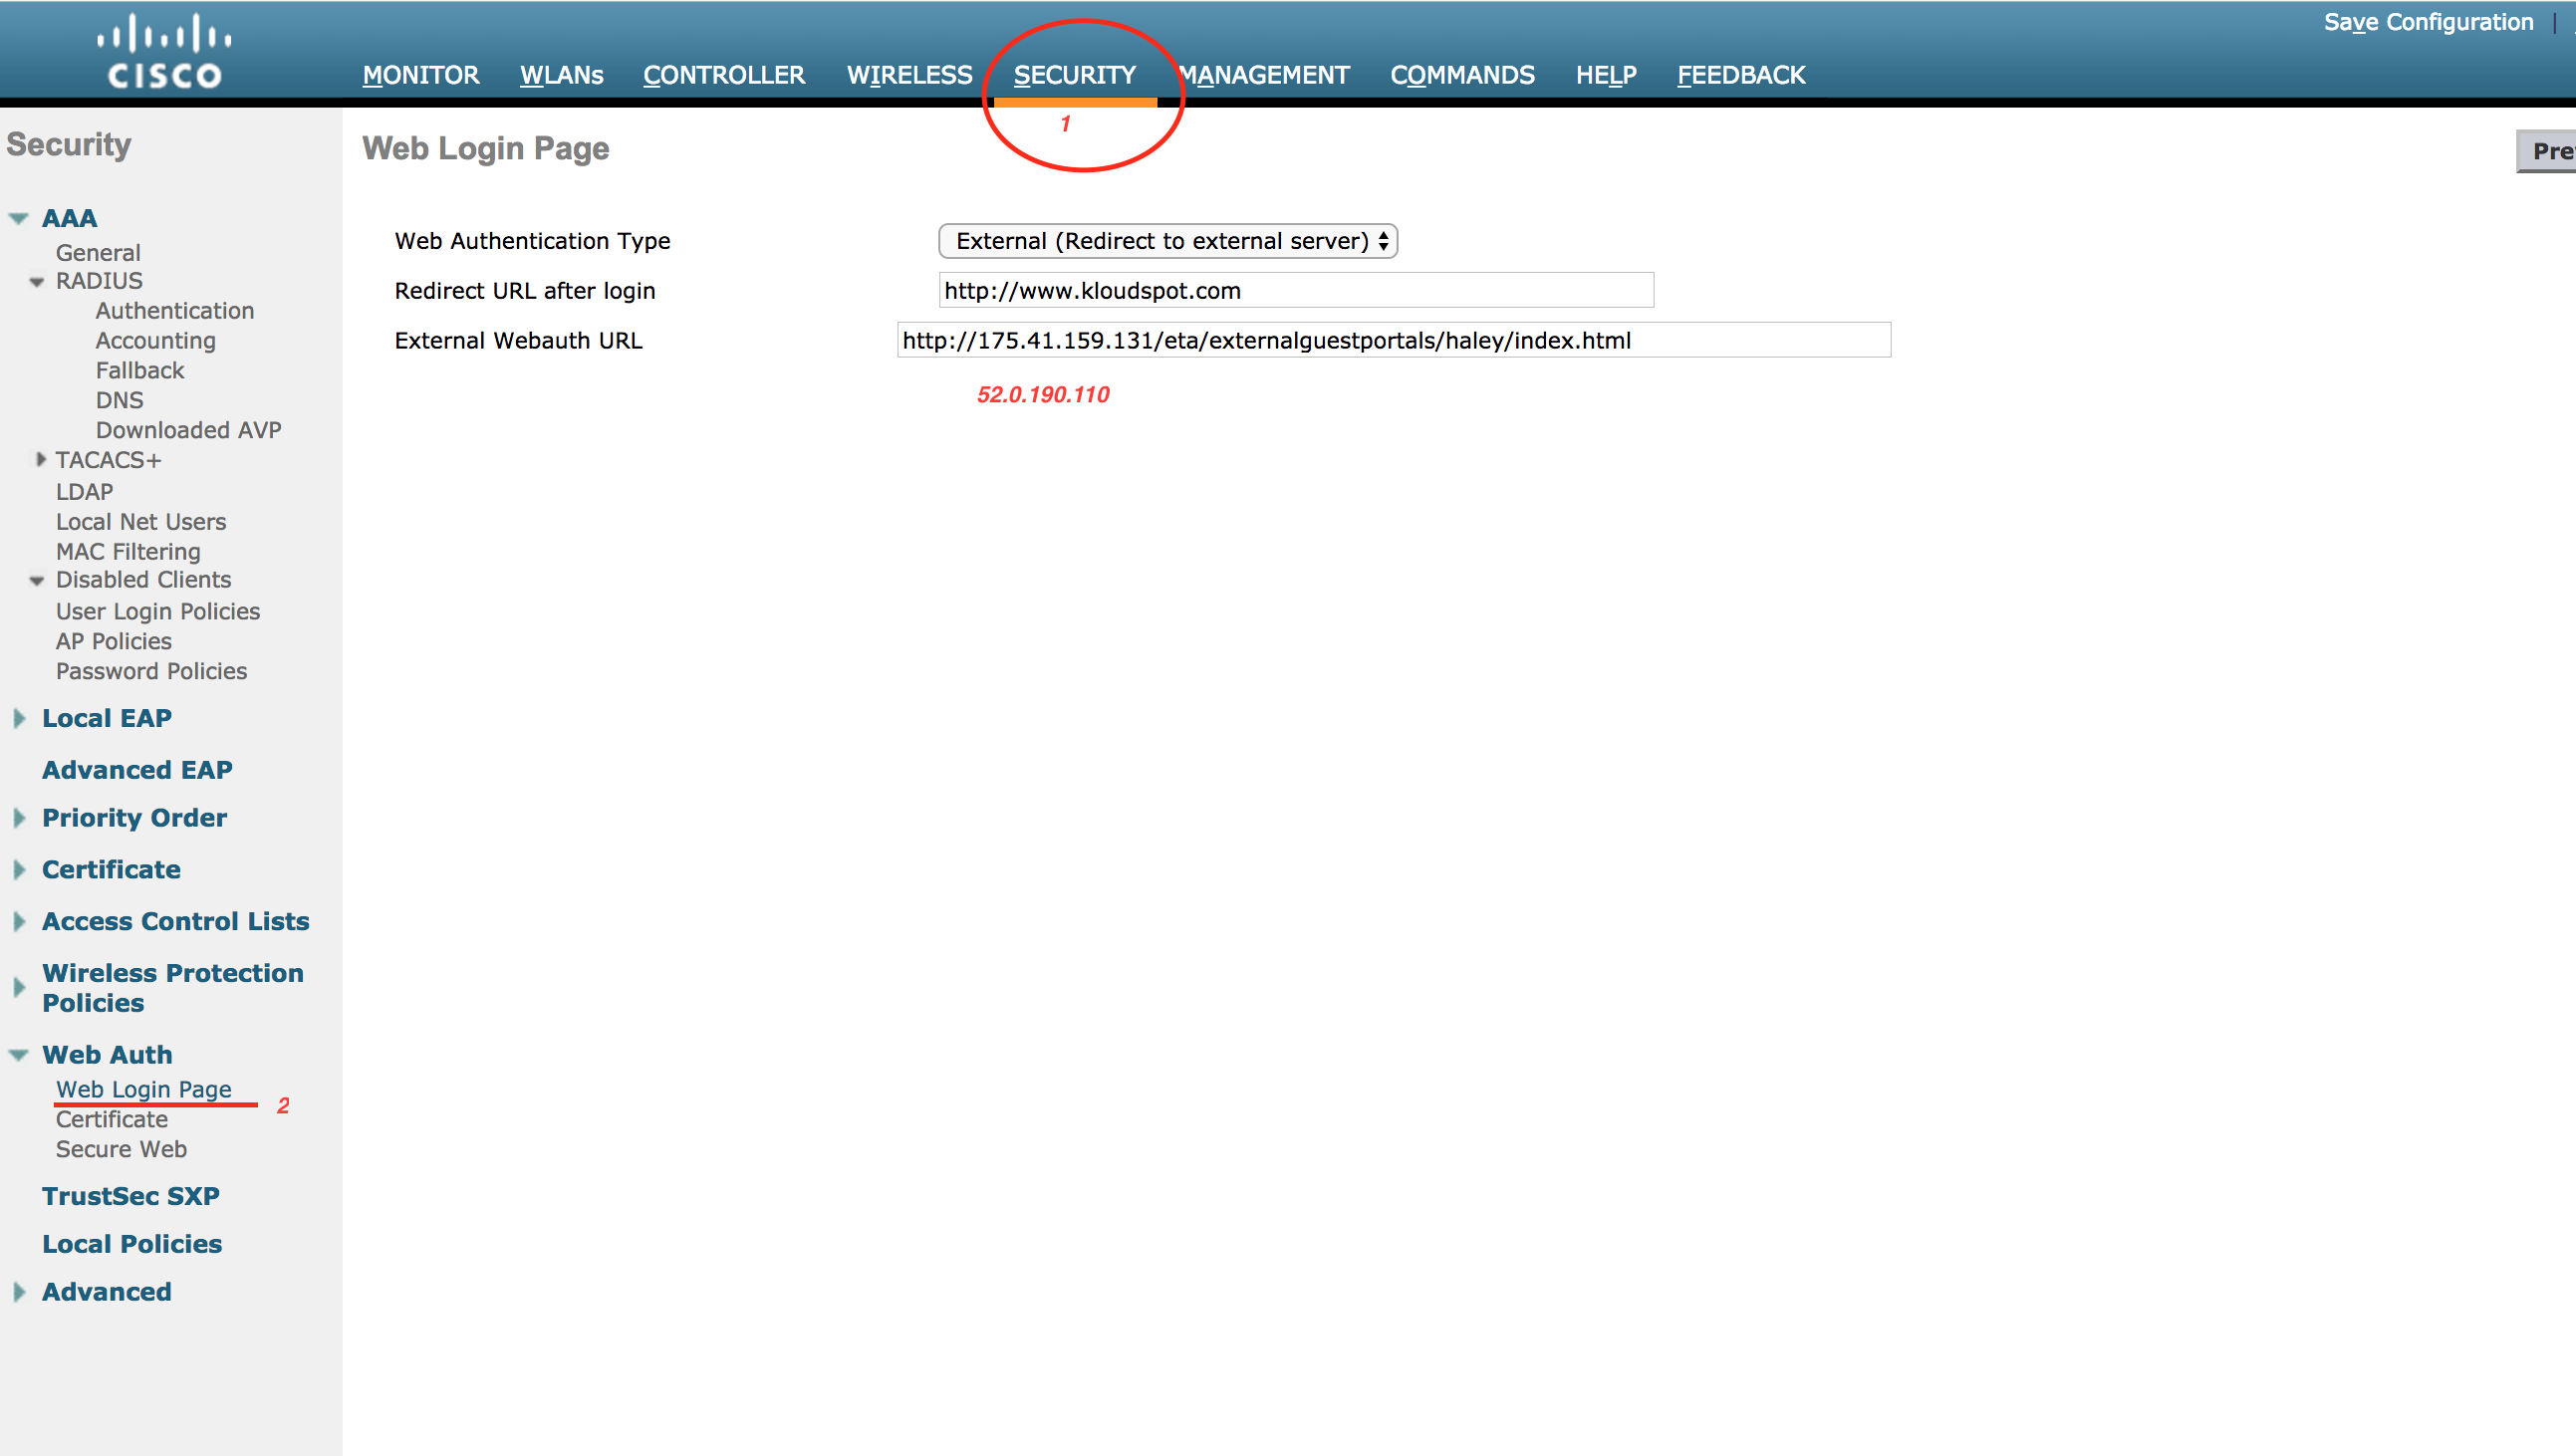
2. Enter redirect URL and External Webauth URL with IP ’52.0.190.110’.
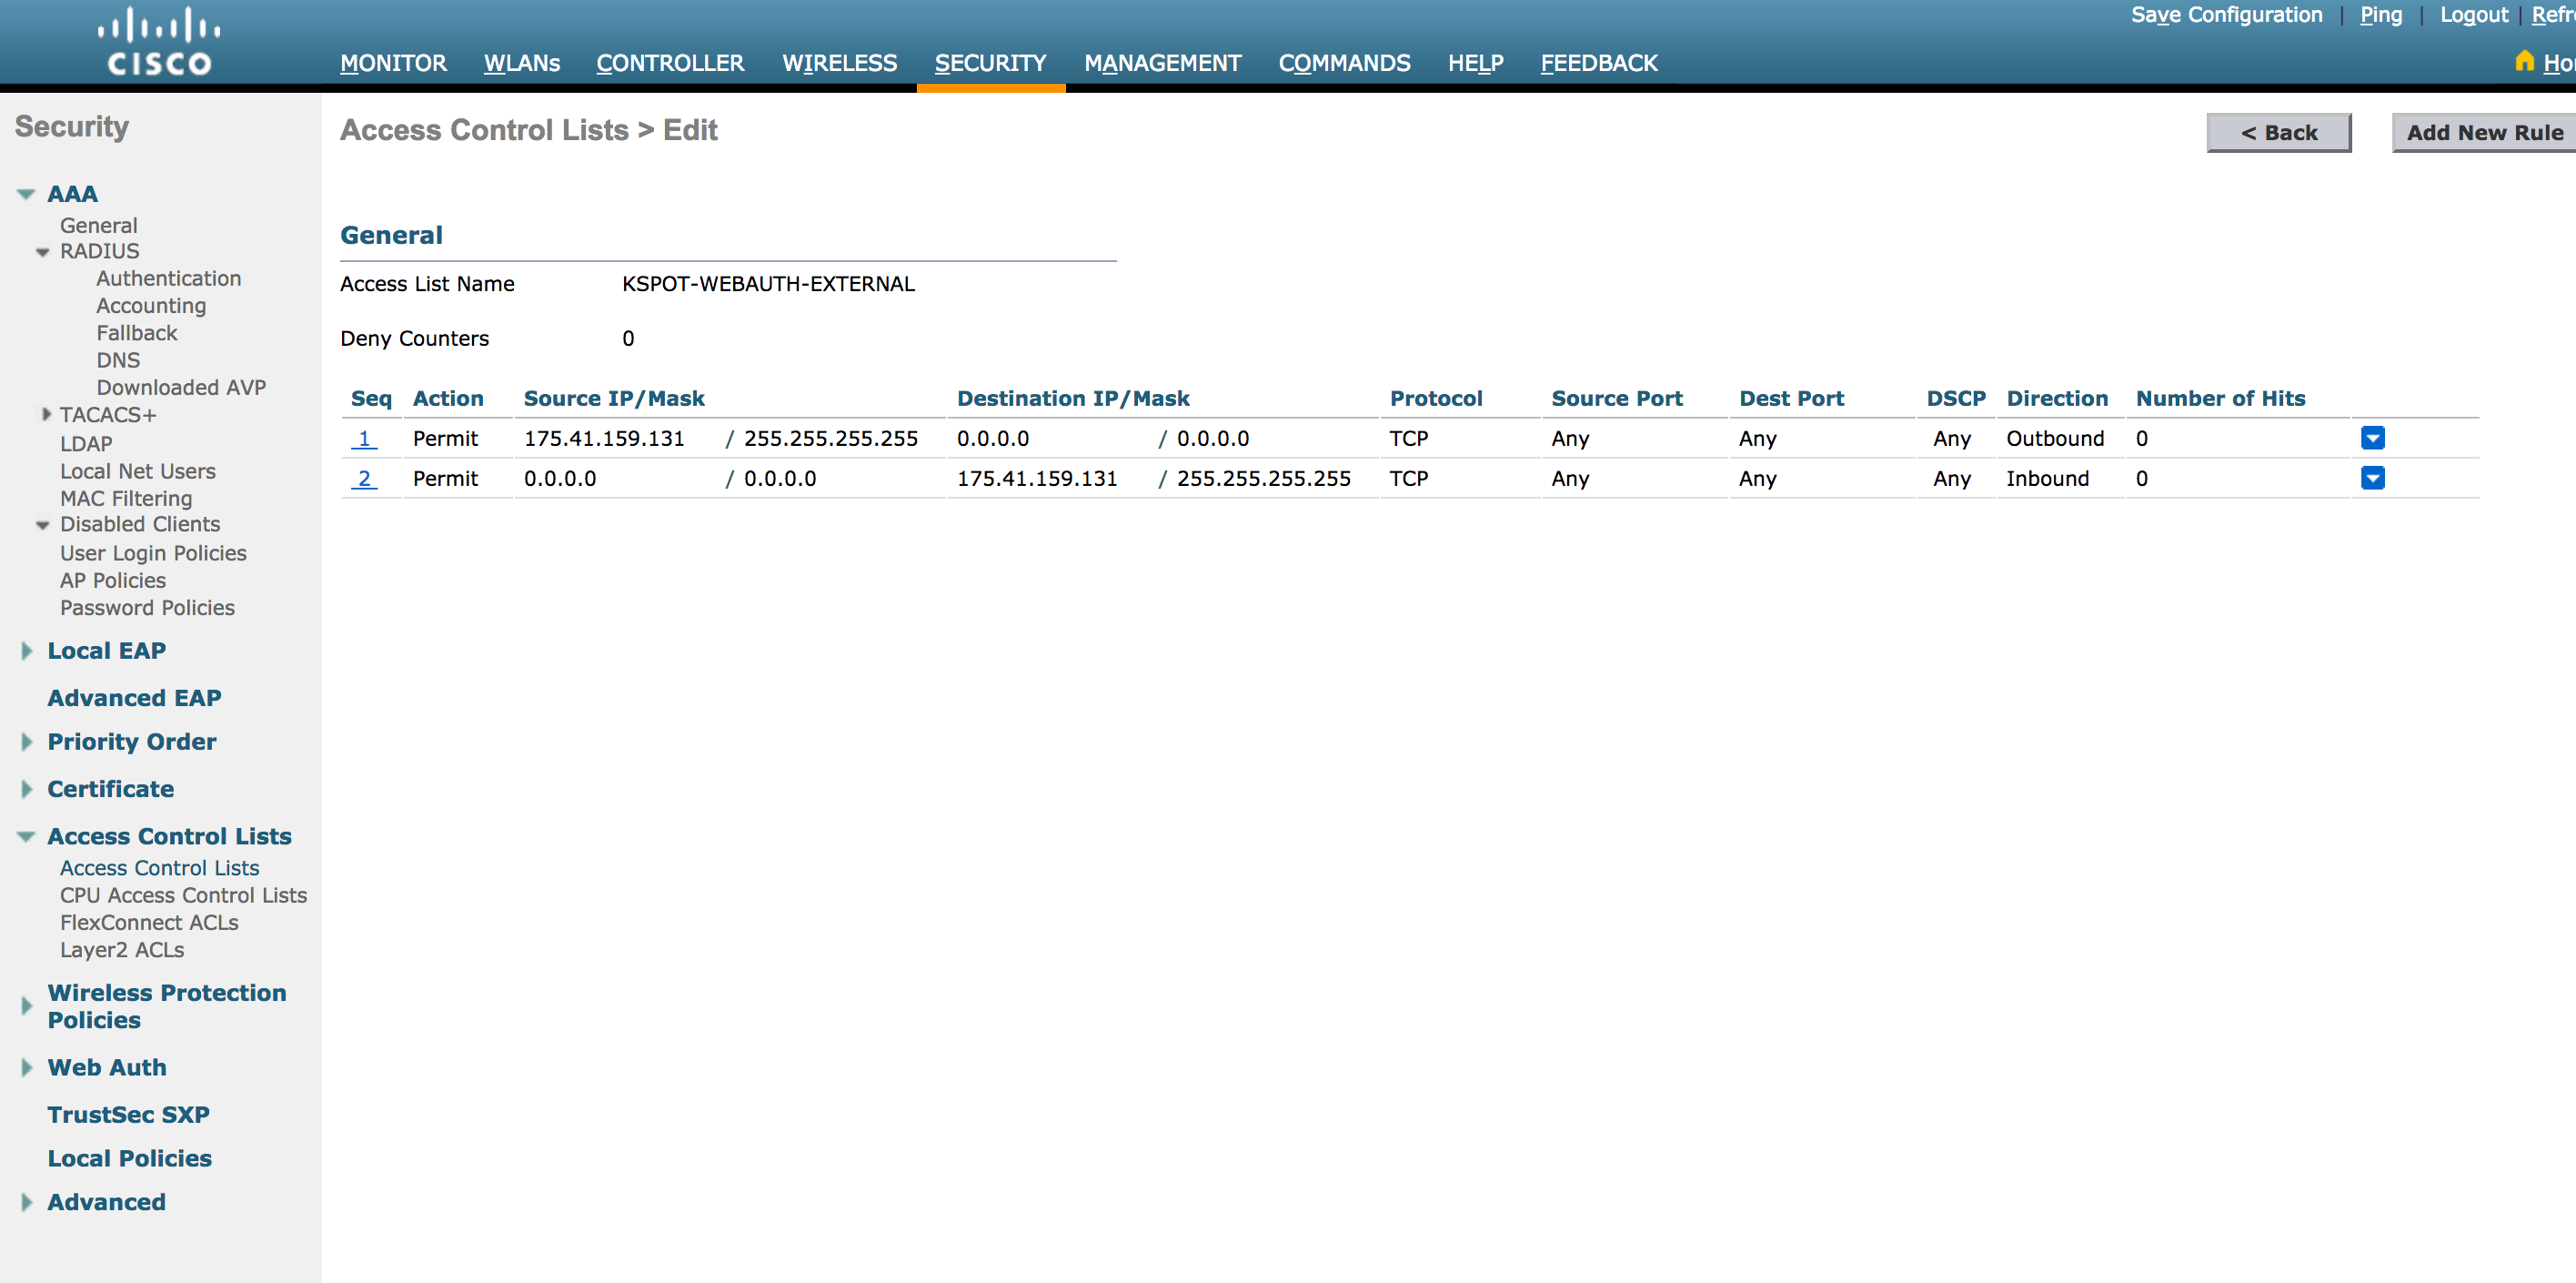
Enable AccessControls for external guest portal.
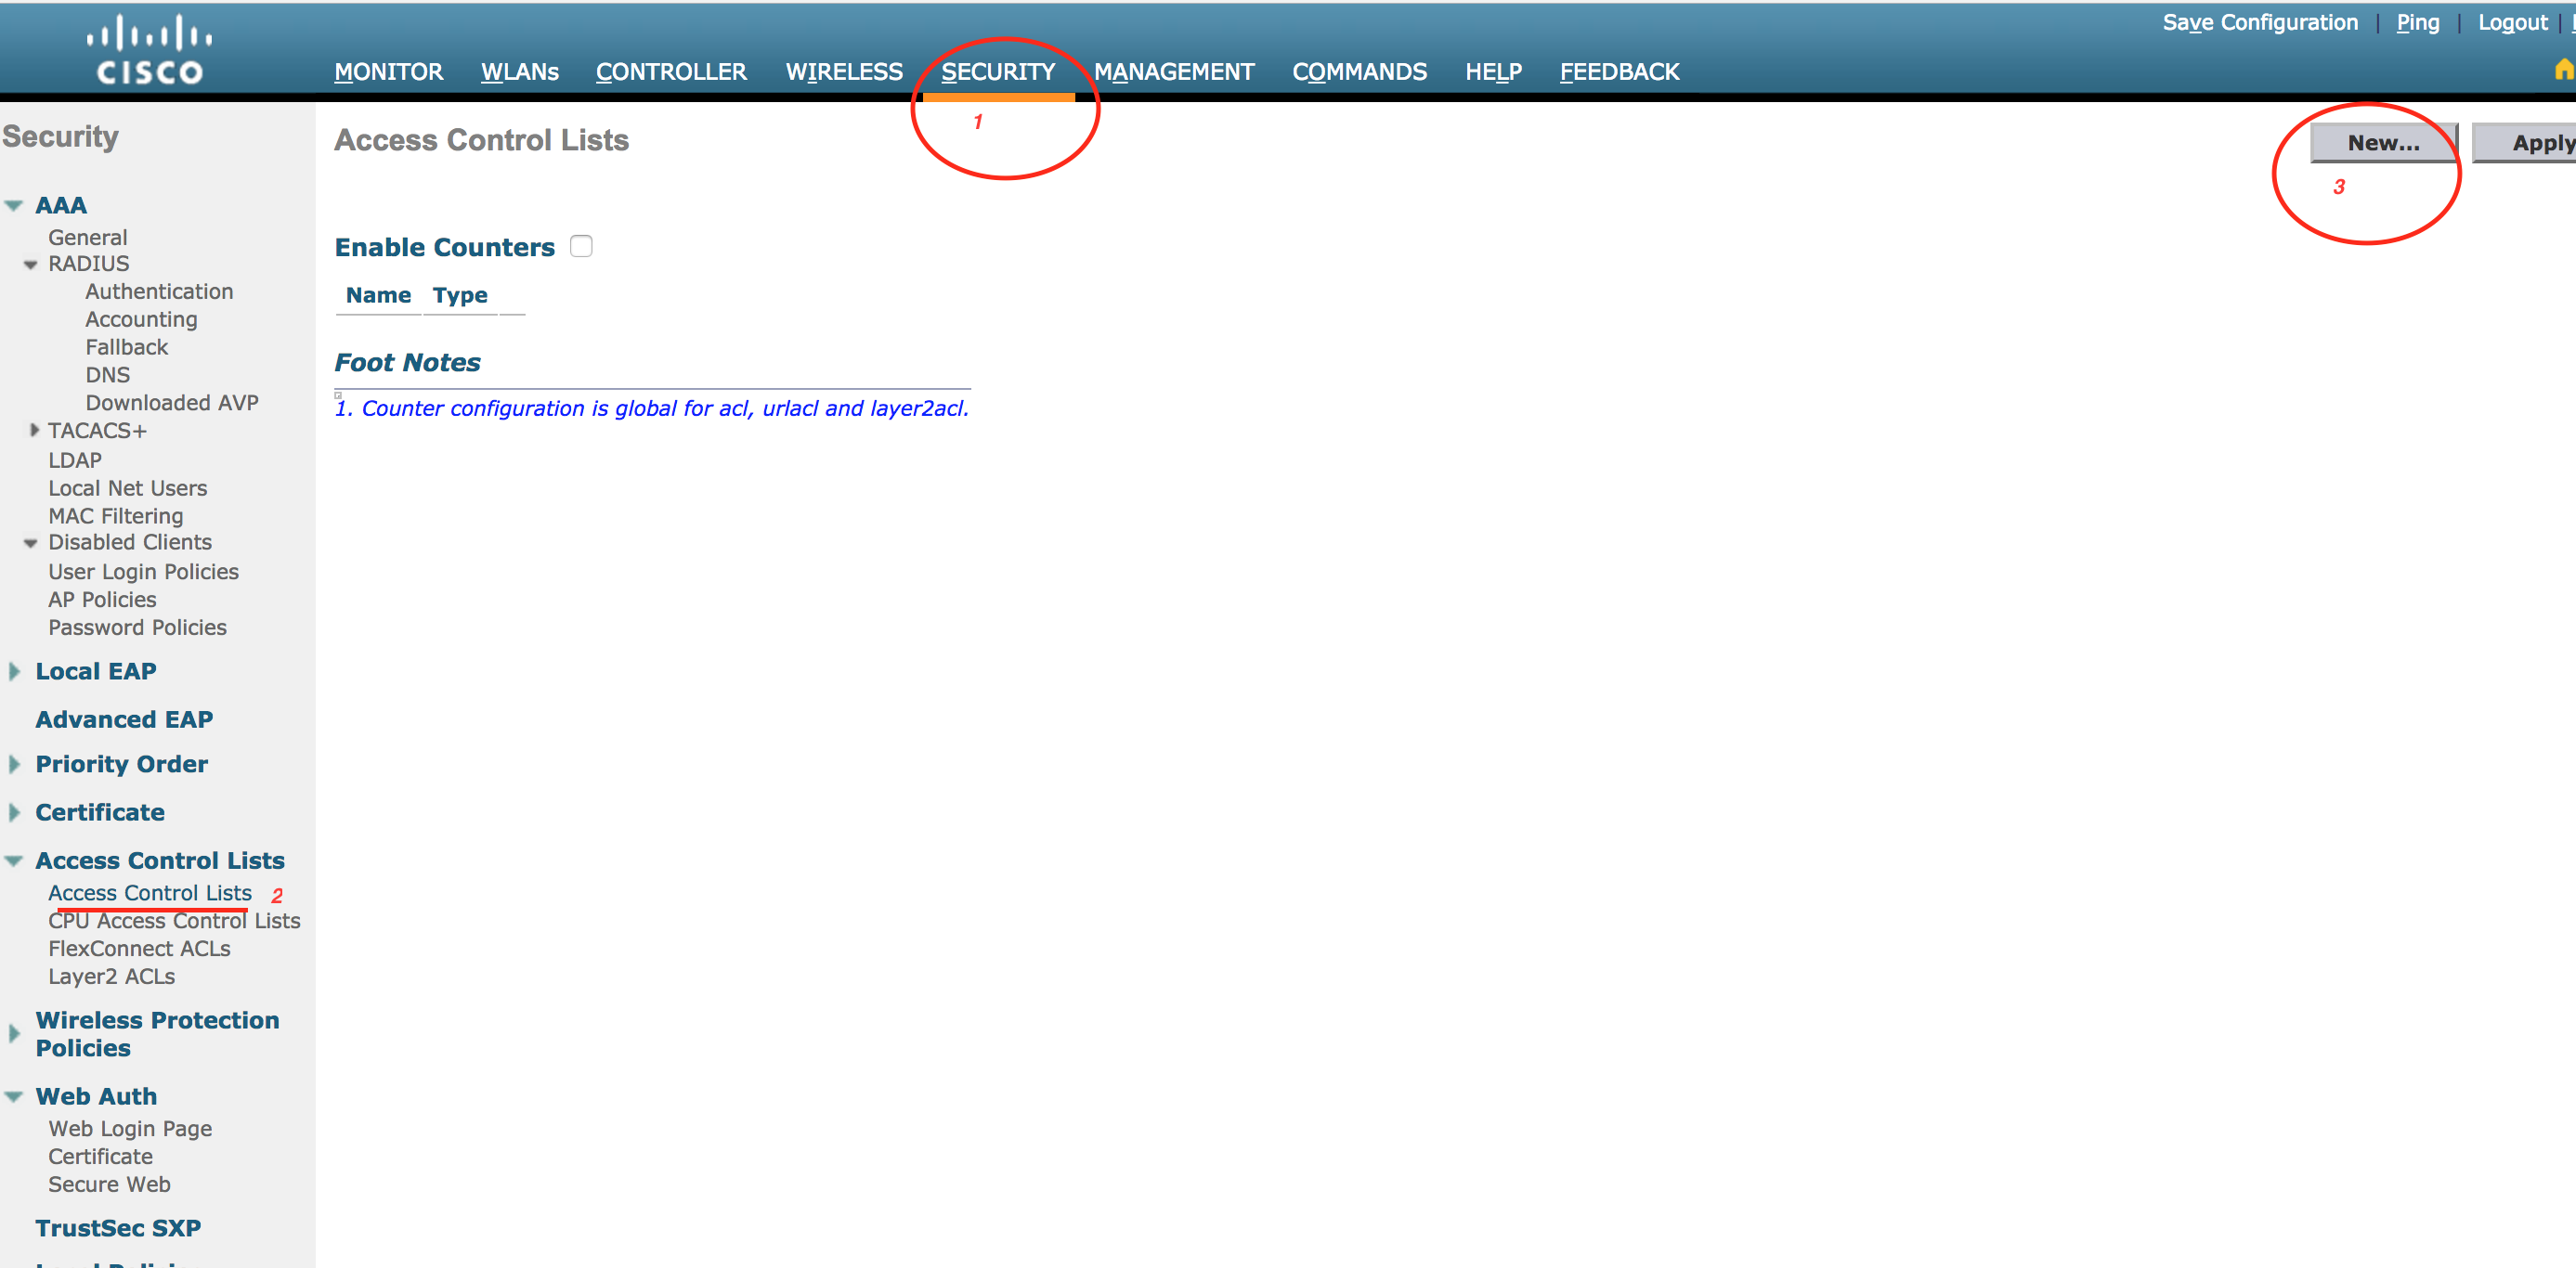
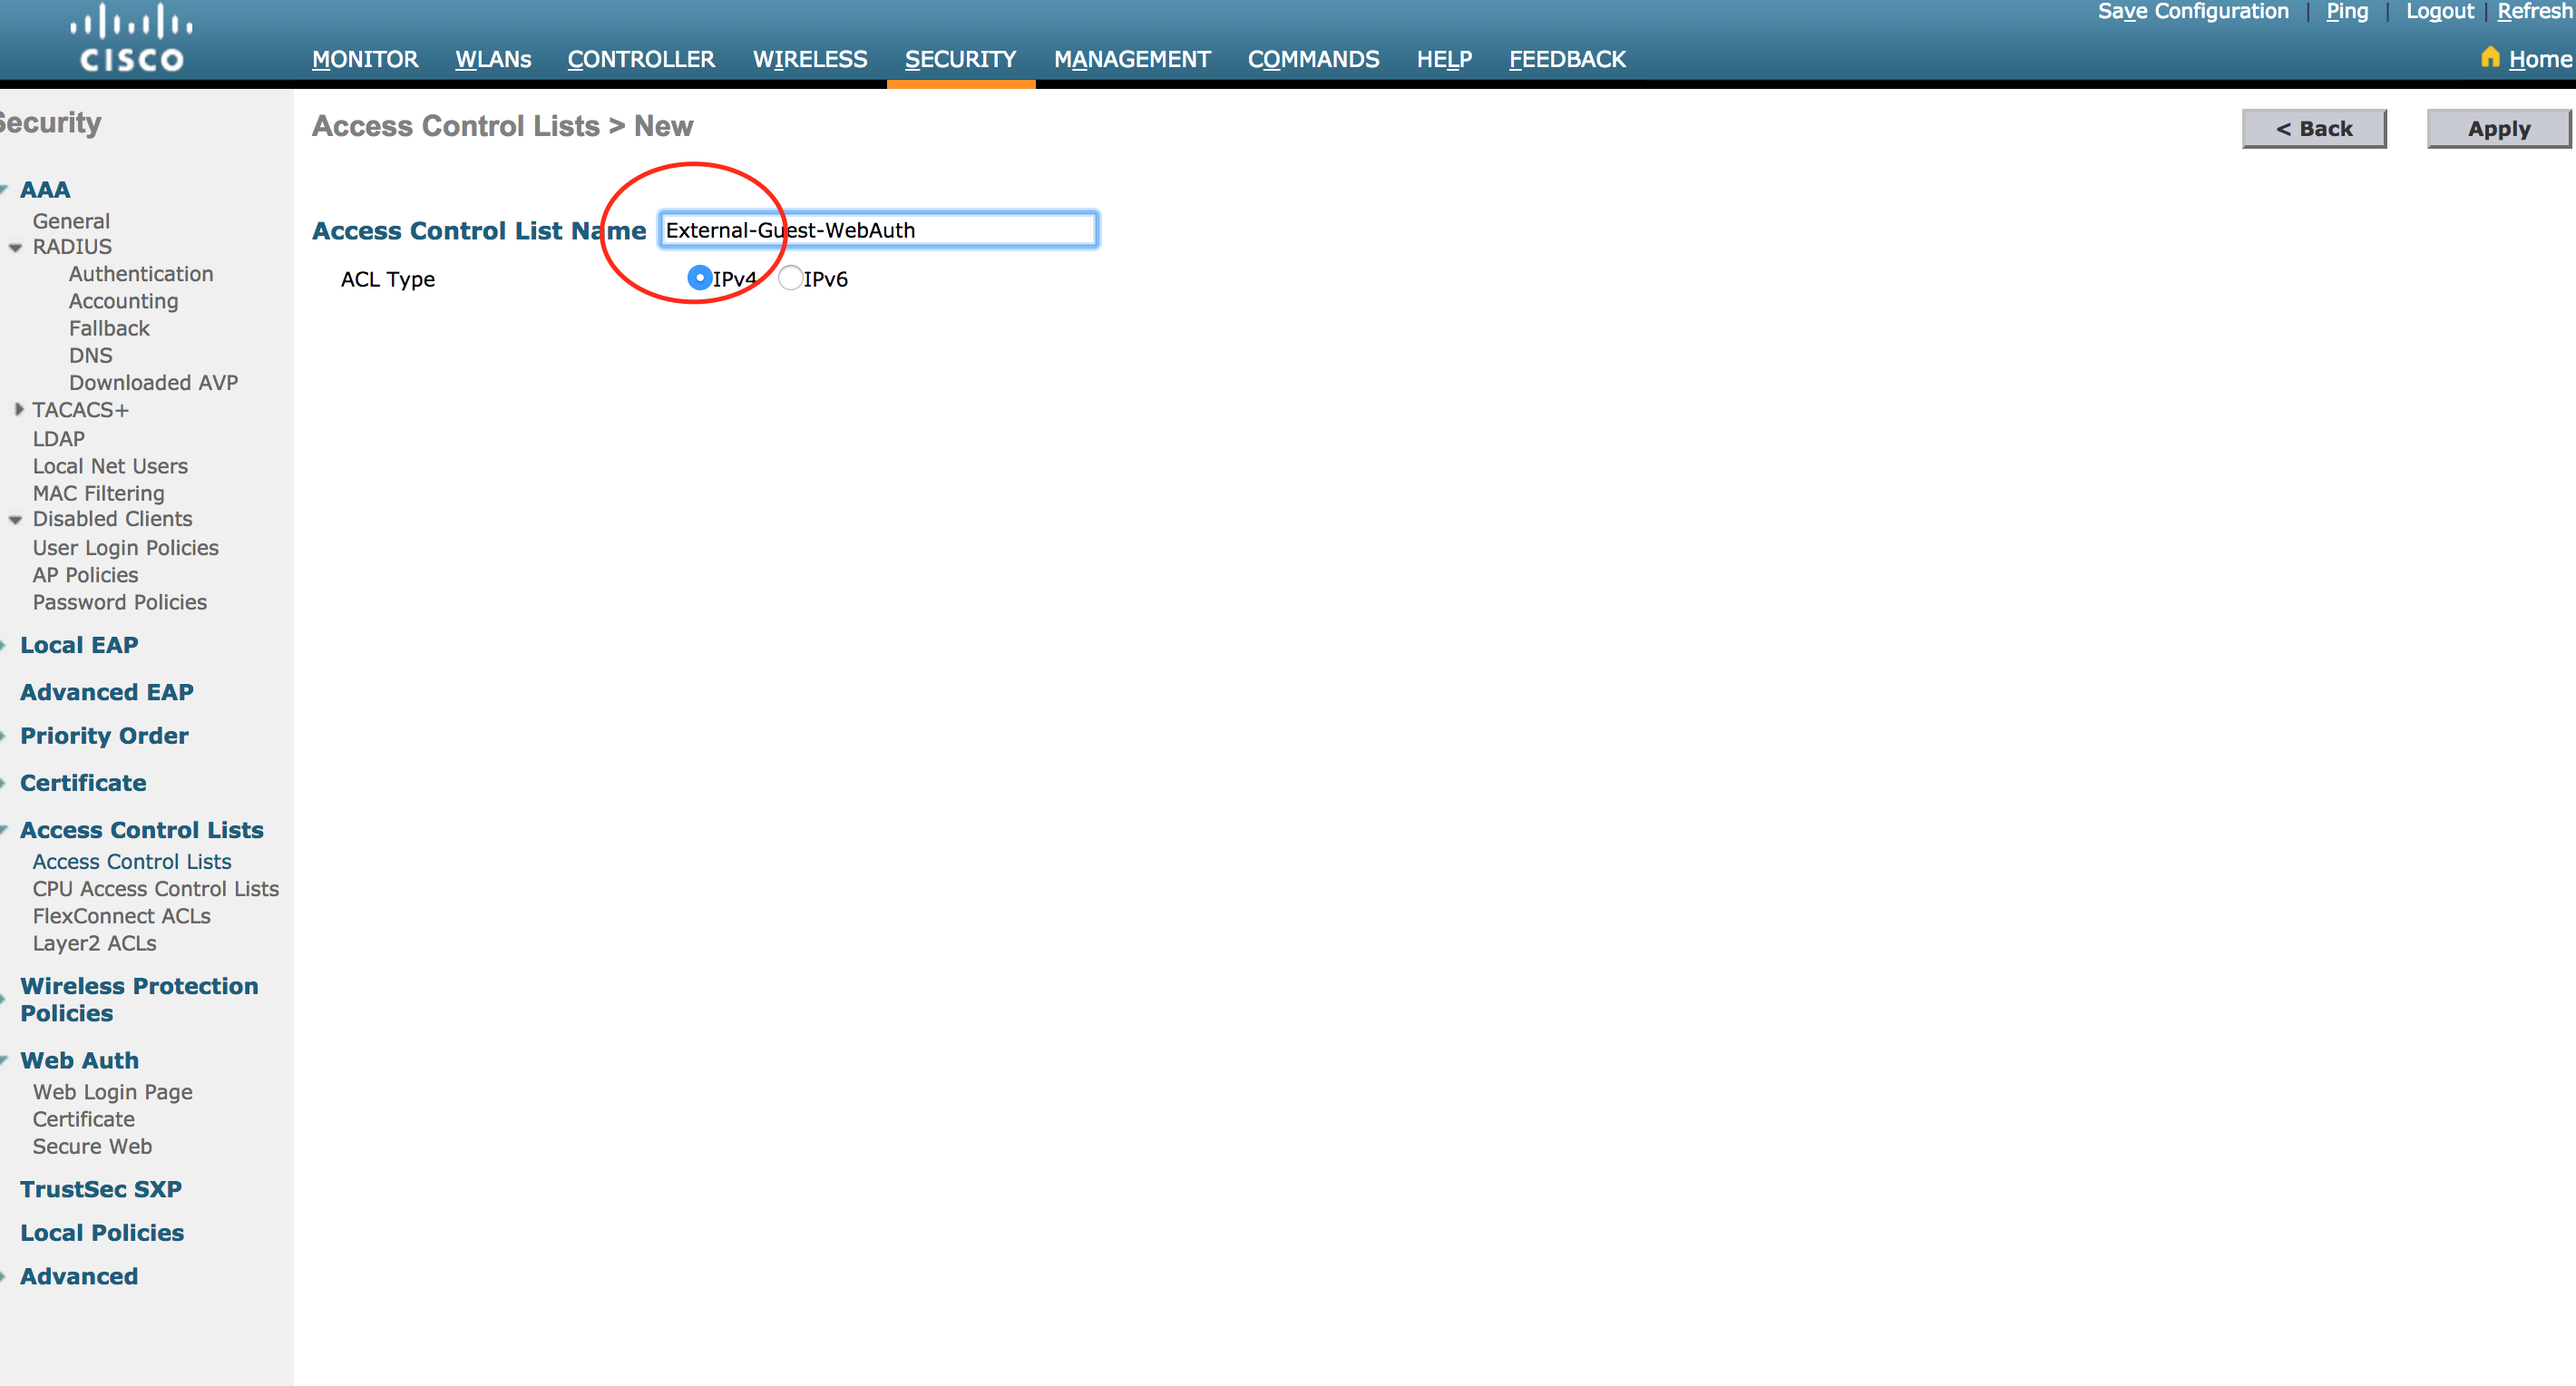
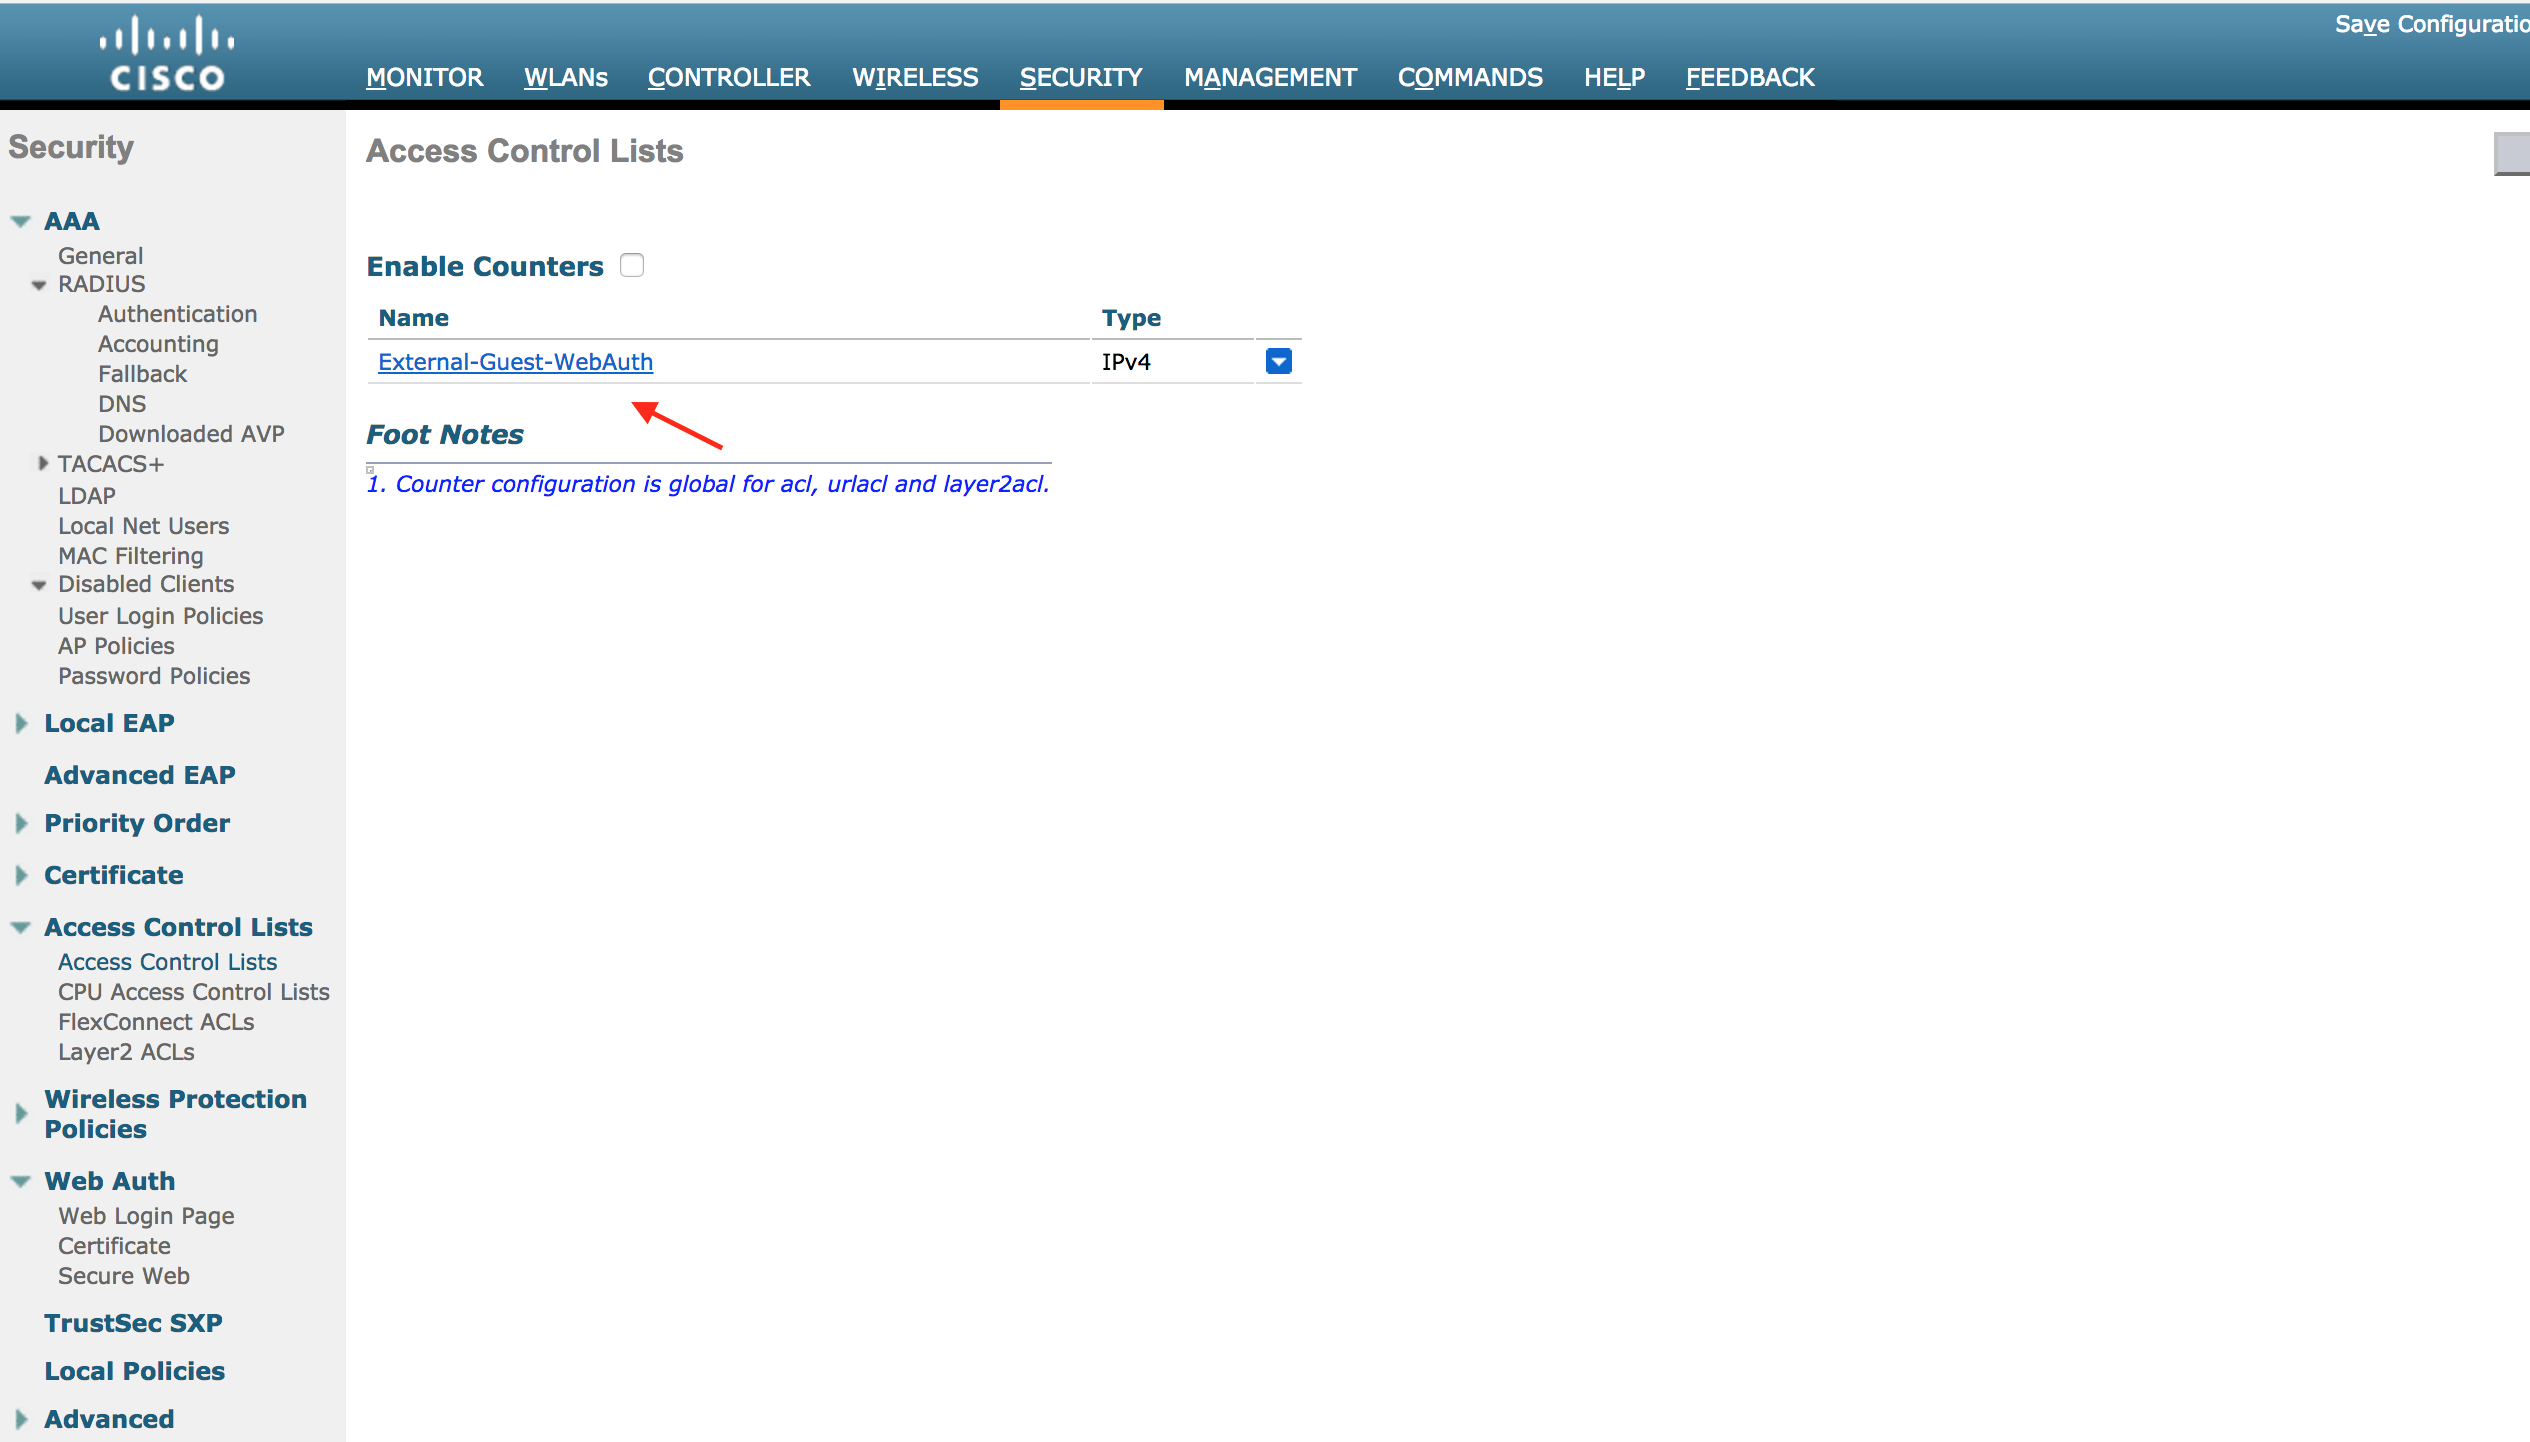
1. Select the created Access Control to add access Rules.

2. Create Outbound Rule to allow 52.0.190.110 access.

3. Similarly, create rule for Inbound access.
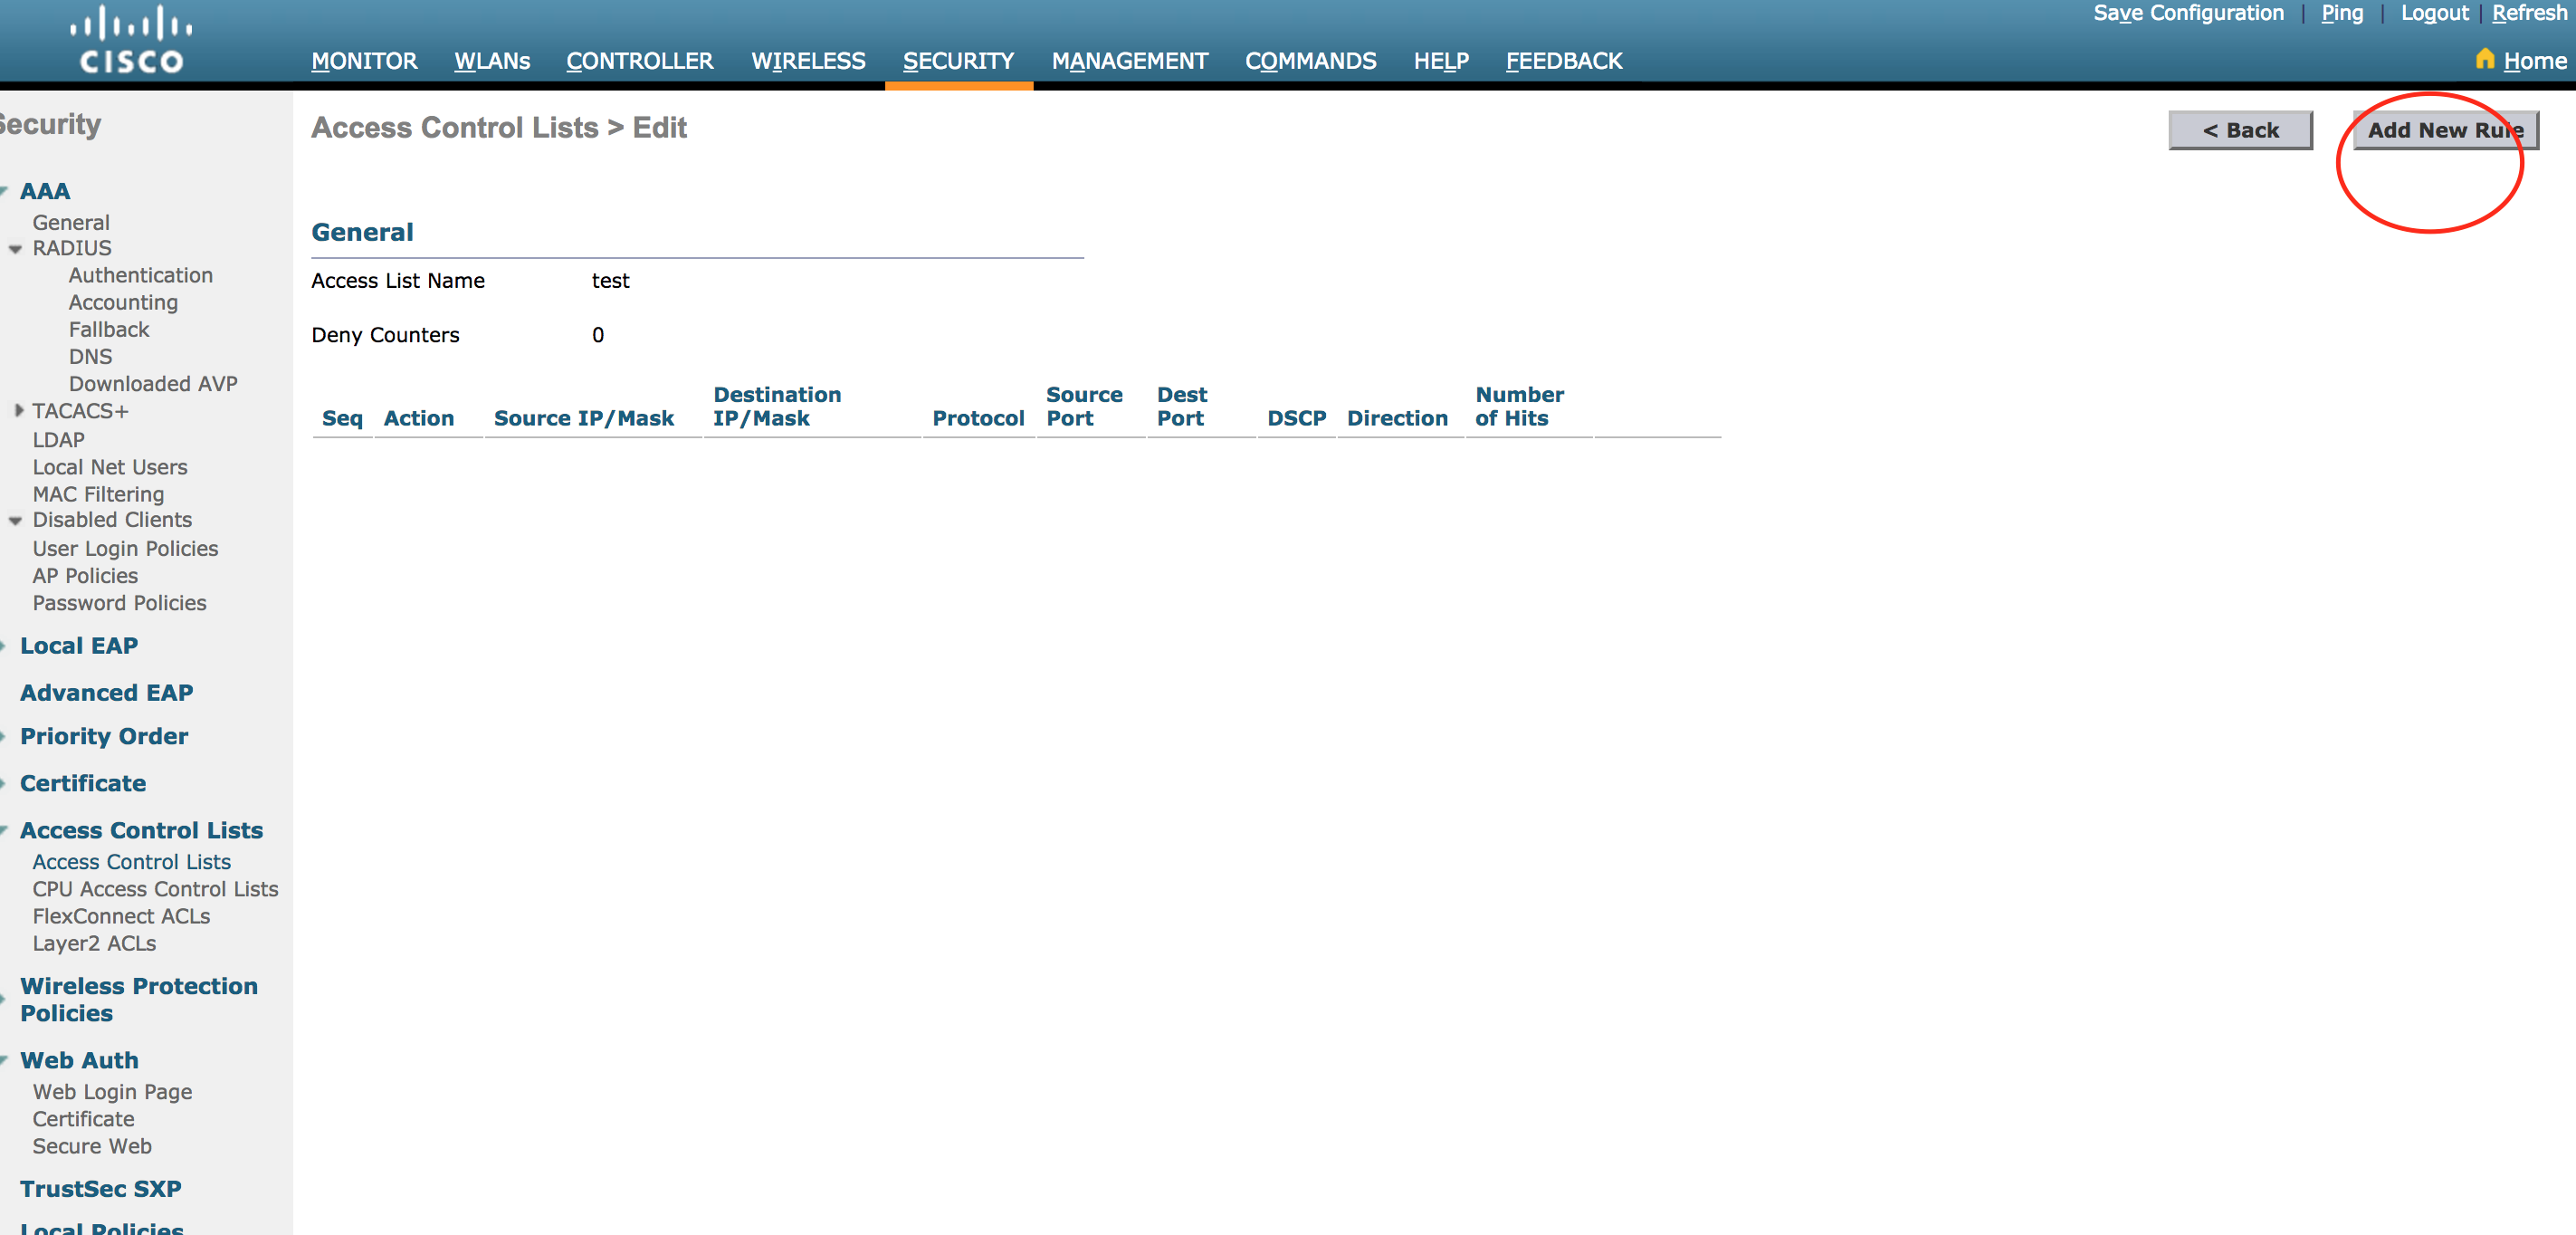
4. Both Inbound and outbound rules should like below.
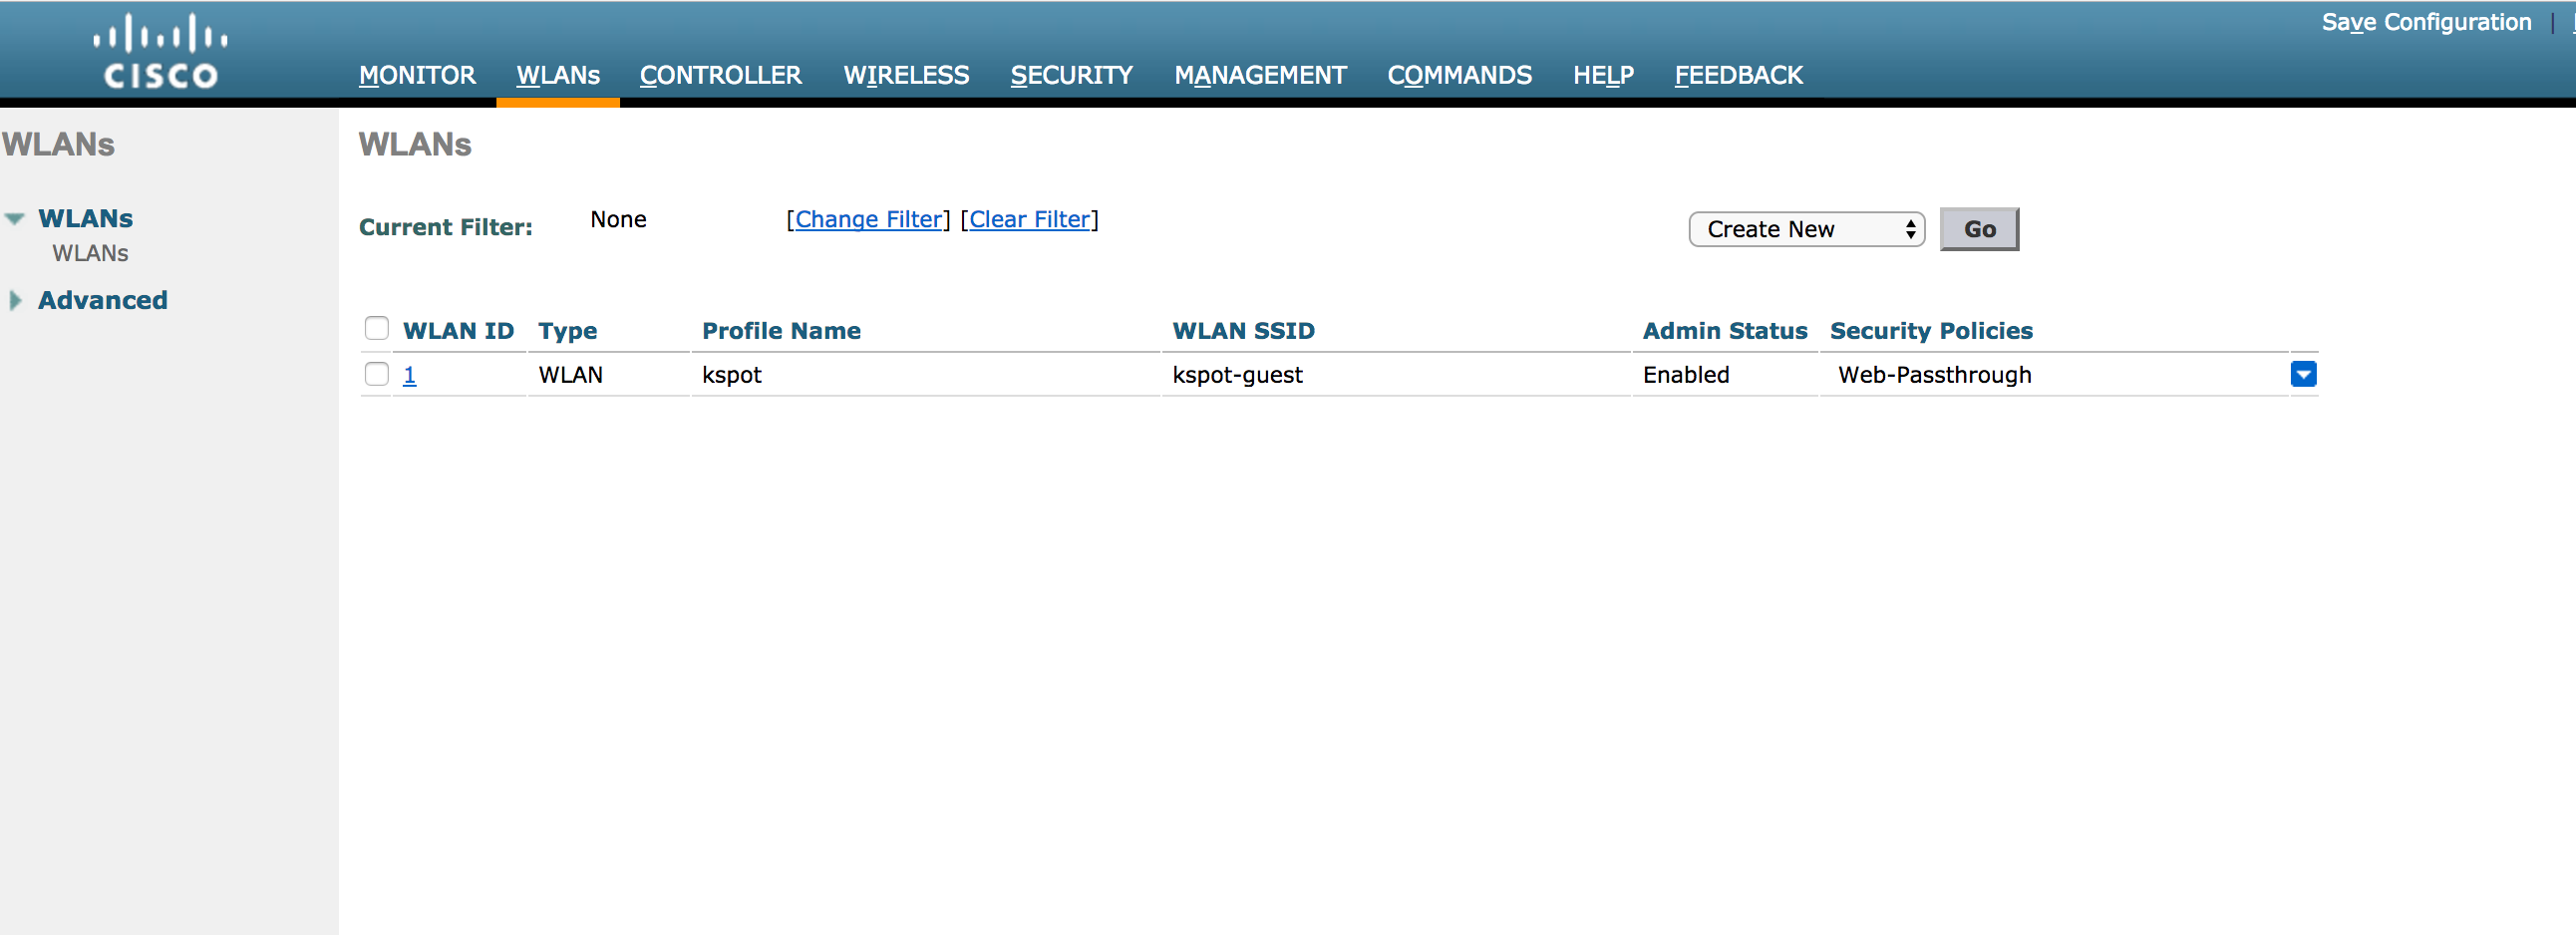
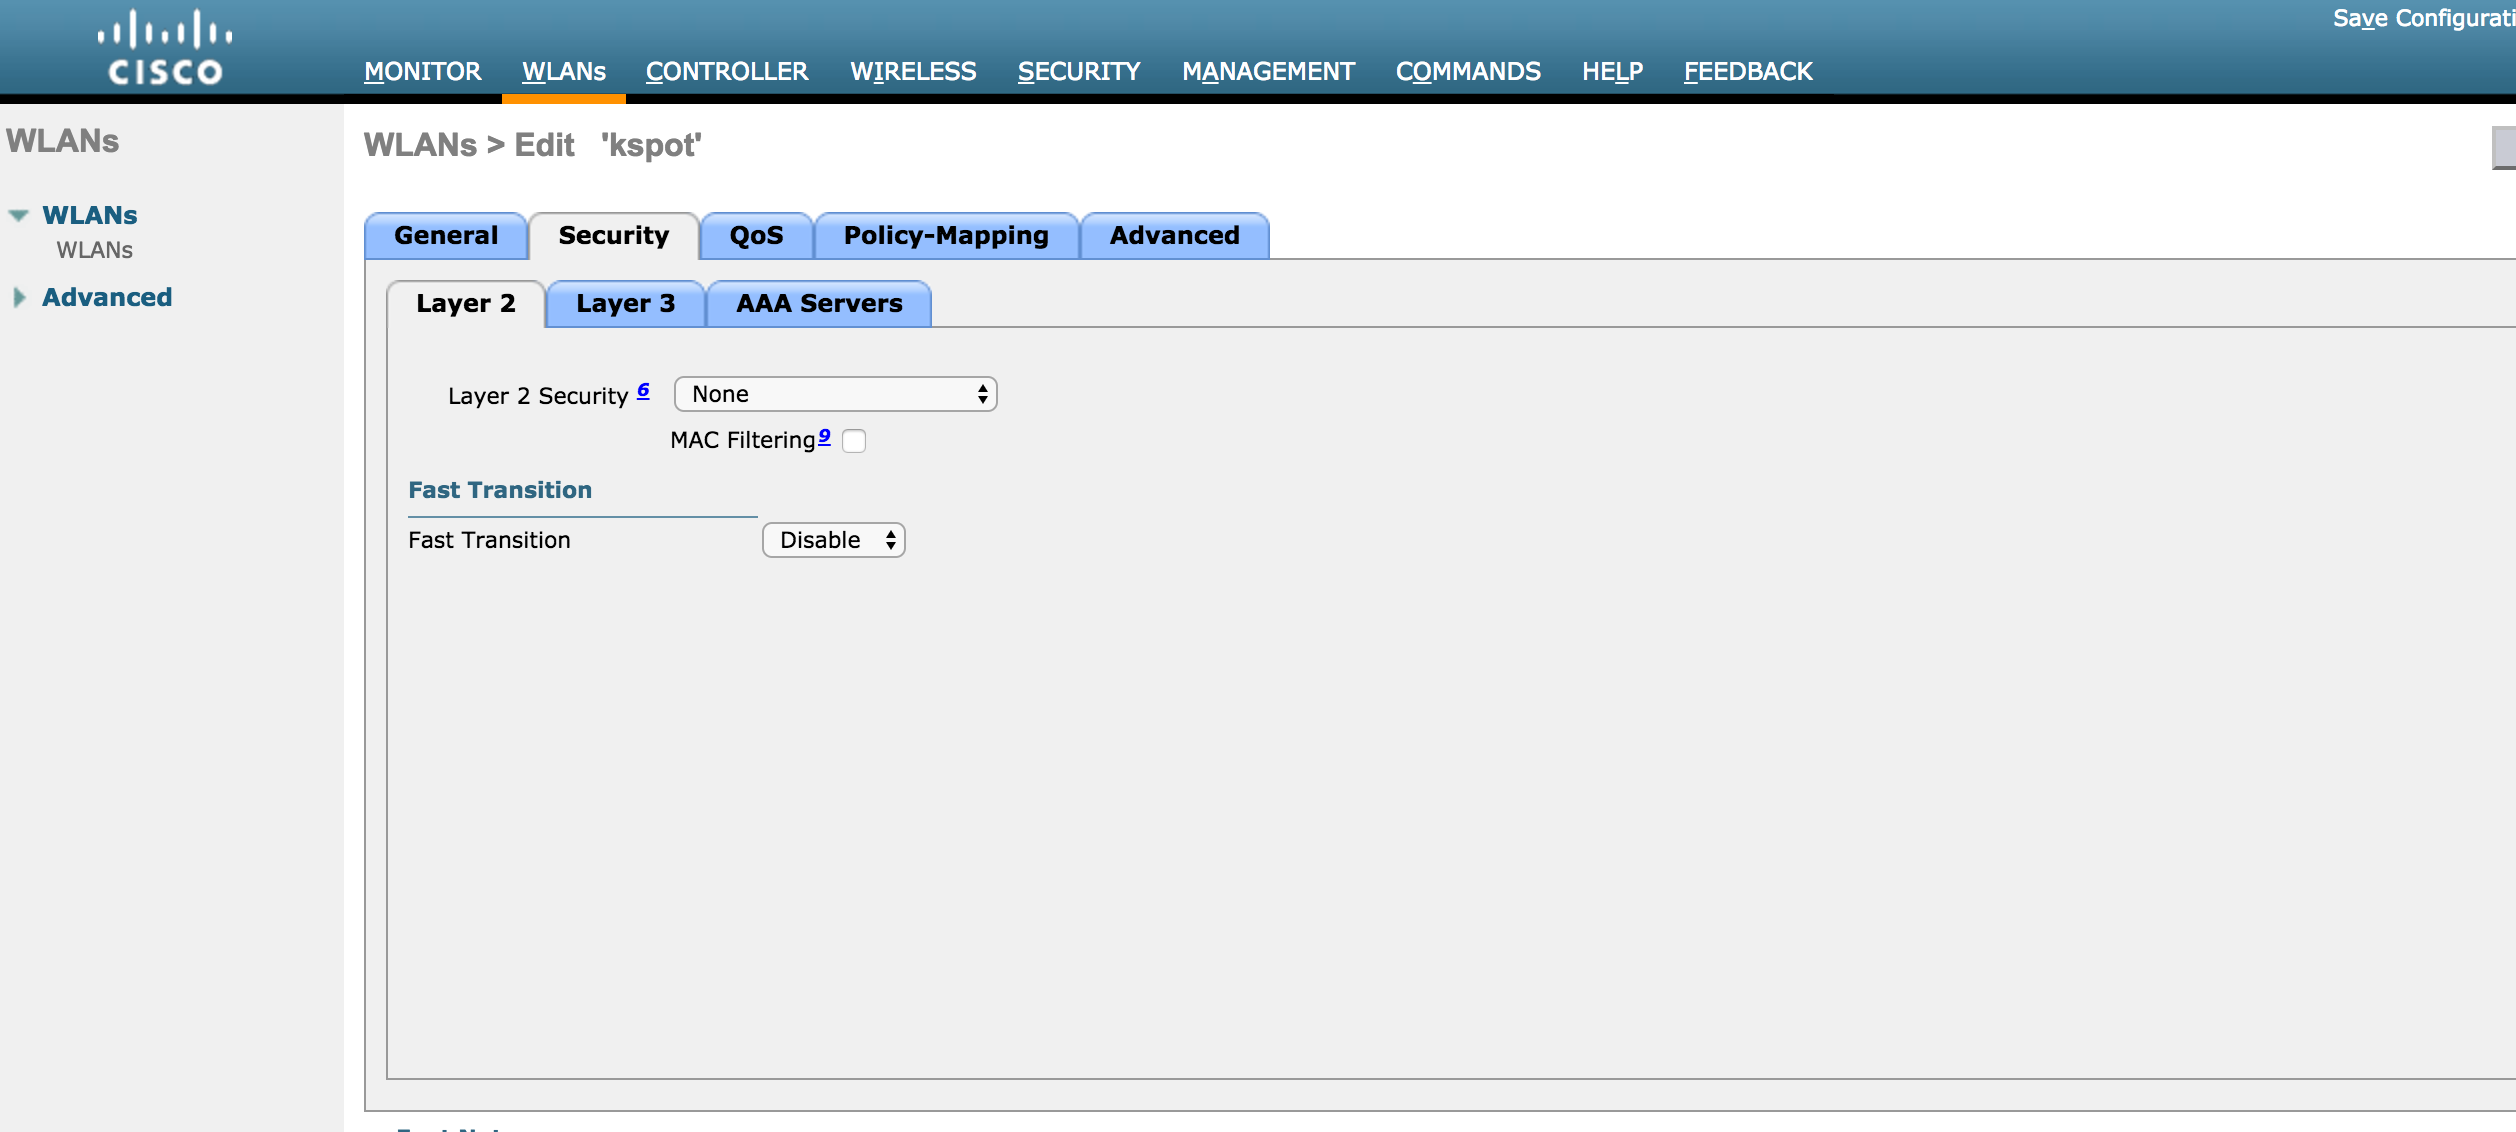
Guest WLAN settings
Welcome to the configuration guide for setting up a Captive Portal with the EnGenius Platform access point. This step-by-step walkthrough will enable you to provide secure and user-friendly internet access to your network users.
Step 1: Register a device in the EnGenius portal
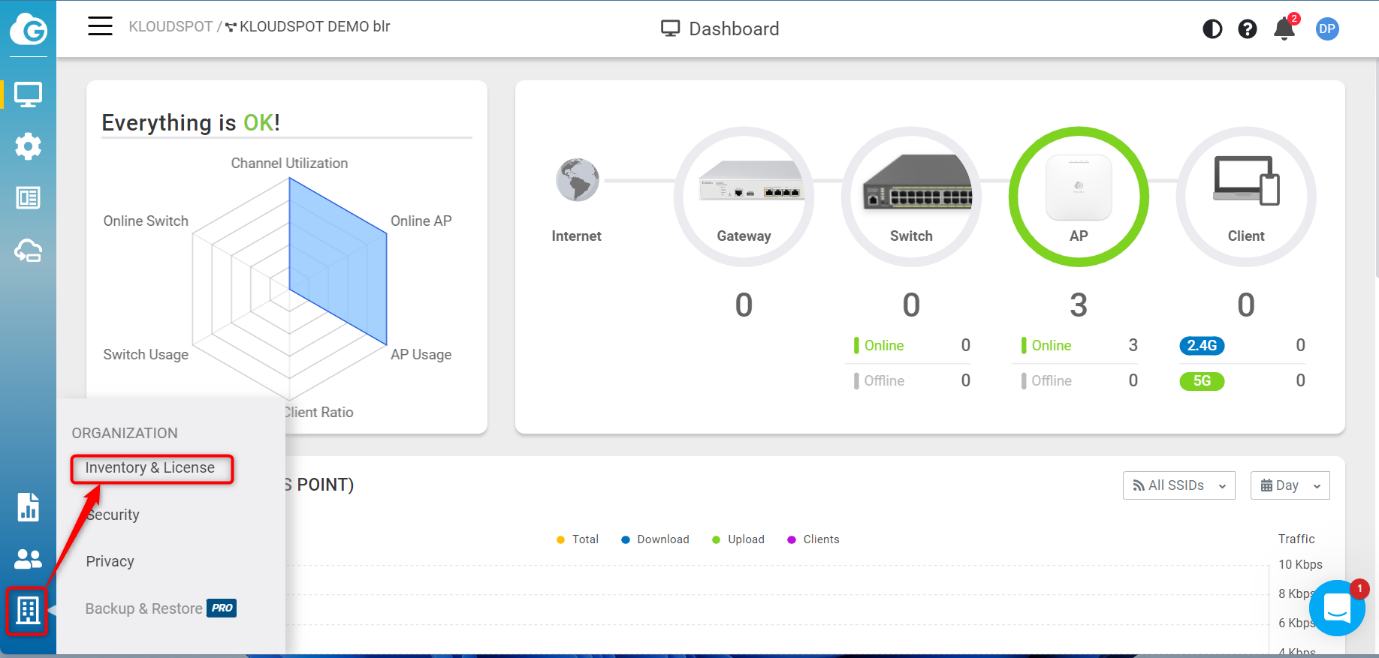
1. Log in to the EnGenius portal to register a new device. Log in with your company credentials.
2. From the Home page that opens, Navigate to ORGANIZATION > Inventory &
License.
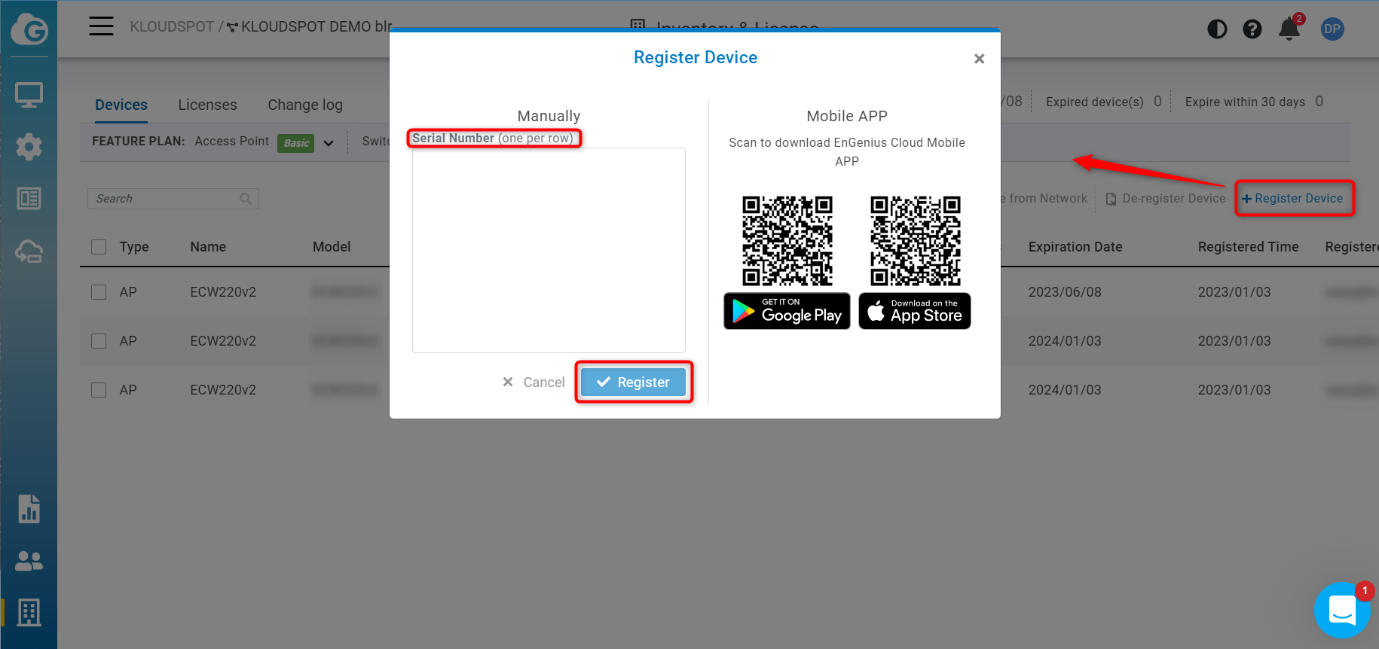
3. On the Inventory & License page that opens, click the + Register
Device button and enter the serial number of the device in the popup window
that opens.
4. Finally click the Register button to register the device. the device
has been registered successfully. Other information related to the device is
automatically obtained while registering with the serial number.
Step 2: Add a new SSID
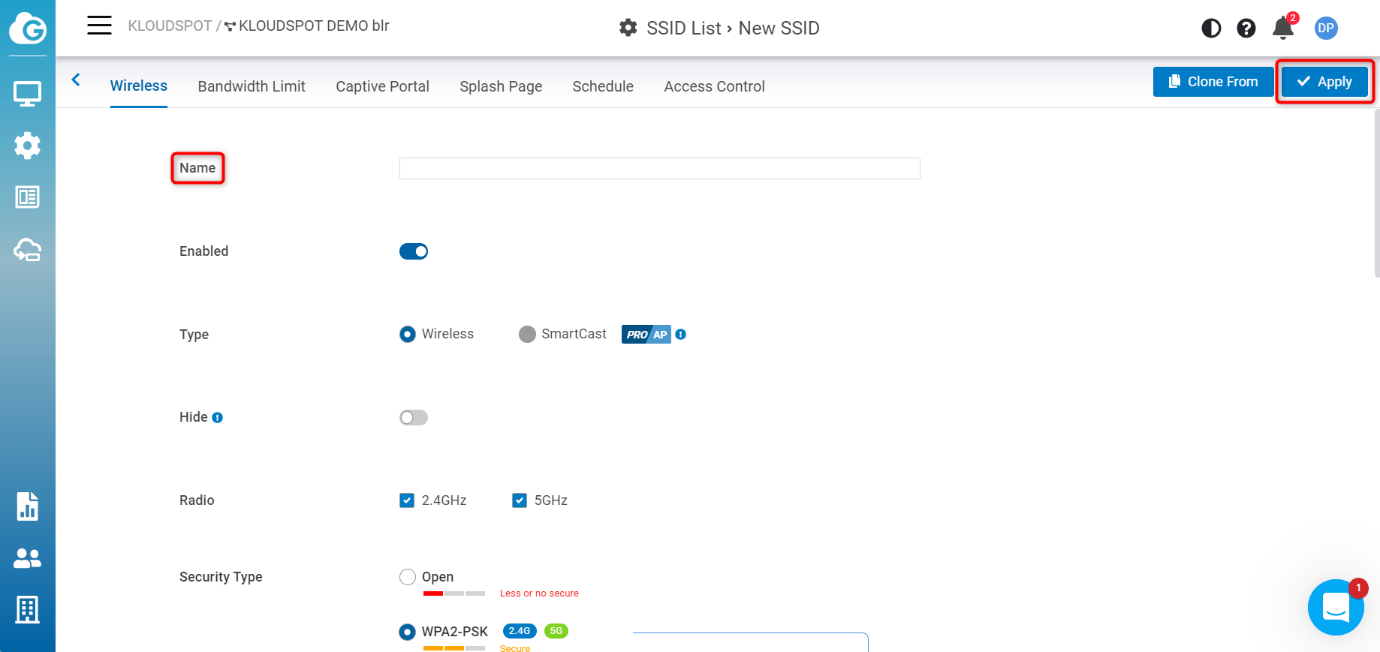
1. After registering the new device, you need to add a new SSID. For that, navigate to CONFIGURE > Access Point > SSID> +Add SSID.
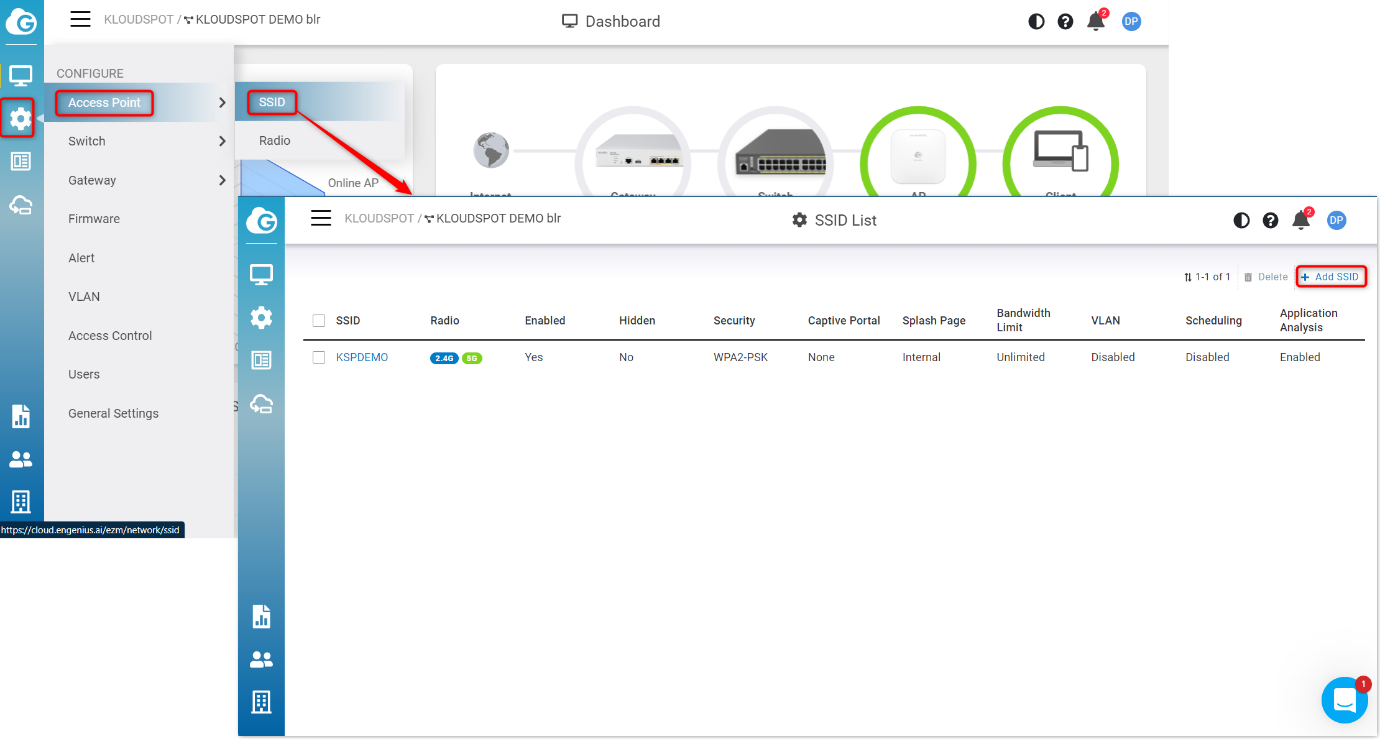
2. Then, as needed, enter the SSID name and security settings. Save the
changes by clicking the Apply button. New SSID added successfully.
1. After adding the SSID, the next step is to set up the Captive portal, for that, open the newly created SSID.
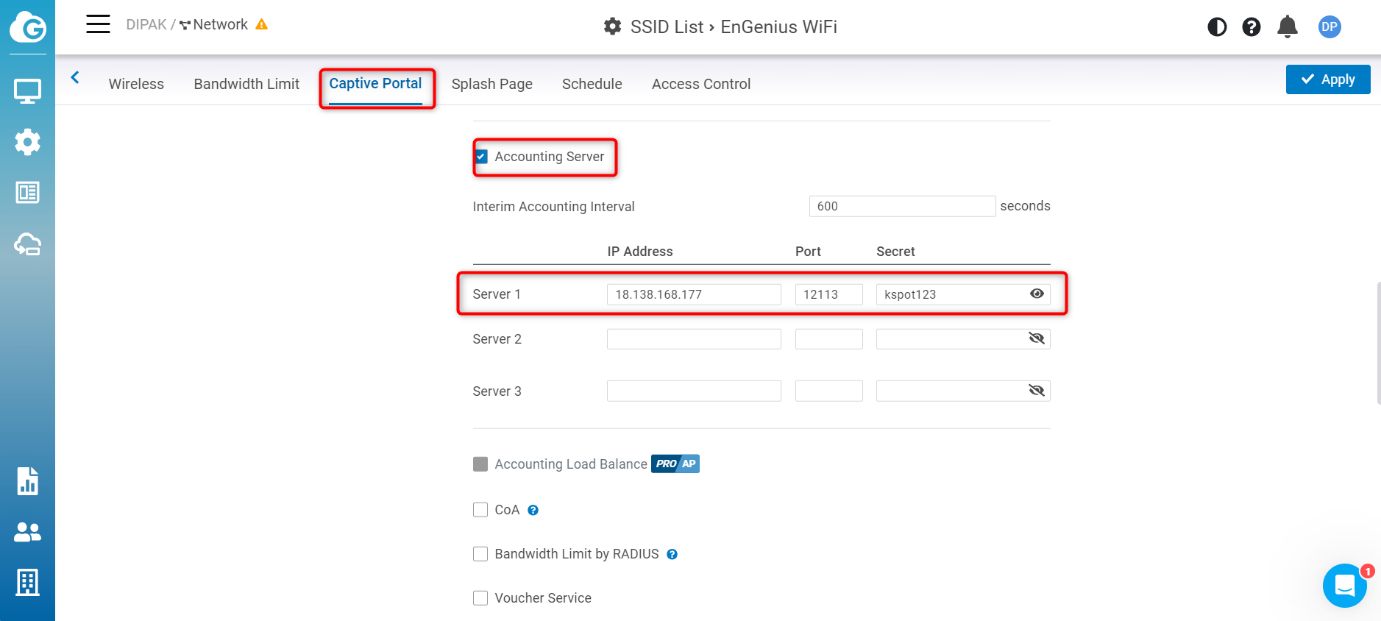
2. Then open the Captive Portal tab and enable the captive portal in the window that opens.
3. In Authentication type select a Custom RADIUS and enter the IP Address, Port, and Secret.

4. Then scroll down and under the Accounting Server , enter the IP
address, Port, and Secret.
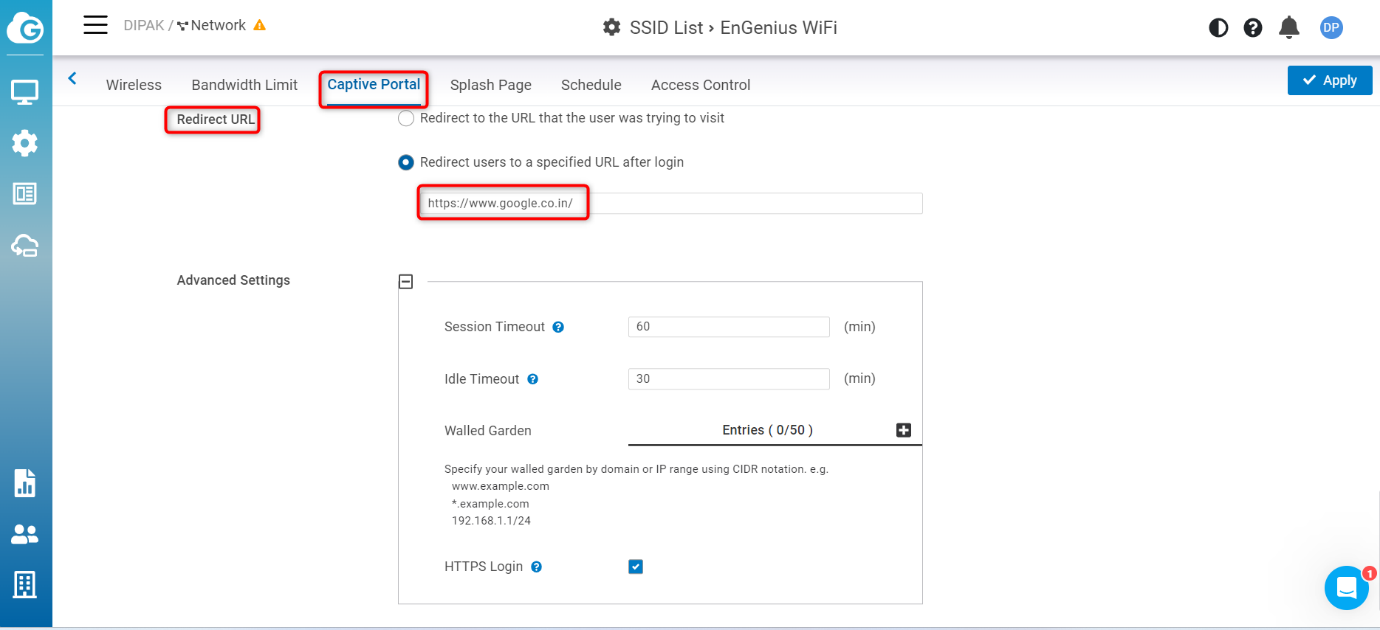
5. Scroll down again and enter the Redirect URL.
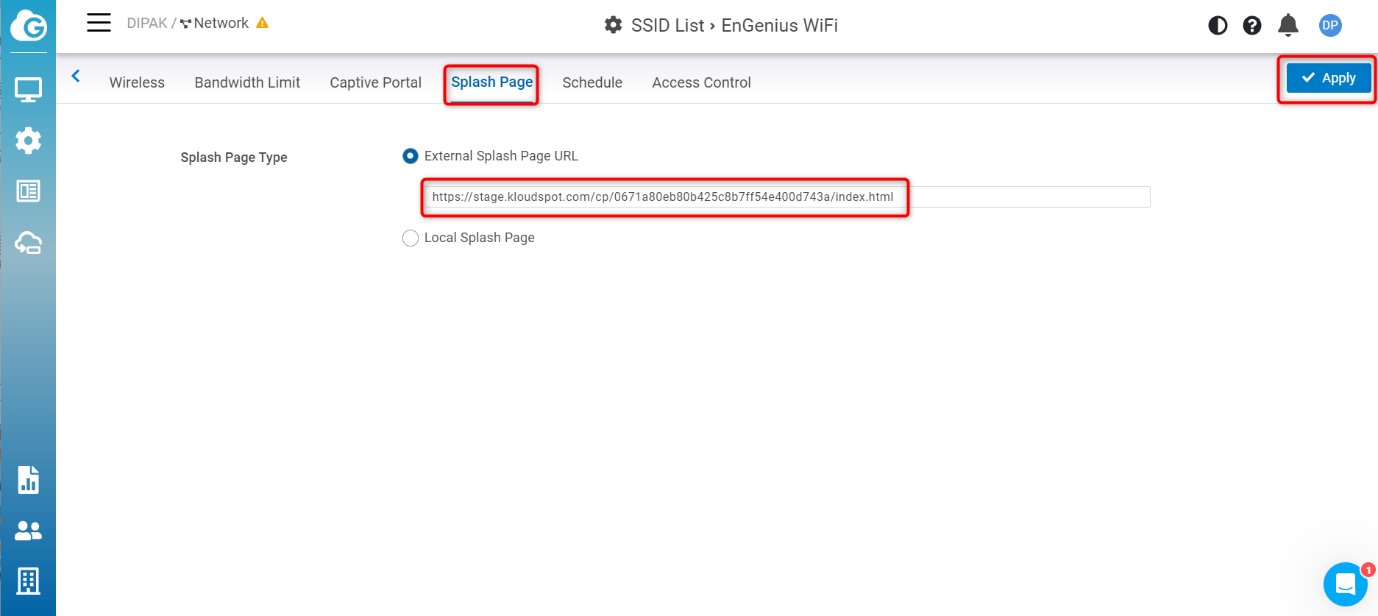
6. Next click on the Splash Page tab and enter the splash page URL.
7. Then click on Apply button to save the changes.
8. Captive portal successfully added to EnGenius platform.
Meraki
Welcome to the configuration guide for setting up a Captive Portal with the Meraki access point. This comprehensive guide will walk you through the process, ensuring that you can seamlessly manage and enhance your users’ internet experience while maintaining top-notch security and compliance.
Guest Portal
Captive Portals or Guest Portal is a multi-channel platform that enables you
to connect and engage with visitors on your premises.
Guest portal screen page allows to create and design a customizable portal
from scratch.
A sample of templates will be given as an option to choose to create a portal,
layout will be available as a part of the template.
Following are the steps to configure the Guest Portal.
Captive Guest Portal Configuration
The captive portal is designed with following terms that are described below:
-
Social Authentication: Needs authentication using social platforms as Facebook, Twitter, Linked and it will ask user to authenticate with a valid account.
-
Email Authentication : It will ask the user for their Name and Email address to be able to Authenticate.
-
SMS Authentication: It asks the user for their contact number and authenticate over a SMS.
-
Token Based: A token is generated by the admin. The users get this token when they register and on entering the token as an authentication, they get access to the internet.
-
Username/Password
-
Third party
The following are for custom development and can be integrated as per
requirement.
- Third party ERP
- Third party PMS
- Third party POS
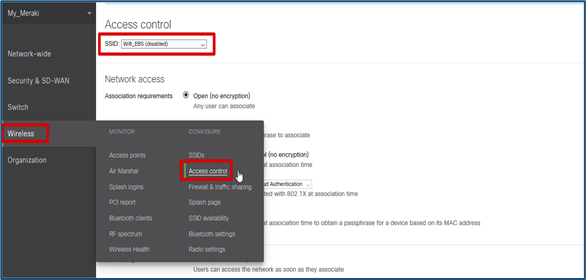
- Enter ‘Wireless’ , ‘Access Control’
- Choose the SSID to which the Captive portal will be configured.
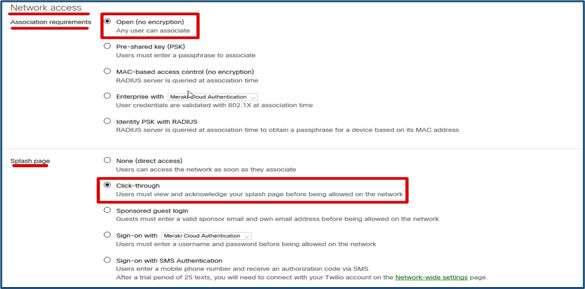
- In Network Access, Association requirement, Select ‘Open (no encryption)’.
- In Network Access, Splash page, Select ‘Click-through’.
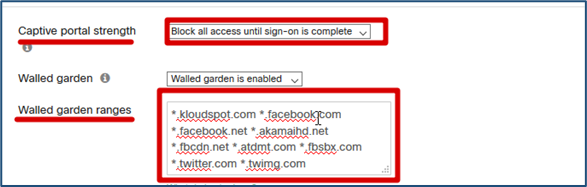
- In Network Access, Captive portal strength, Select ‘Block all access until sign-on is complete’
- In Network Access, Walled garden ranges, Enter the following domains:
_.kloudspot.com _ .facebook.com _ .facebook.net _ .akamaihd.net _ .fbcdn.net _ .atdmt.com _ .fbsbx.com _. twitter.com \* .twimg.com
Warning
You have to separate them only with a space, as shown in the image.
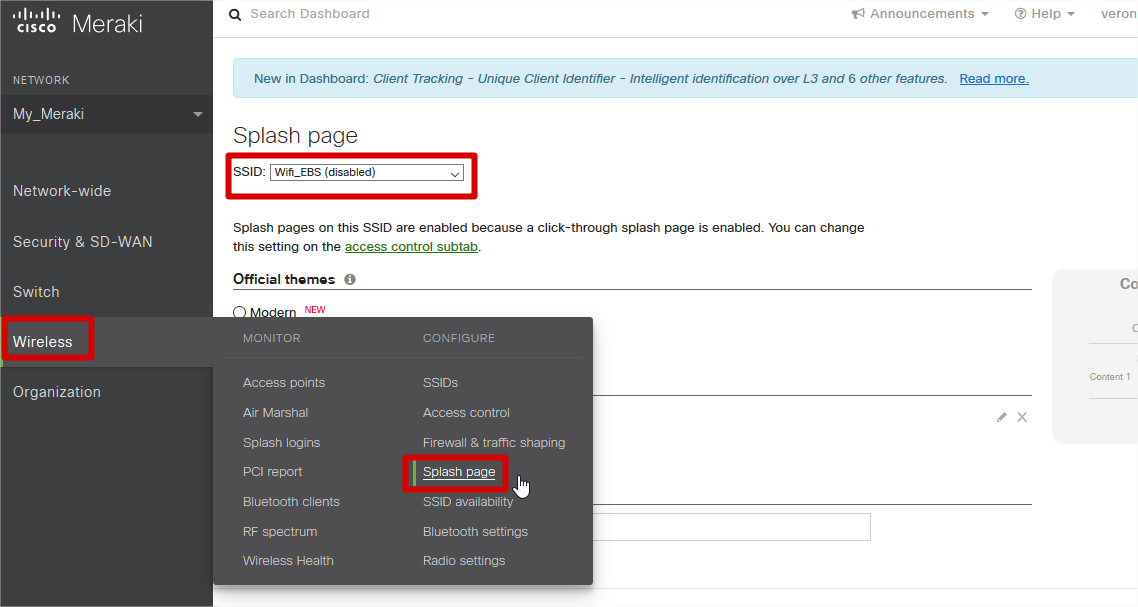
- Enter Wireless, click on ‘Splash page’.
- Choose the SSID to which the captive portal will be configured.

- On ‘Splash page’, Custom splash URL, enter the url below;
https://mx01.kloudspot.com/cp/lacomer/index.htm
For more details on how to create template and workflow driven portal, please
refer to the relevant Kloudspot documentation.
Kloudspot Campaign Management
Kloudspot has a powerful workflow and policy driven campaign management
solution centered mostly around Wi-Fi which offers both online and offline
campaigns. These online campaigns can be created and managed using Captive
Guest Portals. Creation of Captive guest portals is extremely easy using one
of many templates supported by KloudCampaign Editor. KloudCampaign Editor can
help guide the user to create a captive portal for the hardware they have
deployed on the network.
For more details on how to create Campaigns, resources and configure dynamic
policies and workflows, please refer to relevant Kloudspot documentation.