In today’s digital landscape, securing online interactions and managing user identities are paramount. Kloud Portal understands the importance of providing flexible authentication options for your network users. In this section, “Configure 3rd Party Authentication,” we will explore a range of authentication methods that extend beyond traditional username and password combinations.
By integrating third-party authentication services like Facebook, Google Workspace, LinkedIn, Microsoft, and Twitter into your Kloud Portal setup, you can enhance user convenience, streamline the login process, and bolster security measures. These authentication methods allow users to leverage their existing social media or corporate credentials, simplifying access to your network while ensuring a secure and seamless experience.
In this guide, we will take you through the steps required to configure these third-party authentication options within Kloud Portal. Whether you’re operating a small café, managing a hotel’s Wi-Fi network, or overseeing a large-scale enterprise, these authentication methods offer the flexibility and security needed to meet your unique requirements.
Subsections of Configure 3rd Party Authentications
Okta Authentication
Overview
Okta Authentication integration allows Captive Portal users to log in using their Okta account credentials. This document provides a step-by-step guide on how to integrate Okta Authentication into the KloudManage.
Prerequisites
Before starting the integration process, ensure that you have the following credentials:
KloudManage admin account credentials.
Okta developer account credentials.
Integration Steps
Obtaining Okta ID, Secret and Issuer
Visit Okta Developer site and log in to your Okta developer account. If you don’t have an account yet, you have the option to sign up and create one.
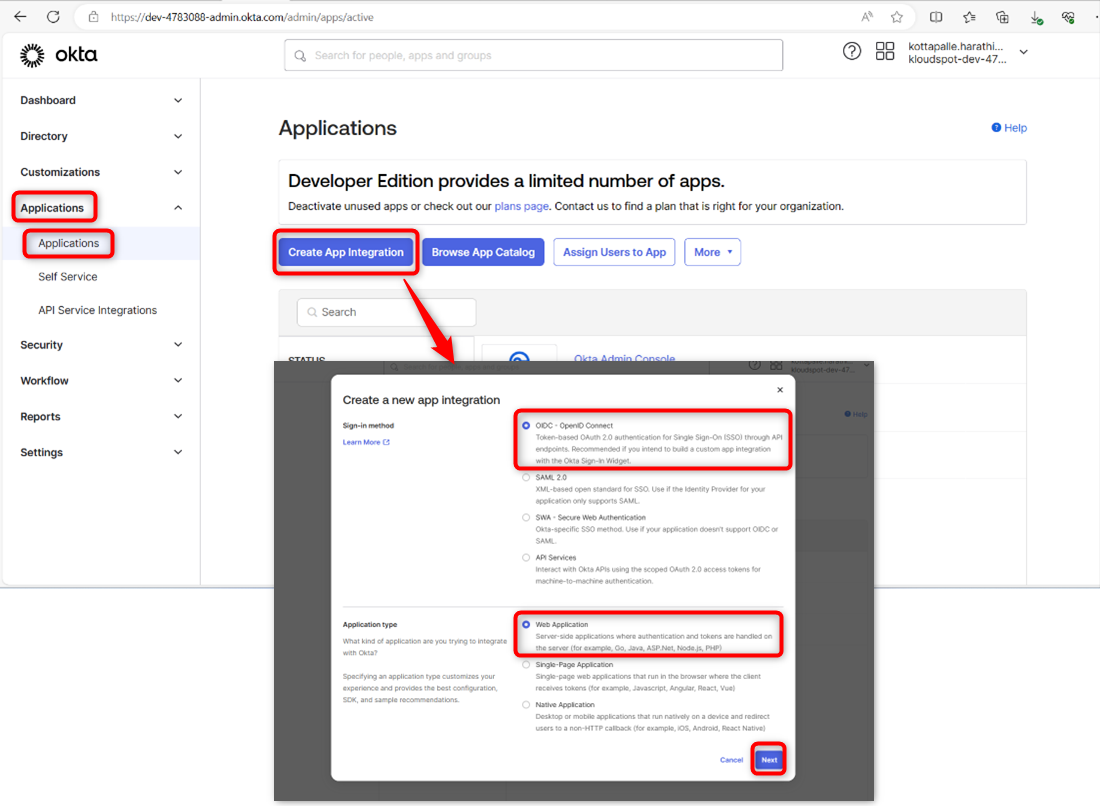
Create a new App Integration by navigating to Application > Create App Integration > OIDC-OpenID Connect > Web Application.
Click on the Next button.
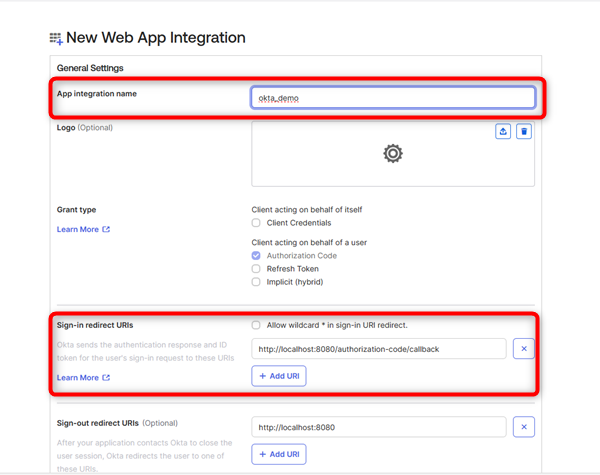
Enter the following details in the New Web App Integration window:
App Integration Name: Enter a name for your app.
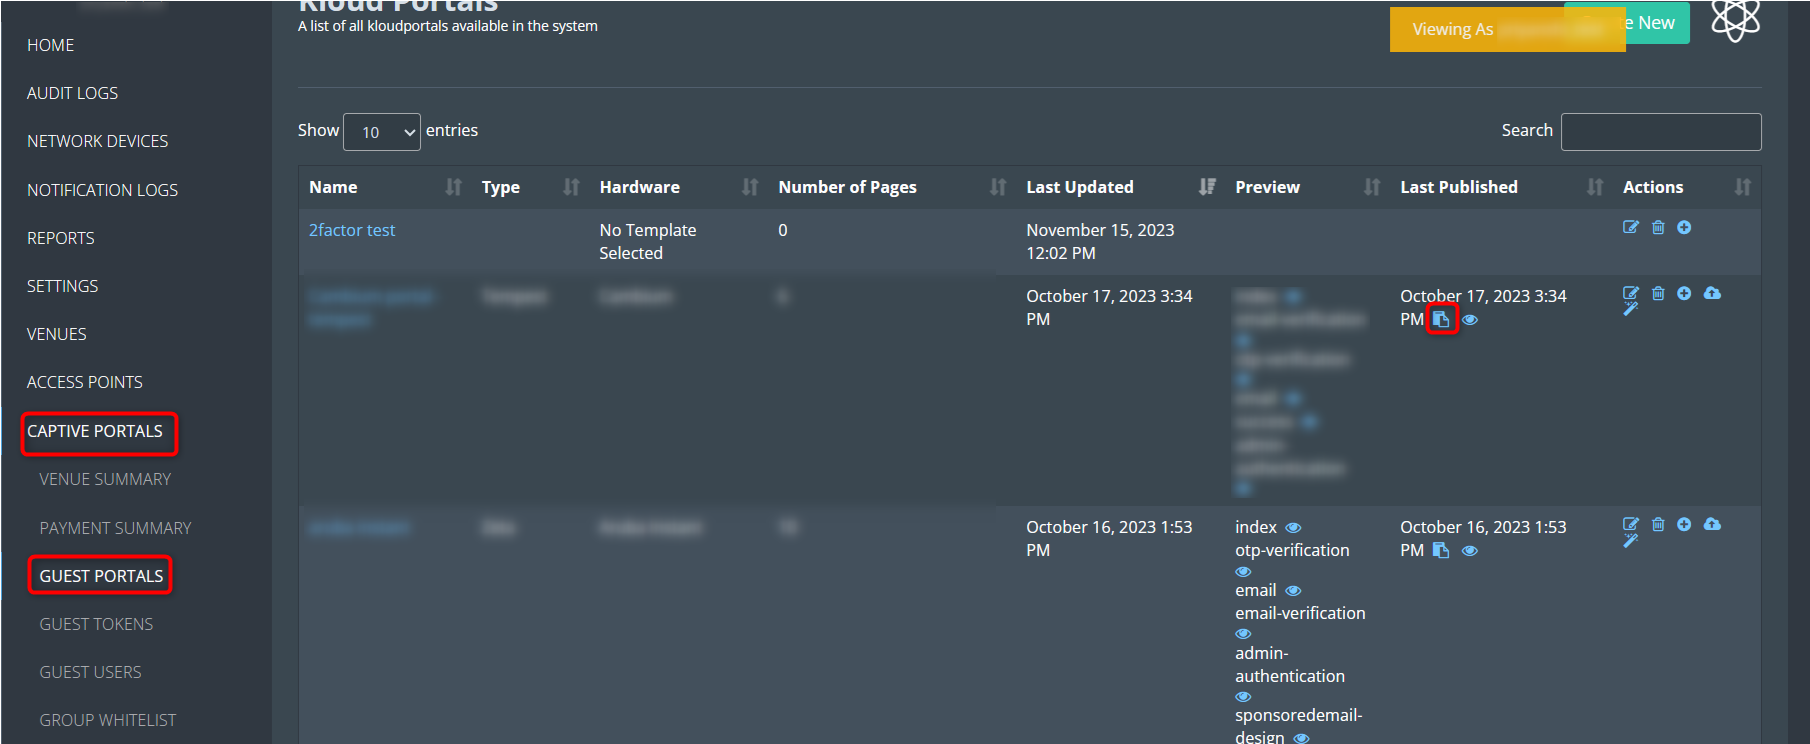
Sign-in Redirect-URI: This is the URL of the Captive Portal. To obtain this, log in to KloudManage and navigate to Captive Portal > Guest Portal. Copy the URL of the portal you want to add Okta SSO.
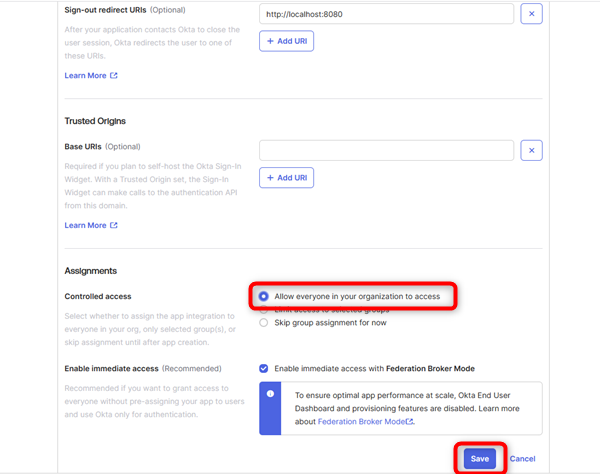
Scroll down, check the Allow everyone in your organization to access checkbox, and click on the Save button. This is an optional step and can be selected as per your requirement.
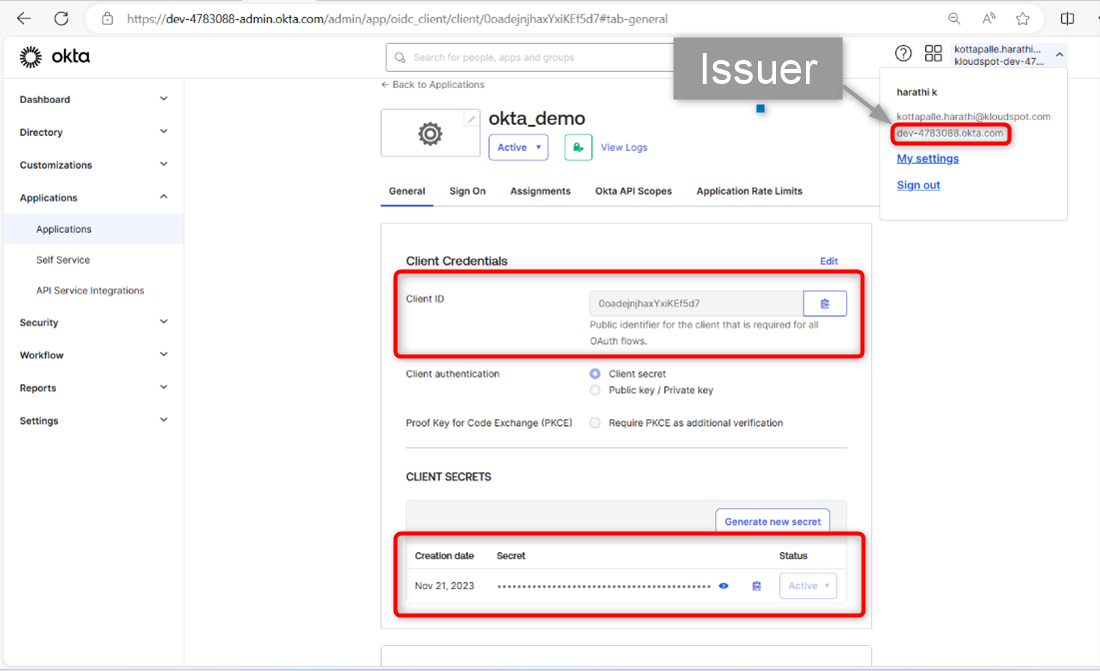
Once saved, the App you created will open. Copy the Client ID, Client Secret, and Issuer from this page.
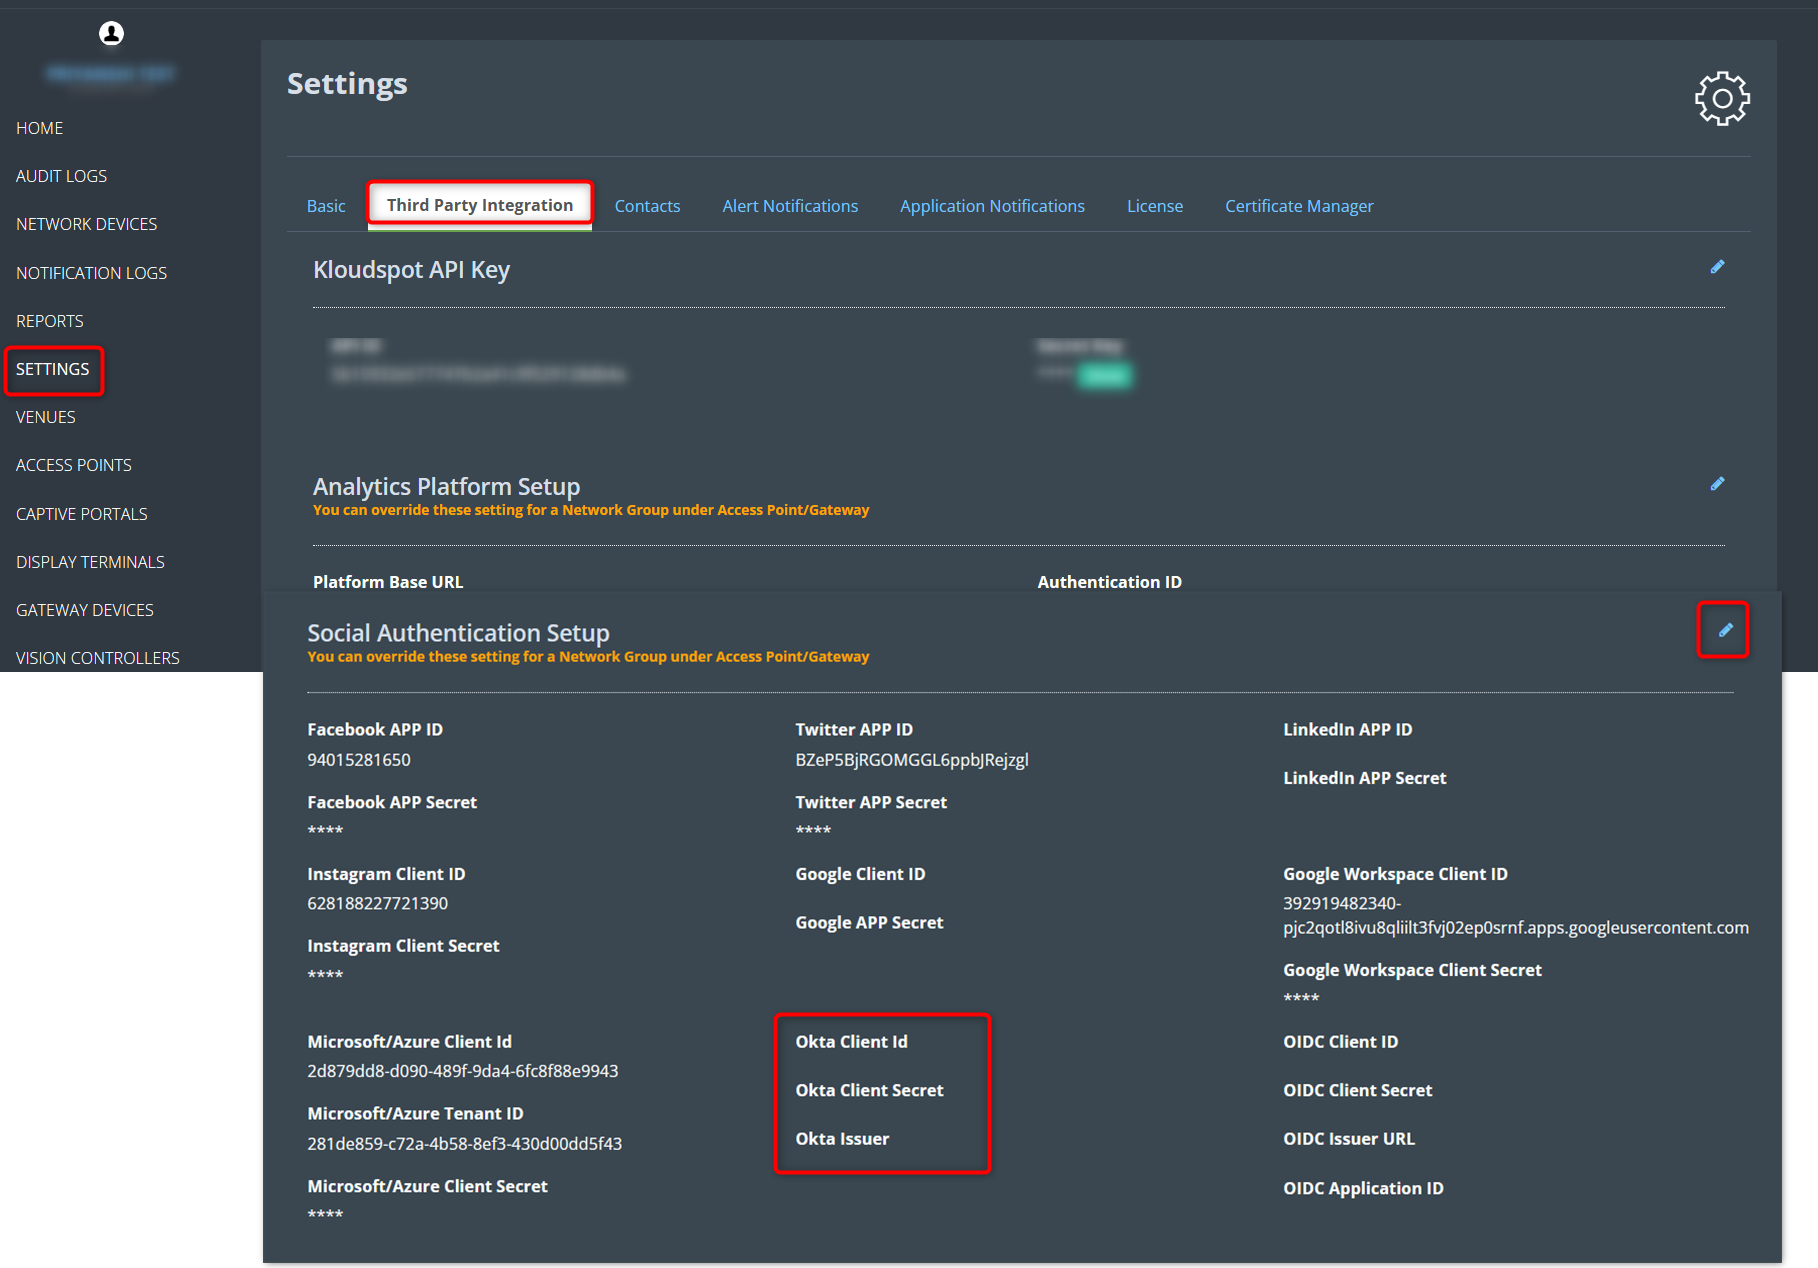
Scroll down to the Social Authentication Setup section.
Click on the Edit button.
Paste the Okta Client ID, Client Secret, and Issuer copied from the Okta App into their respective places.
Click on the Save Social Settings button to save the changes.
Logging in with Okta SSO
After completing the integration steps, users can log in to the Captive Portal using Okta Single Sign-On (SSO). The Okta SSO option should now be available on the Captive Portal login page.
Facebook Authentication
By adding Facebook Social Authentication, Captive Portal users can log in using their Facebook account credentials.
Step 1: Accessing Third-Party Integrations in KloudManage
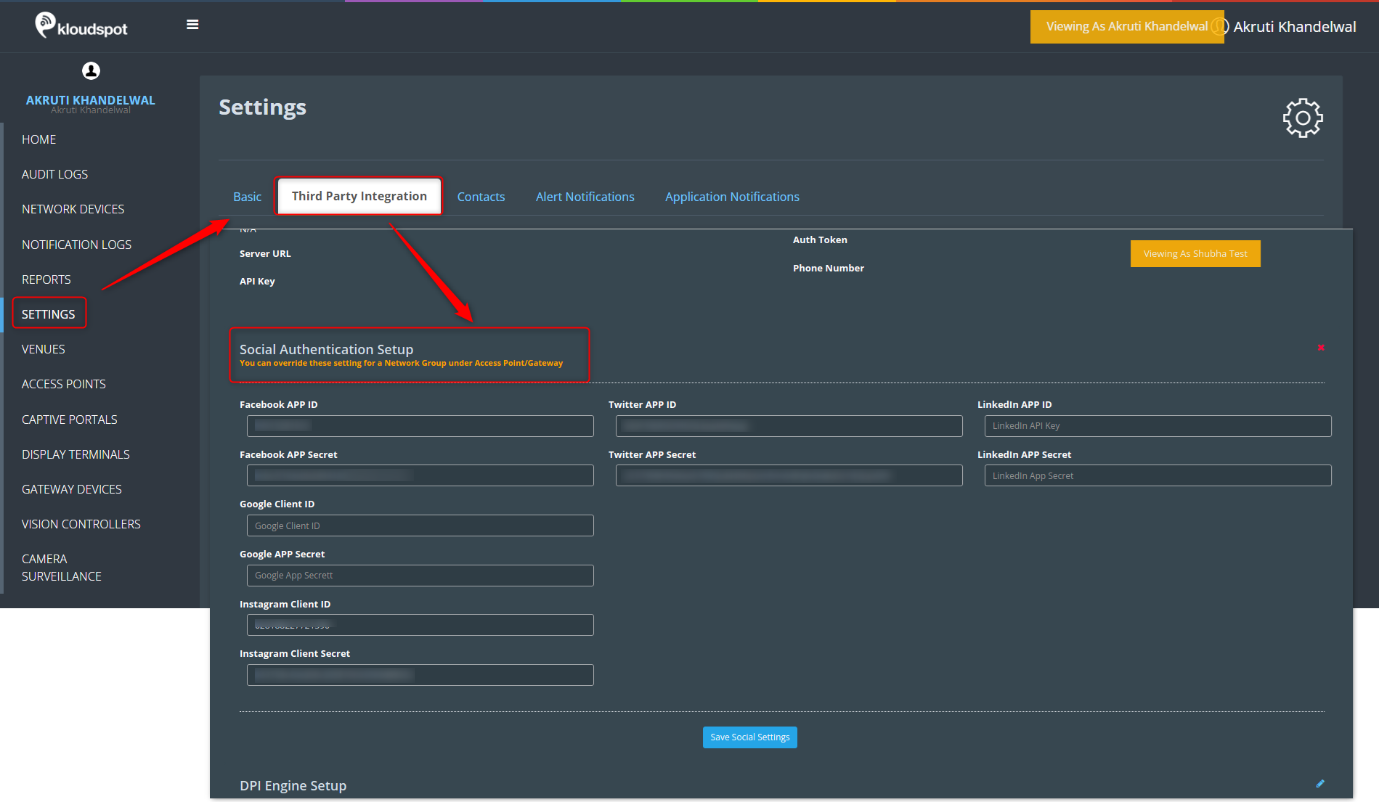
To begin, log in to your KloudManage account and navigate to the Settings page. Look for ‘Third-party Integrations,’ and within it, find the ‘Social Authentication Setup.’
Step 2: Obtaining Facebook App Credentials
Before diving into KloudManage settings, you’ll need a Facebook App ID and App Secret. Follow these steps:
Sign up for a developer account using your company credentials.
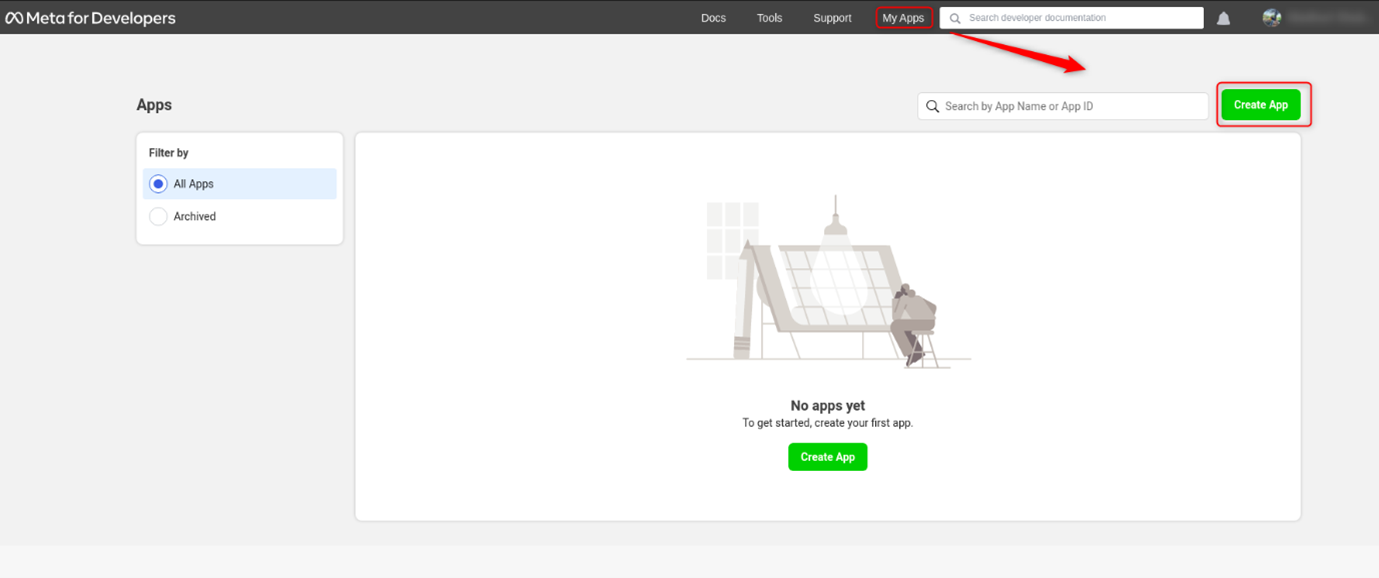
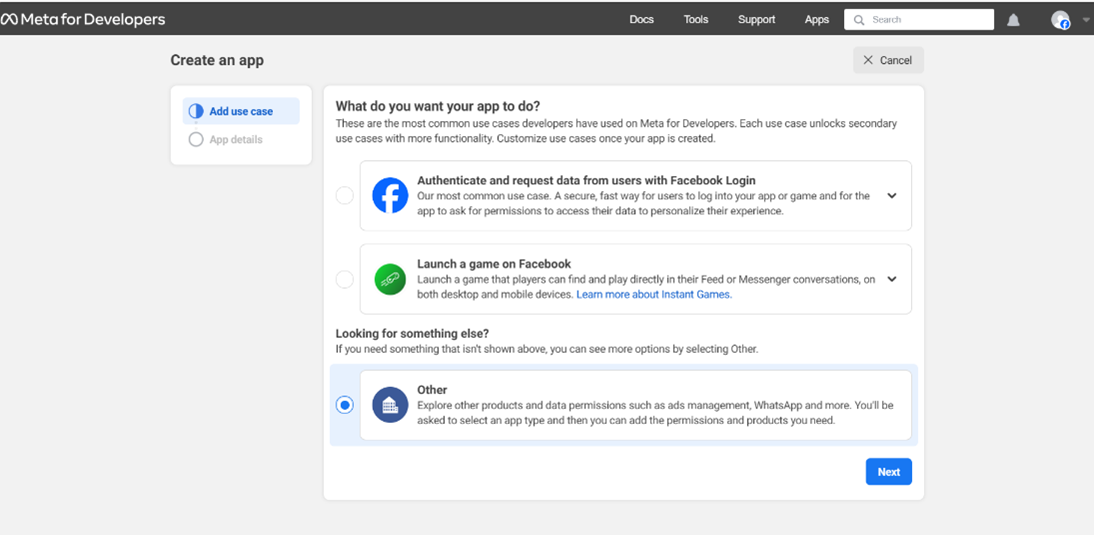
After signing up, click on “Create App.”
Choose “Other” in the opening window and click “Next.”
Enable consumer, and proceed to the next step.
Provide a Display Name for your app (visible to users on the Kloudspot Guest Portal) and click “Create app.”
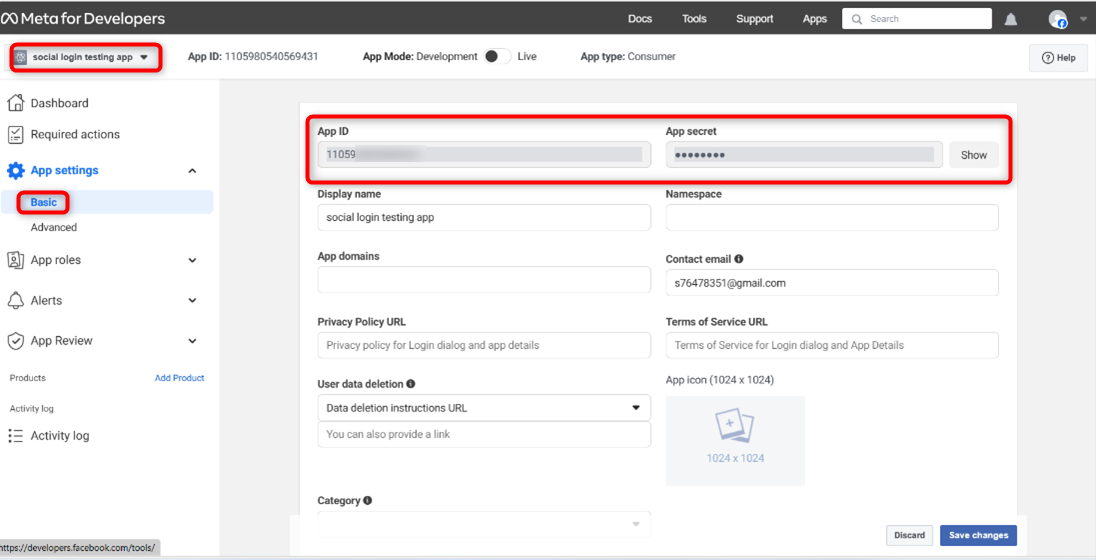
In the ‘My Apps’ section, locate and enter your newly created app.
Go to the ‘basic’ option in the settings menu.
Copy the App ID and App Secret; these will be needed in KloudManage.
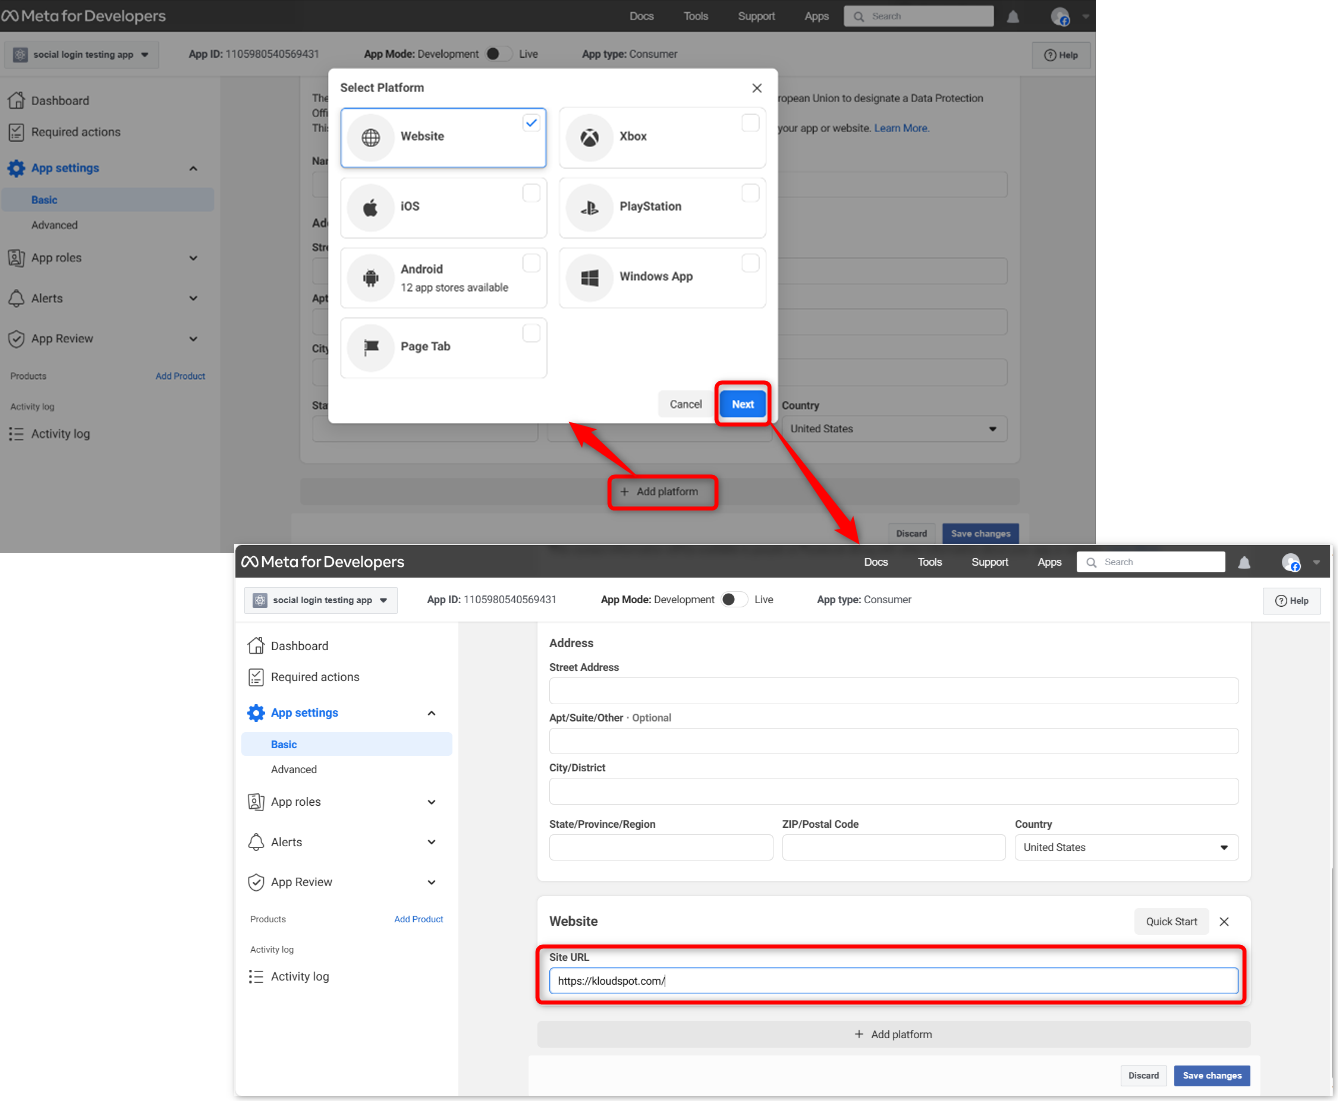
Scroll down, click “Add Platform,” choose “Website,” and enter your KloudPortal URL.
Save the changes.
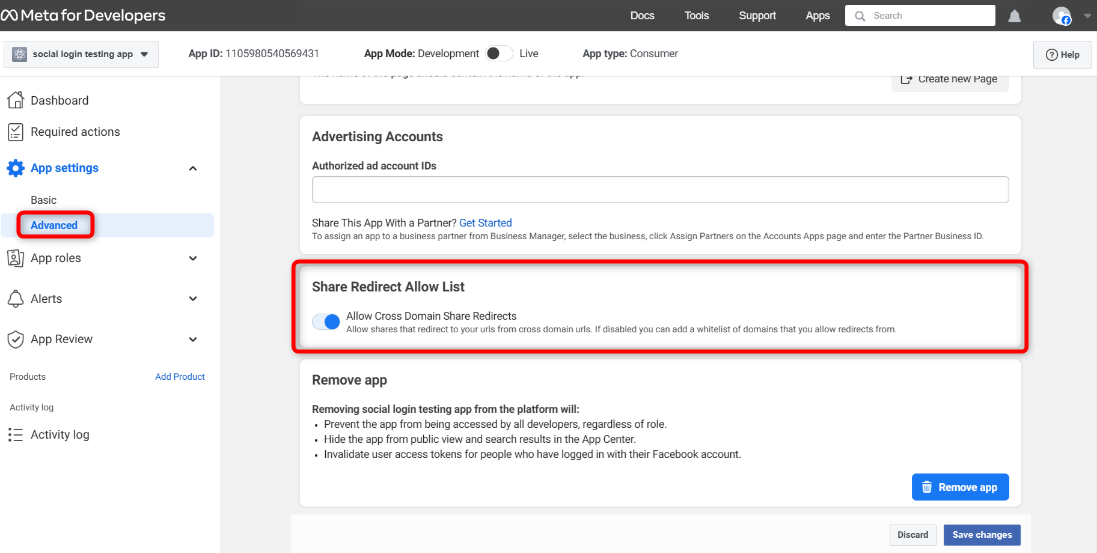
Open the Advanced menu and enable “Allow Cross Domain Share Redirects” in the “Share Redirect Allow List” section.
Save the changes.
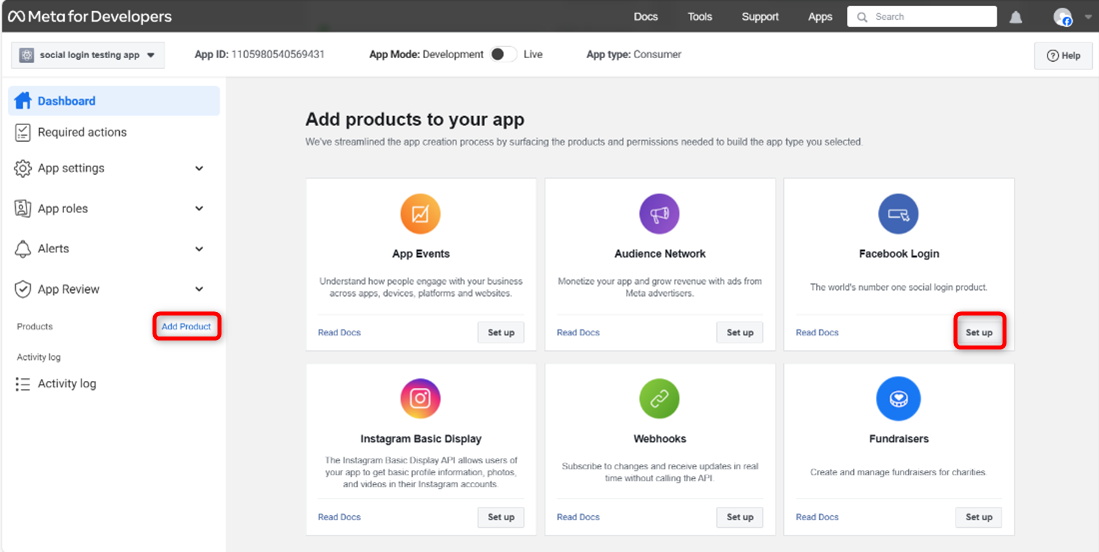
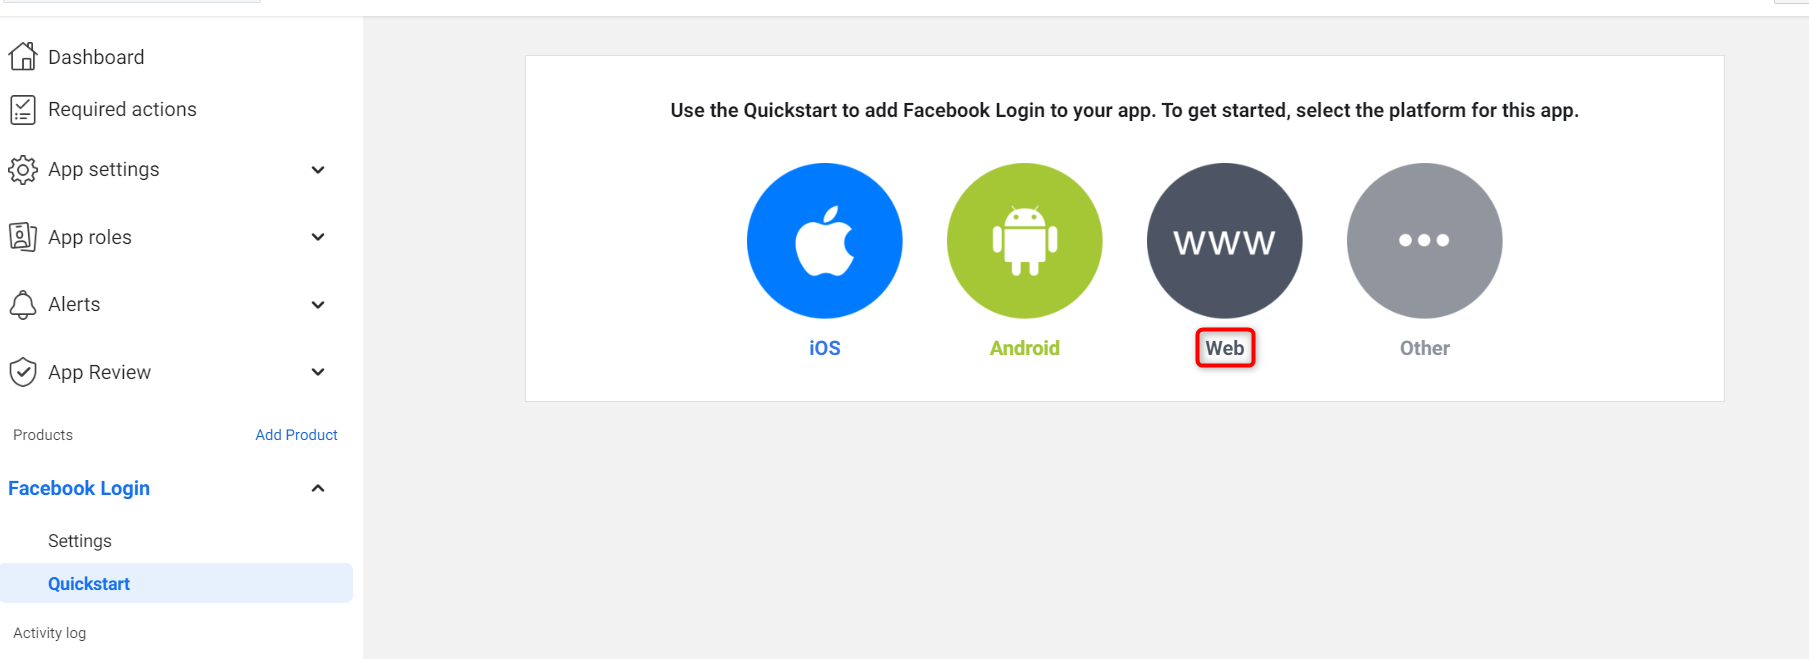
Click “Add Product” in the navigation menu and choose “Facebook Login.”
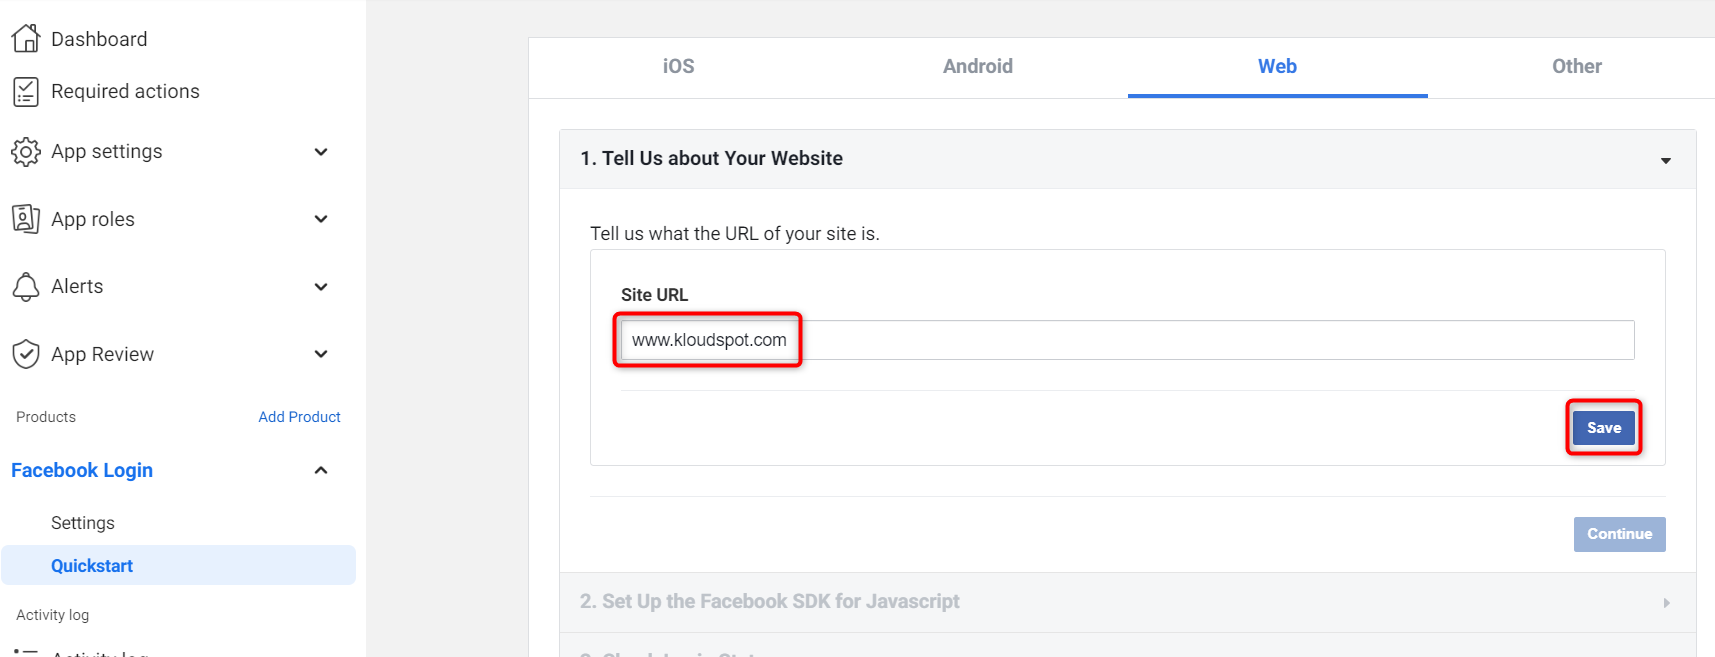
Select the Web platform and enter your Site URL.
Follow the subsequent steps and click “Save and Continue.”
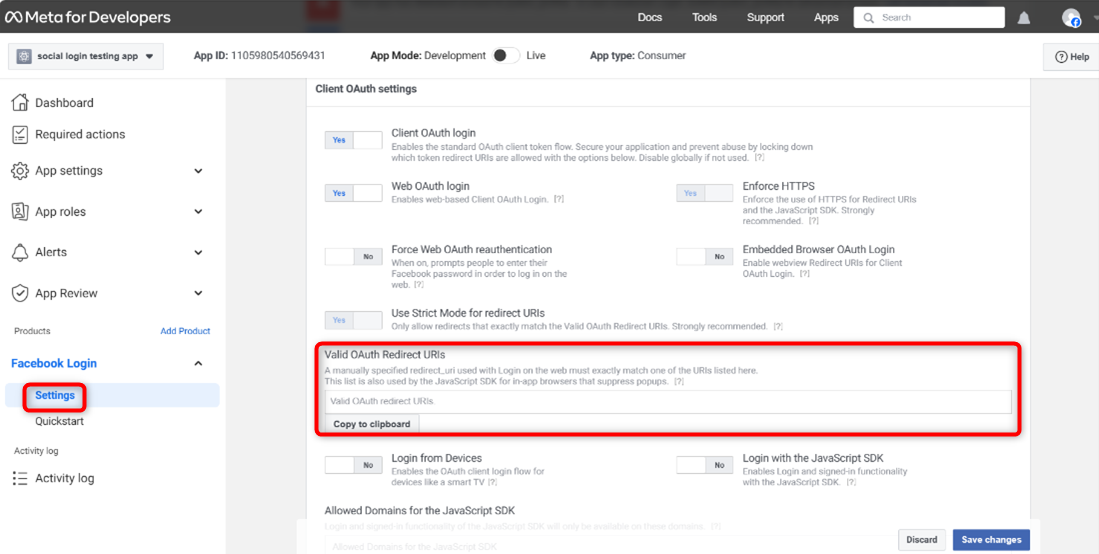
Click on “Settings” under ‘Facebook Login.’
Enter the guest page URL under ‘Valid OAuth Redirect URIs.’
Save Changes.
Step 3: Integration in KloudManage
Back in KloudManage, paste the copied App ID and App Secret.
Click “Save Social Settings.”
Instagram Authentication
Integrate Instagram authentication with the Captive Portal
By adding Instagram Social Authentication, Captive Portal users can log in using their Instagram account credentials.
Step 1: Accessing Third-Party Integrations in KloudManage
To begin, log in to your KloudManage account and navigate to the Settings page. Look for Third-party Integrations, and within it, find the Social Authentication Setup.
Step 2: Obtaining Instagram App Credentials
Before diving into KloudManage settings, you’ll need an Instagram App Secret and Instagram App ID. Follow these steps:
Sign up for a developer account using your company credentials.
After signing up, click on Create App.
Choose Other in the opening window and click Next.
Enable the consumer, and proceed to the next step.
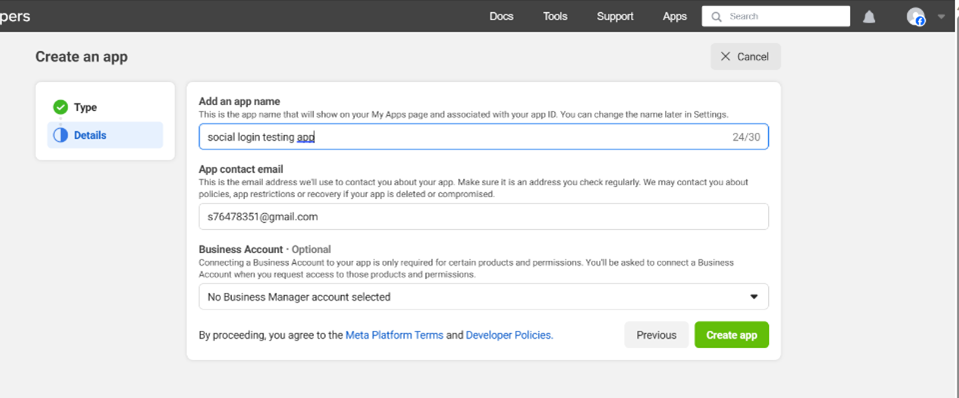
Provide a Display Name for your app (visible to users on the Kloudspot Guest Portal) and click Create app.
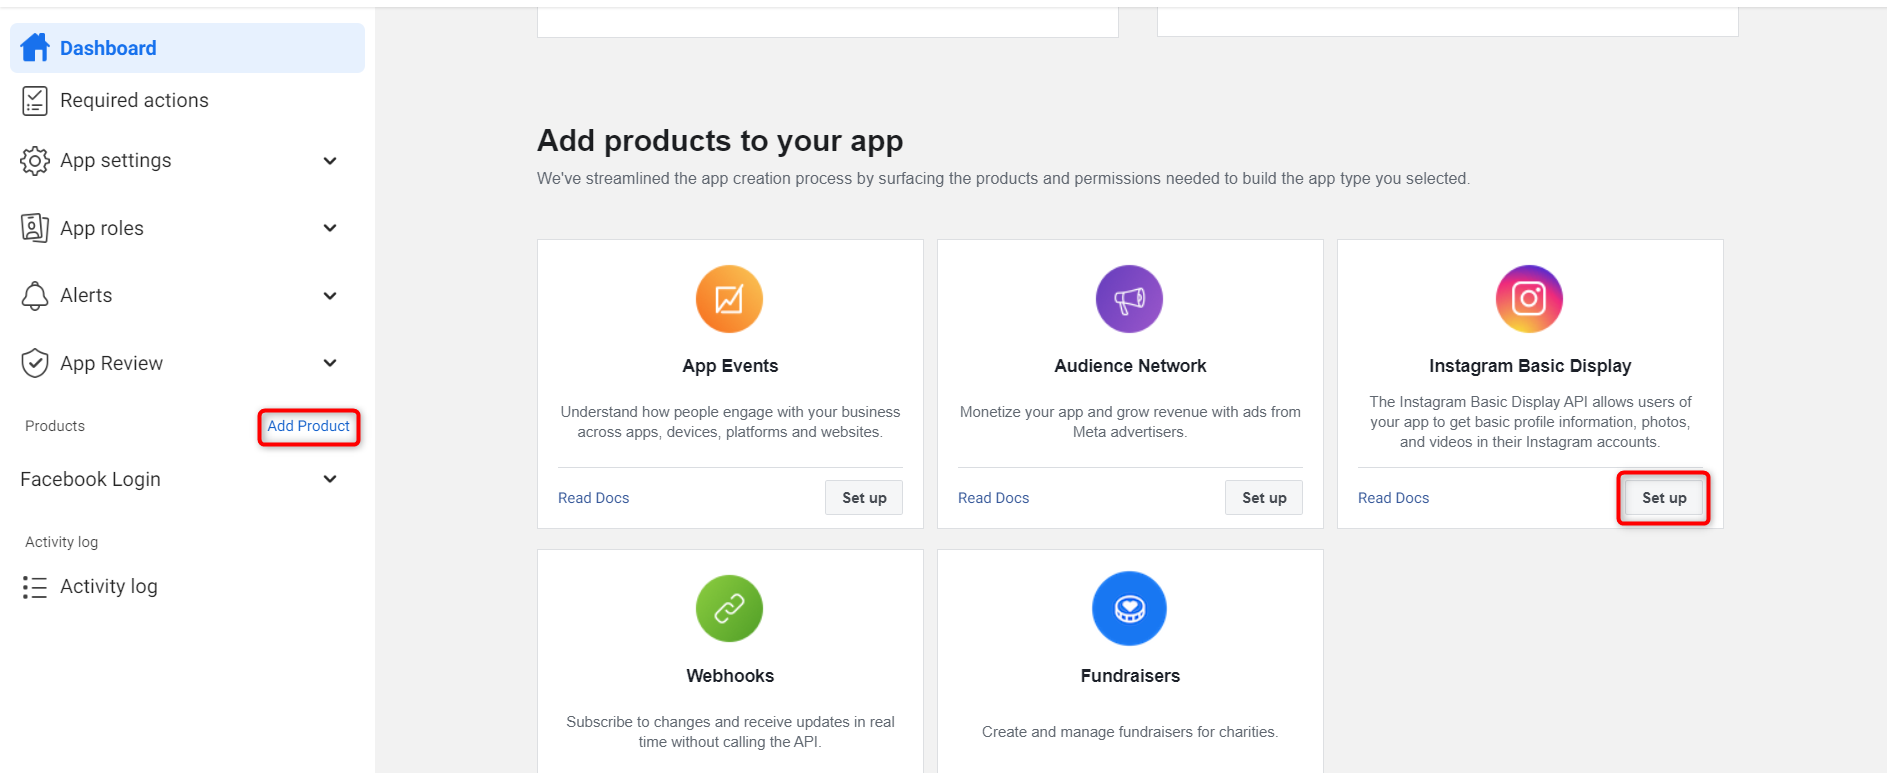
After creating the app, navigate to Add Product in the menu, and choose Instagram Basic Display.
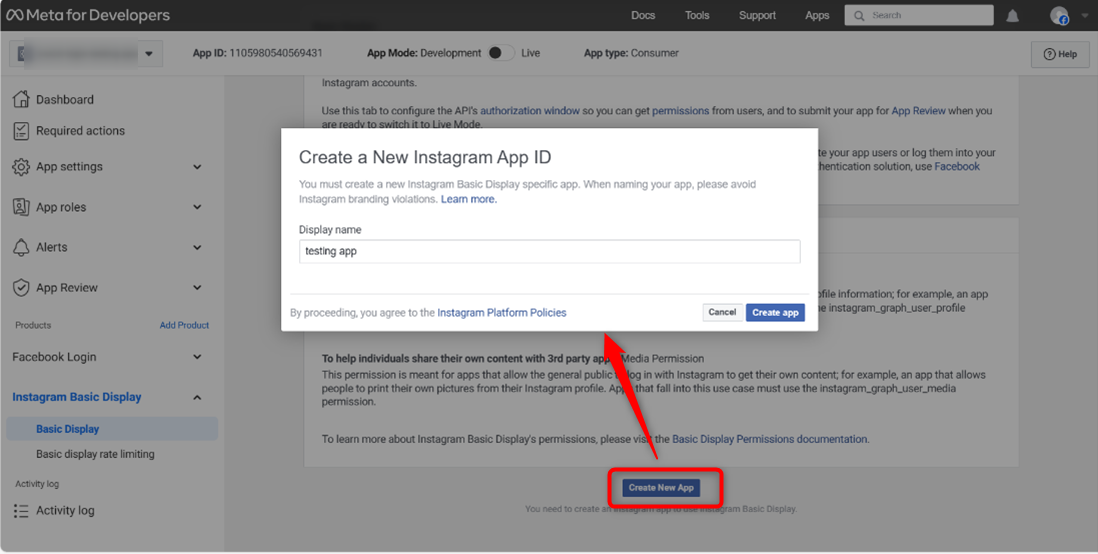
Click Create new app, enter the App name, and then click Create App.
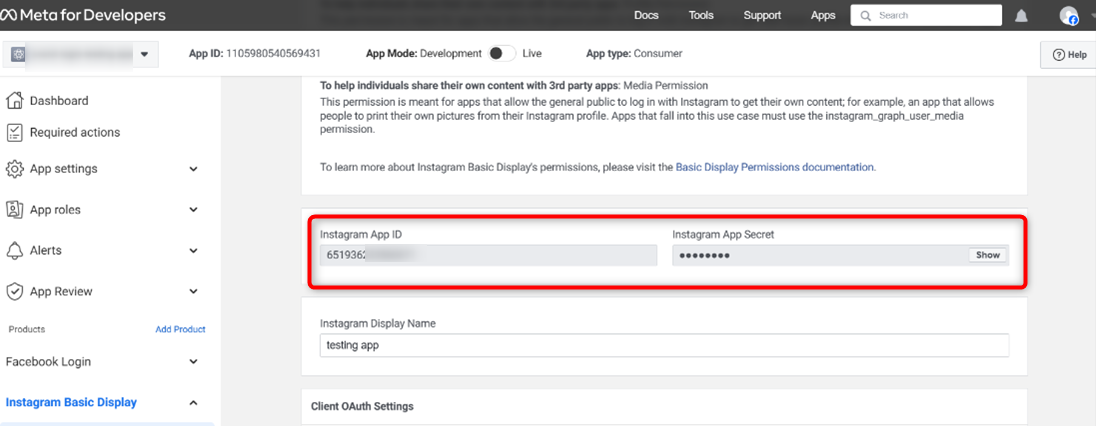
Scroll down in the basic display window, copy the Instagram App Secret and Instagram App ID, and save them for later use.
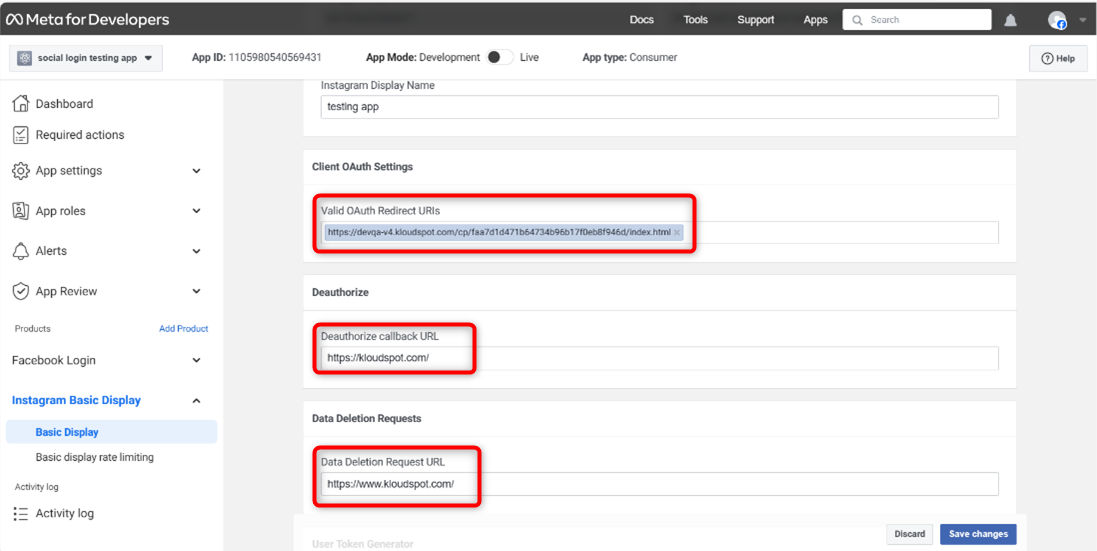
Add Valid OAuth Redirect URIs, Deauthorize callback URL, Data Deletion Request URL, and click Save changes.
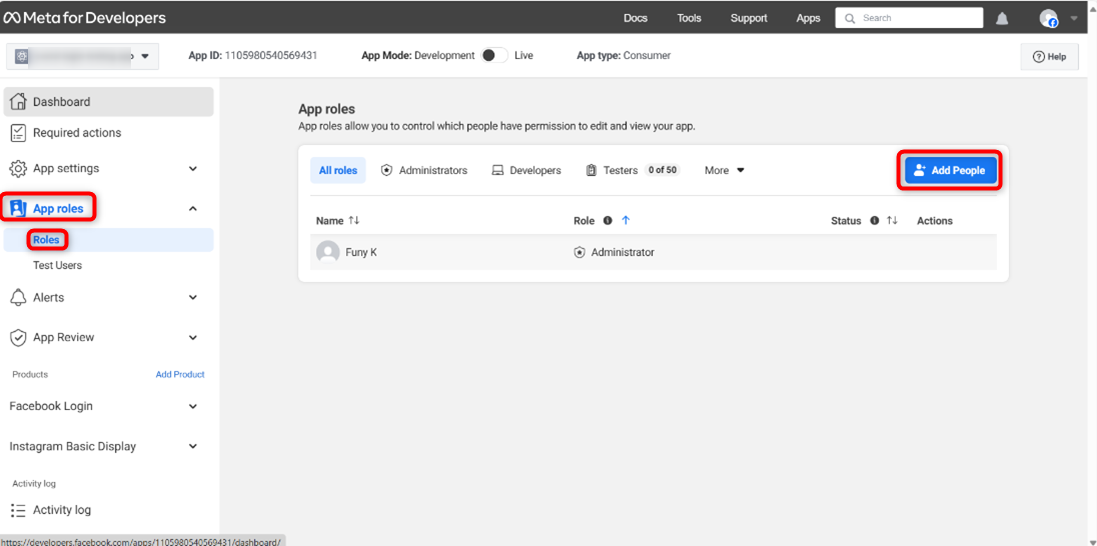
Navigate to App roles > Roles to add App roles.
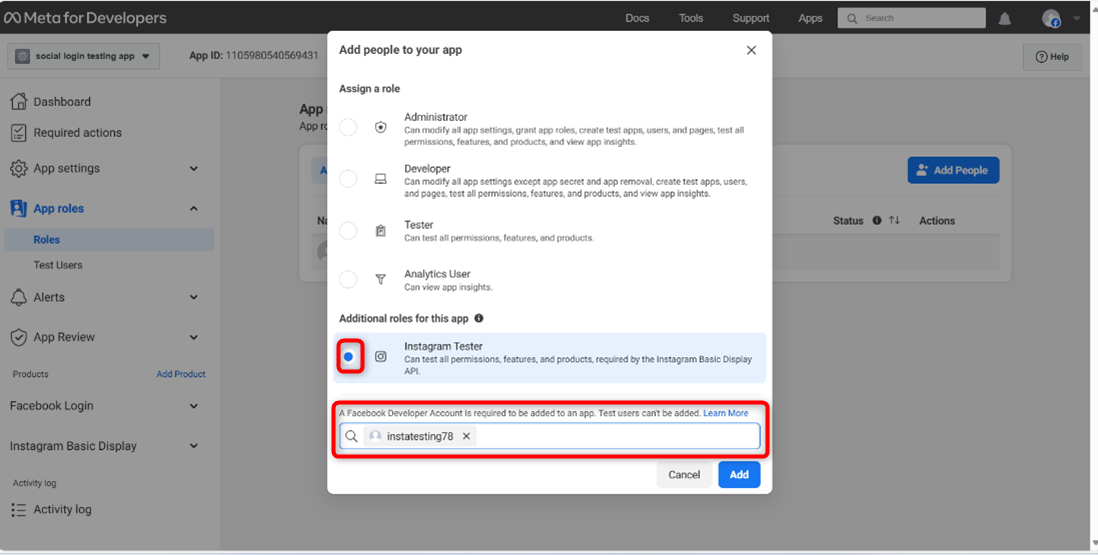
Click Add people, select Instagram Tester, and enter your Instagram username. Click Add.
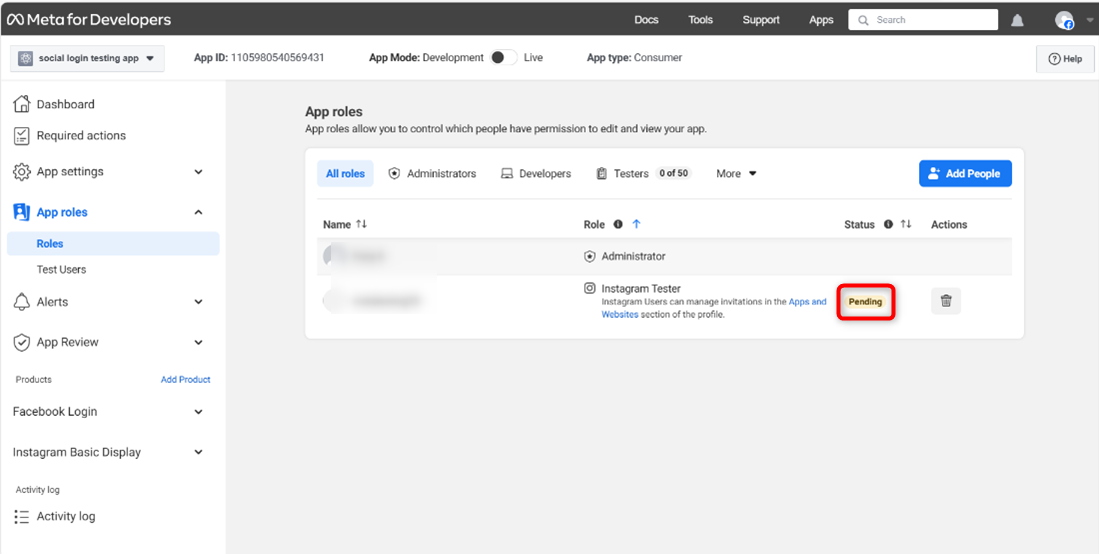
The status will be pending.
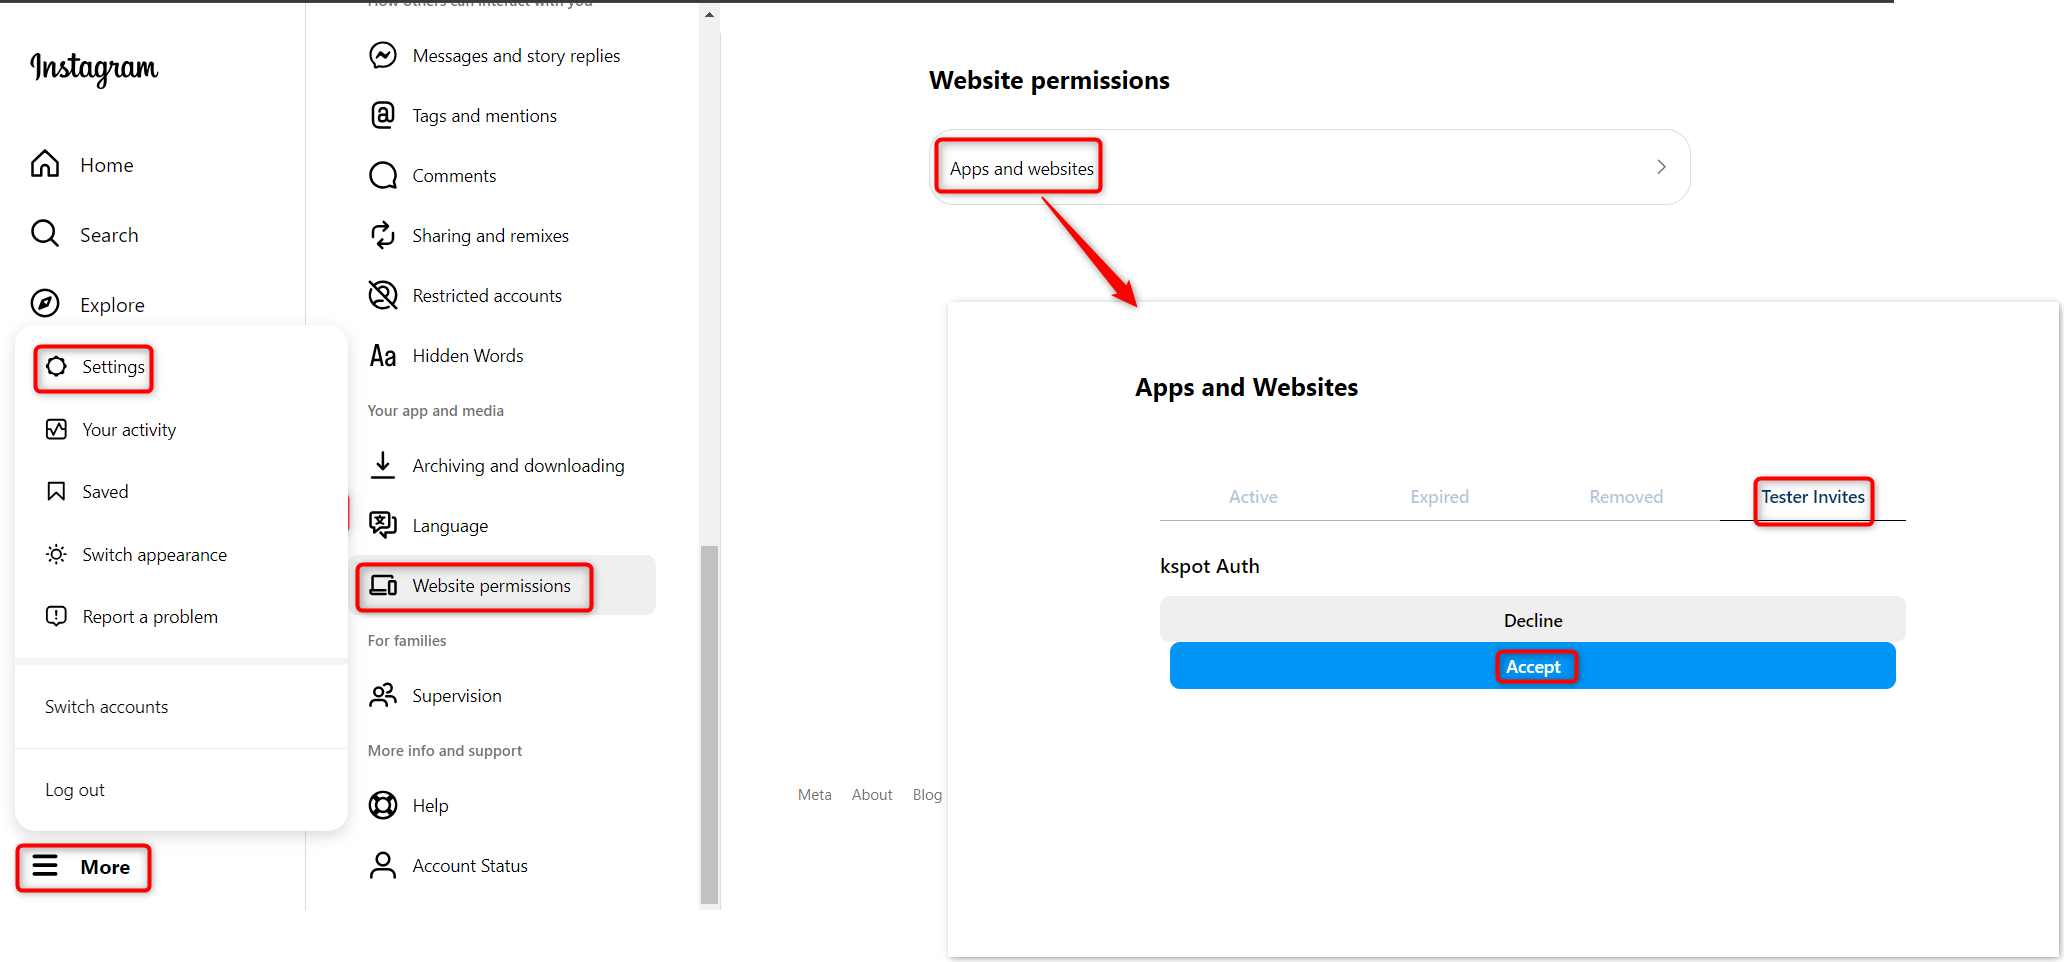
To approve, log in to your Instagram account, and go to More > Settings > Website Permissions > Apps and Permissions. In Tester Invites, click Accept.
Step 3: Integration in KloudManage
Back in KloudManage, paste the copied App ID and App Secret.
Click Save Social Settings.
Google Workspace Oauth 2.0 Authentication
1. By adding Google Authentication, Captive Portal users can log in using their Google account credentials. Click the link given below to access the login page.
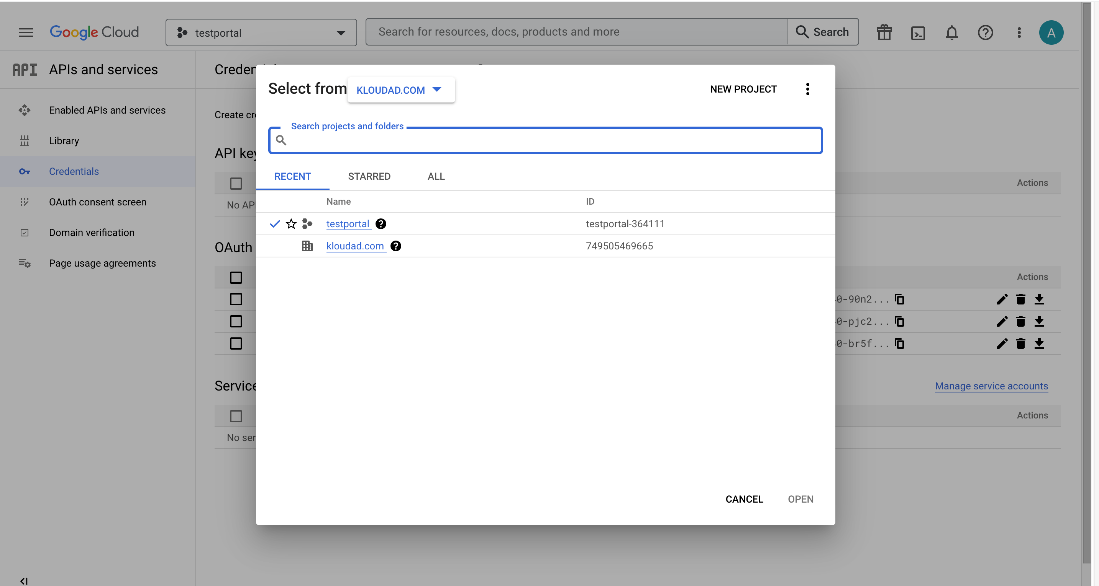
3. Now select the project or create a project by clicking on the dropdown at
the top right corner.
4. This popup will contain all your projects and also gives you the
flexibility to create a new project.
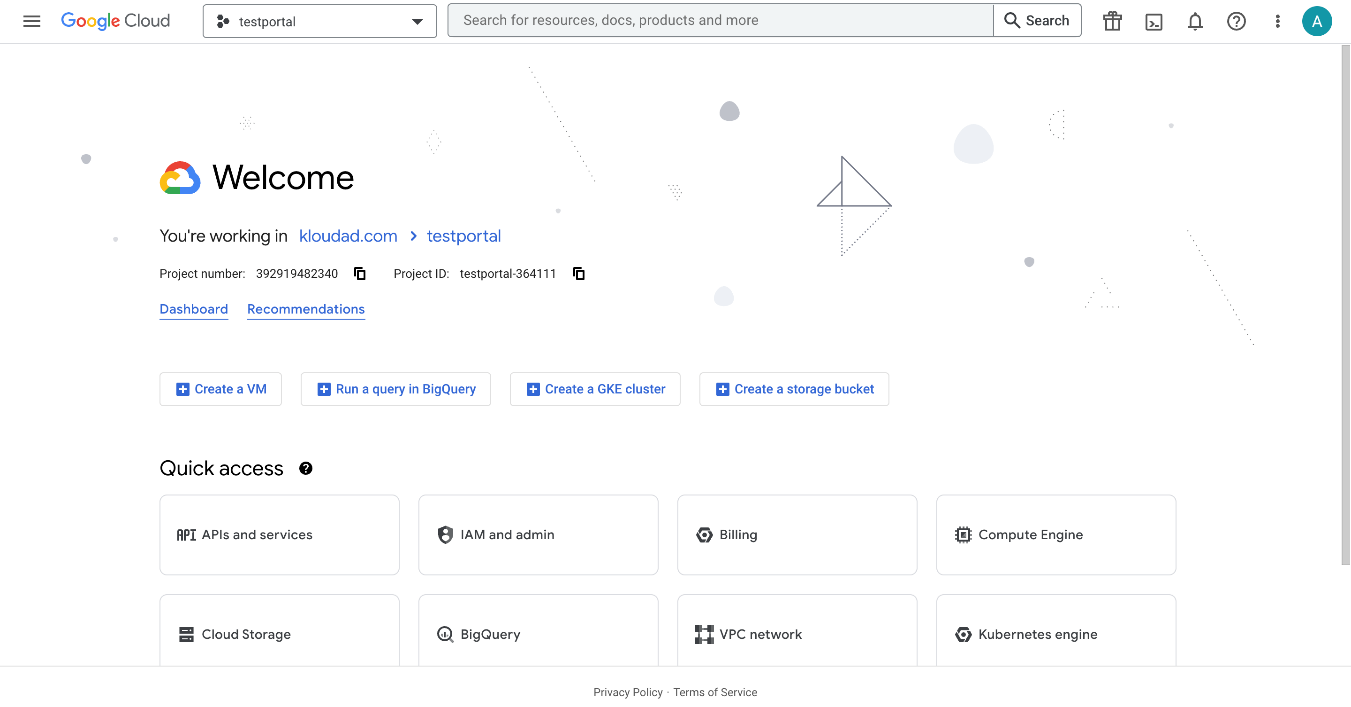
5. After selecting an existing or a new project the below window will open.
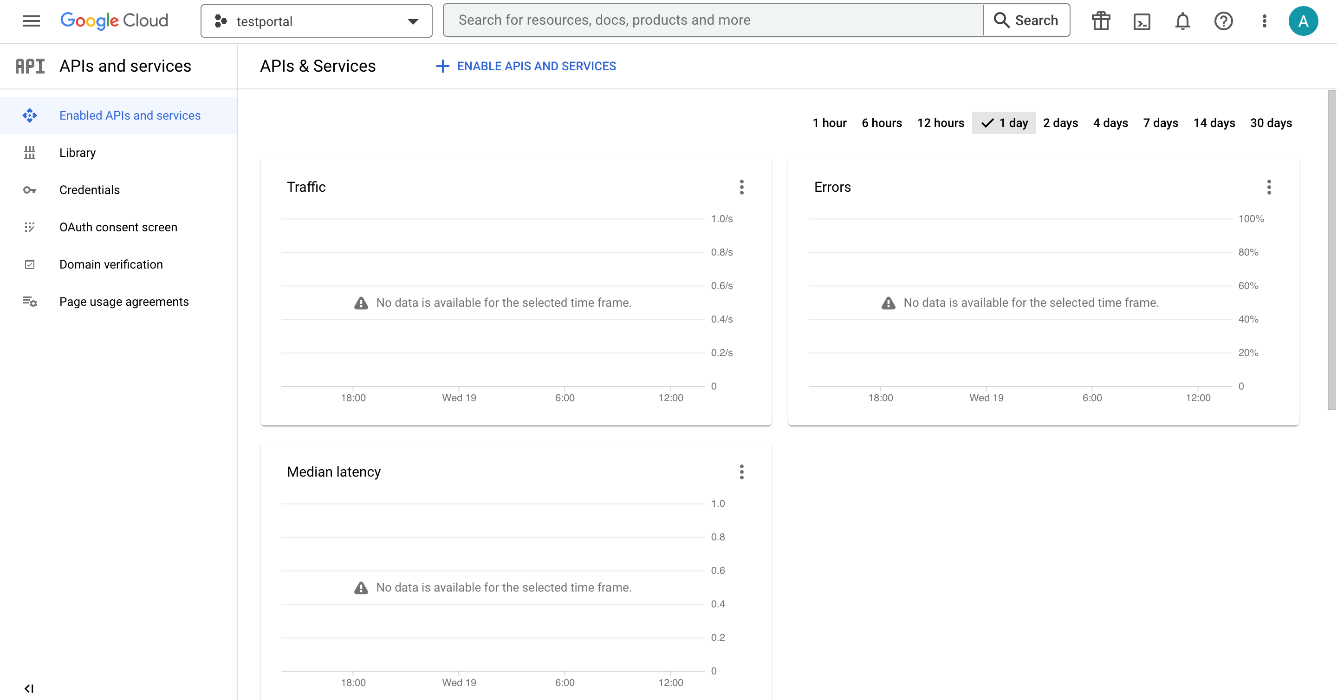
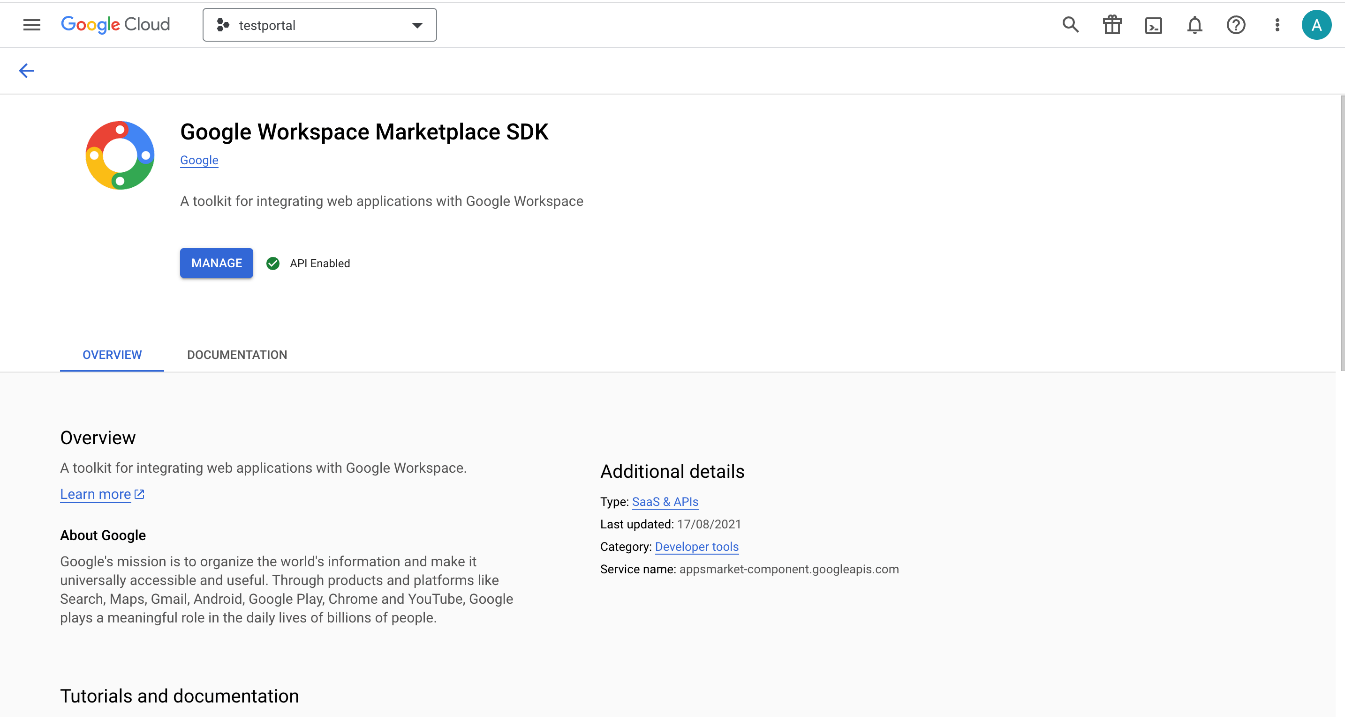
6. Next, you need to enable the Google Workspace Marketplace SDK. For
that navigate to Enabled APIs and Services.
7. Then search for Google Workspace Marketplace SDK and enable it.
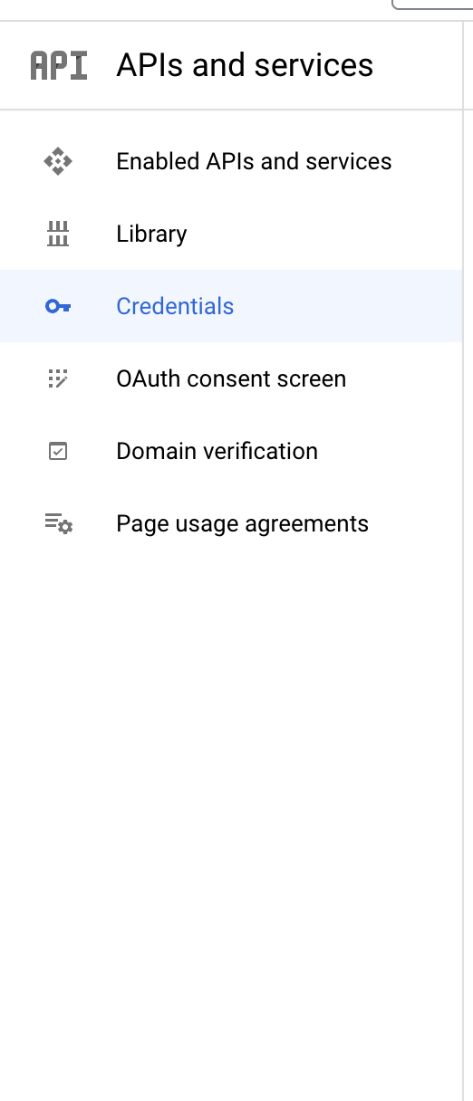
8. Then navigate to Credentials to create Client ID and Secret.
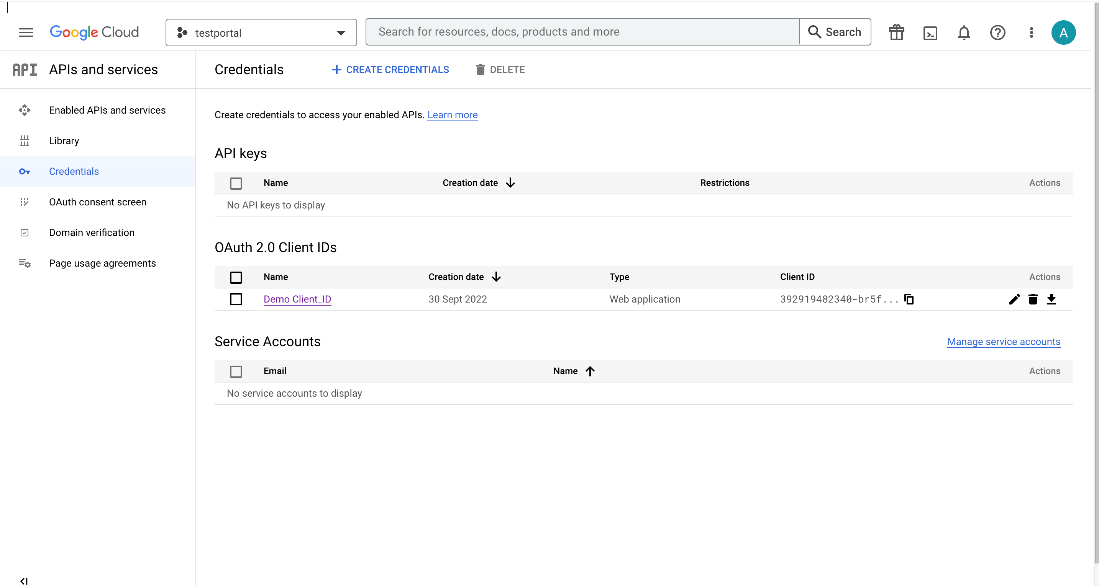
9. In the window that appears, there are several login options.
10. In this case, the captive portal supports OAuth2.0.
11. To configure OAuth you need to create a Client ID and Secret.
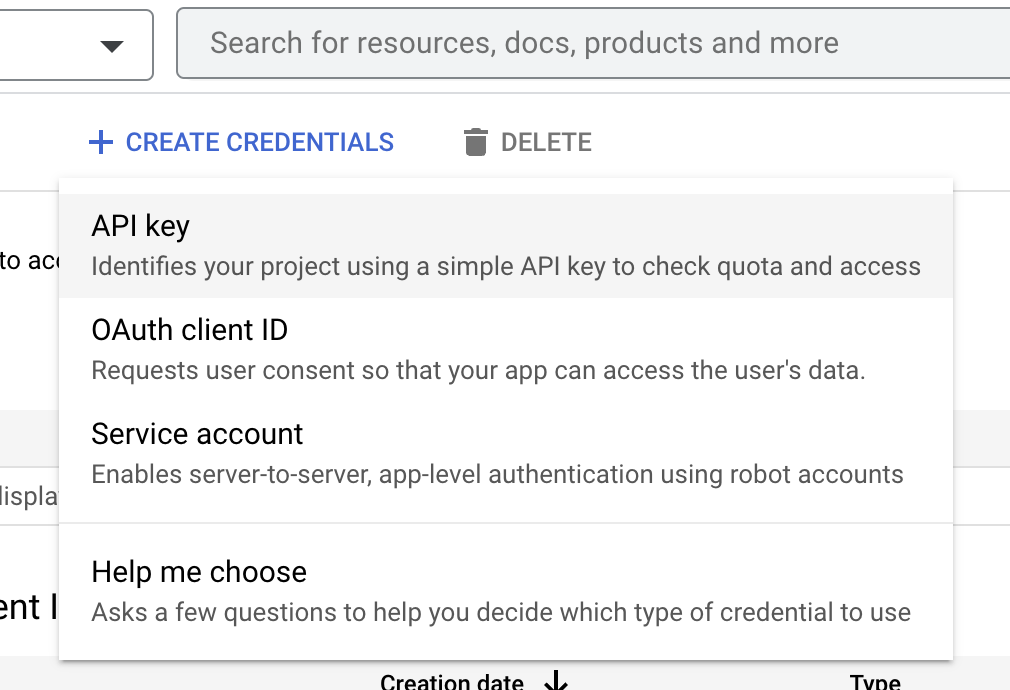
12. Click on CREATE CREDENTIALS button at the top and select the OAuth
Client Id from the dropdown list.
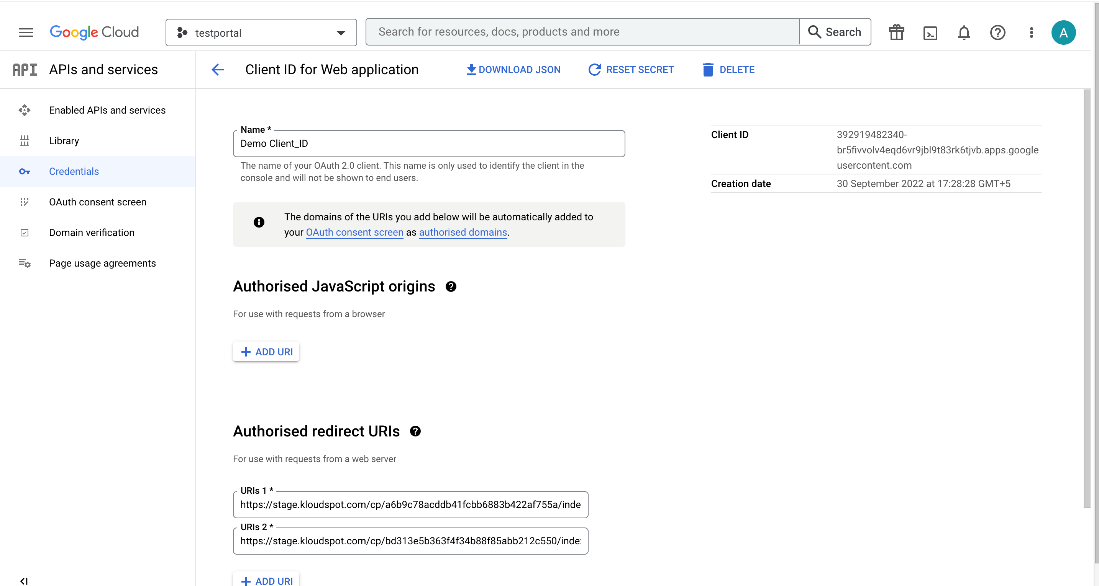
13. Then Create your Client ID. The screen below will be displayed once it
has been created.
14. This screen contains the Client Id and Secret. Copy it and paste it
somewhere else for later use.
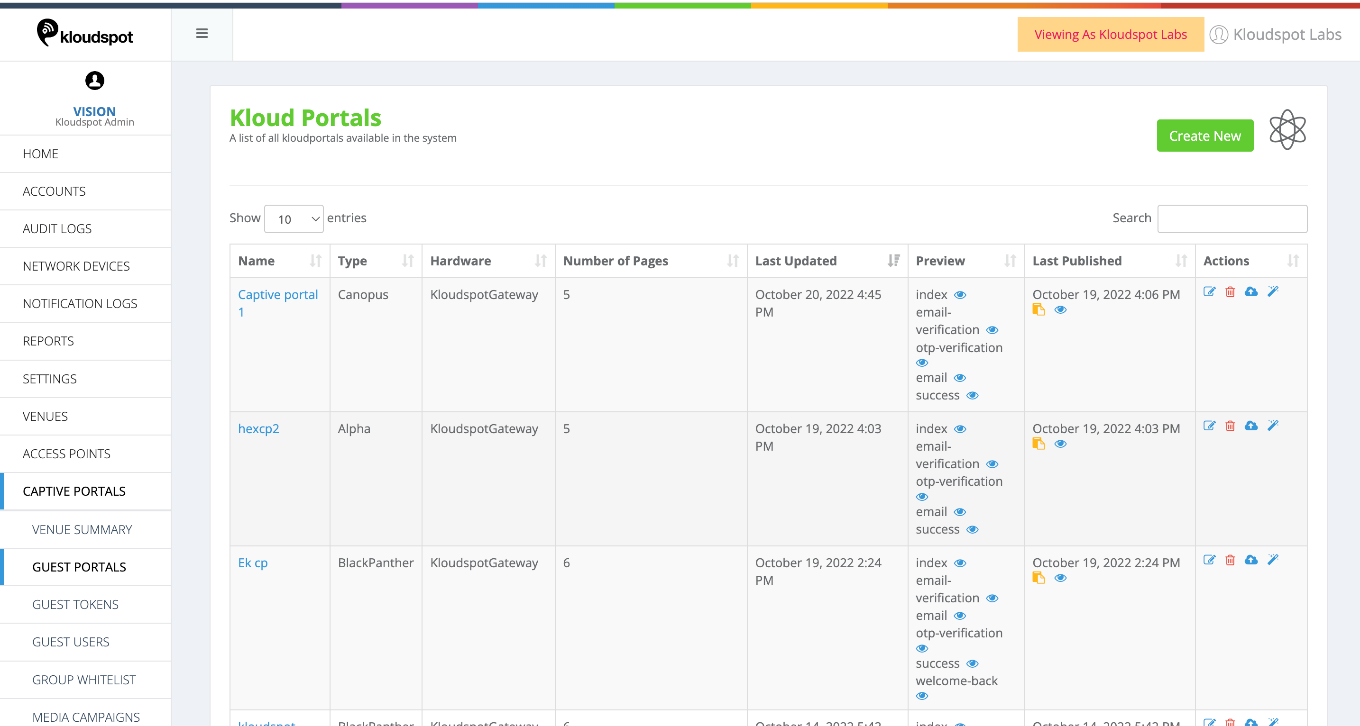
15. Next you have to copy the captive portal URL, for that login to the
captive portal and open the guest portal section.
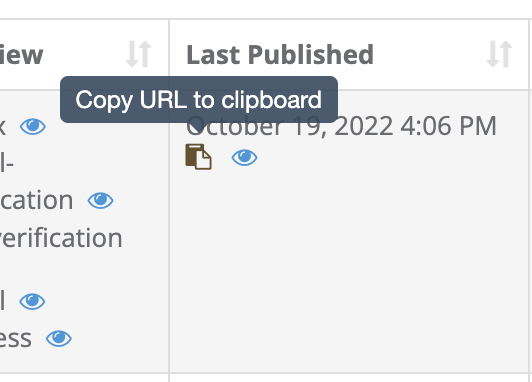
16. Copy the URL by clicking on the yellow icon from the Captive portal’s
Last Published column.
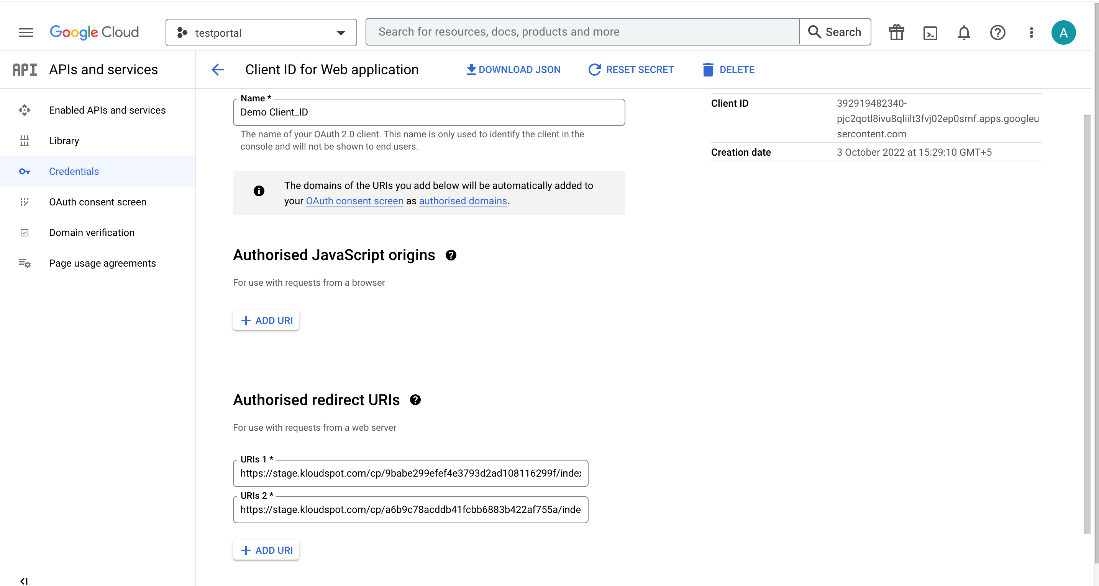
17. Then click on The +Add URI button and add the Captive Portal URI.
Then click the Save button.
18. Log in to Captive Portal and navigate to NMS settings- >Third party
Integrations ->Social Authentication Setup.
19. Here, pastes the Client Id and Secret that you copied earlier.
20. OAuth2.0 has been integrated successfully.
21. People within the organization or in the same domain can then use it.
LinkedIn Authentication
1. By adding LinkedIn Social Authentication, Captive Portal users can log in using their LinkedIn account credentials.
2. To integrate LinkedIn into the Captive Portal , a LinkedIn APP ID and LinkedIn APP Secret key are required.
3. To add it, Log in to the kloudManage account and navigate to the Settings page, then to ‘Third-party Integrations’ then scroll down and find the Social Authentication Setup.
4. To obtain the credentials, follow the instructions below.
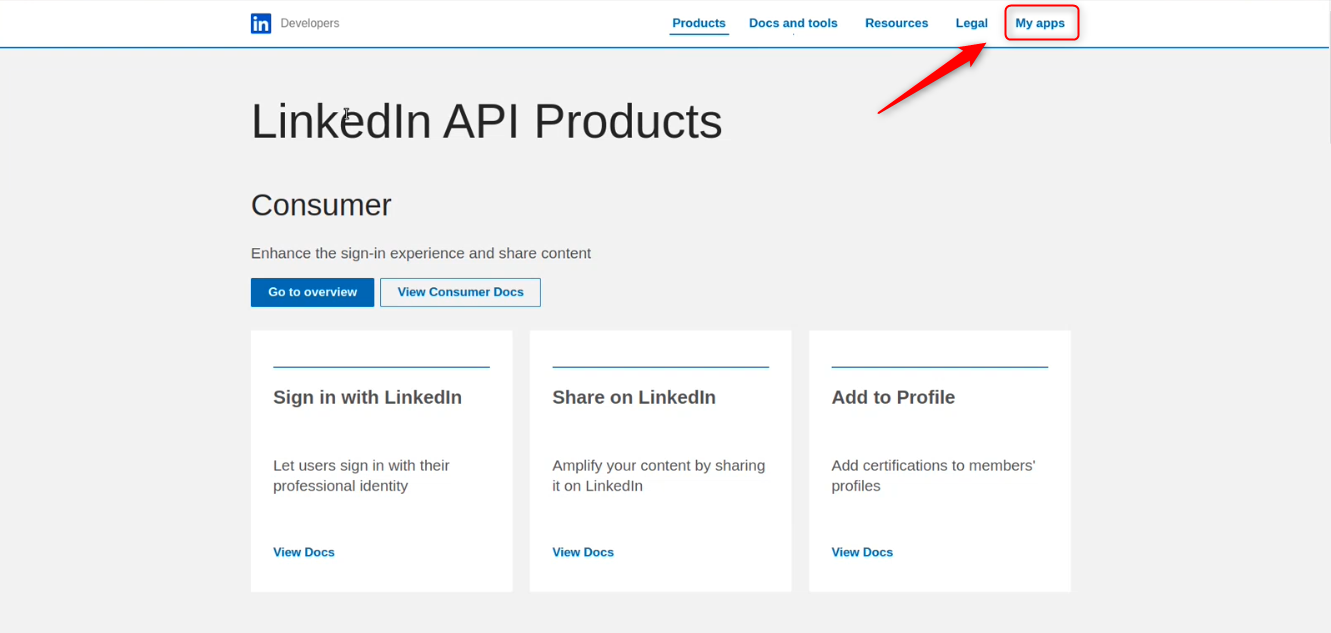
5. Log in to the LinkedIn developer account with company credentials. To
access the login page, click on the link provided below.
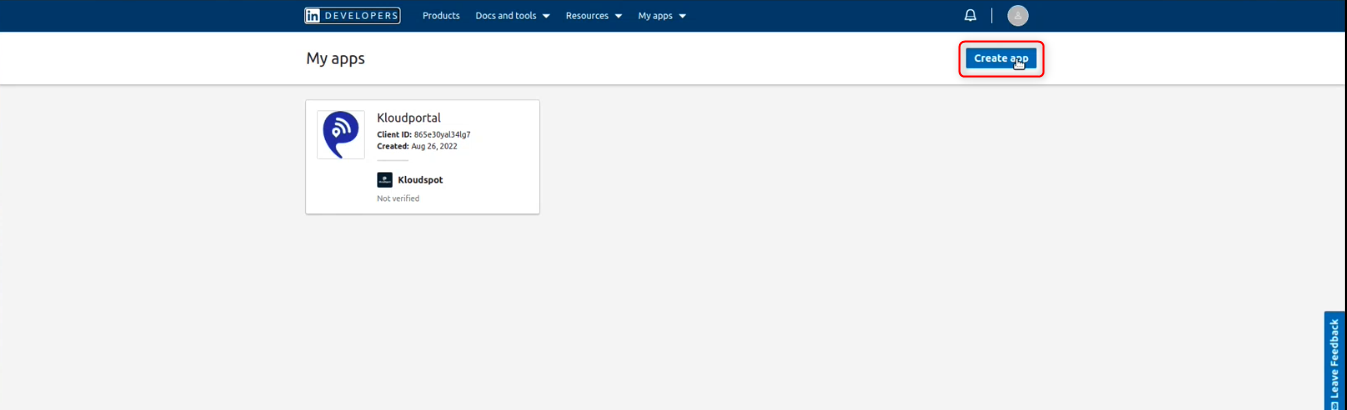
7. Click on the Create App button from the My App window.
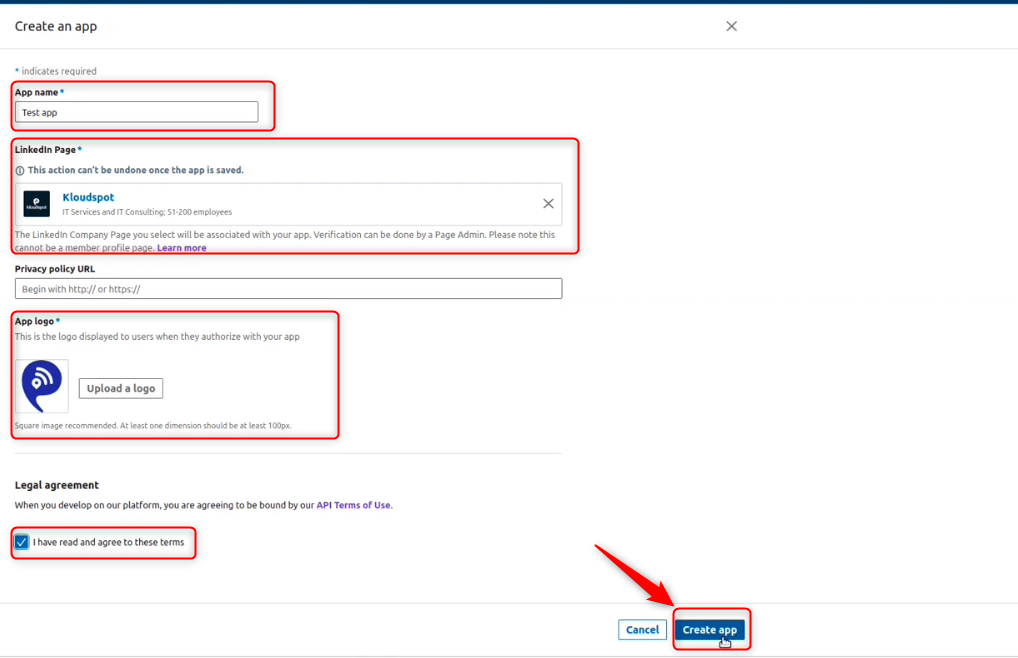
8. Then ‘Create an app’ window that will open. Fill in all the
required fields in this window.
App Name: The name you’d like to give the app.
LinkedIn Page: Search for your company’s LinkedIn account and add it.
App Logo: Upload a logo suitable for your App.
9. Check the acknowledgment checkbox and Click Create App button.
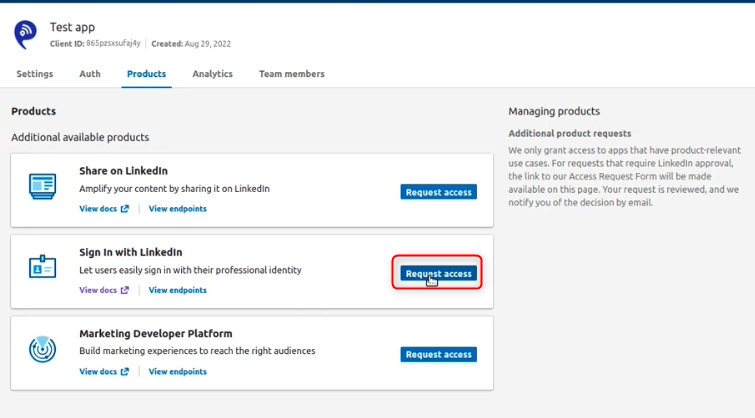
10. Then, on the Test App page that opens, click the Request Access
button next to the Sign in with LinkedIn.
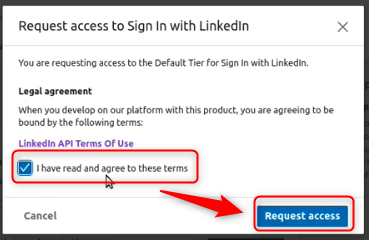
11. Check the acknowledgment checkbox that appears and click on the Request
Access button.
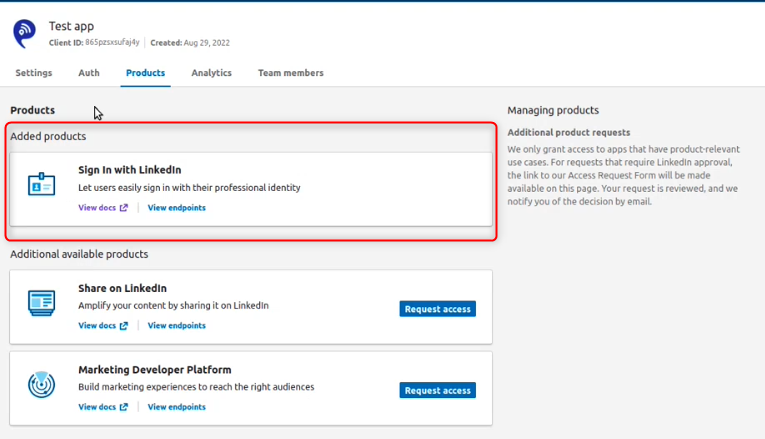
12. As soon as you get access, you will be able to see the product, ‘Sign
in with LinkedIn’ in the ‘Added product’ section.
13. To get application credentials Click on the Auth Tab.
14. Then, from the page that opens, you will obtain the Client ID, and
Client Secret. Copy it and paste it into the ‘Third-party
Integrations’ settings and click on the Save Social Settings button.
15. Copy the Captive portal Index page URL and paste it into the authorized
redirect URL text box.
Note: It is useful to specify which page the user should be directed to
after logging in with LinkedIn.
16. LinkedIn authentication is done successfully.
Microsoft Authentication
You can access your captive portal with your Microsoft account credentials. To
use this service, the KloudManage tool must be linked to a Microsoft Azure
account. This document explains how to do so.
To Get Microsoft Credentials
1. To integrate Microsoft Azure into Captive Portal, you need 3 credentials.
Microsoft Client ID
Tenant ID
Microsoft Client secret
2. To get the credentials, click on the link given below and log in to
Microsoft Azure.
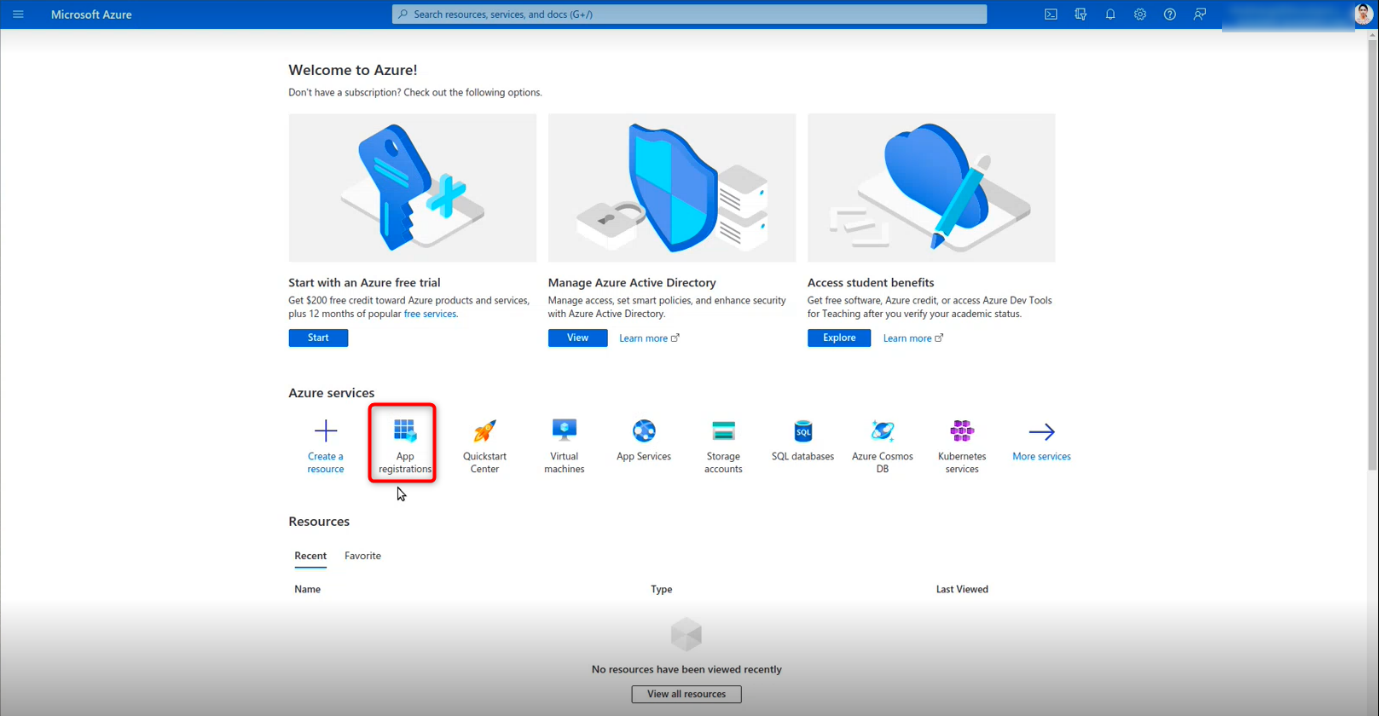
3. Click the App registration button on the Microsoft Azure Home page that
appears.
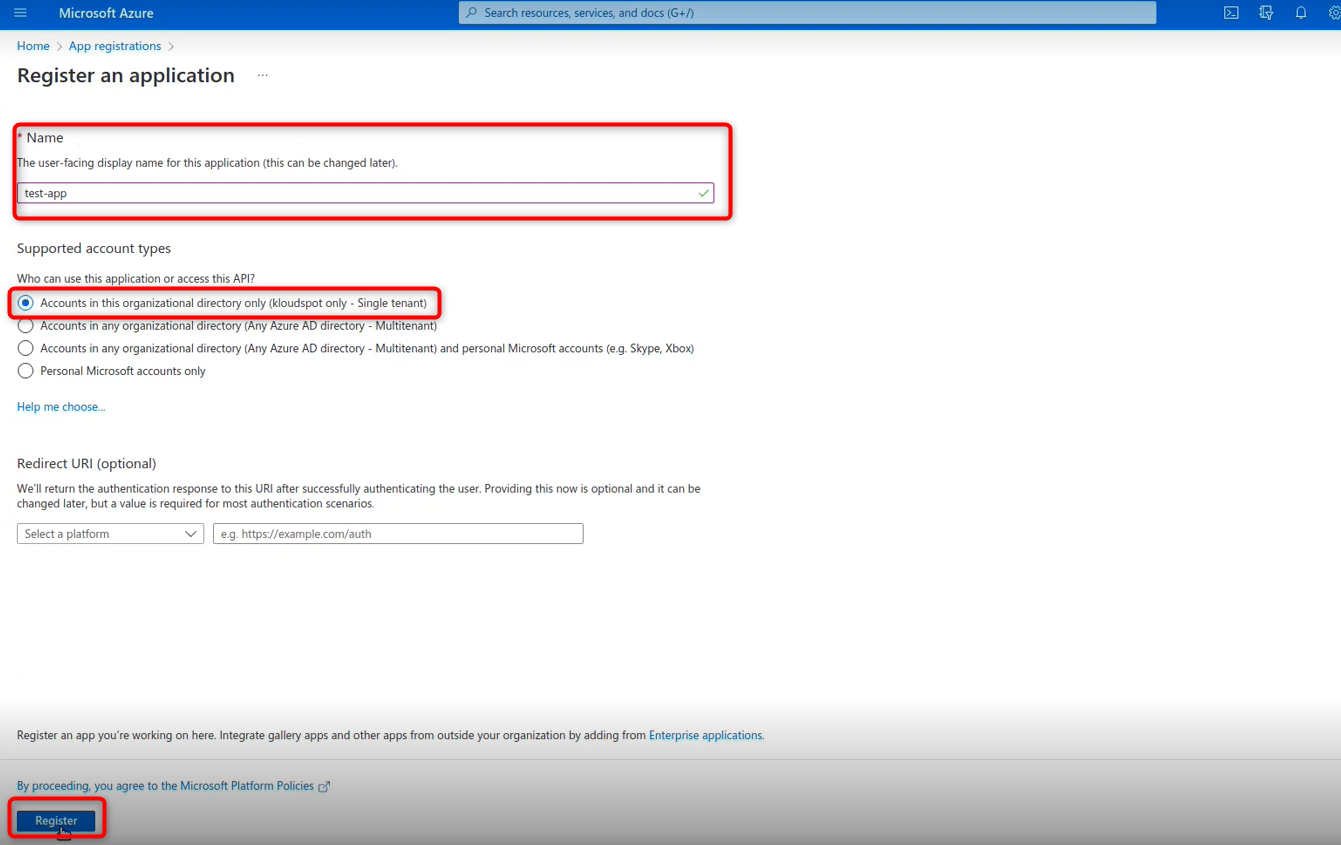
4. This will direct you to the App registration page. Here you click on the
New registration button.
5. Enter the App name , Select the Supported account type as a single
tenant. Then click the Register button.
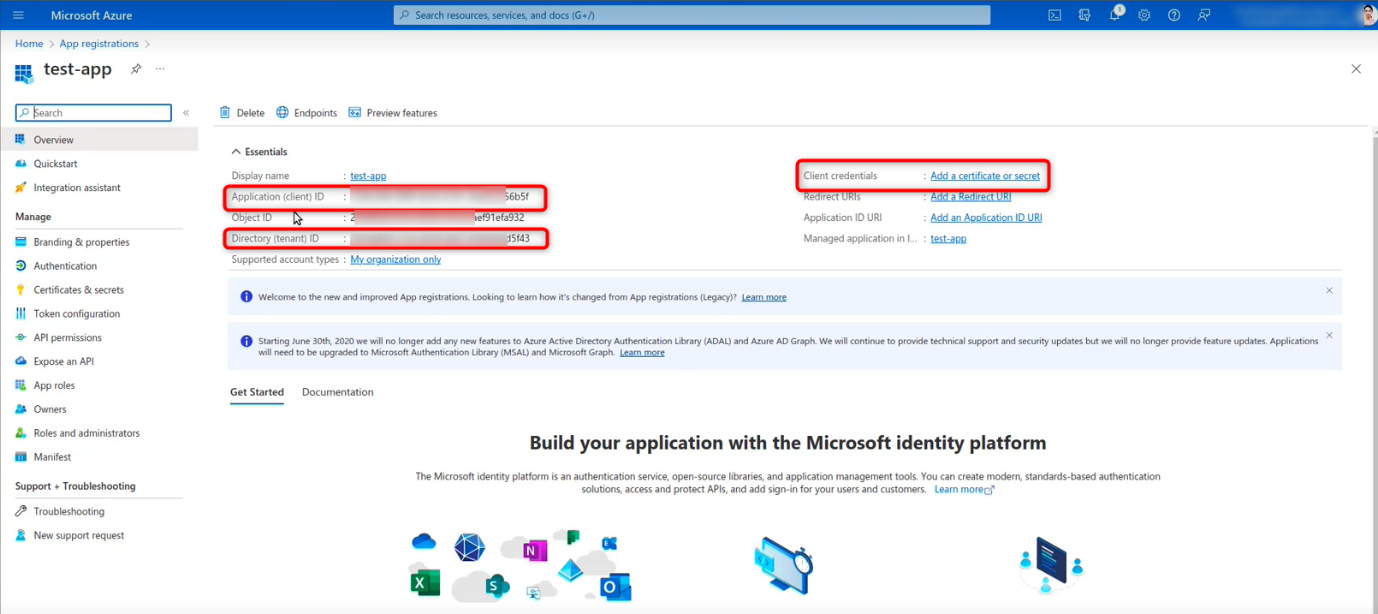
6. The new app has been successfully registered. Copy the Application ID
and tenet ID from the overview window and paste them somewhere else for
later use
7. Then click on the Add a certificate or secret button to create a
client secret.
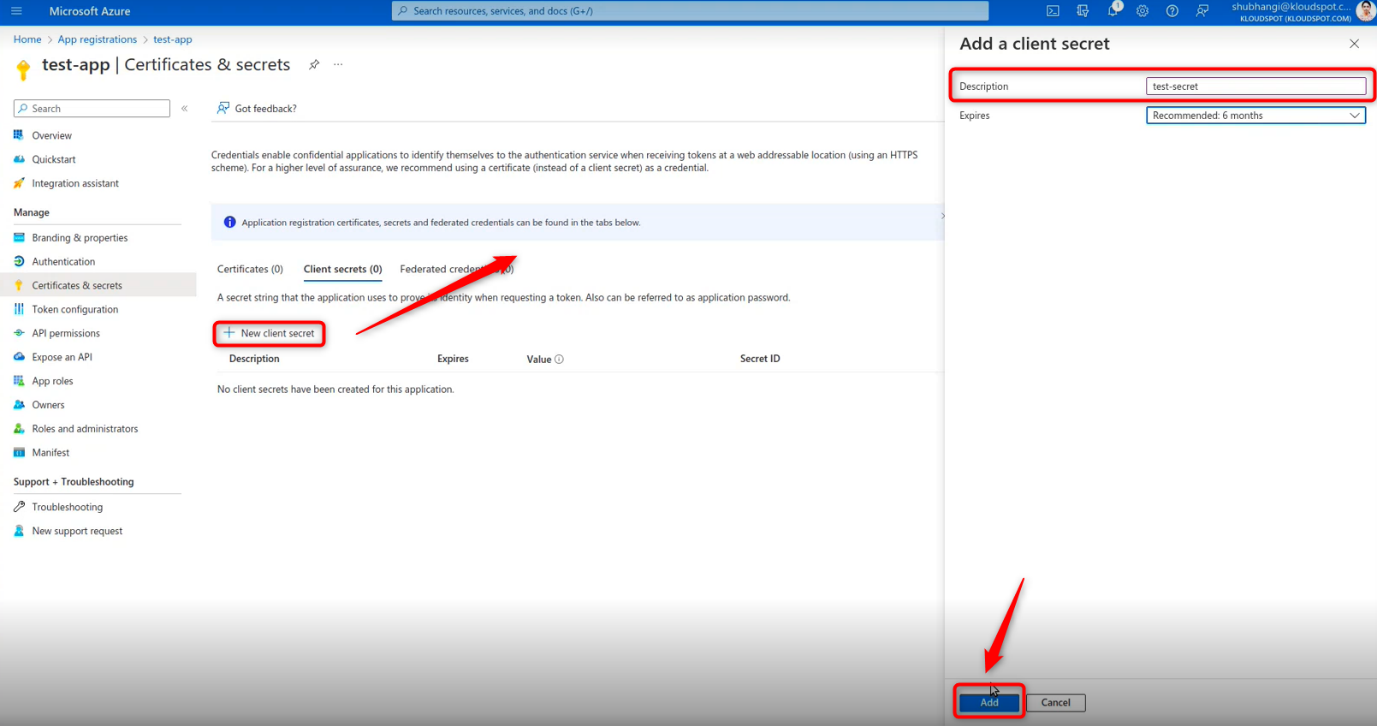
8. Click the New Client Secret button in the Certificates and Secrets
window that appears.
9. Enter the description in the popup that appears and click the Add
button.
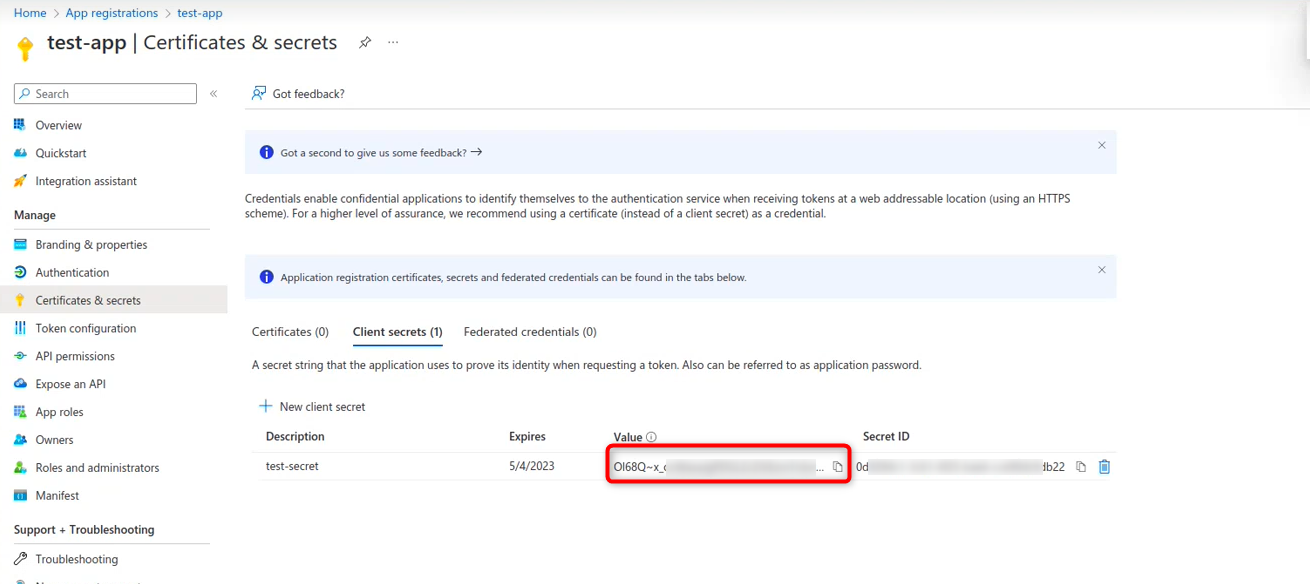
10. New Client secret created successfully. Copy it and paste it
somewhere else for later use.
Add credentials to the KloudManage tool
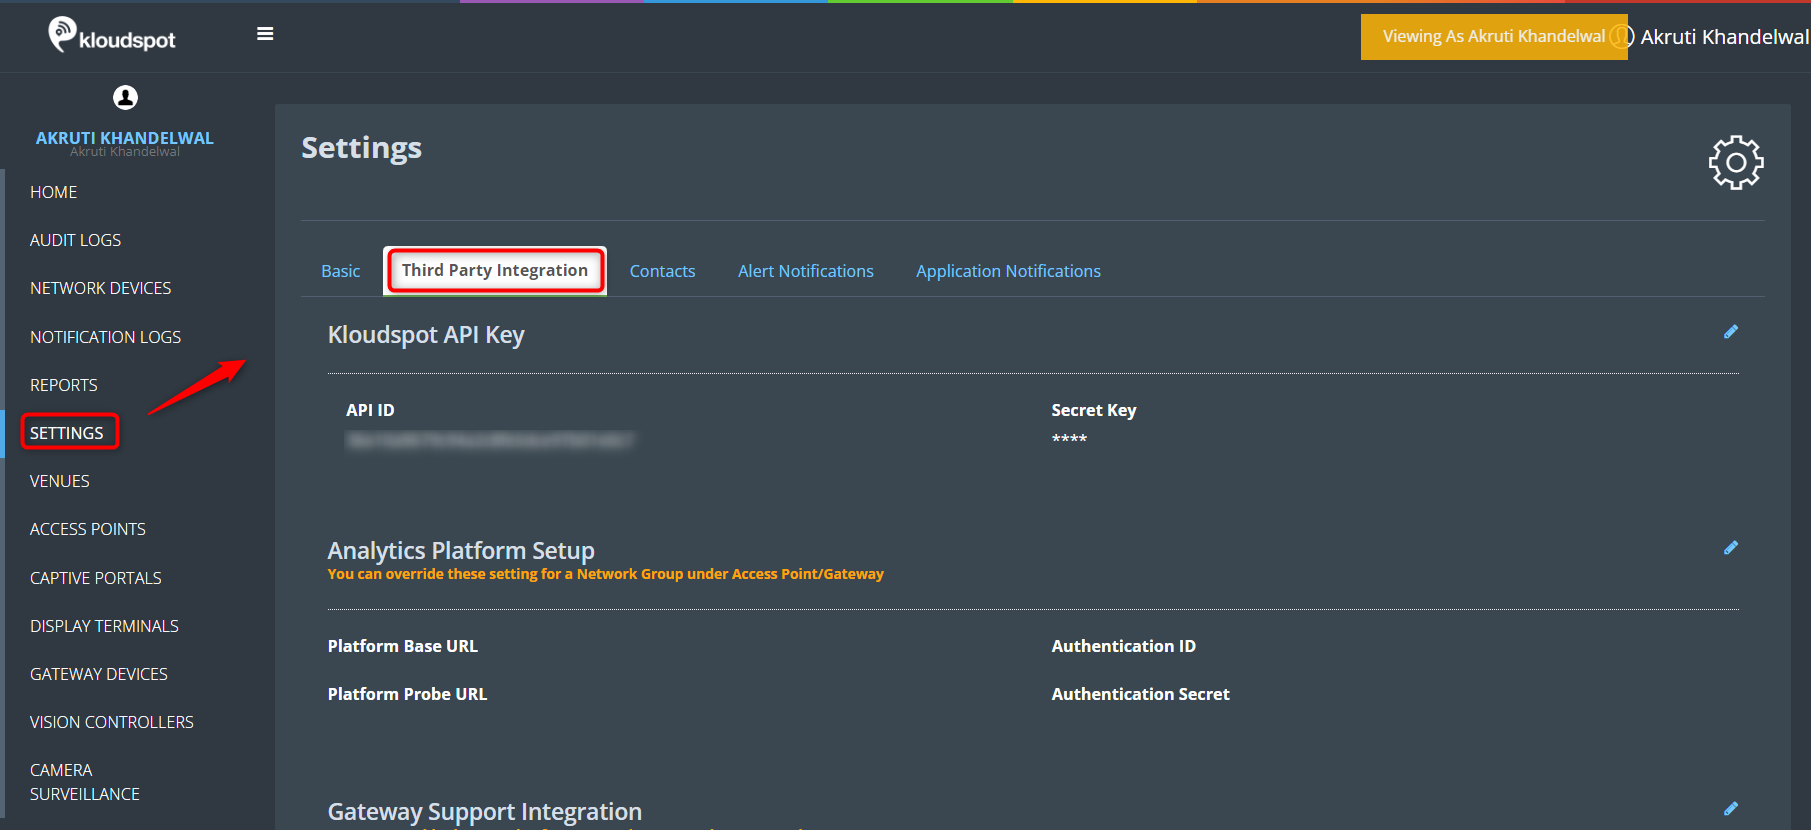
1. Log in to the KloudSpot network management tool. Then navigate to Settings > Third-party Integration.
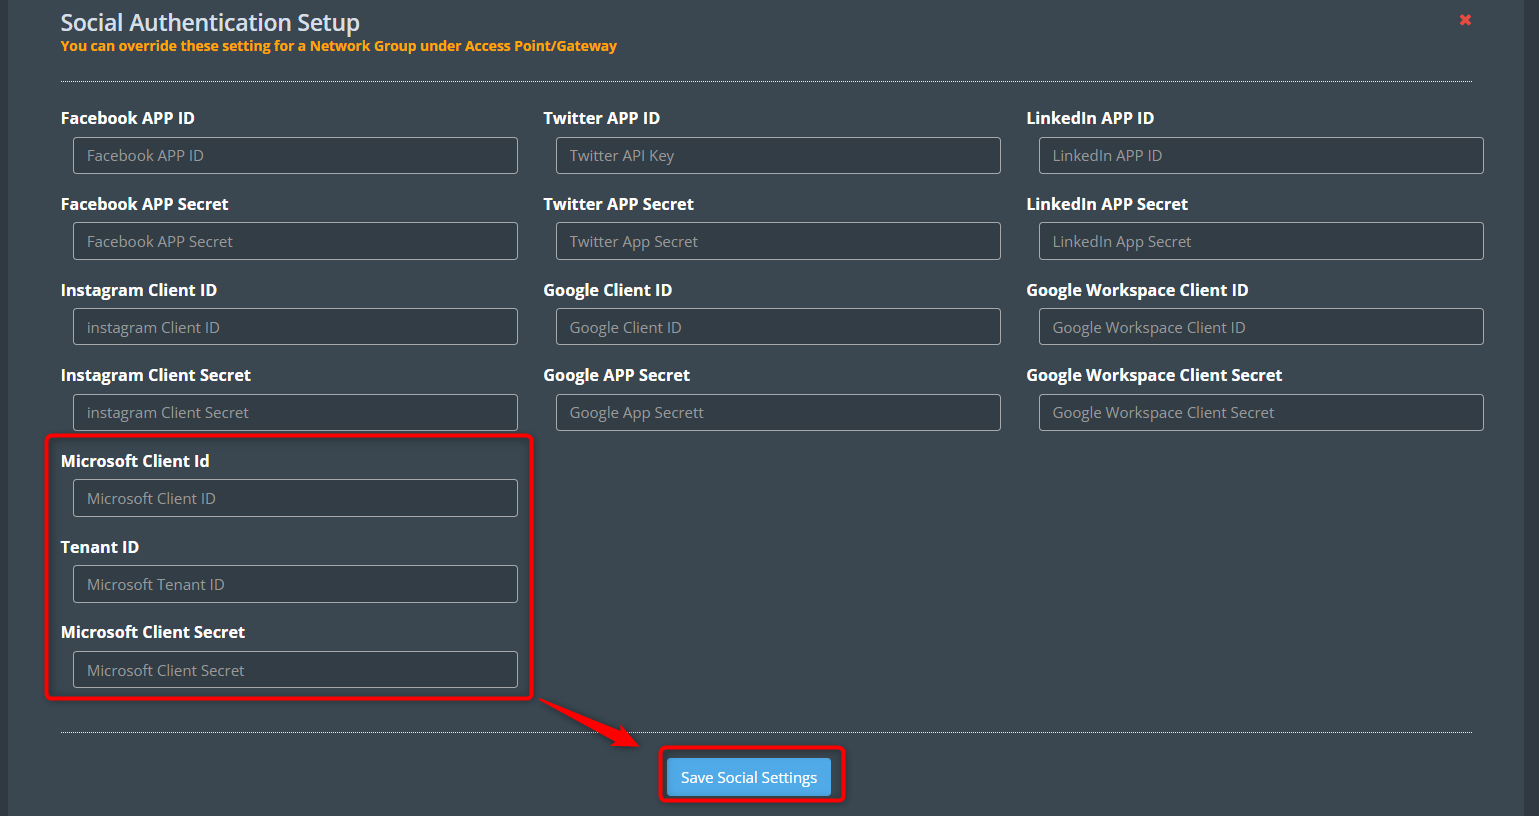
2. Then scroll down to the Social Authentication Setup section. Paste the
Microsoft Client ID, Tenant ID, and Microsoft Client Secret in the
respective text boxes. Then click on the Save Social Settings button.
3. Microsoft Azure credentials have been successfully added.
Authenticate the App.
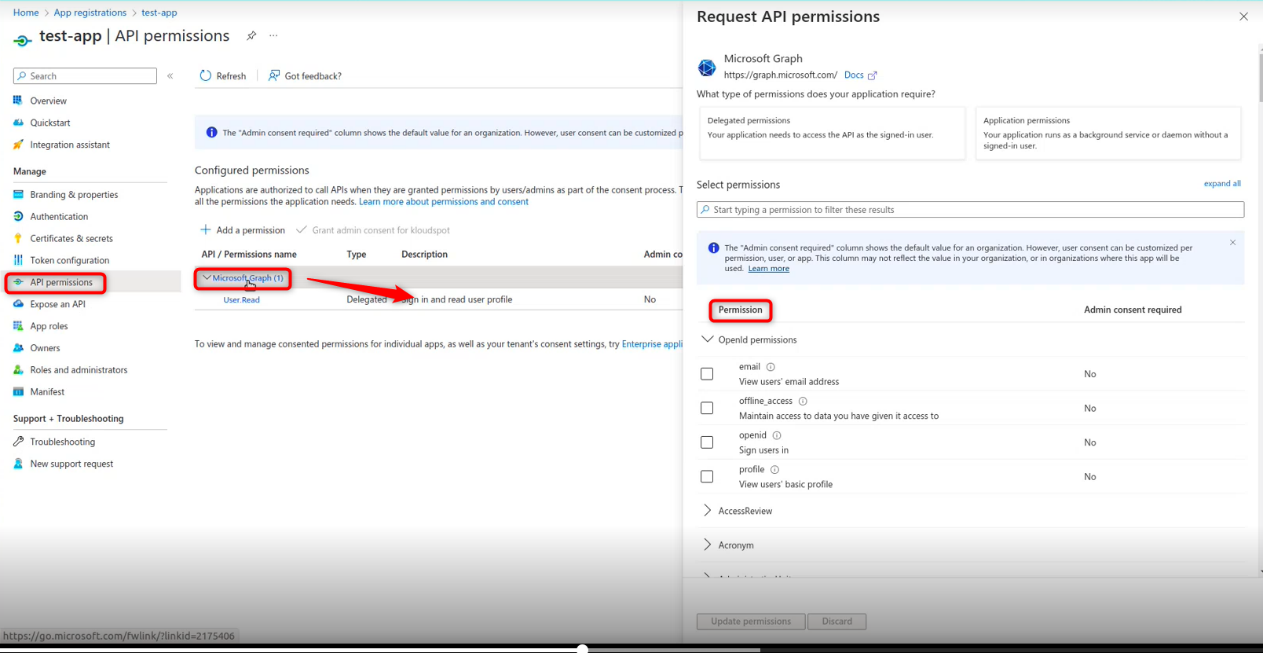
1. After generating the app, you need to grant the necessary permissions to it. For that, navigate to API permissions > Microsoft graph.
2. Then in the request API permissions window that opens, select the required permissions, and click the Update permissions button. Required permissions are listed below.
Email
Offline Access
Open Id
Profile
User Read
User ReadBasic All
Add redirect URI
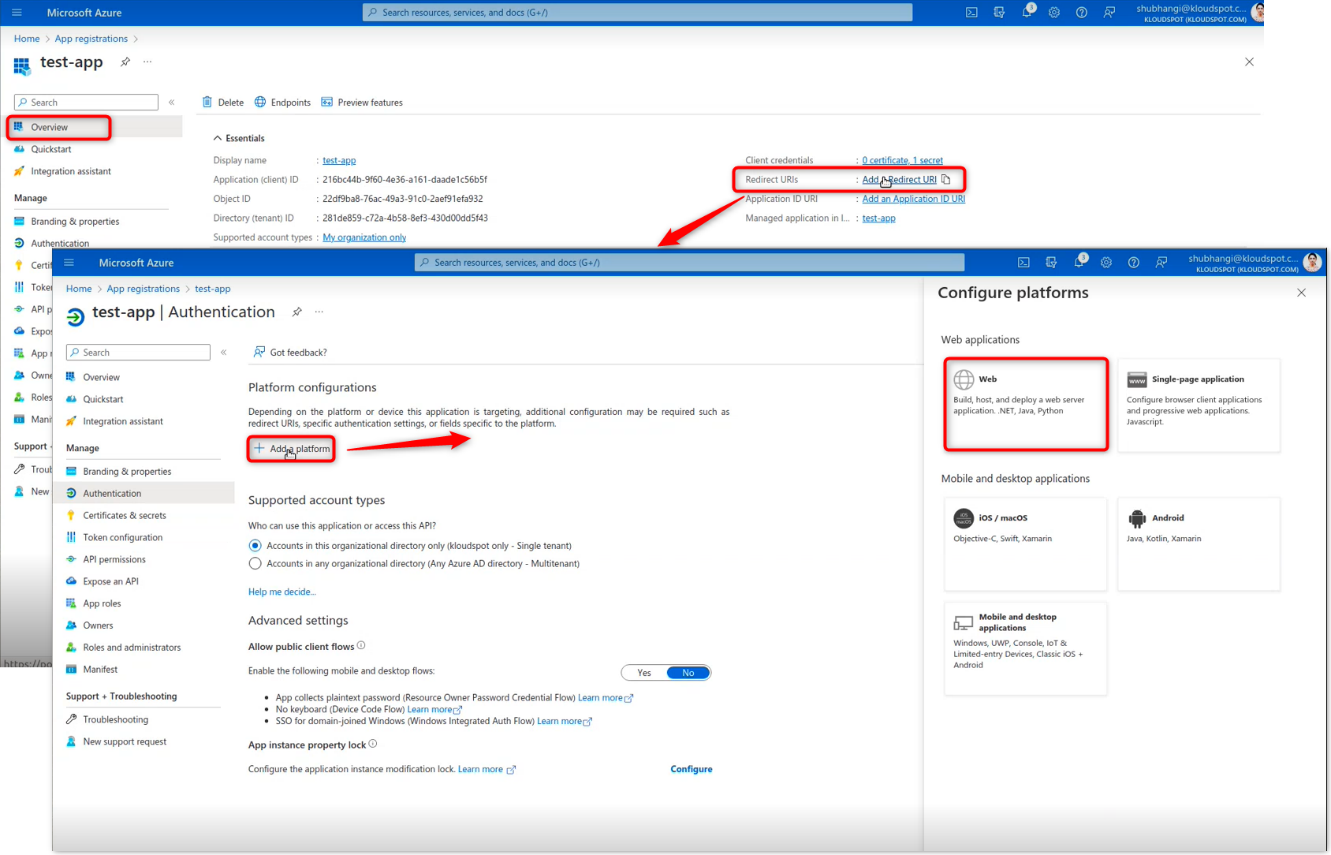
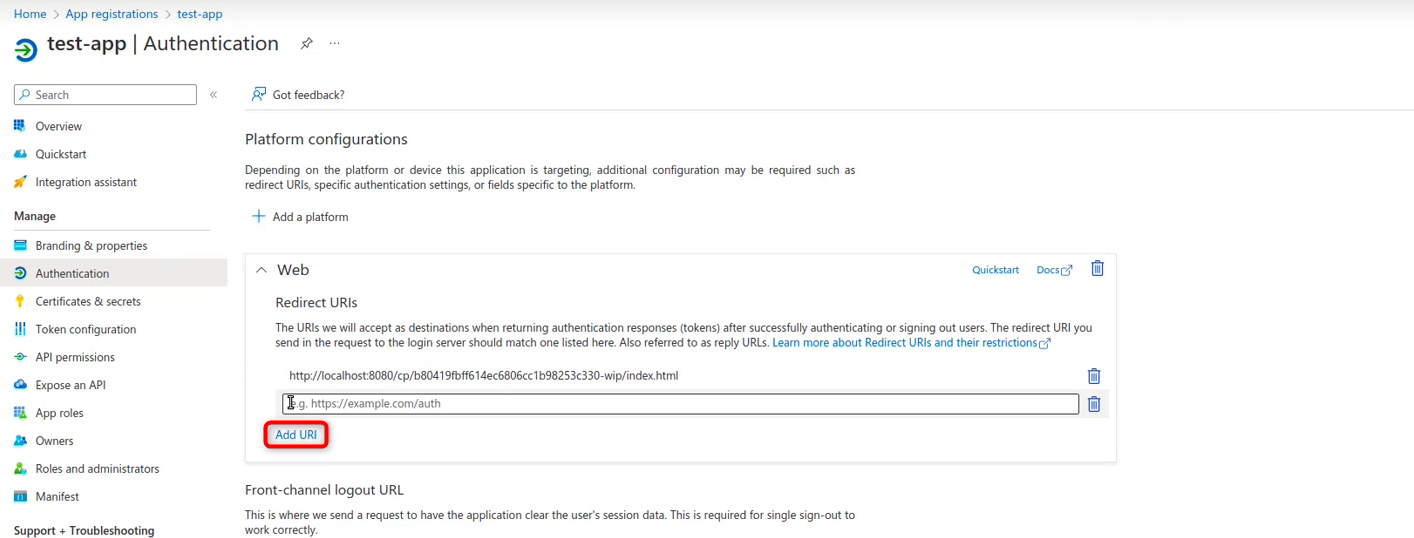
1. The final step of Microsoft Azure integration is to add the redirect URI. To do so, Navigate to Overview > Add a Redirect URI > Add platform > Web.
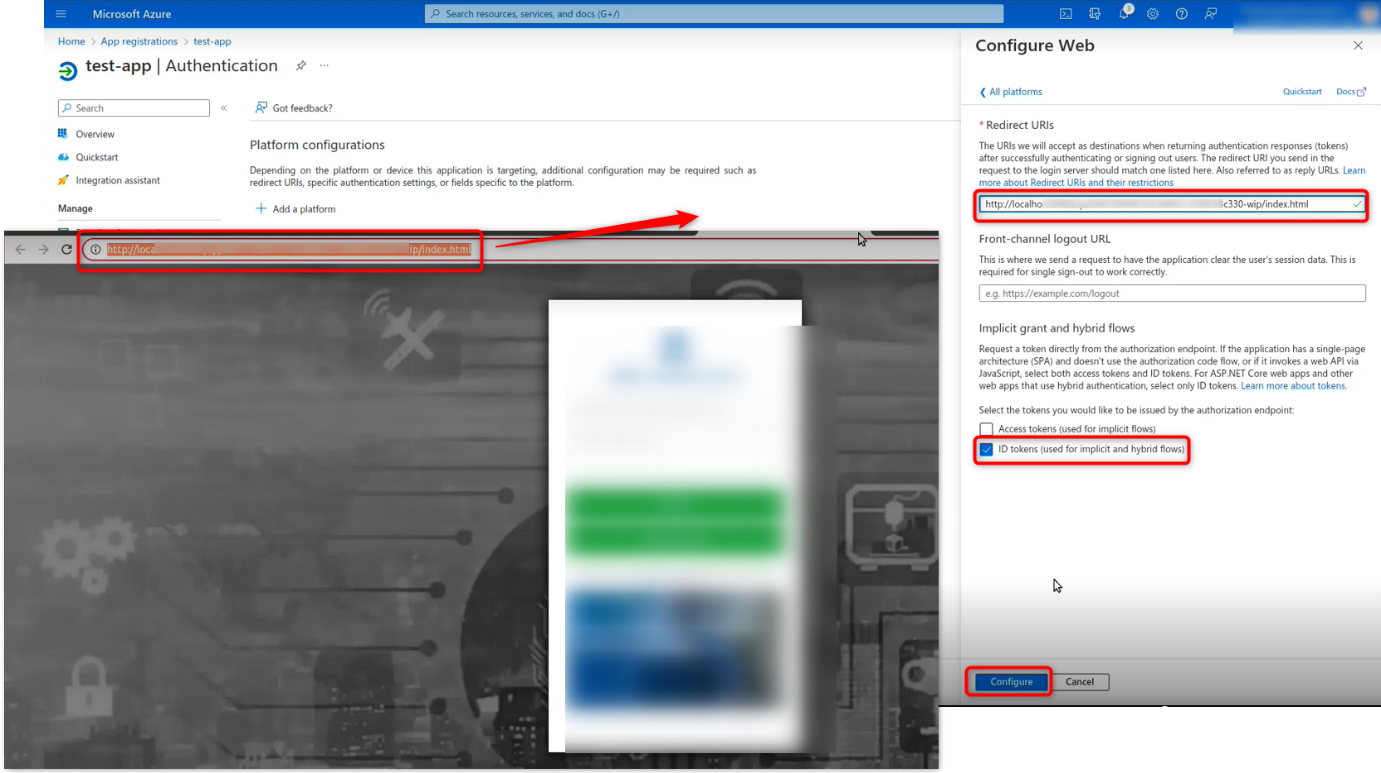
2. On the configuration web page that appears, enter the captive portal’s URI
and check the ID tokens checkbox, then click on the configure button
to configure.
3. If you want to add more captive portal URIs, you can add them by clicking
the Add URI button.
Twitter Authentication
1. By adding Twitter Social Authentication, Captive Portal users can log in using their Twitter account credentials.
2. To integrate Twitter into the Captive Portal , a TwitterAPP ID and TwitterAPP Secret key are required.
3. To add it, Log in to the kloud Manage account and navigate to the Settings page, then to ‘Third-party Integrations’ then scroll down and find the Social Authentication Setup.
4. To obtain the credentials, follow the instructions below.
5. Log in to the Twitter developer account with company credentials.
6. To access the login page, click on the link provided below.
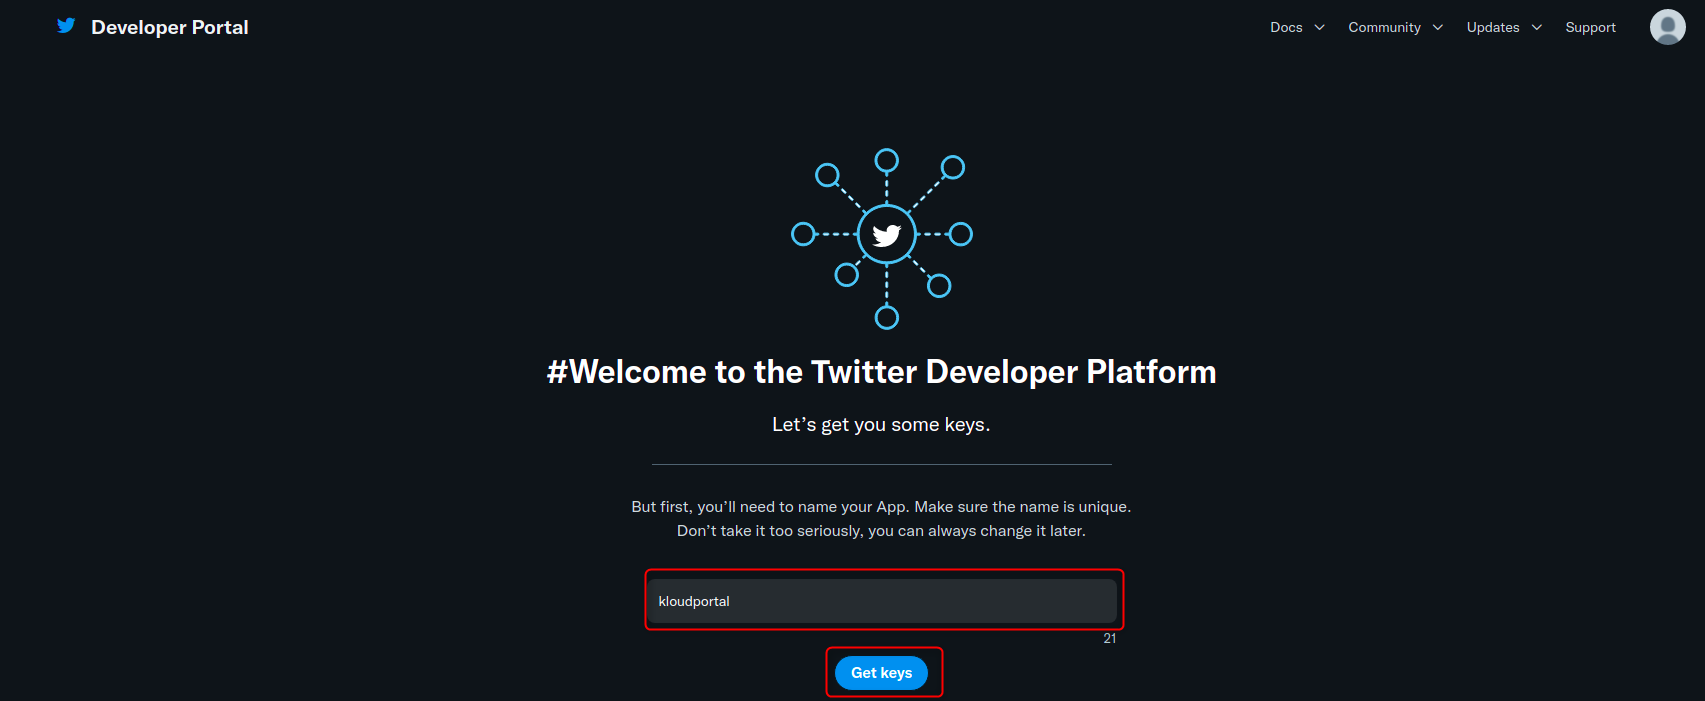
7. After signing up and logging in, a window will appear as shown below.
Enter your App name in it and click on the Get Keys button.
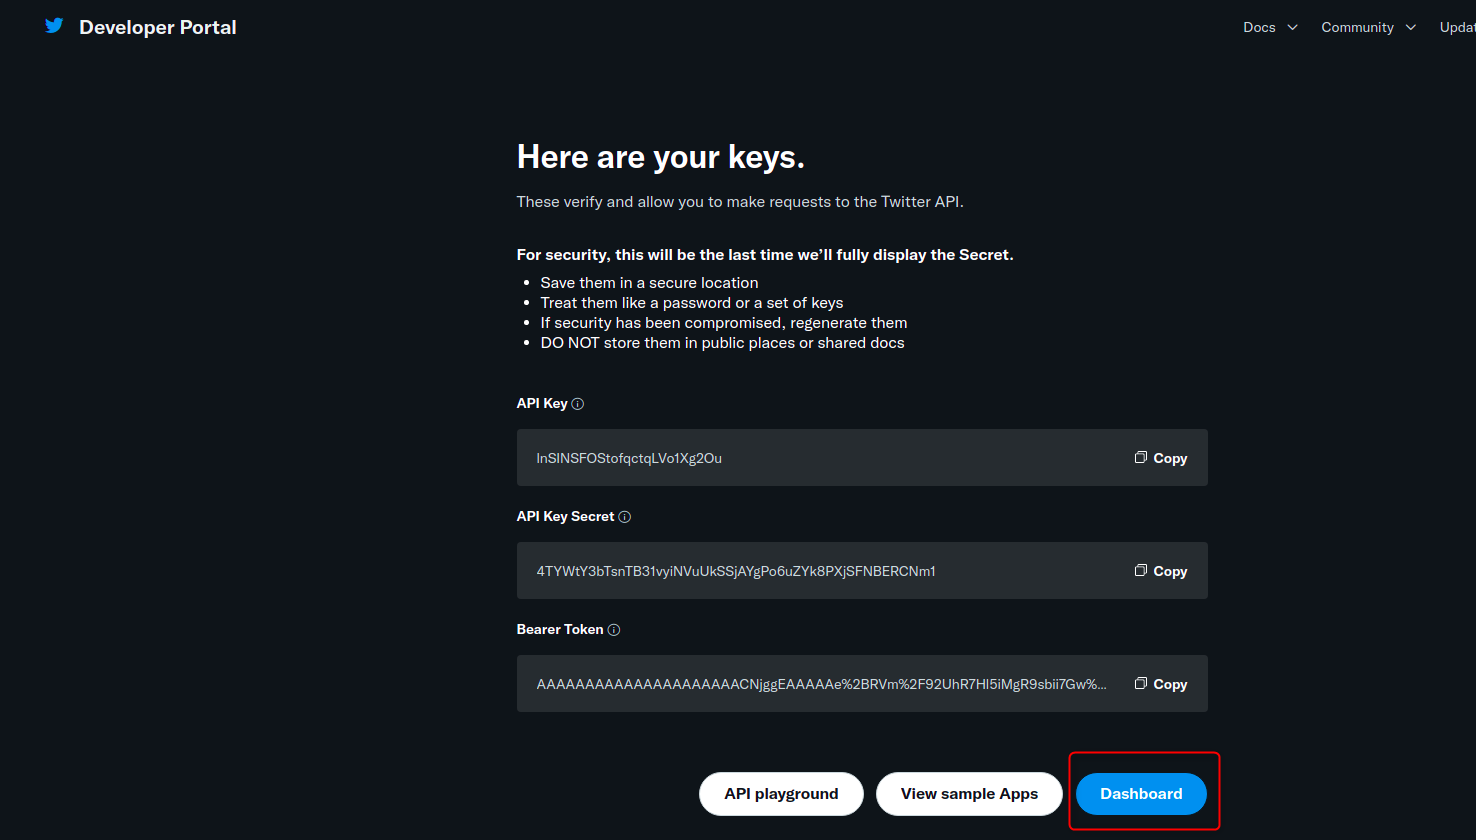
8. Then in the window that opens, click on the Dashboard button, and
enter the dashboard of the created app.
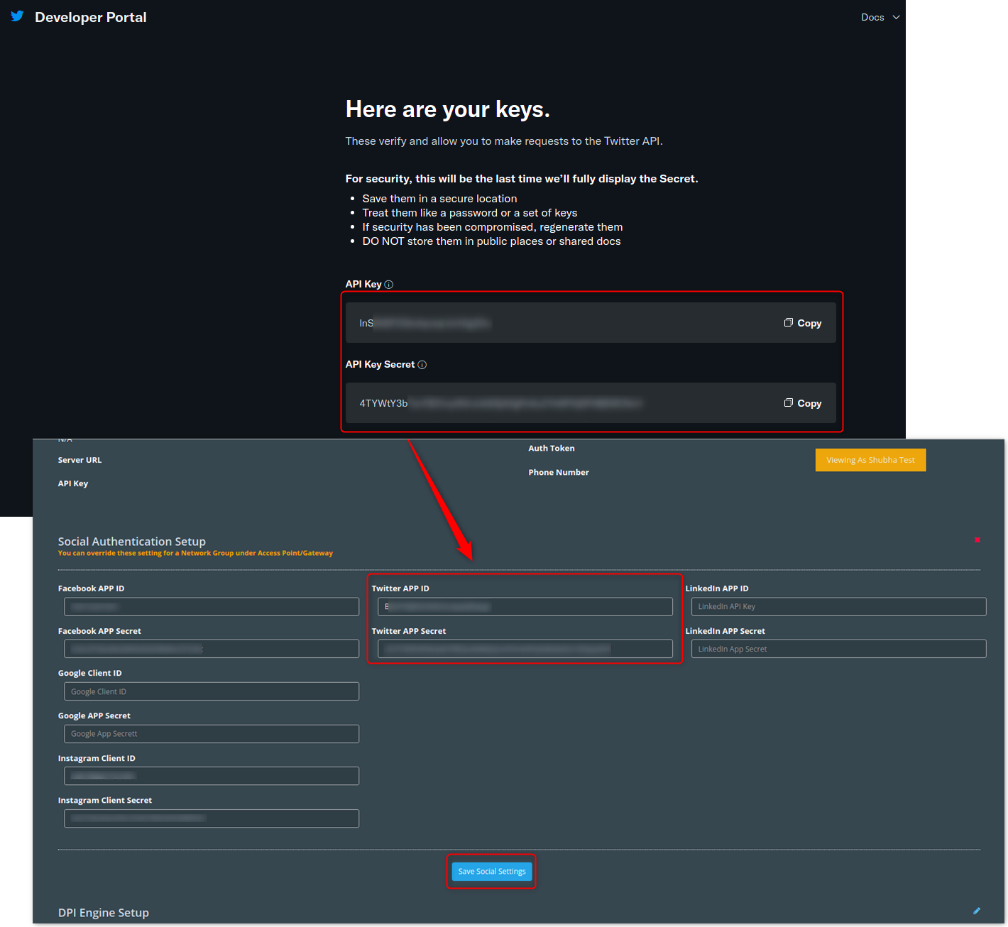
9. Copy the API key and API key secret found on this screen and paste it
somewhere else for later use.
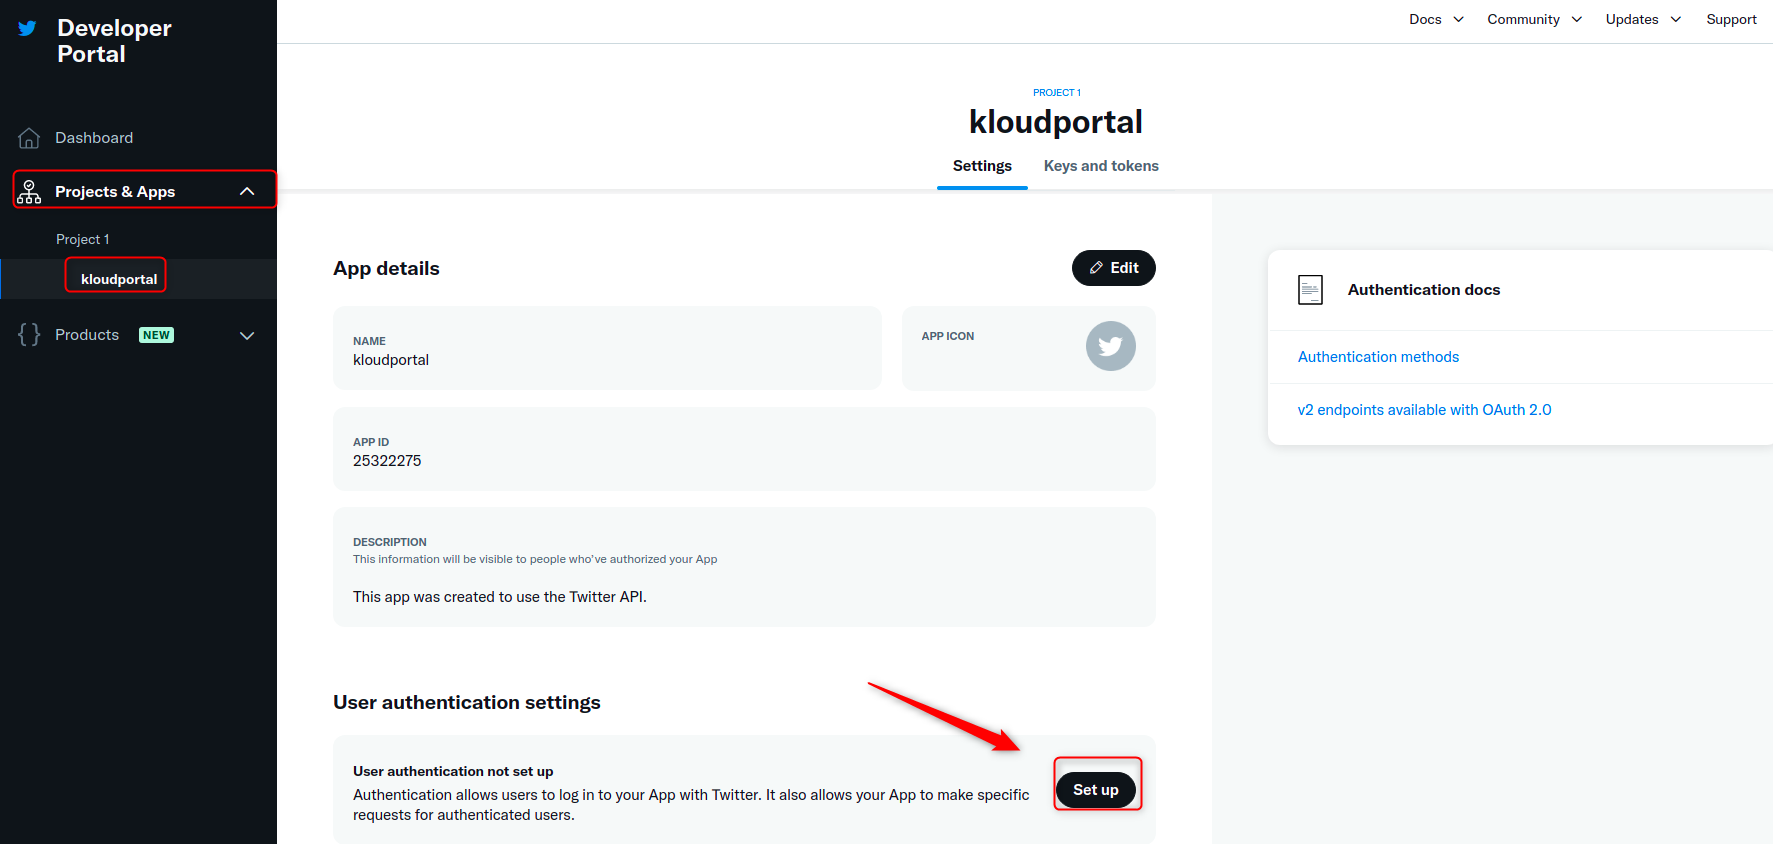
10. Select the app we created from the Projects & Apps menu in the
dashboard.
11. Then click on the Set up button to configure User authenticationsettings.
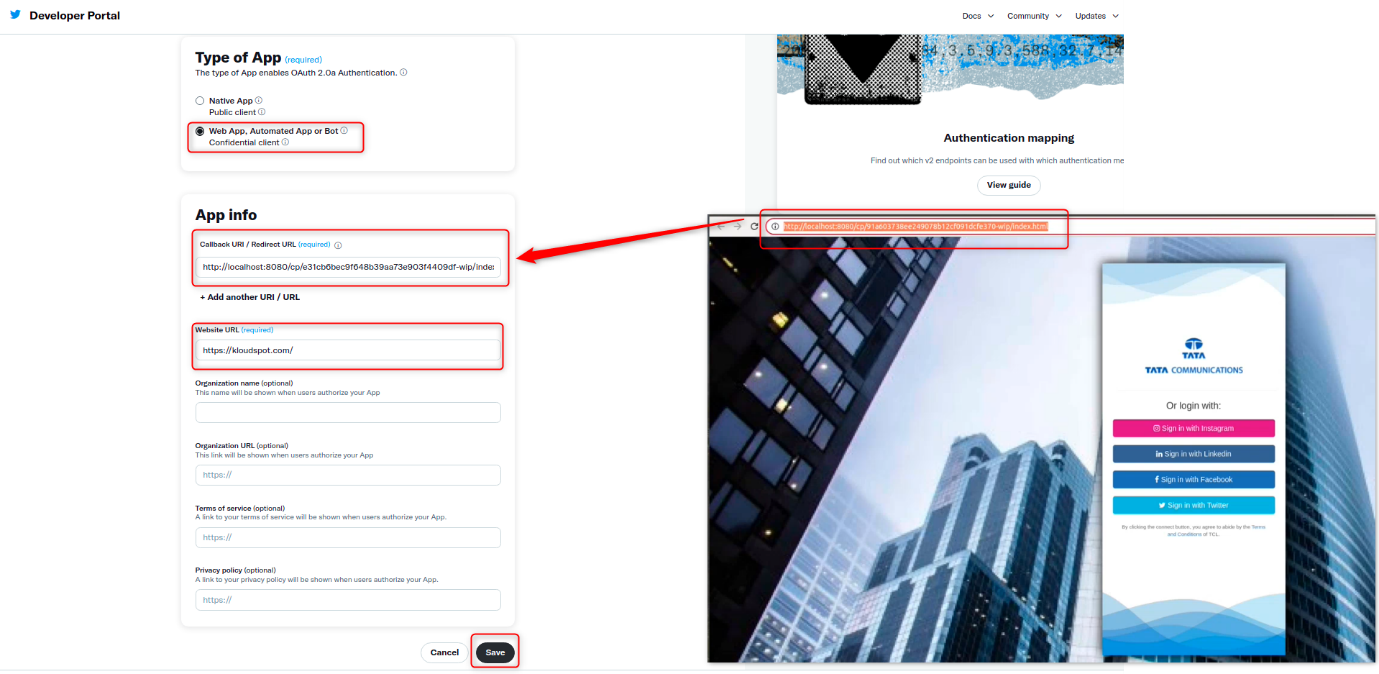
12. Then select Web app in the ‘Type of App’. Enter the Redirect
URL and Website URL in the ‘App Info’ section and click the Save
button.
Redirect URL: It is useful to specify which page the user should be
directed to after logging in with Twitter.
Website URL: Enter your company website URL.
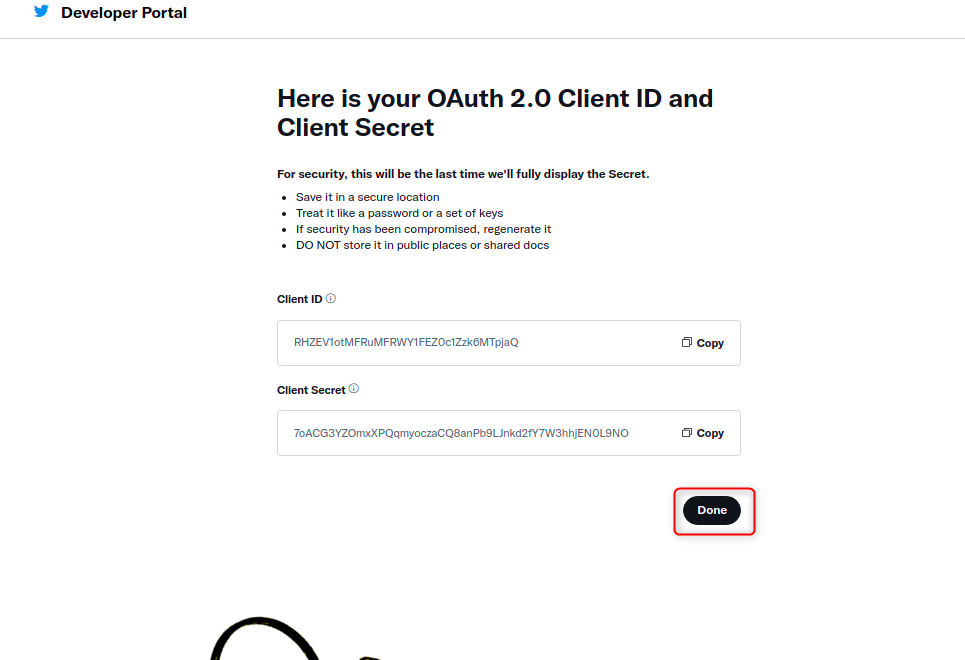
13. Then a window containing Client ID and Client secret will open.
Then click the Done button.
14. Then go to ‘Third-party Integrations’ settings, paste the previously
copied API key and API key secret, and click the Save Social Settings
button.
15. Twitter authentication has been integrated successfully.
WhatsApp Integration
Integrating WhatsApp with KloudManage using Twilio Provider
Introduction
Integrating WhatsApp with KloudManage provides the capability to receive WhatsApp notifications within the KloudManage and enables authentication for the Captive Portal. This document outlines the steps to integrate WhatsApp using the Twilio provider.
Prerequisites
Access to a Twilio developer account.
Access to KloudManage with administrative privileges.
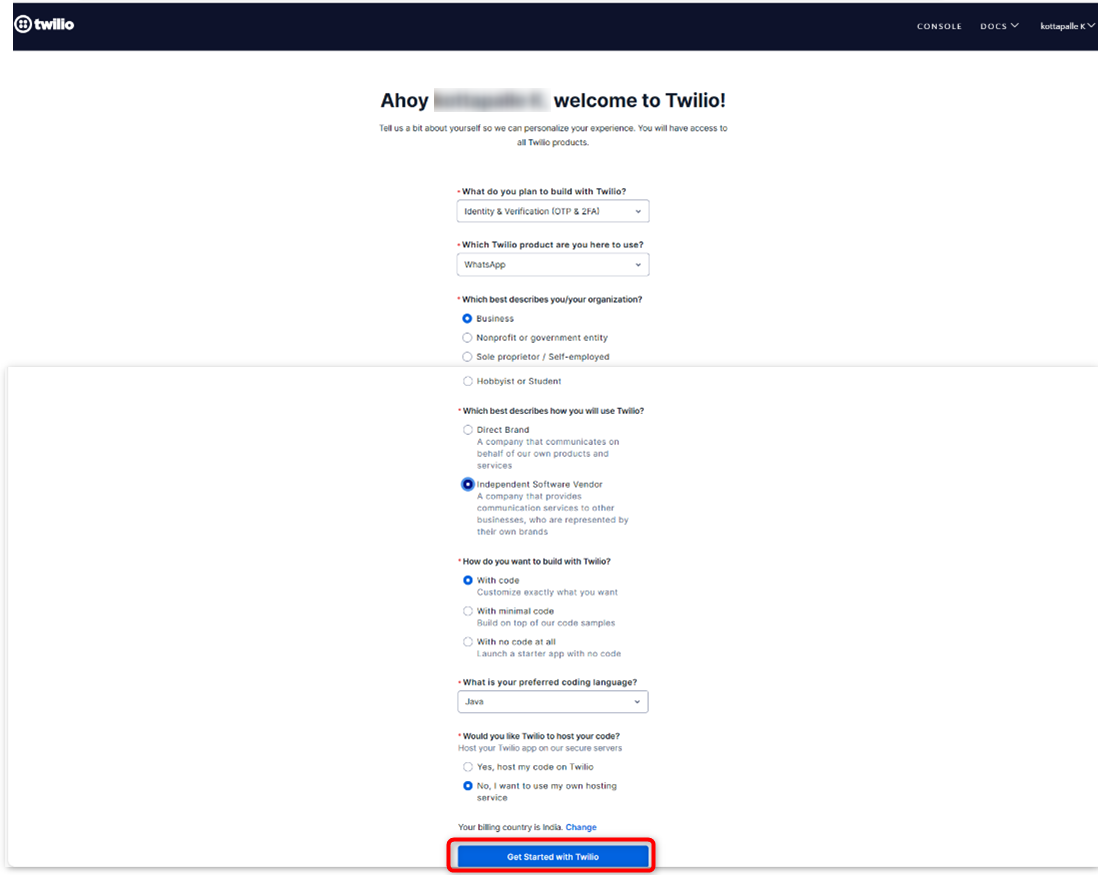
If you don’t have a Twilio developer account, you can create a new one by providing your Email ID and Phone Number.
Upon first login, configure your settings as seen in the welcome page screenshot below.
Click on the Get Started With Twilio button.
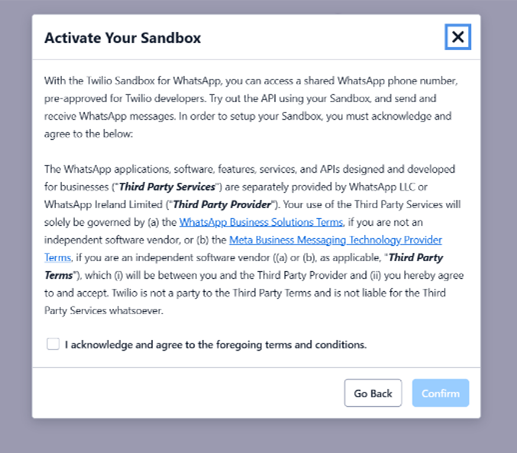
When prompted with the terms and conditions popup, acknowledge by checking the checkbox and click Confirm.
First, set up the WhatsApp sandbox and message template within Twilio. Following this, you will receive the Account SID, Auth Token, and Twilio phone number. Refer to the Twilio documentation for instructions on how to complete this process.
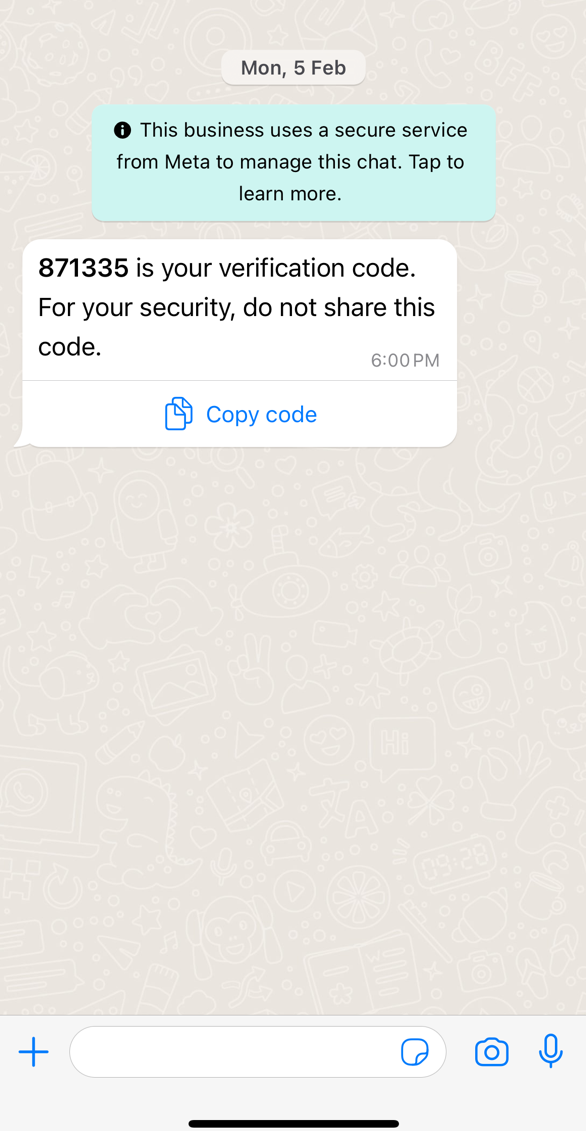
When creating the message template, make sure it is similar with the hardcoded template in KloudMange. Use the template provided below.
{{code}} is your verification code. For your security, do not share this code.
Integrate Twilio Credentials into KloudManage
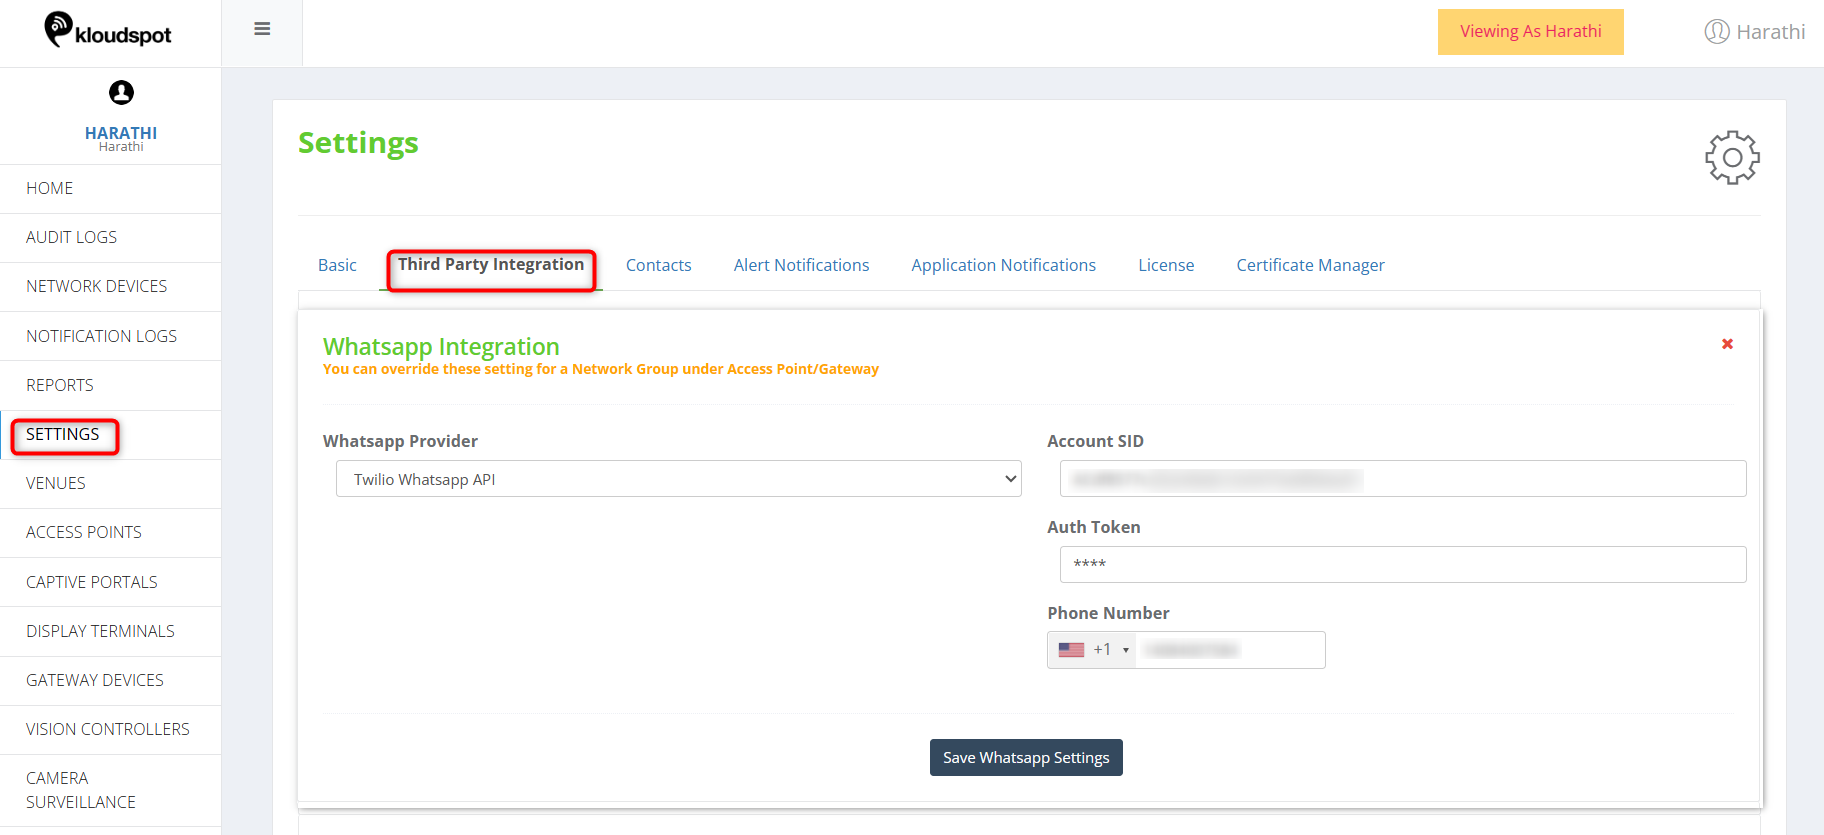
Access KloudManage and navigate to Settings > Third-party Integration.
Under the Whatsapp Integration section, select Twilio as the provider.
Enter the Account SID, Auth Token, and Phone Number received from Twilio.
Click on the Save Whatsapp settings button to save the integration settings.
Following the outlined steps, you have successfully integrated WhatsApp with KloudManage using the Twilio provider.
This integration enables the seamless flow of WhatsApp notifications and facilitates Captive Portal authentication within the KloudManage.