Access to the internet is a necessity in this day and age. KloudPortal has become the leader in network management, giving you a binding solution that provides secure and uninterrupted access to the internet via public WiFi networks. With an immense array of features, KloudPortal gives you a premium user experience while adhering to strict security standards.
KloudPortal works as the bridge between businesses and their customers, redefining how their network access is managed. With KloudPortal, you can also customize your captive portal with templates, allowing you to design your introductory pages according to your preference, and also offers a variety of authentication methods. It also provides multilingual support so you can view the Portal in your preferred language.
Whether you run a café, manage a hotel, organize events, or provide public Wi-Fi, KloudPortal simplifies the user journey on the internet, while strictly following the terms of use and strong security protocols. This translates into a smooth user experience for individuals seeking on-the-go internet access. Security and privacy take center stage, with KloudPortal protecting user data without compromising efficiency.
If you are new to KloudPortal, please refer to the Installation Guide to ensure a hassle-free purchase. To explore KloudPortal and unlock its full potential, check out our User Guide for an in-detail description of every feature KloudPortal has to offer. Still confused? Our extensive FAQ page gives you the answers you need.
Unlock the power of KloudPortal with our User Guide, covering 3rd party access point integration, KloudManage connection, template creation, and advanced features like Campaign and Guest Management.
Get quick answers to common KloudPortal questions with our informative FAQ resource.
Subsections of Kloud Portal
Installation
To embark on the journey of configuring KloudPortal to align precisely with your requirements, you’ll need Kloudspot’s web-based software, KloudManage. KloudManage serves as the central hub for tailoring your KloudPortal experience to perfection. Additionally, it’s imperative to configure the splash page of your access point to ensure seamless integration.
When it comes to acquiring Kloudspot’s products, we offer a variety of purchase options to suit you. For a detailed overview of the available purchase methods and to determine which one best fits your requirements, please refer to the comprehensive “KloudSpot Product Purchase Options and Provisioning Process” guide.
For a step-by-step guide on configuring KloudPortal with a 3rd-party access point, please consult the document titled “Configure Kloud Portal With 3rd Party Access Point” This document will provide you with valuable insights into the integration process, ensuring a smooth and successful setup.
Upon the successful completion of your purchase, you will receive the following essential details:
The URL for accessing the KloudManage software.
Your designated username.
Your confidential password.
The URL for your splash page.
These credentials will grant you access to the full suite of KloudPortal management tools and ensure a smooth configuration process.
Refer the User Manual for comprehensive guidance on configuring KloudPortal’s user management, portal customization, and guest management features.
User Guide
This user manual serves as your comprehensive guide to navigating and utilizing the features of KloudPortal. Whether you’re a network administrator, an IT professional, a business owner, or a user seeking internet access, this manual will walk you through the process of getting started, understanding authentication methods, troubleshooting common issues, and making the most of the advanced capabilities KloudPortal offers.
Explore the possibilities that KloudPortal presents and unlock the potential of seamless and secure internet connectivity for your users. With KloudPortal, you can offer a sophisticated and reliable Wi-Fi experience that aligns with the needs of today’s digitally connected world.
Configure Kloud portal with 3rd party Access point.
If you’re utilizing a third-party access point, this step is mandatory; however, it’s unnecessary if you’re utilizing a Kloudspot gateway. In this section, we’ll guide you through the process of configuring a captive portal with various third-party access point platforms, ensuring that your users can seamlessly access the internet while adhering to your network’s terms and security protocols.
There are three available access points: Cisco Wireless LAN Controller, EnGenius Platform, and Meraki. Let’s explore how to configure them in the upcoming sections.
It necessitates a splash page URL, which will be provided upon the successful completion of your purchase. For detailed information on the different purchase options available, please refer to the Installation section.
Subsections of Configure Kloud portal with 3rd party Access point.
Cisco Wireless Lan Controller
In this section, we will guide you through the process of configuring captive portal with the Cisco Wireless LAN Controller access point, ensuring seamless and secure internet access for your users.
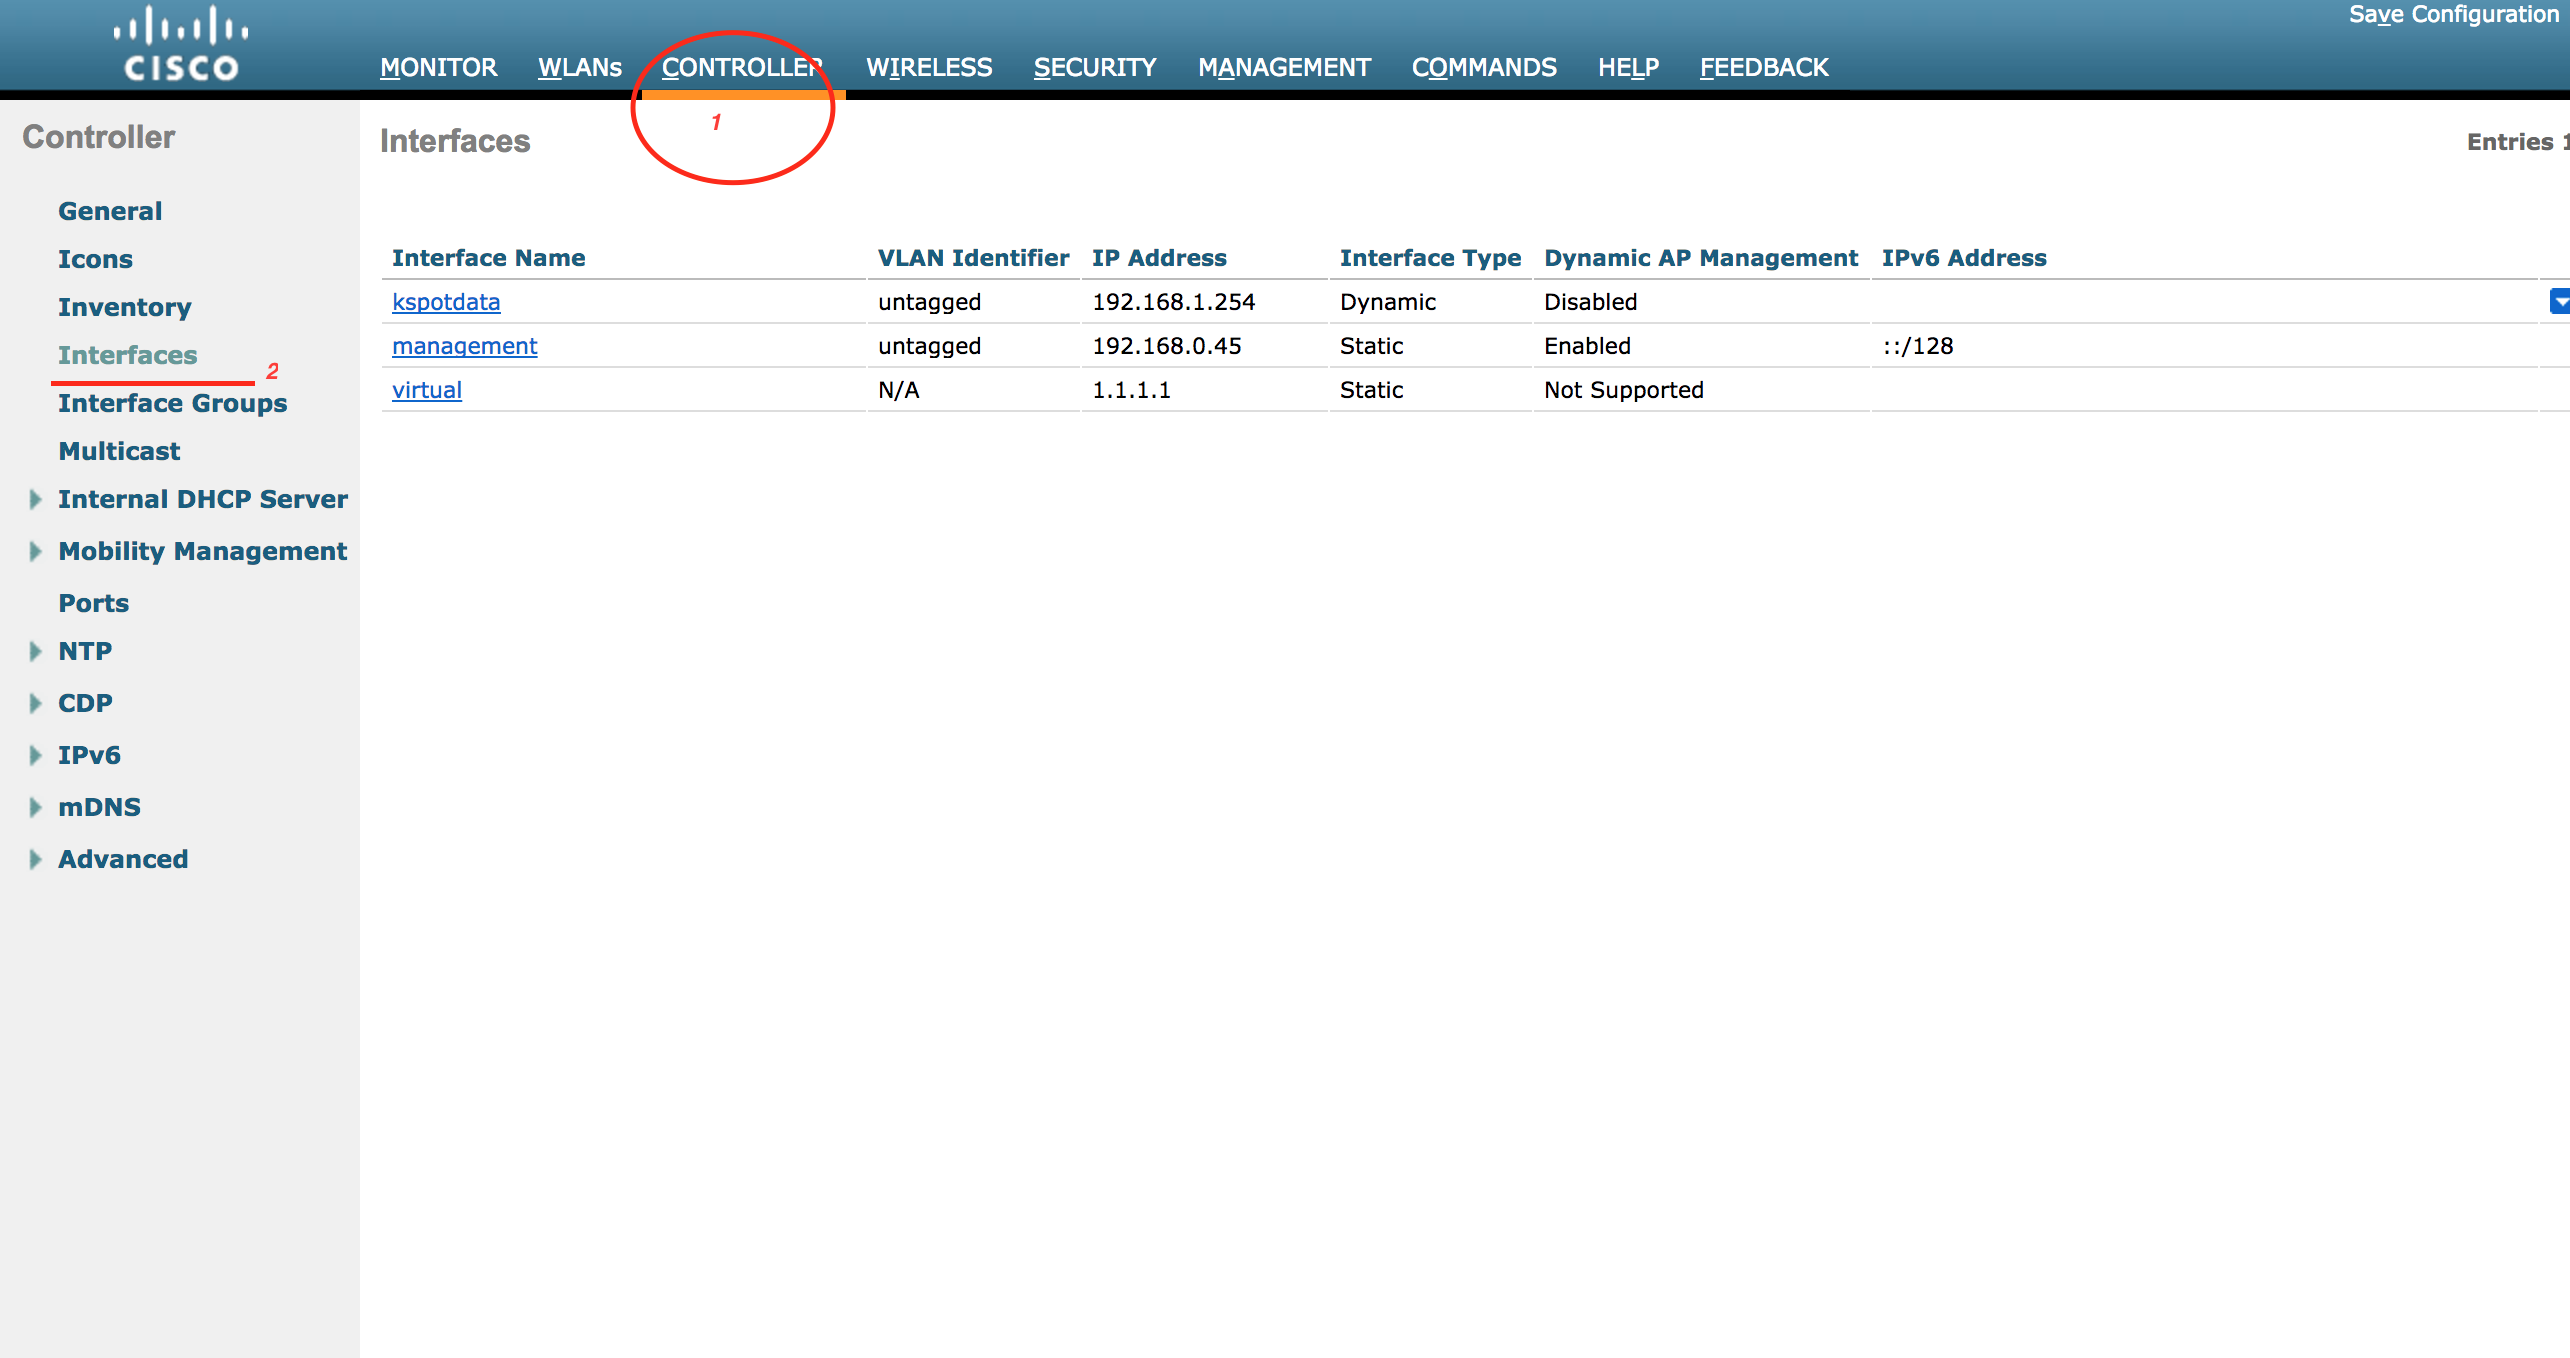
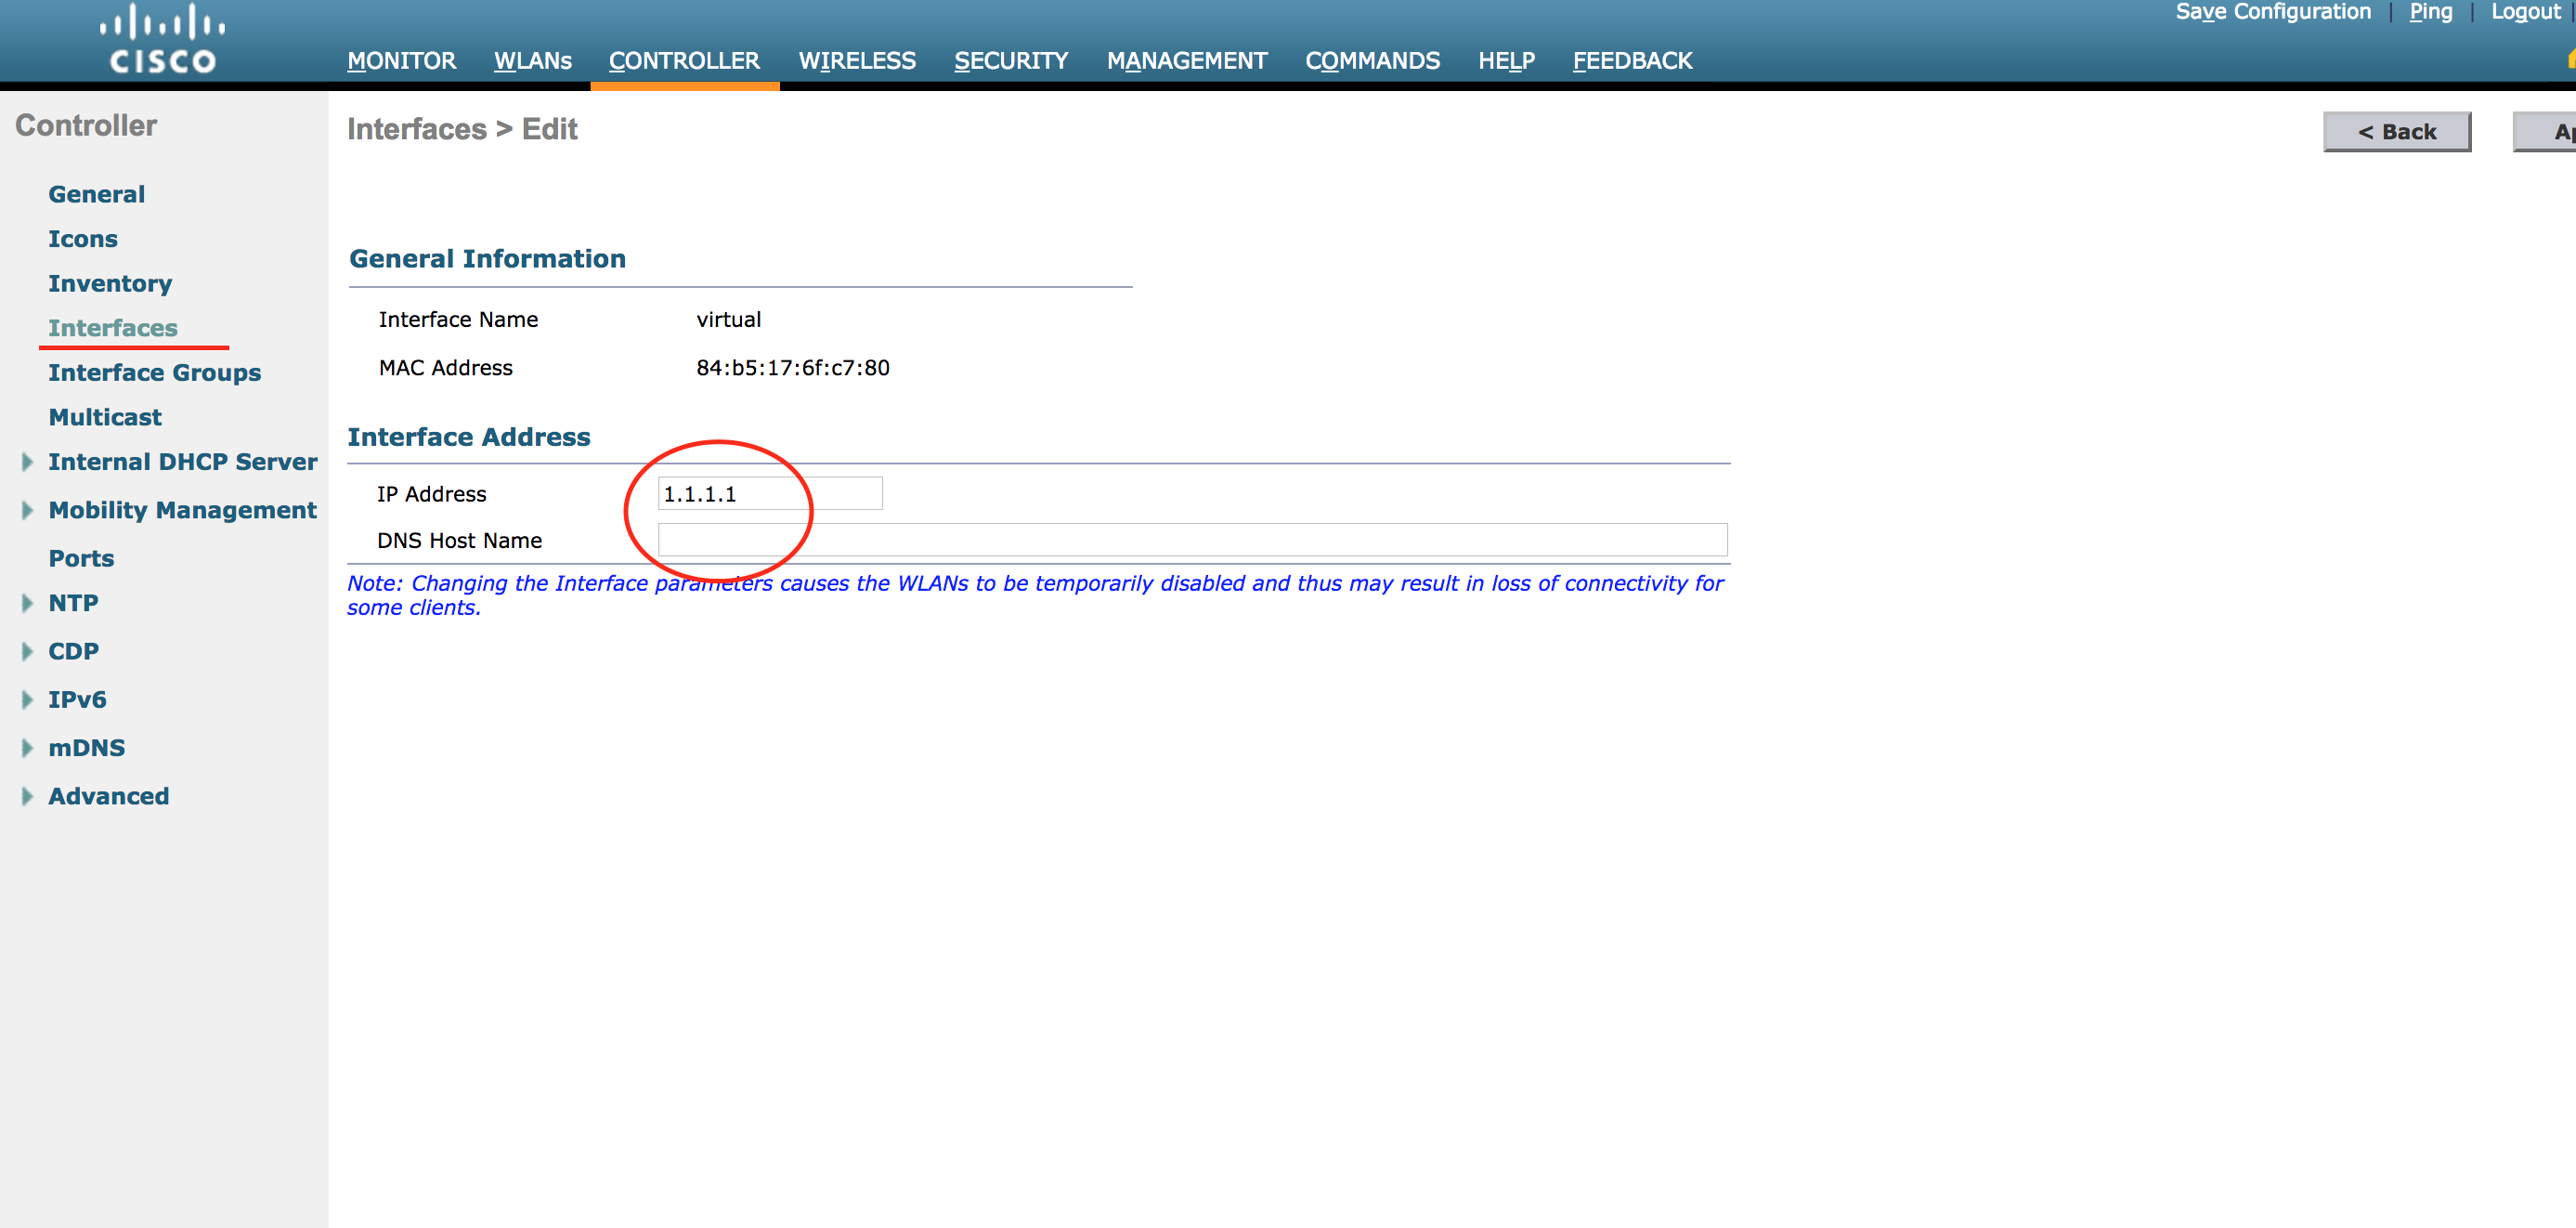
1. Configure Virtual Interface.
2. Configure the External Guest portal URL and redirection page.
3. Enable AccessControls for the external guest portal.
4. Guest WLAN settings.
Configure Virtual Interface ( if doesn’t exist already )
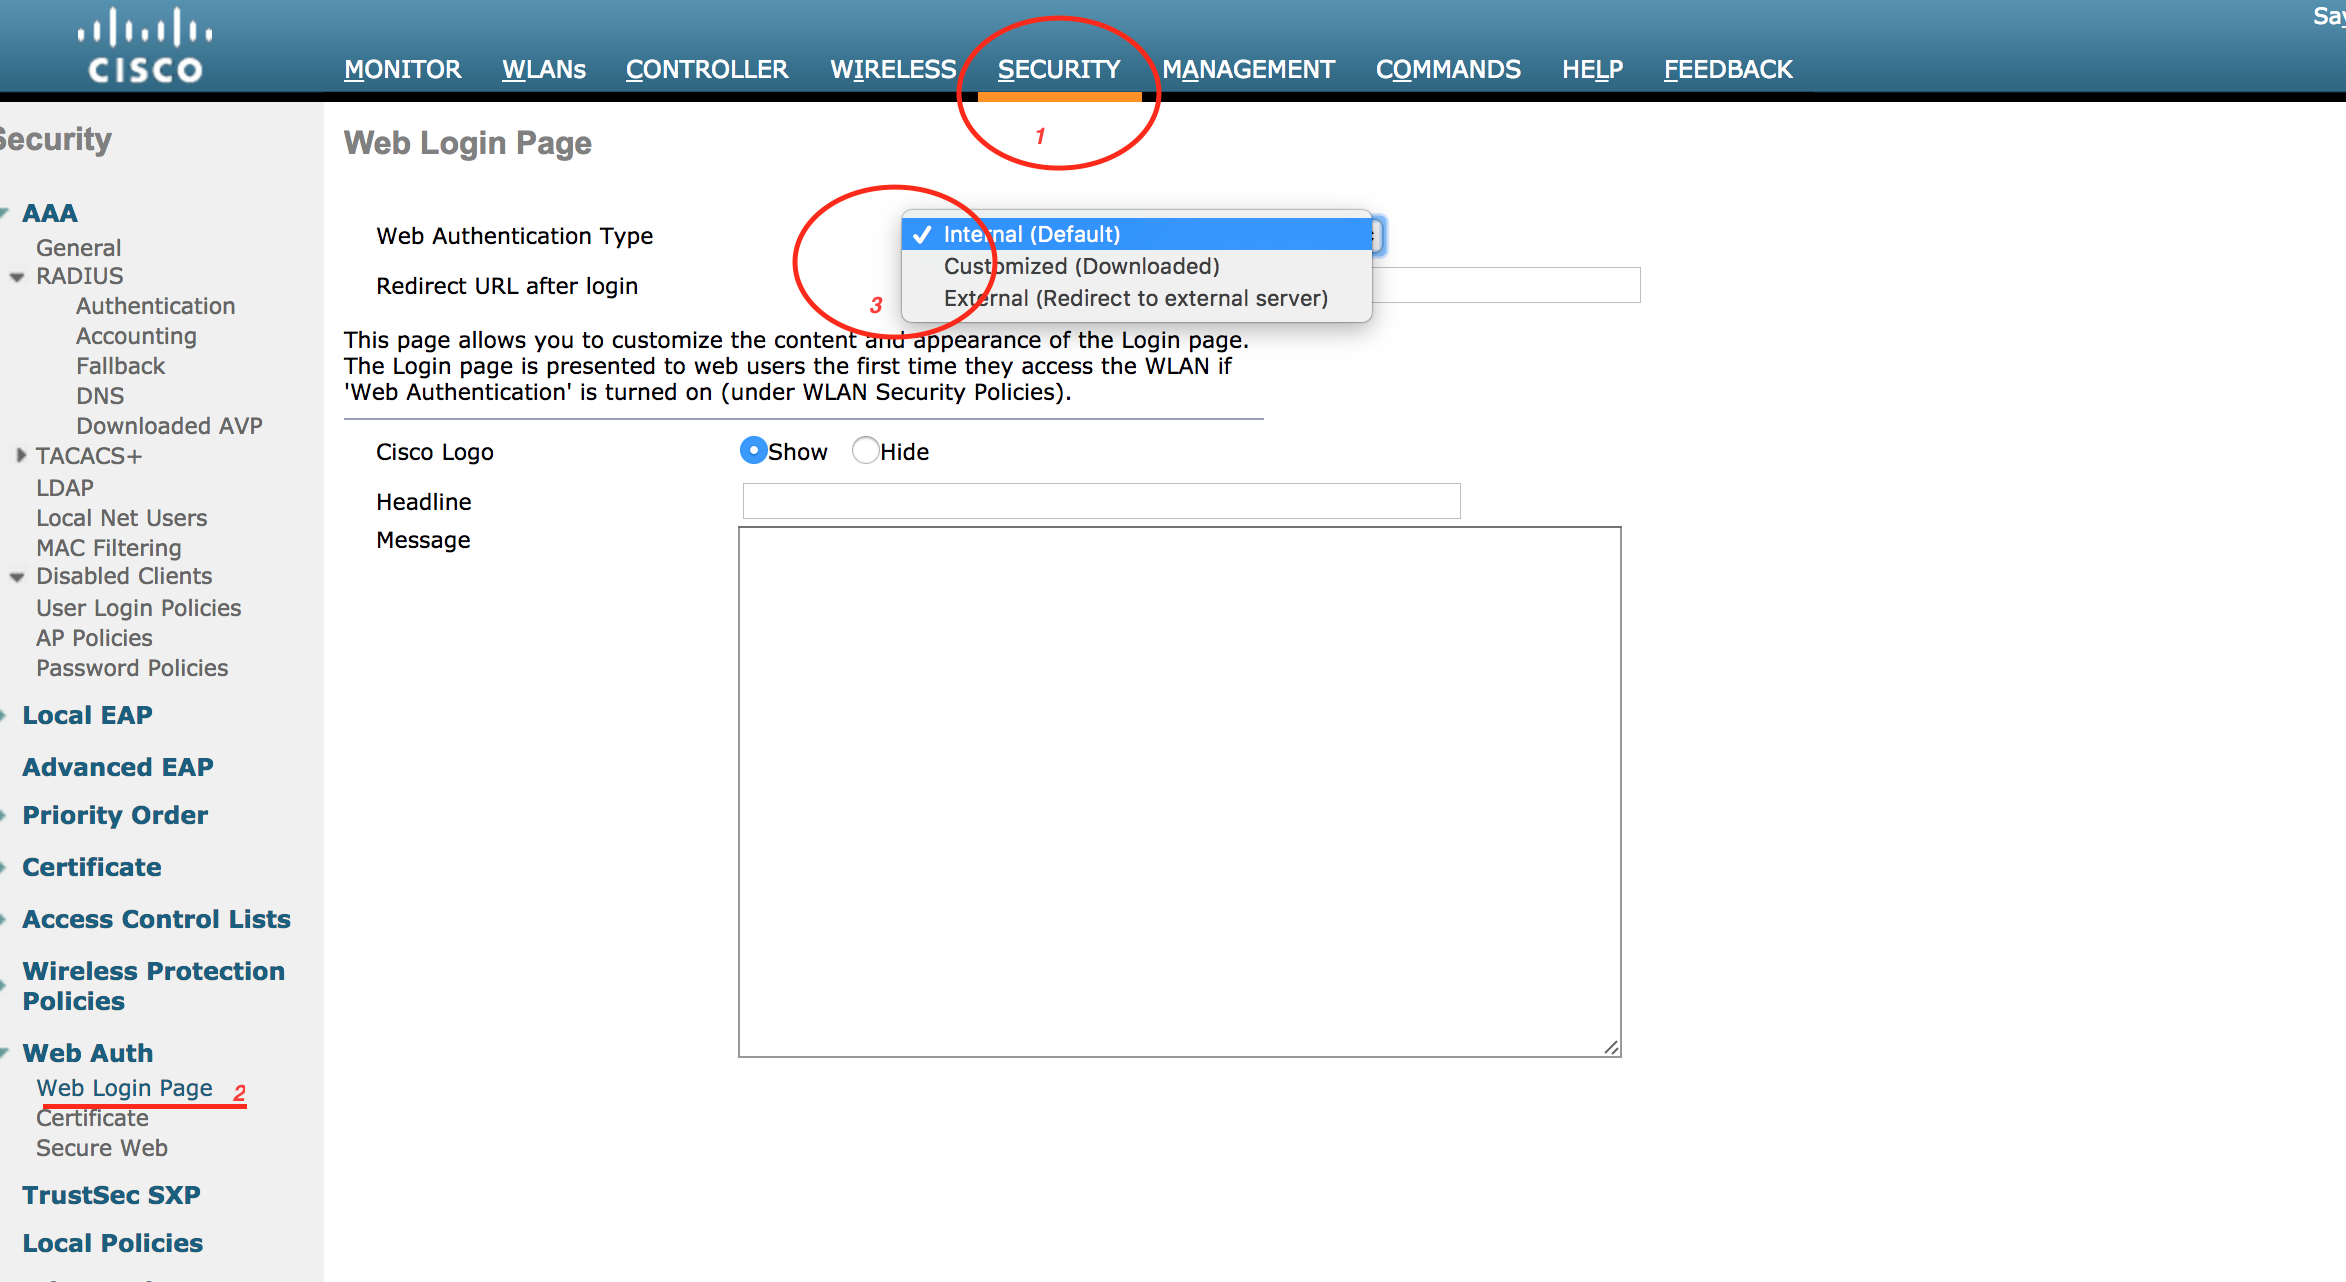
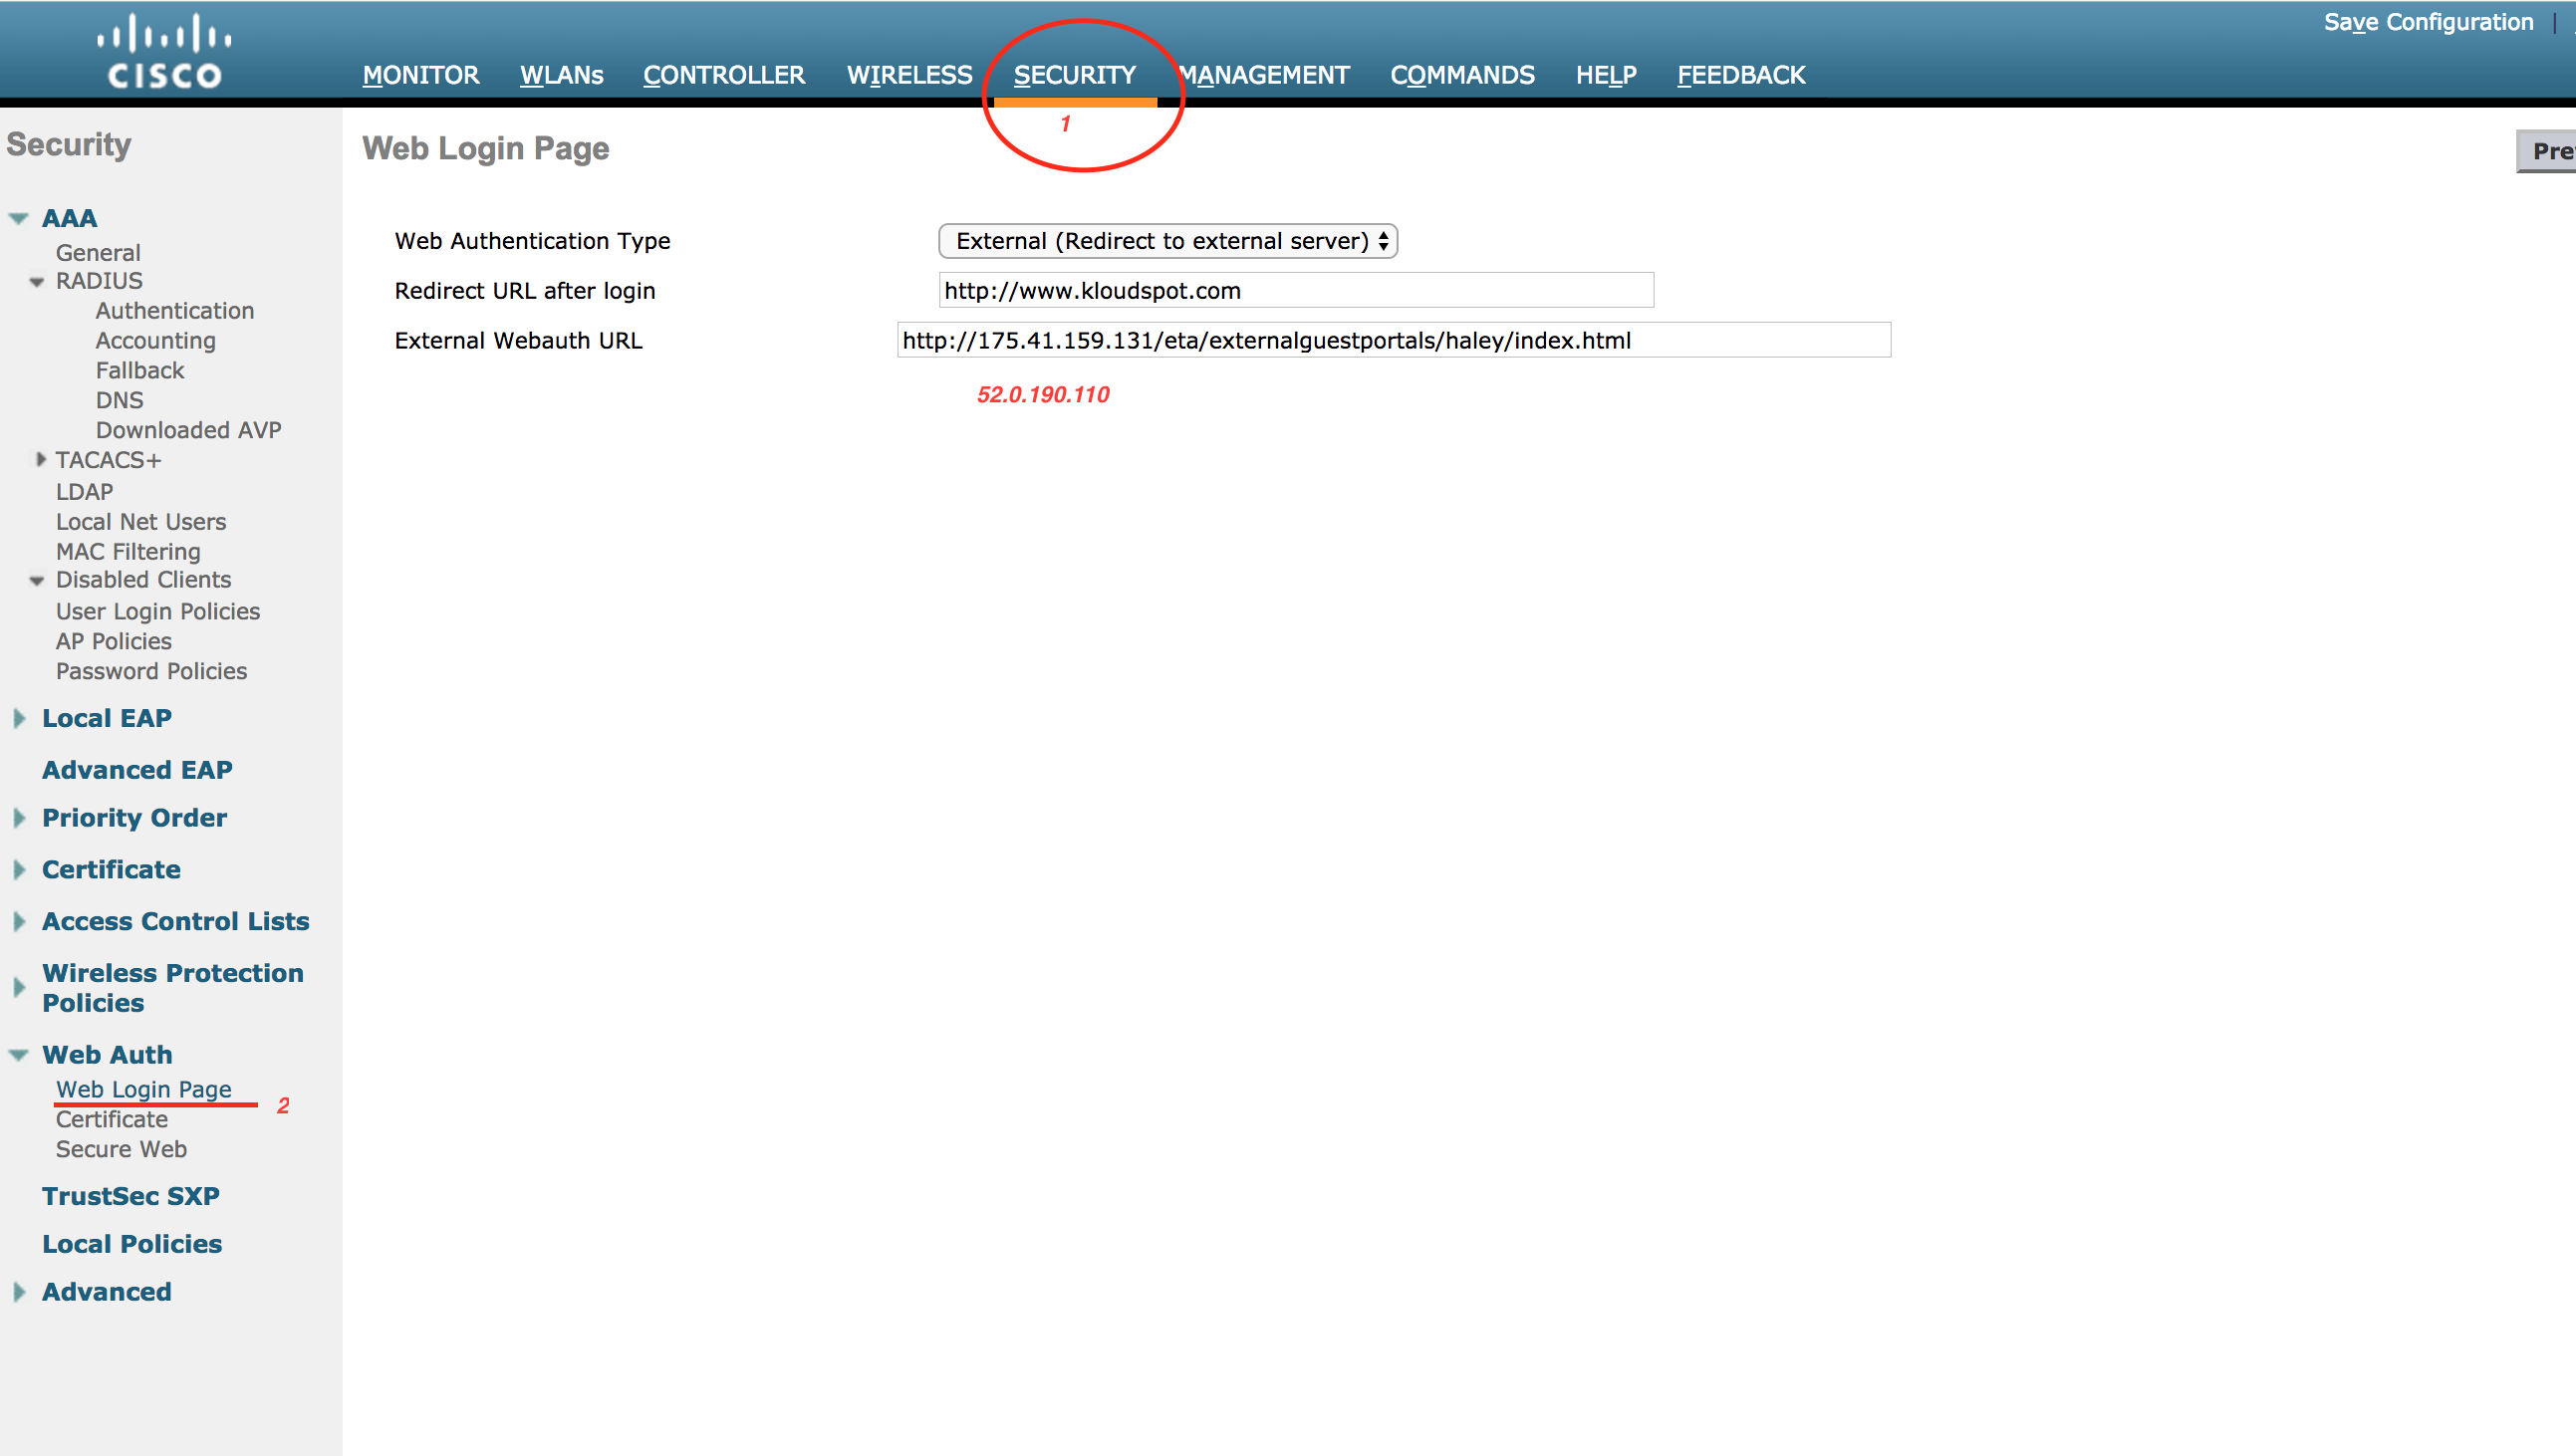
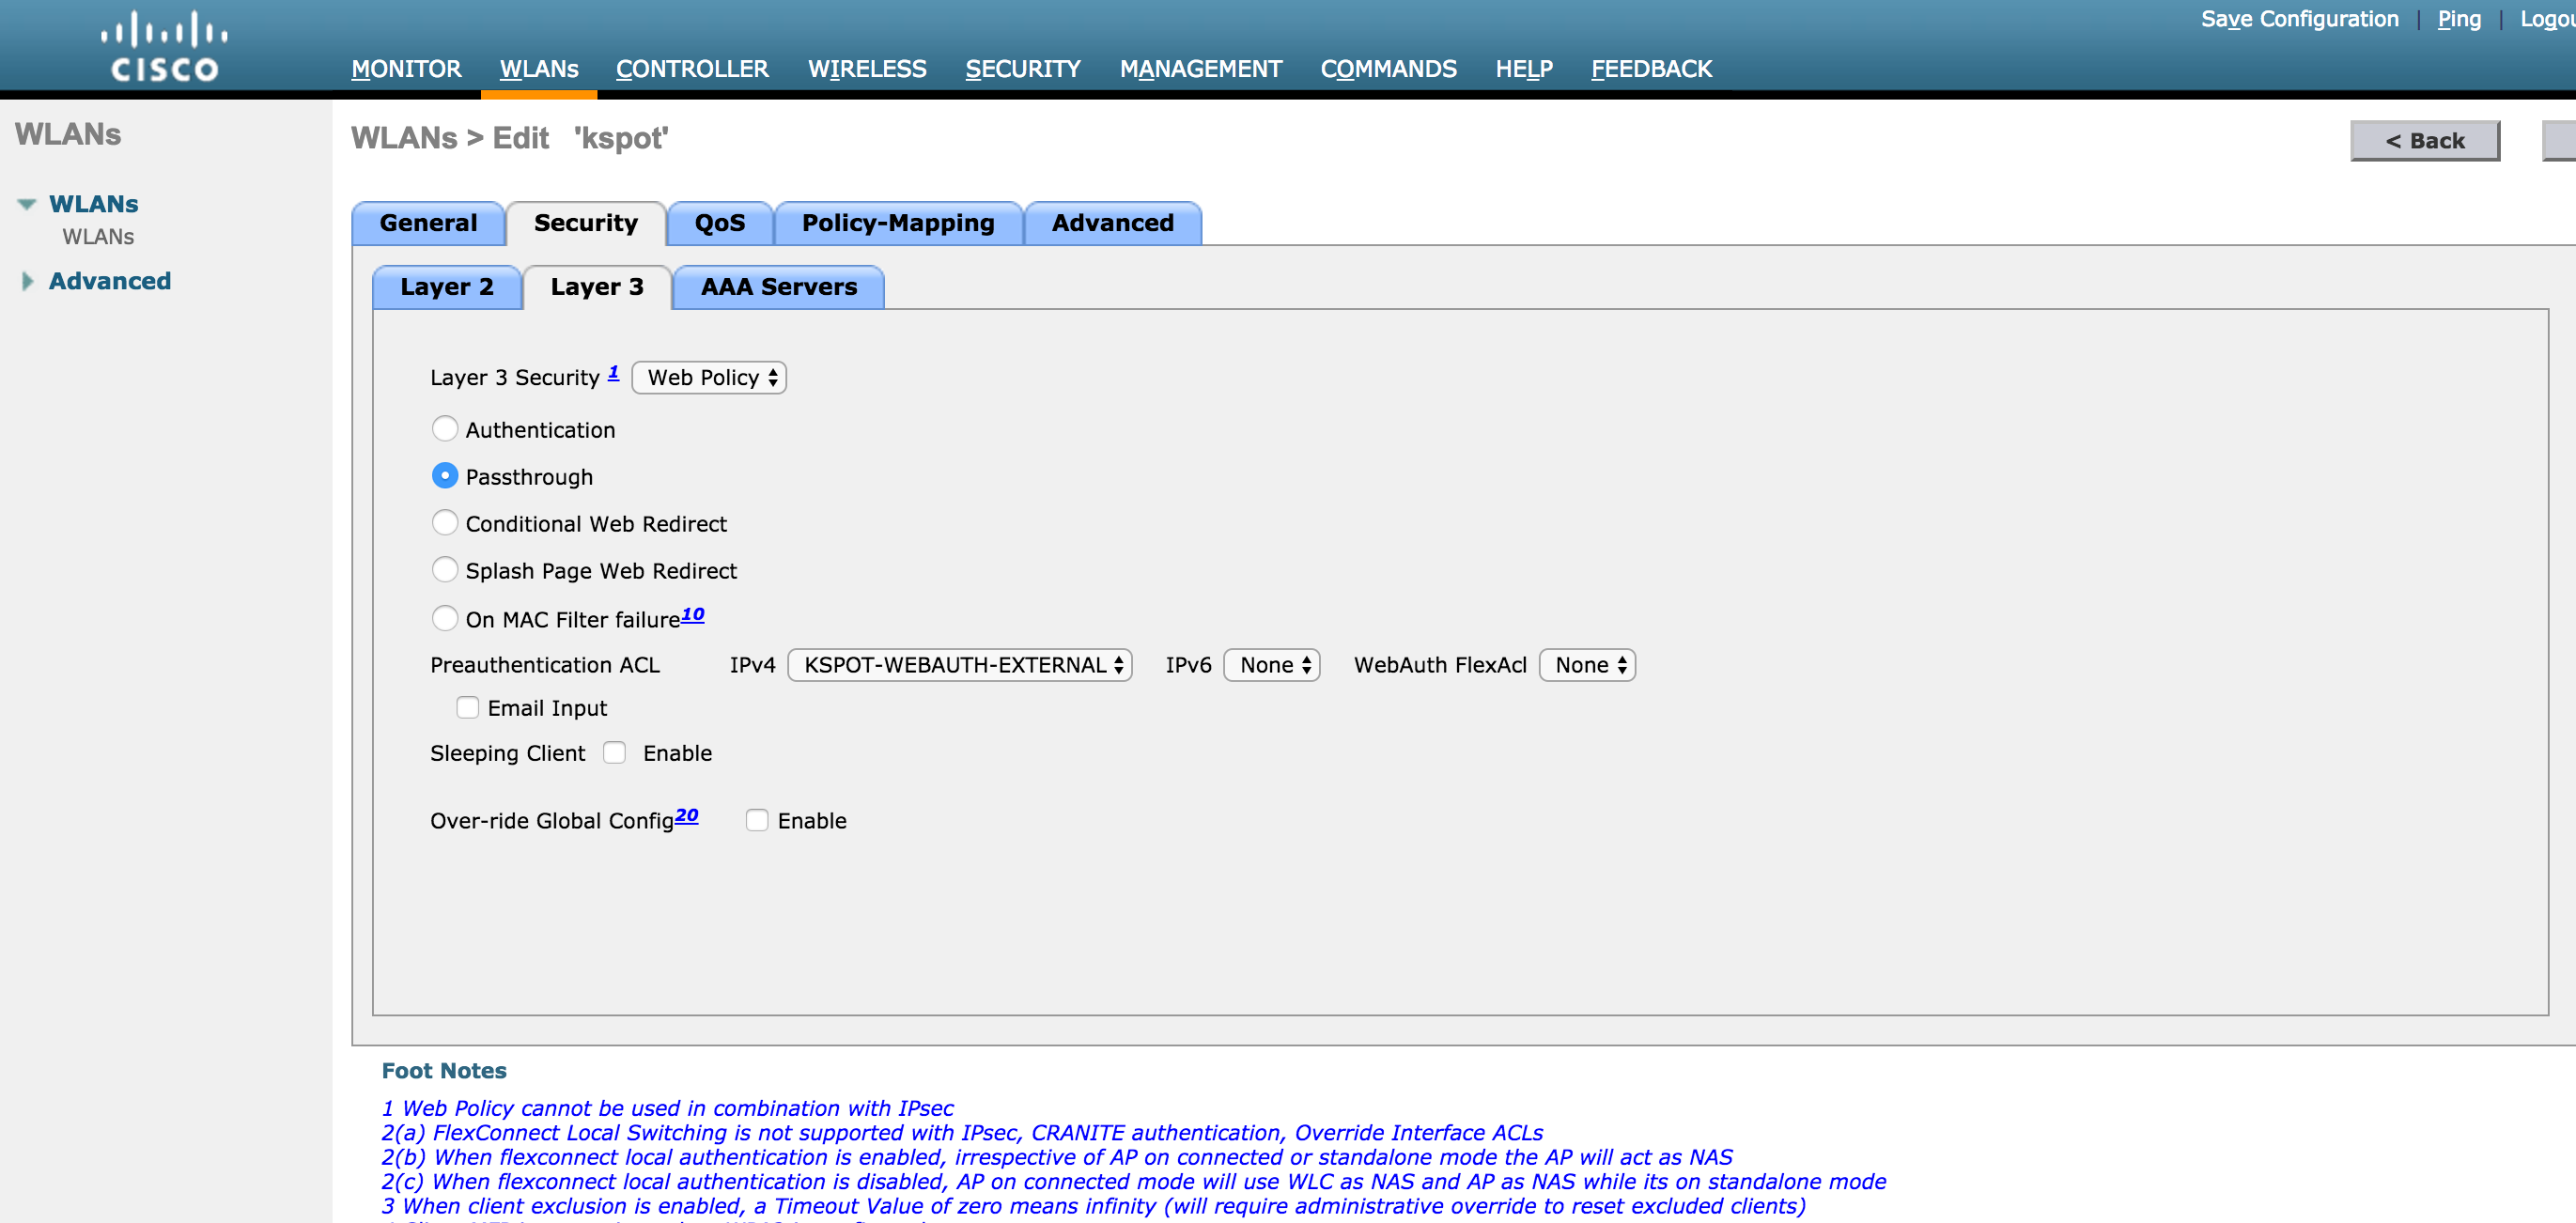
Configure the External Guest portal URL and redirection page
1. Select ‘External (redirect to external server)’
2. Enter redirect URL and External Webauth URL with IP ’52.0.190.110’.
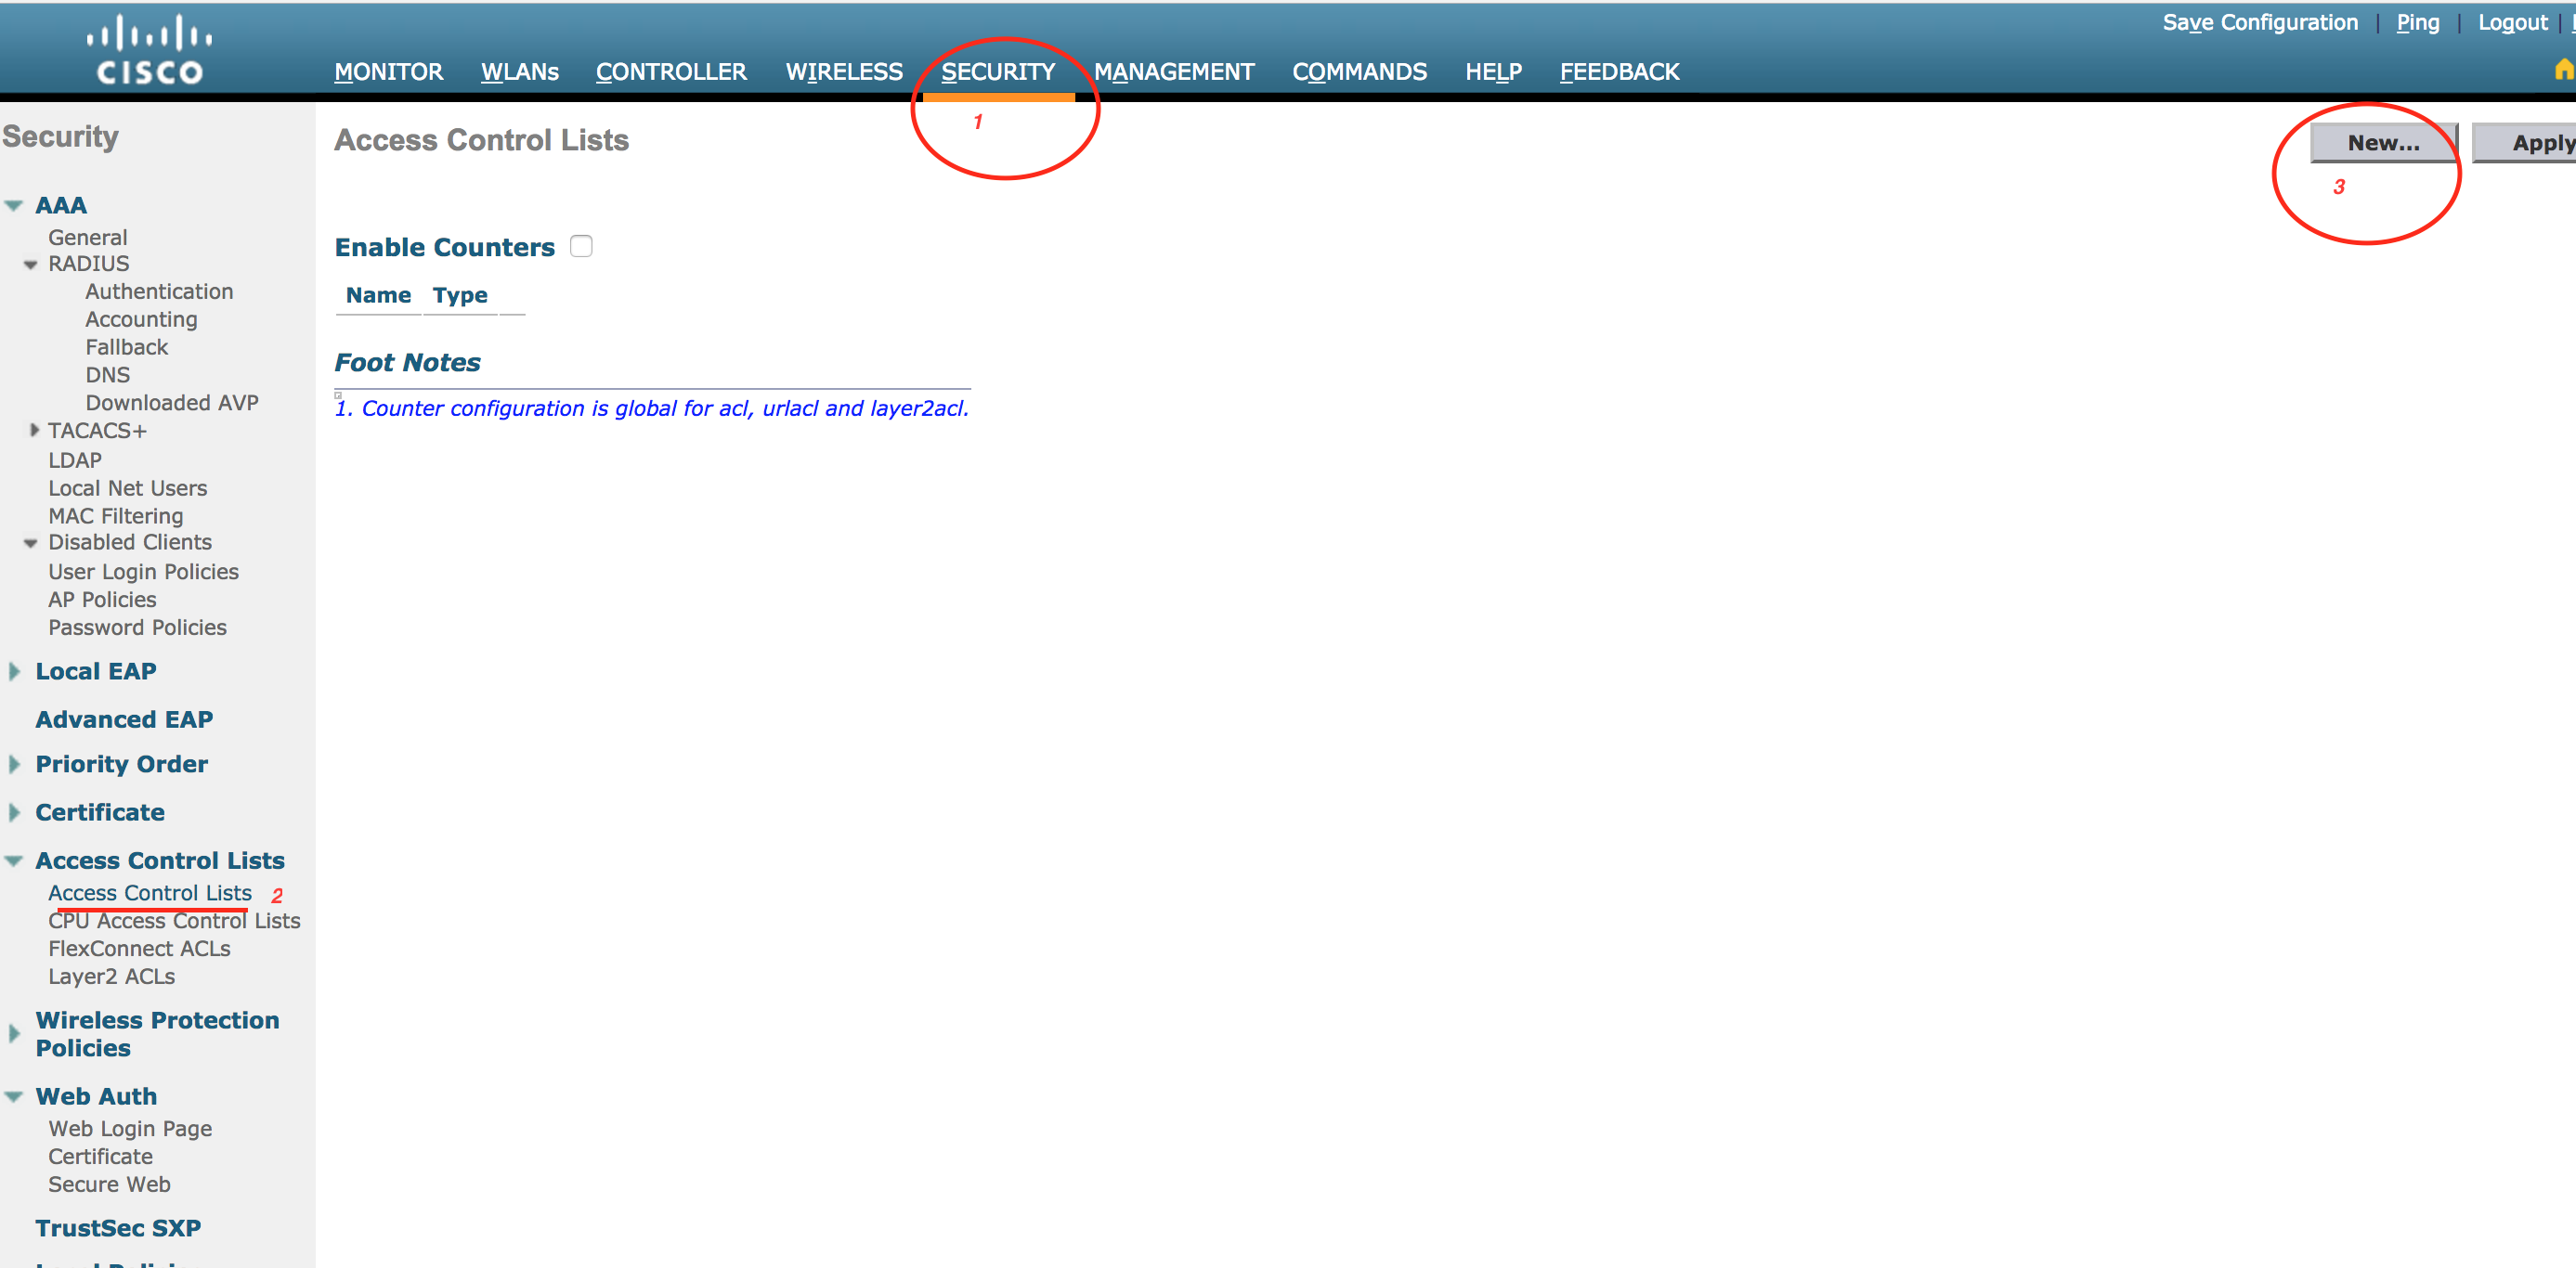
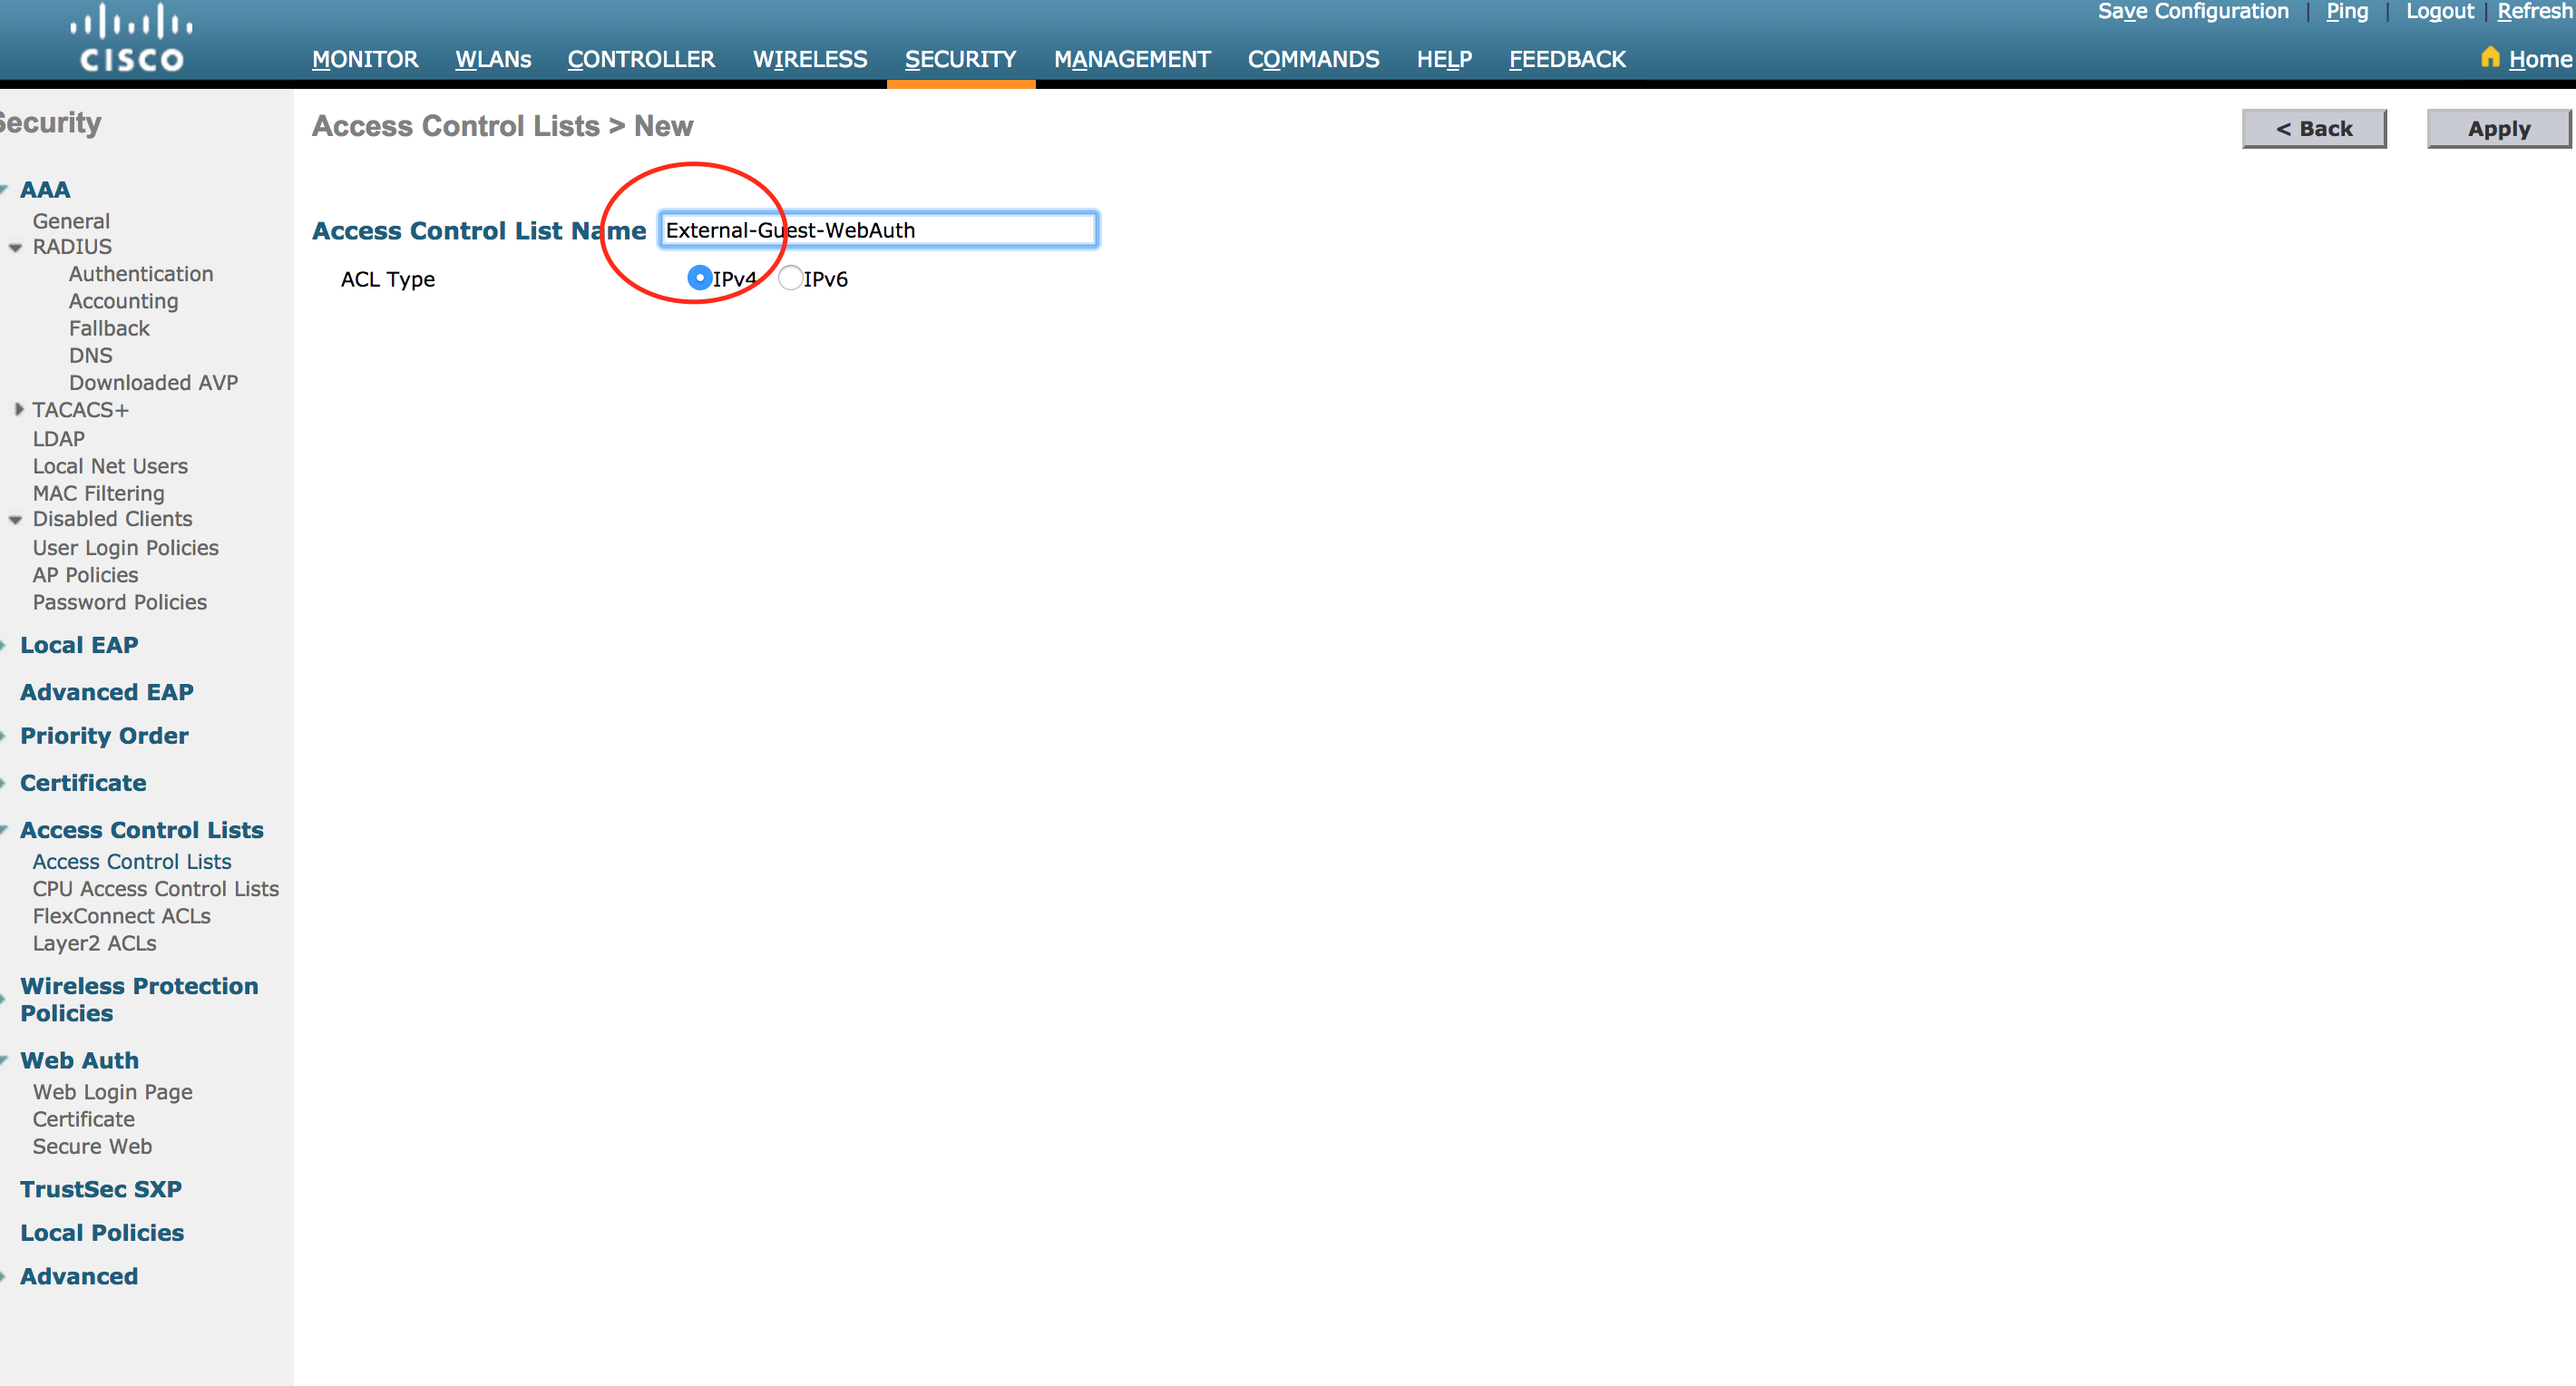
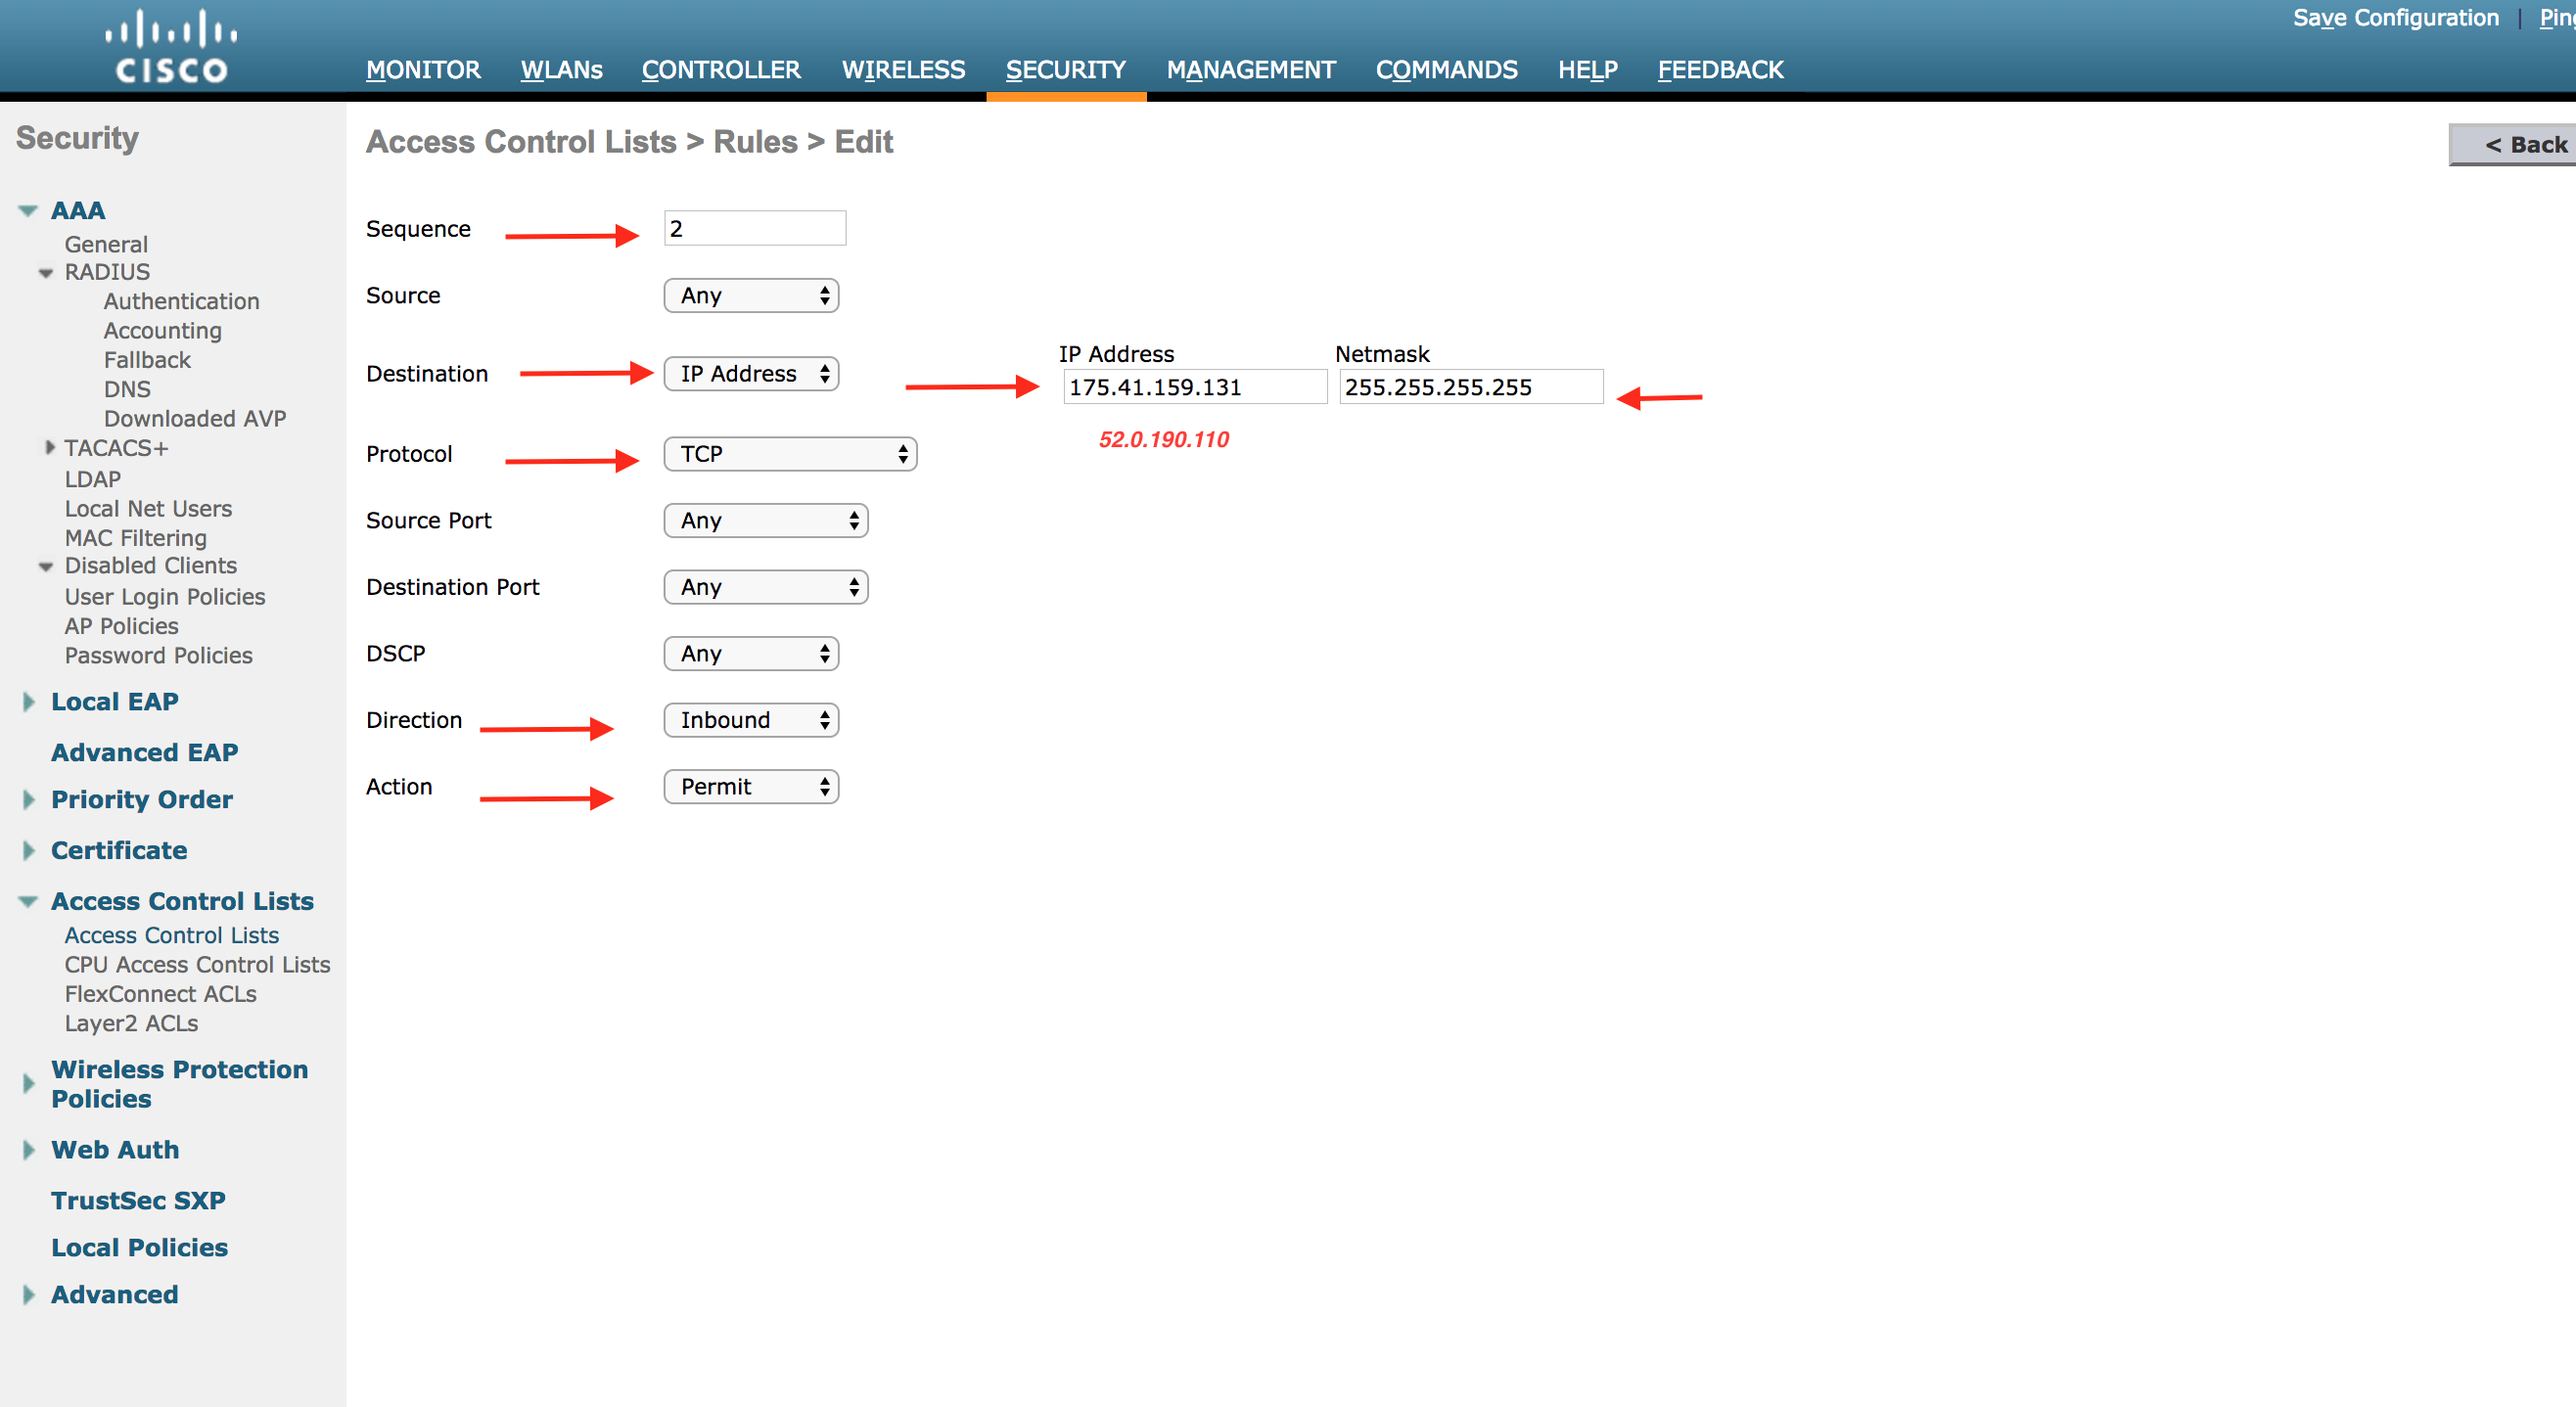
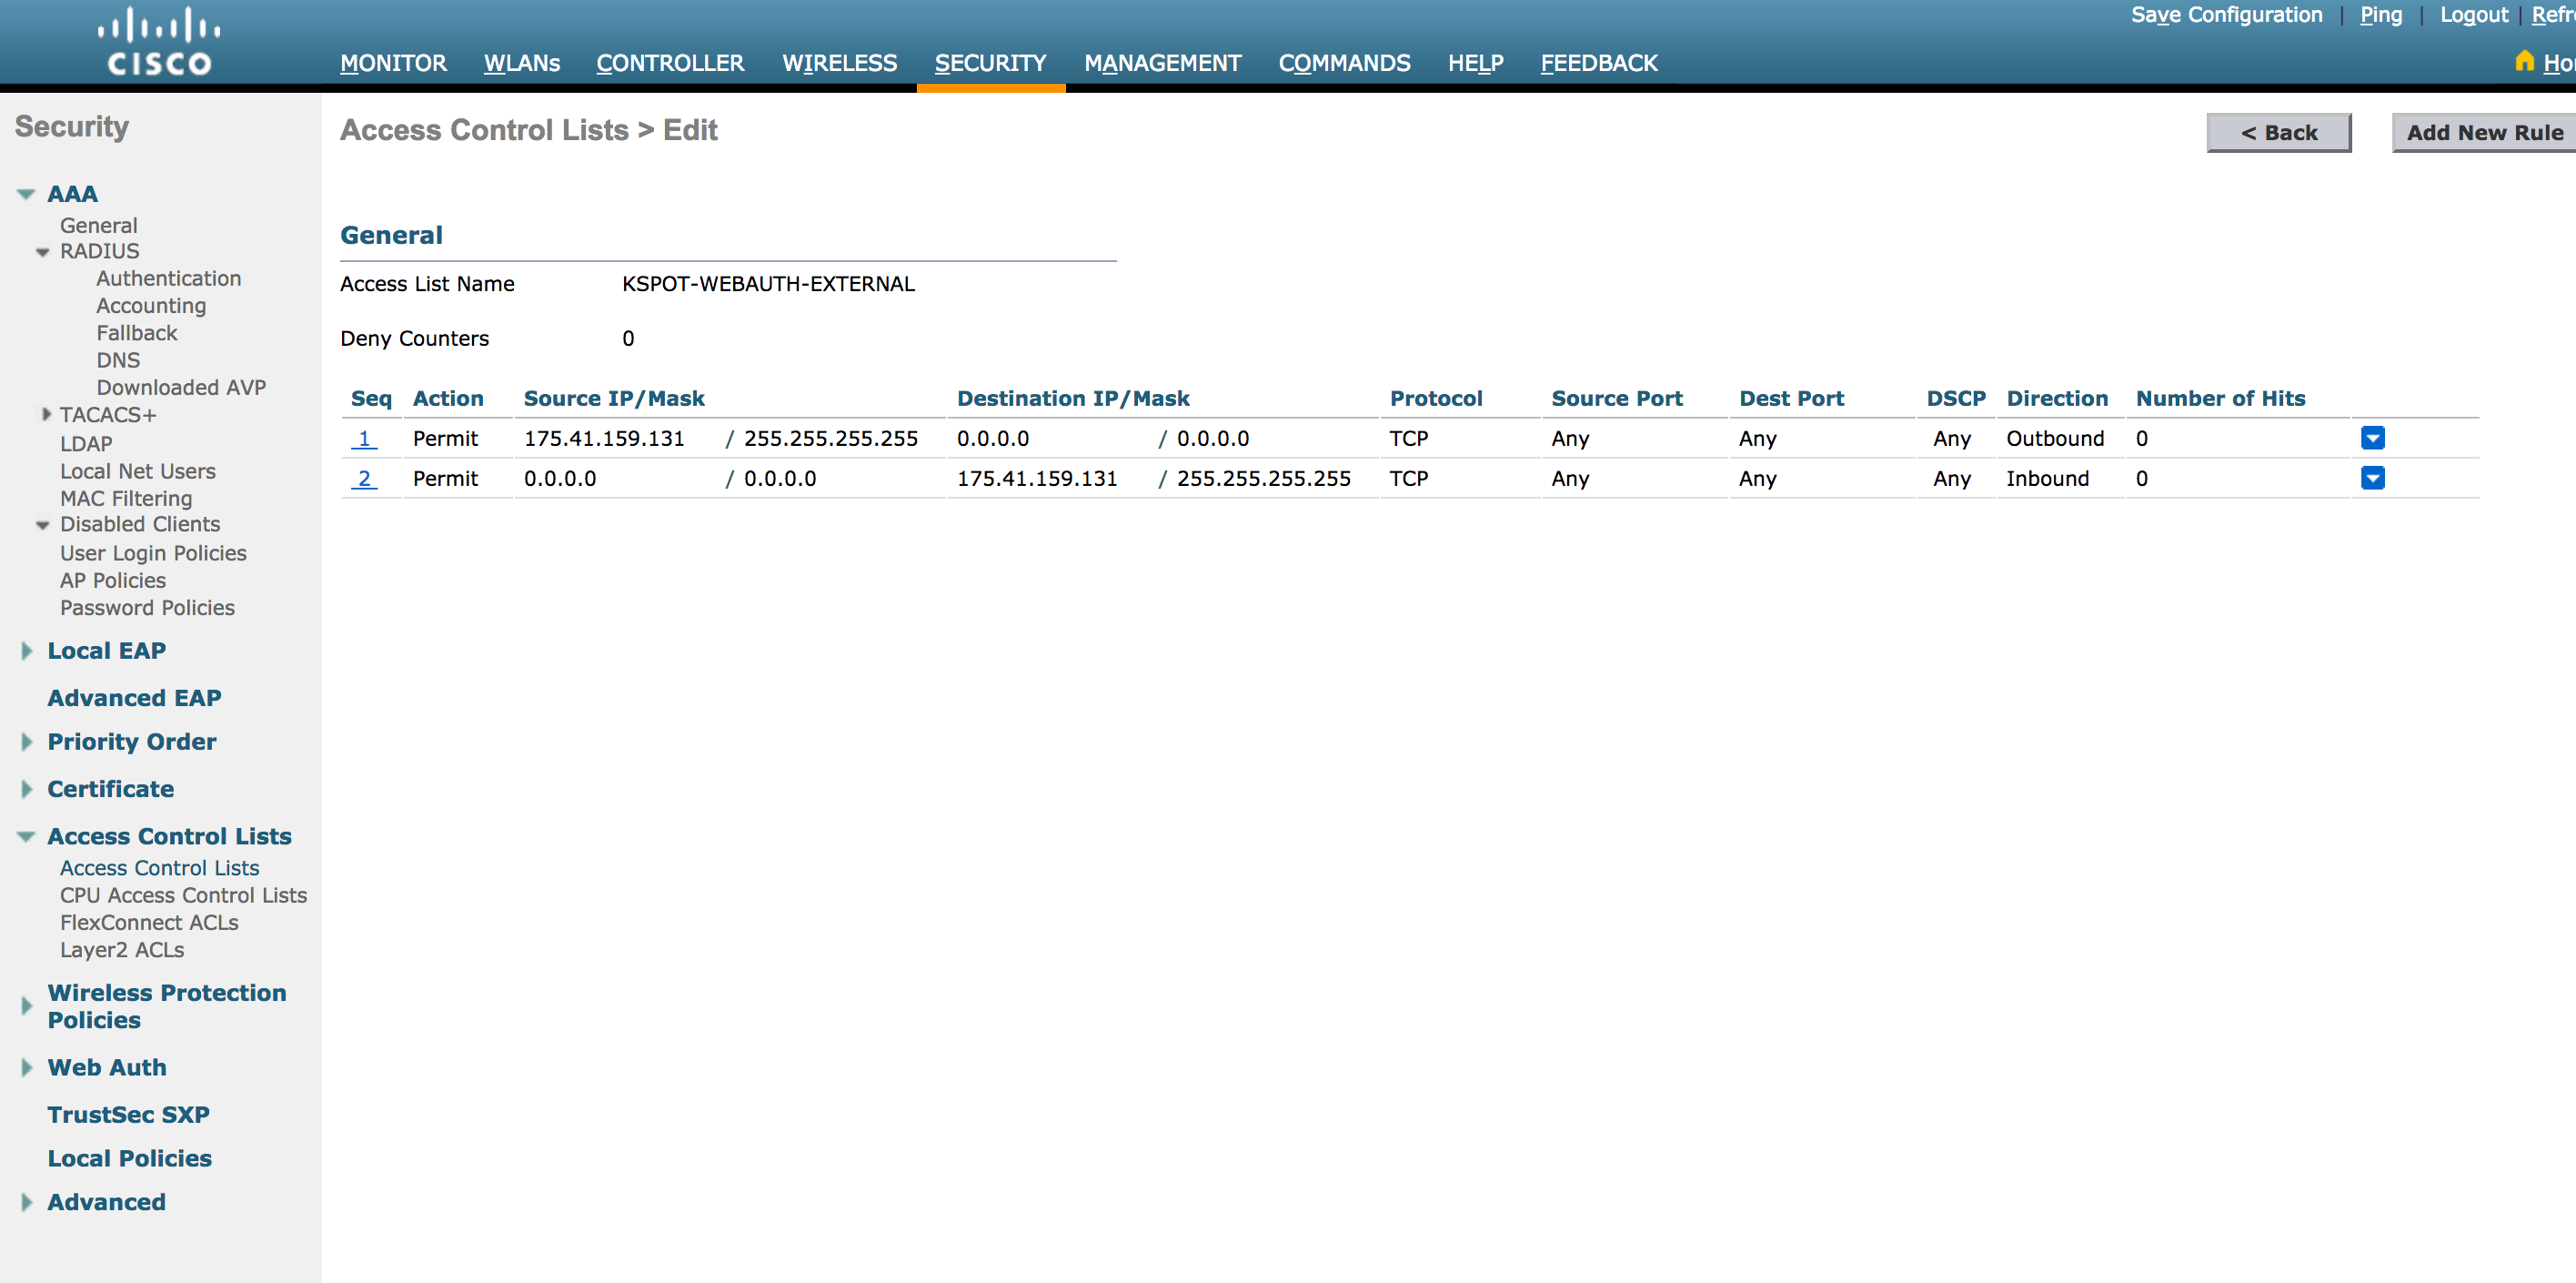
Enable AccessControls for external guest portal.
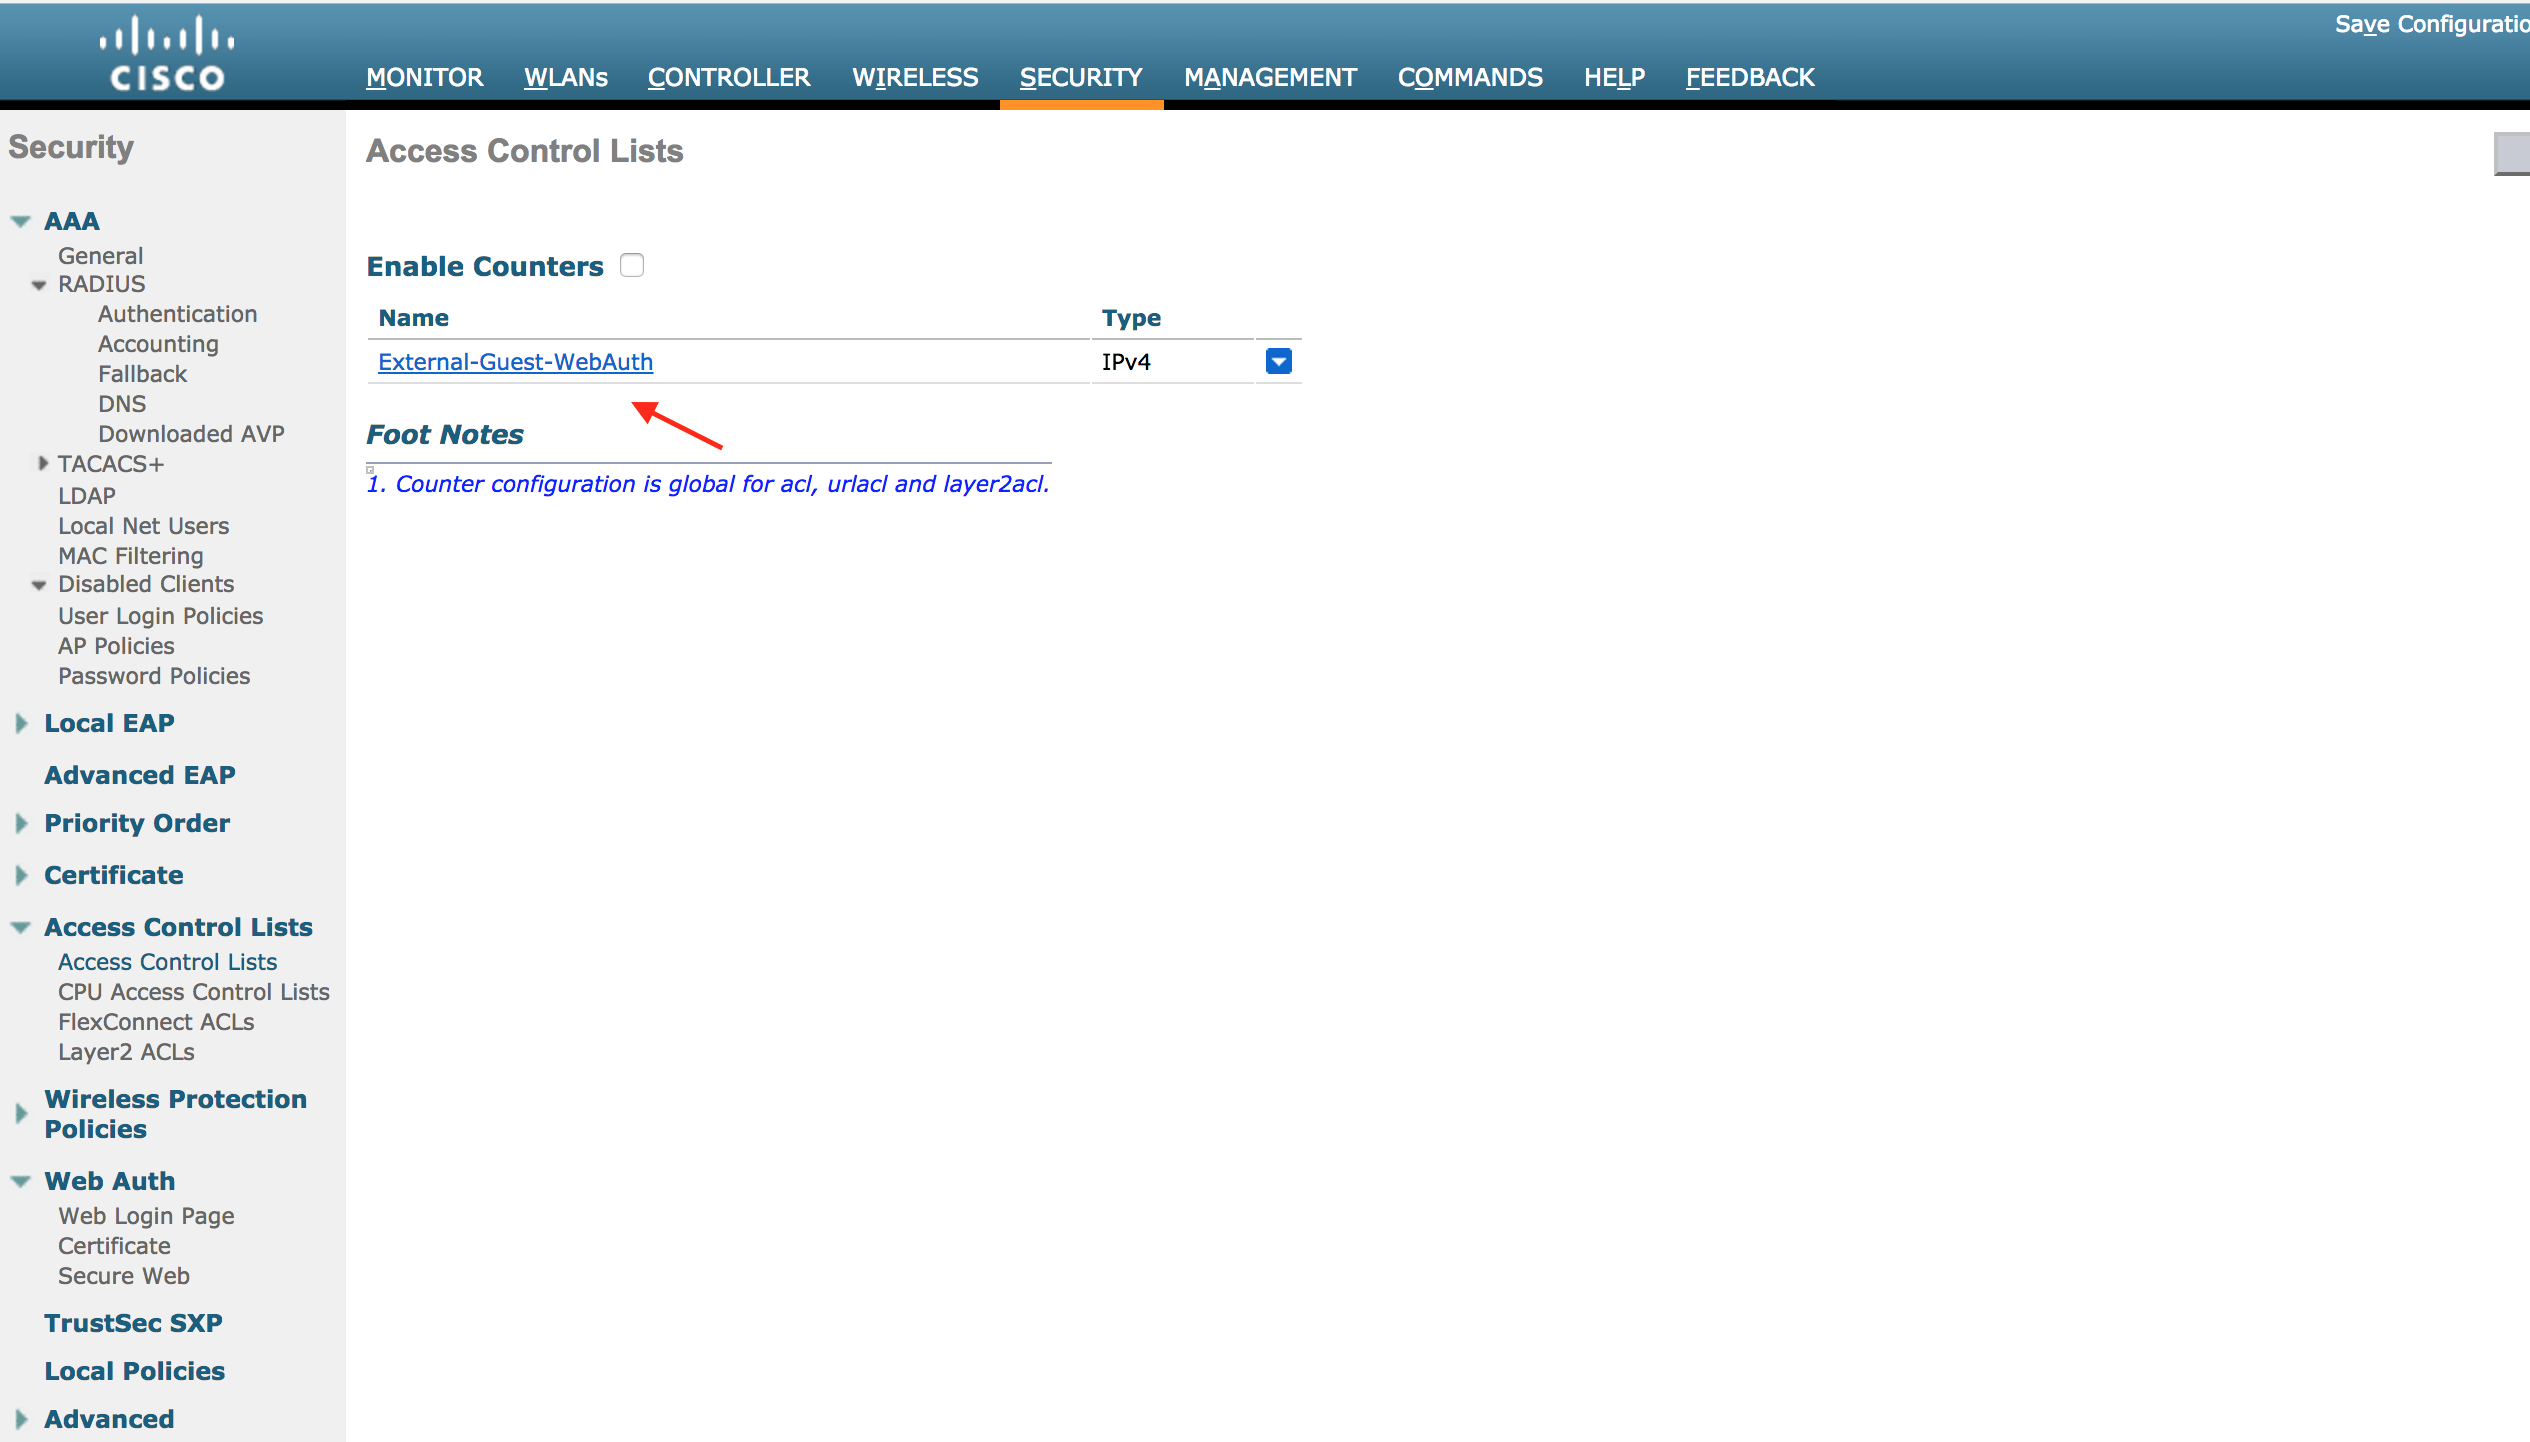
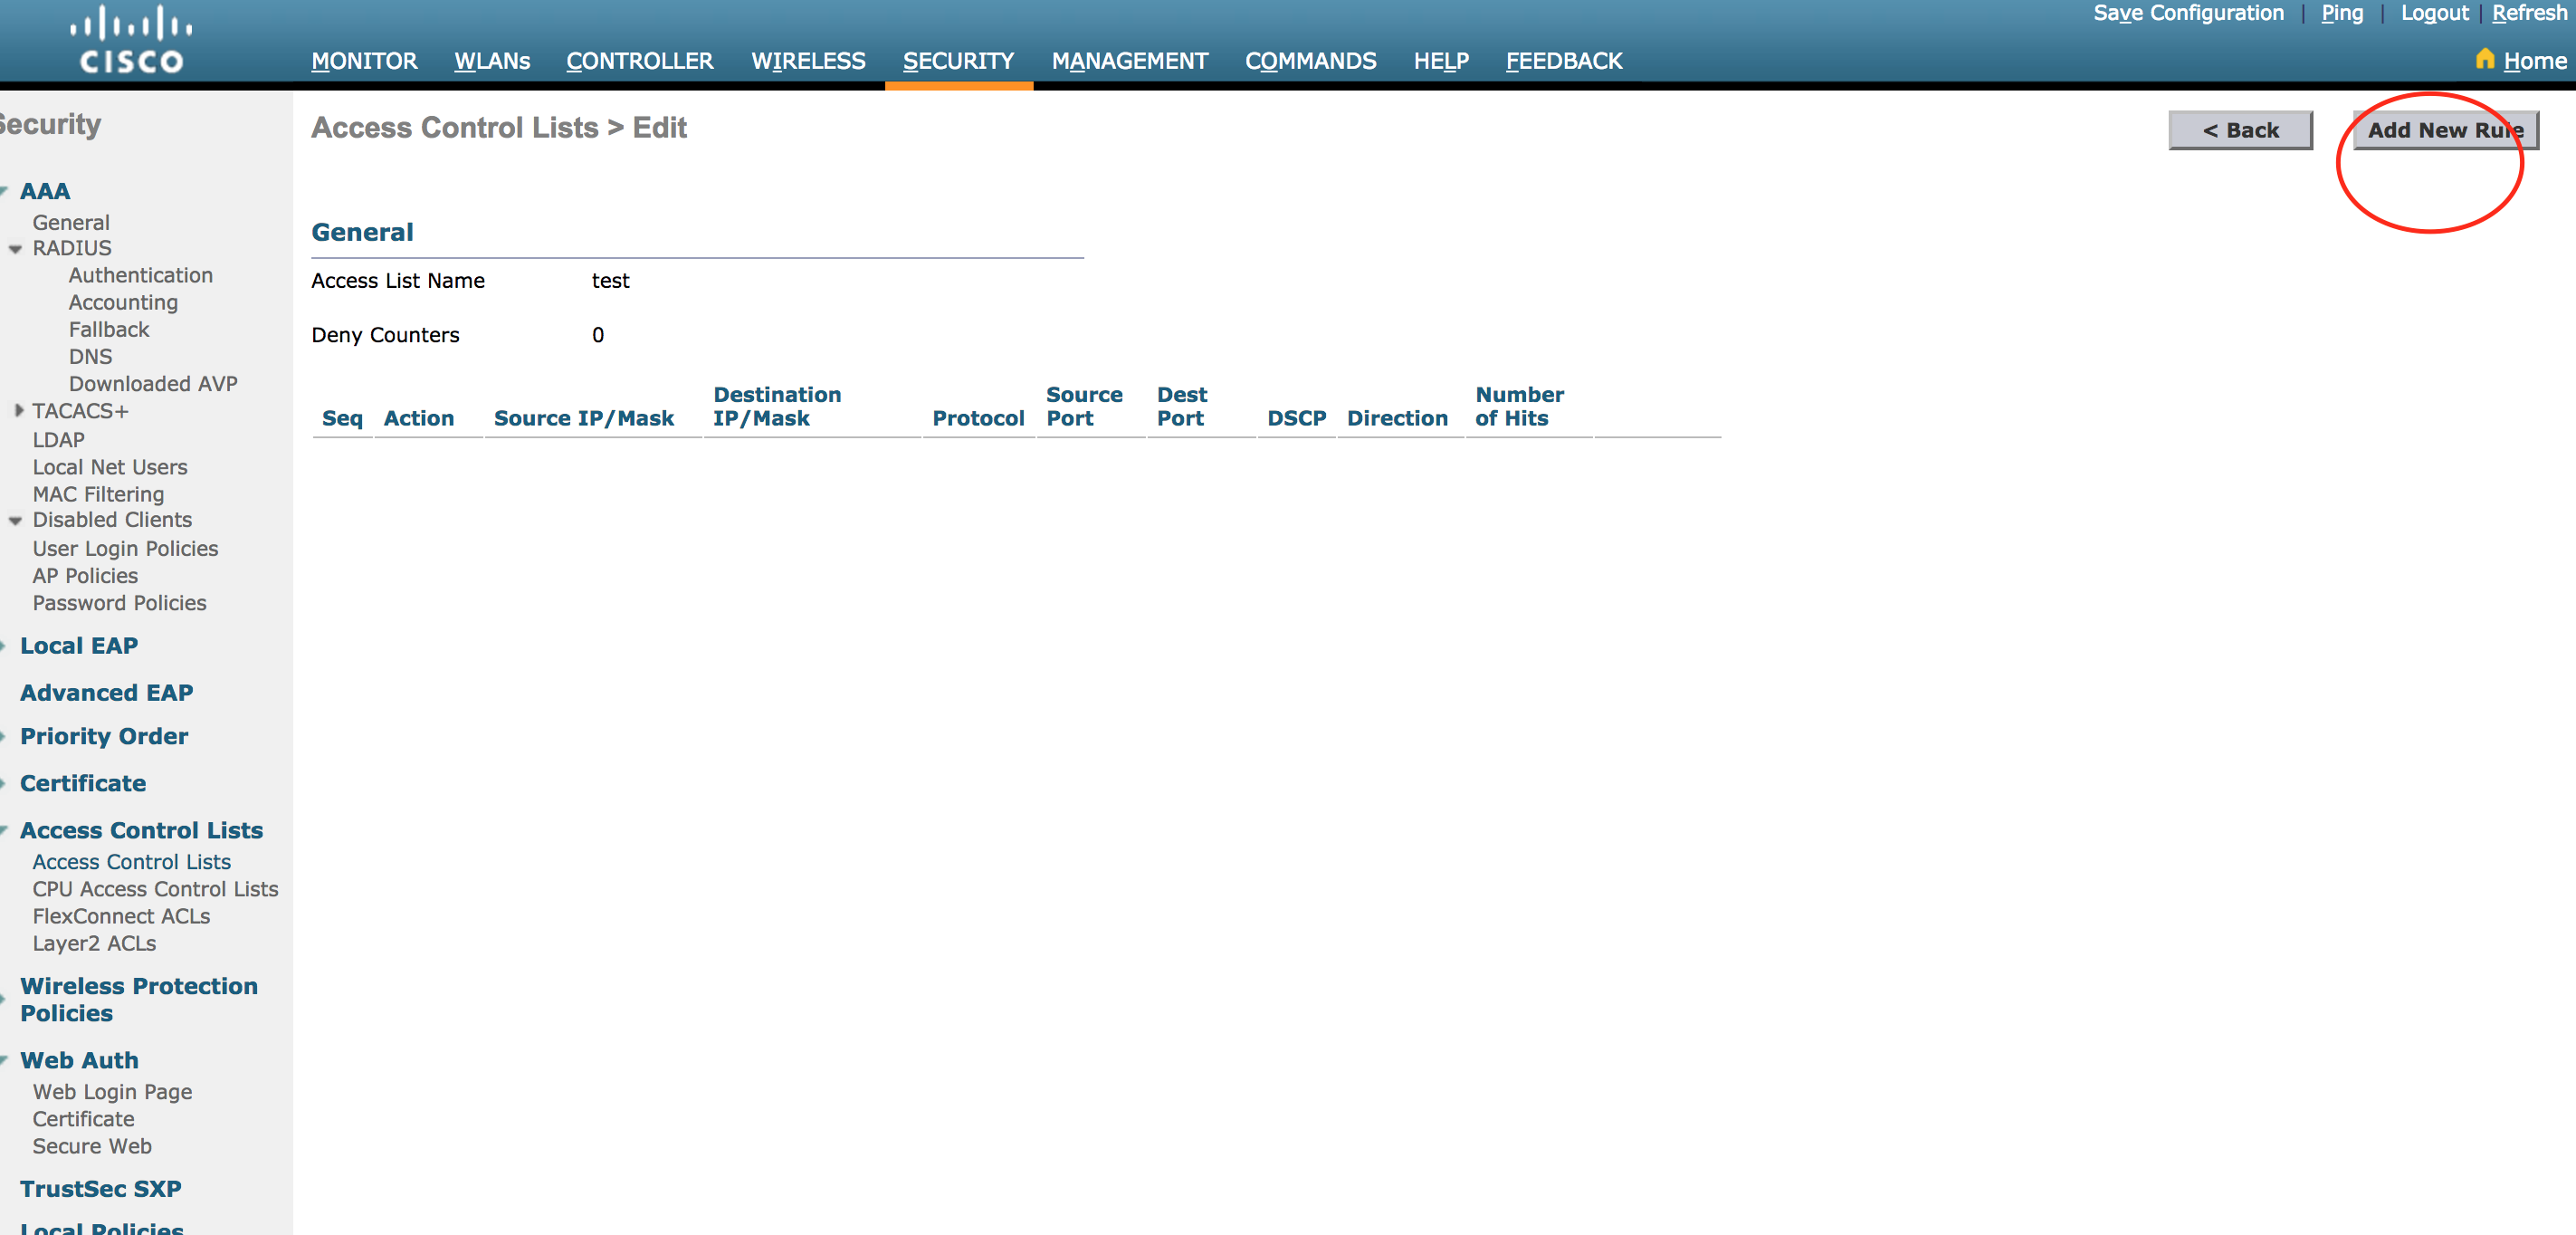
1. Select the created Access Control to add access Rules.
2. Create Outbound Rule to allow 52.0.190.110 access.
3. Similarly, create rule for Inbound access.
4. Both Inbound and outbound rules should like below.
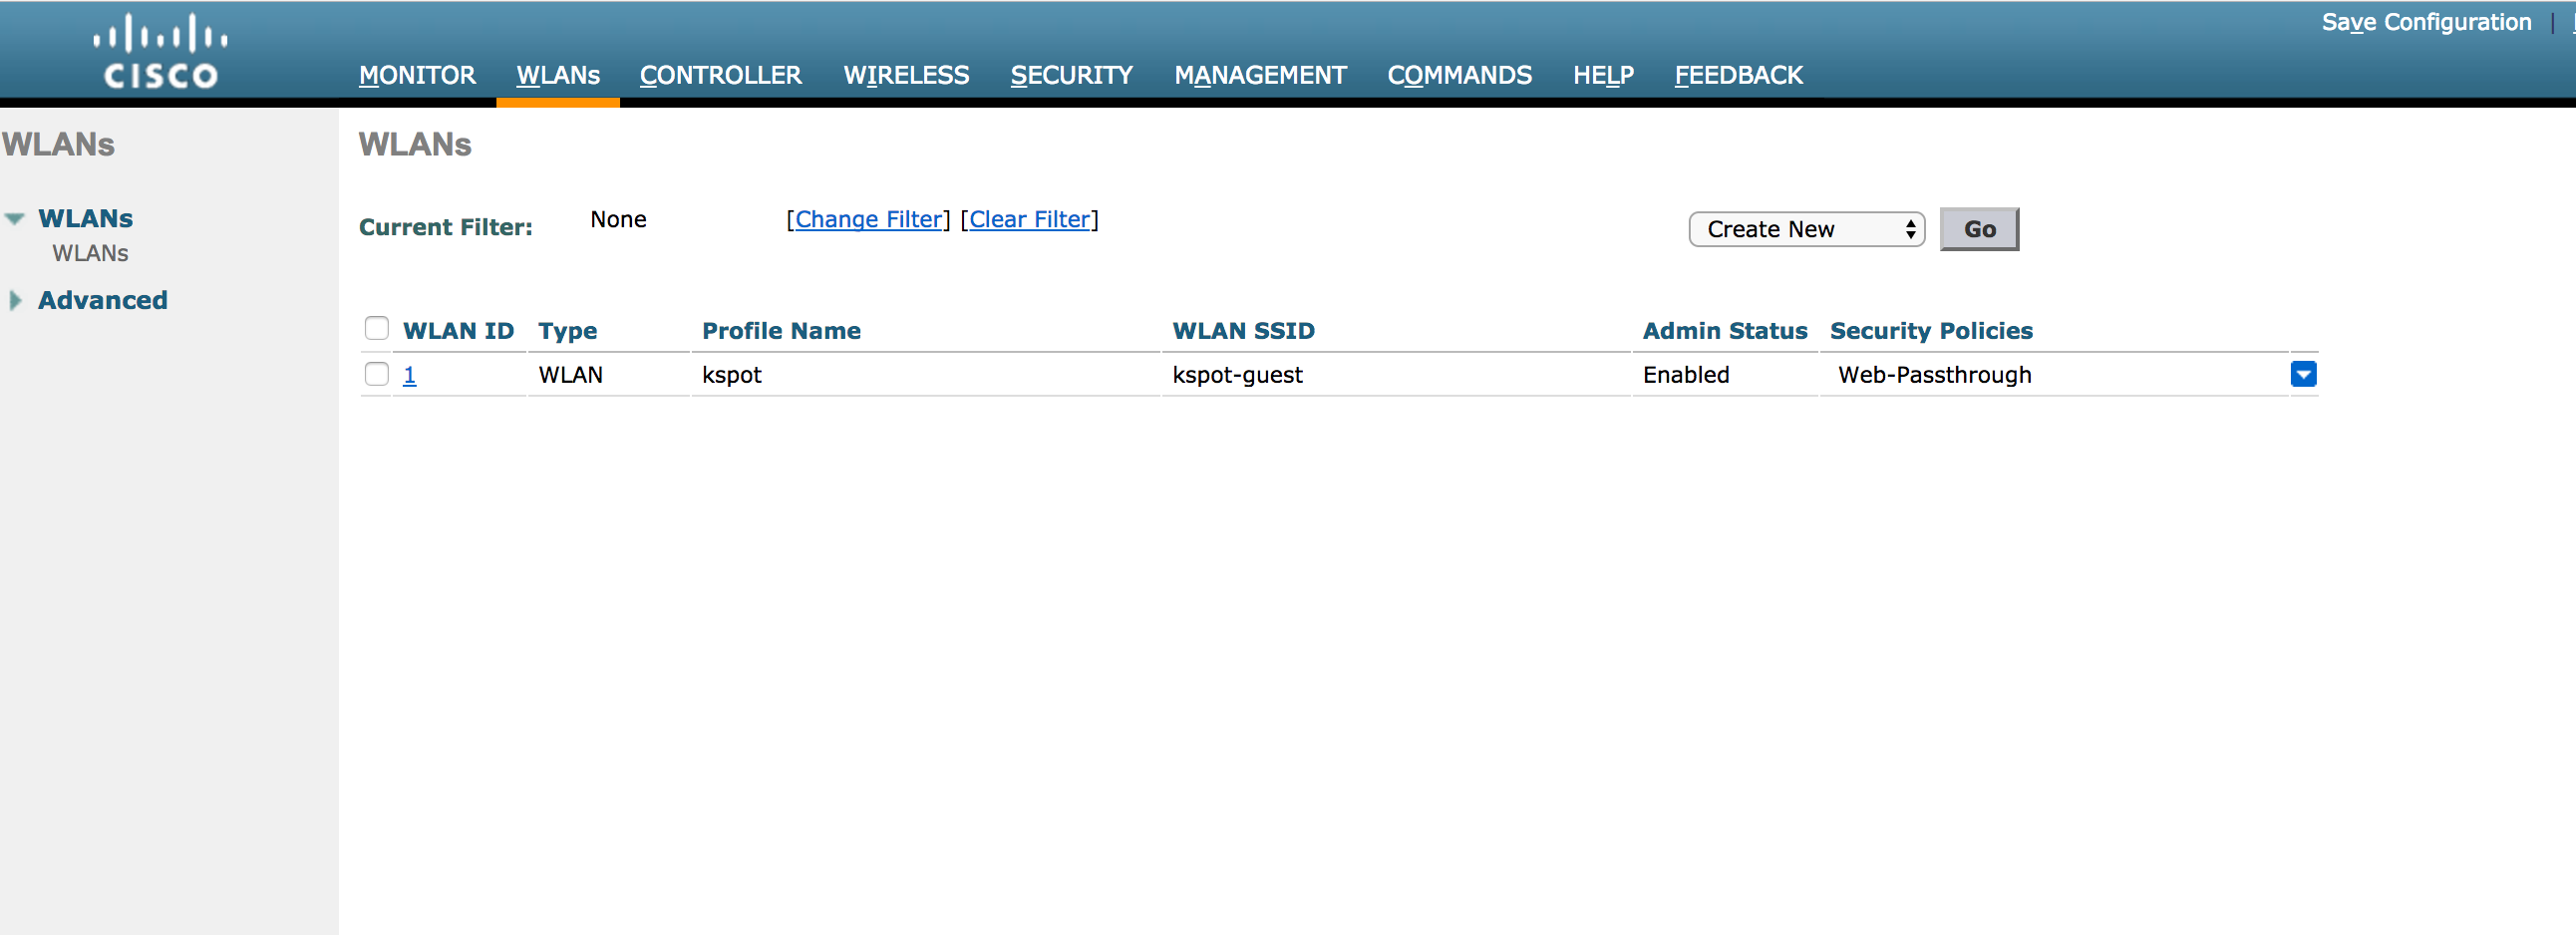
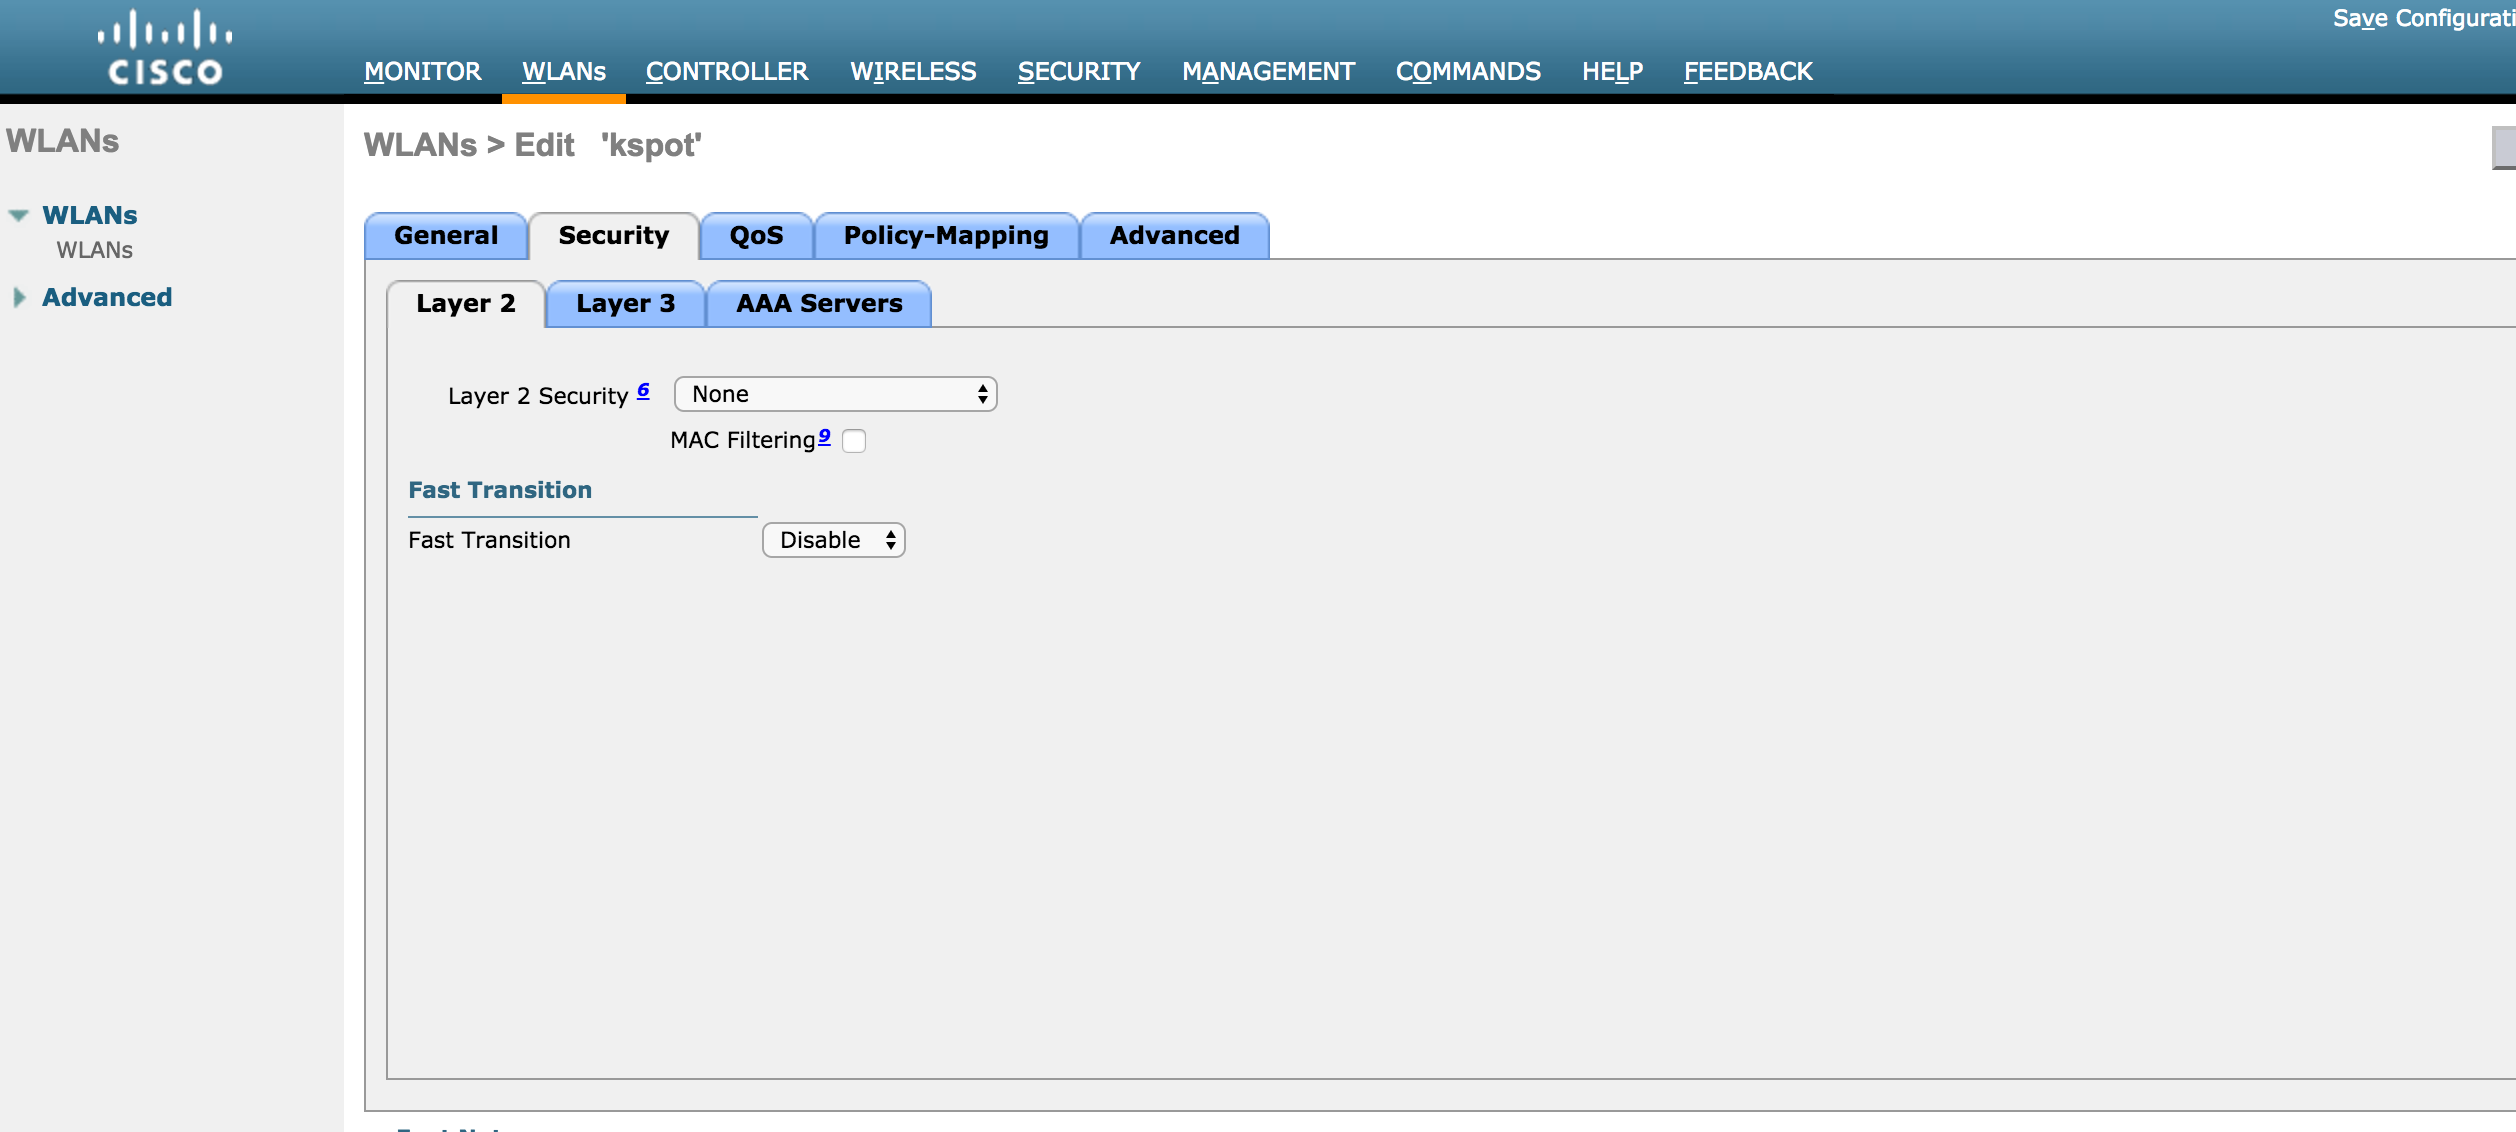
Guest WLAN settings
EnGenius Platform
Welcome to the configuration guide for setting up a Captive Portal with the EnGenius Platform access point. This step-by-step walkthrough will enable you to provide secure and user-friendly internet access to your network users.
Step 1: Register a device in the EnGenius portal
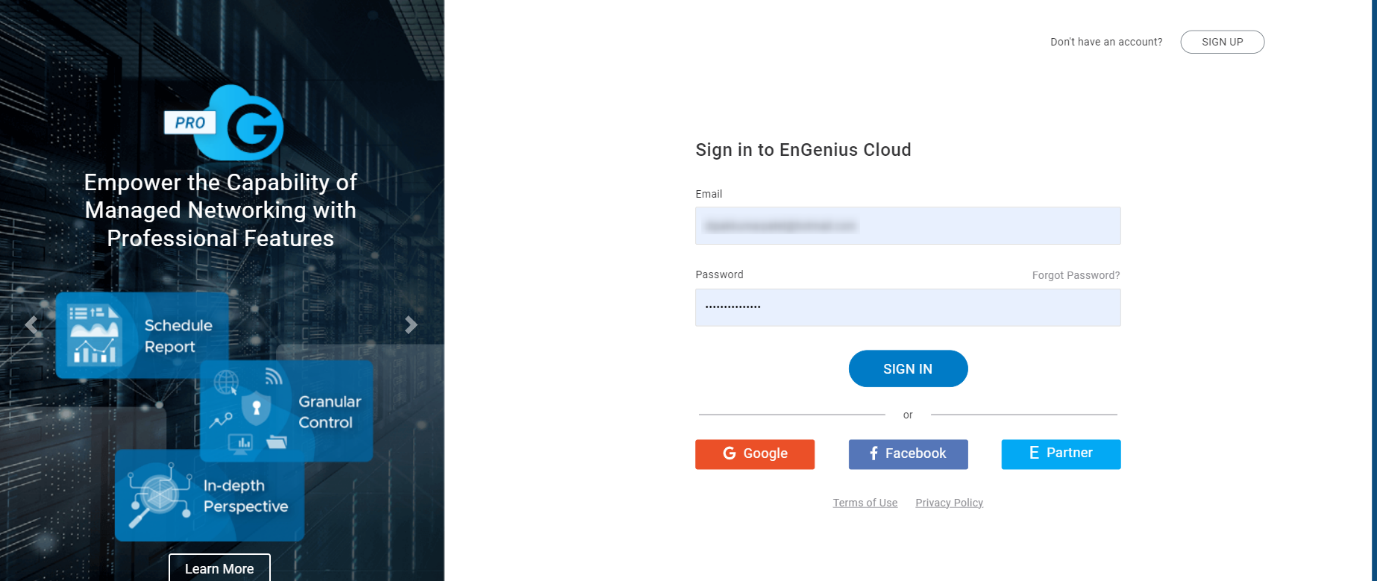
1. Log in to the EnGenius portal to register a new device. Log in with your company credentials.
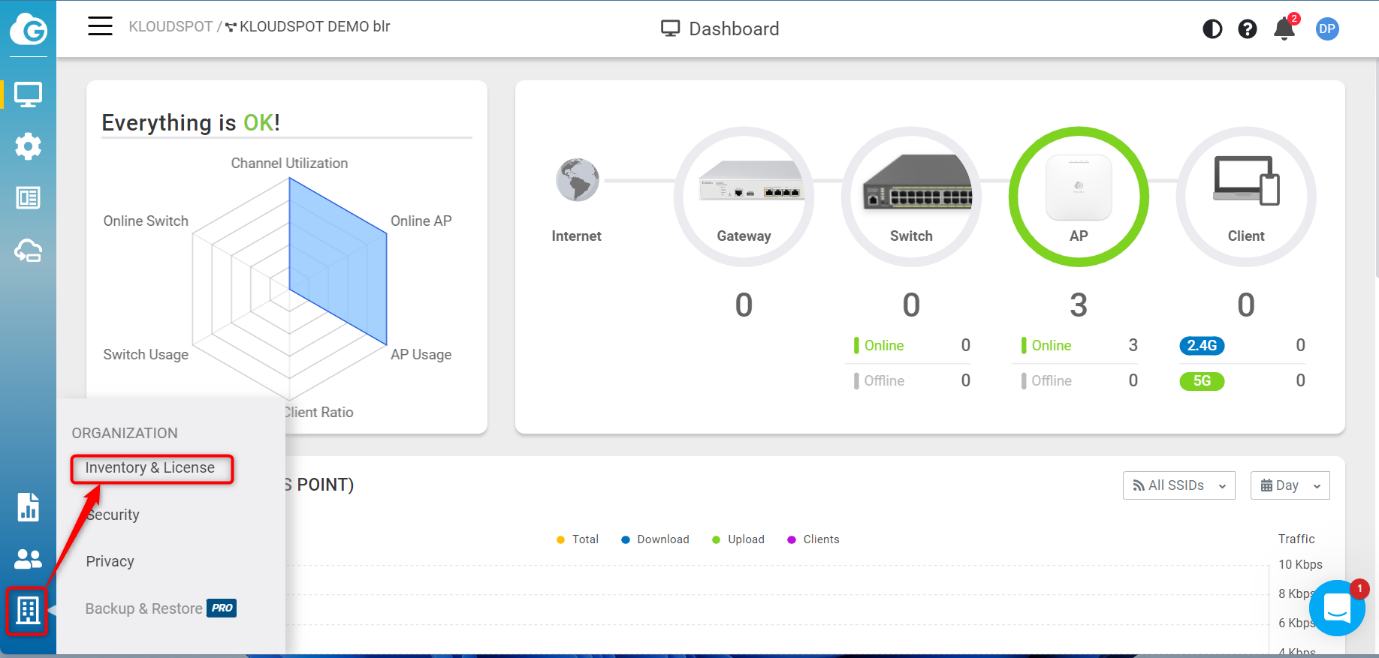
2. From the Home page that opens, Navigate to ORGANIZATION > Inventory &
License.
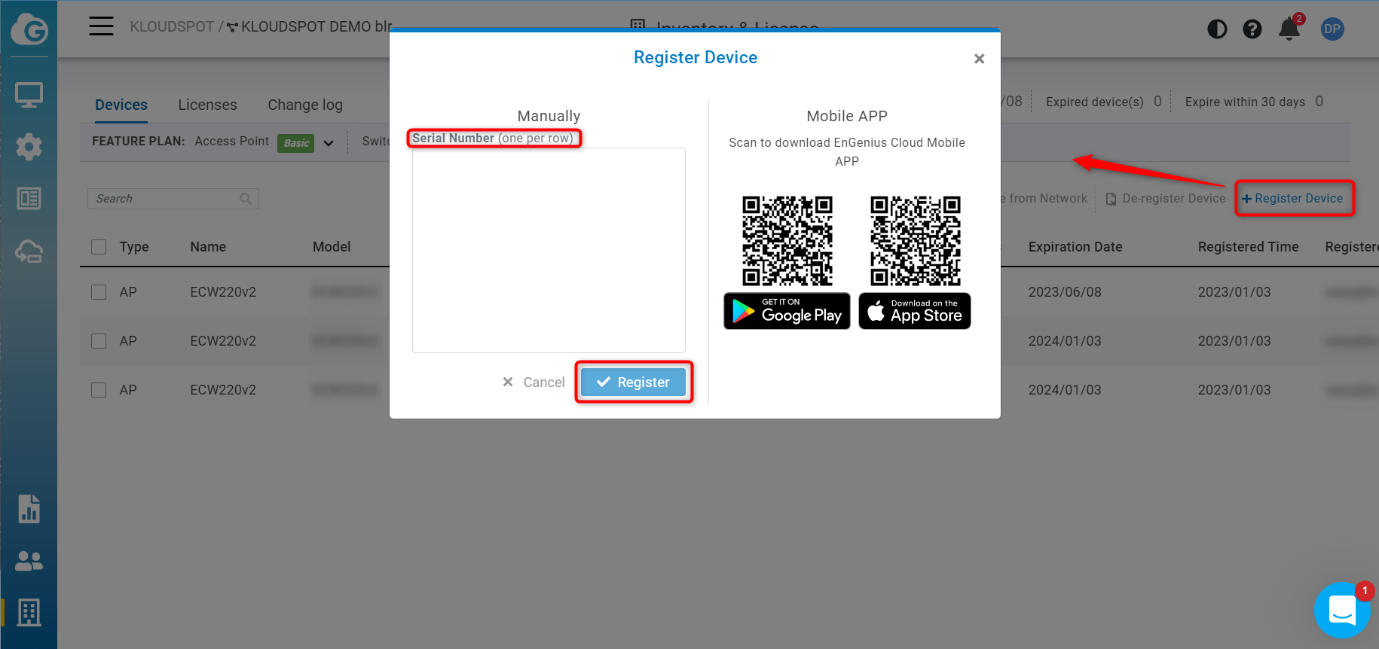
3. On the Inventory & License page that opens, click the + Register
Device button and enter the serial number of the device in the popup window
that opens.
Note: The serial number can be found on the back of the device.
4. Finally click the Register button to register the device. the device
has been registered successfully. Other information related to the device is
automatically obtained while registering with the serial number.
Step 2: Add a new SSID
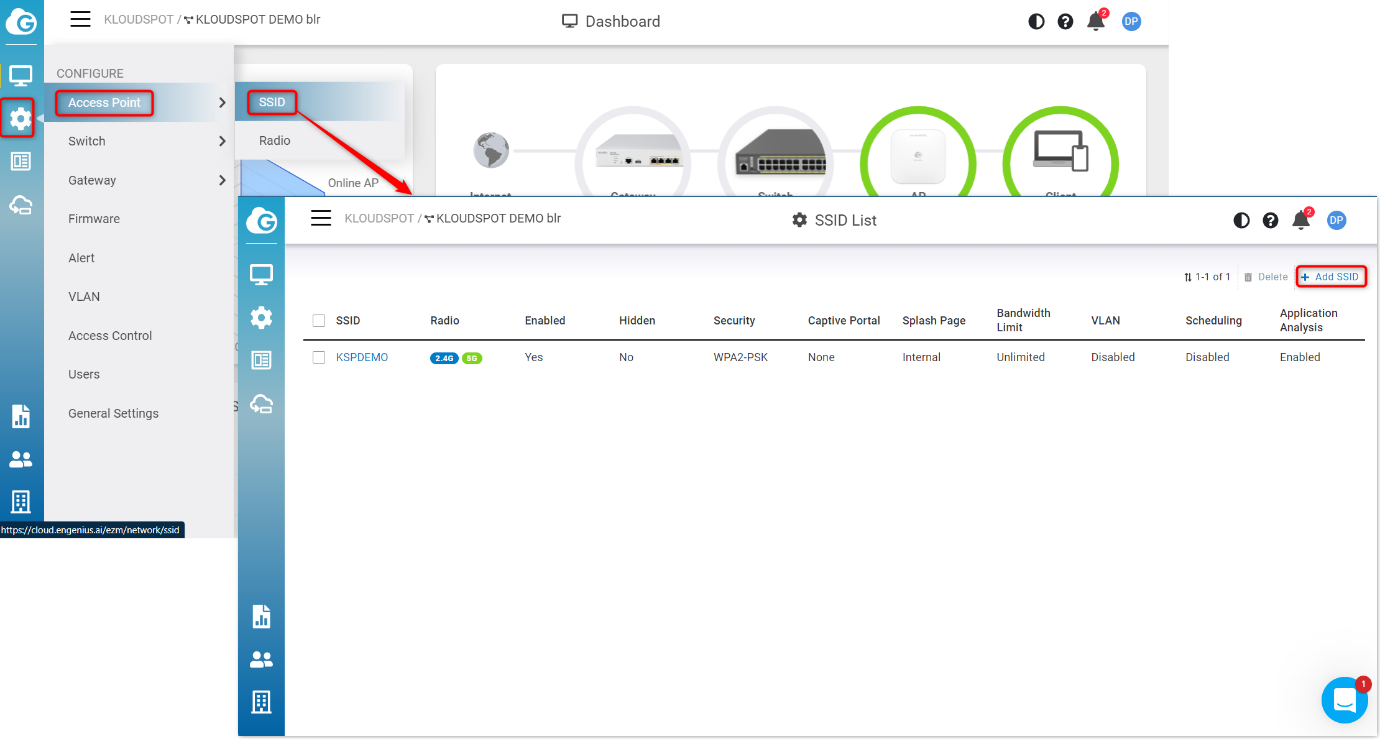
1. After registering the new device, you need to add a new SSID. For that, navigate to CONFIGURE > Access Point > SSID> +Add SSID.
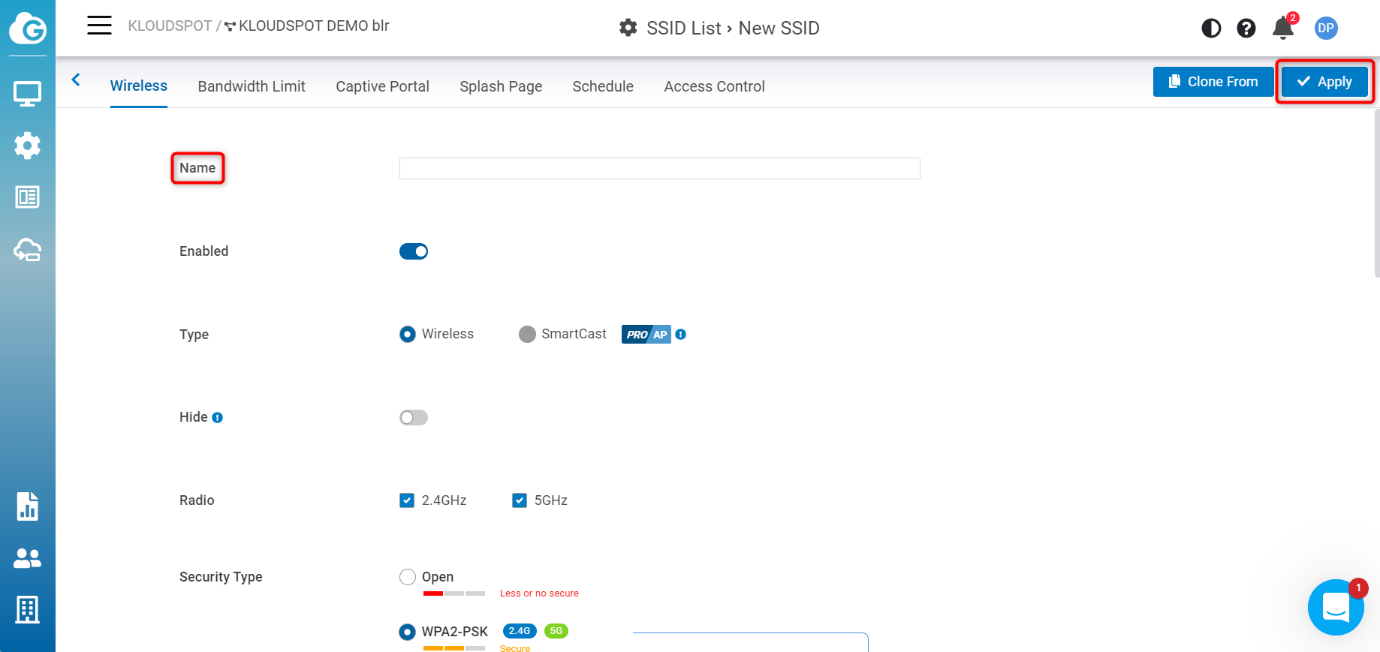
2. Then, as needed, enter the SSID name and security settings. Save the
changes by clicking the Apply button. New SSID added successfully.
Step 3: Setup Captive Portal with EnGenius platform
1. After adding the SSID, the next step is to set up the Captive portal, for that, open the newly created SSID.
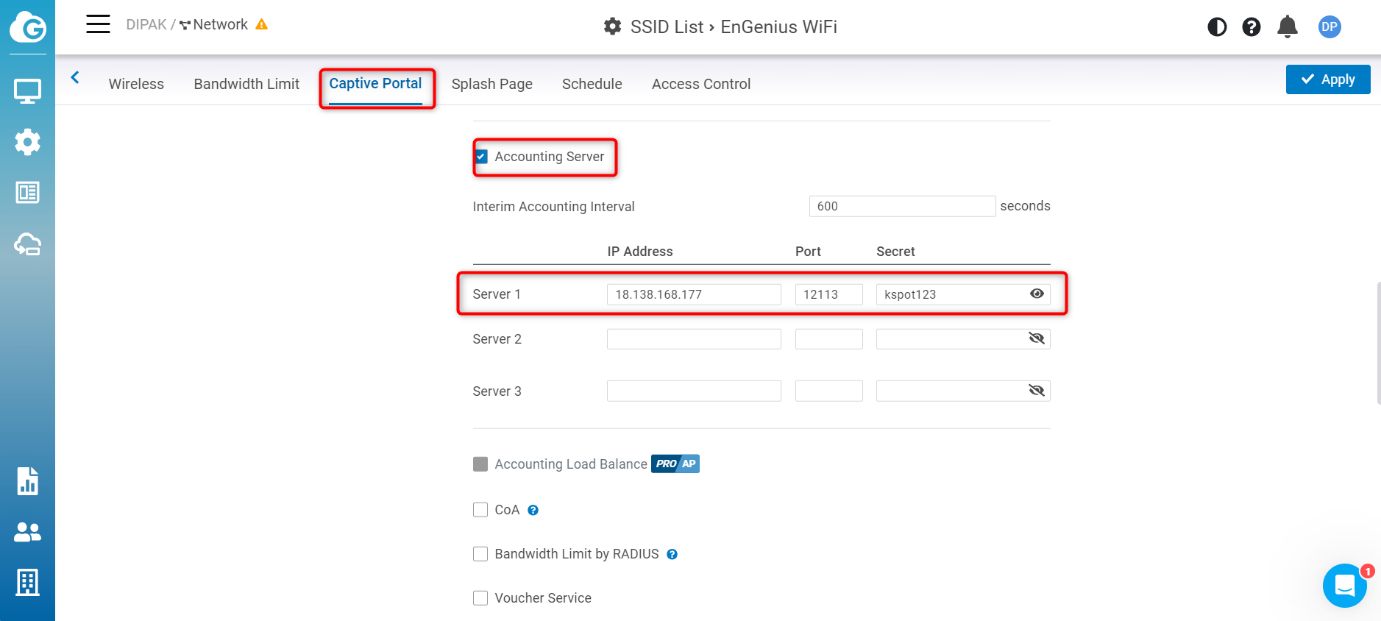
2. Then open the Captive Portal tab and enable the captive portal in the window that opens.
3. In Authentication type select a Custom RADIUS and enter the IP Address, Port, and Secret.
4. Then scroll down and under the Accounting Server , enter the IP
address, Port, and Secret.
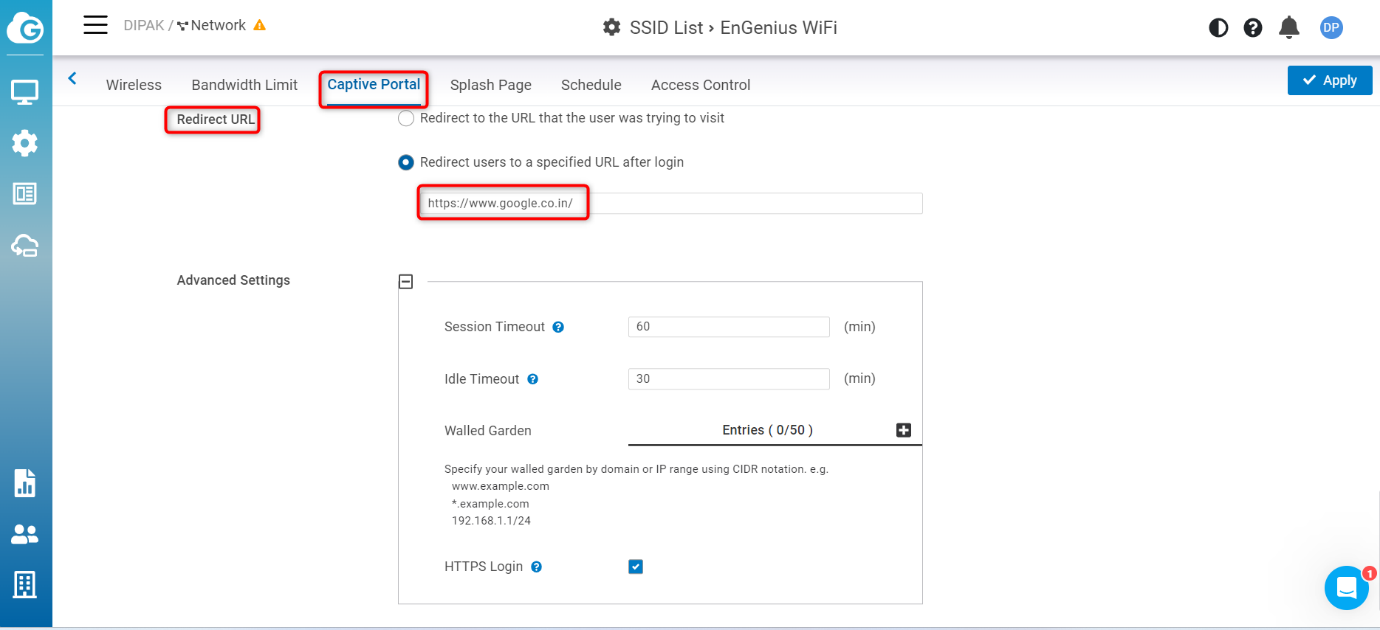
5. Scroll down again and enter the Redirect URL.
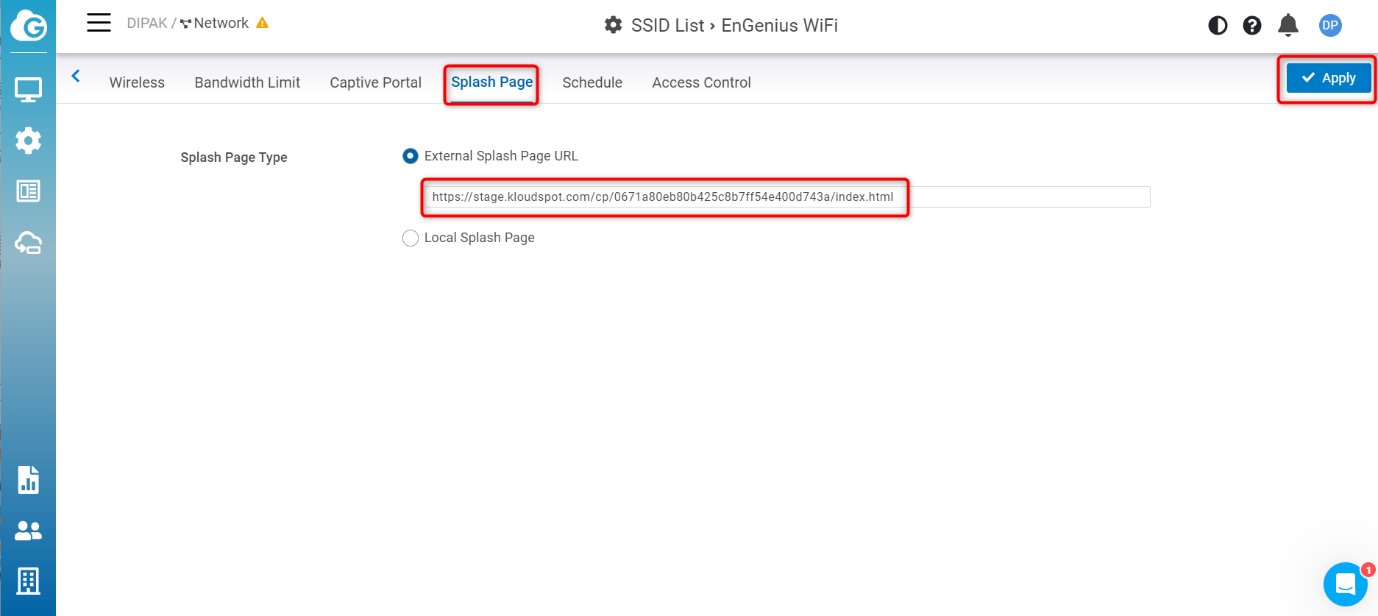
6. Next click on the Splash Page tab and enter the splash page URL.
Note: This is the URL that KloudSpot gives you.
7. Then click on Apply button to save the changes.
8. Captive portal successfully added to EnGenius platform.
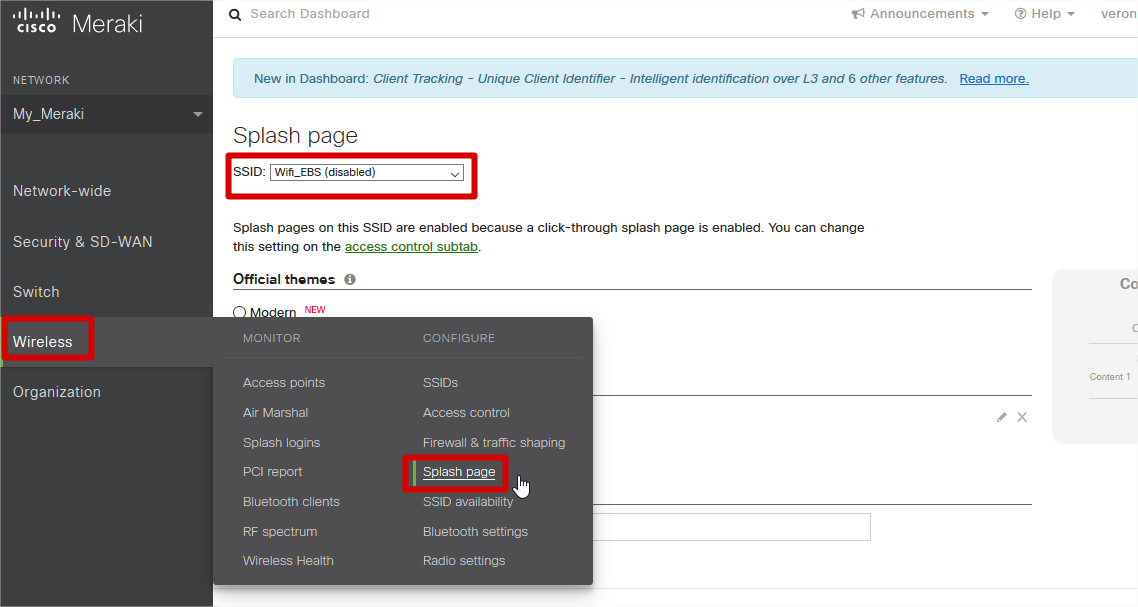
Meraki
Welcome to the configuration guide for setting up a Captive Portal with the Meraki access point. This comprehensive guide will walk you through the process, ensuring that you can seamlessly manage and enhance your users’ internet experience while maintaining top-notch security and compliance.
Guest Portal
Captive Portals or Guest Portal is a multi-channel platform that enables you
to connect and engage with visitors on your premises.
Guest portal screen page allows to create and design a customizable portal
from scratch.
A sample of templates will be given as an option to choose to create a portal,
layout will be available as a part of the template.
Following are the steps to configure the Guest Portal.
Captive Guest Portal Configuration
The captive portal is designed with following terms that are described below:
Social Authentication: Needs authentication using social platforms as Facebook, Twitter, Linked and it will ask user to authenticate with a valid account.
Email Authentication : It will ask the user for their Name and Email address to be able to Authenticate.
SMS Authentication: It asks the user for their contact number and authenticate over a SMS.
Token Based: A token is generated by the admin. The users get this token when they register and on entering the token as an authentication, they get access to the internet.
Username/Password
Third party
The following are for custom development and can be integrated as per
requirement.
Third party ERP
Third party PMS
Third party POS
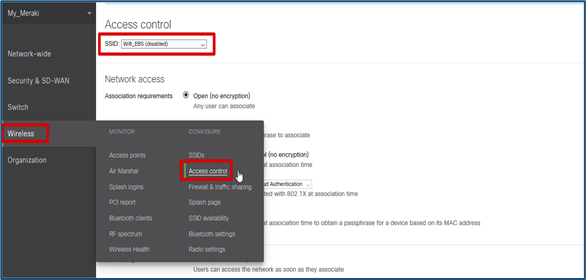
Enter ‘Wireless’ , ‘Access Control’
Choose the SSID to which the Captive portal will be configured.
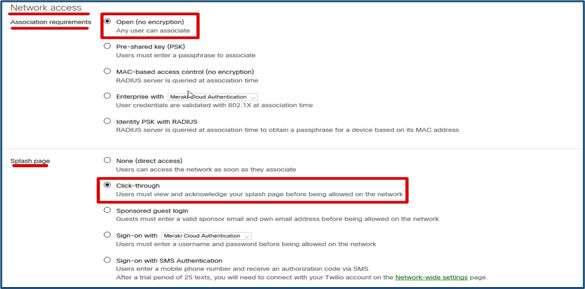
In Network Access, Association requirement, Select ‘Open (no encryption)’.
In Network Access, Splash page, Select ‘Click-through’.
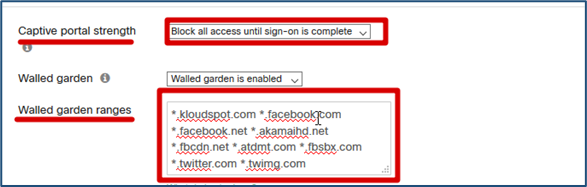
In Network Access, Captive portal strength, Select ‘Block all access until sign-on is complete’
In Network Access, Walled garden ranges, Enter the following domains:
Kloudspot has a powerful workflow and policy driven campaign management
solution centered mostly around Wi-Fi which offers both online and offline
campaigns. These online campaigns can be created and managed using Captive
Guest Portals. Creation of Captive guest portals is extremely easy using one
of many templates supported by KloudCampaign Editor. KloudCampaign Editor can
help guide the user to create a captive portal for the hardware they have
deployed on the network.
For more details on how to create Campaigns, resources and configure dynamic
policies and workflows, please refer to relevant Kloudspot documentation.
Log in to Kloud Manage
After configuring KloudPortal with your third-party access point, the next step is to log in to KloudManage. KloudManage is the web-based software provided by Kloudspot that allows you to manage and customize your KloudPortal settings according to your specific needs. Here’s how to log in:
Step 1: Open your web browser.
Step 2: In the address bar, type the URL provided to you upon purchase, and press Enter. This URL will lead you to the KloudManage login page.
Step 3: On the login page, you will need to enter your username and password. These credentials should have been provided to you upon purchase. If you haven’t received them or have trouble logging in, please contact Kloudspot support for assistance.
Step 4: Once you’ve entered your username and password, click the “Log In” button to access the KloudManage dashboard.
You are now logged in to KloudManage, where you can further customize and manage your KloudPortal settings, user management, portal customization, and guest management. If you need guidance on how to use KloudManage effectively, please refer to the following sections for detailed instructions.
Dashboard overview
In this Dashboard Overview, we will walk you through the key features and functionalities of KloudManage. Whether you’re a network administrator, an IT professional, or a business owner, this guide will help you navigate the dashboard with confidence, allowing you to tailor your KloudPortal experience to meet your organization’s unique needs.
There are 2 types of dashboards available.
Main account level
Venue level
Main account level dashboard.
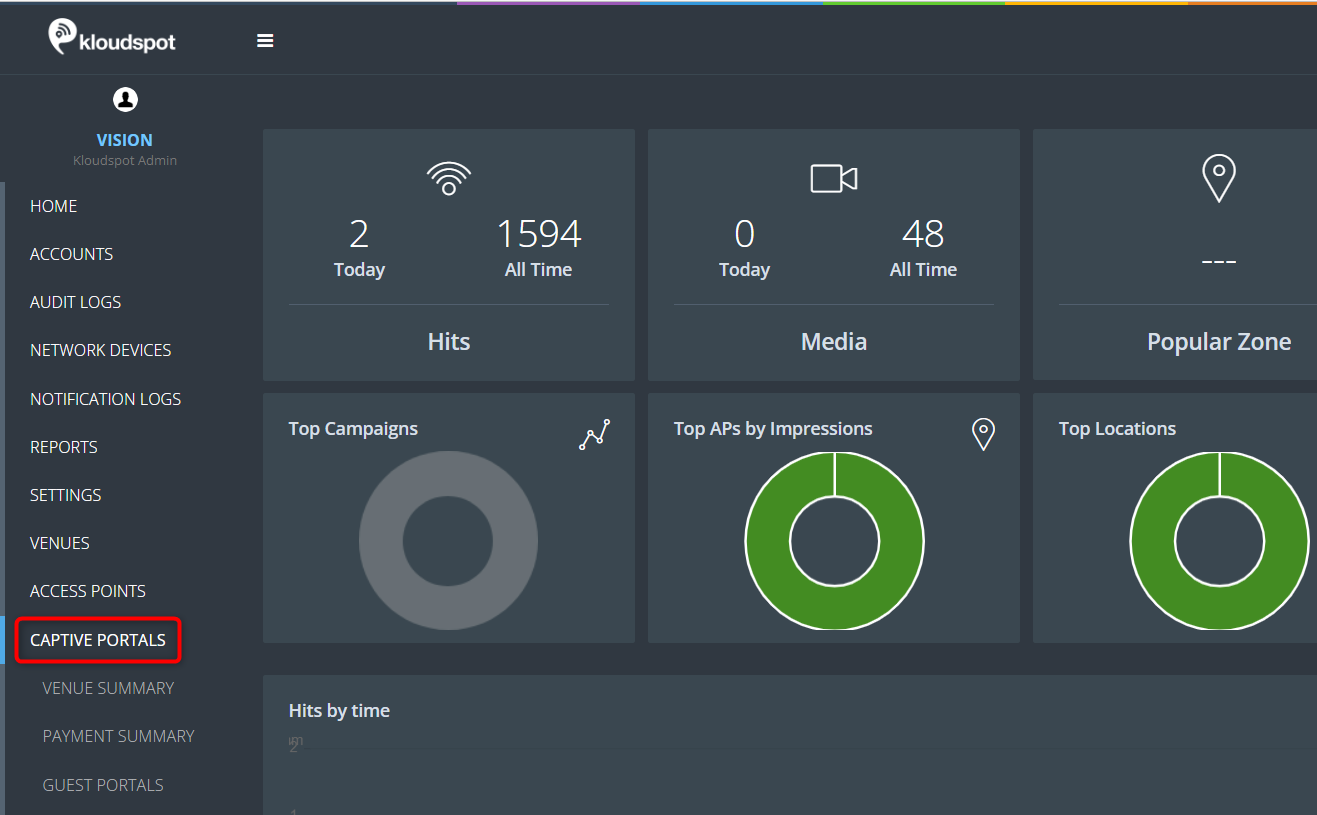
1. The captive portal main account level dashboard is a powerful tool that enables you to collect and view information from all venues using the captive portal. This dashboard is designed to provide you with an overview of your entire network and allows you to view data from all locations in one place. By collecting information from the captive portal of all venues, the dashboard provides you with valuable insights into the performance of your network and helps you make informed decisions to improve user experience.
2. To access the Main account level dashboards, follow these simple steps:
Step 3: The main account level dashboard will immediately open.
3. Once you have access to the Captive portal menu, you will see several dashboards that contain important information.
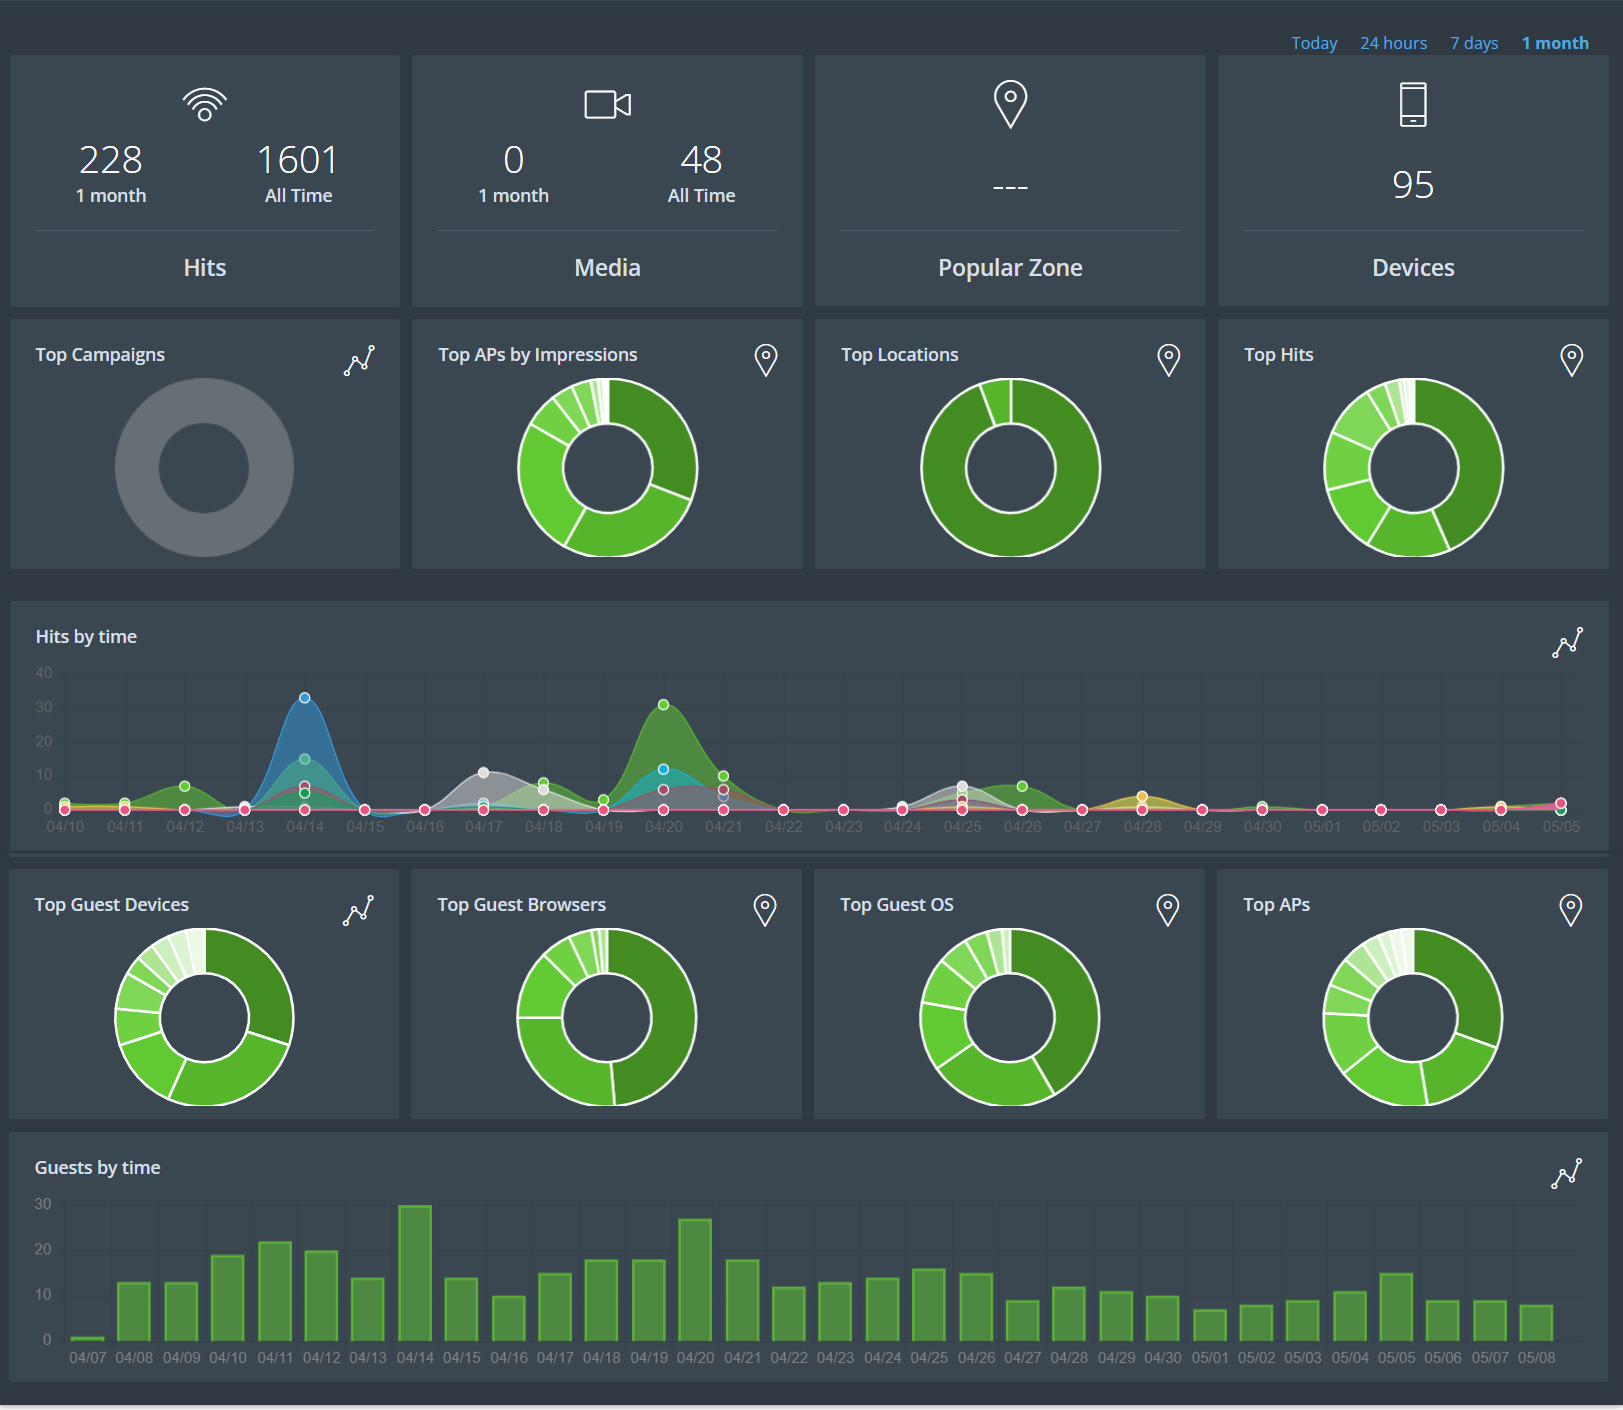
4. The information displayed in this section pertains to the main account level. In other words, the dashboard data shown here are based on information collected from all locations.
5. Here is a brief explanation of each section:
Hits: This section shows you how many people have connected to the
captive portal today and how many people have connected to the portal so far.
This information is updated in real-time, so you can track the number of hits
as they happen.
Media: This section shows you how many media campaigns are currently
running and how many media campaigns have been run so far. This information
can help you understand the effectiveness of your media campaigns and make
improvements where necessary.
Popular Zone: This section shows you which venue has the most people
using the captive portal. This information can help you optimize your network
and ensure that you are providing the best possible experience to your users.
Devices: This section shows you how many devices are currently connected
to the captive portal. This information can help you monitor your network and
ensure that it is running smoothly.
Top Campaigns: This section shows you which campaigns have been viewed by
the most people. This information can help you understand which campaigns are
most effective and make improvements where necessary.
Top APs by Impression: This section shows you the most used access points
in the form of a pie chart. This information can help you optimize your
network and ensure that your users are getting the best possible experience.
Top Locations: This section shows you the location of the hits in pie
chart form according to their usage.
Top Hits: Top Hits: This section shows you the most popular hits in the
form of a pie chart. Hits refer to the number of times users tried to access
the captive portal, including how many successfully connected, how many used
authentication methods, and how many visited the landing page. This
information can help you understand what your users are most interested in and
make improvements where necessary.
Hits by Time: This section shows you the number of hits in the form of a
line chart according to time. This information can help you understand when
your network is busiest and make necessary adjustments.
Top Guest Devices: This section shows you the devices used by guests in
pie chart form. This information can help you optimize your network and ensure
that your users are getting the best possible experience.
Top Guest Browsers: This section shows you the browsers used by guests in
pie chart form.
Top Guest OS: This section shows you the operating systems used by guests
in pie chart form.
Top APs: This section shows you the most used access points in the form
of a pie chart.
Guest by Time: This section shows you the number of guests in the form of
a bar chart according to time. This information can help you understand when
your network is busiest and make necessary adjustments.
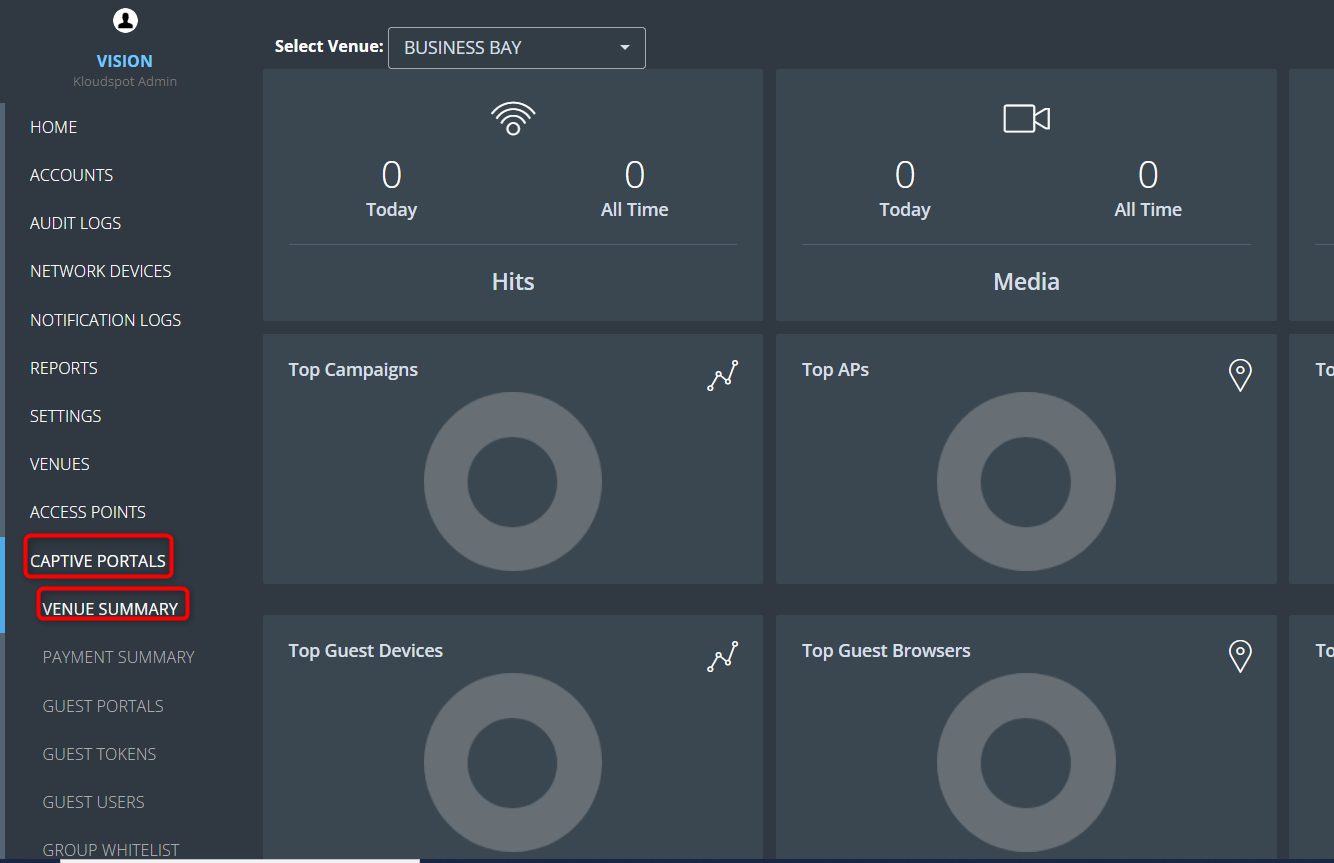
Venue level Dashboard
1. Venue-level dashboards provide specific information about the captive portal usage and performance of a particular location. These dashboards are designed to provide a detailed view of the captive portal activity at the individual venue level. By analysing this information, venue owners and administrators can gain insights into how their captive portal is being used, identify potential issues or areas for improvement, and make informed decisions about how to optimize their network performance.
2. To access the Venue level dashboards, follow these simple steps:
Step 2: Then navigate to the Captive Portal > Venue Summary.
Step 3: The Venue level dashboard will immediately open.
3. Once you have access to the Venue Summary, you will see several dashboards
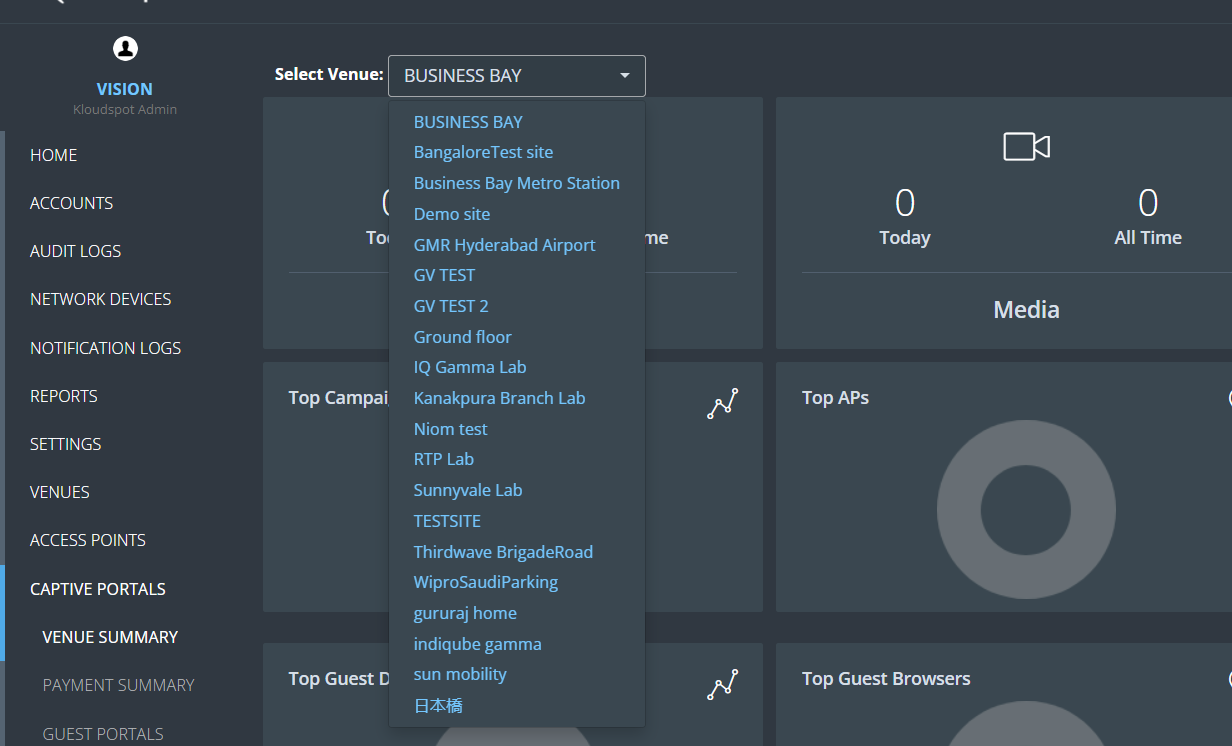
that contain important information. From here you can filter the dashboard by
venue. For that select your desired venue from the venue dropdown list.
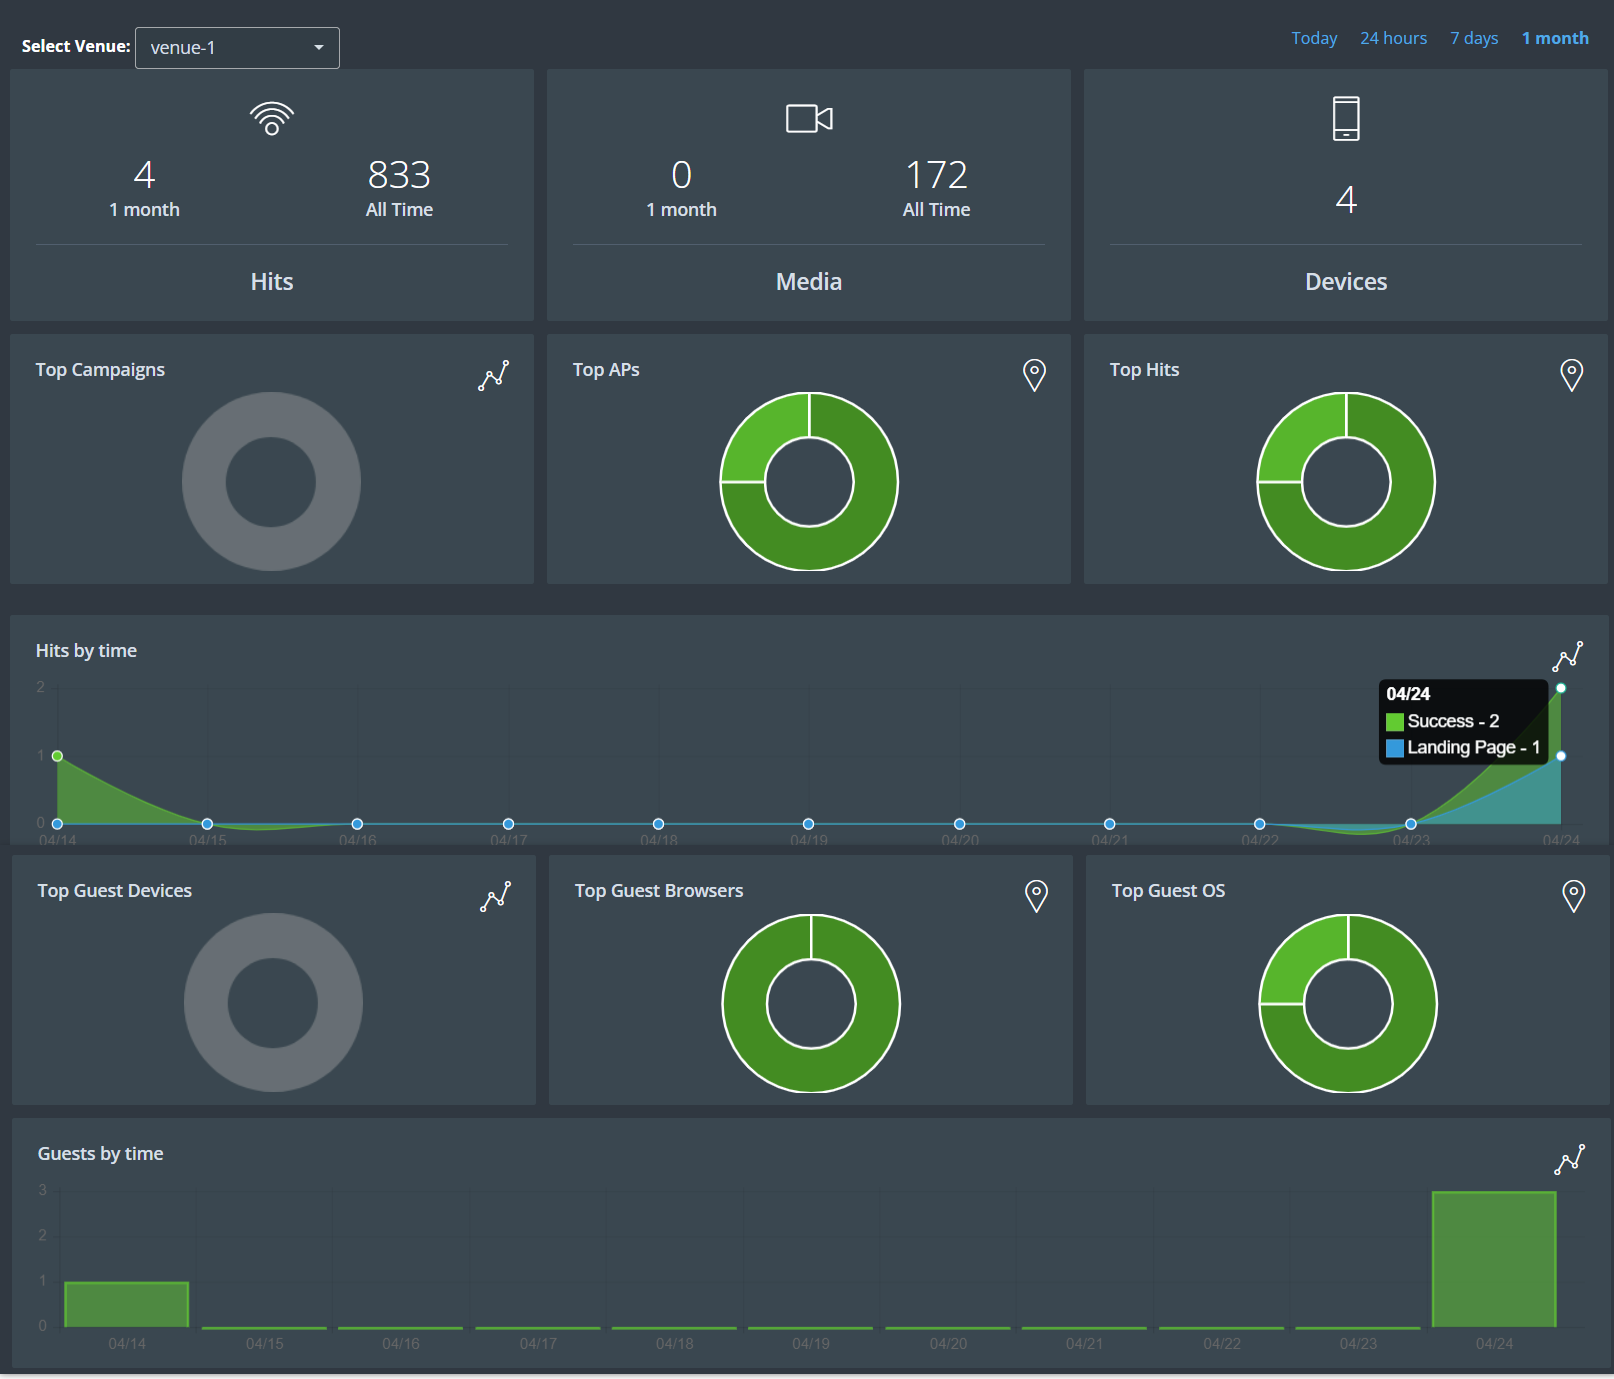
4. Then, choose the desired time frame to obtain the requested data. The
available time intervals include options such as “today,” “24 hours,” “7
days,” and “1 month.”
5. Here is a brief explanation of each section:
Hits: This section shows you how many people have connected to the
captive portal today and how many people have connected to the portal so far.
This information is updated in real-time, so you can track the number of hits
as they happen.
Media: This section shows you how many media campaigns are currently
running and how many media campaigns have been run so far. This information
can help you understand the effectiveness of your media campaigns and make
improvements where necessary.
Devices: This section shows you how many devices are currently connected
to the captive portal. This information can help you monitor your network and
ensure that it is running smoothly.
Top Campaigns: This section shows you which campaigns have been viewed by
the most people. This information can help you understand which campaigns are
most effective and make improvements where necessary.
Top APs: This section shows you the most used access points in the form
of a pie chart. This information can help you optimize your network and ensure
that your users are getting the best possible experience.
Top Hits: Top Hits: This section shows you the most popular hits in the
form of a pie chart. Hits refer to the number of times users tried to access
the captive portal, including how many successfully connected, how many used
authentication methods, and how many visited the landing page. This
information can help you understand what your users are most interested in and
make improvements where necessary.
Hits by Time: This section shows you the number of hits in the form of a
line chart according to time.
Top Guest Devices: This section shows you the devices used by guests in
pie chart form. This information can help you optimize your network and ensure
that your users are getting the best possible experience.
Top Guest Browsers: This section shows you the browsers used by guests in
pie chart form.
Top Guest OS: This section shows you the operating systems used by guests
in pie chart form.
Guest by Time: This section shows you the number of guests in the form of
a bar chart according to time. This information can help you understand when
your network is busiest and make necessary adjustments.
Add KloudPortal to KloudManage
1. Once you have obtained your login credentials from Kloudspot, you can proceed to the next step, which involves adding the captive portal’s controller to KloudSpot’s Device management system.
3. Navigate to NETWORK DEVICES > Add Network Devices.
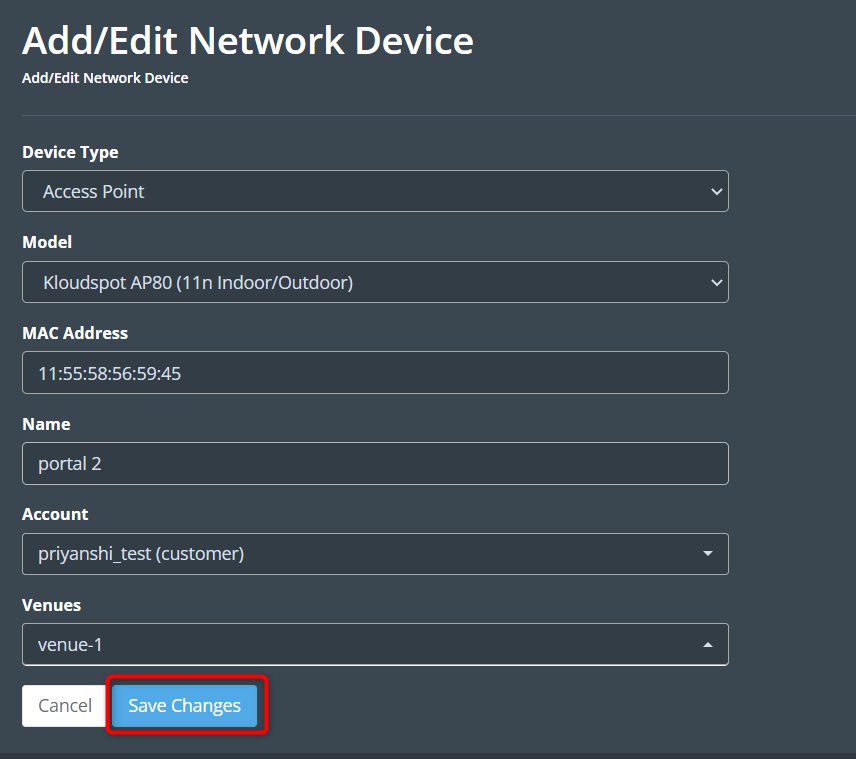
4. Enter the following in the window that opens and click the Save
Changes button.
Device Type: Select the Access Point or Gateway device from the
dropdown list depending on the controller you are using. Select Access
point if you are using a third-party controller.
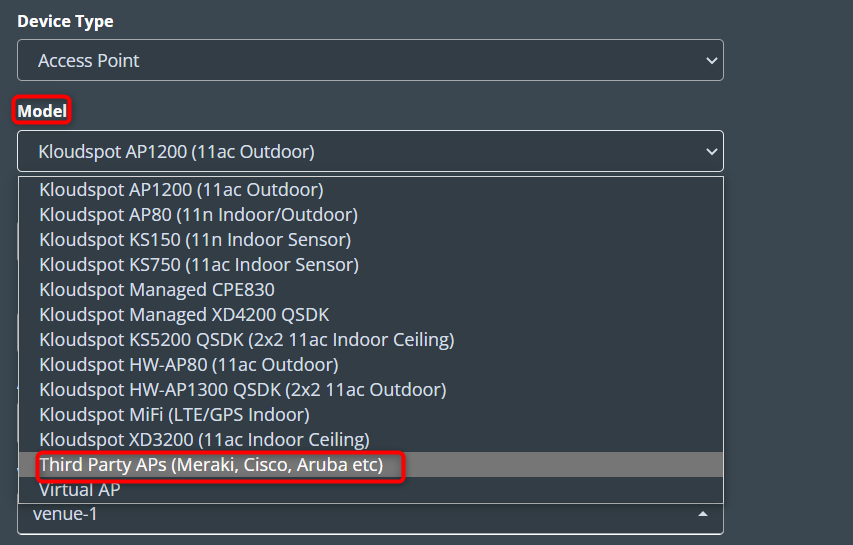
Model: Select your controller model from the dropdown list.
Note: If you are using a third-party controller, select the option “Third
Party Aps (Meraki, Cisco, Aruba etc)” from the model list.
Vendor: If you are selected a third party device, select the vendor name
from the vendor list.
MAC address: Enter the MAC address of your controller.
Name: Give a name for the controller.
Account: Kloudspot provides this information during account creation, and
it is advised to keep it as is.
Venues: During the account creation process, KloudSpot provides
information about the venue.
5. Click the Save Changes button to save the controller.
User and Role management
In this guide, we will walk you through the process of creating and managing user accounts, defining roles and permissions, and ensuring that your network remains secure and compliant with your organization’s policies. Regardless of your level of expertise, this section will provide valuable insights and instructions to help you navigate the user and role management features of KloudPortal.
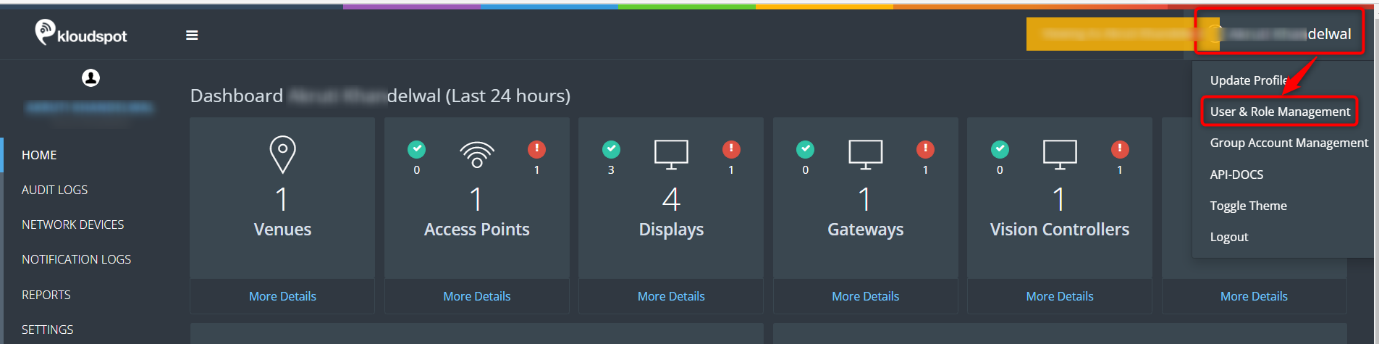
2. Click on the user profile button from the top right corner. After login.
3. Then click on the User & Role Management button from the dropdown list that opens.
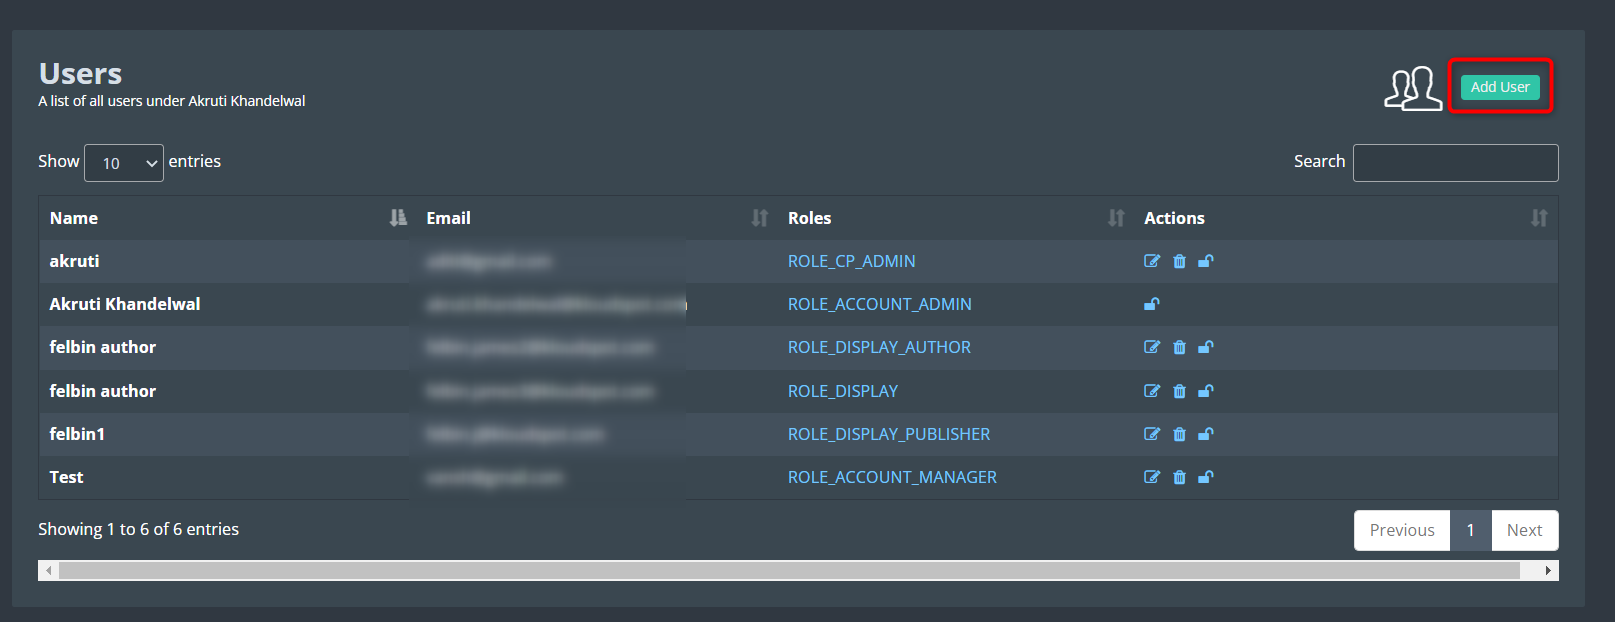
4. From the User window that opens, click the Add User button.
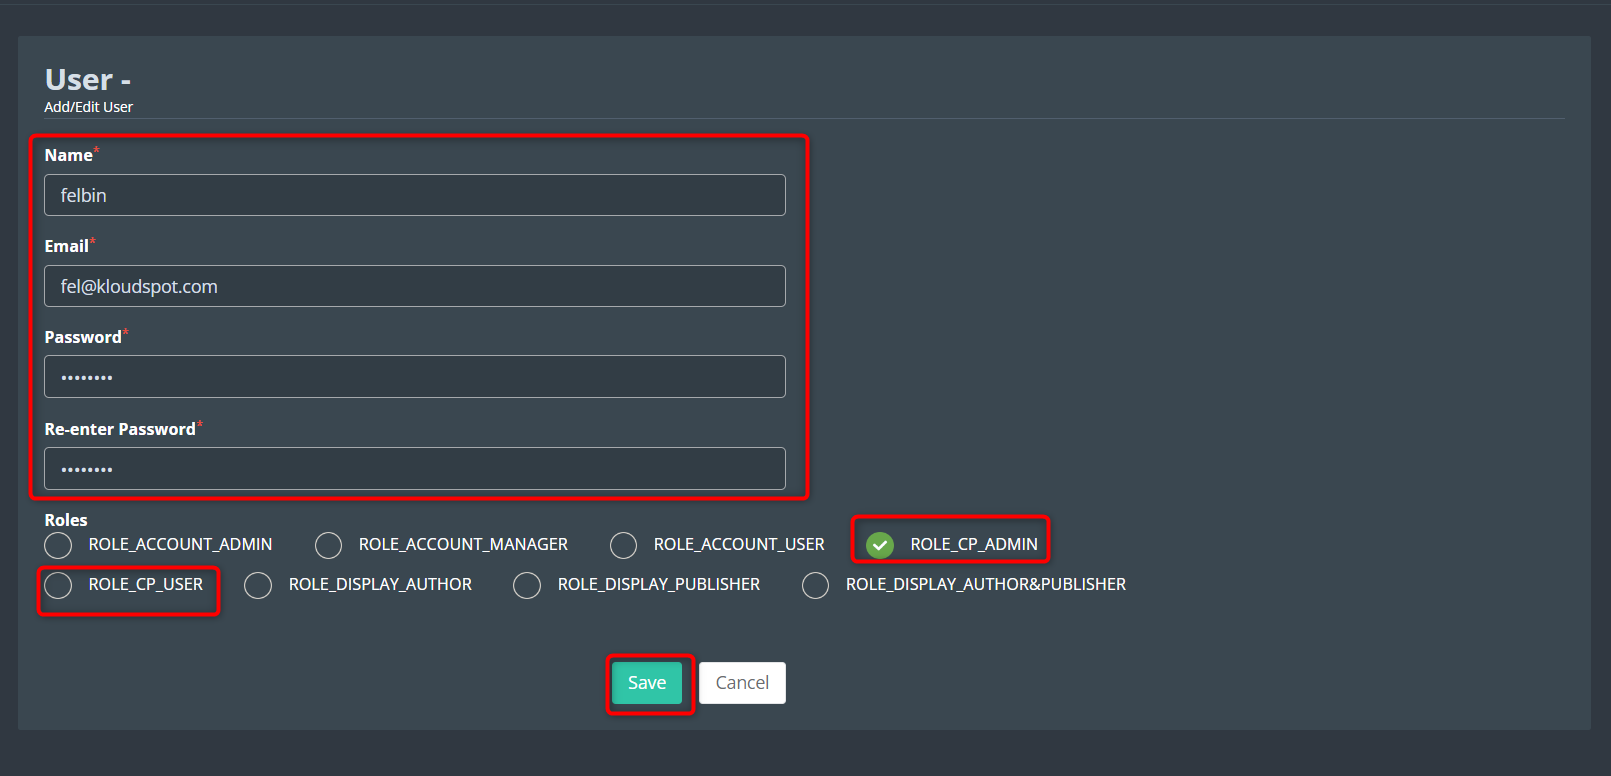
5. Then enter the information of the user and select the user role.
6. ROLE_CP_ADMIN or ROLE_CP_USER can be chosen depending on the role of the
user being added.
7. Click the Save button to save the changes.
8. New user has been added successfully.
Configure 3rd Party Authentications
In today’s digital landscape, securing online interactions and managing user identities are paramount. Kloud Portal understands the importance of providing flexible authentication options for your network users. In this section, “Configure 3rd Party Authentication,” we will explore a range of authentication methods that extend beyond traditional username and password combinations.
By integrating third-party authentication services like Facebook, Google Workspace, LinkedIn, Microsoft, and Twitter into your Kloud Portal setup, you can enhance user convenience, streamline the login process, and bolster security measures. These authentication methods allow users to leverage their existing social media or corporate credentials, simplifying access to your network while ensuring a secure and seamless experience.
In this guide, we will take you through the steps required to configure these third-party authentication options within Kloud Portal. Whether you’re operating a small café, managing a hotel’s Wi-Fi network, or overseeing a large-scale enterprise, these authentication methods offer the flexibility and security needed to meet your unique requirements.
Subsections of Configure 3rd Party Authentications
Okta Authentication
Overview
Okta Authentication integration allows Captive Portal users to log in using their Okta account credentials. This document provides a step-by-step guide on how to integrate Okta Authentication into the KloudManage.
Prerequisites
Before starting the integration process, ensure that you have the following credentials:
KloudManage admin account credentials.
Okta developer account credentials.
Integration Steps
Obtaining Okta ID, Secret and Issuer
Visit Okta Developer site and log in to your Okta developer account. If you don’t have an account yet, you have the option to sign up and create one.
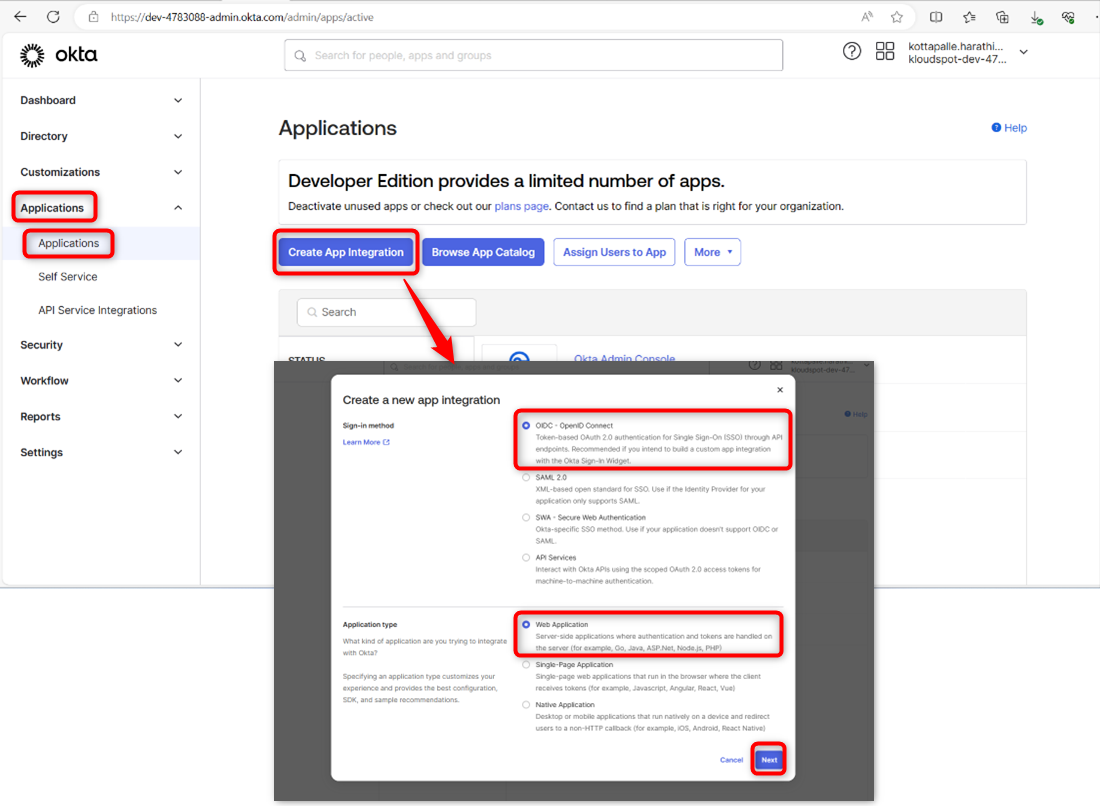
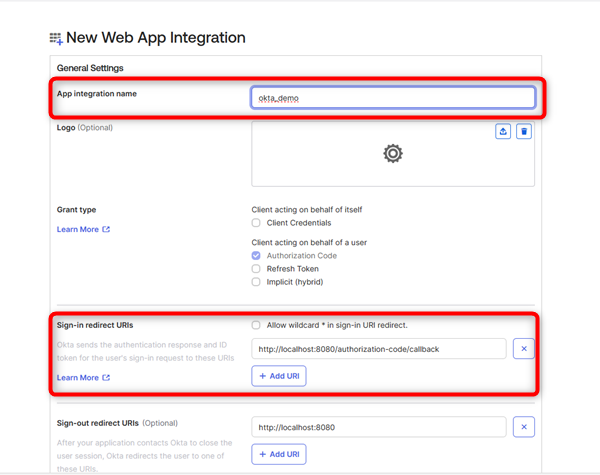
Create a new App Integration by navigating to Application > Create App Integration > OIDC-OpenID Connect > Web Application.
Click on the Next button.
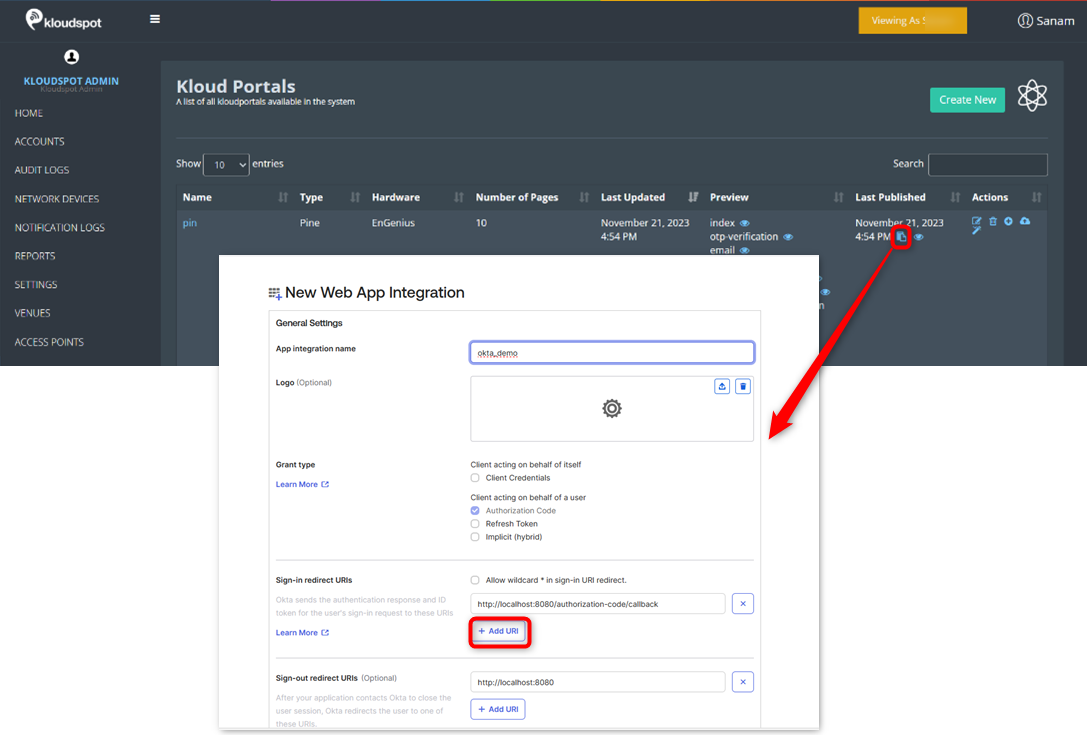
Enter the following details in the New Web App Integration window:
App Integration Name: Enter a name for your app.
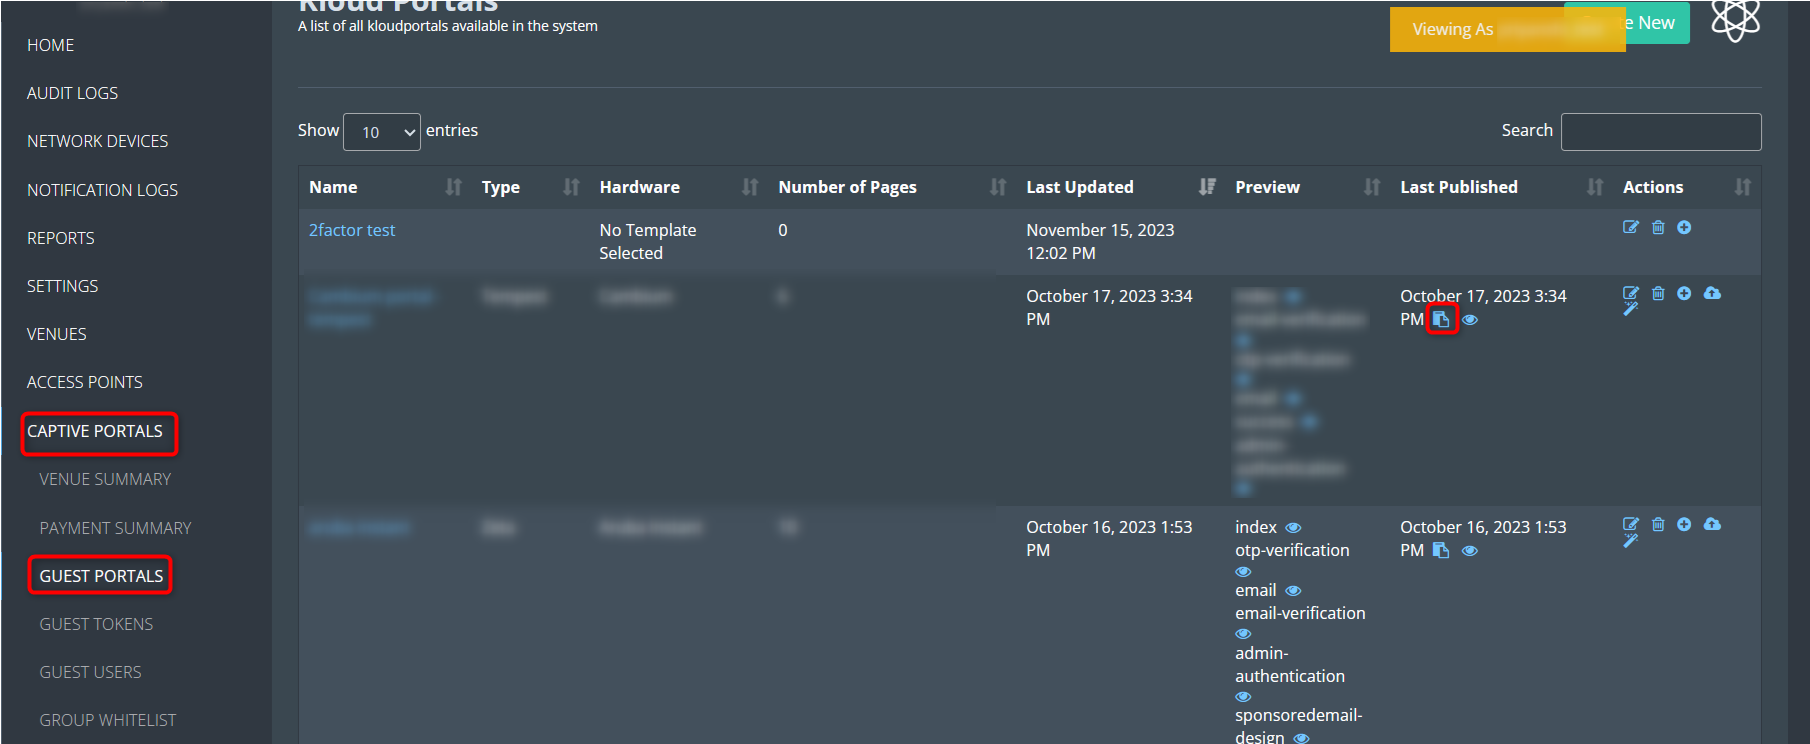
Sign-in Redirect-URI: This is the URL of the Captive Portal. To obtain this, log in to KloudManage and navigate to Captive Portal > Guest Portal. Copy the URL of the portal you want to add Okta SSO.
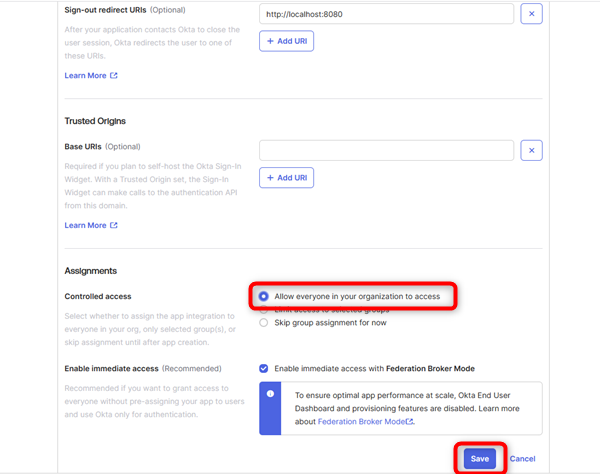
Scroll down, check the Allow everyone in your organization to access checkbox, and click on the Save button. This is an optional step and can be selected as per your requirement.
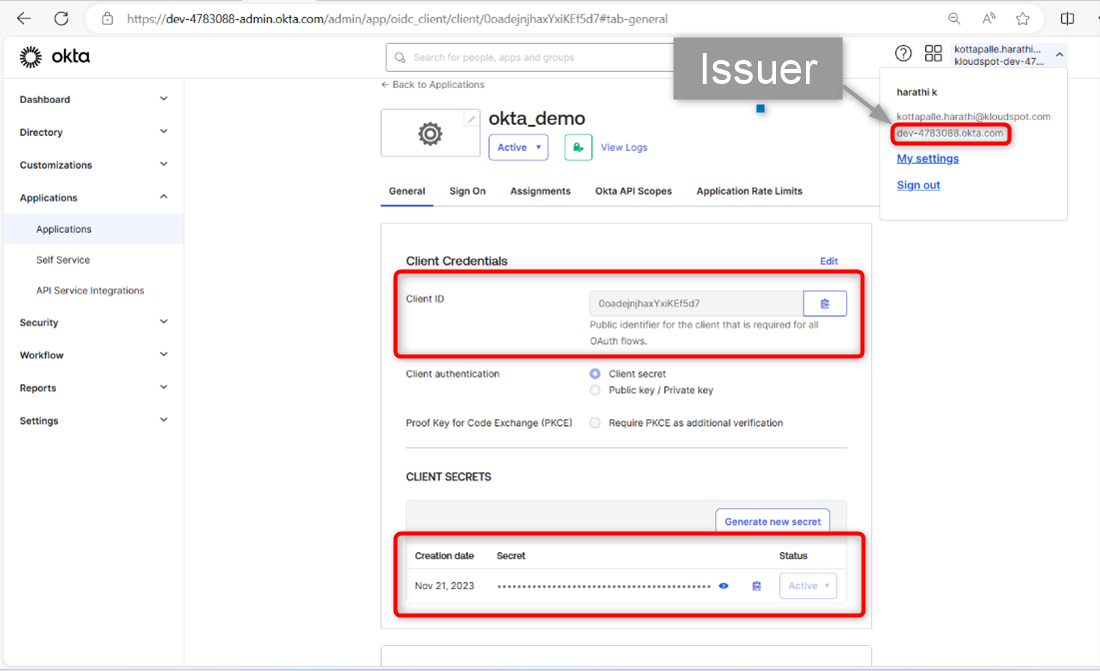
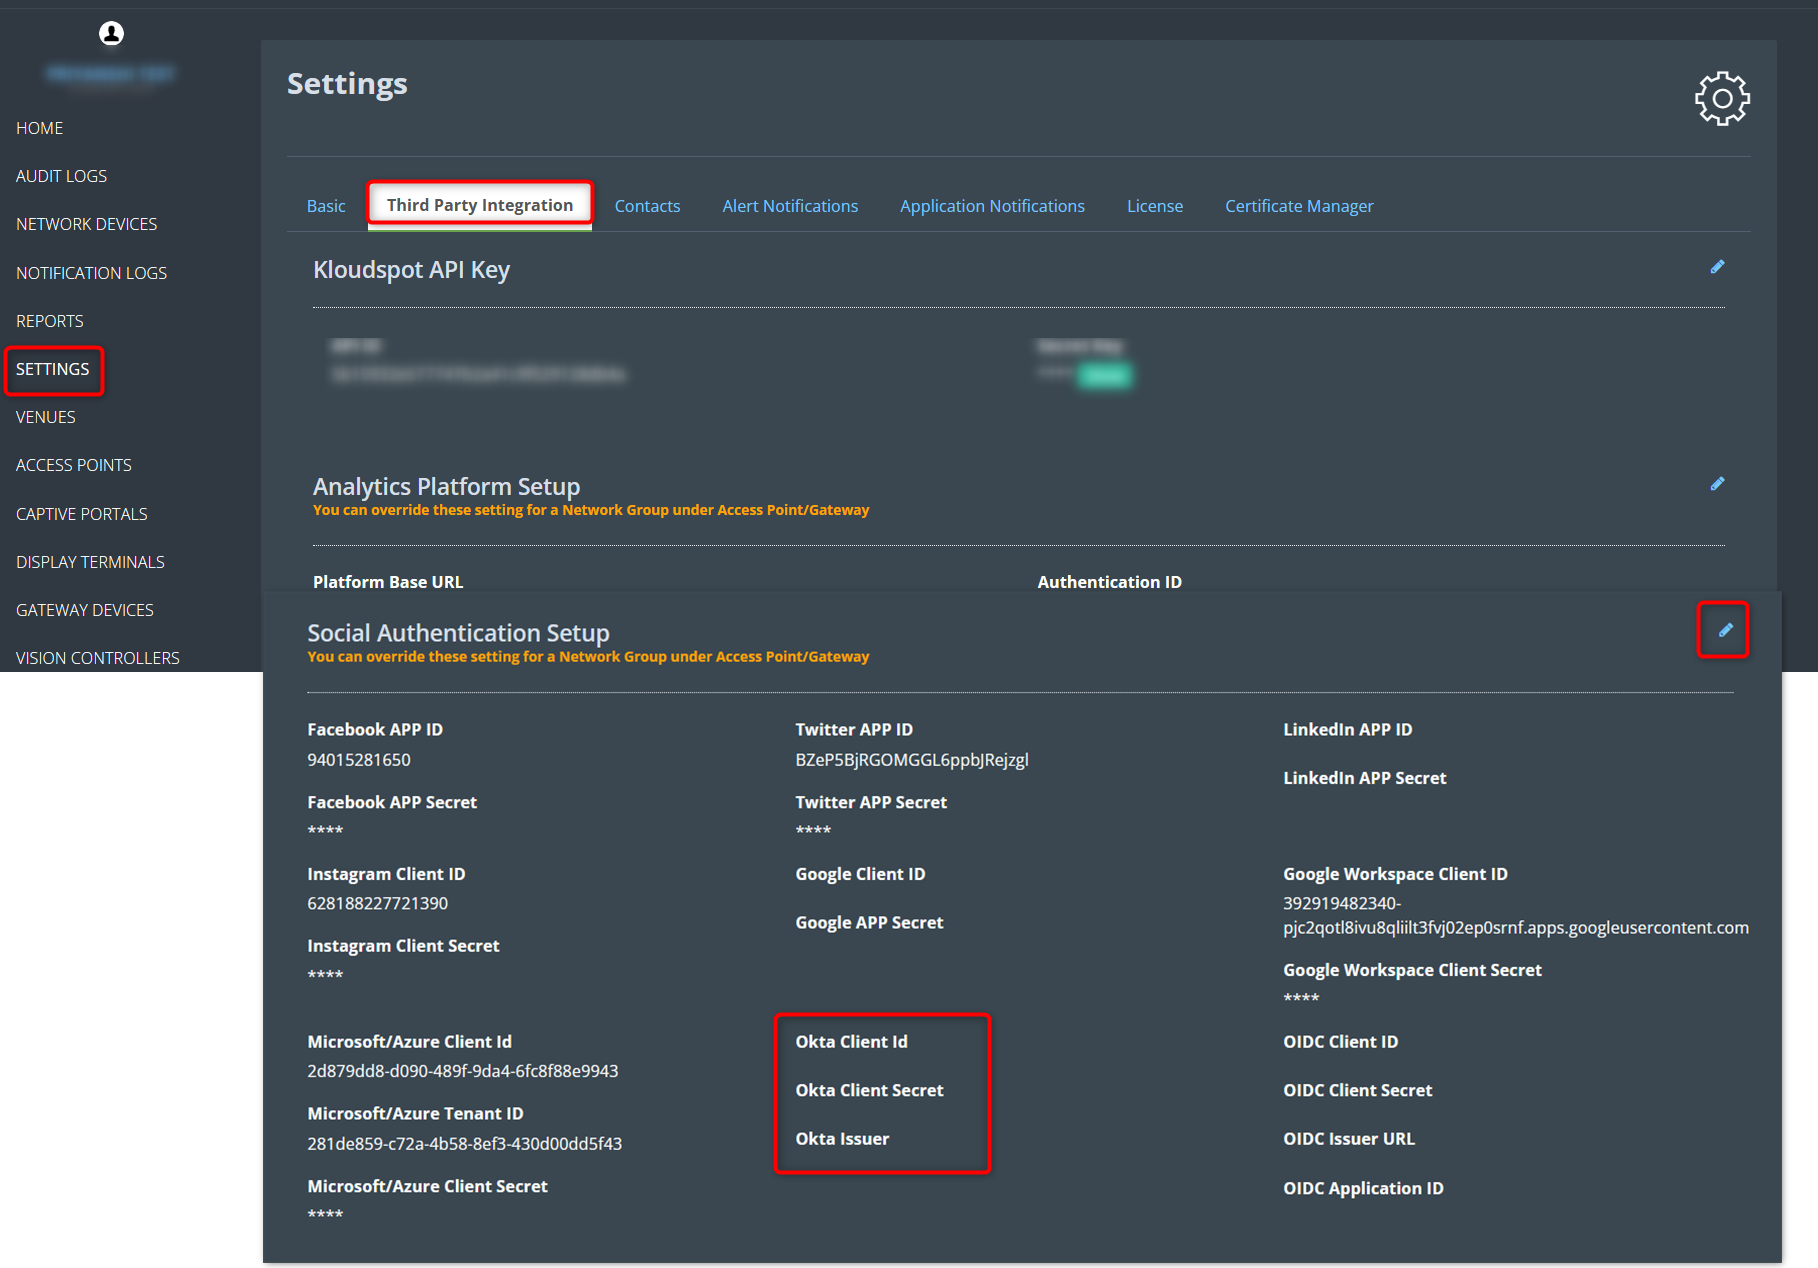
Once saved, the App you created will open. Copy the Client ID, Client Secret, and Issuer from this page.
Scroll down to the Social Authentication Setup section.
Click on the Edit button.
Paste the Okta Client ID, Client Secret, and Issuer copied from the Okta App into their respective places.
Click on the Save Social Settings button to save the changes.
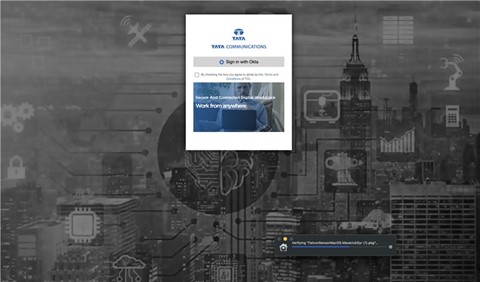
Logging in with Okta SSO
After completing the integration steps, users can log in to the Captive Portal using Okta Single Sign-On (SSO). The Okta SSO option should now be available on the Captive Portal login page.
Facebook Authentication
By adding Facebook Social Authentication, Captive Portal users can log in using their Facebook account credentials.
Step 1: Accessing Third-Party Integrations in KloudManage
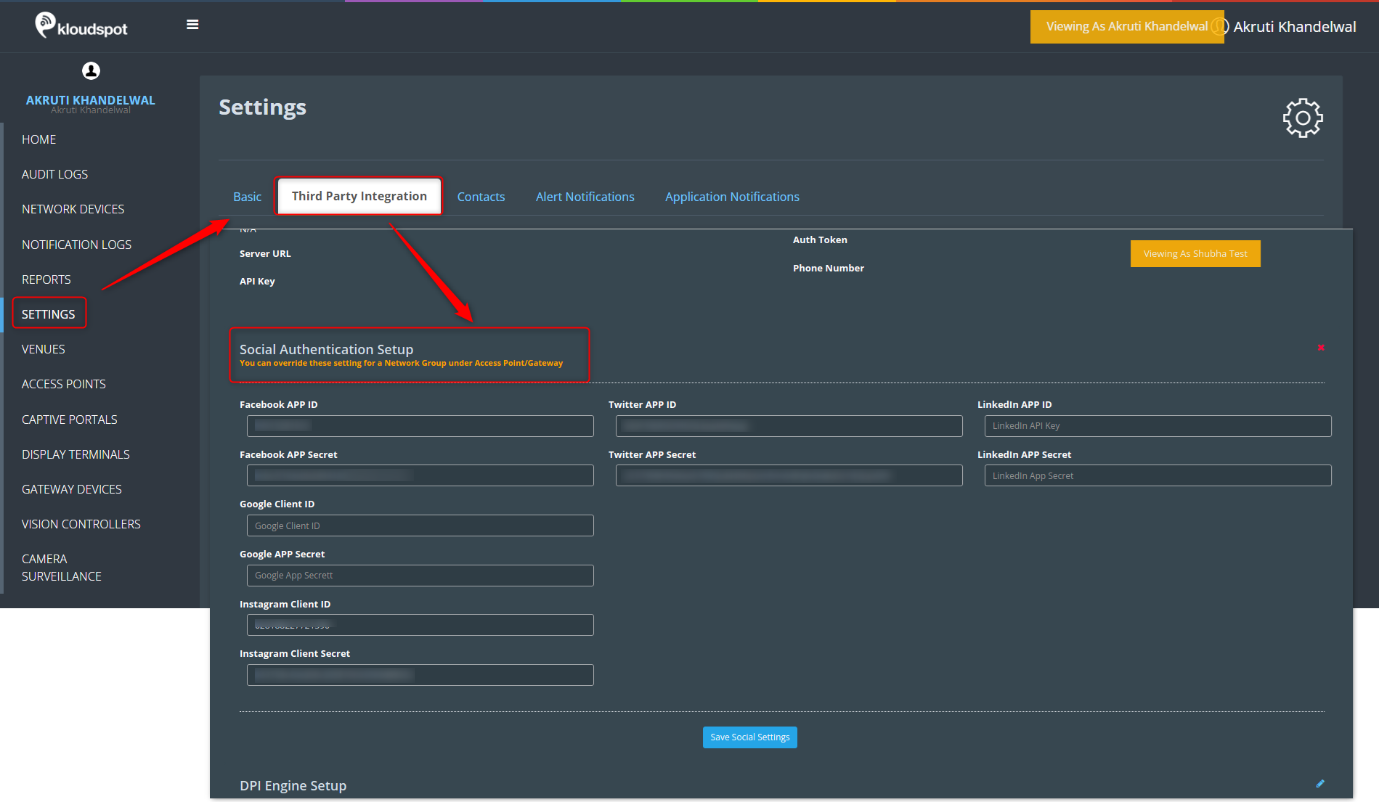
To begin, log in to your KloudManage account and navigate to the Settings page. Look for ‘Third-party Integrations,’ and within it, find the ‘Social Authentication Setup.’
Step 2: Obtaining Facebook App Credentials
Before diving into KloudManage settings, you’ll need a Facebook App ID and App Secret. Follow these steps:
Sign up for a developer account using your company credentials.
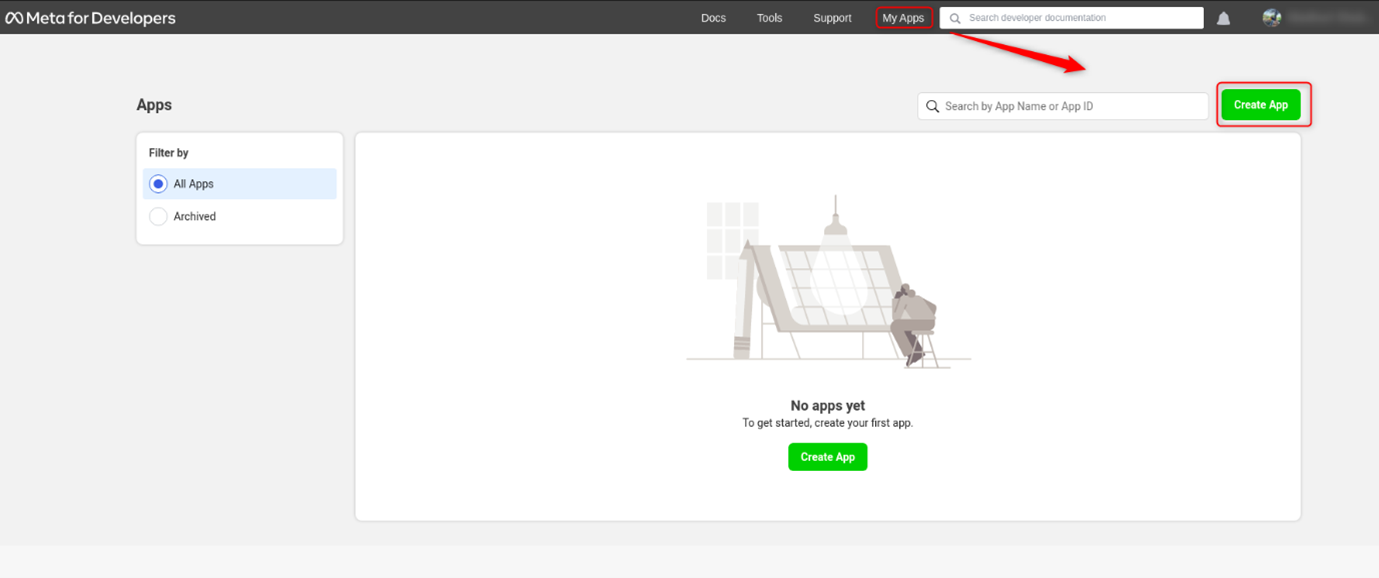
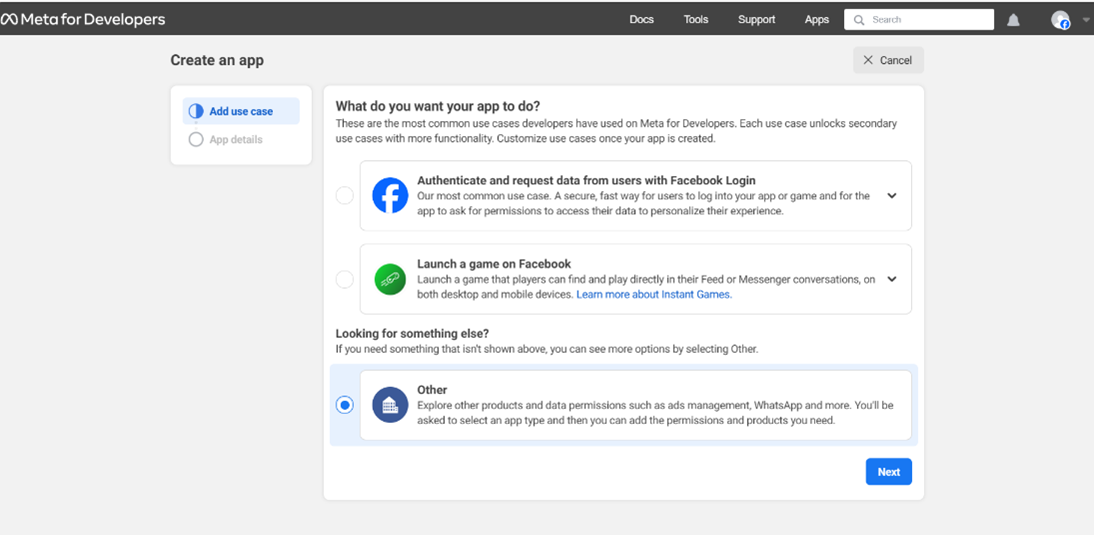
After signing up, click on “Create App.”
Choose “Other” in the opening window and click “Next.”
Enable consumer, and proceed to the next step.
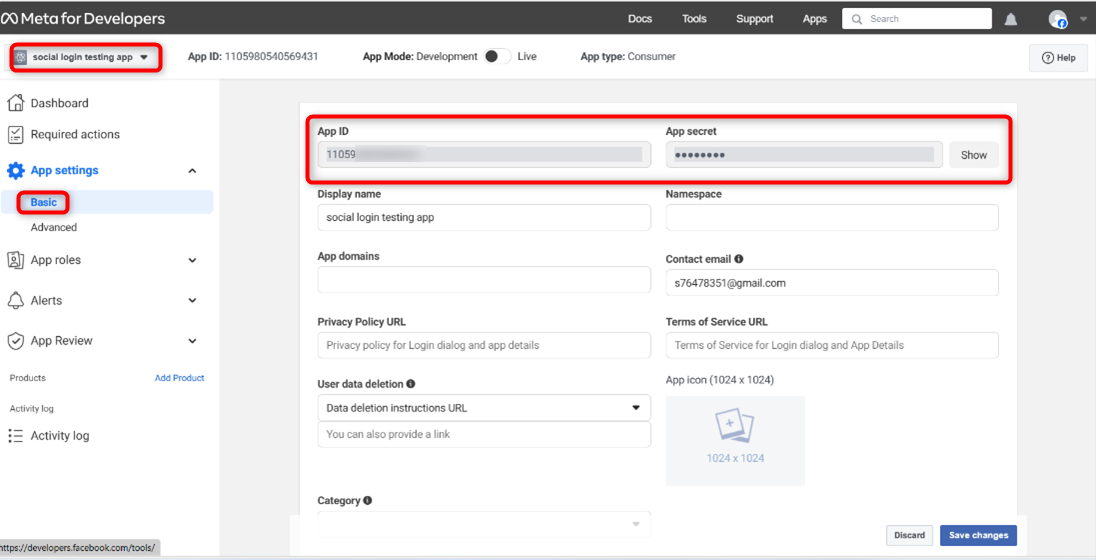
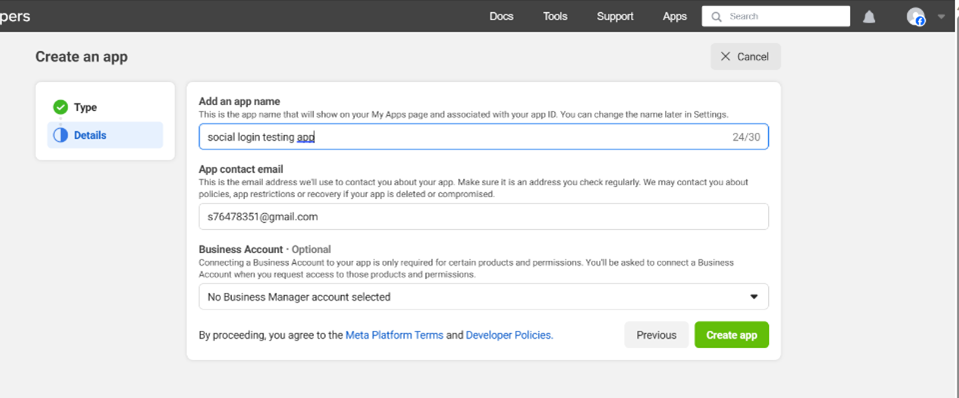
Provide a Display Name for your app (visible to users on the Kloudspot Guest Portal) and click “Create app.”
In the ‘My Apps’ section, locate and enter your newly created app.
Go to the ‘basic’ option in the settings menu.
Copy the App ID and App Secret; these will be needed in KloudManage.
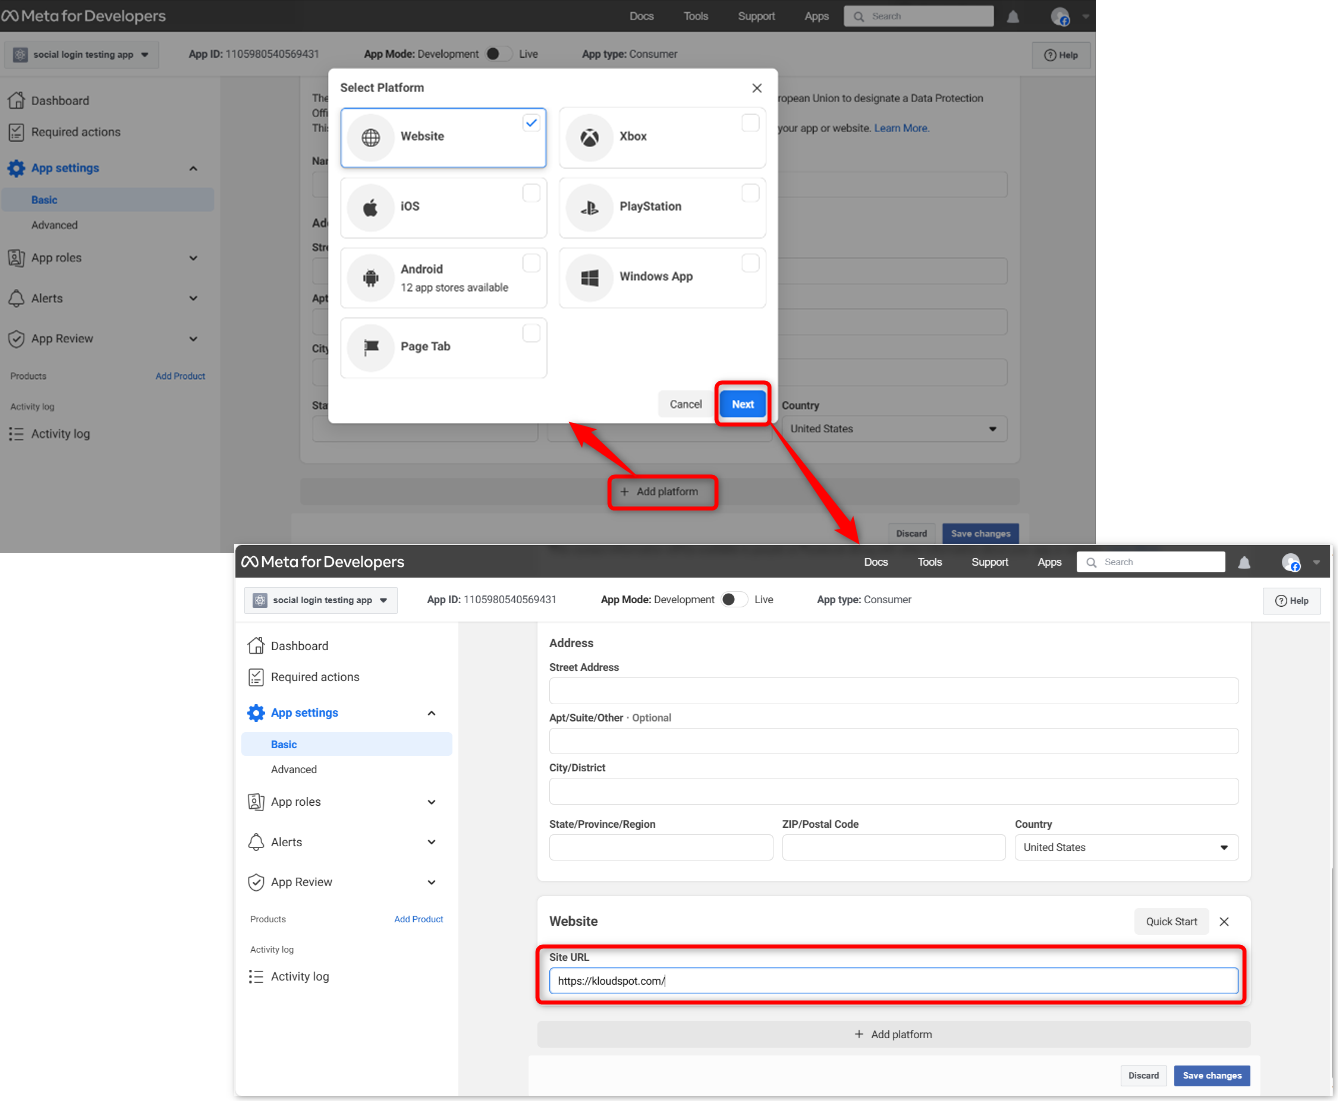
Scroll down, click “Add Platform,” choose “Website,” and enter your KloudPortal URL.
Save the changes.
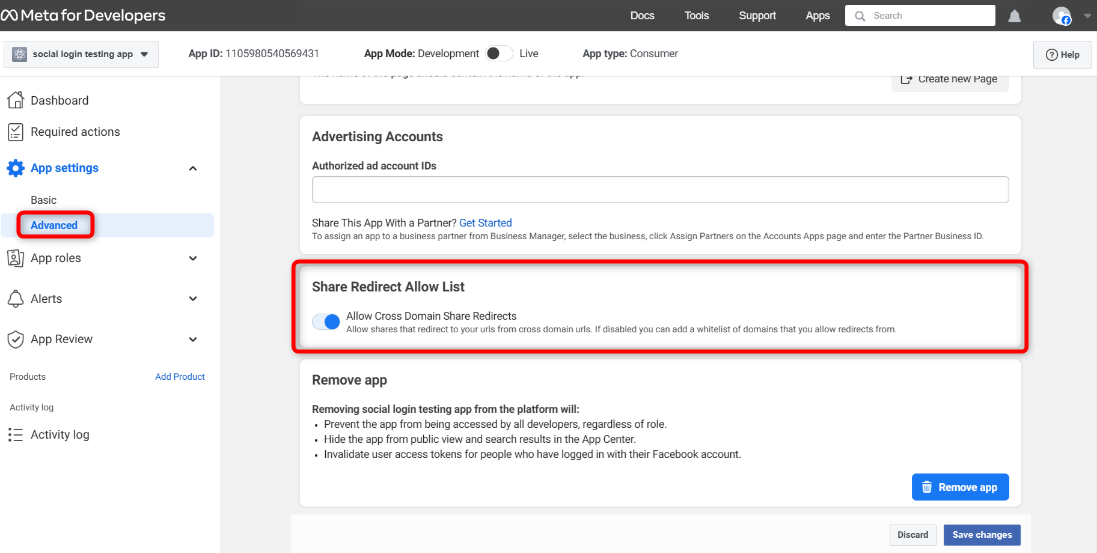
Open the Advanced menu and enable “Allow Cross Domain Share Redirects” in the “Share Redirect Allow List” section.
Save the changes.
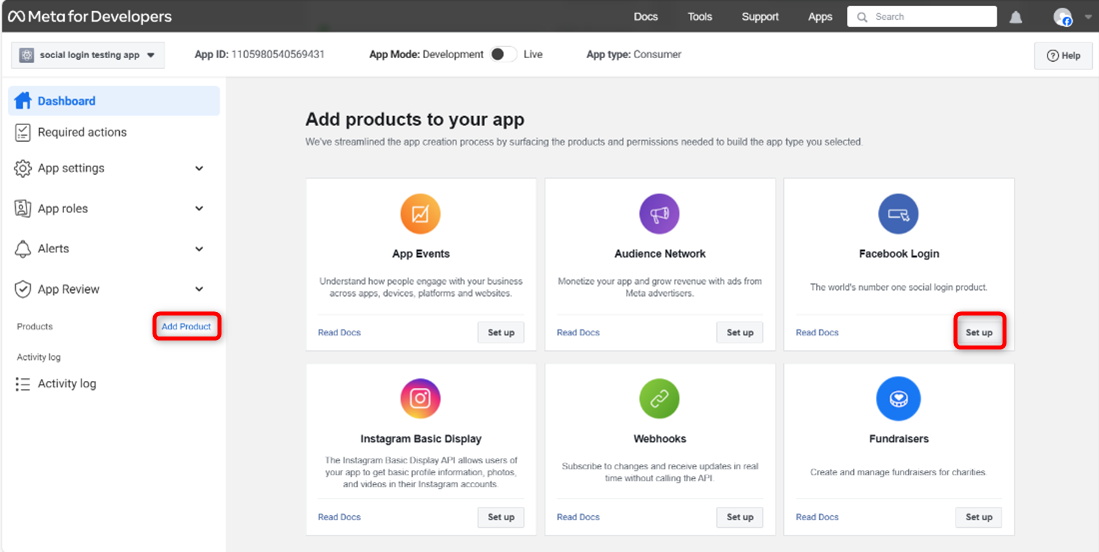
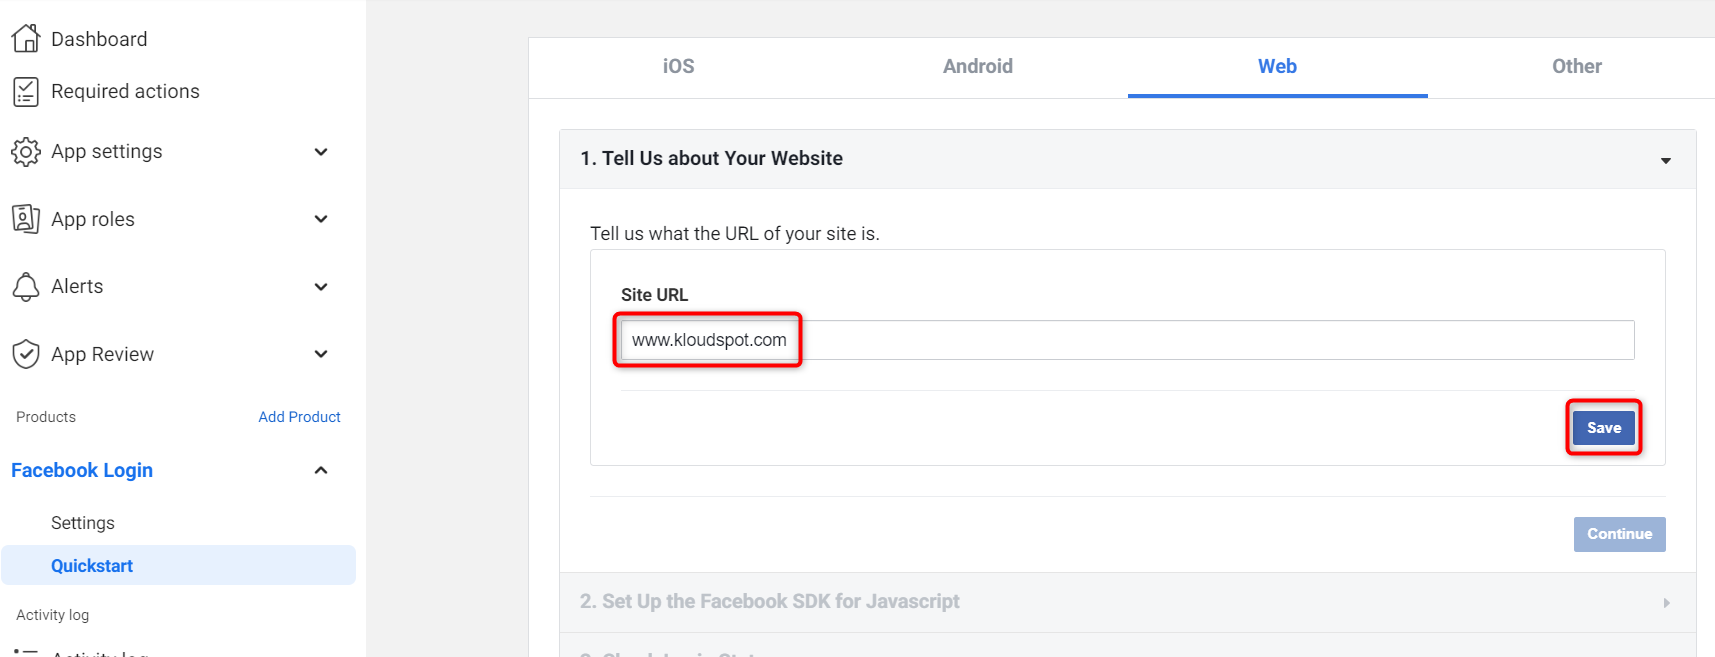
Click “Add Product” in the navigation menu and choose “Facebook Login.”
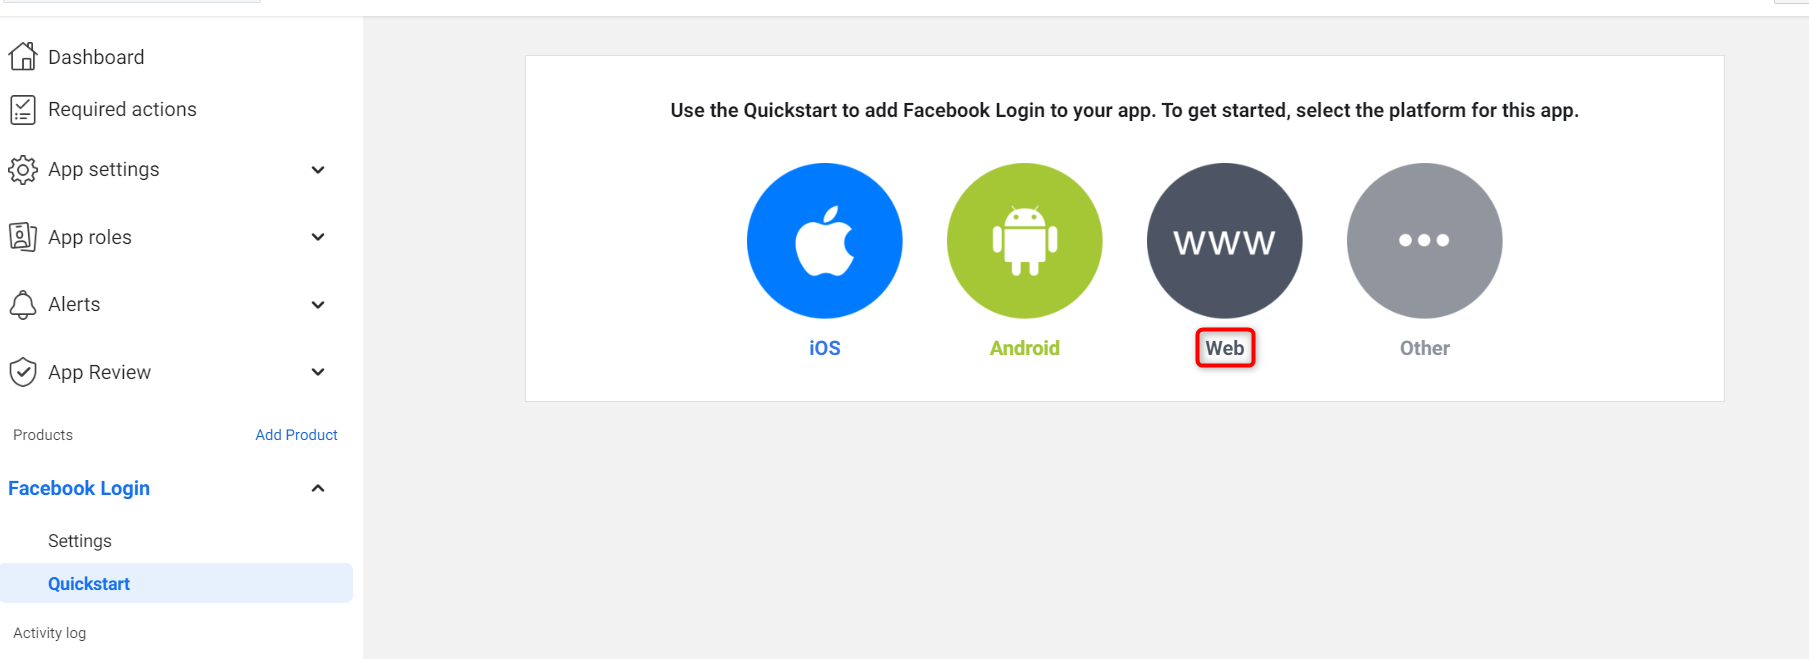
Select the Web platform and enter your Site URL.
Follow the subsequent steps and click “Save and Continue.”
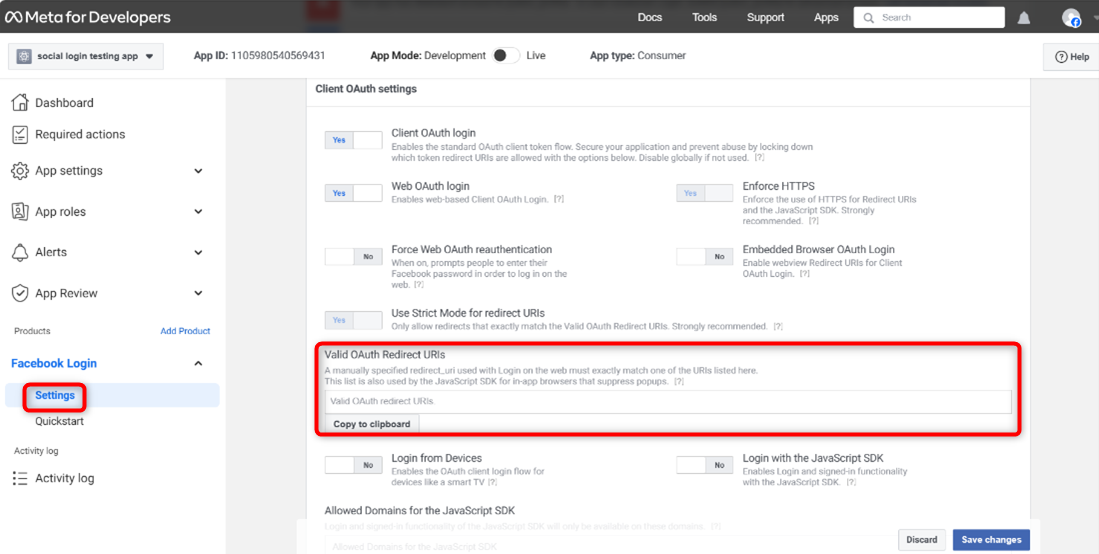
Click on “Settings” under ‘Facebook Login.’
Enter the guest page URL under ‘Valid OAuth Redirect URIs.’
Save Changes.
Step 3: Integration in KloudManage
Back in KloudManage, paste the copied App ID and App Secret.
Click “Save Social Settings.”
Instagram Authentication
Integrate Instagram authentication with the Captive Portal
By adding Instagram Social Authentication, Captive Portal users can log in using their Instagram account credentials.
Step 1: Accessing Third-Party Integrations in KloudManage
To begin, log in to your KloudManage account and navigate to the Settings page. Look for Third-party Integrations, and within it, find the Social Authentication Setup.
Step 2: Obtaining Instagram App Credentials
Before diving into KloudManage settings, you’ll need an Instagram App Secret and Instagram App ID. Follow these steps:
Sign up for a developer account using your company credentials.
After signing up, click on Create App.
Choose Other in the opening window and click Next.
Enable the consumer, and proceed to the next step.
Provide a Display Name for your app (visible to users on the Kloudspot Guest Portal) and click Create app.
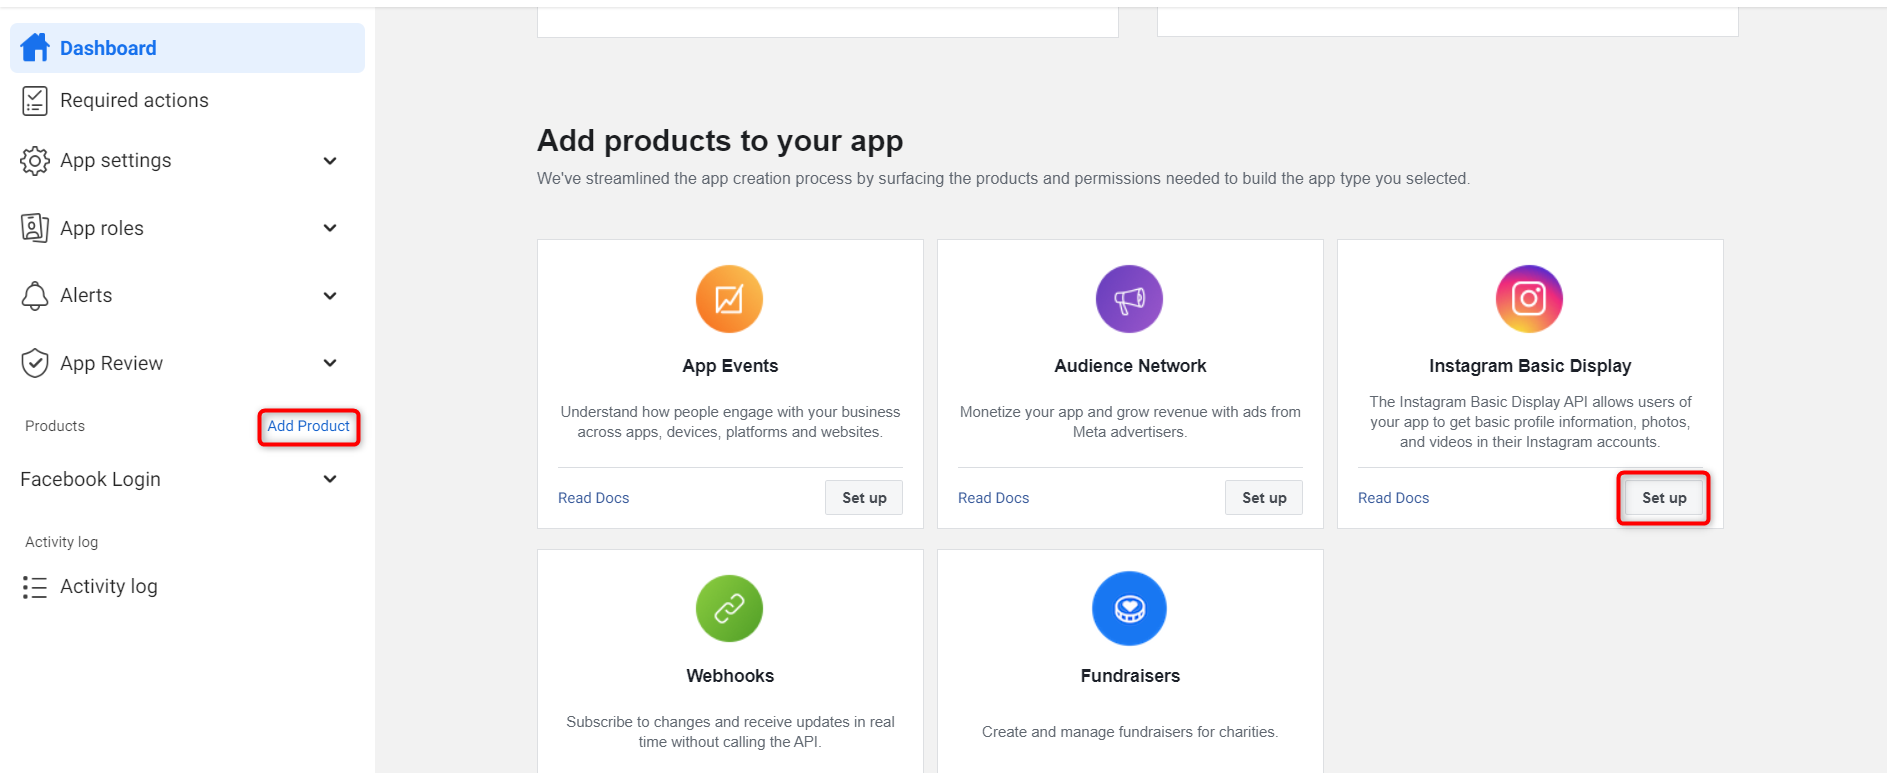
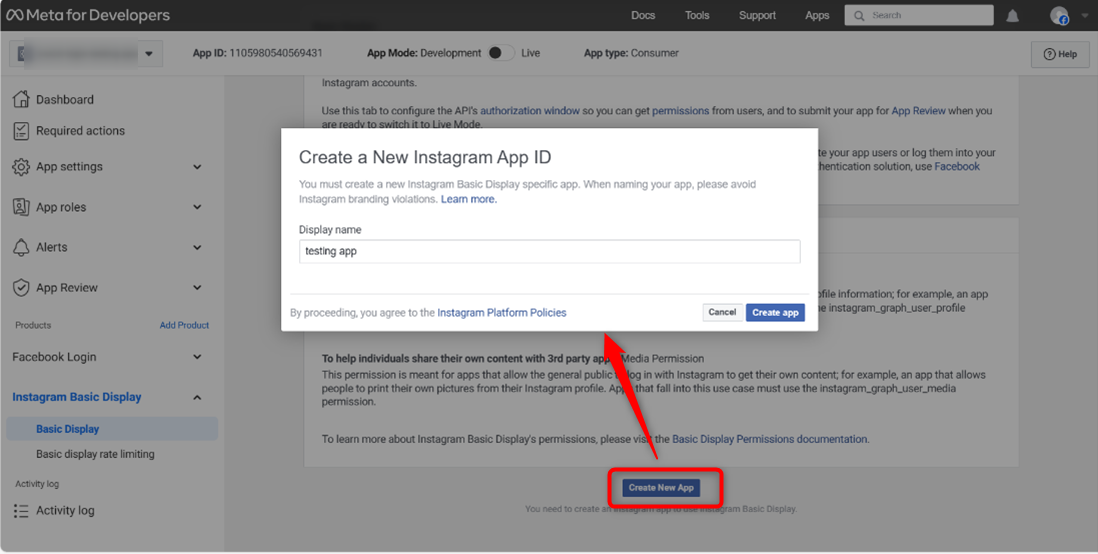
After creating the app, navigate to Add Product in the menu, and choose Instagram Basic Display.
Click Create new app, enter the App name, and then click Create App.
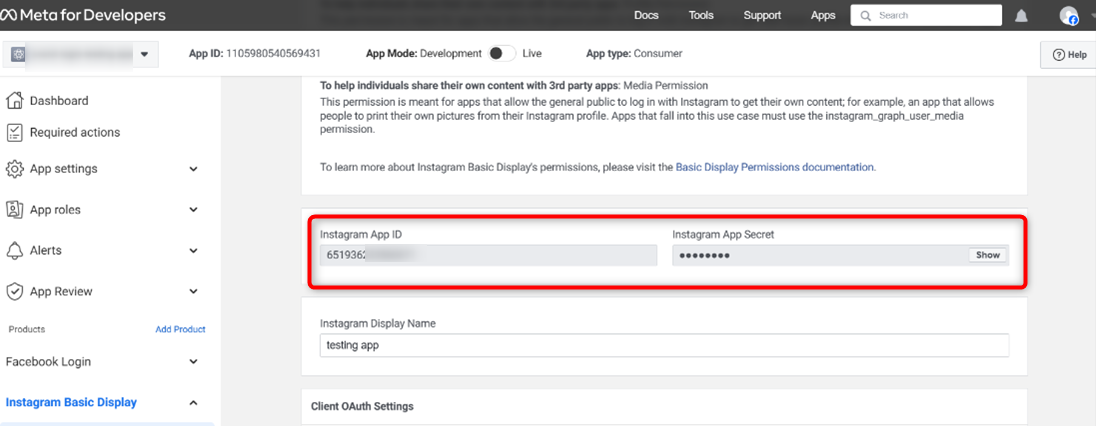
Scroll down in the basic display window, copy the Instagram App Secret and Instagram App ID, and save them for later use.
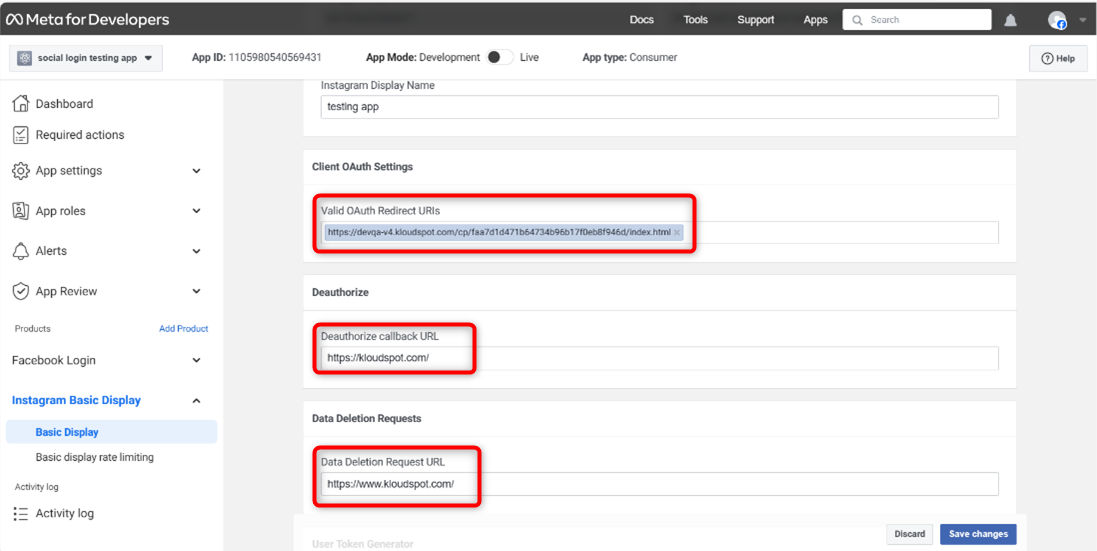
Add Valid OAuth Redirect URIs, Deauthorize callback URL, Data Deletion Request URL, and click Save changes.
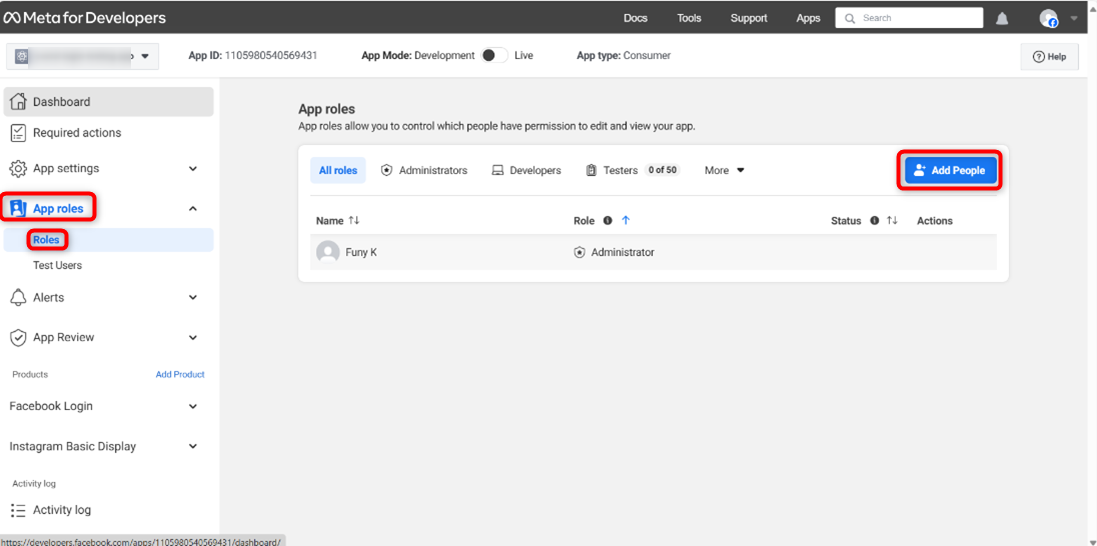
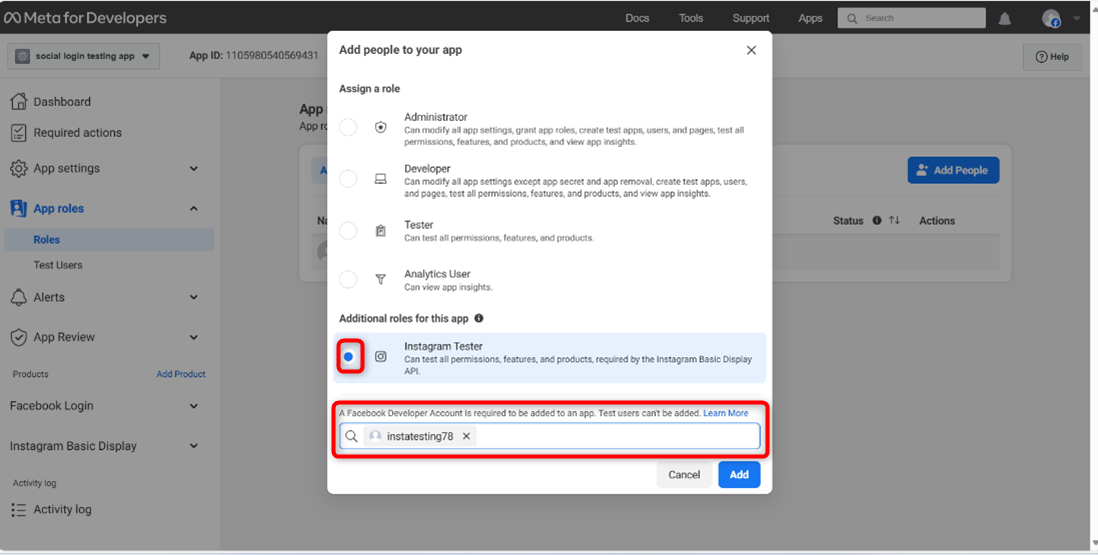
Navigate to App roles > Roles to add App roles.
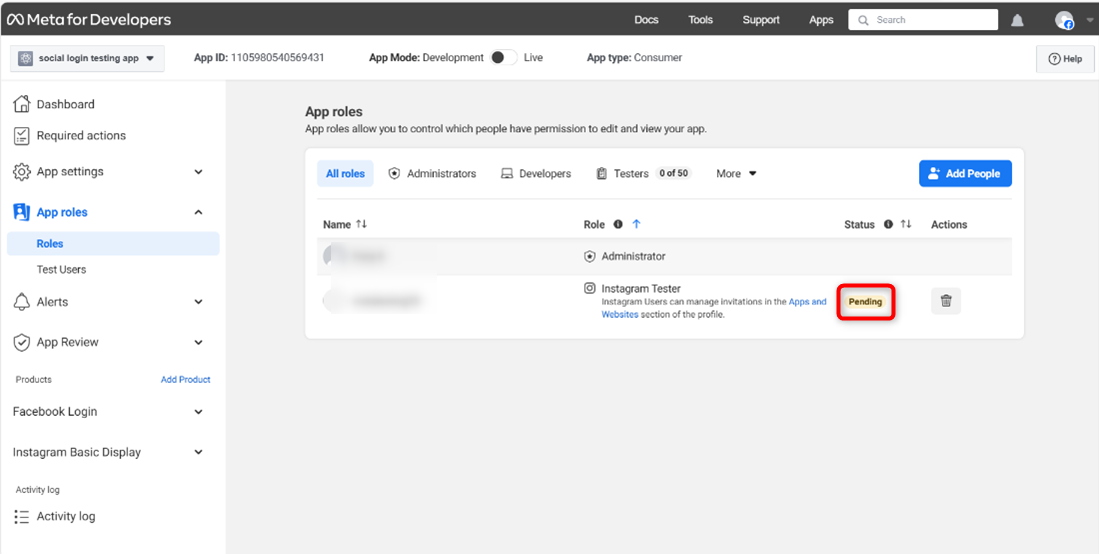
Click Add people, select Instagram Tester, and enter your Instagram username. Click Add.
The status will be pending.
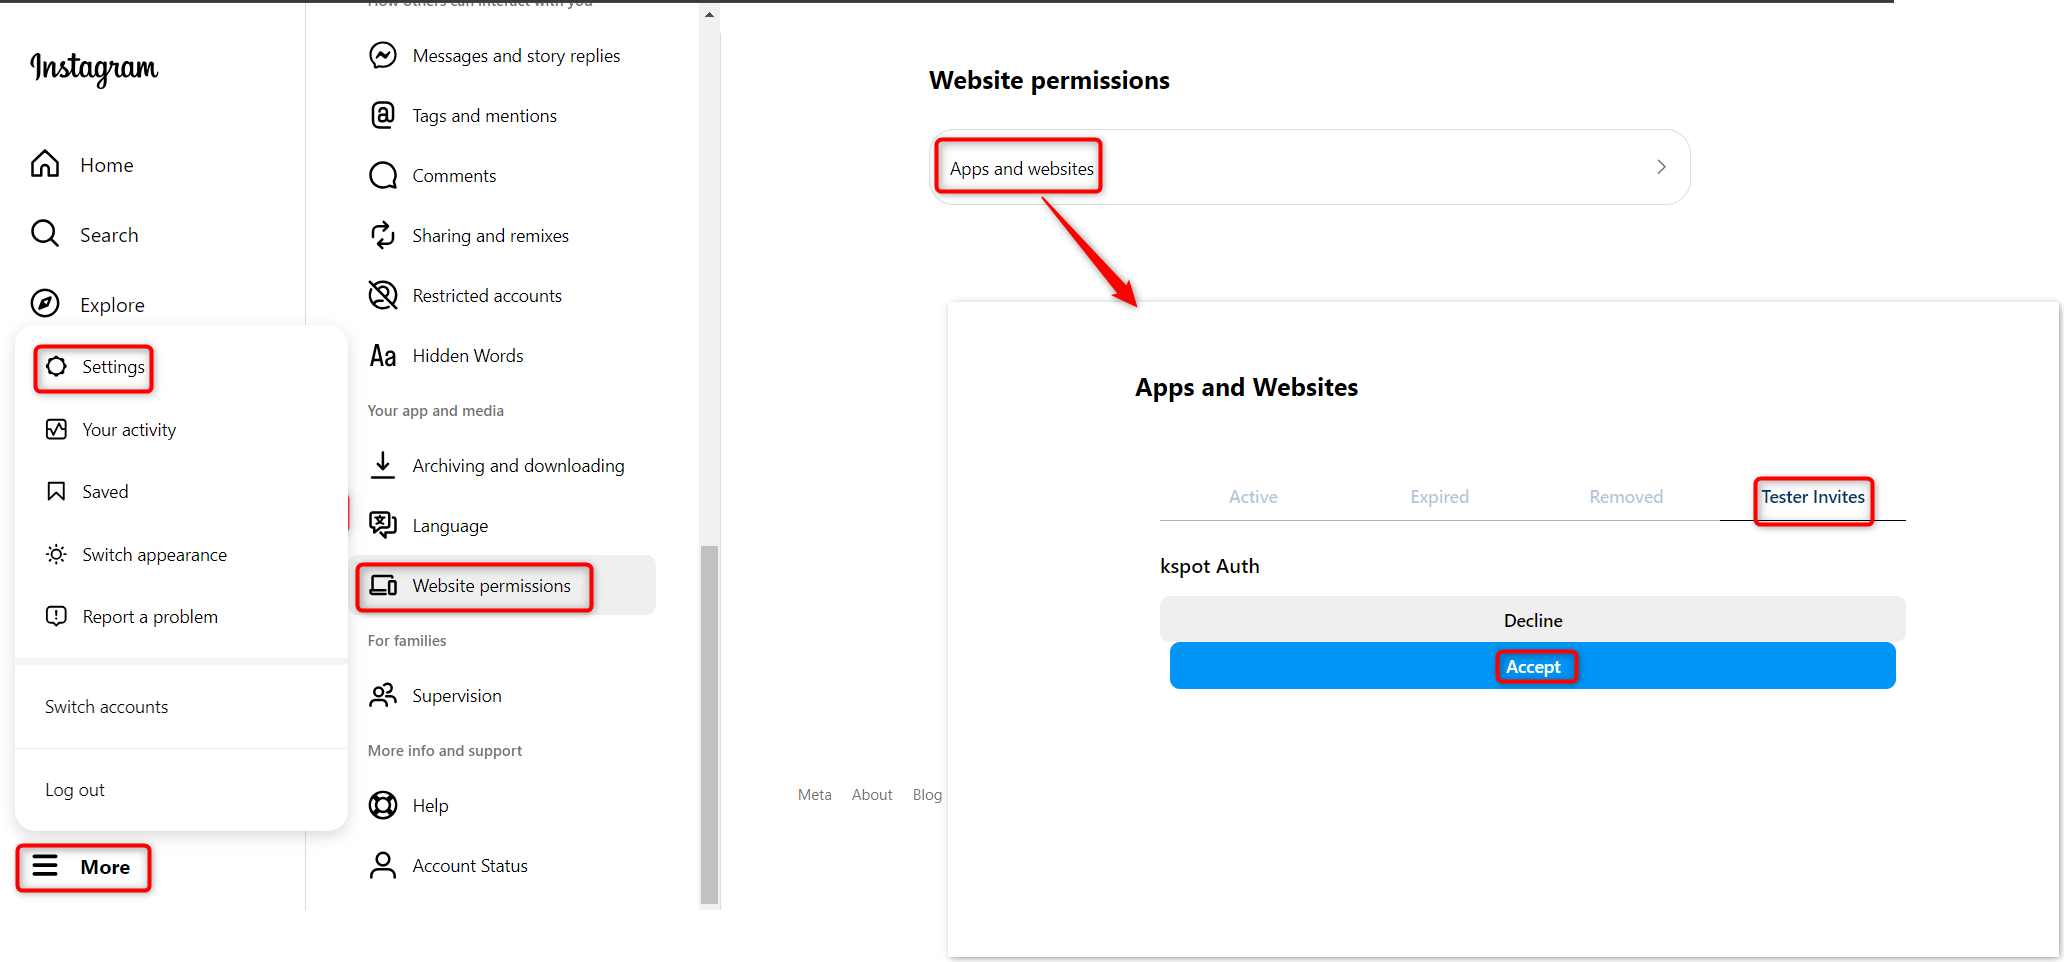
To approve, log in to your Instagram account, and go to More > Settings > Website Permissions > Apps and Permissions. In Tester Invites, click Accept.
Step 3: Integration in KloudManage
Back in KloudManage, paste the copied App ID and App Secret.
Click Save Social Settings.
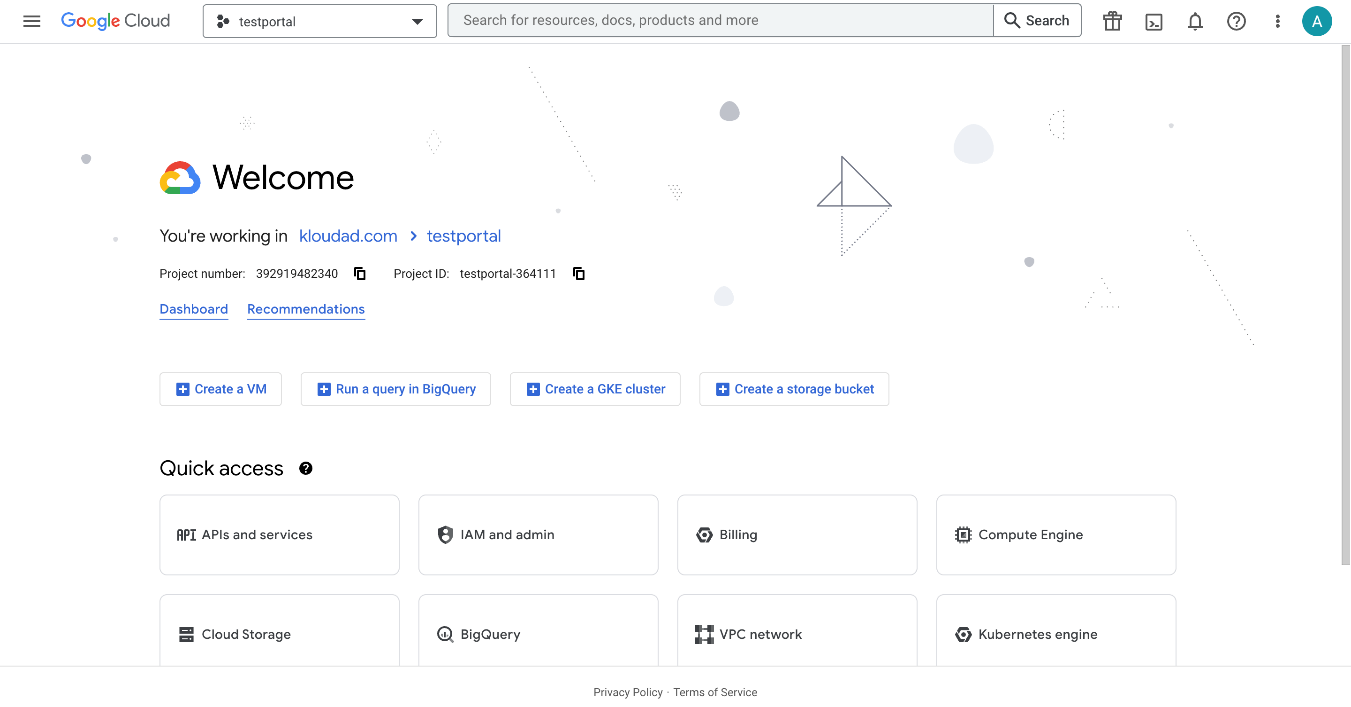
Google Workspace Oauth 2.0 Authentication
1. By adding Google Authentication, Captive Portal users can log in using their Google account credentials. Click the link given below to access the login page.
3. Now select the project or create a project by clicking on the dropdown at
the top right corner.
4. This popup will contain all your projects and also gives you the
flexibility to create a new project.
5. After selecting an existing or a new project the below window will open.
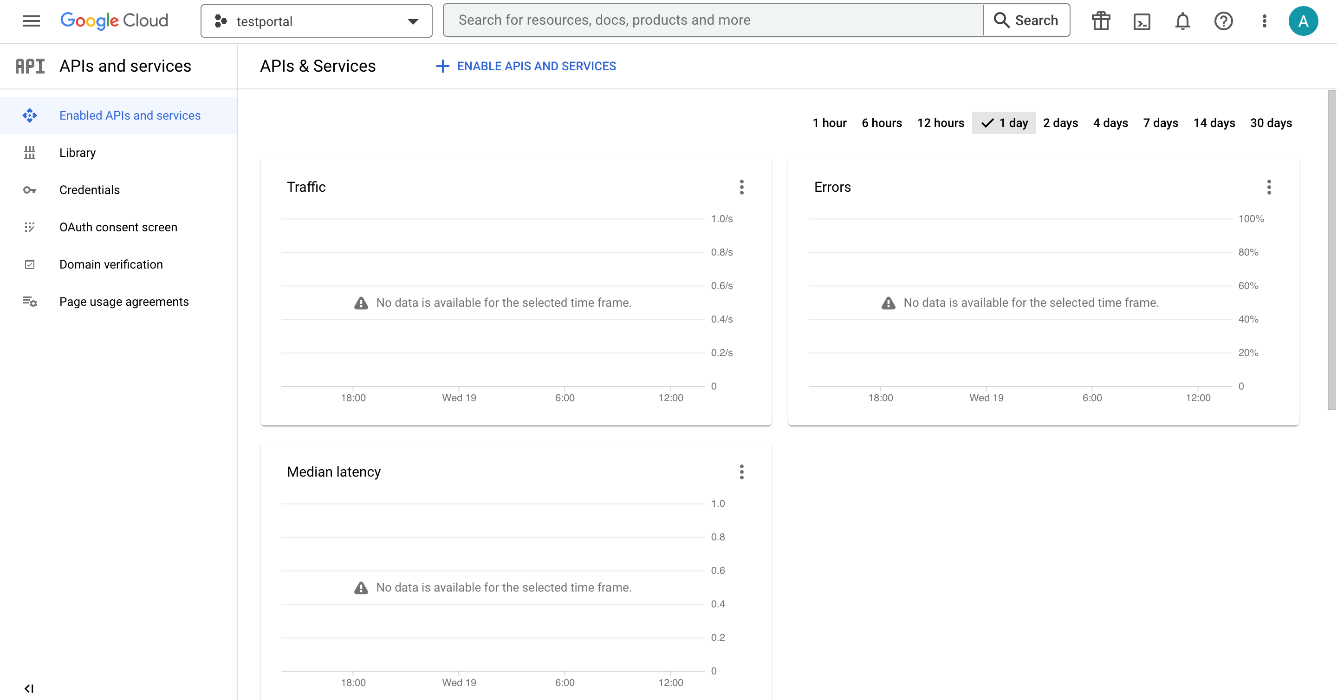
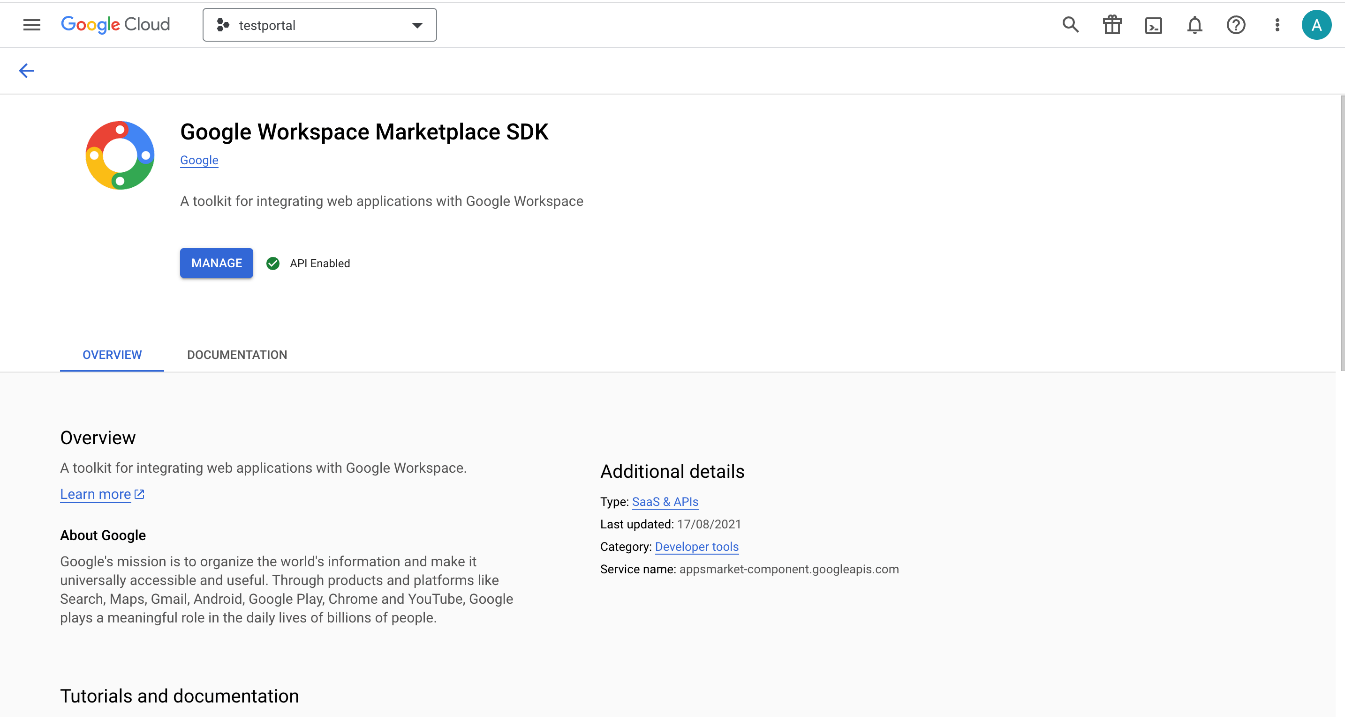
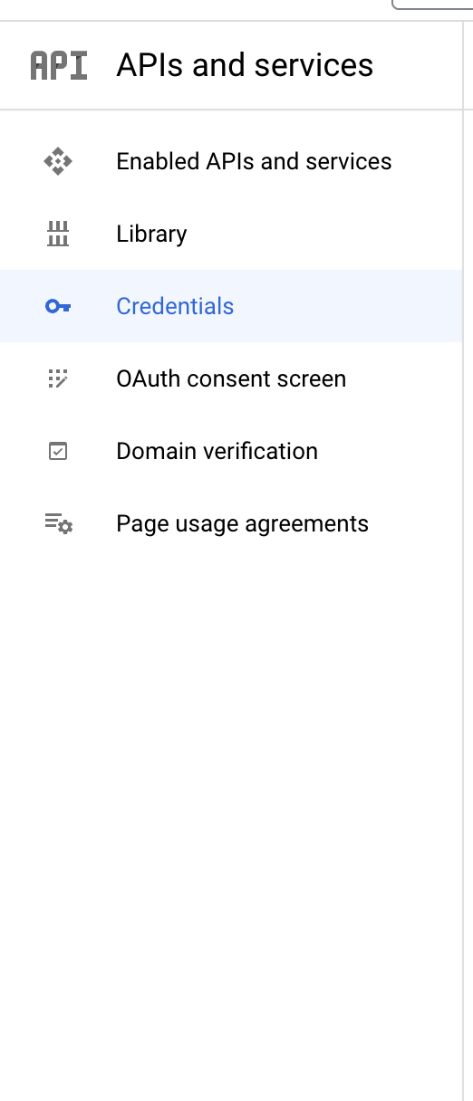
6. Next, you need to enable the Google Workspace Marketplace SDK. For
that navigate to Enabled APIs and Services.
7. Then search for Google Workspace Marketplace SDK and enable it.
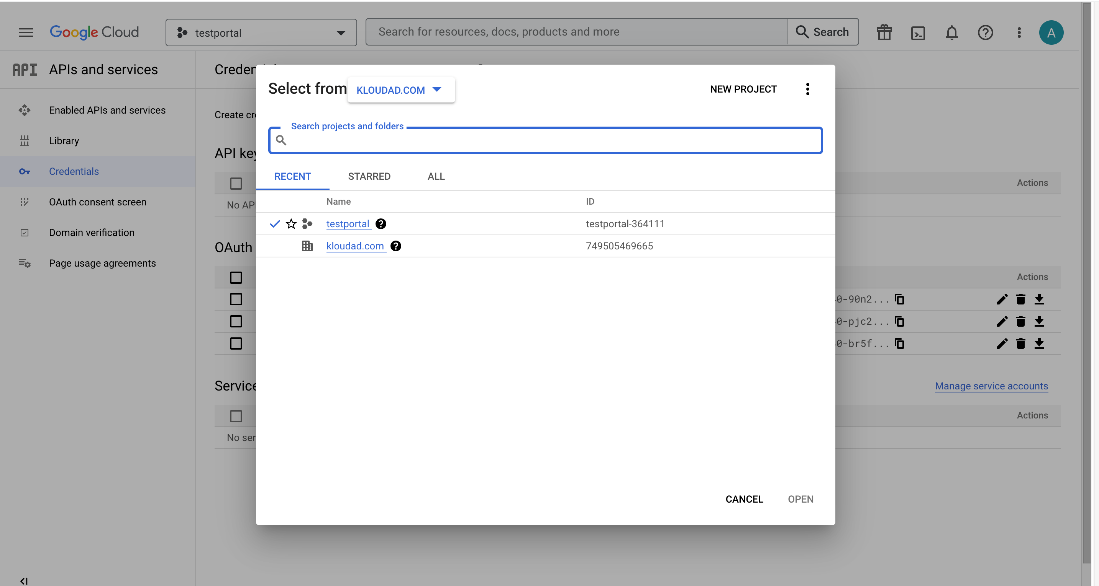
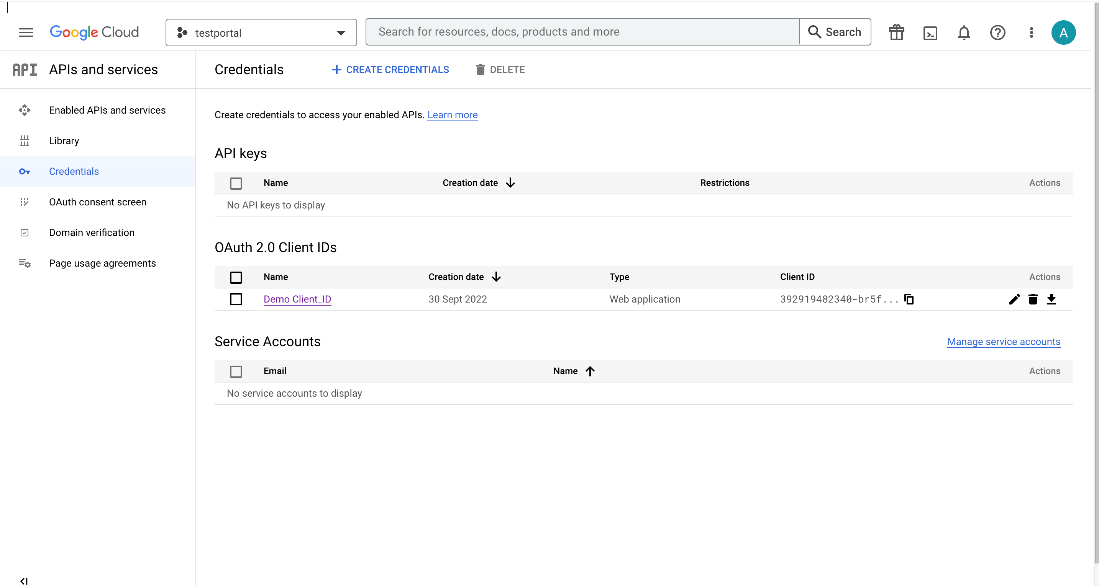
8. Then navigate to Credentials to create Client ID and Secret.
9. In the window that appears, there are several login options.
10. In this case, the captive portal supports OAuth2.0.
11. To configure OAuth you need to create a Client ID and Secret.
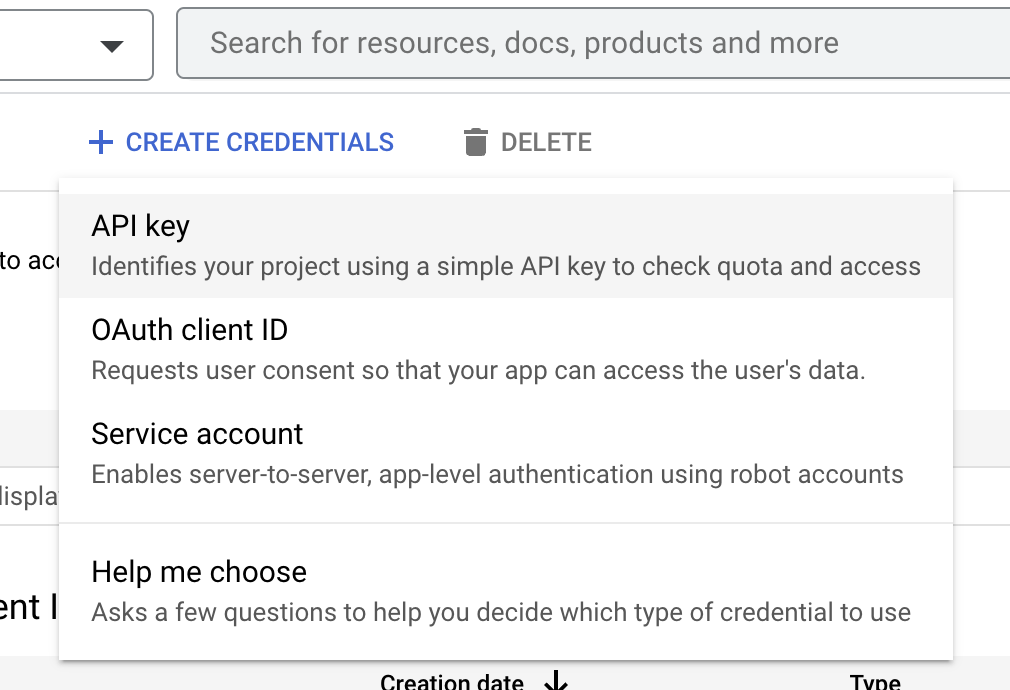
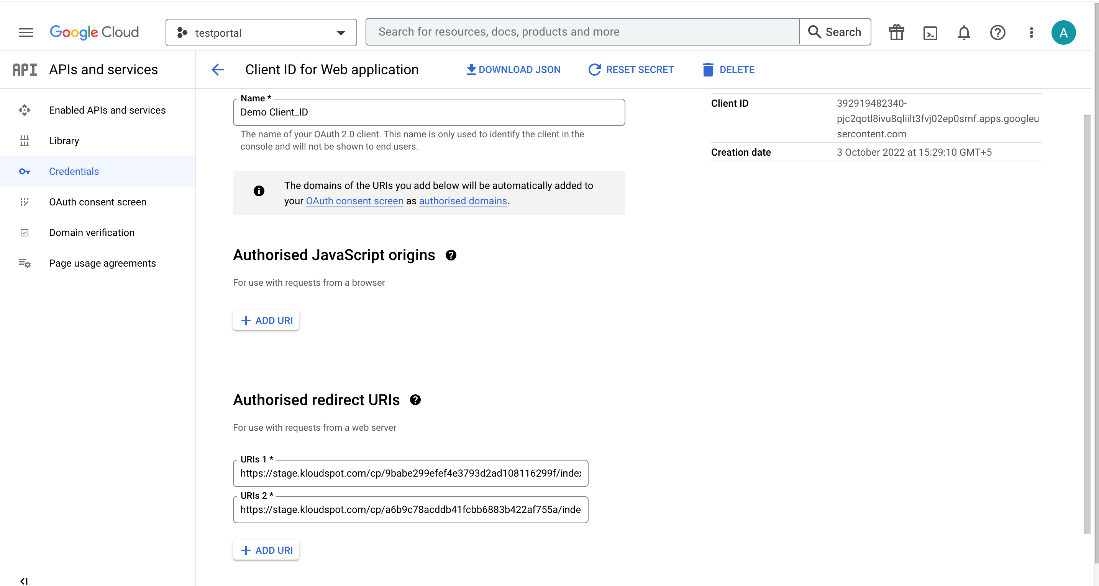
12. Click on CREATE CREDENTIALS button at the top and select the OAuth
Client Id from the dropdown list.
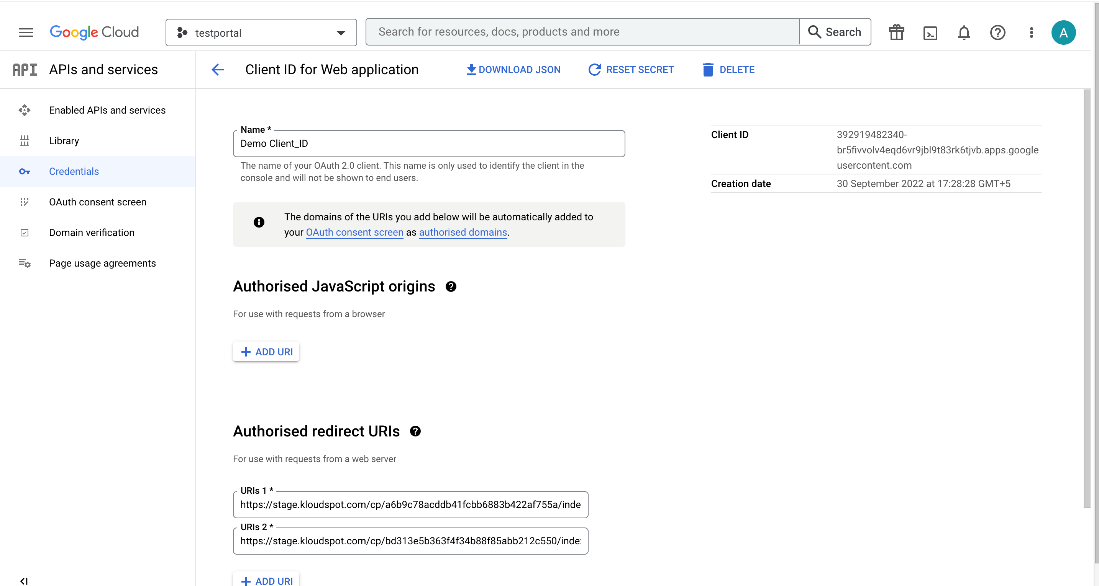
13. Then Create your Client ID. The screen below will be displayed once it
has been created.
14. This screen contains the Client Id and Secret. Copy it and paste it
somewhere else for later use.
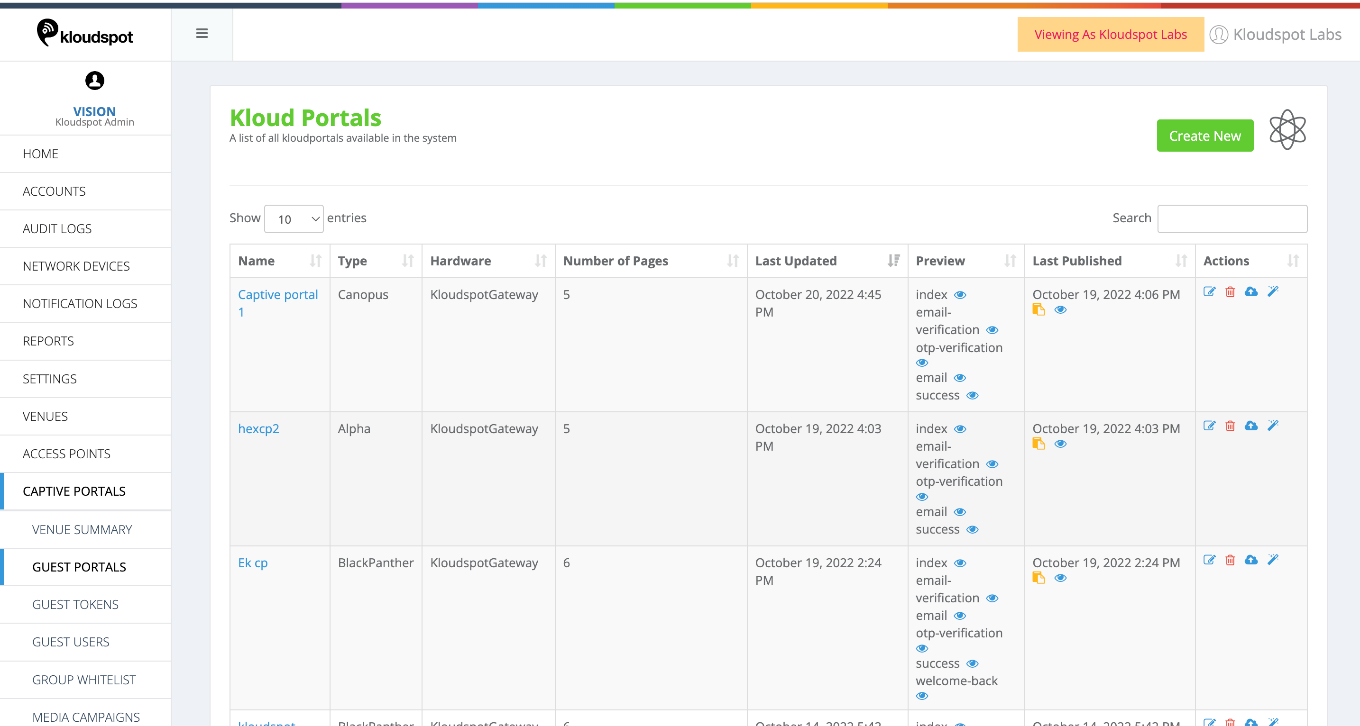
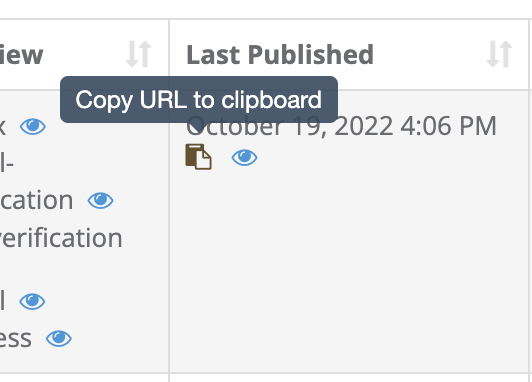
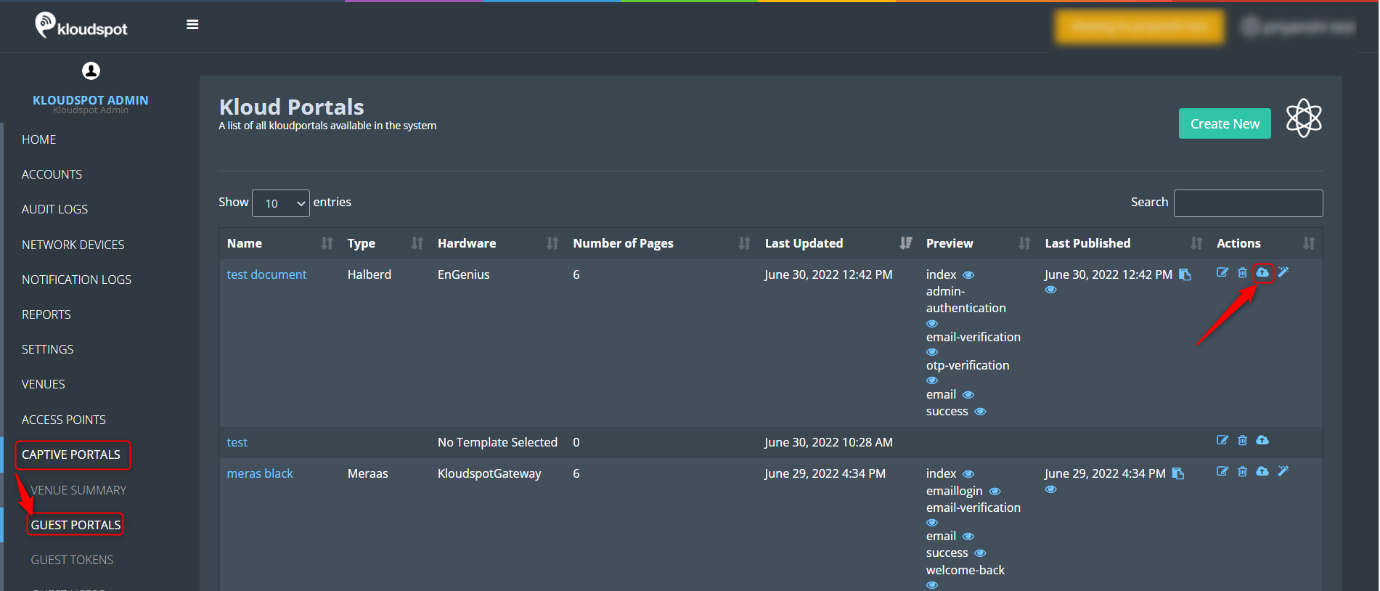
15. Next you have to copy the captive portal URL, for that login to the
captive portal and open the guest portal section.
16. Copy the URL by clicking on the yellow icon from the Captive portal’s
Last Published column.
17. Then click on The +Add URI button and add the Captive Portal URI.
Then click the Save button.
18. Log in to Captive Portal and navigate to NMS settings- >Third party
Integrations ->Social Authentication Setup.
19. Here, pastes the Client Id and Secret that you copied earlier.
20. OAuth2.0 has been integrated successfully.
21. People within the organization or in the same domain can then use it.
LinkedIn Authentication
1. By adding LinkedIn Social Authentication, Captive Portal users can log in using their LinkedIn account credentials.
2. To integrate LinkedIn into the Captive Portal , a LinkedIn APP ID and LinkedIn APP Secret key are required.
3. To add it, Log in to the kloudManage account and navigate to the Settings page, then to ‘Third-party Integrations’ then scroll down and find the Social Authentication Setup.
4. To obtain the credentials, follow the instructions below.
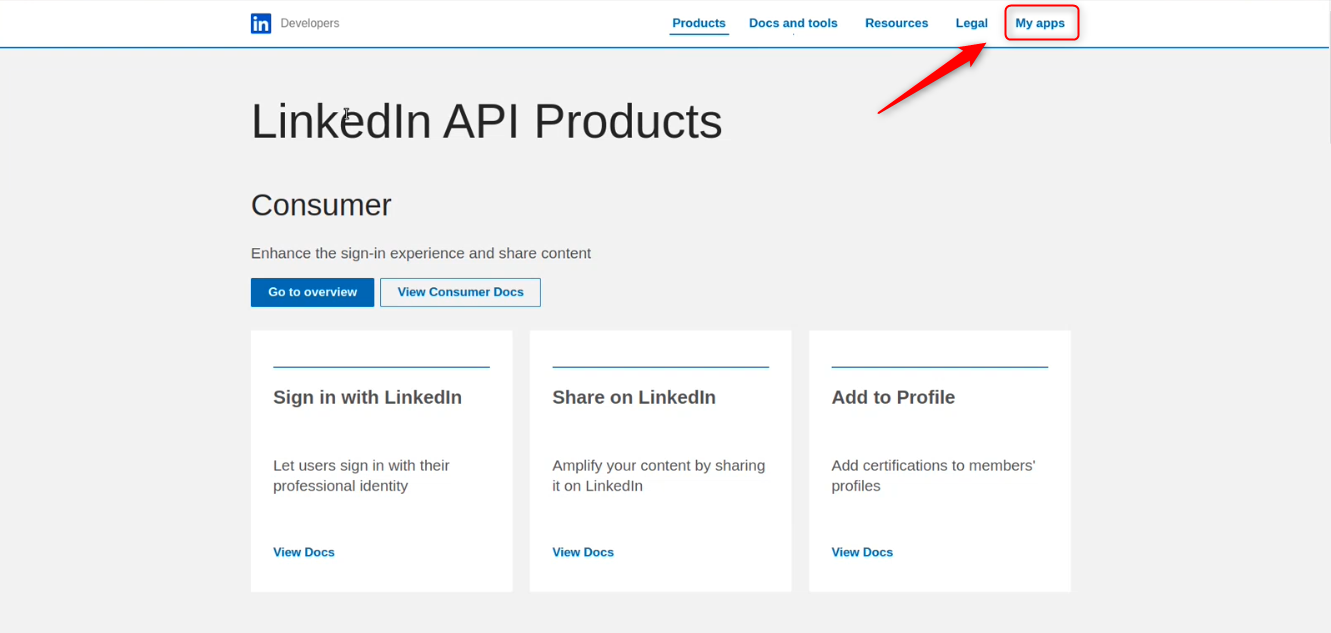
5. Log in to the LinkedIn developer account with company credentials. To
access the login page, click on the link provided below.
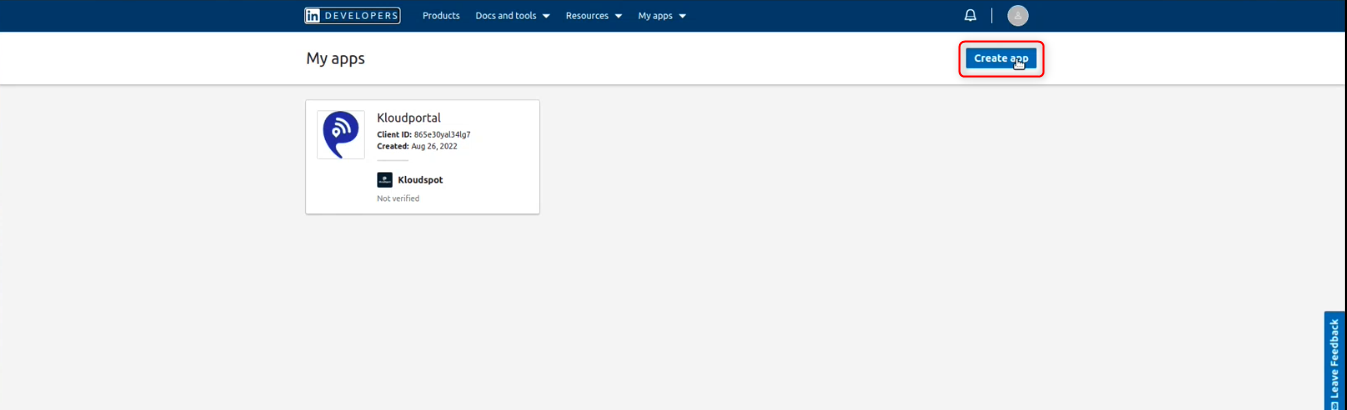
7. Click on the Create App button from the My App window.
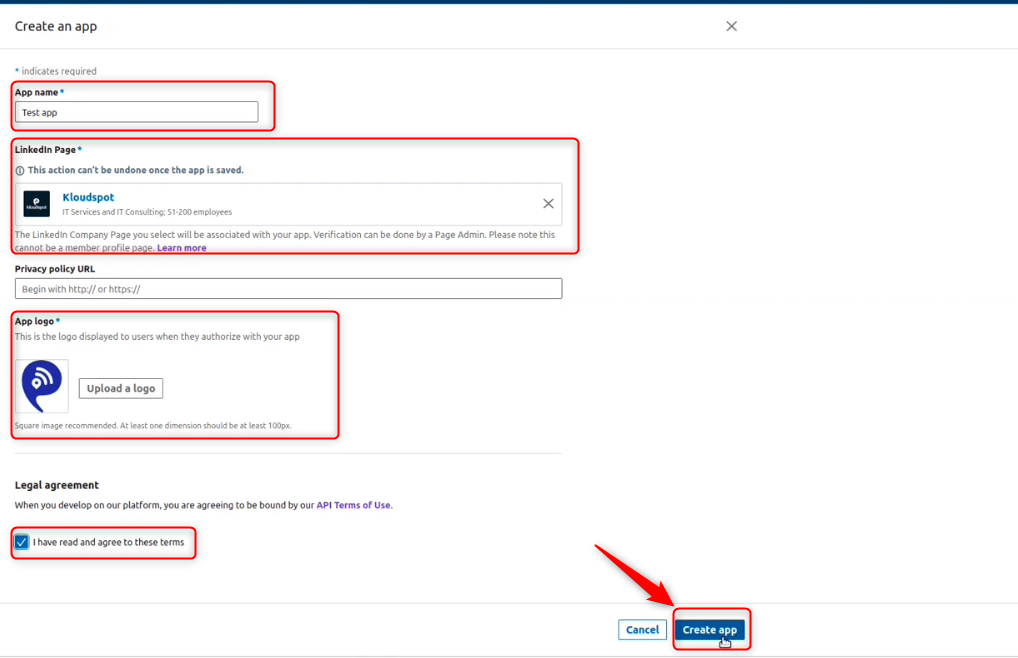
8. Then ‘Create an app’ window that will open. Fill in all the
required fields in this window.
App Name: The name you’d like to give the app.
LinkedIn Page: Search for your company’s LinkedIn account and add it.
App Logo: Upload a logo suitable for your App.
9. Check the acknowledgment checkbox and Click Create App button.
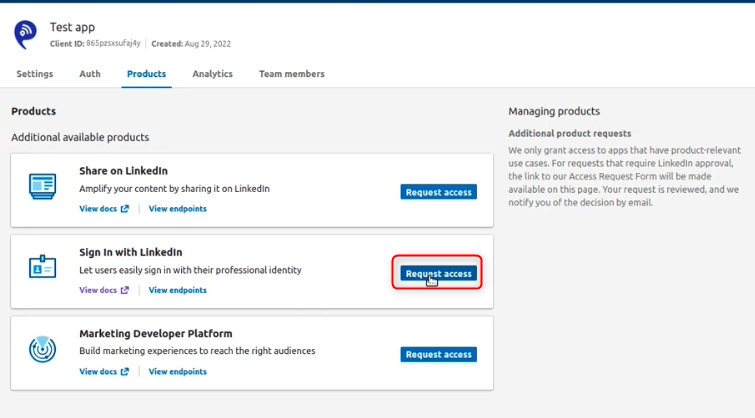
10. Then, on the Test App page that opens, click the Request Access
button next to the Sign in with LinkedIn.
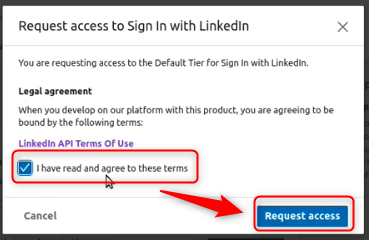
11. Check the acknowledgment checkbox that appears and click on the Request
Access button.
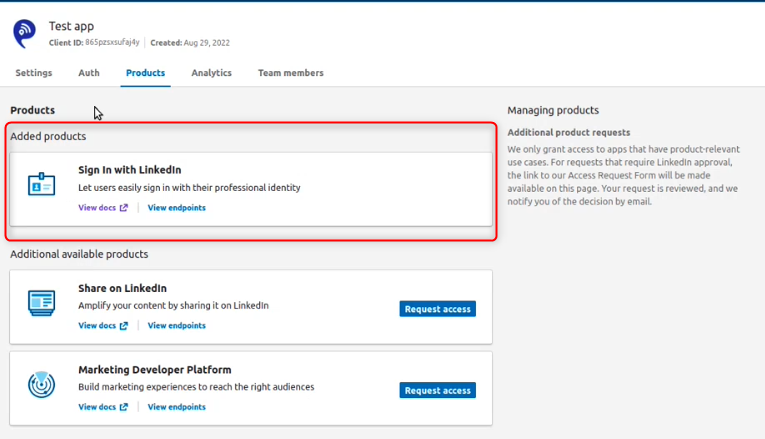
12. As soon as you get access, you will be able to see the product, ‘Sign
in with LinkedIn’ in the ‘Added product’ section.
13. To get application credentials Click on the Auth Tab.
14. Then, from the page that opens, you will obtain the Client ID, and
Client Secret. Copy it and paste it into the ‘Third-party
Integrations’ settings and click on the Save Social Settings button.
15. Copy the Captive portal Index page URL and paste it into the authorized
redirect URL text box.
Note: It is useful to specify which page the user should be directed to
after logging in with LinkedIn.
16. LinkedIn authentication is done successfully.
Microsoft Authentication
You can access your captive portal with your Microsoft account credentials. To
use this service, the KloudManage tool must be linked to a Microsoft Azure
account. This document explains how to do so.
To Get Microsoft Credentials
1. To integrate Microsoft Azure into Captive Portal, you need 3 credentials.
Microsoft Client ID
Tenant ID
Microsoft Client secret
2. To get the credentials, click on the link given below and log in to
Microsoft Azure.
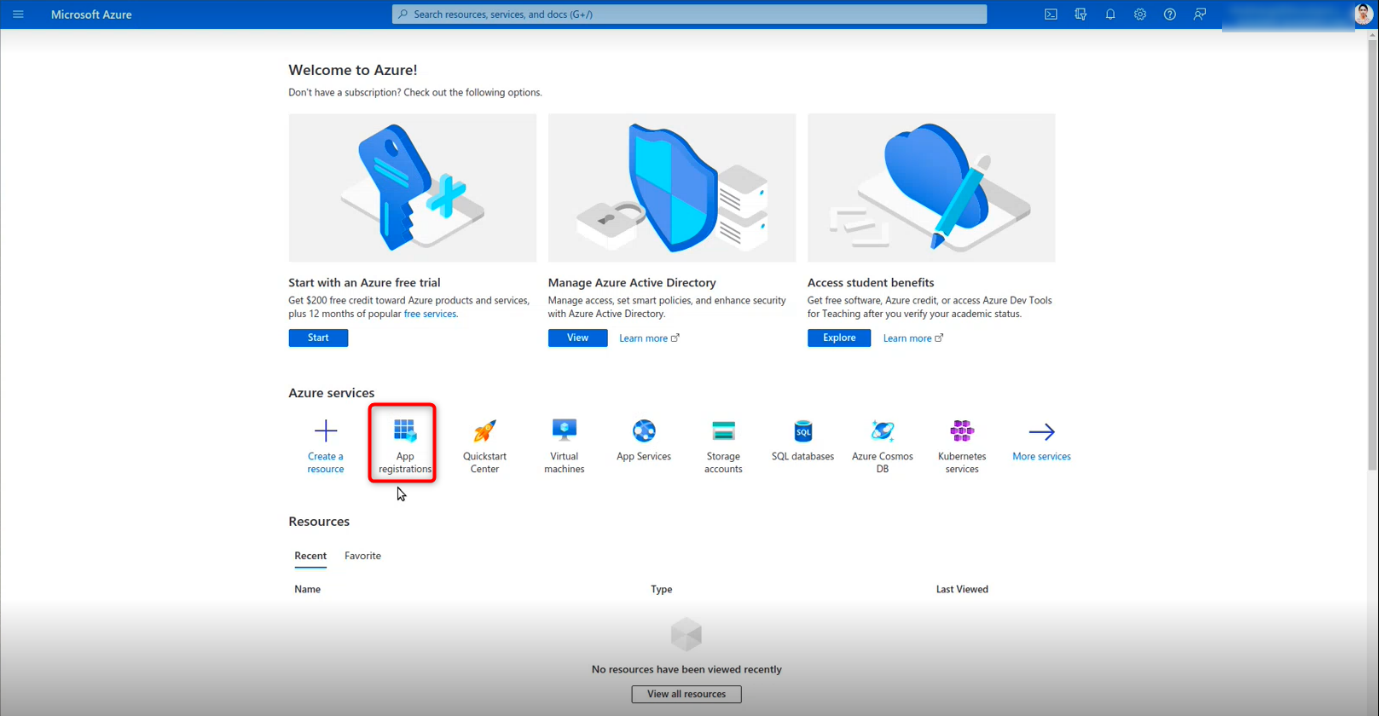
3. Click the App registration button on the Microsoft Azure Home page that
appears.
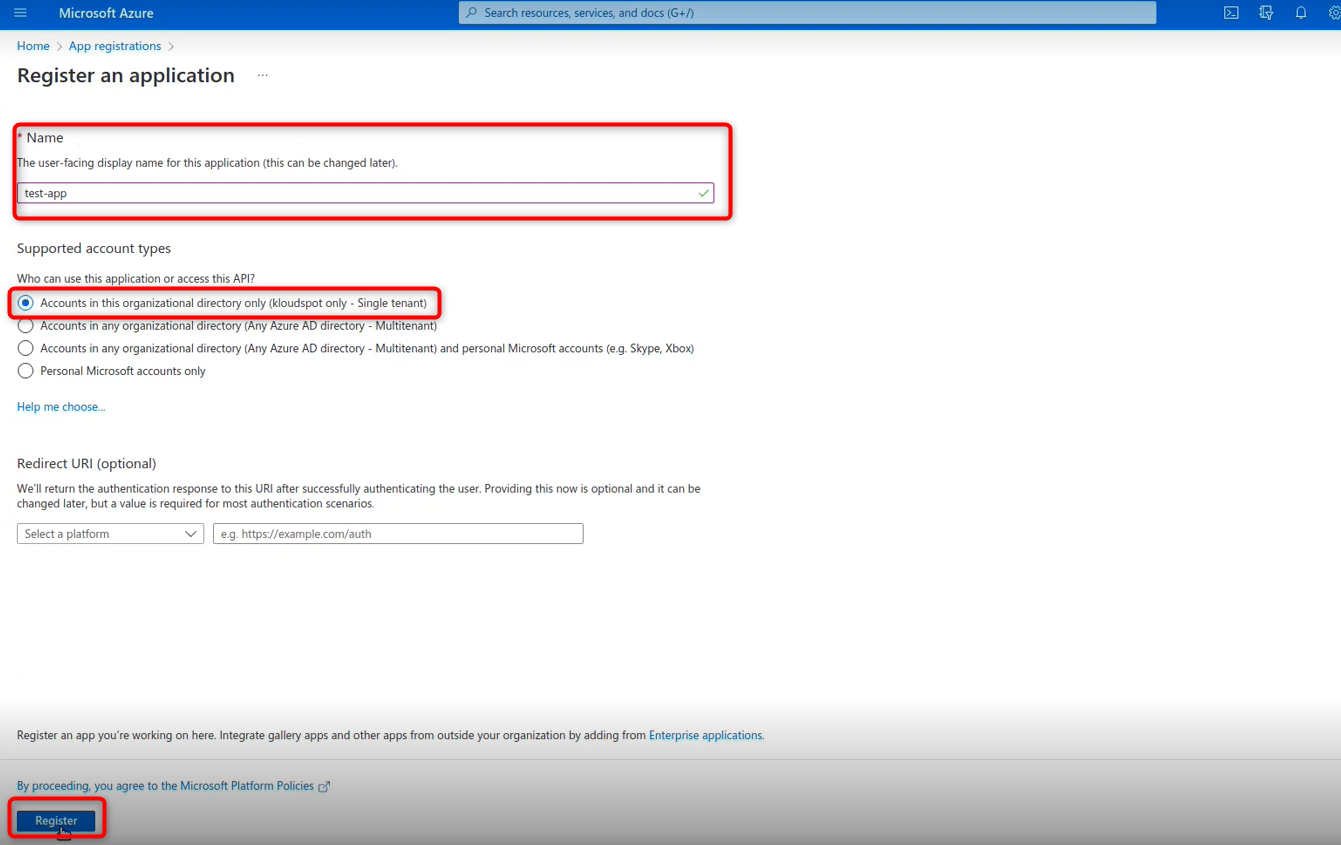
4. This will direct you to the App registration page. Here you click on the
New registration button.
5. Enter the App name , Select the Supported account type as a single
tenant. Then click the Register button.
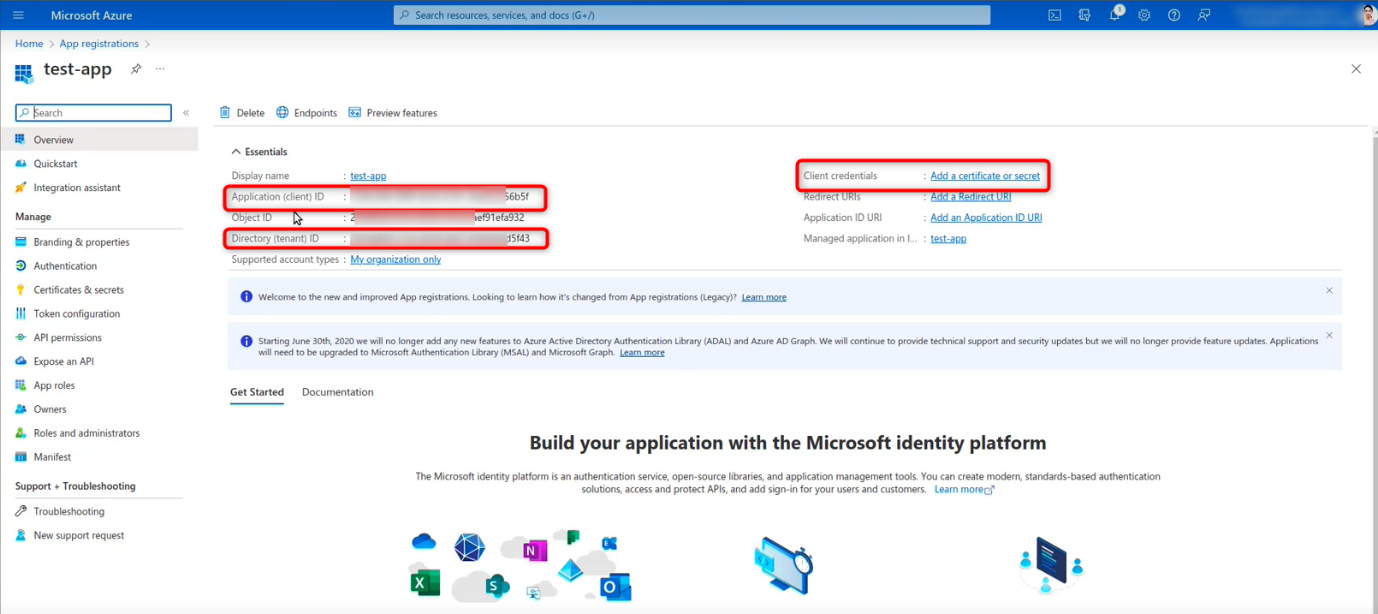
6. The new app has been successfully registered. Copy the Application ID
and tenet ID from the overview window and paste them somewhere else for
later use
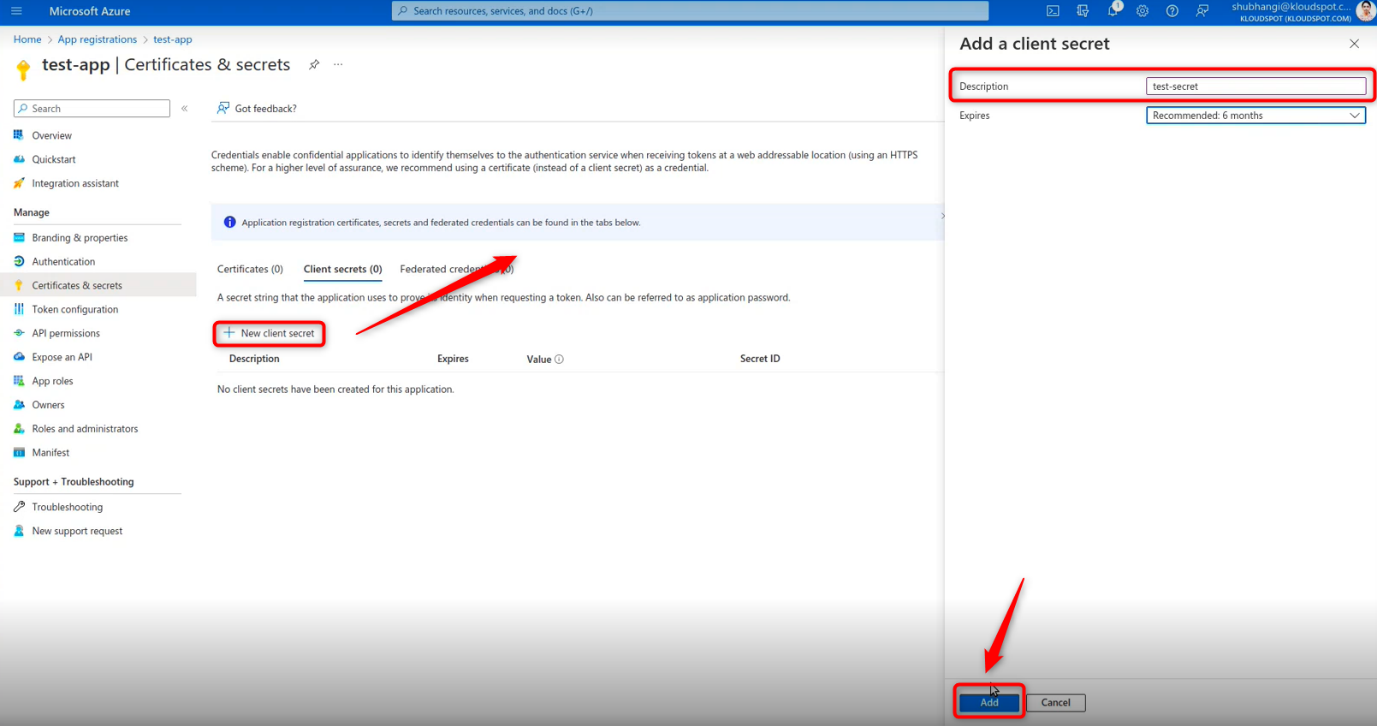
7. Then click on the Add a certificate or secret button to create a
client secret.
8. Click the New Client Secret button in the Certificates and Secrets
window that appears.
9. Enter the description in the popup that appears and click the Add
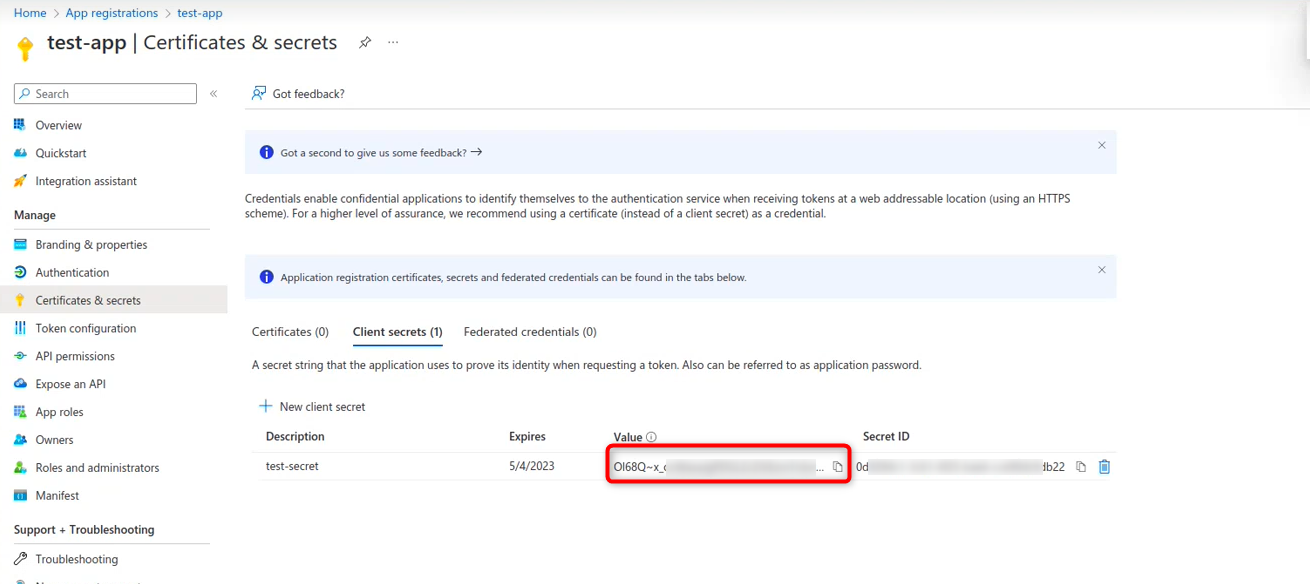
button.
10. New Client secret created successfully. Copy it and paste it
somewhere else for later use.
Add credentials to the KloudManage tool
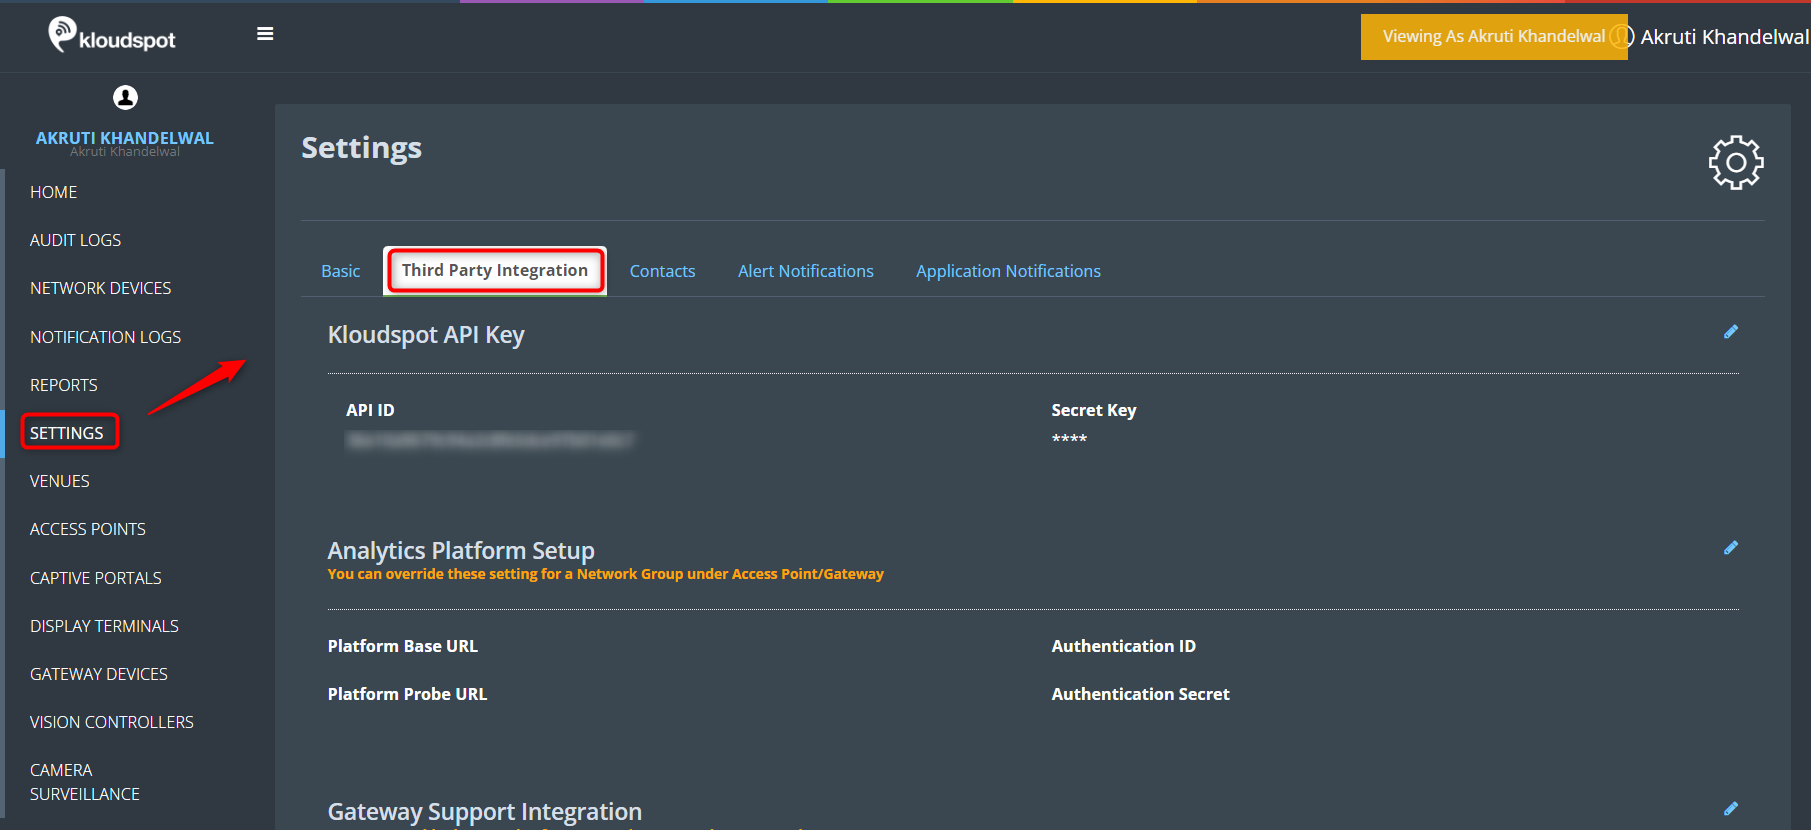
1. Log in to the KloudSpot network management tool. Then navigate to Settings > Third-party Integration.
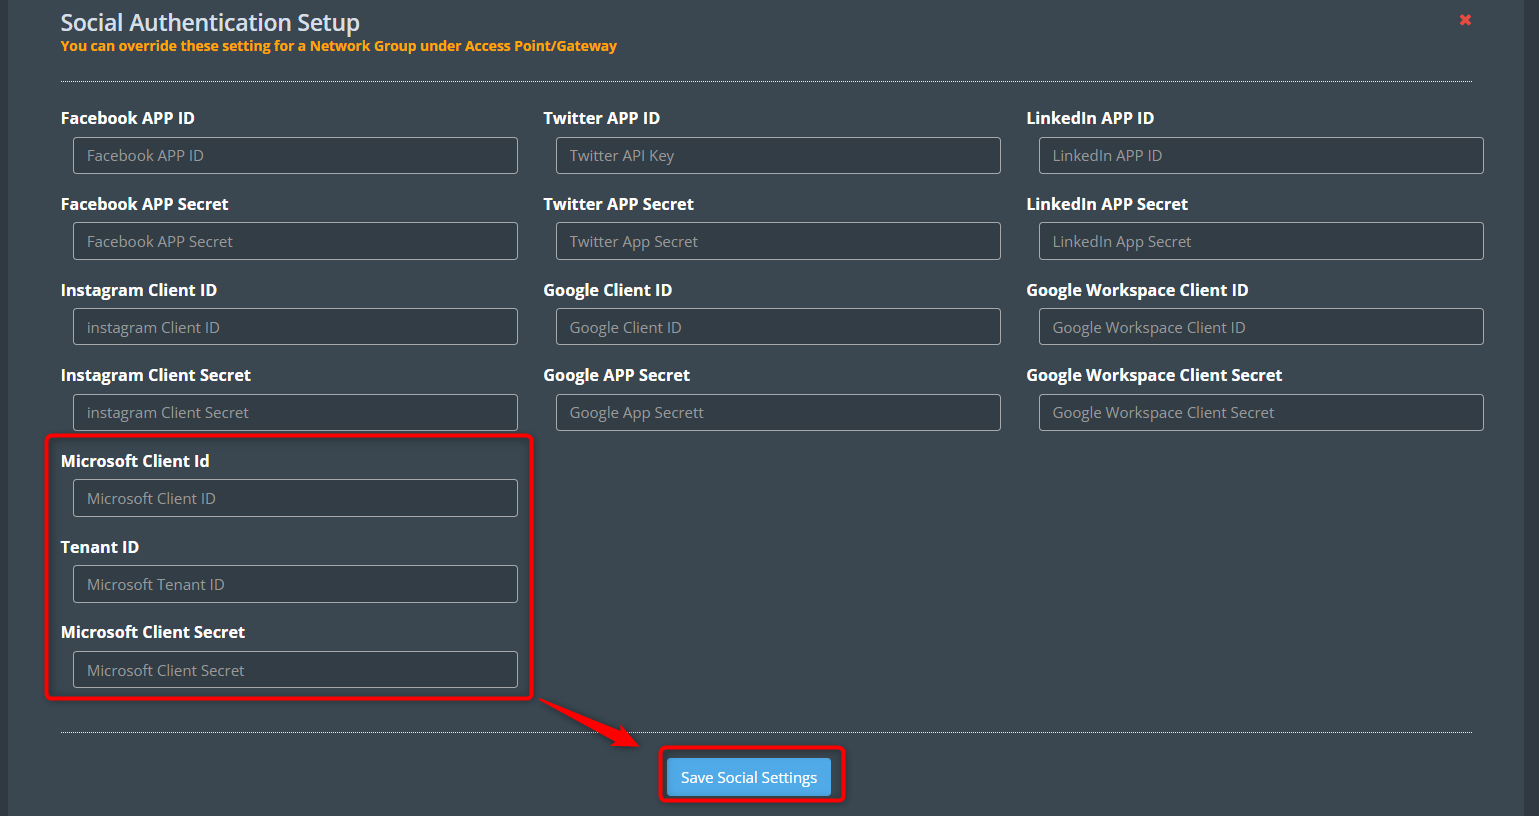
2. Then scroll down to the Social Authentication Setup section. Paste the
Microsoft Client ID, Tenant ID, and Microsoft Client Secret in the
respective text boxes. Then click on the Save Social Settings button.
3. Microsoft Azure credentials have been successfully added.
Authenticate the App.
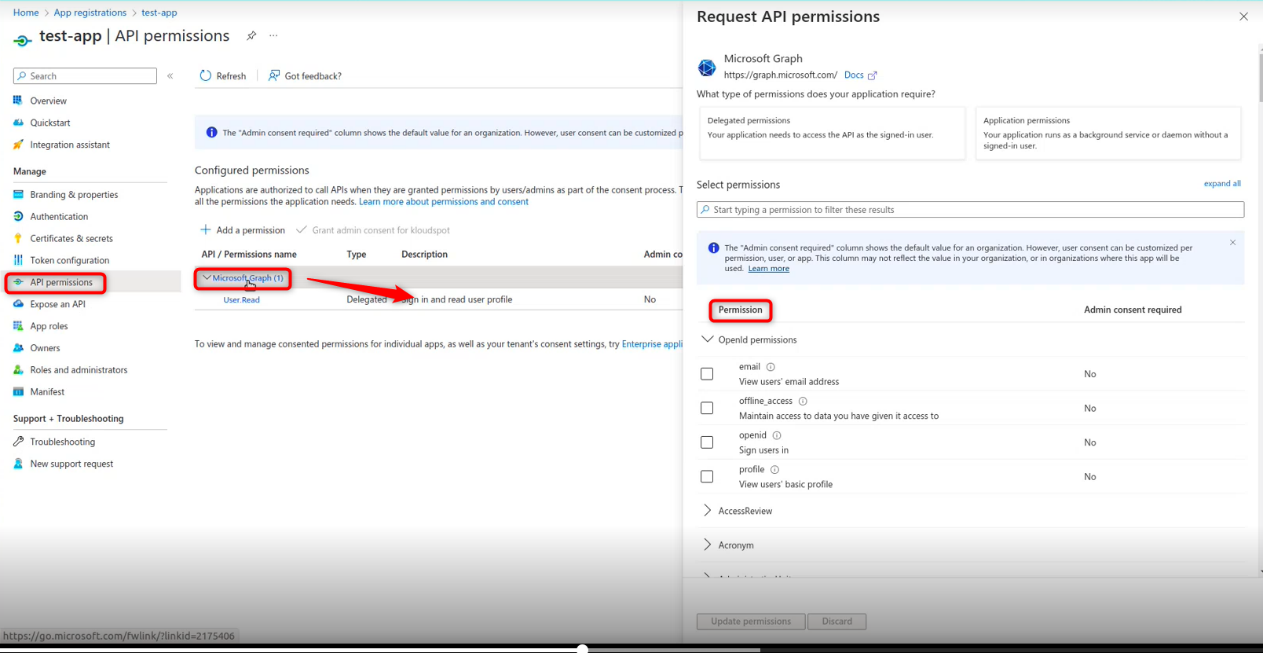
1. After generating the app, you need to grant the necessary permissions to it. For that, navigate to API permissions > Microsoft graph.
2. Then in the request API permissions window that opens, select the required permissions, and click the Update permissions button. Required permissions are listed below.
Email
Offline Access
Open Id
Profile
User Read
User ReadBasic All
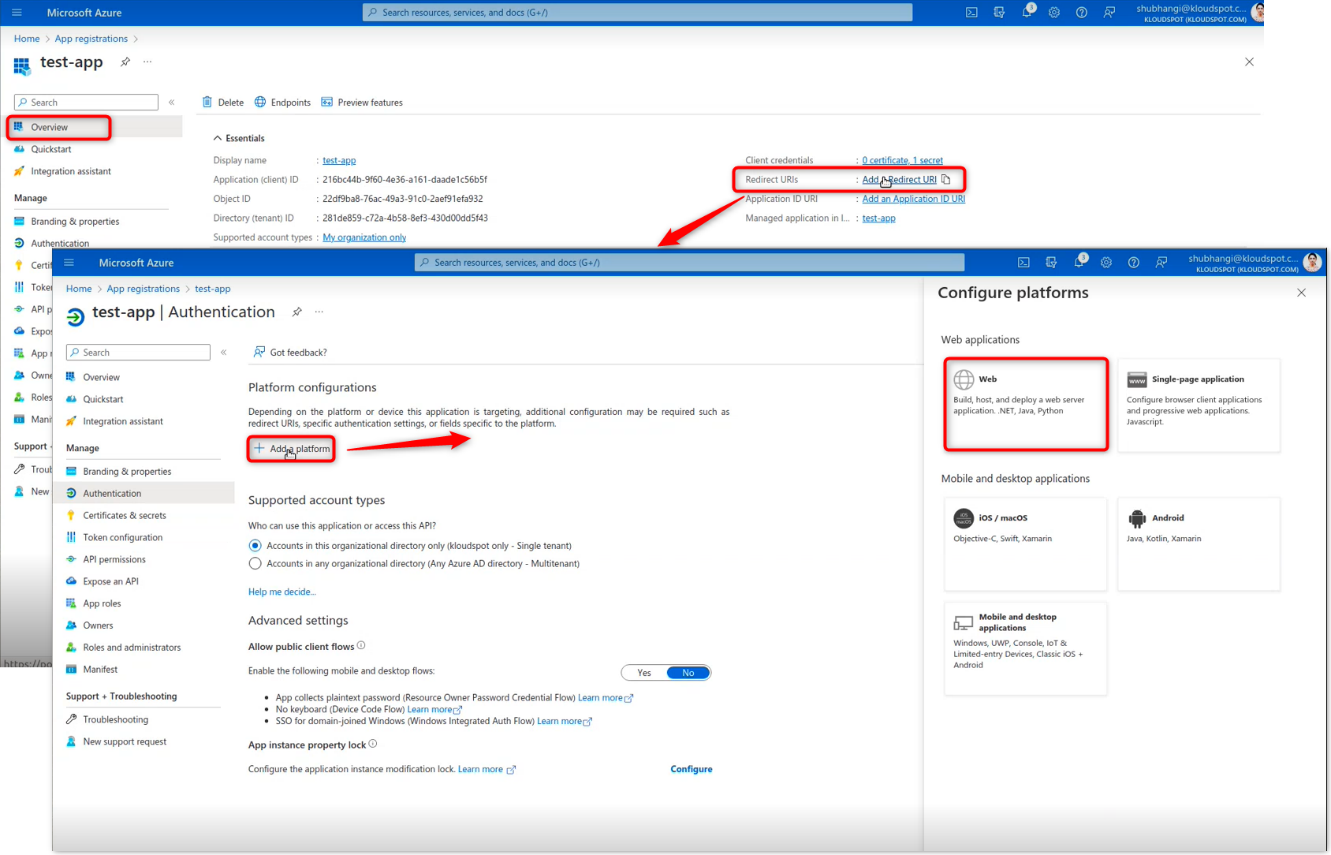
Add redirect URI
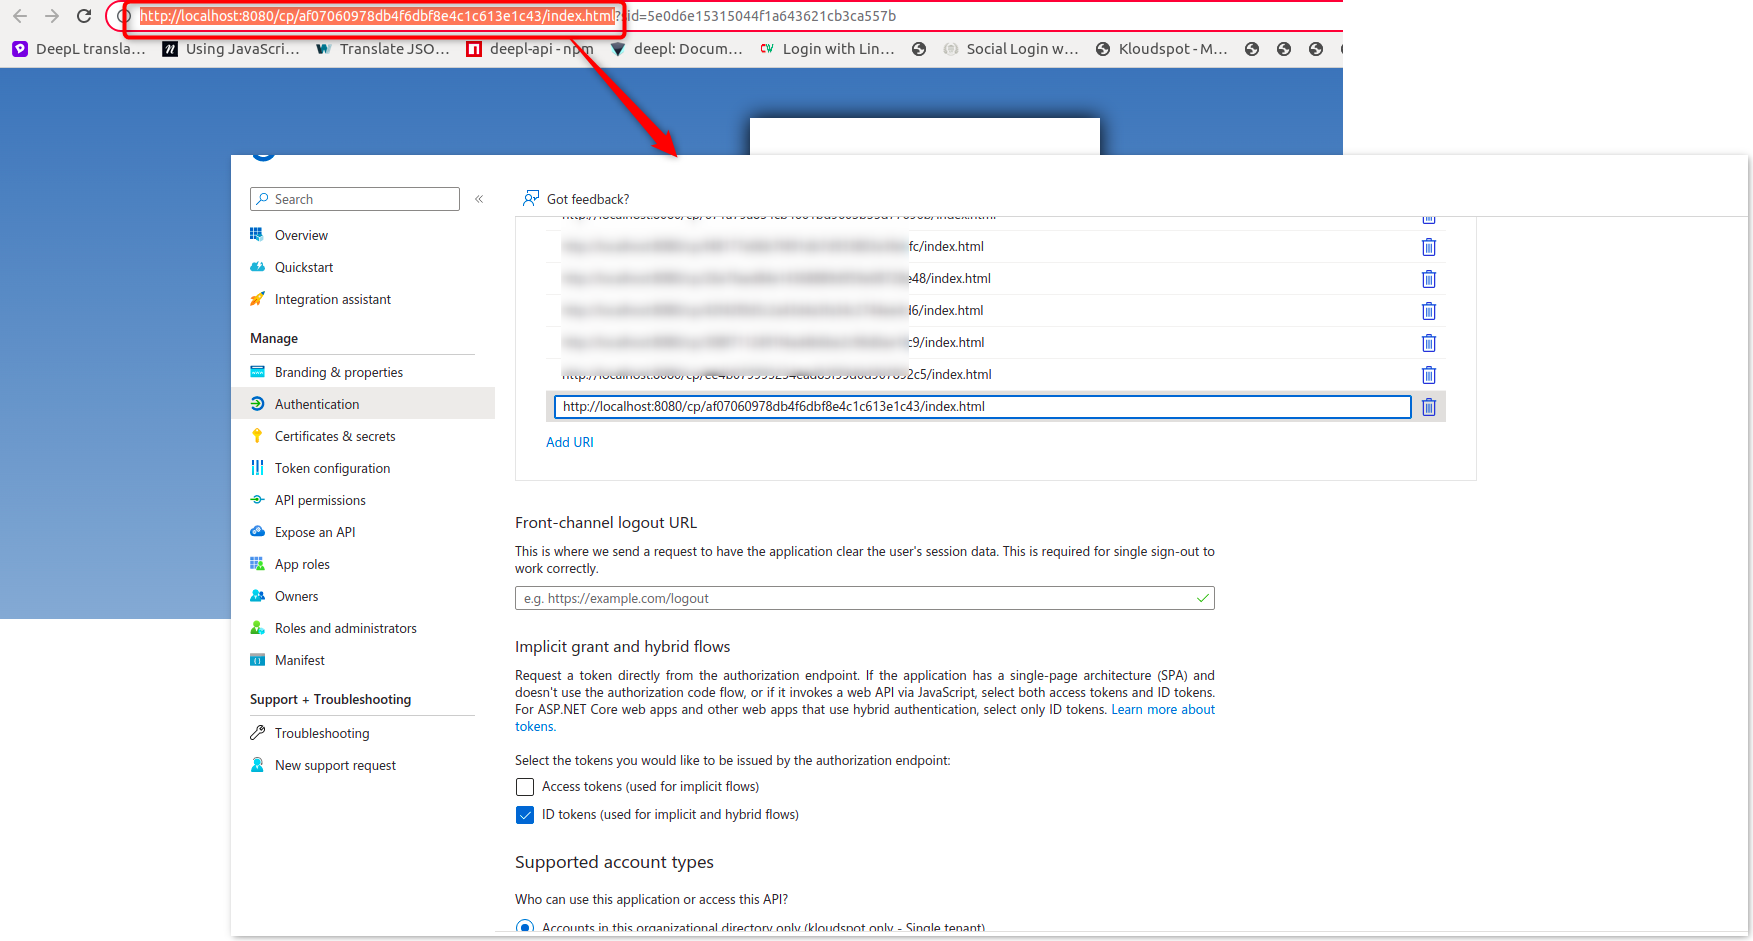
1. The final step of Microsoft Azure integration is to add the redirect URI. To do so, Navigate to Overview > Add a Redirect URI > Add platform > Web.
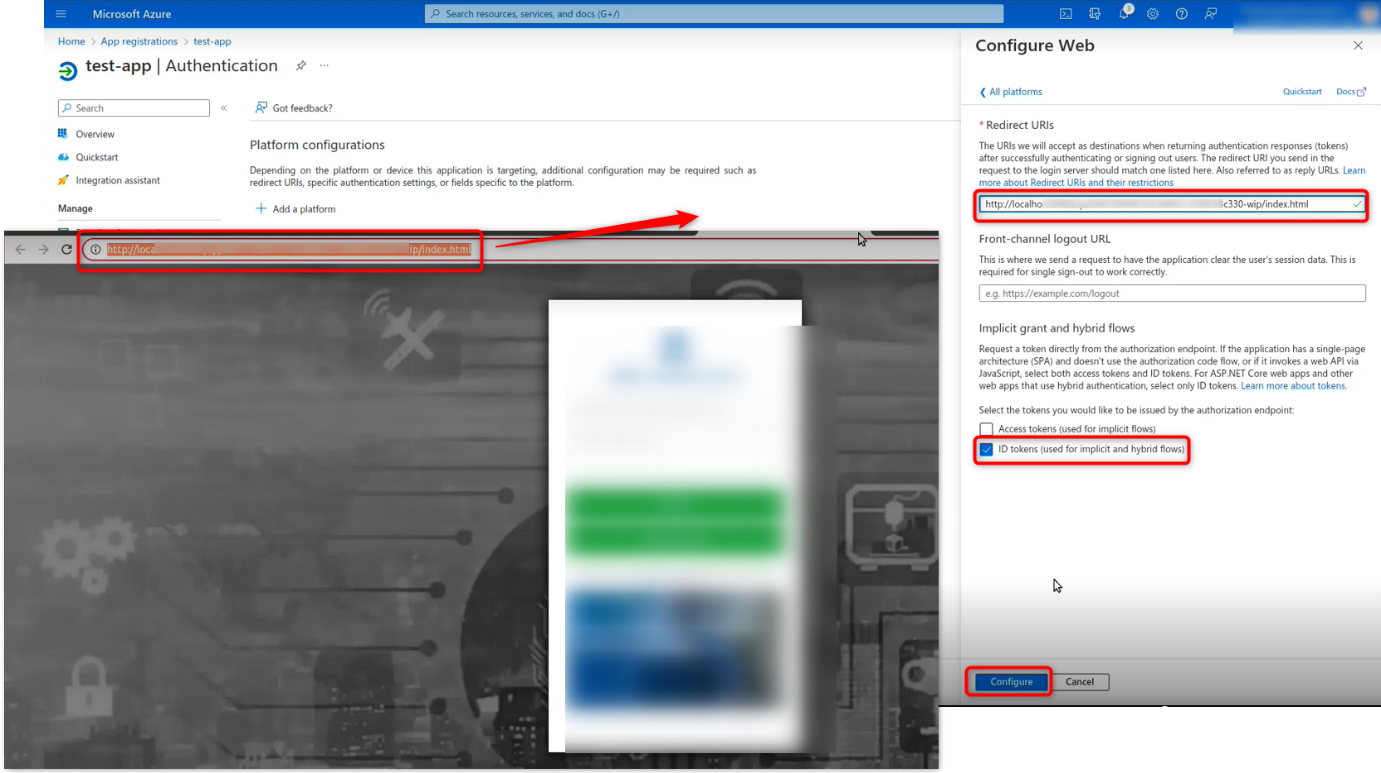
2. On the configuration web page that appears, enter the captive portal’s URI
and check the ID tokens checkbox, then click on the configure button
to configure.
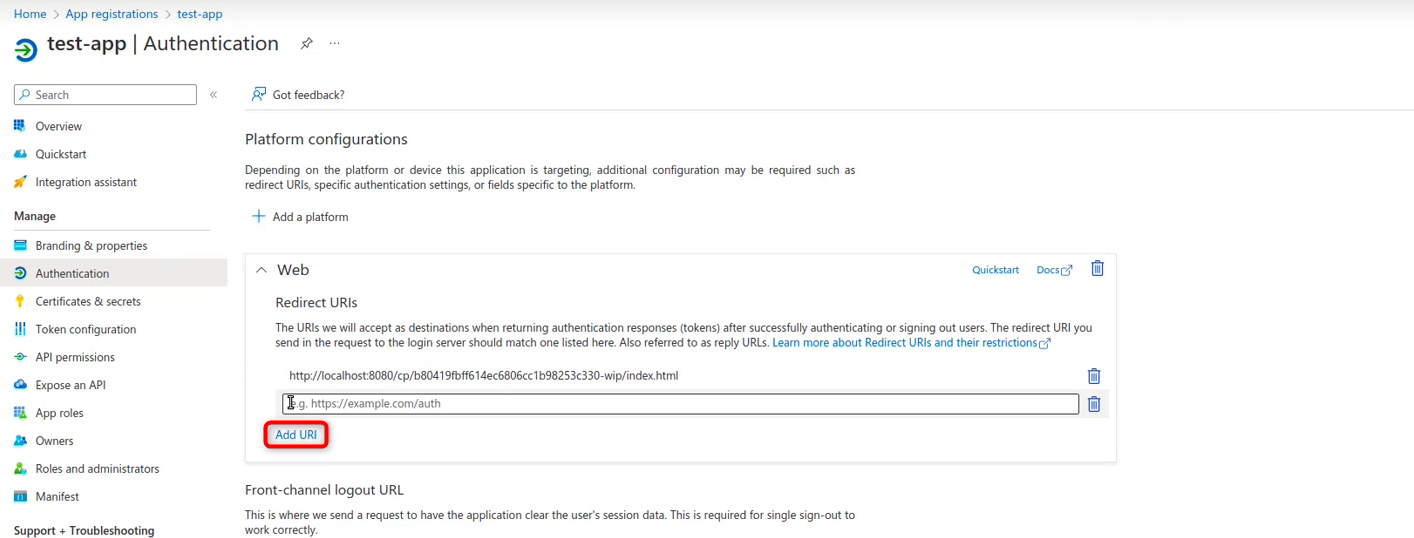
3. If you want to add more captive portal URIs, you can add them by clicking
the Add URI button.
Twitter Authentication
1. By adding Twitter Social Authentication, Captive Portal users can log in using their Twitter account credentials.
2. To integrate Twitter into the Captive Portal , a TwitterAPP ID and TwitterAPP Secret key are required.
3. To add it, Log in to the kloud Manage account and navigate to the Settings page, then to ‘Third-party Integrations’ then scroll down and find the Social Authentication Setup.
4. To obtain the credentials, follow the instructions below.
5. Log in to the Twitter developer account with company credentials.
6. To access the login page, click on the link provided below.
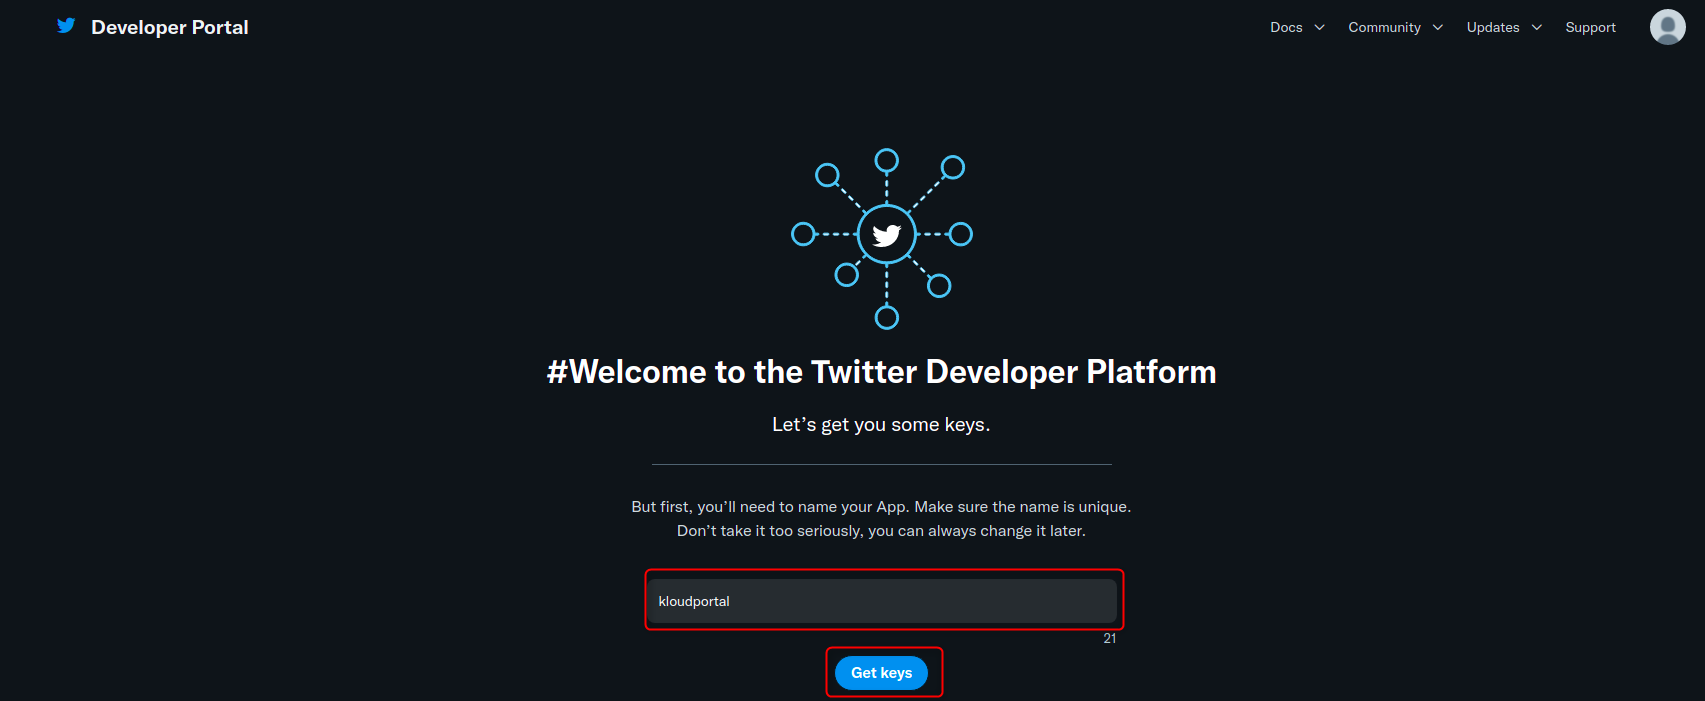
7. After signing up and logging in, a window will appear as shown below.
Enter your App name in it and click on the Get Keys button.
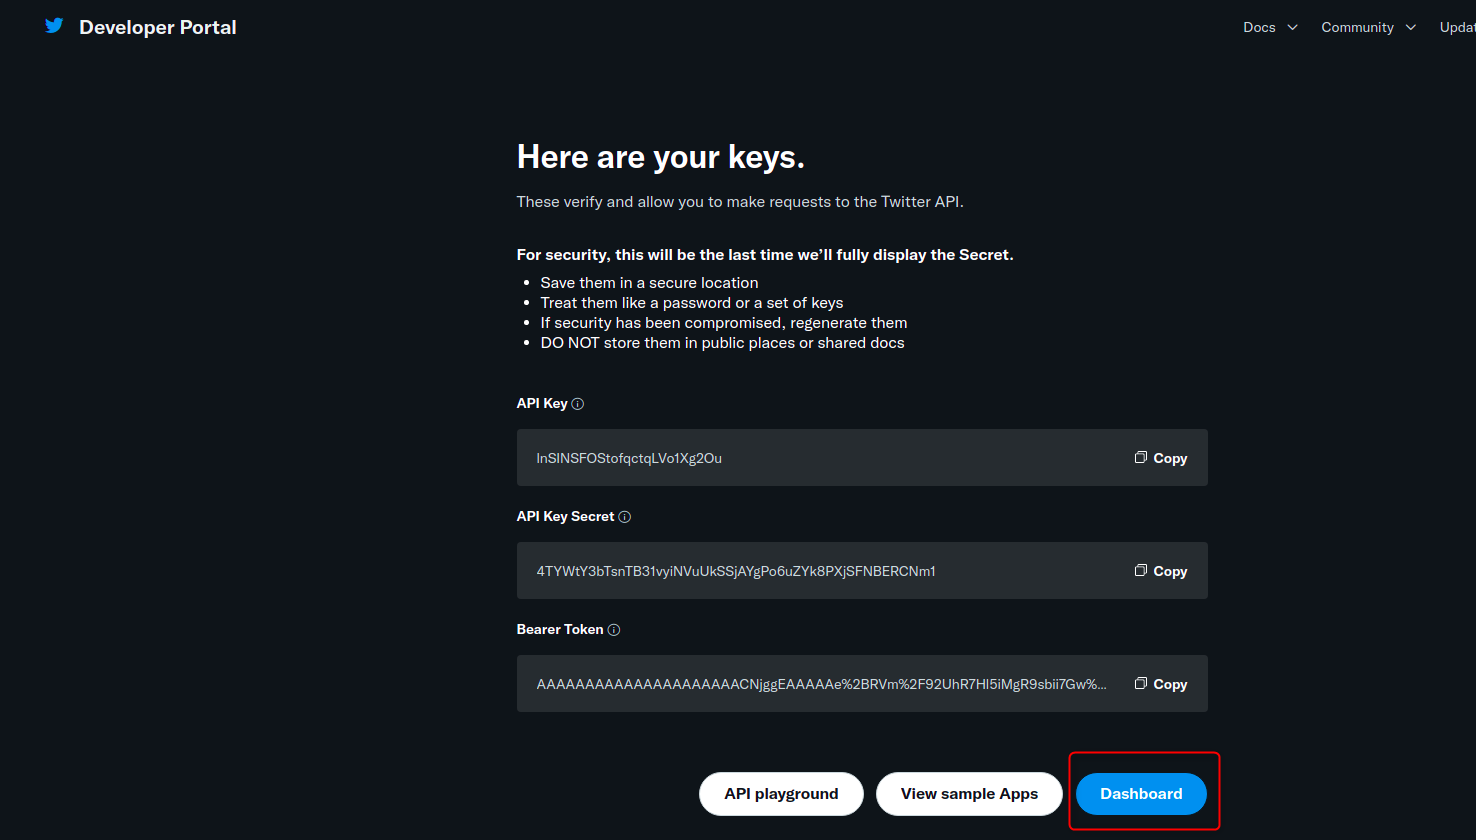
8. Then in the window that opens, click on the Dashboard button, and
enter the dashboard of the created app.
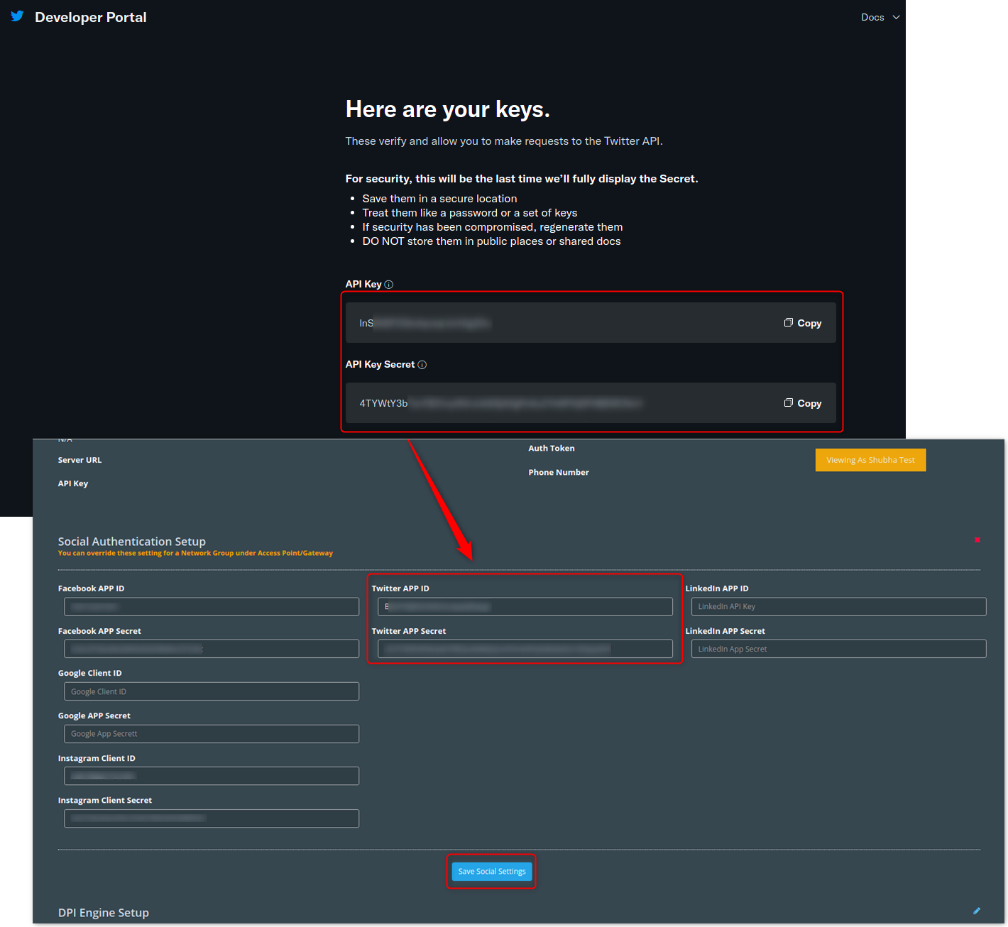
9. Copy the API key and API key secret found on this screen and paste it
somewhere else for later use.
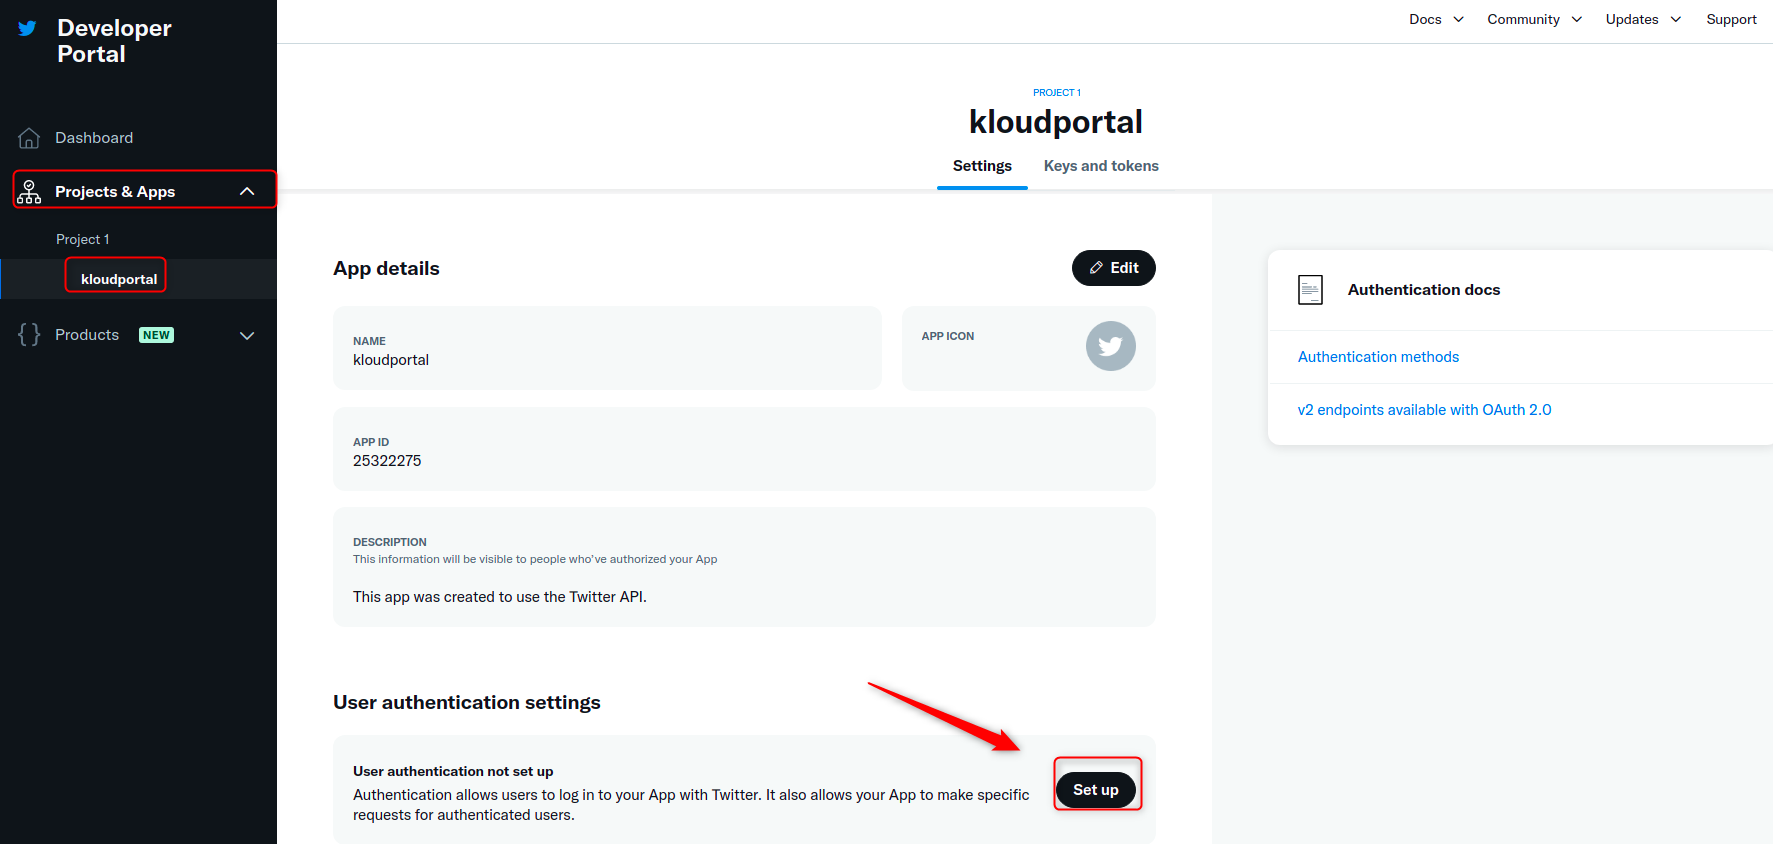
10. Select the app we created from the Projects & Apps menu in the
dashboard.
11. Then click on the Set up button to configure User authenticationsettings.
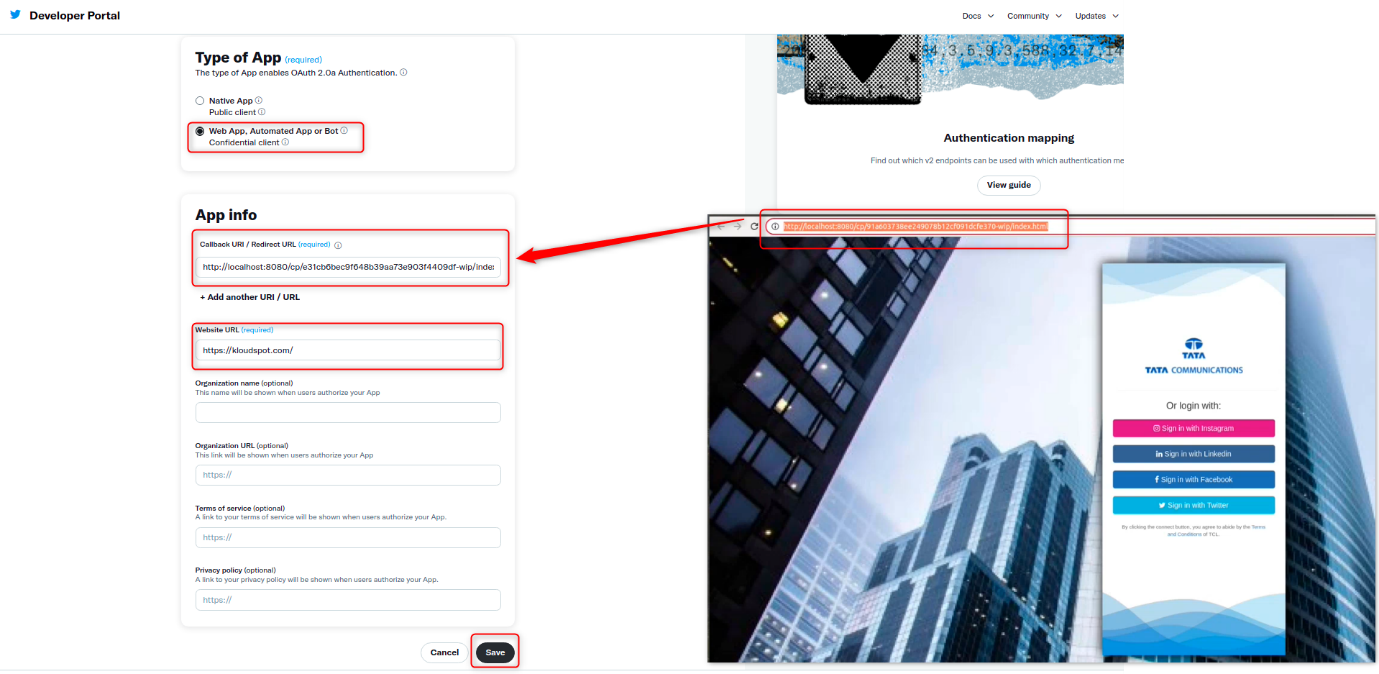
12. Then select Web app in the ‘Type of App’. Enter the Redirect
URL and Website URL in the ‘App Info’ section and click the Save
button.
Redirect URL: It is useful to specify which page the user should be
directed to after logging in with Twitter.
Website URL: Enter your company website URL.
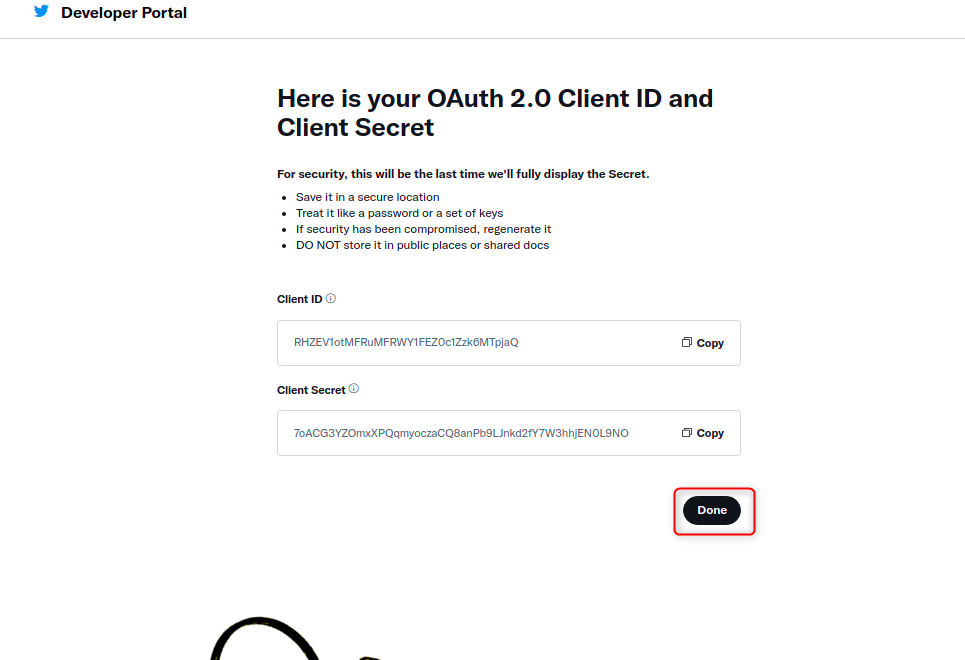
13. Then a window containing Client ID and Client secret will open.
Then click the Done button.
14. Then go to ‘Third-party Integrations’ settings, paste the previously
copied API key and API key secret, and click the Save Social Settings
button.
15. Twitter authentication has been integrated successfully.
WhatsApp Integration
Integrating WhatsApp with KloudManage using Twilio Provider
Introduction
Integrating WhatsApp with KloudManage provides the capability to receive WhatsApp notifications within the KloudManage and enables authentication for the Captive Portal. This document outlines the steps to integrate WhatsApp using the Twilio provider.
Prerequisites
Access to a Twilio developer account.
Access to KloudManage with administrative privileges.
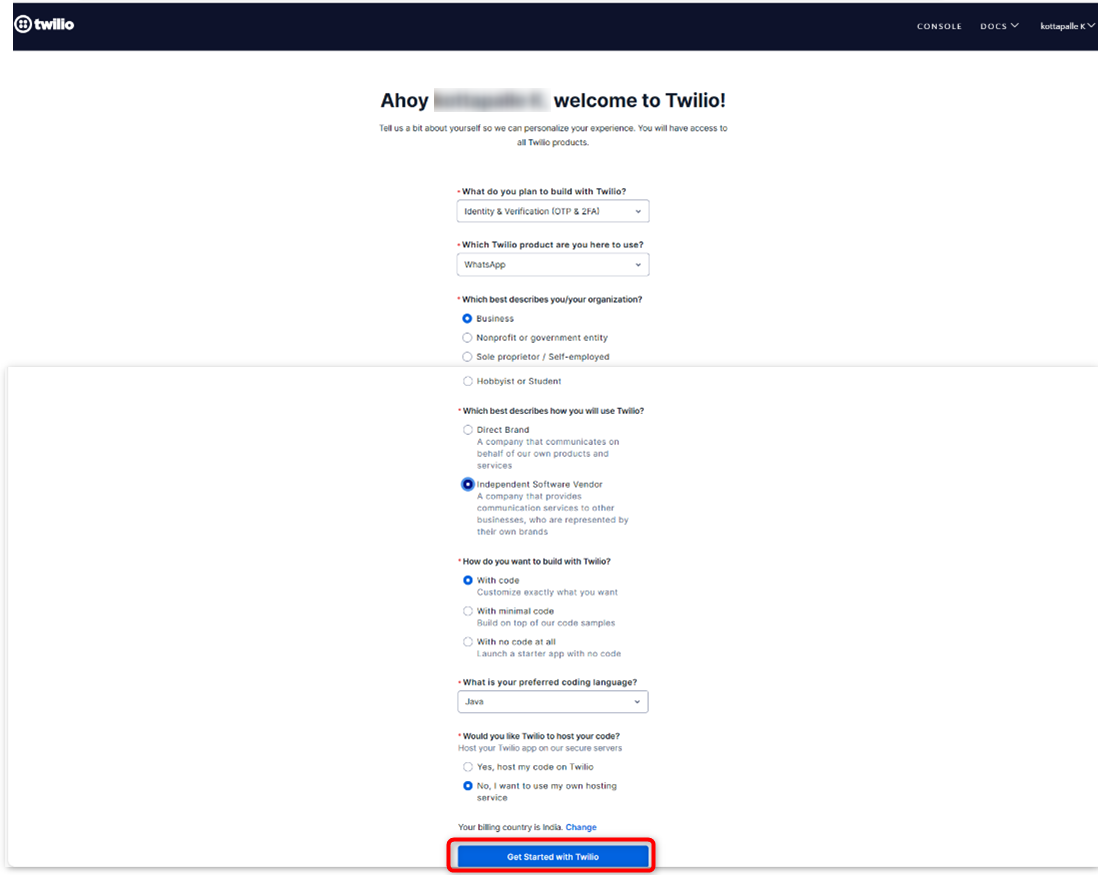
If you don’t have a Twilio developer account, you can create a new one by providing your Email ID and Phone Number.
Upon first login, configure your settings as seen in the welcome page screenshot below.
Click on the Get Started With Twilio button.
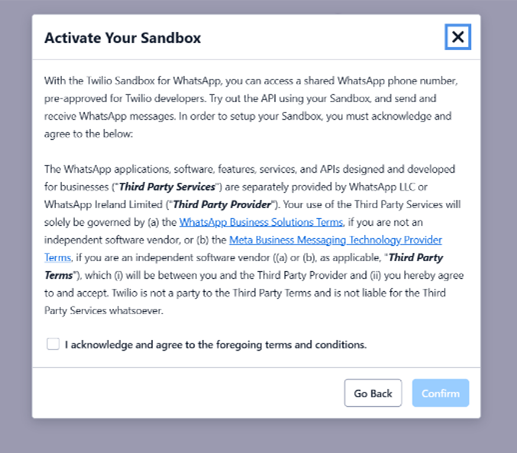
When prompted with the terms and conditions popup, acknowledge by checking the checkbox and click Confirm.
First, set up the WhatsApp sandbox and message template within Twilio. Following this, you will receive the Account SID, Auth Token, and Twilio phone number. Refer to the Twilio documentation for instructions on how to complete this process.
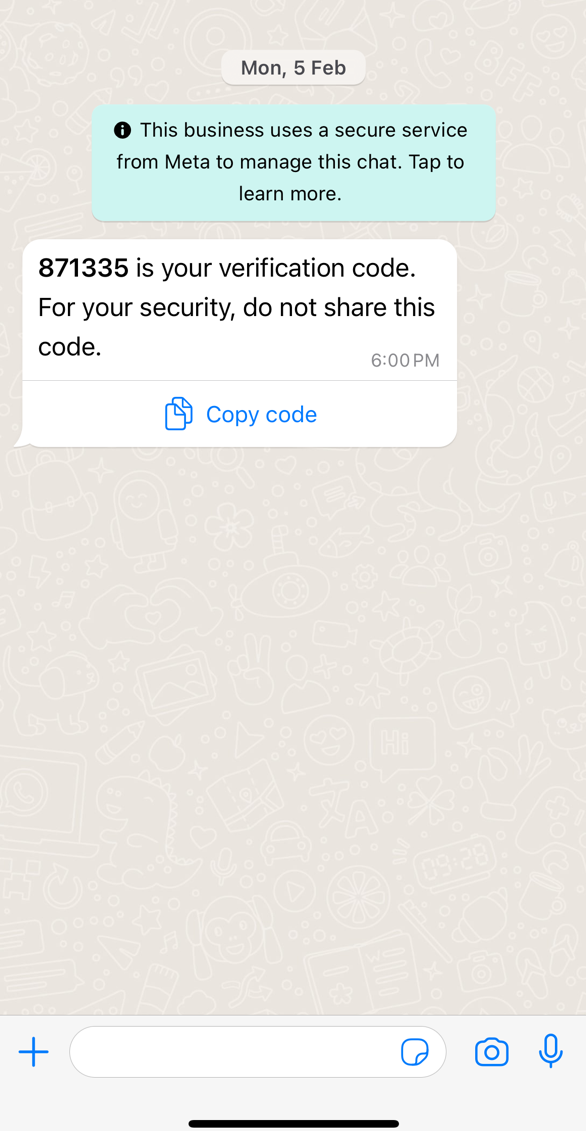
When creating the message template, make sure it is similar with the hardcoded template in KloudMange. Use the template provided below.
{{code}} is your verification code. For your security, do not share this code.
Integrate Twilio Credentials into KloudManage
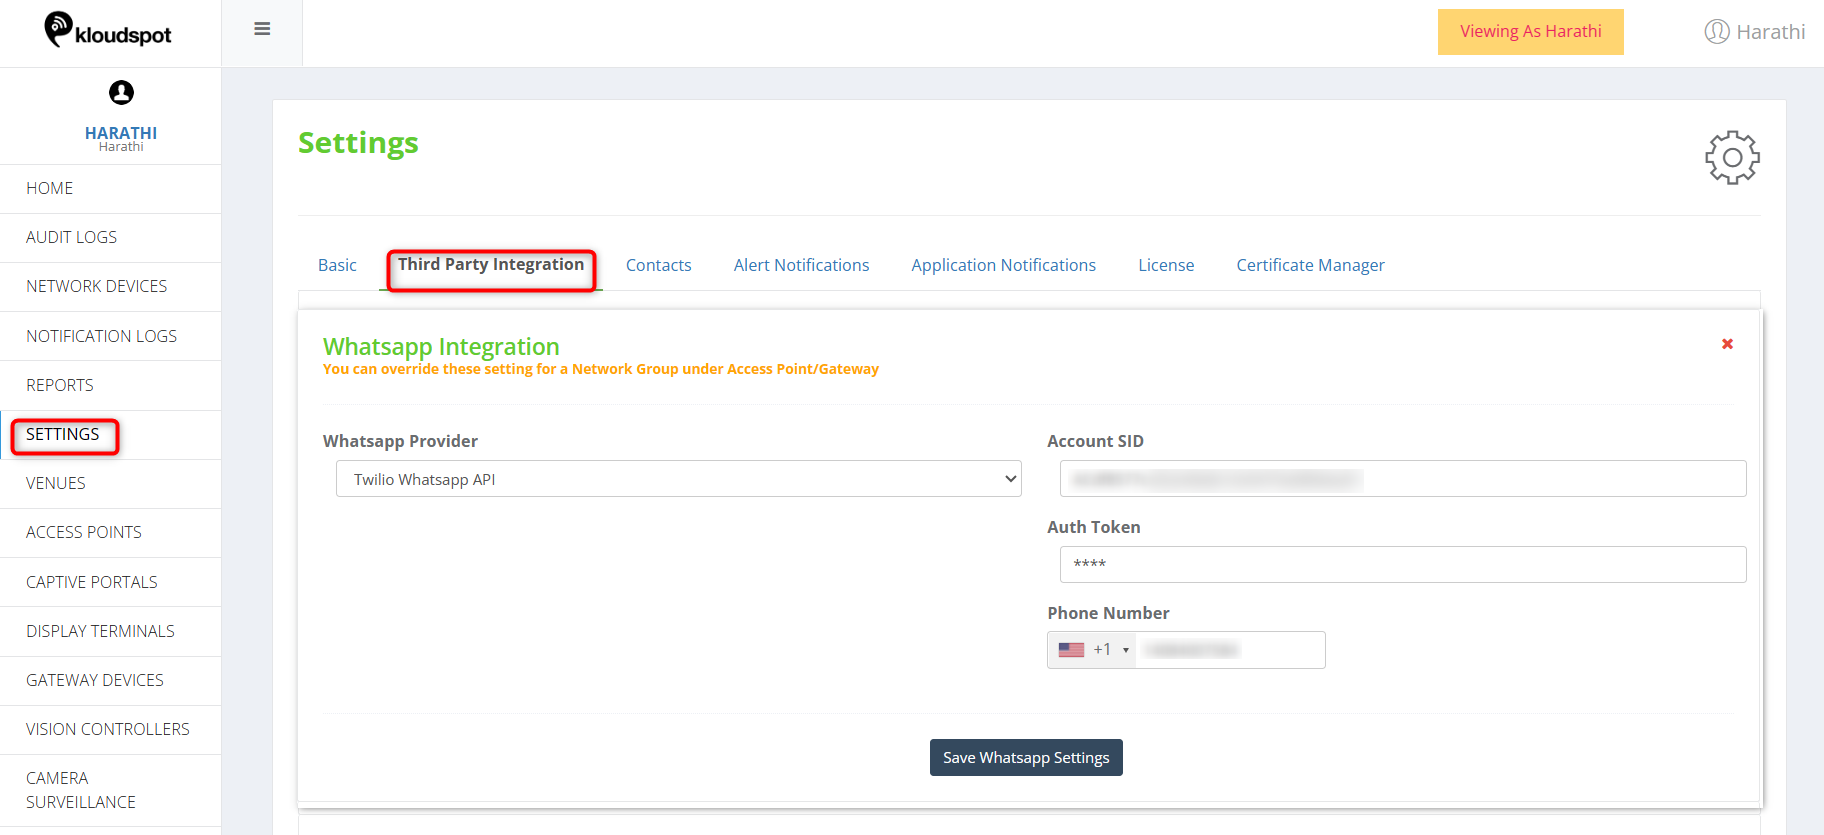
Access KloudManage and navigate to Settings > Third-party Integration.
Under the Whatsapp Integration section, select Twilio as the provider.
Enter the Account SID, Auth Token, and Phone Number received from Twilio.
Click on the Save Whatsapp settings button to save the integration settings.
Following the outlined steps, you have successfully integrated WhatsApp with KloudManage using the Twilio provider.
This integration enables the seamless flow of WhatsApp notifications and facilitates Captive Portal authentication within the KloudManage.
Customizing Captive Portal Templates
Your network’s welcome page, often the first point of interaction between users and your brand, can leave a lasting impression. To ensure this impression is a positive one, Kloud Portal offers robust customization options for your captive portal templates.
Continuing from our exploration of third-party authentications, where we enabled a range of options for user login, we now delve into the realm of customizing captive portal templates. This crucial step allows you to tailor the welcome page that users encounter when they connect to your network. Whether you’re operating a bustling coffee shop, a boutique hotel, or a corporate enterprise, this customization process empowers you to create an immersive and brand-consistent experience.
Through the following sections, we will guide you through the process of fine-tuning your captive portal templates. This includes adjusting text, images, colors, and layout to align with your brand identity and messaging.
To discover the hardware options supported by the Captive Portal and explore the templates compatible with each hardware, please refer to the “Hardware and Templates " guide. This guide will also provide insights into which templates are designed to support various authentication methods.
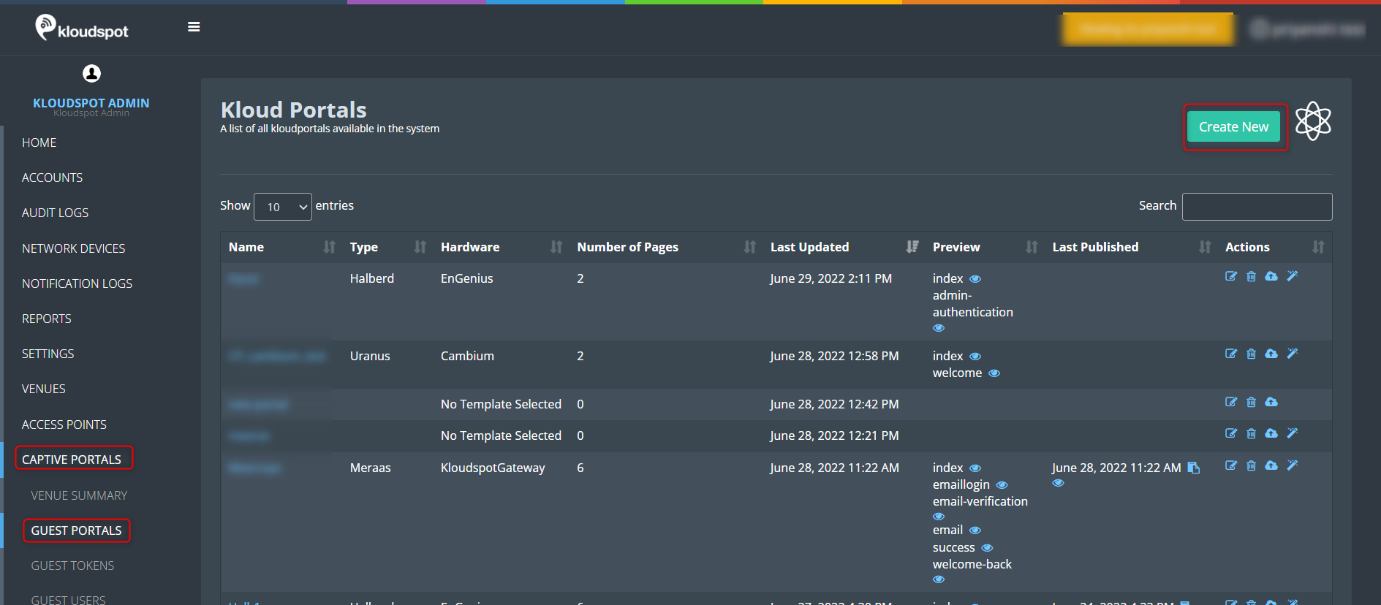
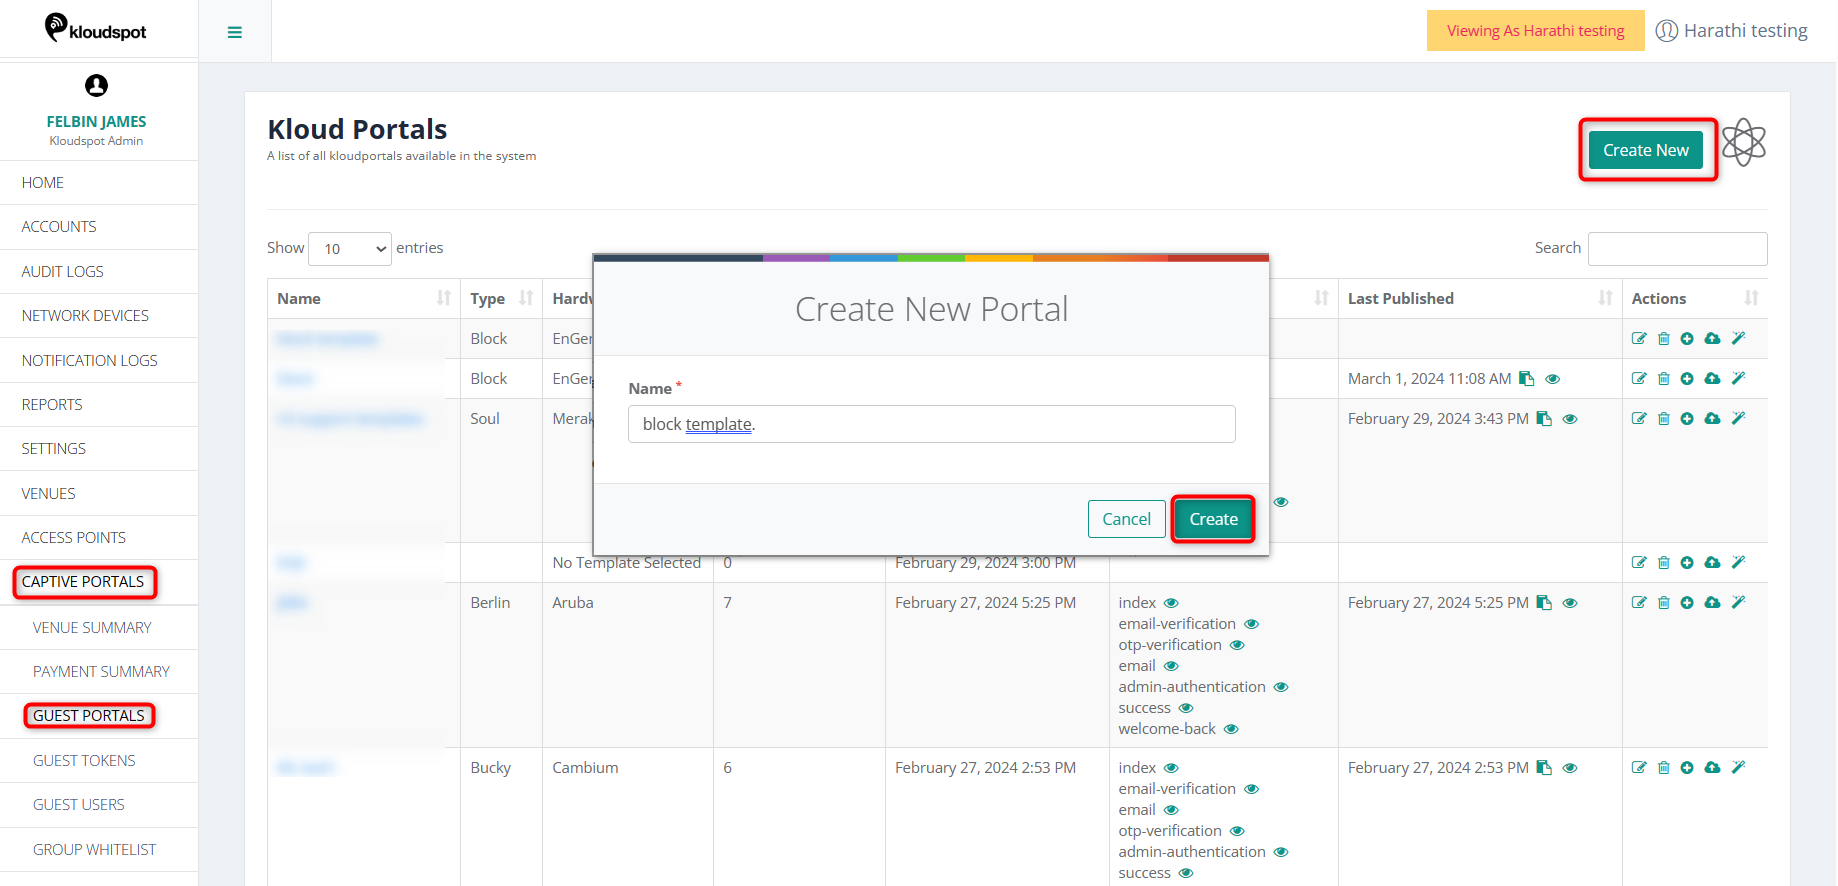
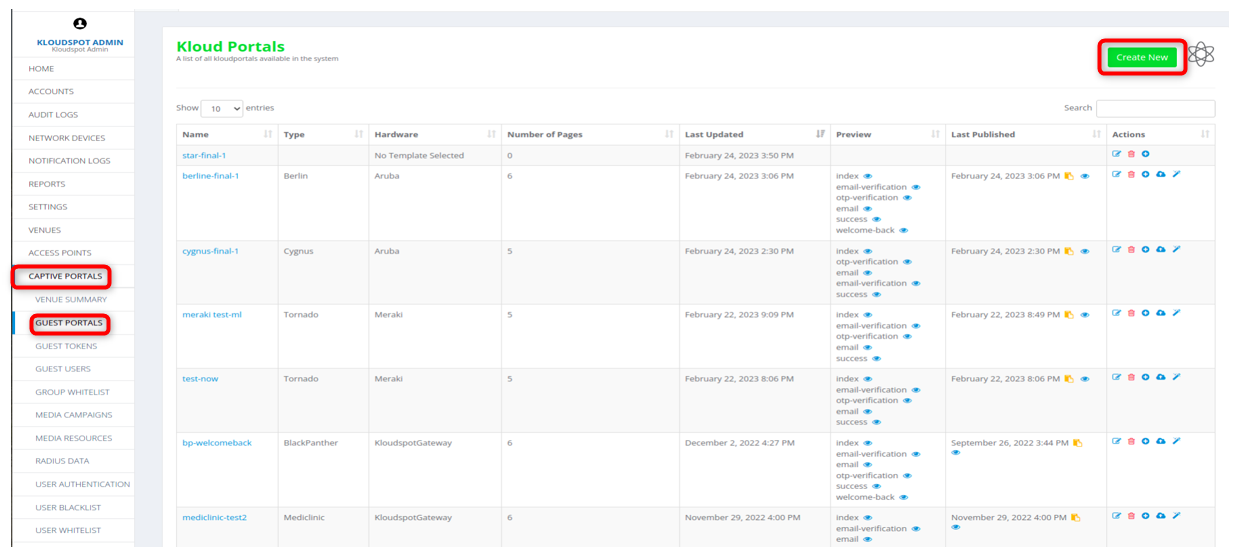
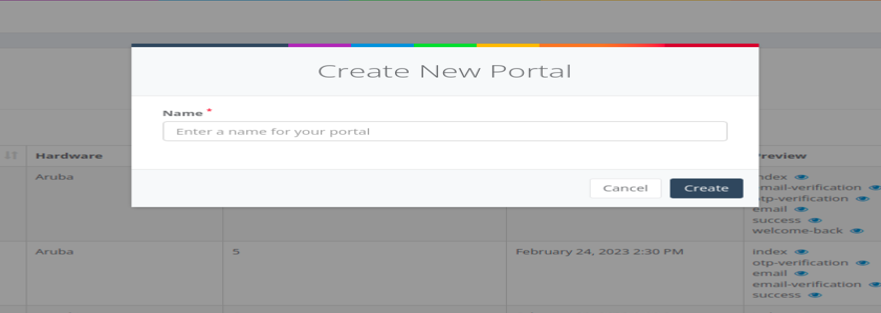
2. Then Navigate to CAPTIVE PORTAL > GUEST PORTAL > Create New.
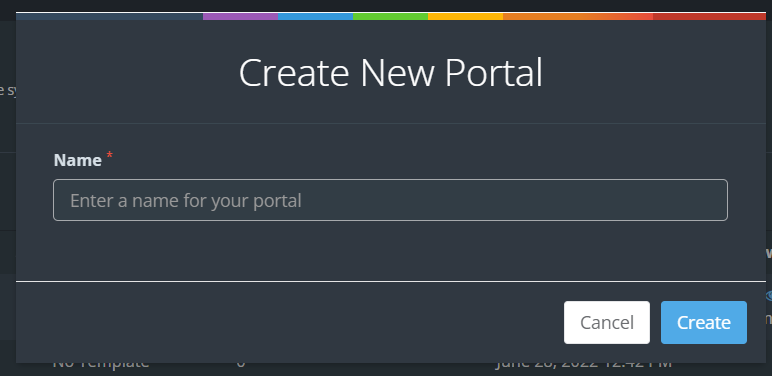
3. Enter a name for the portal in the popup window that appears and click the
Create button.
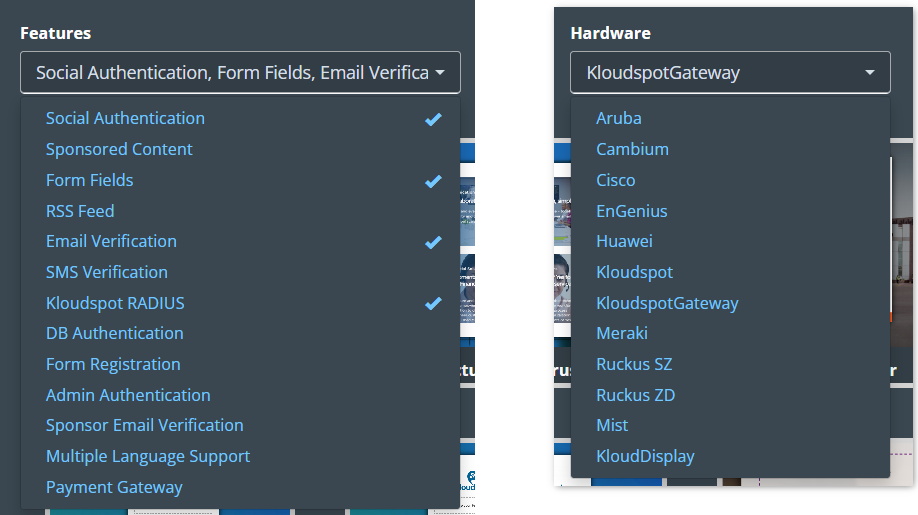
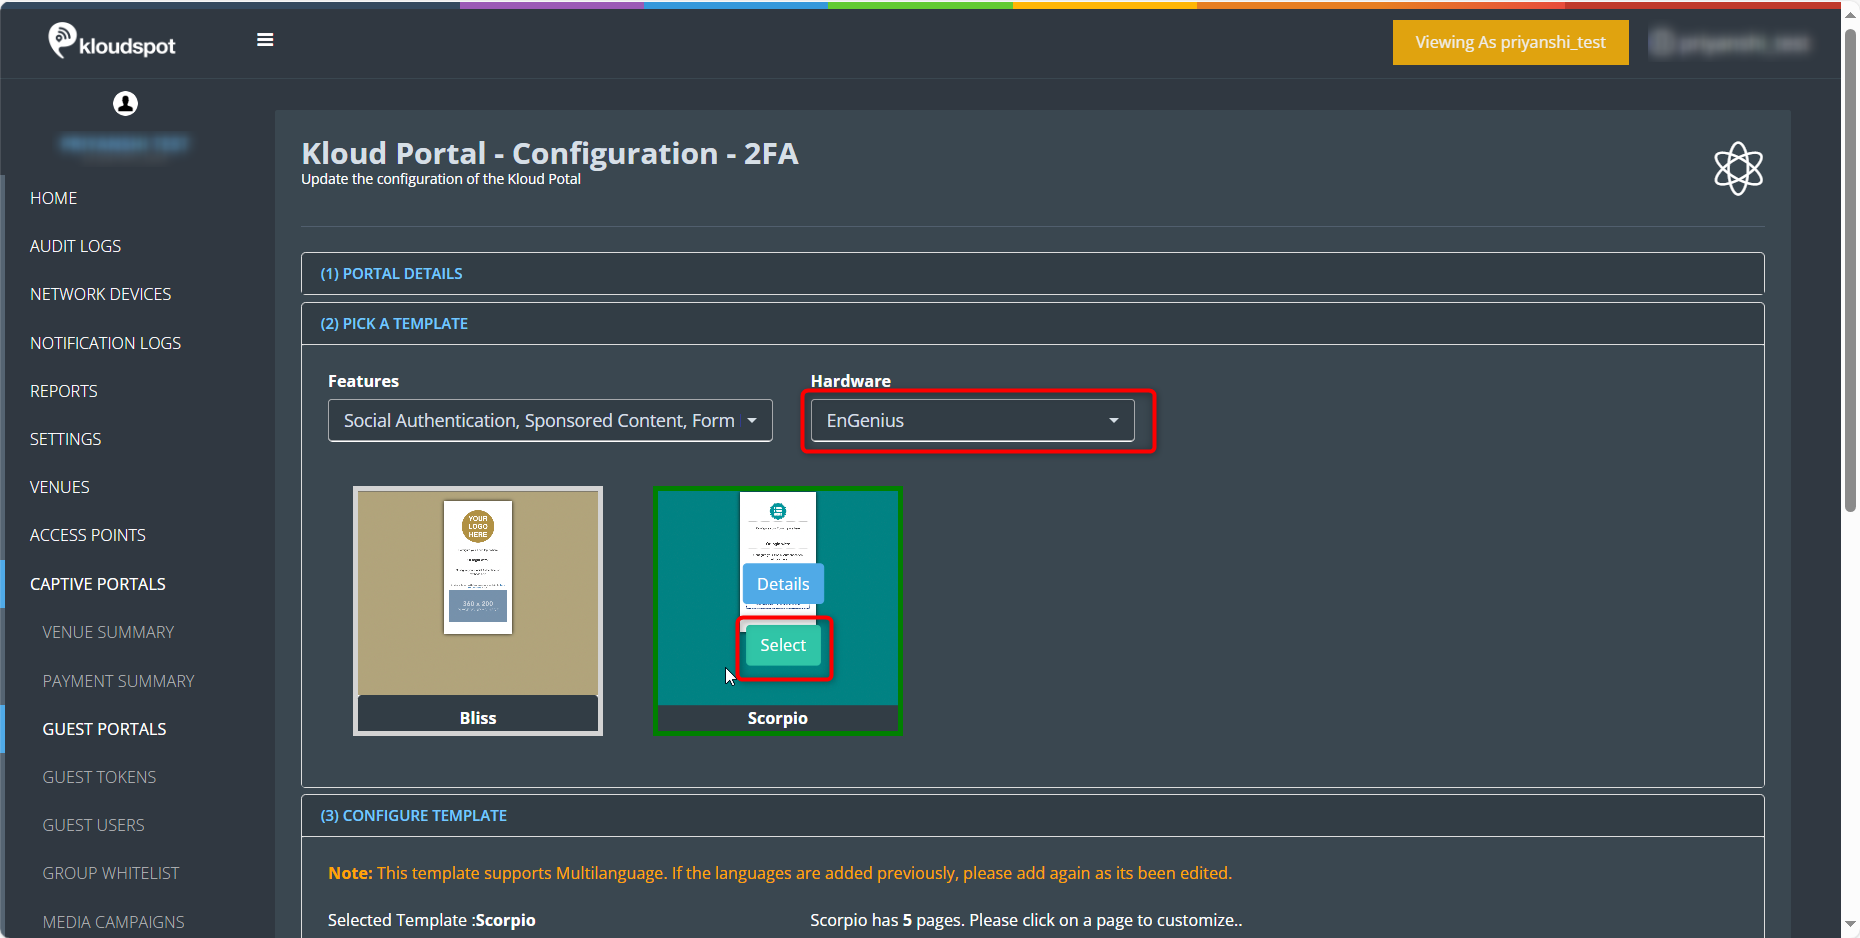
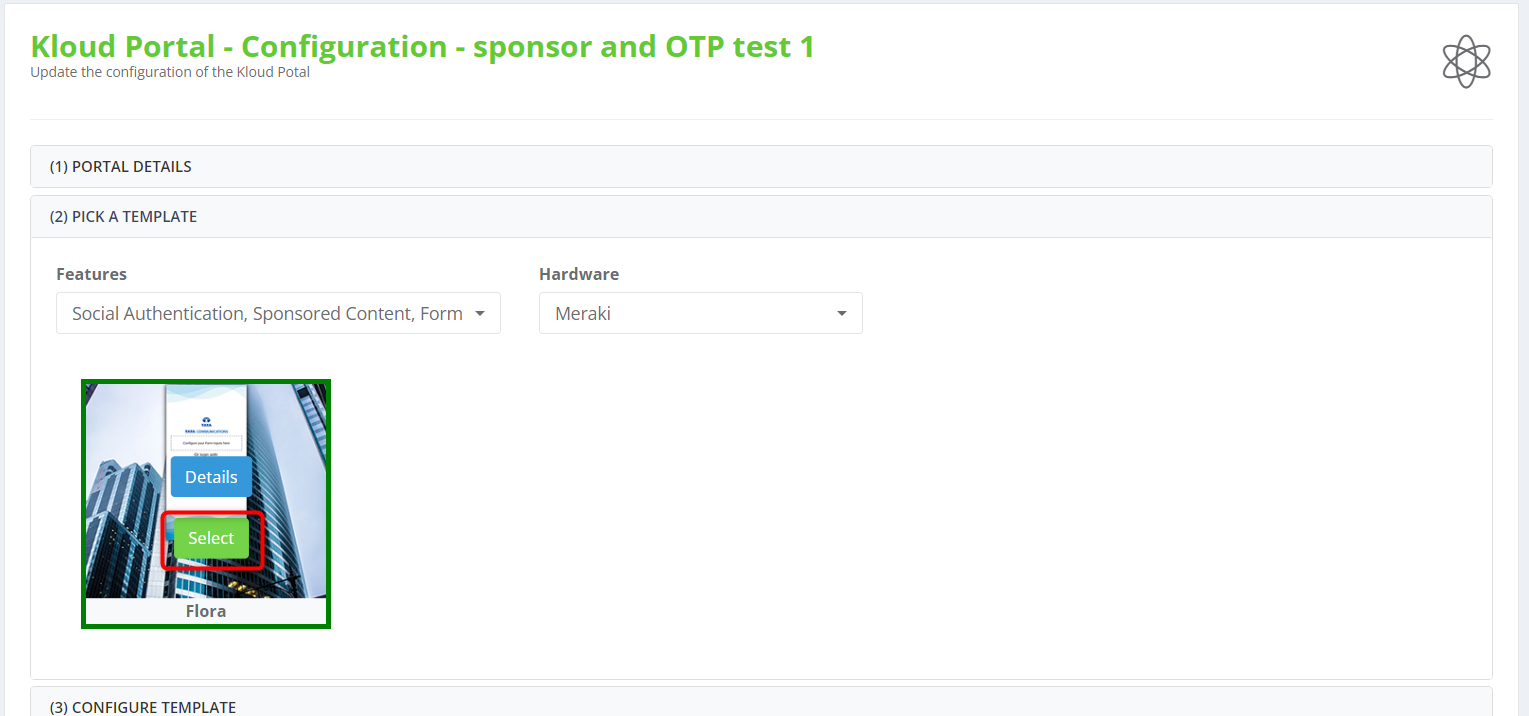
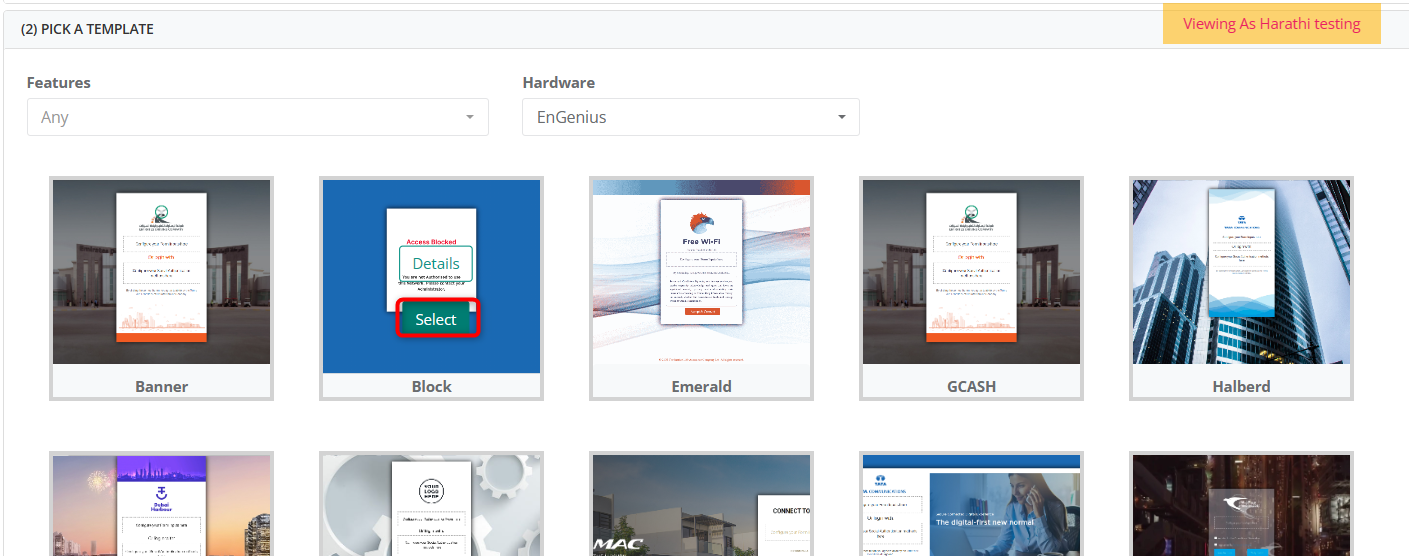
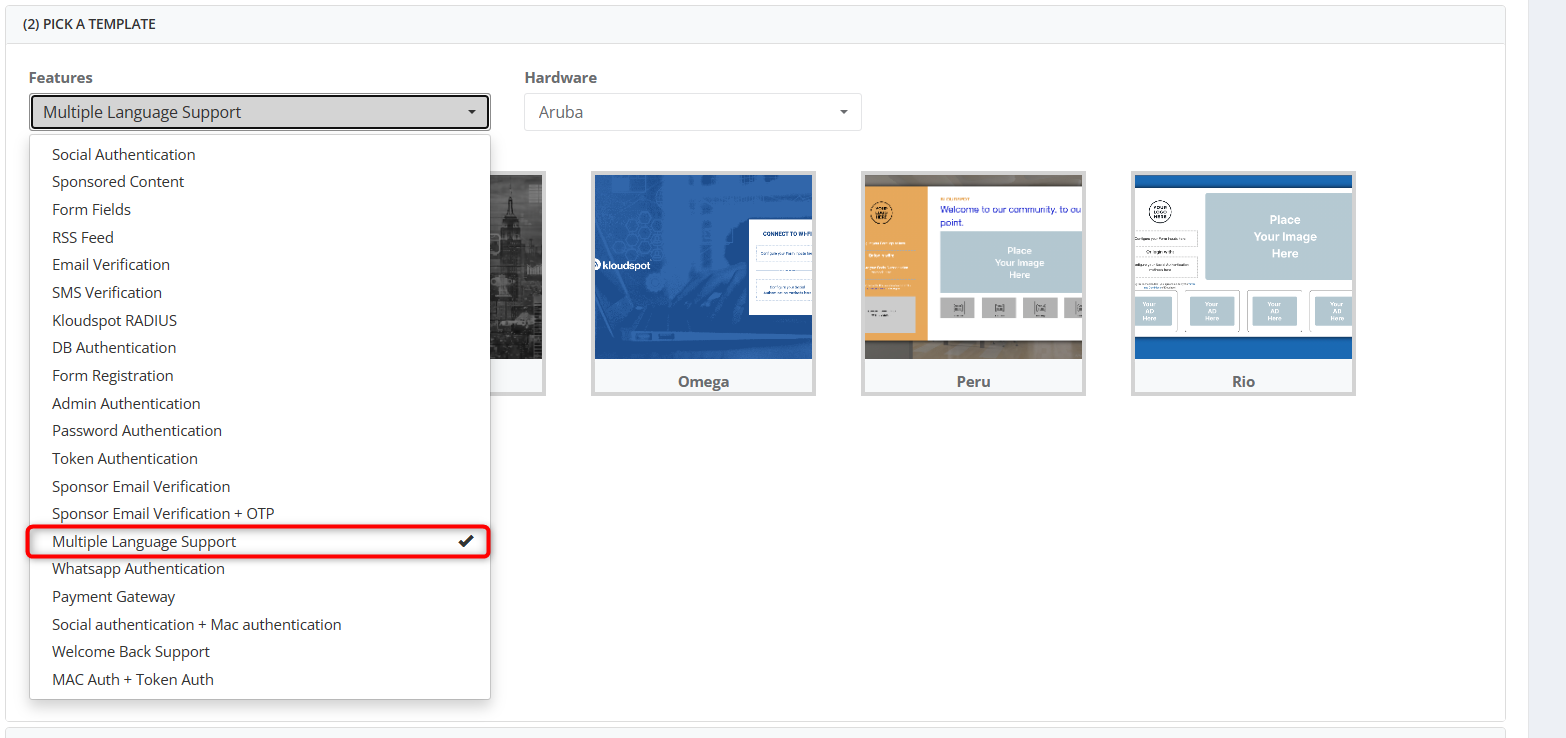
4. In the features dropdown menu, select the features you want. Then select
Hardware from the hardware dropdown list.
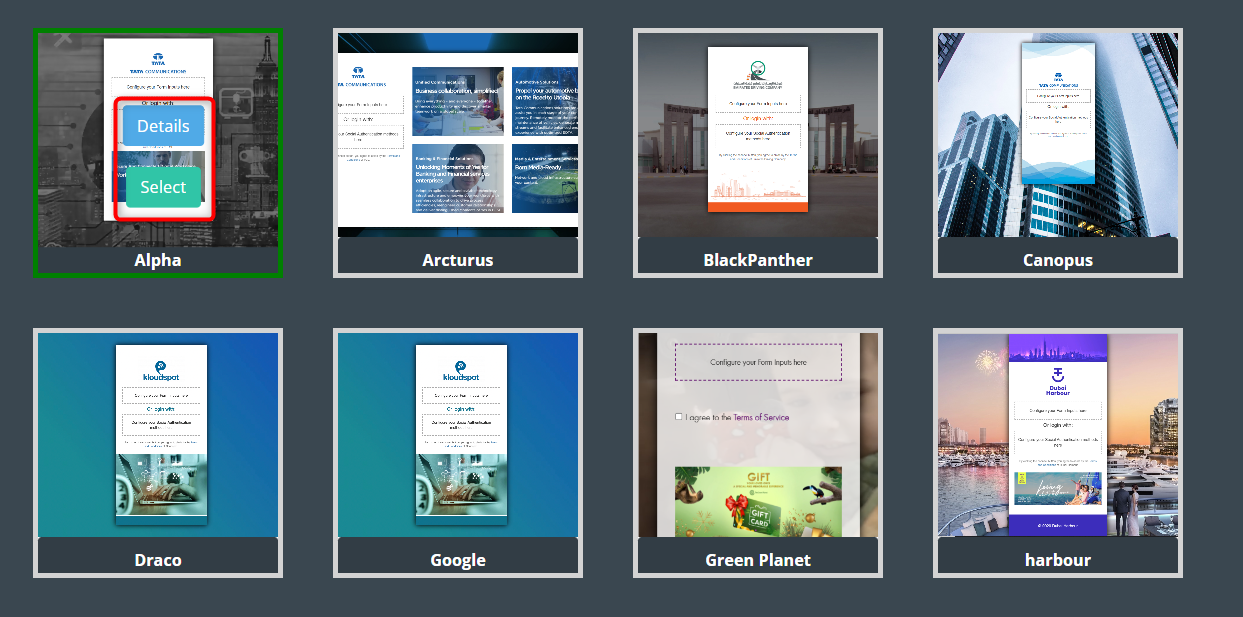
5. Then select your desired template from the template list. Click on the
Details button to preview the template. Click on the Select button to
edit.
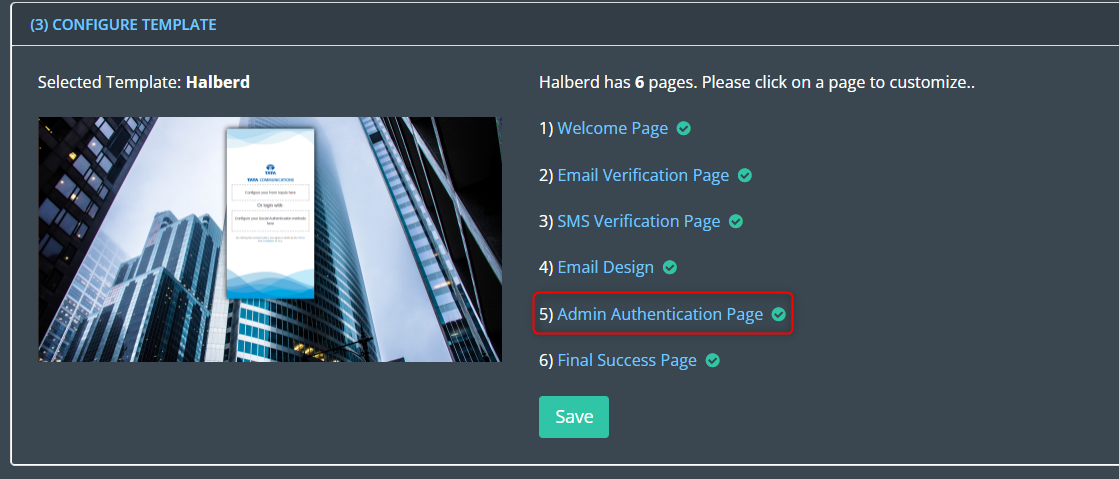
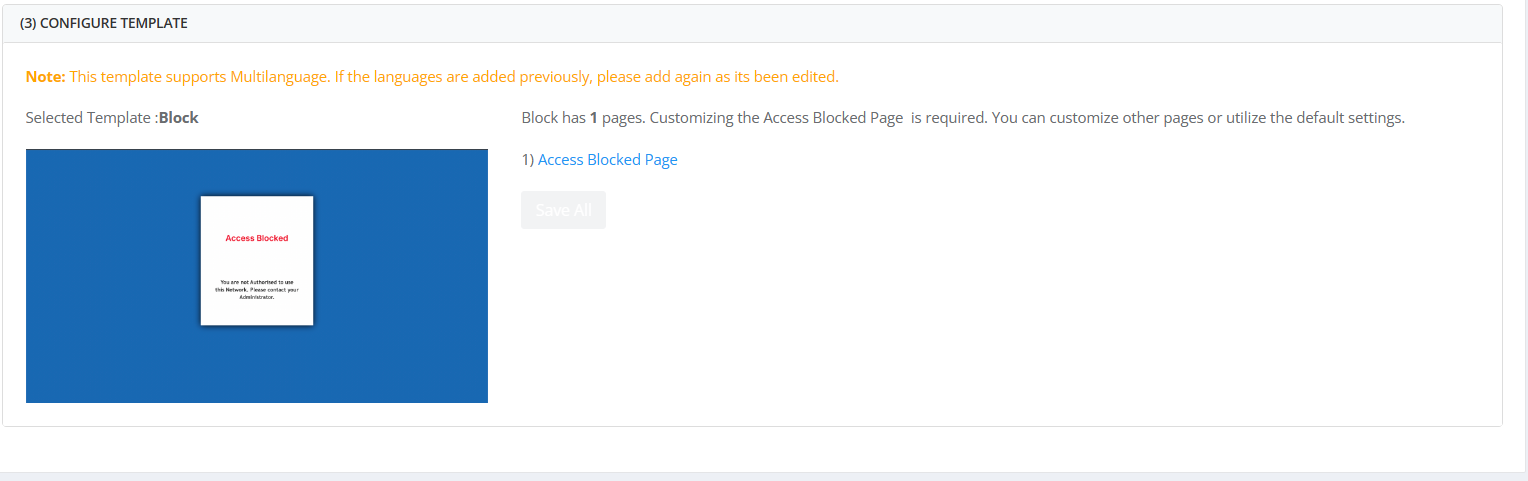
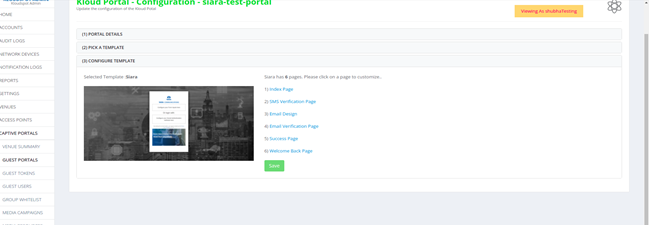
6. The selected template can be edited in the following steps. We can change
it to suit your needs.
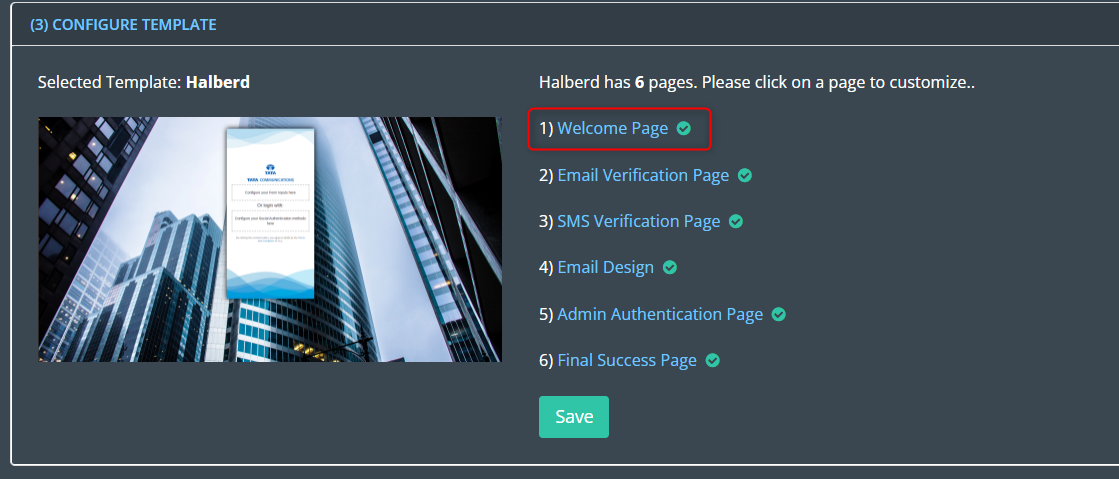
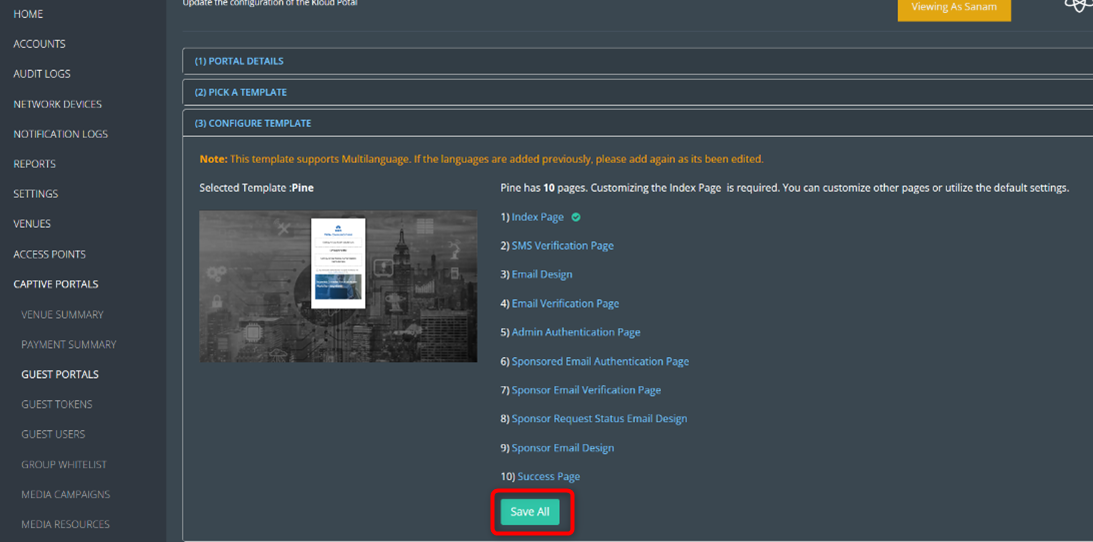
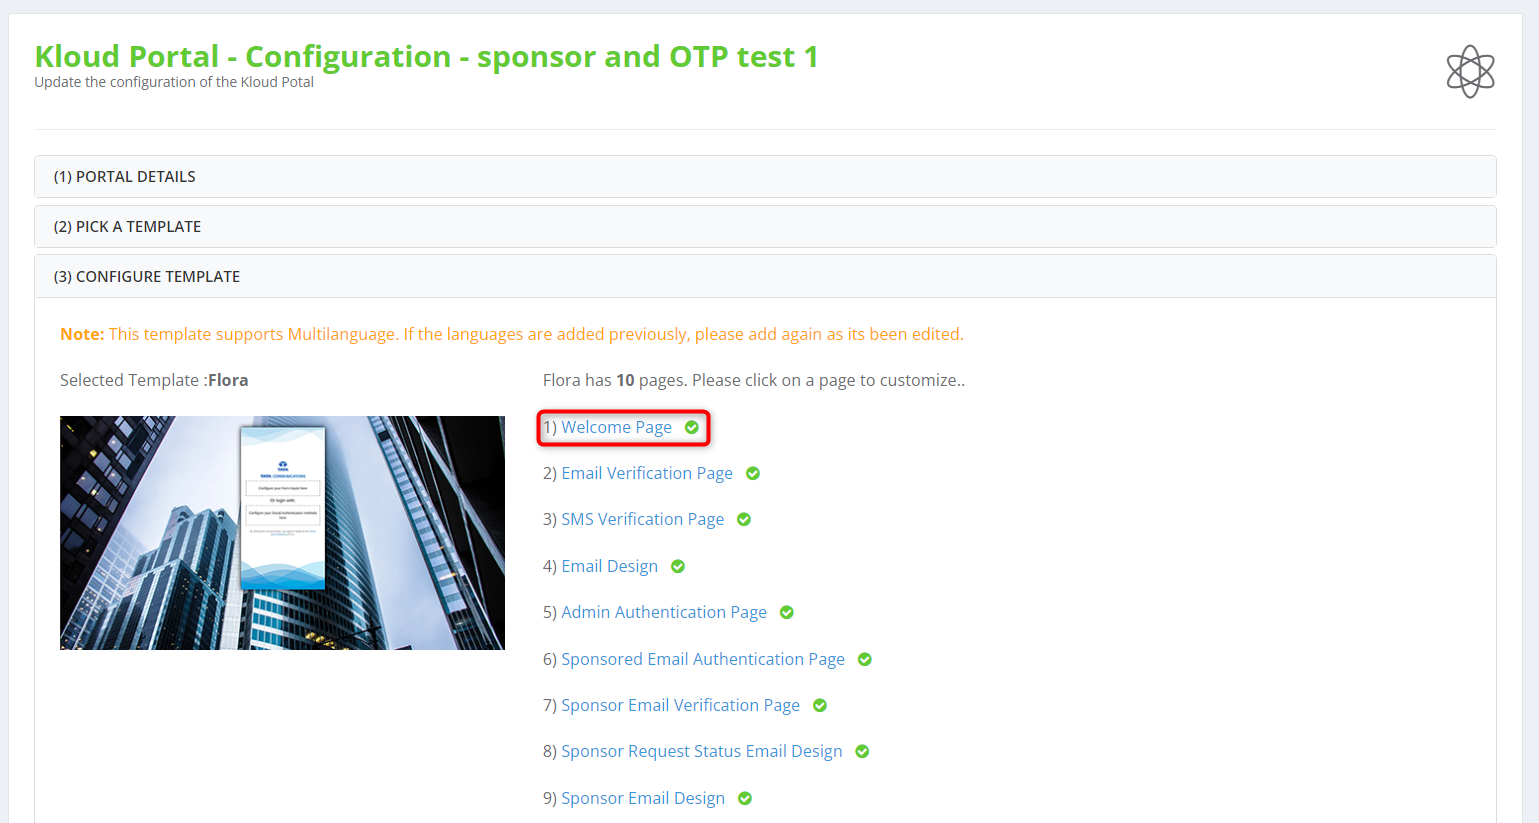
7. To do so, select the page you want to edit. the click on the CONFIGURE
TEMPLATE.
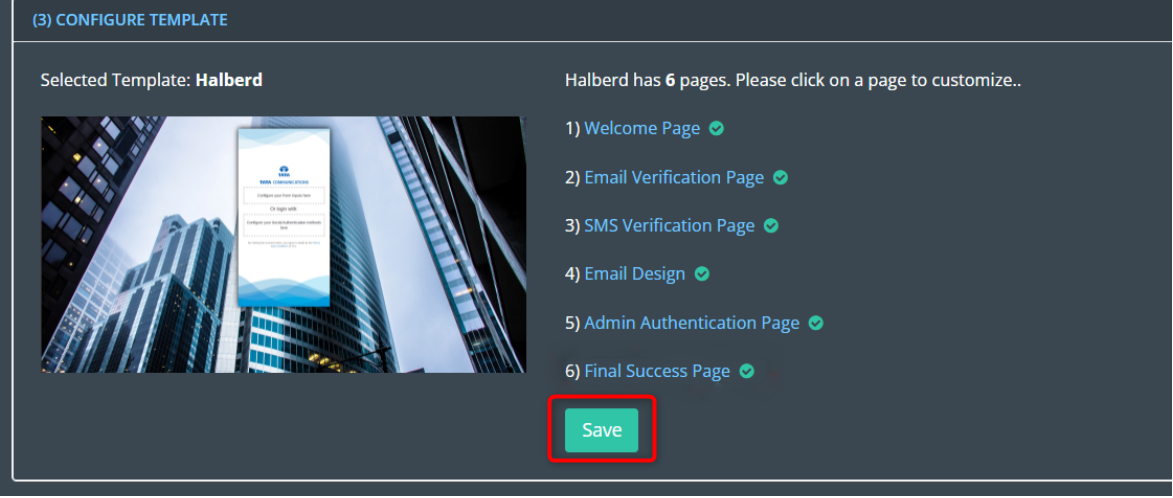
Note: The portal can be saved only if all the pages shown in the
configure template page have been edited.
Edit Welcome Page
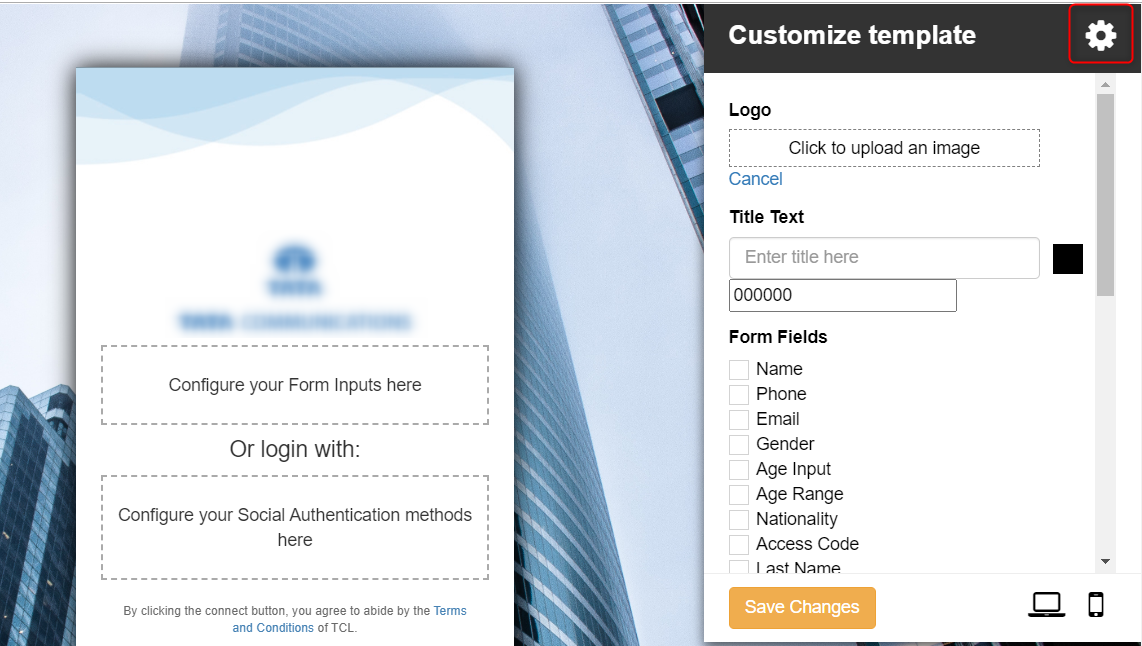
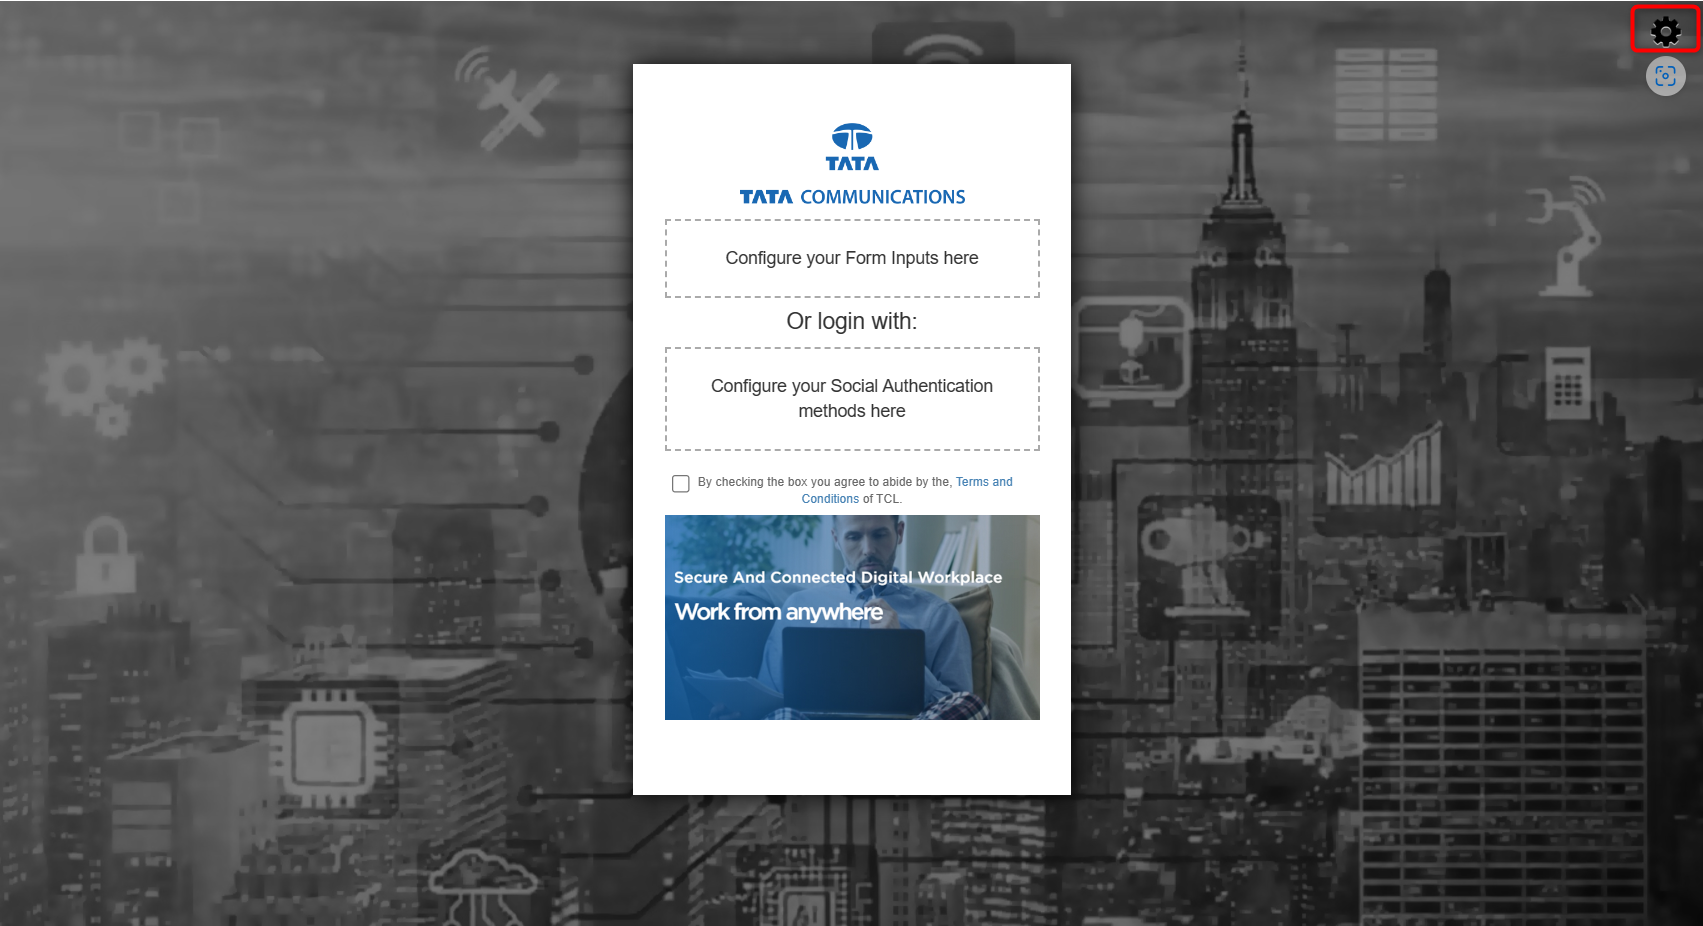
1. Click on the welcome page button.
2. In the window that opens, click on the Settings button. Here you can edit
the following.
Logo
Title text
Form field
Authentication Types
Social login
Background image
Company
3. Once edited, click on the Save changes button.
Enable Authentication Type
1. Click on the Settings button from the welcome page.
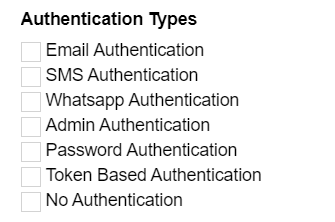
2. Scroll down and find the Authentication Types. Here you can find the 6
Authentication types.
Email Authentication: You will receive a link to the registered email ID,
and by clicking on it, you will be able to log in.
SMS Authentication: This can be verified by receiving an OTP to the phone
number from which you intend to log in.
Whatsapp Authentication: This can be verified by receiving an OTP to the
Whatsapp number from which you intend to log in.
Token Based Authentication: This enables you to log in using a token
generated by the administrator.
Password Authentication: This allows you to log in with the username and
password provided by the organisation.
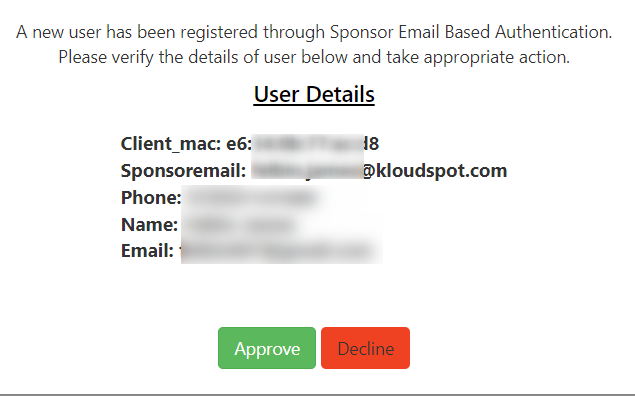
Admin Authentication : This allows you to check and approve each user
manually. Each new user is notified, and the admin can manually approve or
decline it.
No Authentication: Allows the user to use the portal without any
restrictions.
3. Apart from these 6 authentication methods, there are two other methods. It
is not available in all templates.
DB Authentication: Upon the user logging in, the system prompts them to
provide their username and password. The credentials are subsequently verified
against those stored in the database. If there is a match between the provided
credentials and the existing ones, the user is then directed to a success
page.
Sponsor Email : A staff can sponsor users. Users can request permission
to use the captive portal by providing the sponsor’s email id.
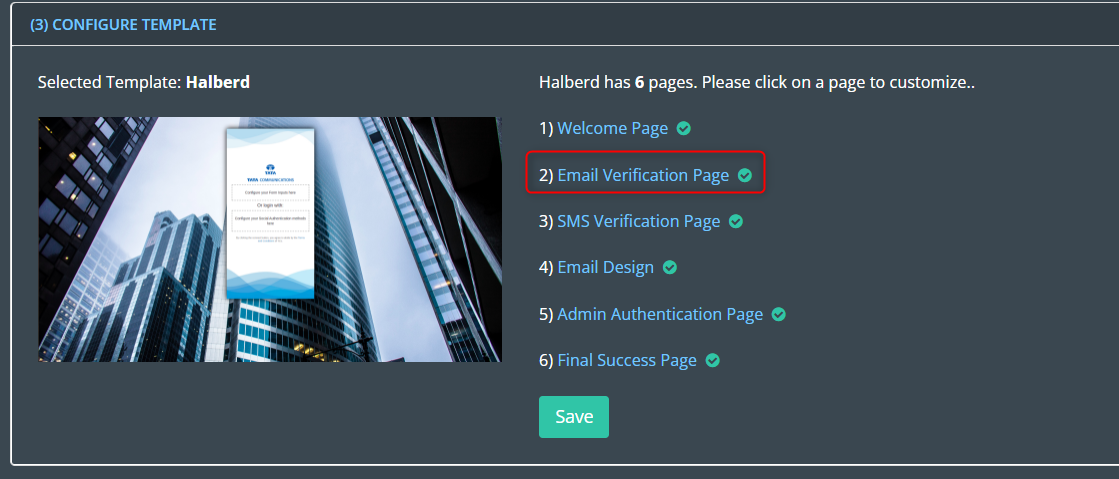
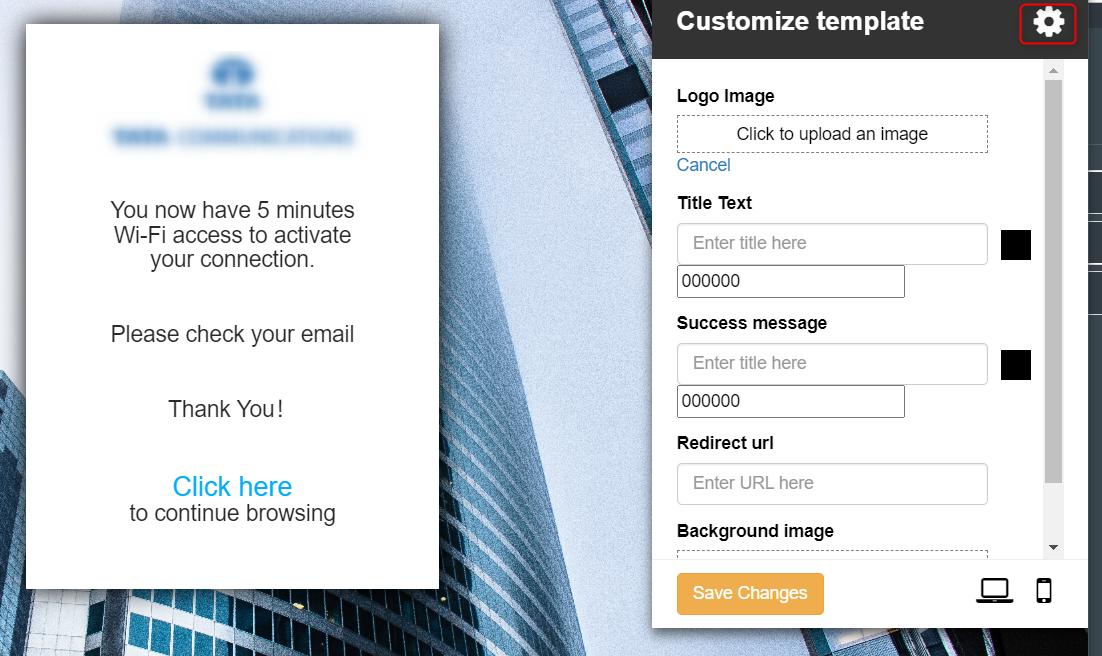
Edit Email Verification Page
1. If the Email is selected as the authentication type on the welcome page, this page can be edited.
2. Click on Email verification page button.
3. In the window that opens, click on the Settings button. Here you can edit
the following.
Logo Image
Title text
Success message
Redirect url
Background image
4. Once edited, click on the Save Changes button.
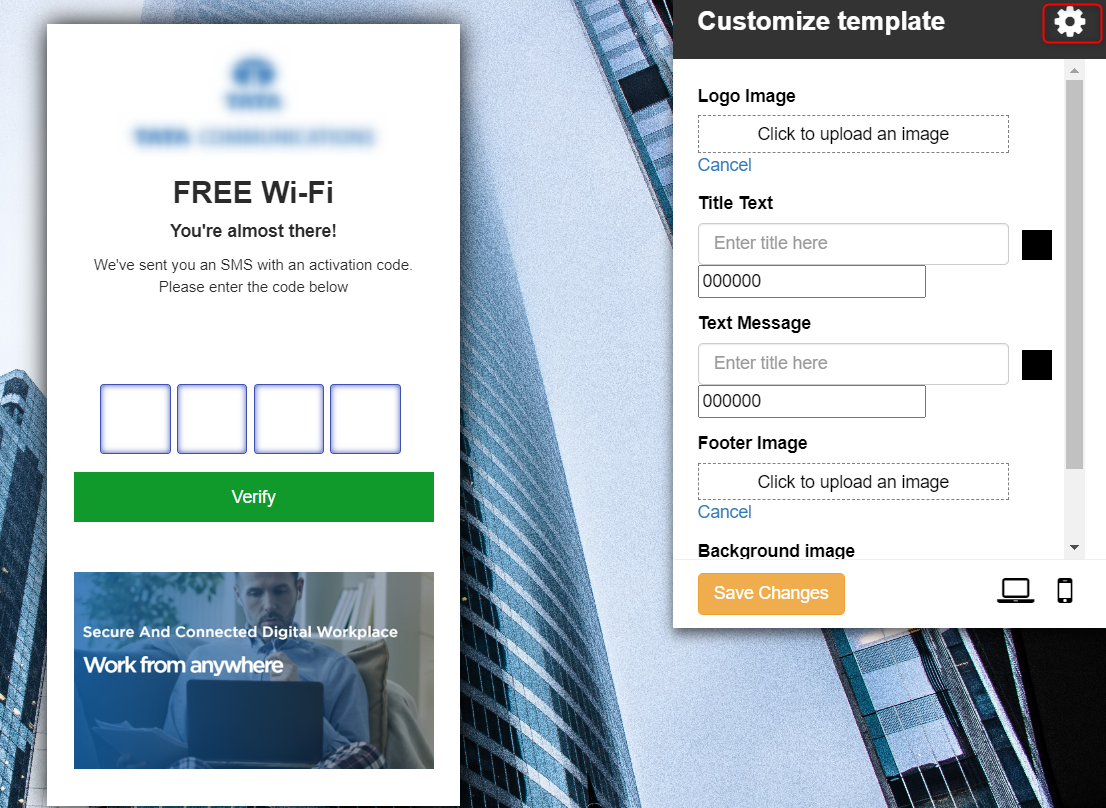
Edit SMS Verification Page
1. If the SMS is selected as the Authentication type on the welcome page, this page can be edited.
2. Click on the SMS verification page button.
3. In the window that opens, click on the Settings button. Here you can edit
the following
Logo Image
Title text
Text message
Footer Image
Background image
4. Once edited, click on the Save Changes button.
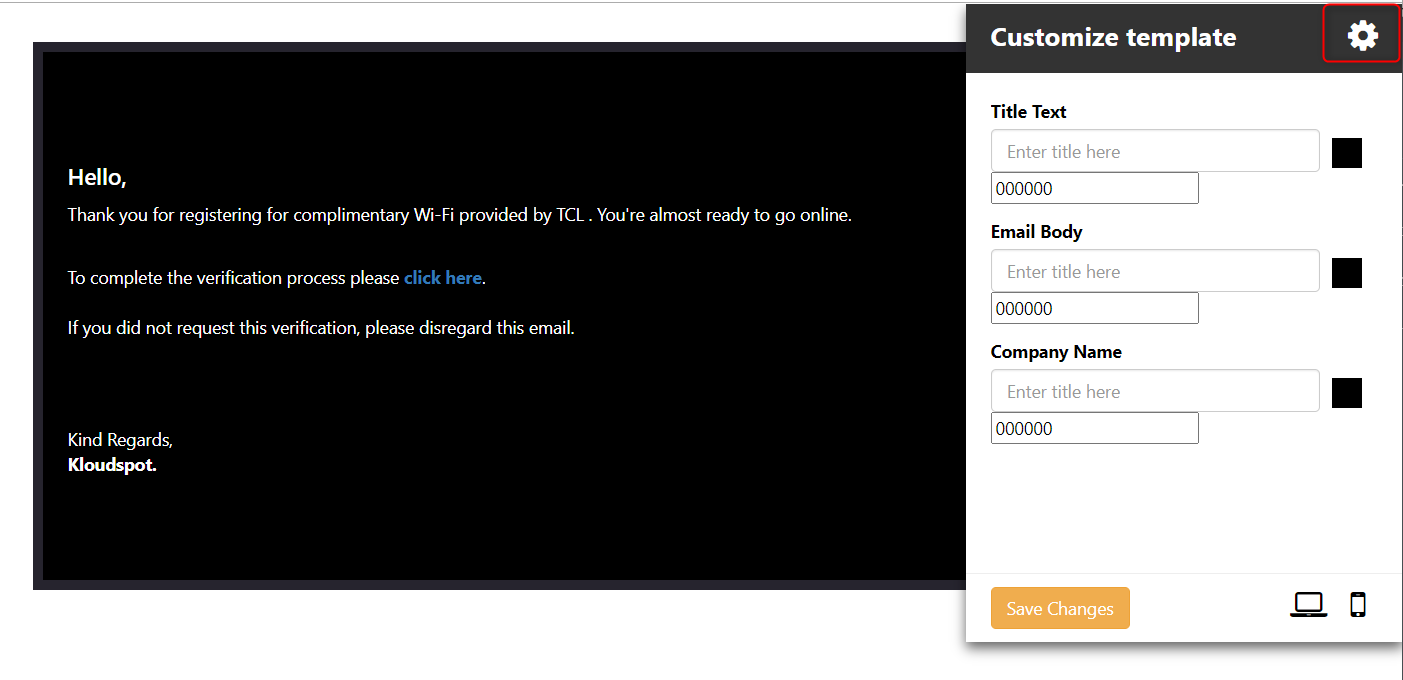
Edit Email Design
1. This is a confirmation email informing the user that their registration was successful. It can be customize as needed.
2. Click on the Email Design button.
3. In the window that opens, click on the Settings button. Here you can
edit the following
Title text
Email body
Company Name
4. Once edited, click on the SaveChanges button.
re
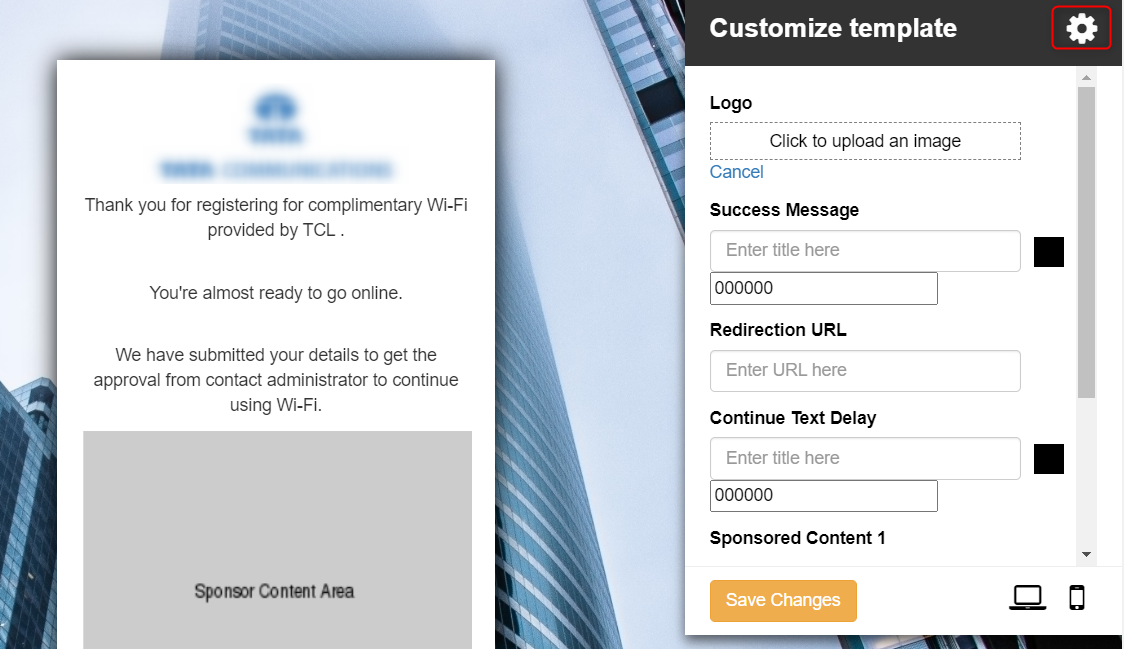
Edit Admin Authentication Page
1. If the Admin Authentication is selected as the Authentication type on the welcome page, this page can be edited. To learn more about admin authentication, see Approve or decline the user request section.
2. Click on Admin Authentication Page button.
3. In the window that opens, click on the Settings button. Here you can
edit the following.
Logo
Success Message
Redirection URL
API Interval (in sec): Helps to determine the waiting time after admin approval. Default It will be 30 sec. maximum- 120 sec.
Sponsored Content
Background Image
4. Once edited, click on the Save Changes button.
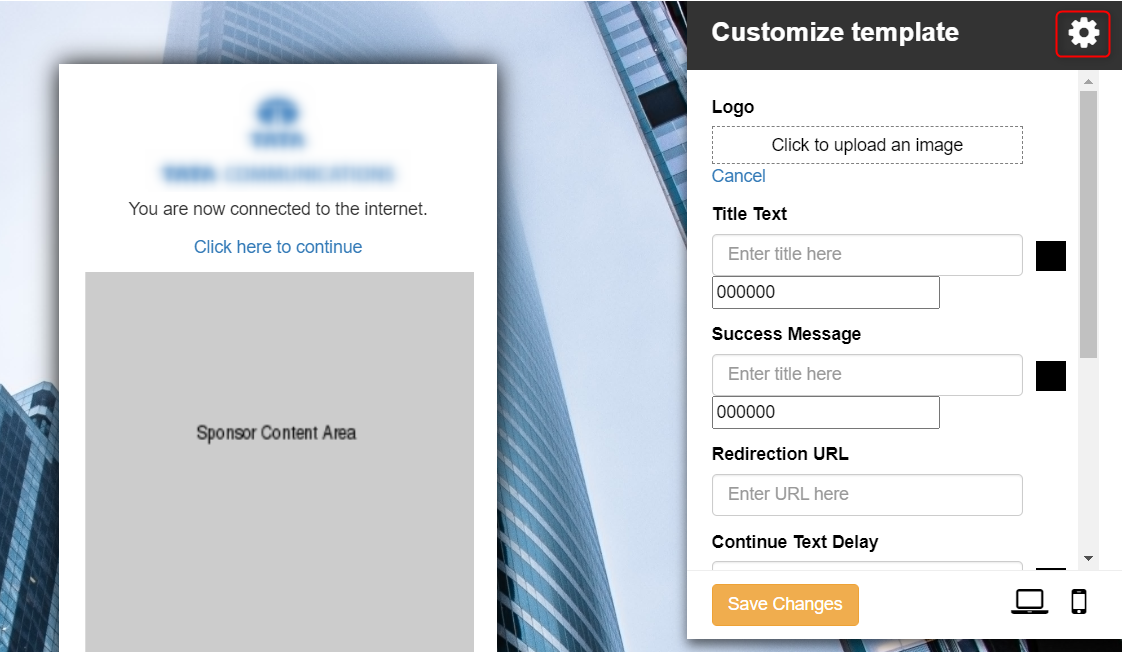
Edit Final Success Page
1. If you want to make changes to the Final Success Page, click on the Final Success Page button.
2. In the window that opens, click on the Settings button. Here you can edit
the following.
“In addition to the basic configurations, this section provides detailed insights into the finer aspects of captive portal customization. It offers a comprehensive exploration of the diverse settings that allow you to fine-tune your portal according to specific requirements. By delving into these additional settings, you can maximize the potential of your captive portal customization.”
Subsections of Other authentications for captive portal
Two-factor authentication with MAC address
Introduction
This document describes how to create a two-factor authentication system that uses MAC address identification along with OTP, email, or token-based authentication methods. By incorporating MAC authentication into the login process, this method improves security and access control in captive portal systems.
Mac address and SMS authentication - This is a two-step verification process. First, it verifies the device’s MAC address, then sends an OTP via SMS to authenticate the user’s mobile phone number.
Mac address and Email authentication - This is a two-step verification process. Initially, it authenticates the device’s MAC address and subsequently sends an authentication email to verify the user’s email address.
Mac address and token authentication - This is a two-step verification process. It starts by authenticating the device’s MAC address, followed by the use of a token for further authentication.
Getting Started
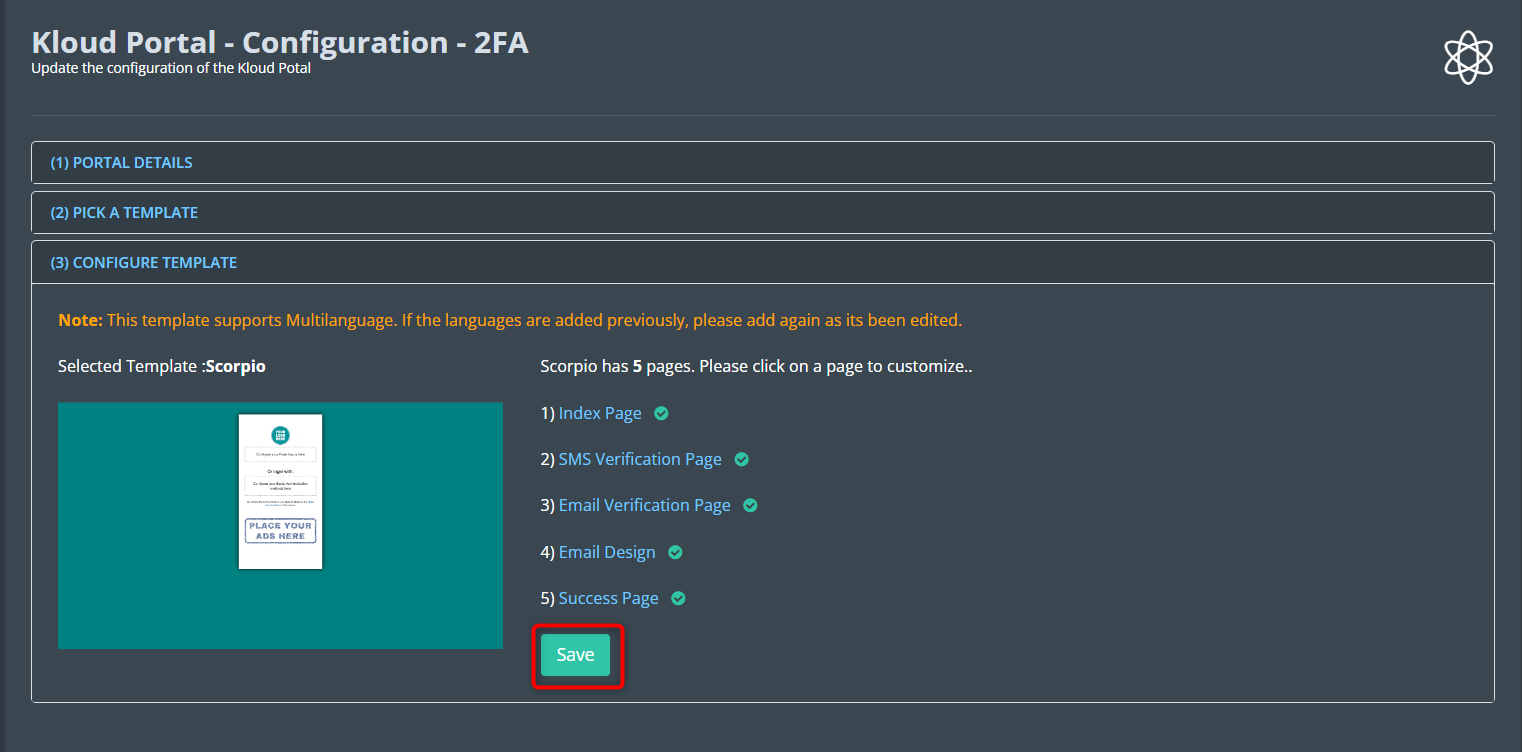
This feature is specifically designed for use with the Scorpio template on EnGenius hardware. For detailed instructions on customizing templates, refer to the “Customizing Captive Portal Templates” section.
Begin by selecting the Scorpio template using the designated button.
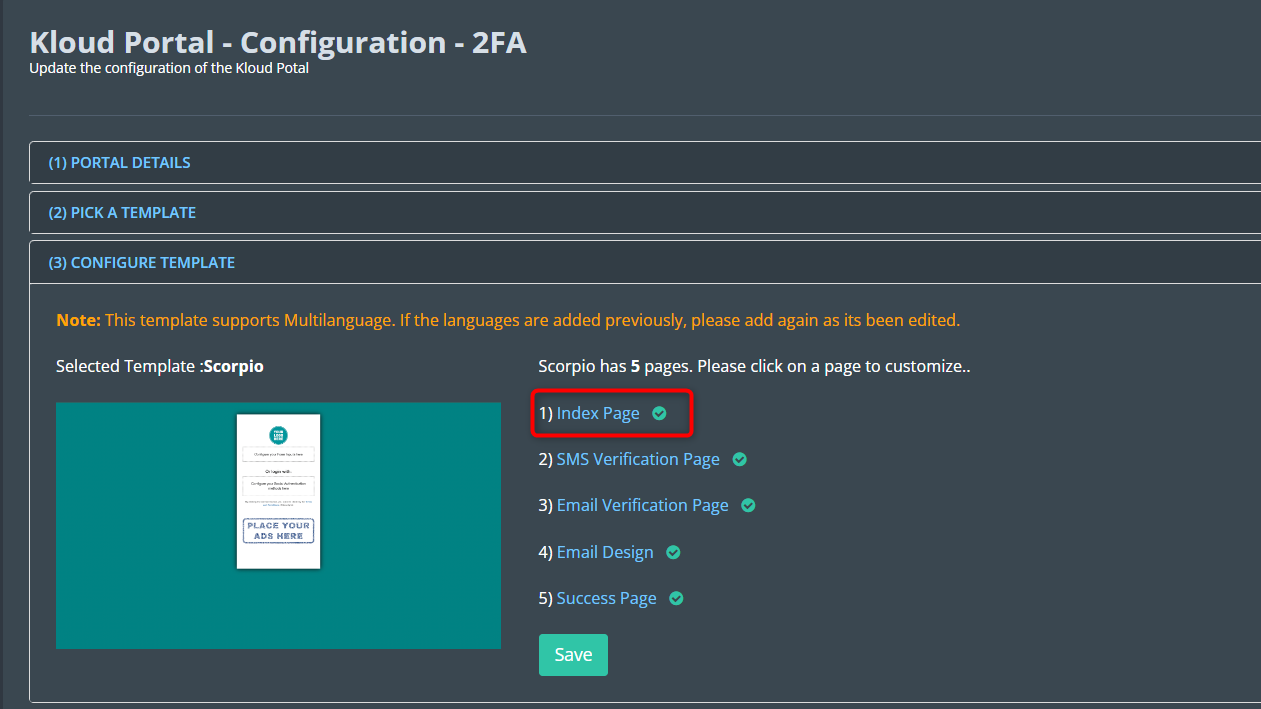
On the “Configure Template” page, navigate to the “Index Page” section.
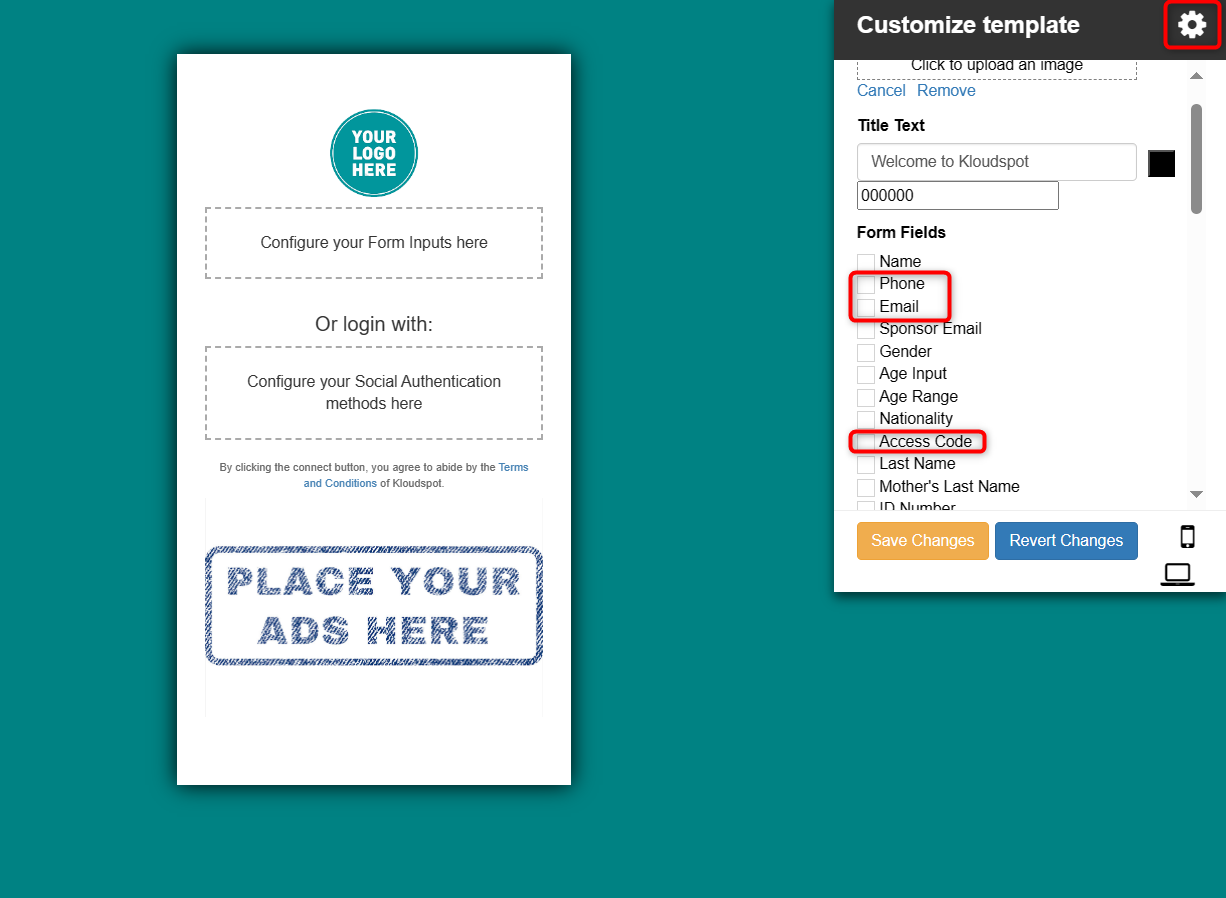
Click on the settings button to customize the Index page.
The form fields to select will vary based on the two-factor authentication method you wish to use..
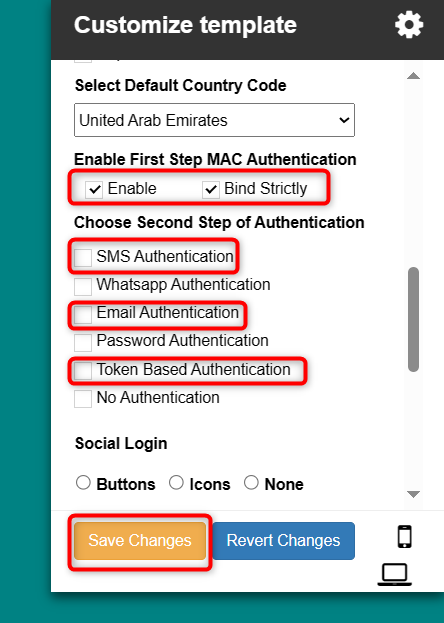
For SMS authentication, select the Phone field.
For email authentication, select the Email field.
For token-based authentication, select the Access Code field.
In the “Enable First Step MAC Authentication” section, ensure that both the Enable and Bind Strictly checkboxes are checked.
Enable: Activates First Step MAC Authentication.
Bind Strictly: Enabling this option associates a specific MAC address with a second-step authentication method. Then, the user can only log in using the information provided in the two-factor authentication settings.
Then select the Second Step of Authentication. Select SMS, Email, or Token Based authentication as per your requirement.
Adjust any additional configurations as needed, then click “Save Changes” to apply the settings.
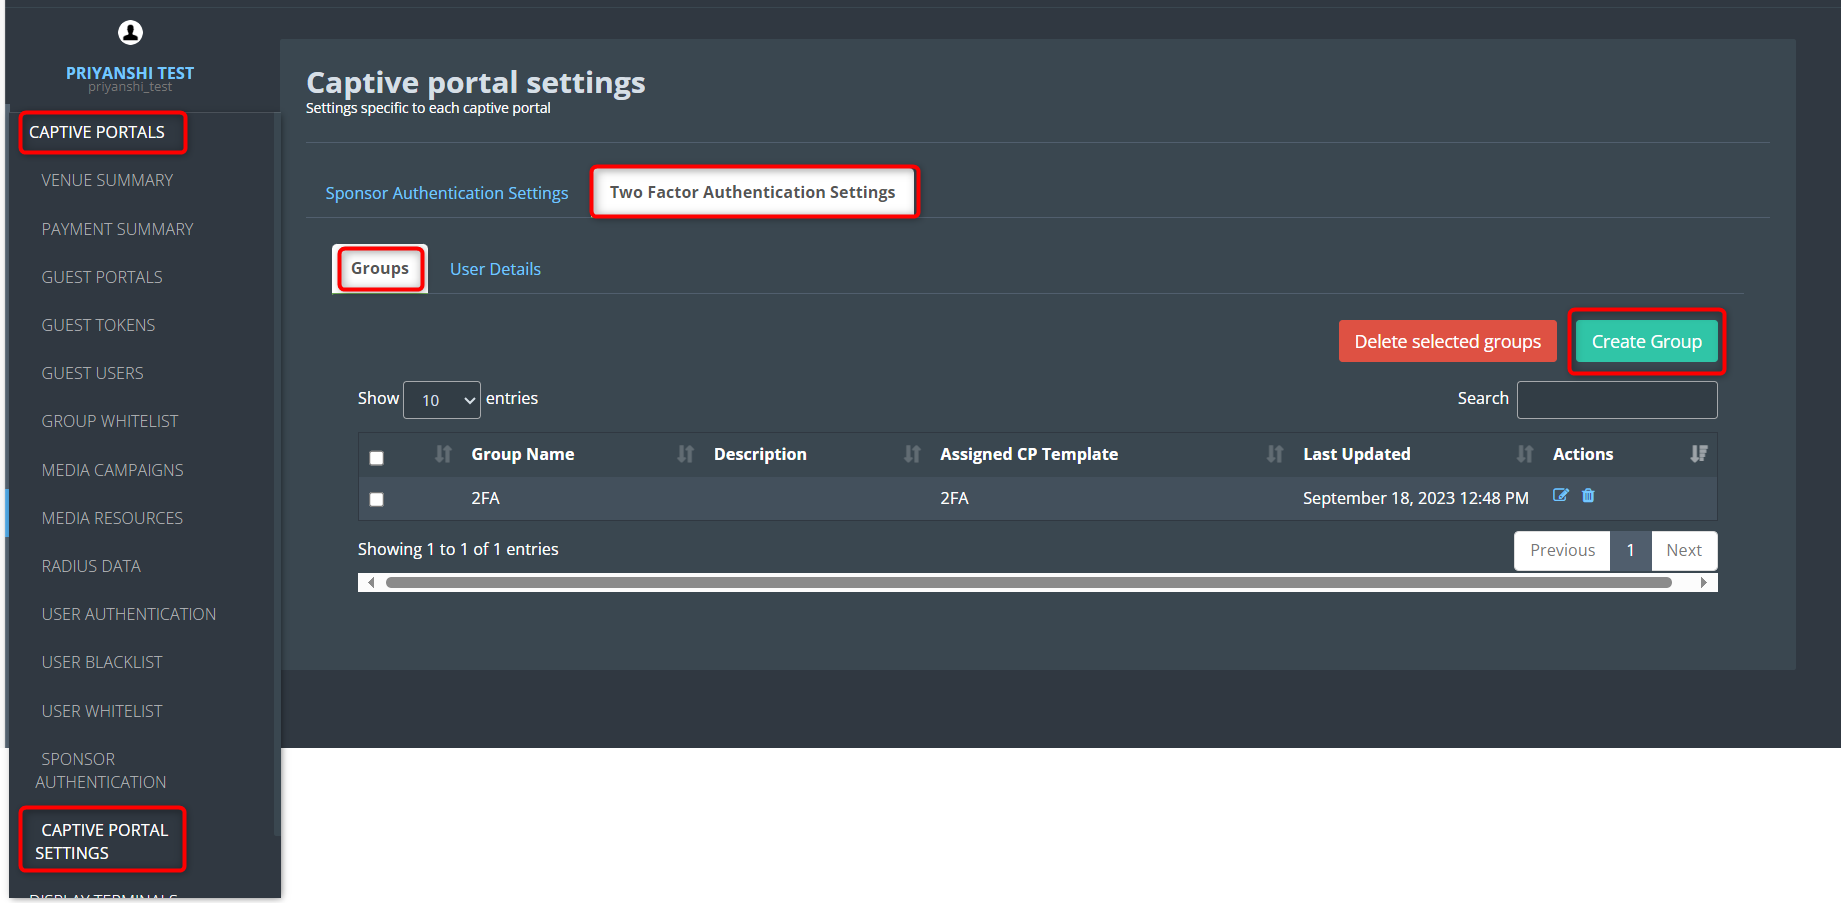
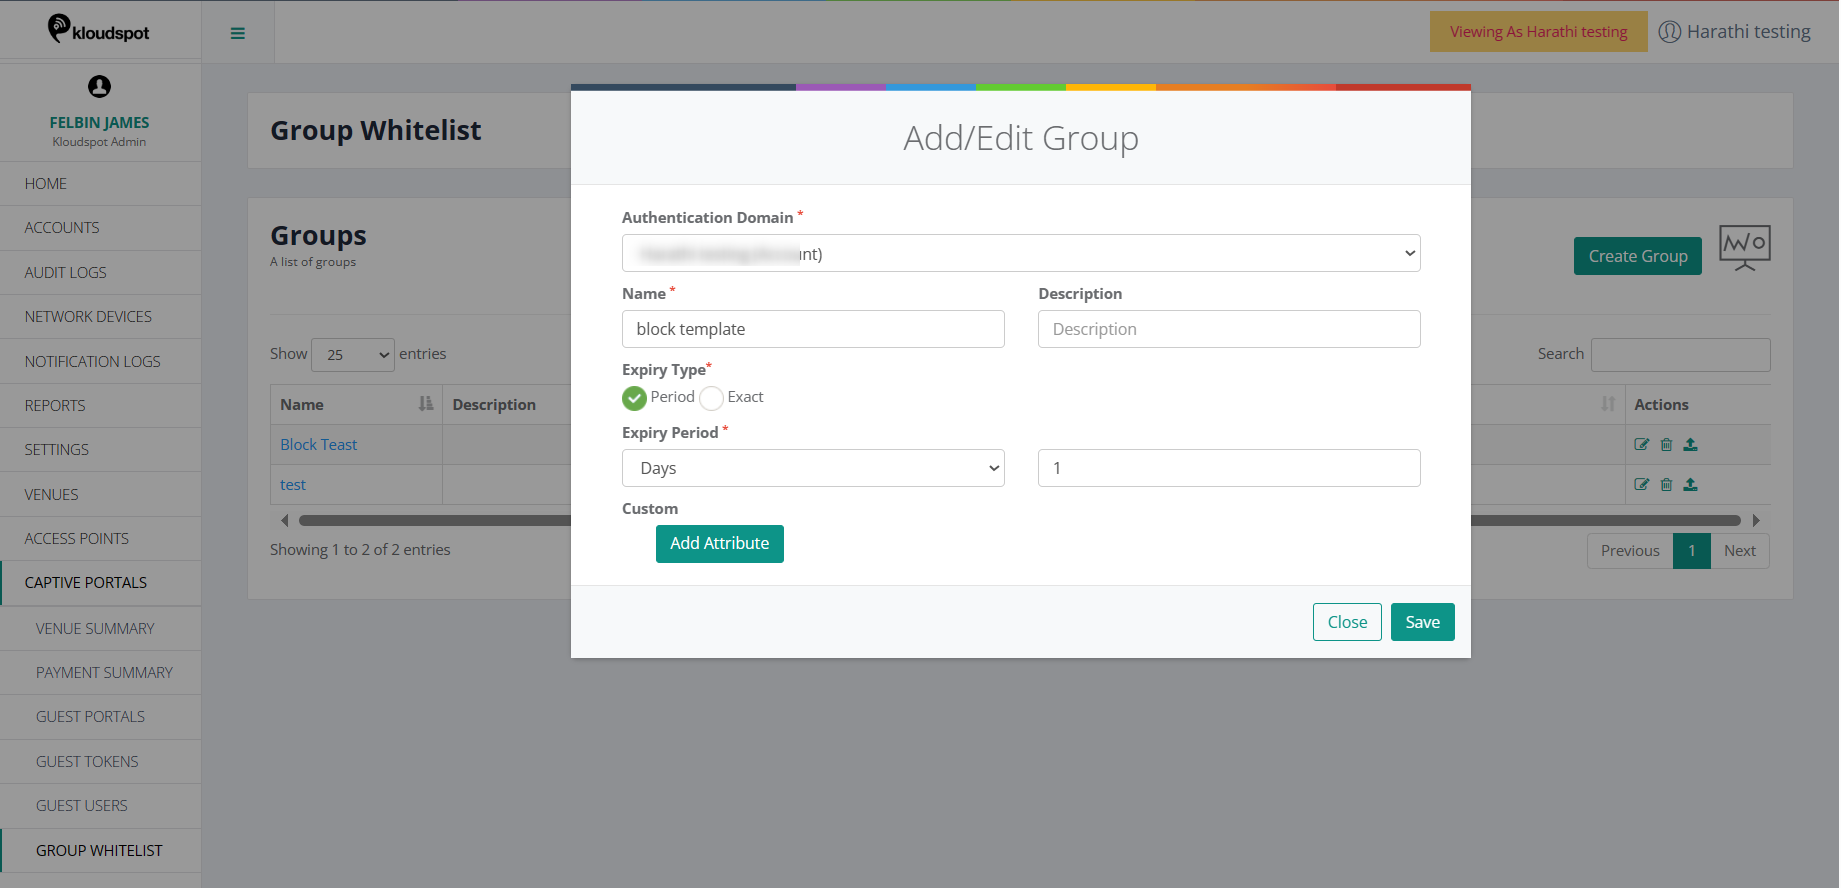
Navigate to Captive Portals > Captive Portal Settings > Two Factor Authentication Settings > Group.
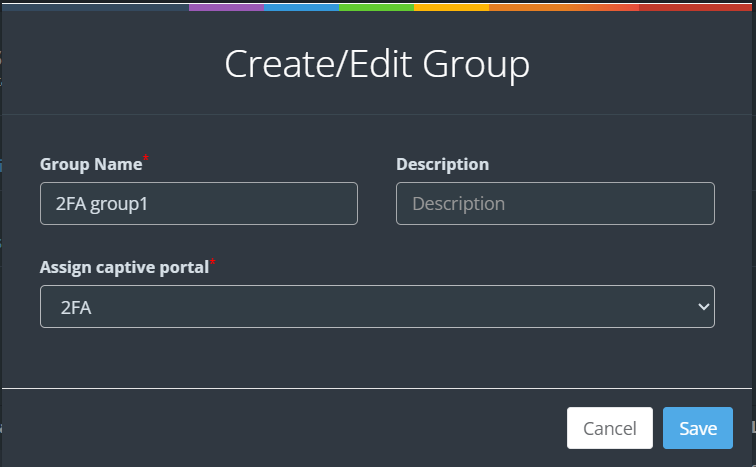
Click on Create Group and define a new group. In the “Assign Captive Portal” column, select the previously configured captive portal.
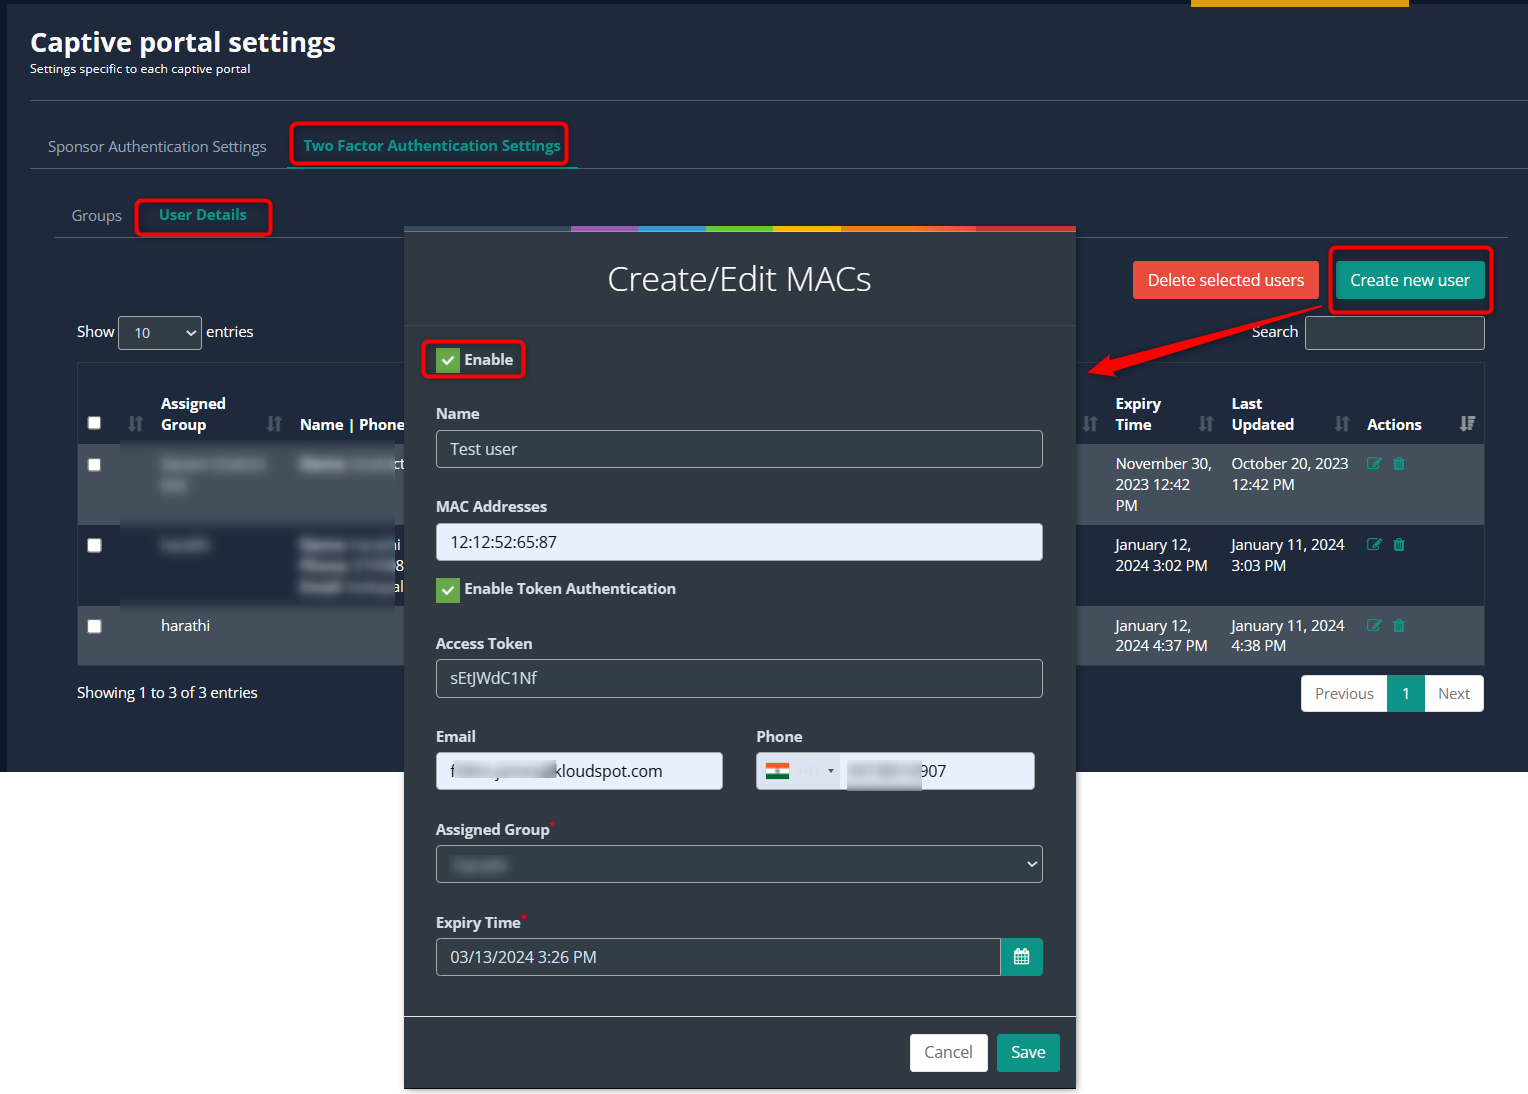
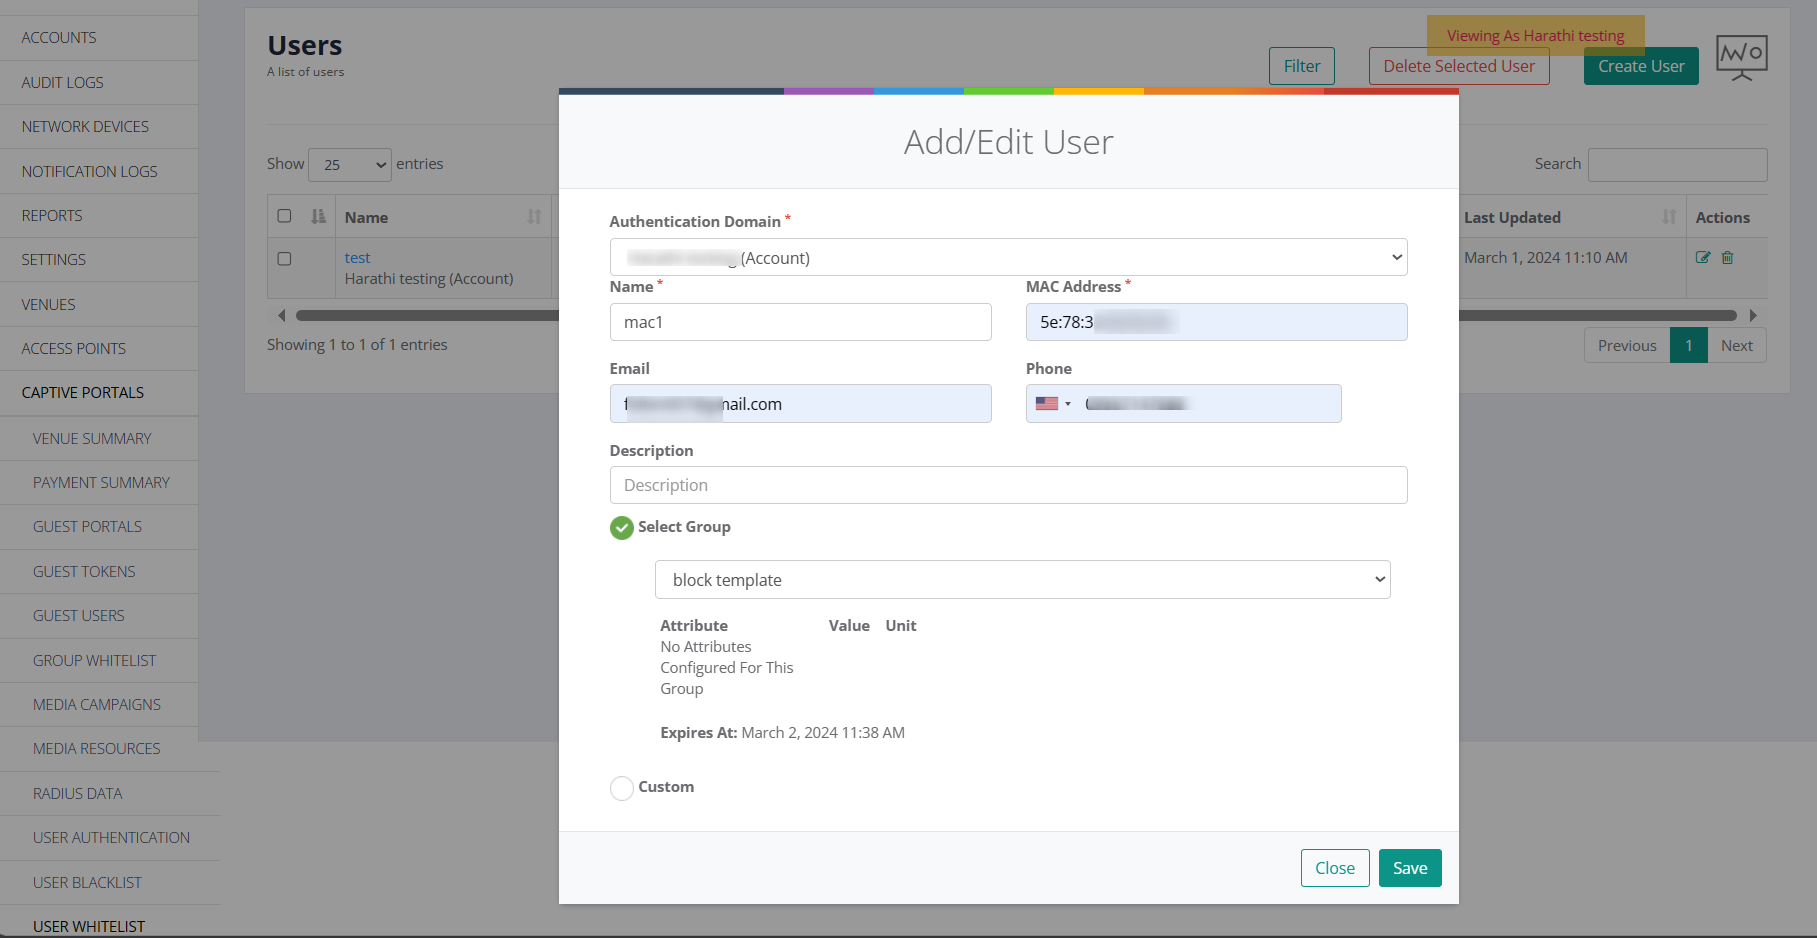
Once the group is created, proceed to add user details. Click on the User Details tab and then click on the Create New User button to add a new user.
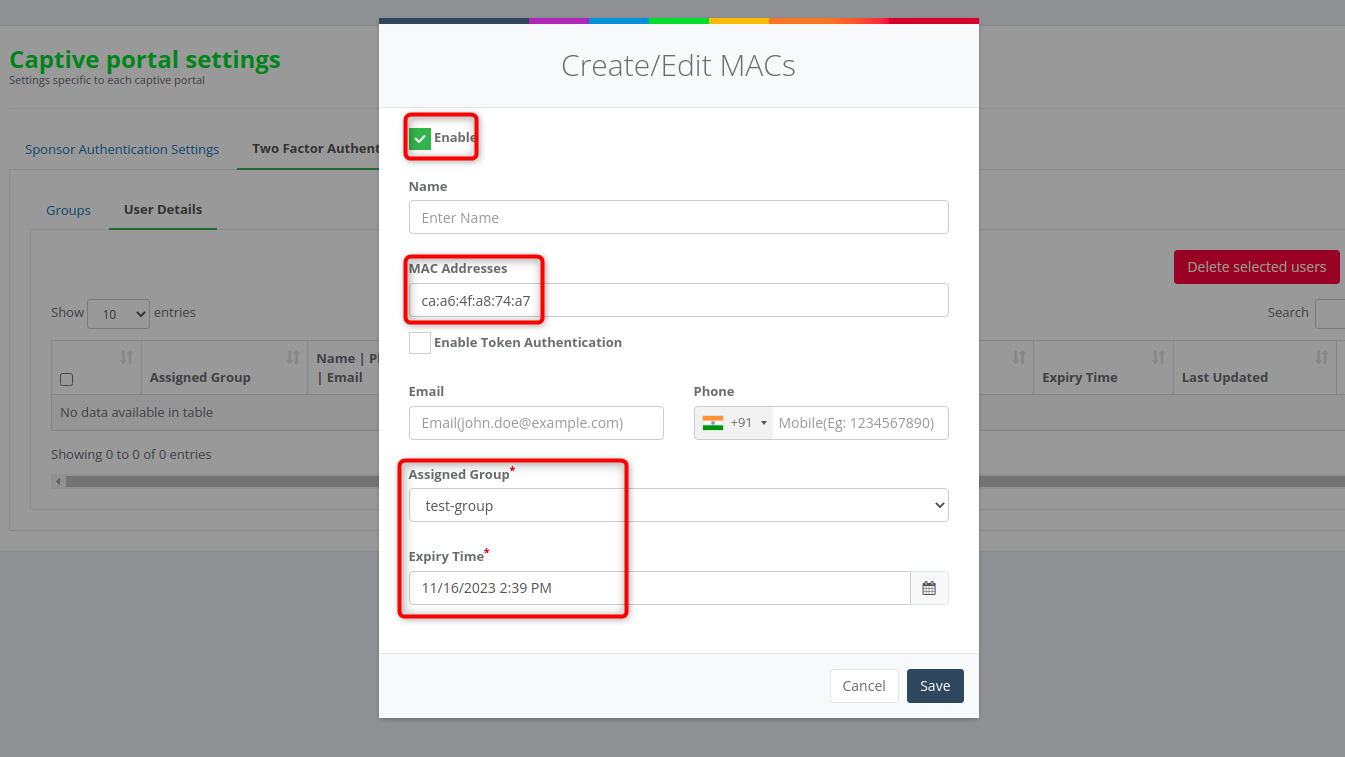
In the popup window that open, Enable the user by checking the Enable checkbox and provide the required information.
When adding a user, ensure to provide relevant information based on the configured two-factor authentication method:
Name: User’s name.
MAC Address: MAC address of the user’s device.
Enable Token Authentication: Enable this option for token-based authentication.
Access Token: Upon enabling token authentication, an access token will be generated. This token is linked to the associated MAC address and grants access to the captive portal.
Email: User’s email address for email authentication.
Phone: User’s phone number for OTP authentication.
Assigned Group: Select the group created earlier from the dropdown list.
Expiry Time: Set the duration for which the user can access the internet via the captive portal.
Click Save to save the user.
Conduct thorough testing of the captive portal to ensure proper functionality of MAC Authentication. In case of any issues, refer back to the outlined steps for troubleshooting.
Azure Authentication for Captive Portal
Overview
This technical documentation guides you through the process of configuring Azure authentication for a Captive Portal using the Soul template on Meraki hardware. Follow the steps outlined below to seamlessly integrate Azure for social login on your captive portal.
Template Customization with Soul Template
This feature is compatible with the Soul template on Meraki hardware.
To start the configuration, “Azure” should be integrated with Kloud Manage, and refer to the Microsoft Authentication section to know how to do it.
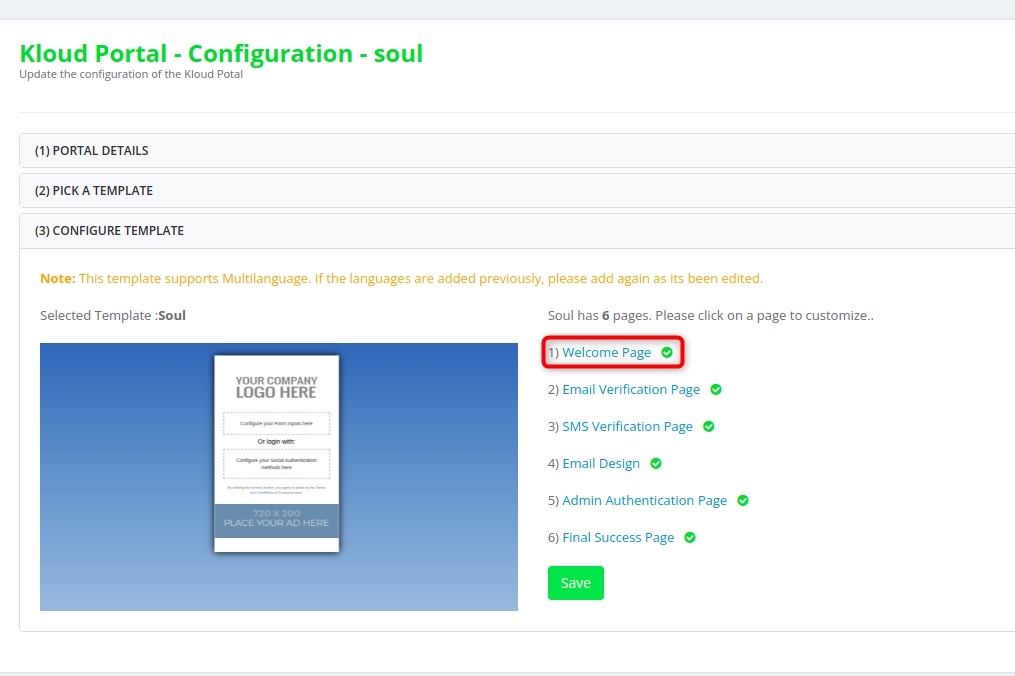
In this case, proceed by selecting the Soul template using the designated button.
On the “Configure Template” page, click on the Welcome Page button.
Click on the settings button to customize the Index page.
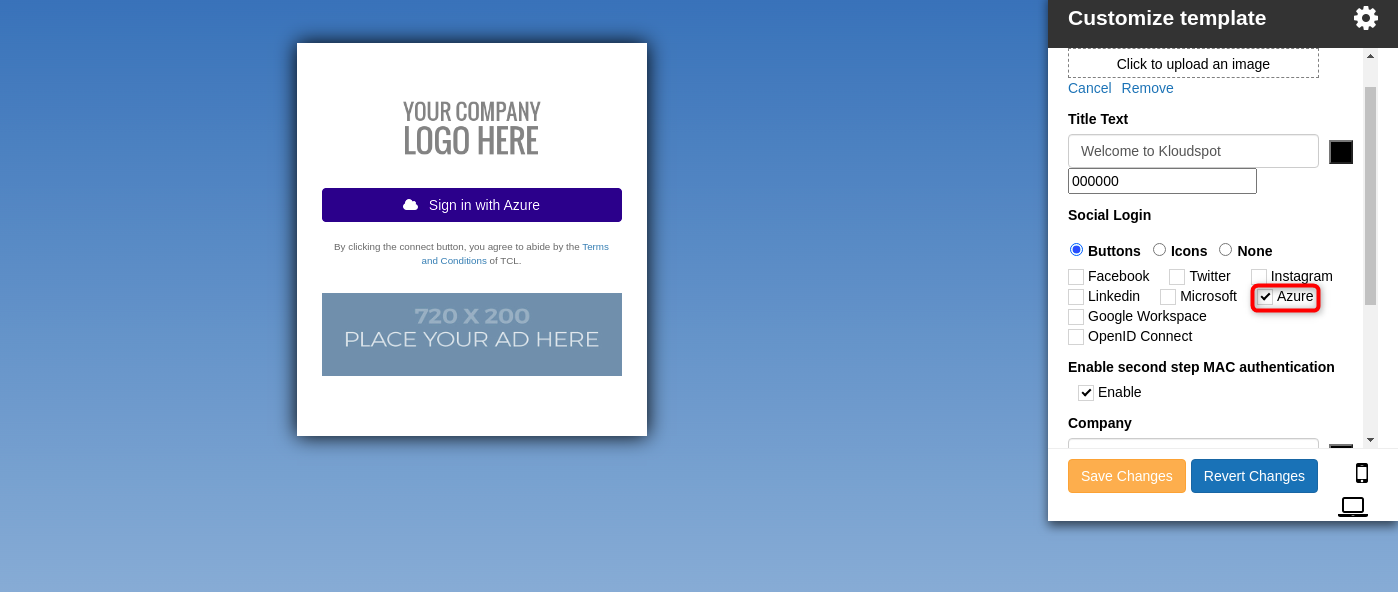
In the settings window, select Azure as the form of social login. If second step mac authentication is needed, please check enable second step mac authentication checkbox.
Add the redirect URL of your captive portal to the Azure portal. Refer to the Add Redirect URI section in the Microsoft Authentication documentation for detailed instructions.
Creating a Two-Factor Authentication Group
In case of a MAC address not found error, create a group.
Only adding the MAC address is necessary for this Azure authentication.
Assign the user to the created group. Also, you can add expiry time also.
Save the changes.
Multiple MAC addresses can be added in this manner.
Once the above steps are completed, users can log in to the captive portal using Azure authentication.
Okta Authentication for Captive Portal
Overview
This technical documentation guides you through the process of configuring Okta authentication for a Captive Portal using the Pine template on EnGenius hardware. Follow the steps outlined below to seamlessly integrate Okta for social login on your captive portal.
Template Customization with Pine Template
This feature is compatible with the Pine template on EnGenius hardware.
To start the configuration, Okta should be integrated with KloudManage, refer to the Okta Authentication section to know how to do it.
For detailed instructions on customizing templates, refer to the Customizing Captive Portal Templates section.
In this case, proceed by selecting the Pine template using the designated button.
On the Configure Template page, click on the Index Page.
Click on the settings button to customize the Index page.
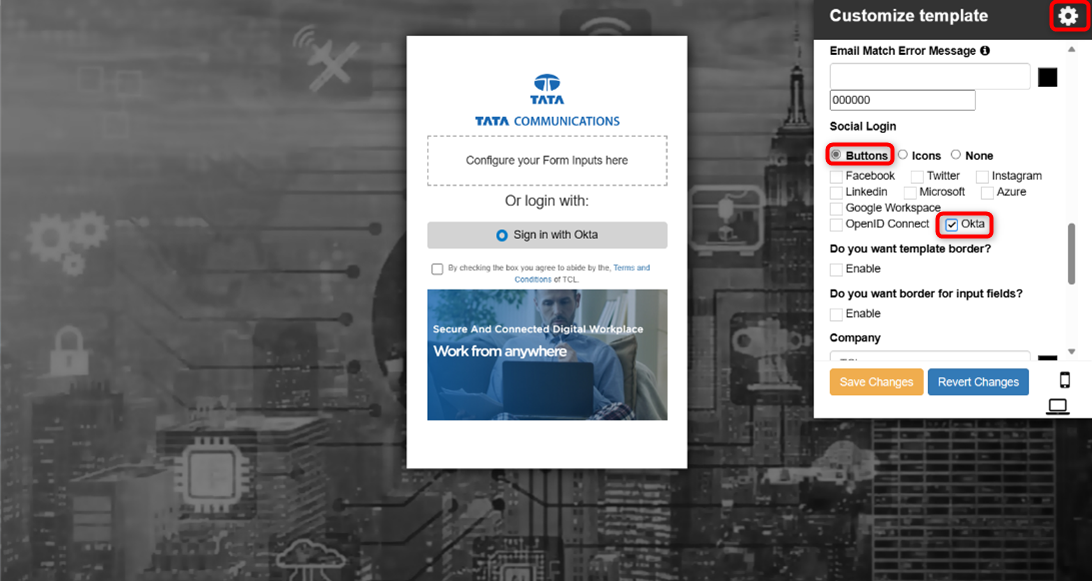
In the settings window, select Okta as the form of social login.
Add the redirect URL of your captive portal to the Okta App. Refer to the Okta Authentication document for detailed instructions.
Once the above steps are completed, users can log in to the captive portal using Okta.
Sponsor Authentication with OTP
Introduction
One method of authentication within captive portals is sponsor-based authentication, where users are granted access by a sponsor. In this document, we will discuss the setup and configuration of sponsor authentication with one-time passwords (OTPs) using the Flora template in Meraki hardware or the Raga template in Kloudspot Gateway hardware.
Template Customization
Choose the Flora template for Meraki hardware or the Raga template for Kloudspot Gateway hardware. For a detailed walkthrough on customizing templates, please refer to the “Customizing Captive Portal Templates” section.
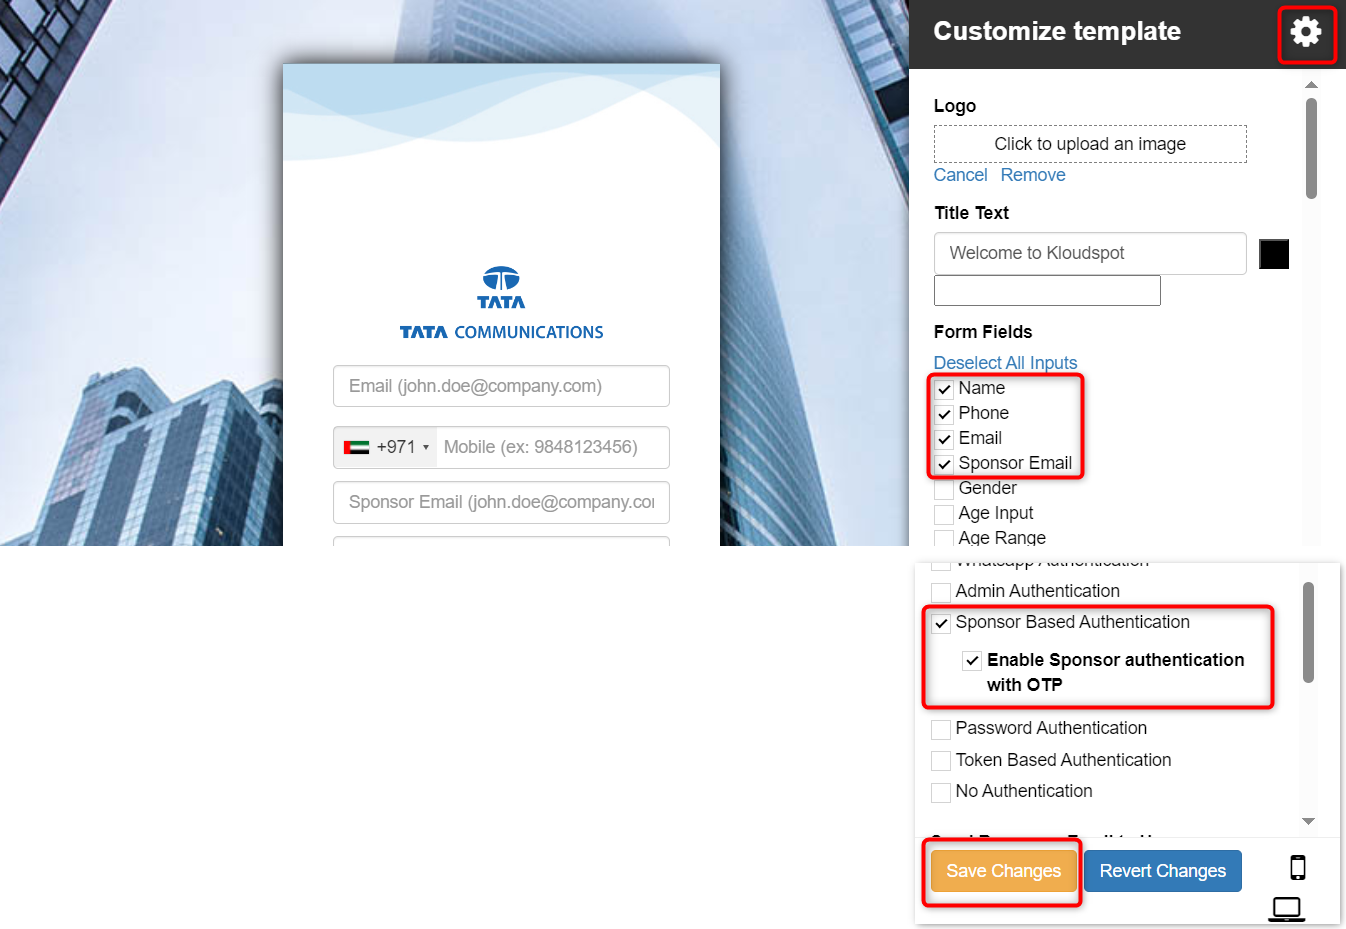
Access the welcome page in the template configuration section.
Click on the settings button.
Select the following form fields: Name, Phone, Email, Sponsor Email, and WI-FI Access Period.
Note: WI-FI Access Period is optional but recommended for better control over access duration.
Scroll down and check the Sponsor Based Authentication checkbox.
Check the Enable Sponsor authentication with OTP option.
Note: If you only want Sponsor Based Authentication, you do not need to check the Sponsor authentication with the OTP.
Note: The captive portal’s expiration time will coincide with the access point’s expiration time if the WI-FI Access Period check box is not checked.
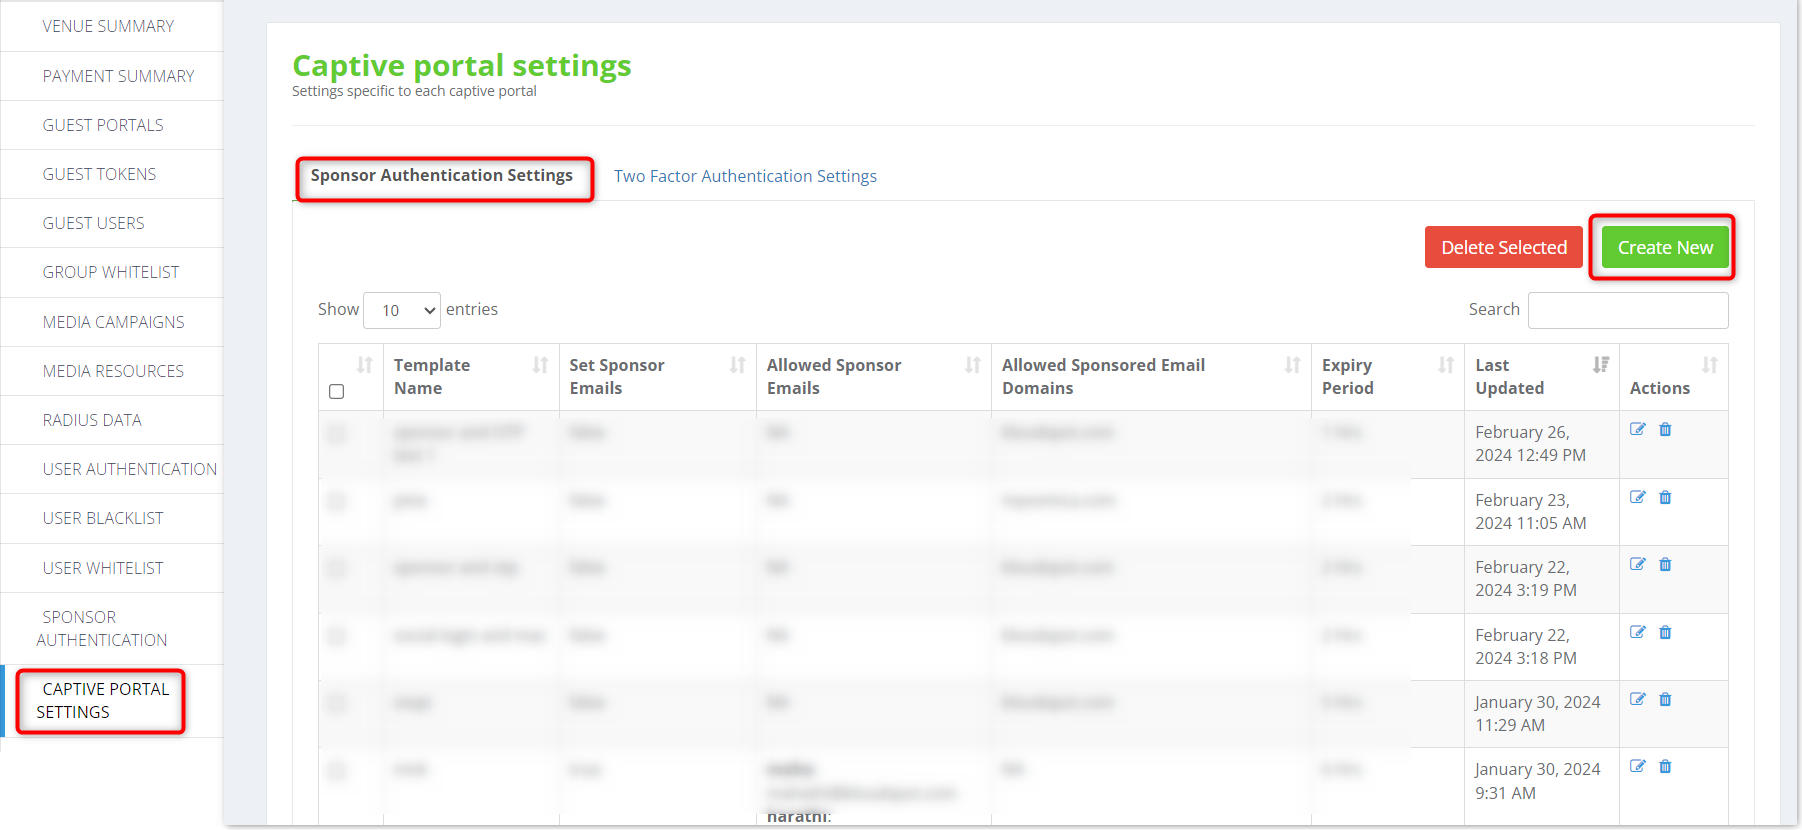
Add Sponsored Email or Domain
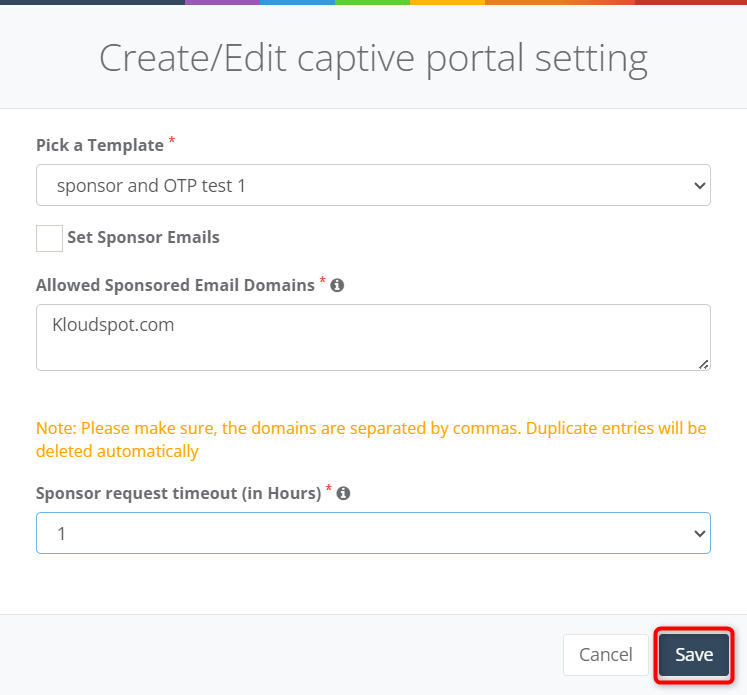
Access captive portal settings.
Go to Sponsor Authentication Settings tab.
Click on the Create new button.
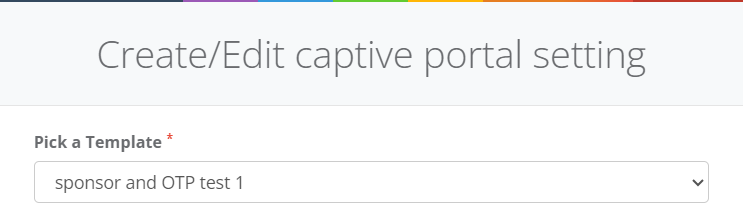
Select the previously created template.
Choose one of the following options:
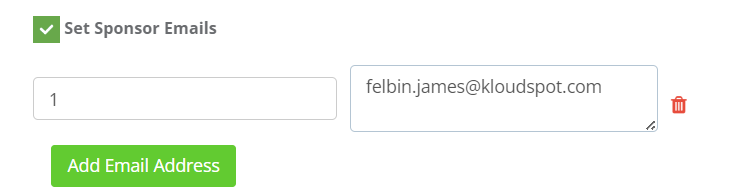
a. Enter the sponsor’s email address directly:
Check the Set Sponsor Emails checkbox.
Click on the Add email address button.
Enter sponsor name and email.
b. Provide Sponsor’s Email Domains:
Enter email domains, separating multiple domains with commas.
Set the timeout duration for sponsor requests.
Click the Save button to save the changes.
Testing
Now that the captive portal is configured, it’s essential to test it to ensure proper functionality. Test the captive portal by accessing the network and initiating the sponsor authentication process.
On the captive portal login page, enter the user’s email ID, phone number, sponsor’s email, name, Wi-Fi expiration time and click on the Request Access button.
Note: The Wi-Fi expiration time dropdown is only available if the WI-FI Access Period field is checked.
Authentication mail will be sent to the sponsor immediately.
The sponsor can approve or decline it.
Once approved, the user can use the internet.
MAC Authentication
Introduction
This technical document provides step-by-step instructions for configuring Captive Portal MAC Authentication using EnGenius hardware and Block template. Captive Portal MAC Authentication allows access to the internet only to users whose MAC addresses are whitelisted.
Template Configuration
Navigate to Captive Portal > Guest Portals > Create New.
Enter captive portal name and click on Create.
Choose the Block Template from EnGenius Hardware.
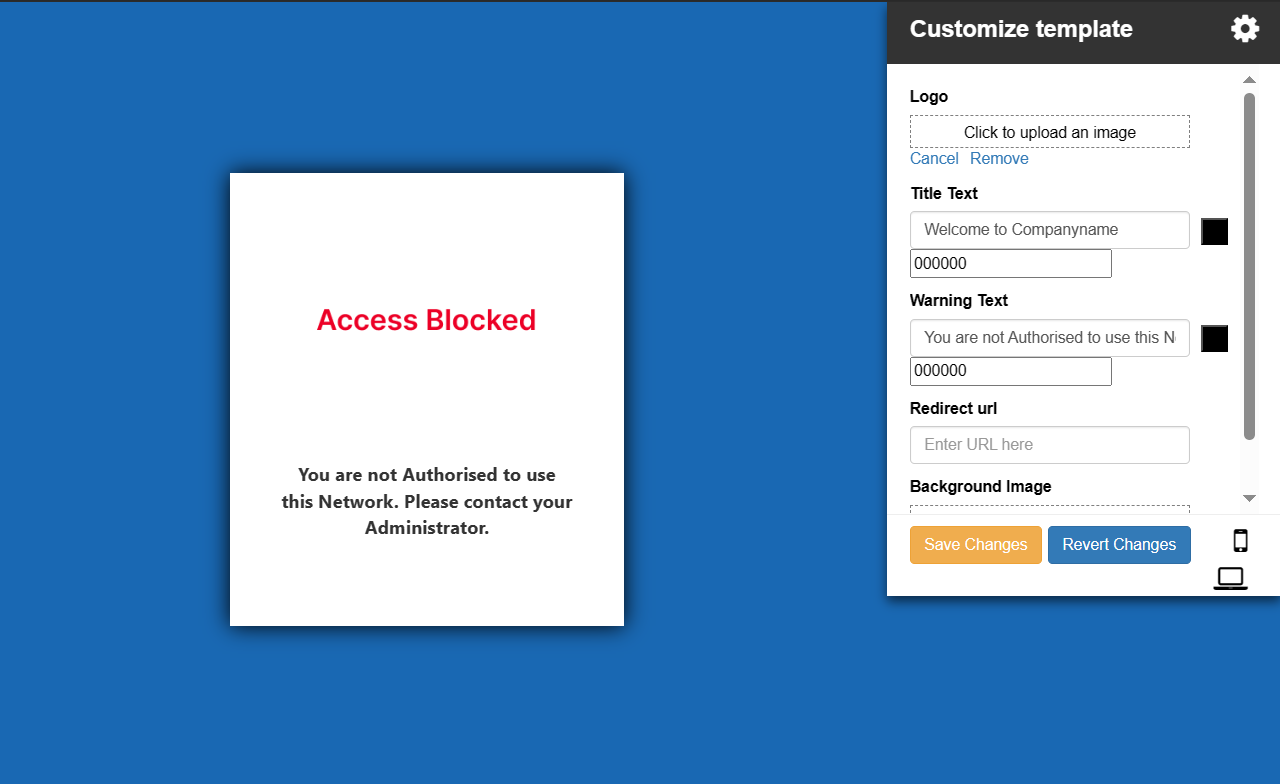
Navigate to the Access Blocked Page within the template configuration section.
Click on the settings button.
Configure the following parameters as per your requirements:
Logo
Title Text
Warning Text
Redirect URL
Background Image
Once configured, click on the Save Changes button to apply the settings.
Finally, click the Save All button to save the template.
Assigning the Captive Portal to Access Point
After creating and configuring the template, the next step is to assign it to an access point.
Check the Select Group checkbox and choose the group created in the previous step.
Add the MAC addresses of the users who should have direct access to the captive portal.
Once the above steps are completed, users whose MAC addresses are whitelisted will have access to the internet via the configured Captive Portal.
Assign a guest portal to the access point
Assigning a guest portal to your access point is a crucial step in ensuring that users connecting to your network have a seamless and branded experience. In this section, we’ll walk you through the process of linking your customized captive portal templates to your access points, making it easy for users to access your network while enjoying a cohesive and user-friendly interface.
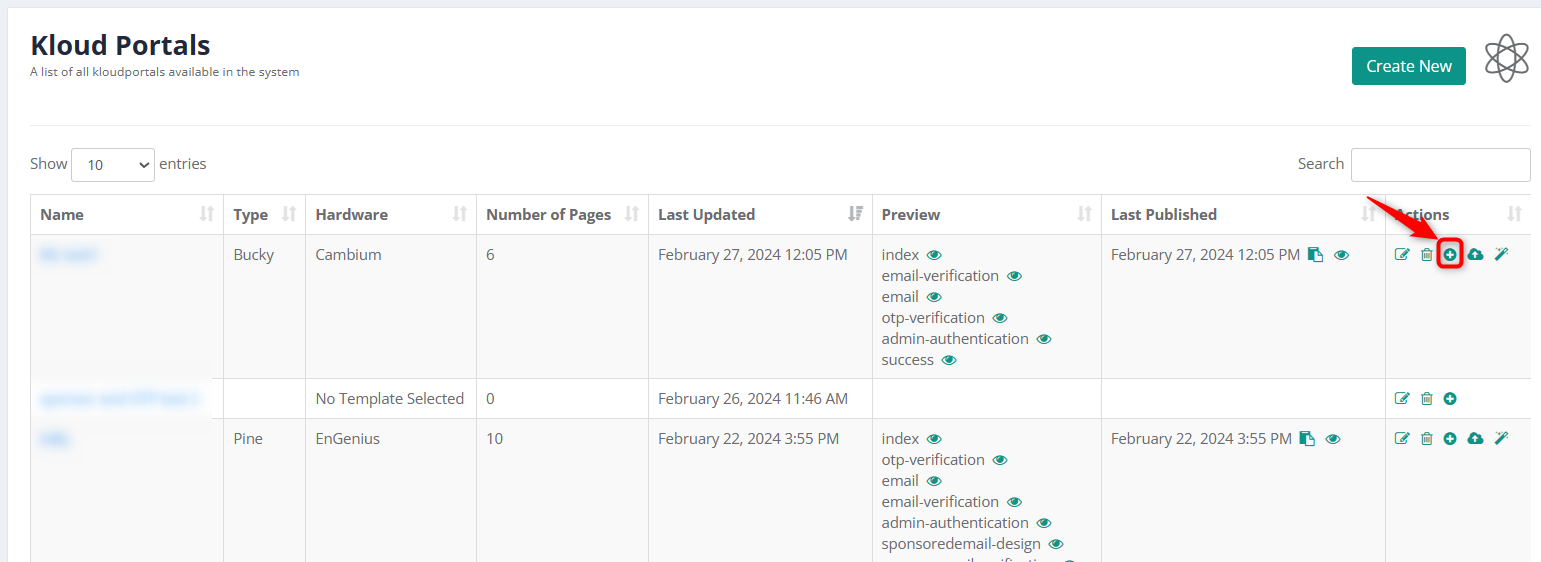
1. You must first publish the newly created guest portal before adding it to the access point. To do so, navigate to the guest portal and press the publish button.
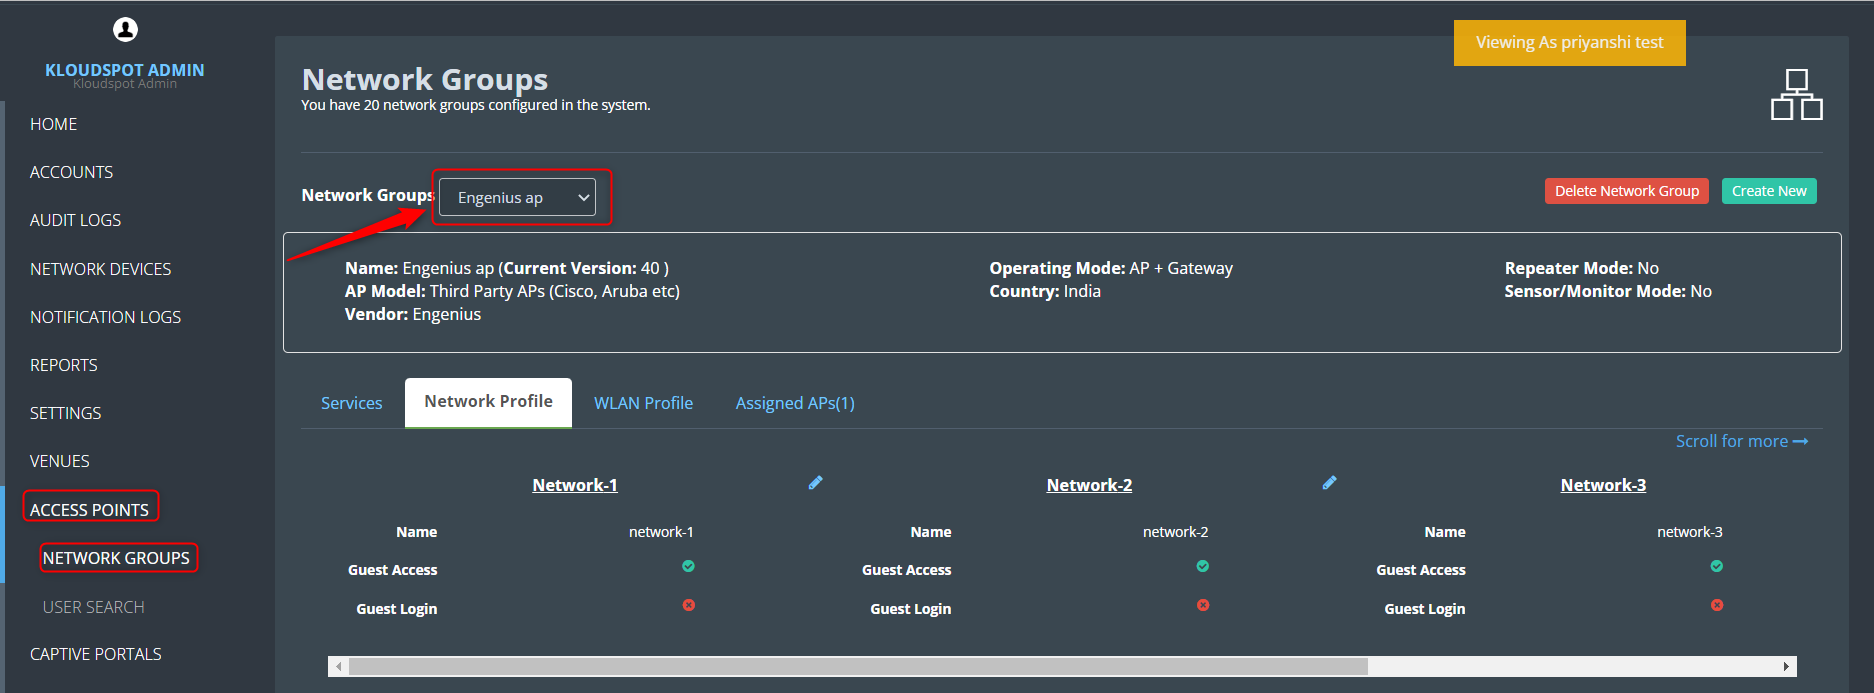
2. Navigate to ACCESS POINTS > NETWORK GROUPS. Select the Network groups
from the drop-down list.
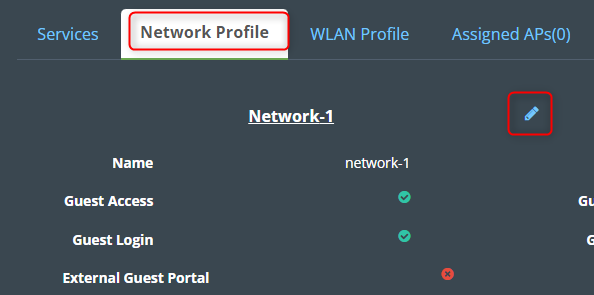
3. After adding the network group, go to the Network profile tab and click
the edit button.
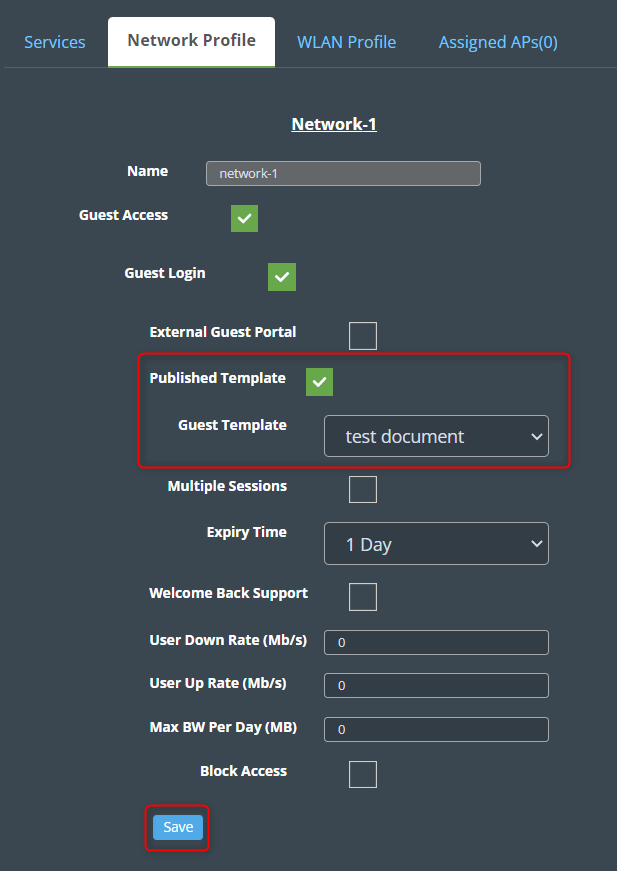
4. Then, in the edit window that appears, check the Published template box,
and select the guest portal to which you want to assign it. Click Save.
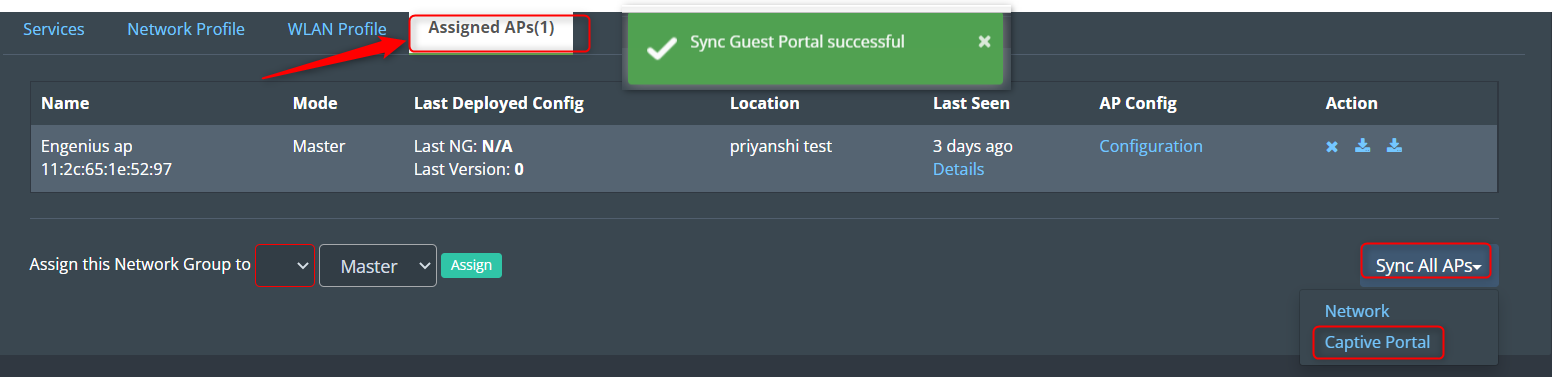
5. Then, on the Assigned APs tab, navigate to Sync All APs > Captive
Portal. You will receive a successful message notification immediately.
6. The guest portal has been added to the access point successfully. To test
the guest portal, connect with the wifi. The guest portal you created can be
found here. If not, repeat steps 1–5.
Log into the guest portal
Once you’ve successfully integrated the guest portal with your access point, the next step is to log in and explore its functionalities. This section will guide you through the login process, allowing you to harness the full potential of your guest portal’s features and user management capabilities.
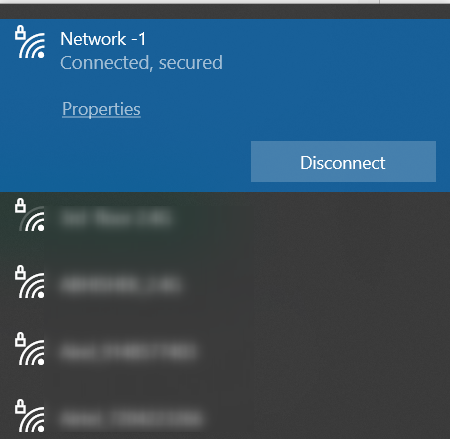
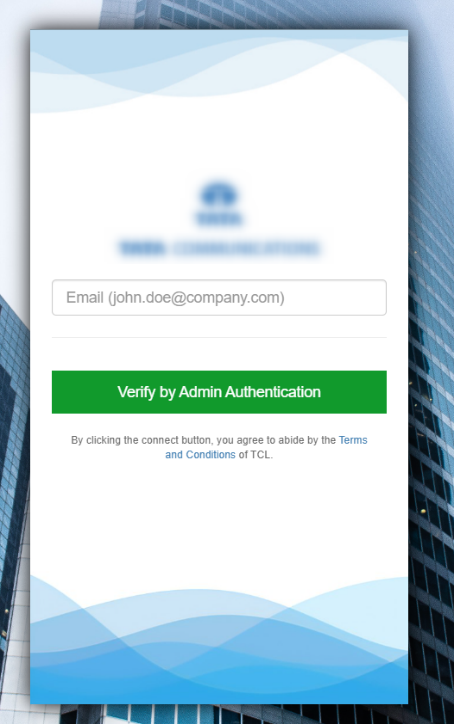
1. When you connect to Wi-Fi, the login page will appear.
2. Fill in the form field information. This will differ depending on the portal you enter.
Note: Email information is requested in this case. Depending on the
portal you are entering, you may be asked for your name, username, phone Etc.
3. Then click Verify by Admin Authentication button.
Note: There are many types of authentications. Here admin authentication
is used. In addition, other authentication methods are used depending on the
convenience of the provider.
4. As soon as the guest user clicks on the Verify by Admin Authentication
button, the CP_ADMIN and CP_USER will receive an email, informing them that a
new guest user request has arrived.
5. After the authentication process, the connection will be activated.
Guest Management
With your guest portal seamlessly integrated into your access point, it’s time to dive into effective guest management. This section provides you with an in-depth understanding of how to efficiently manage guest users, ensuring a secure and streamlined experience for both you and your guests. From creating guest accounts to approving or declining user requests, setting up user whitelists and blacklists, and even creating guest tokens, this comprehensive guide empowers you to make the most of your guest management capabilities.
1. In this section, we delve into the crucial process of generating guest user accounts within your captive portal. Creating guest users is a fundamental step with multifaceted benefits.
By crafting individualized guest accounts, you gain control over access, ensuring that only authorized individuals can connect to your network. This level of control enhances security and provides a more personalized experience for your guests.
Moreover, guest user creation empowers you with the ability to monitor and track network usage, fostering accountability and compliance. Additionally, this feature streamlines the authentication process for your guests, ensuring a seamless and secure connection.
2. To facilitate this process, it’s necessary to include fields for entering a user ID and password on the guest portal’s welcome page. To learn how to design a welcome page with these elements, please consult the “Customizing Captive Portal Templates”
section for detailed instructions.
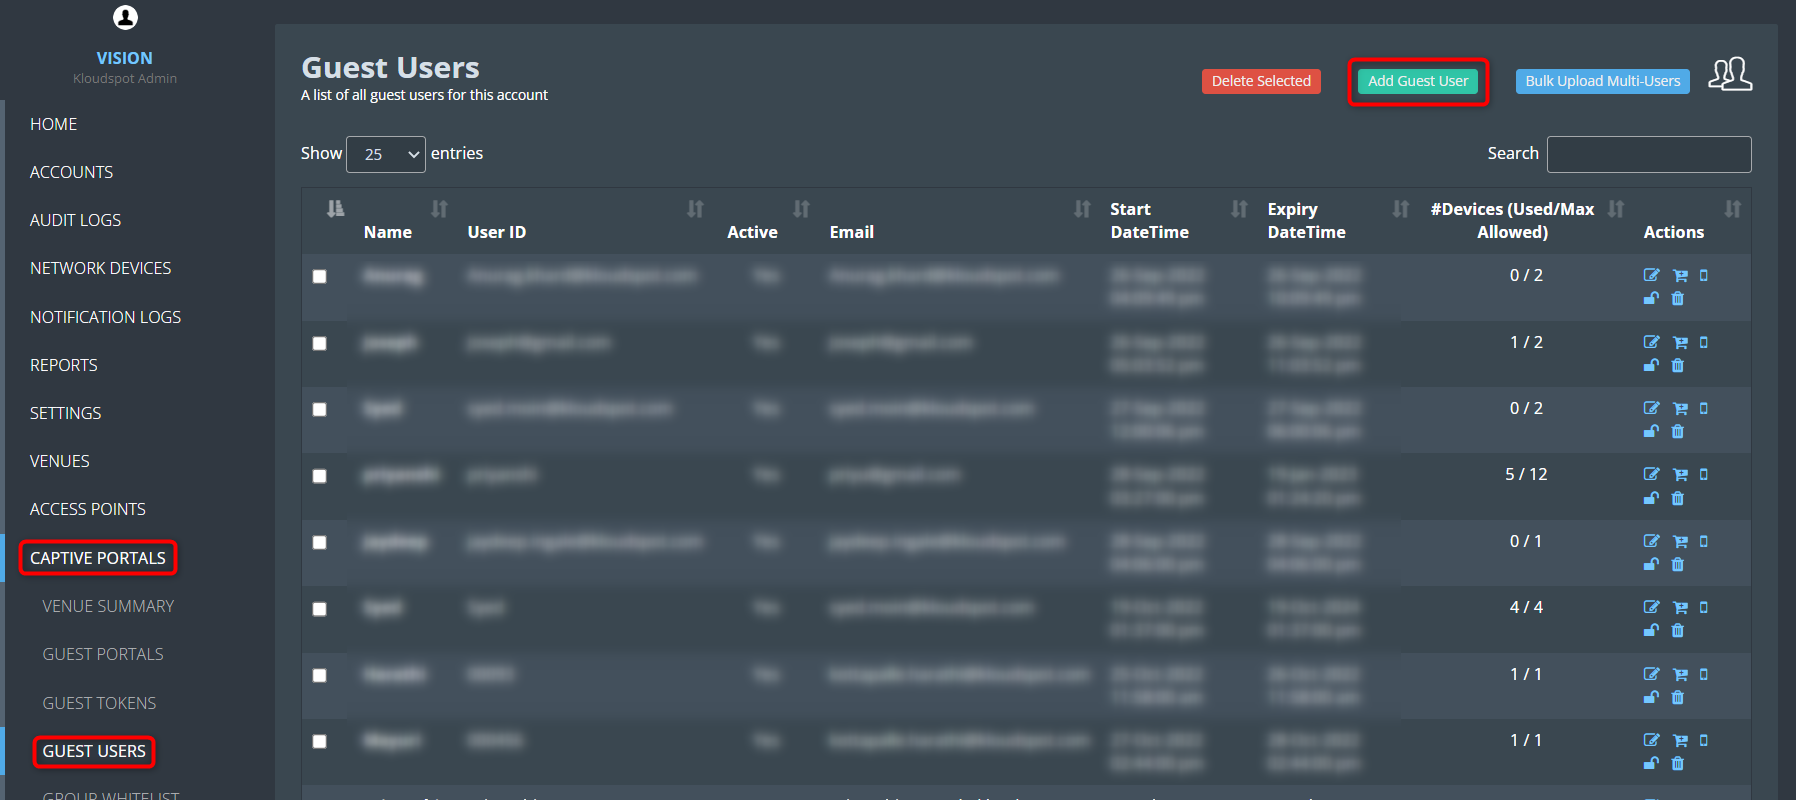
4. Then Navigate to CAPTIVE PORTAL > GUEST USERS > Add Guest user.
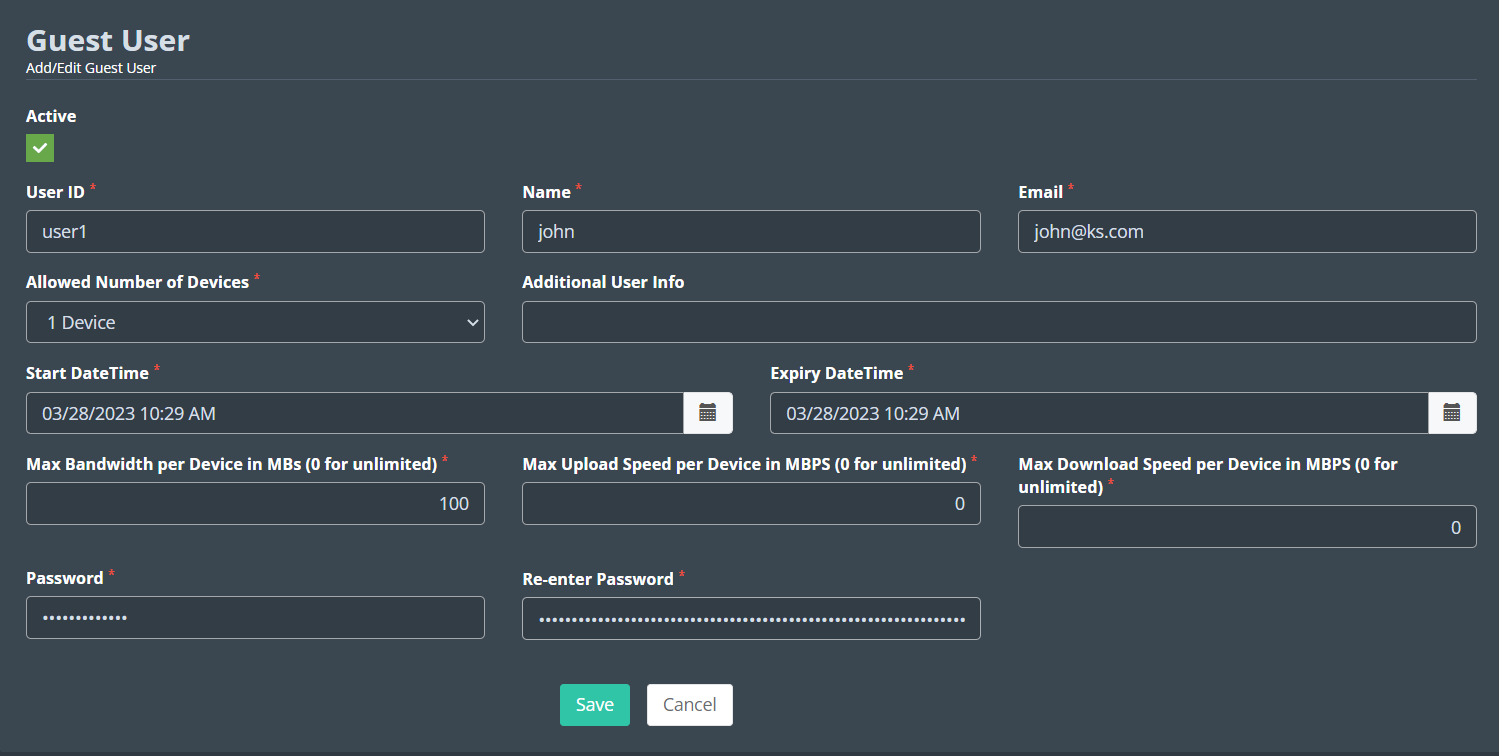
5. Fill in the following in the window that opens.
User ID: Enter the User ID that will help the user to log in.
Name: Enter the User’s name.
Email: Enter the User’s Email address.
Allowed Number of Devices: Enter the limit on how many devices this token
can be used on.
Additional User Info: Enter any additional information about the user
here. This is optional.
Max Bandwidth per Device in MBs (0 for unlimited): Enter the maximum
bandwidth available with this token.
Max Upload Speed per Device in MBPS (0 for unlimited): Enter the maximum
Upload Speed available with this token.
Max Download Speed per Device in MBPS (0 for unlimited): Enter the
maximum Download Speed available with this token.
Start DateTime: Select the date from when this token should be activated.
Expiry DateTime: Select the last date for which the token should be
active.
Password: Enter the password required to login to the user.
Re-enter Password: Re-enter the password.
6. Click on the Save button to save the guest user.
7. If you want to add multiple users together, you can use the Bulk Upload
Multi-Users option.
8. You can do more with the buttons below the action field.
1. Edit User details
2. Credit details
3. device details
4. Change the password
5. Delete the user
Approve or decline the user request
In cases where the chosen authentication method is “Verify by Admin Authentication,” guests entering the portal are required to provide their email ID and send an authentication request. In this section, we’ll explore the steps to either APPROVE or DECLINE these authentication requests.
1. When you connect to Wi-Fi, the login page will appear.
2. Fill in the form field information. This will differ depending on the portal you enter.
Note: Email information is requested in this case. Depending on the
portal you are entering, you may be asked for your name, username, phone Etc.
3. Then click Verify by Admin Authentication button.
Note: There are many types of authentications. Here admin authentication
is used. In addition, other authentication methods are used depending on the
convenience of the provider.
4. As soon as the user logs in, the CP_ADMIN and CP_USER will receive an
email, informing them that a new user request has arrived.
5. After the authentication process, the connection will be activated.
Approve a new user request.
1. If Admin Authentication is enabled in the authentication type. Each new user must be approved by the CP_ADMIN/CP_USER. Follow the steps described below to accomplish this.
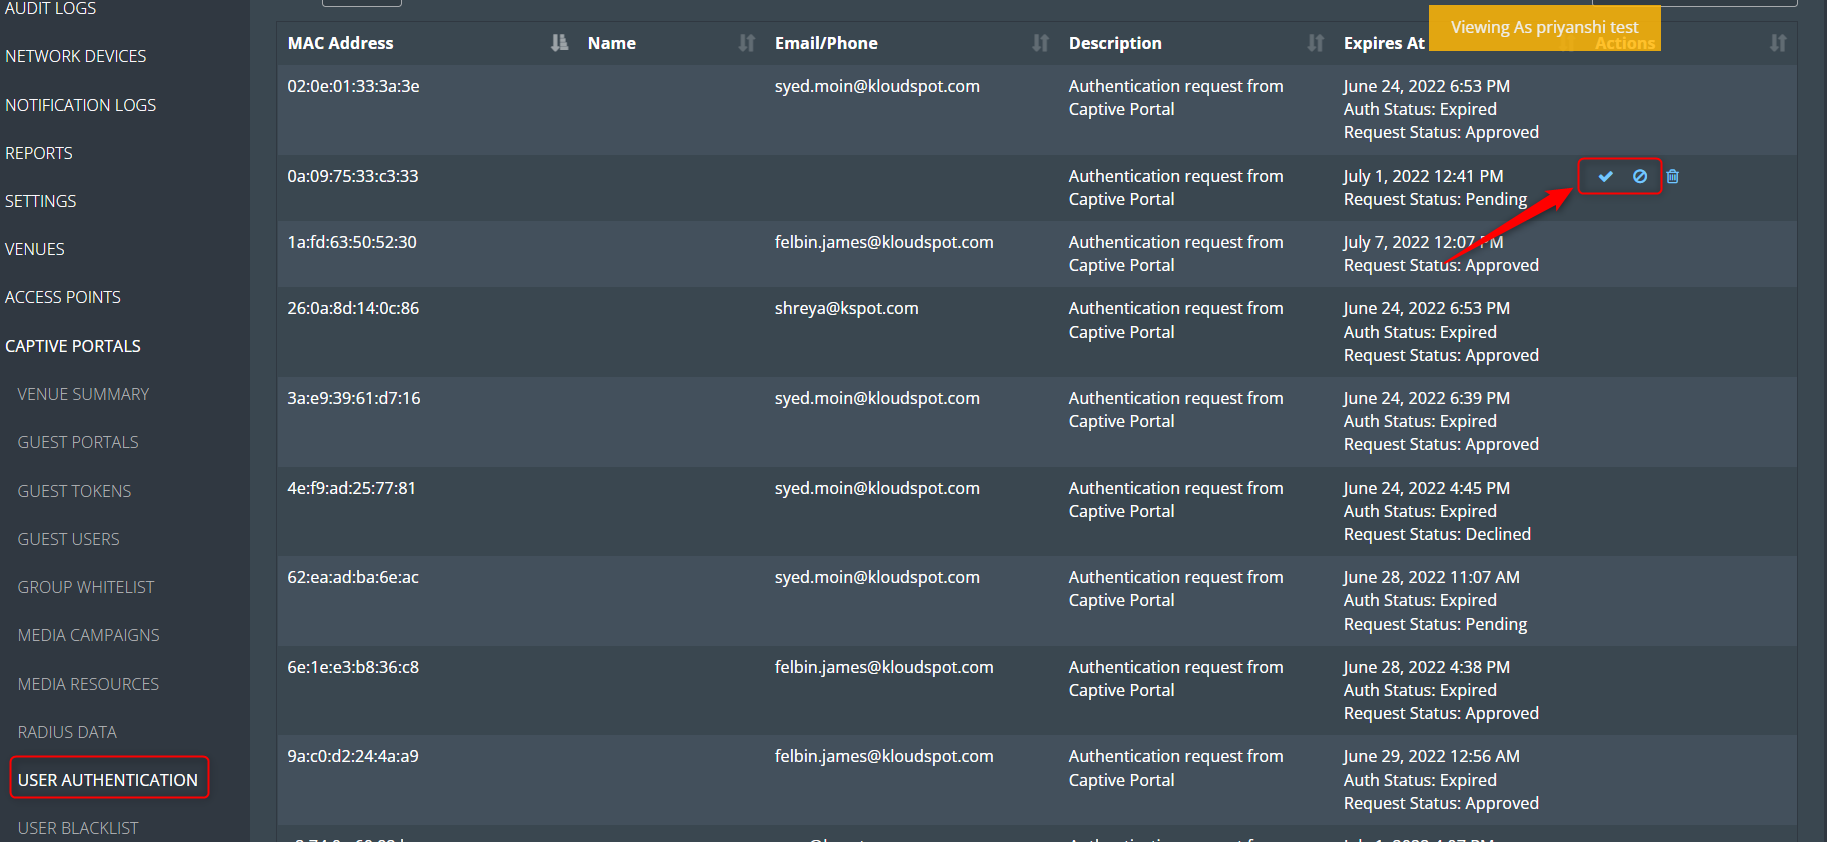
3. Then Navigate to CAPTIVE PORTAL > USER AUTHENTICATION.
4. The next window displays a list of all authentication requests. Here admin
can approve or decline as required.
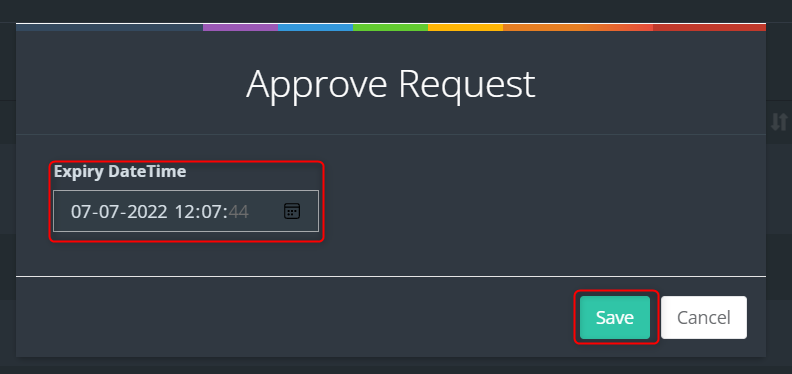
5. After you approve, enter the user’s allotted time in the popup window that
appears and click the Save button. By default, one day is permitted. You
can edit it if you want to make changes.
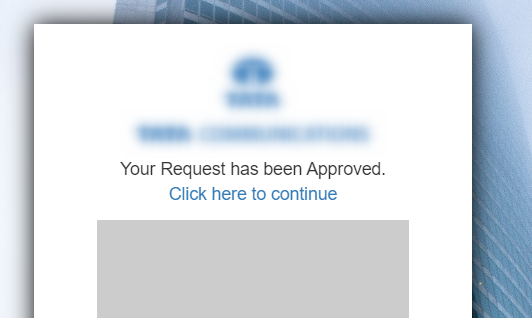
6. The user will receive an approve/decline message after 1 minute of
approval/decline.
Note: This is decided by the admin. Default it is 30 sec, it can be made
up to 120 sec according to the requirement of admin.
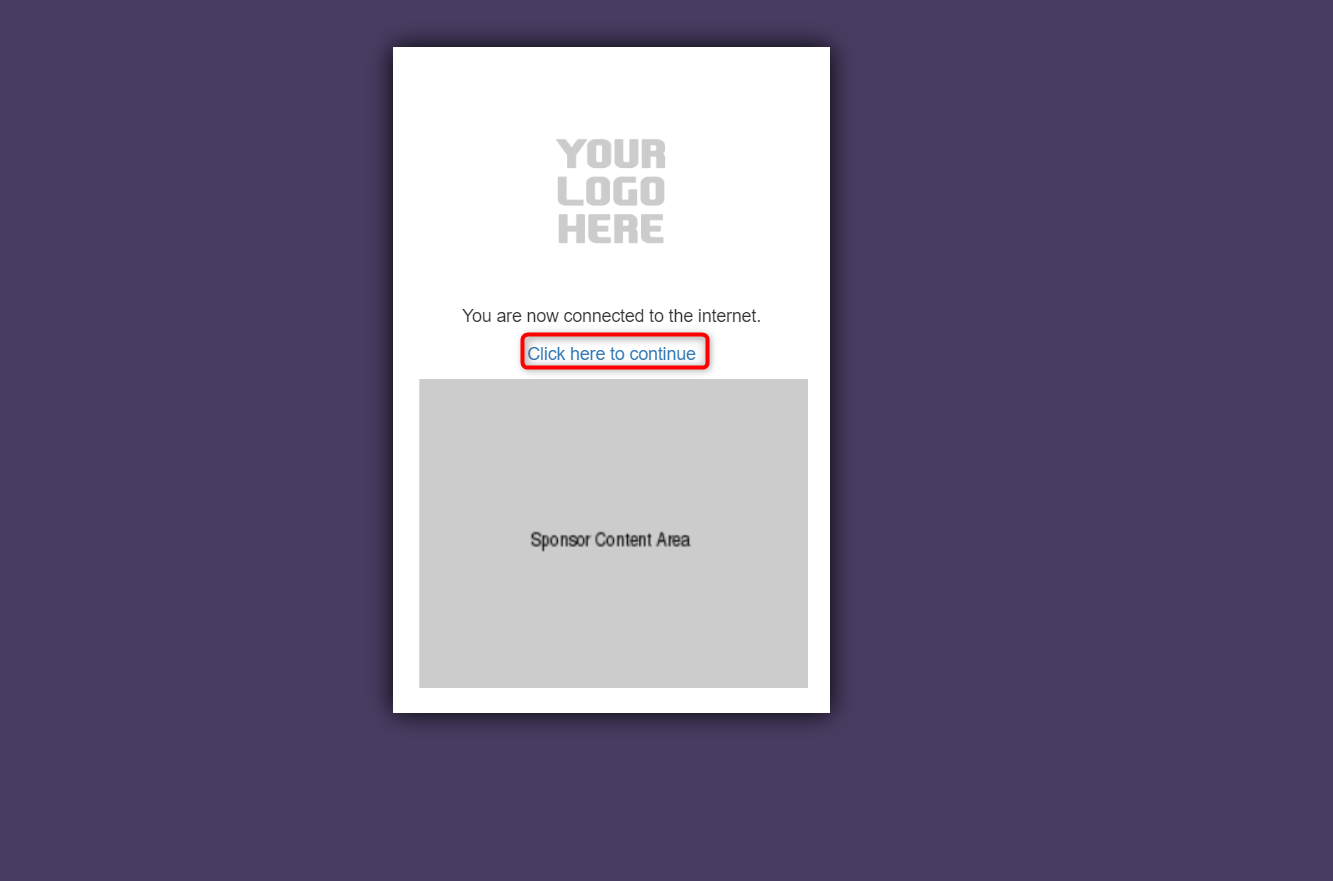
7. Then ‘ Click here to continue’ button and access the portal.
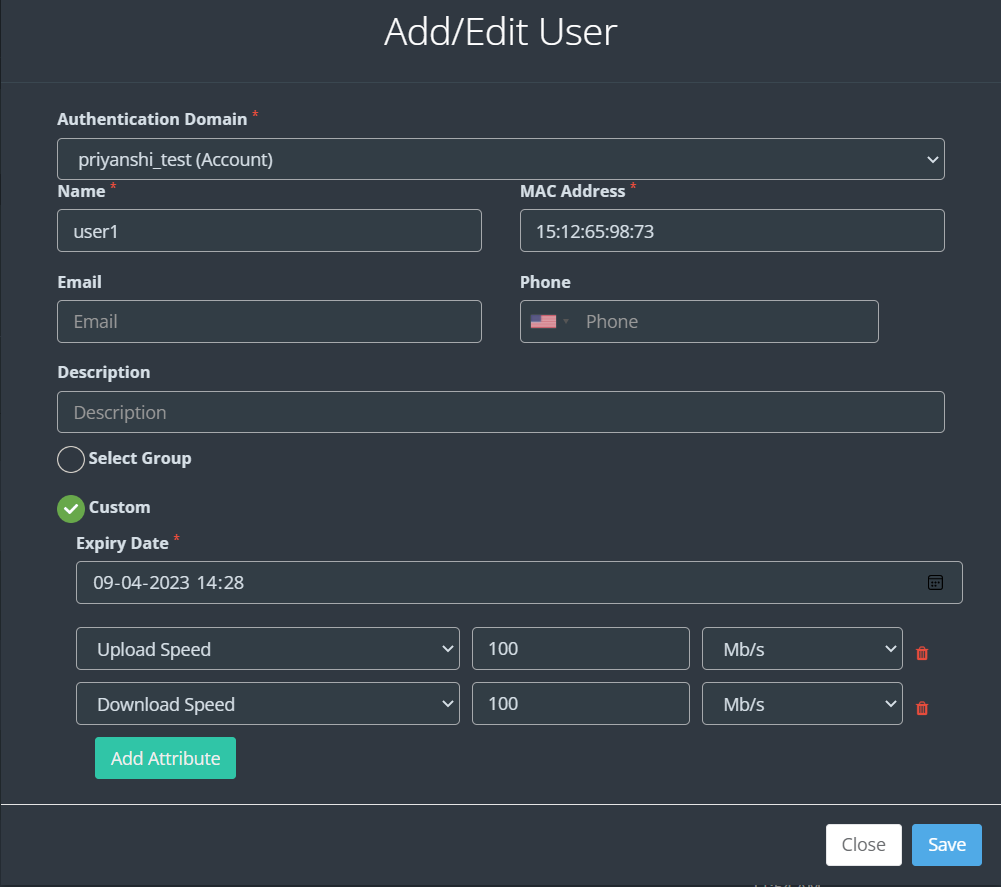
Create a user whitelist
1. This feature is particularly useful for scenarios where certain users, such as staff or trusted individuals, should have uninterrupted internet access without the need to authenticate through the captive portal. By creating a User Whitelist, you can streamline their connectivity experience while ensuring that others still go through the necessary authentication steps.
In this section, we will explore how to set up and manage a User Whitelist within your KloudPortal configuration.
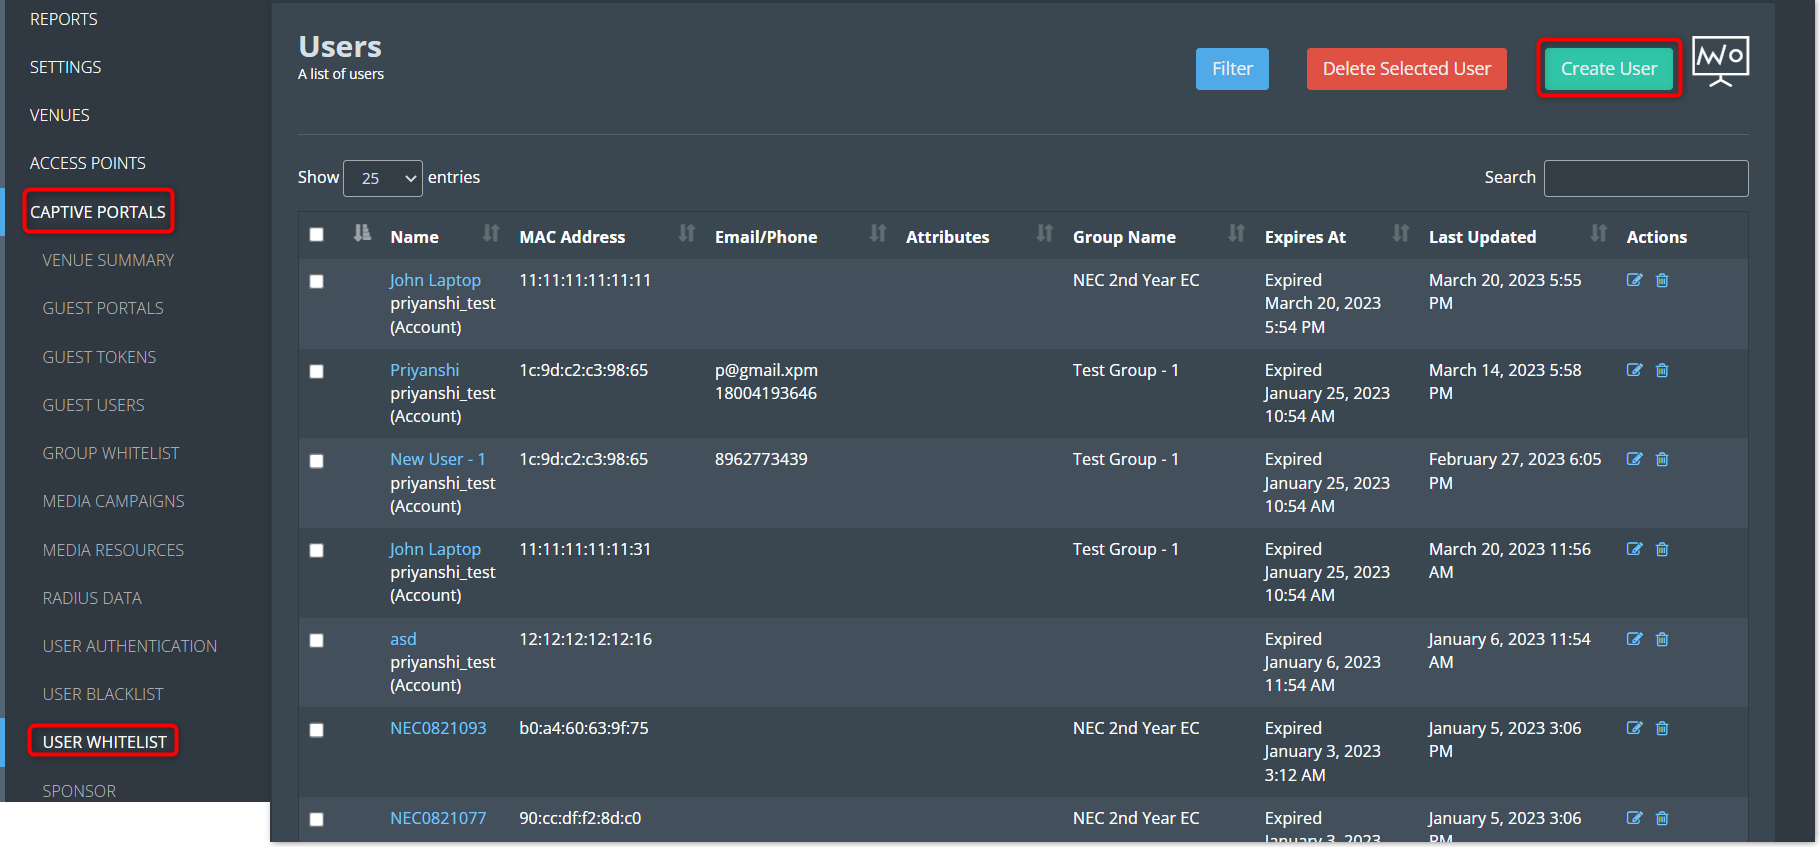
2. To create a user whitelist, Log in to your Kloud Manage account.
3. Then Navigate to CAPTIVE PORTAL > USER WHITELIST > Create User.
4. Enter all the necessary information and click the Save button.
5. There are two choices available: either include this device in an existing
group or specify a custom expiration date. Choose any of these as per your
requirement.
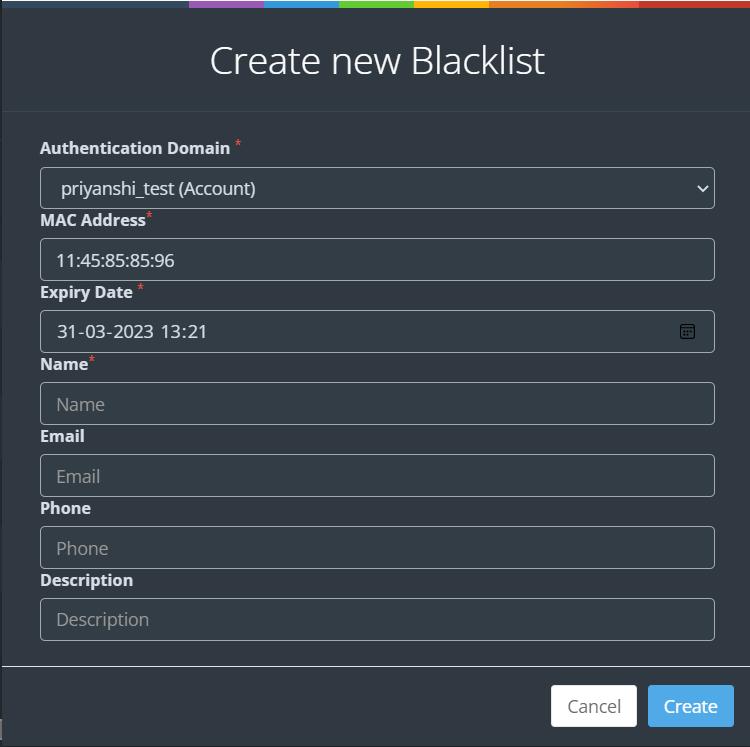
Create a user blacklist
1. Creating a User Blacklist is a crucial aspect of network management, especially when you need to restrict specific users’ access to your network. Unlike the User Whitelist, which grants certain individuals uninterrupted internet access, the User Blacklist allows you to block or suspend access for specific users or devices.
In this section, we will delve into the process of setting up and managing a User Blacklist within your Kloud Portal configuration.
3. Then Navigate to CAPTIVE PORTAL > USER BLACKLIST > Create New.
4. Enter all the necessary information and click the Create button.
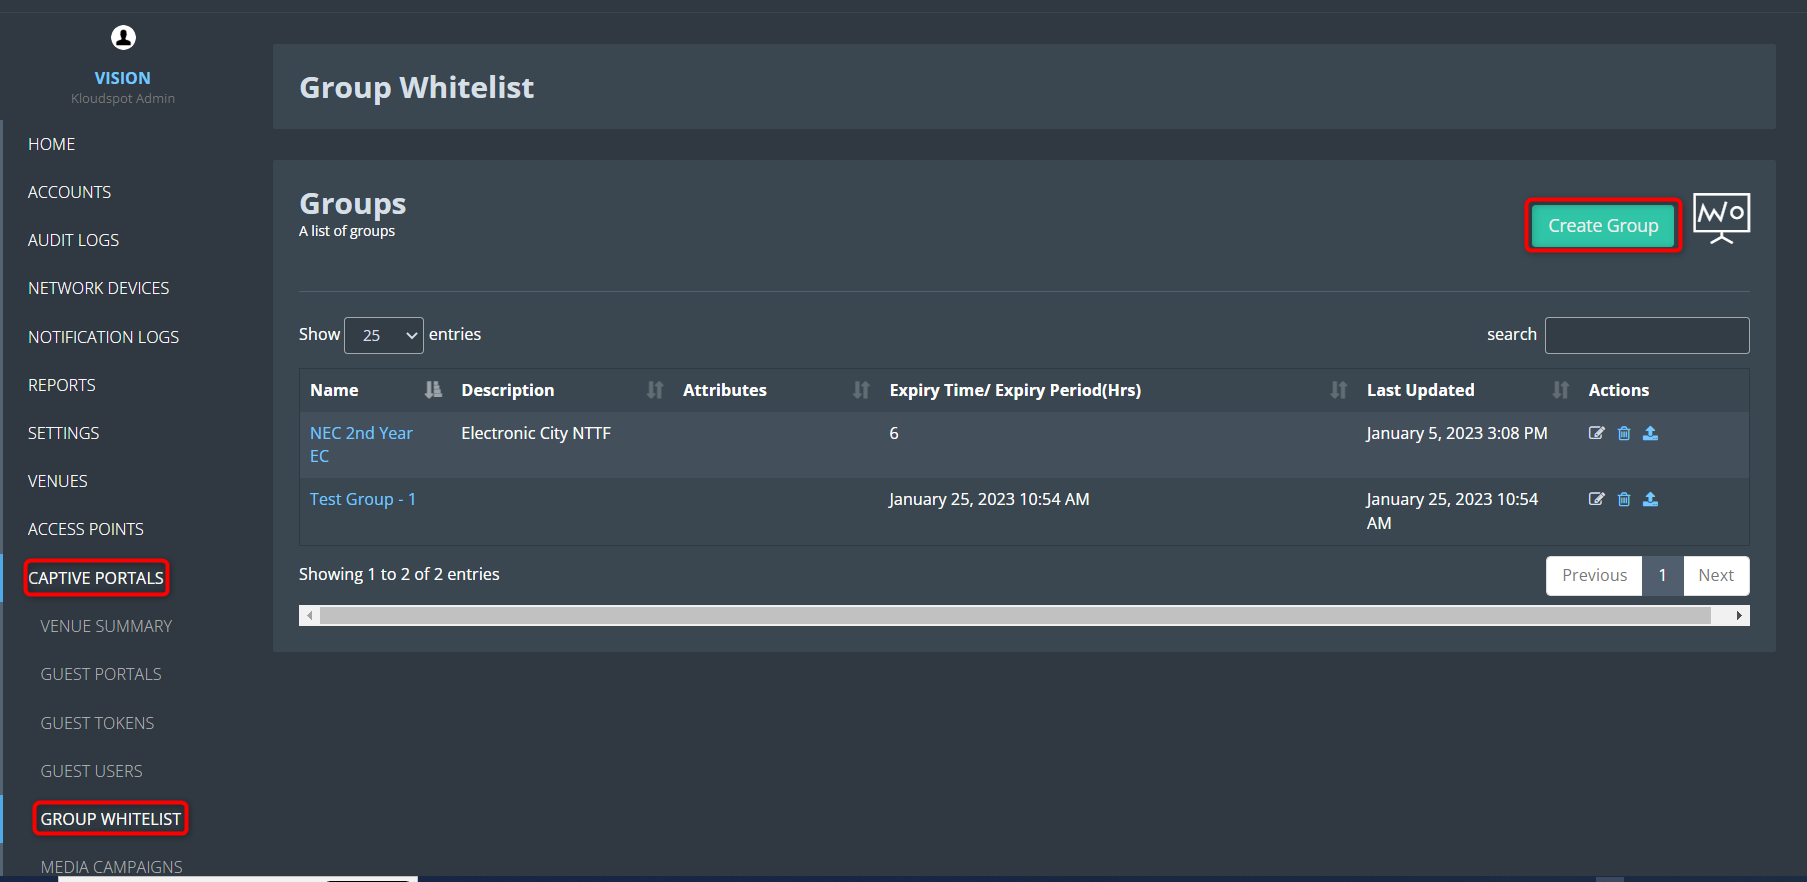
Create a Group Whitelist
The group whitelist feature is a way to allow a specific group of users to
bypass the captive portal login process and access the internet directly. This
feature can be useful in situations where certain users, such as employees or
trusted partners, need to have immediate access to the internet without having
to log in every time they connect to the network.
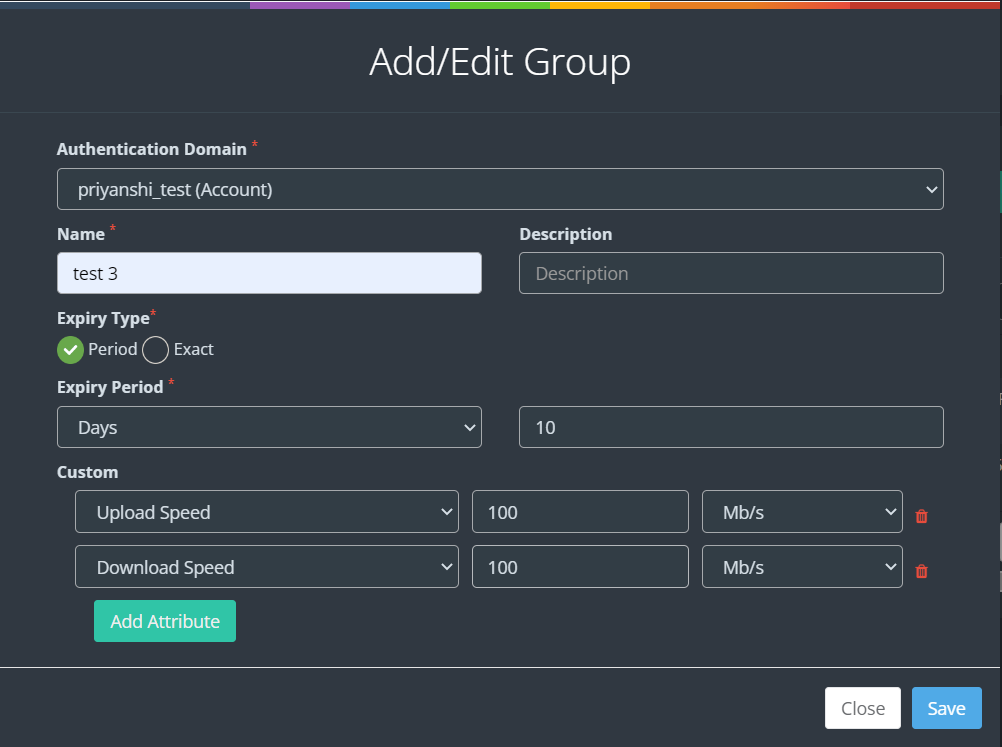
2. Then Navigate to CAPTIVE PORTAL > GROUP WHITELIST > Create Group
3. Fill in all the details and click the Save button.
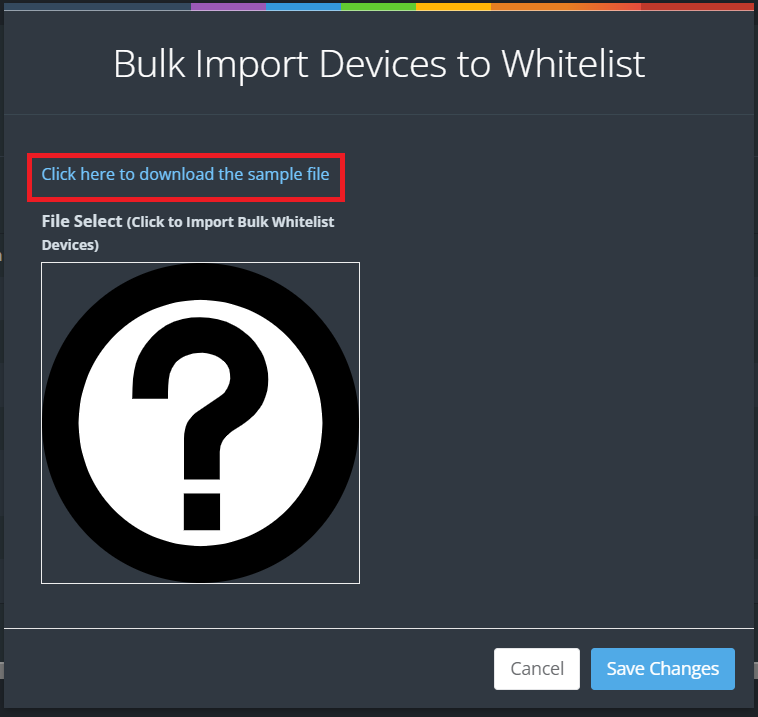
4. Then click on the Upload Bulk Users CSV icon from the action column.
5. In the window that opens, you can upload the CSV file.
6. Click on the " Click here to download the sample file " button to get
a sample of the CSV file.
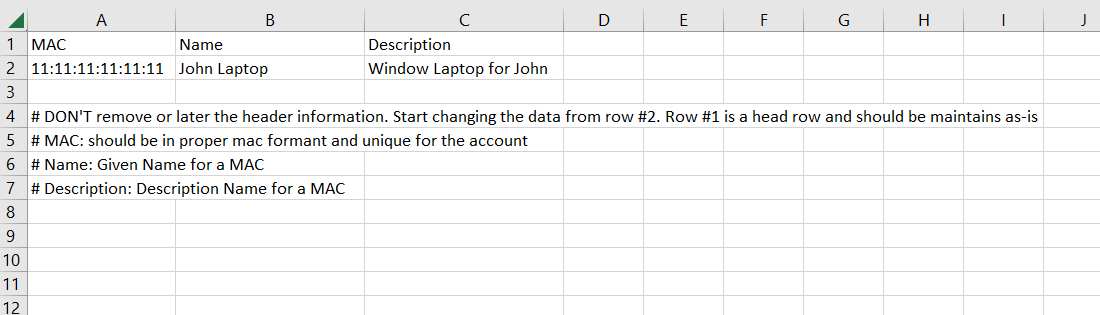
7. You can add the required information in the downloaded .csv file. Things
to keep in mind while adding information are given in the CSV file.
8. Once the CSV file is ready, click on the question mark symbol in the popup
window. Then select the CSV file you saved and click on the Save Changes
button.
Create a guest token
1. A guest token serves as an exclusive identifier designed for individuals using a captive portal for their initial network access. It eliminates the necessity of entering a username and password, as the guest token serves as the primary login credential for users.
Furthermore, guest tokens can be customized to automatically expire either after a defined duration or when the user logs out. This functionality plays a vital role in enhancing network security by guaranteeing that access is restricted exclusively to authorized users, thereby safeguarding the network from unauthorized entry.
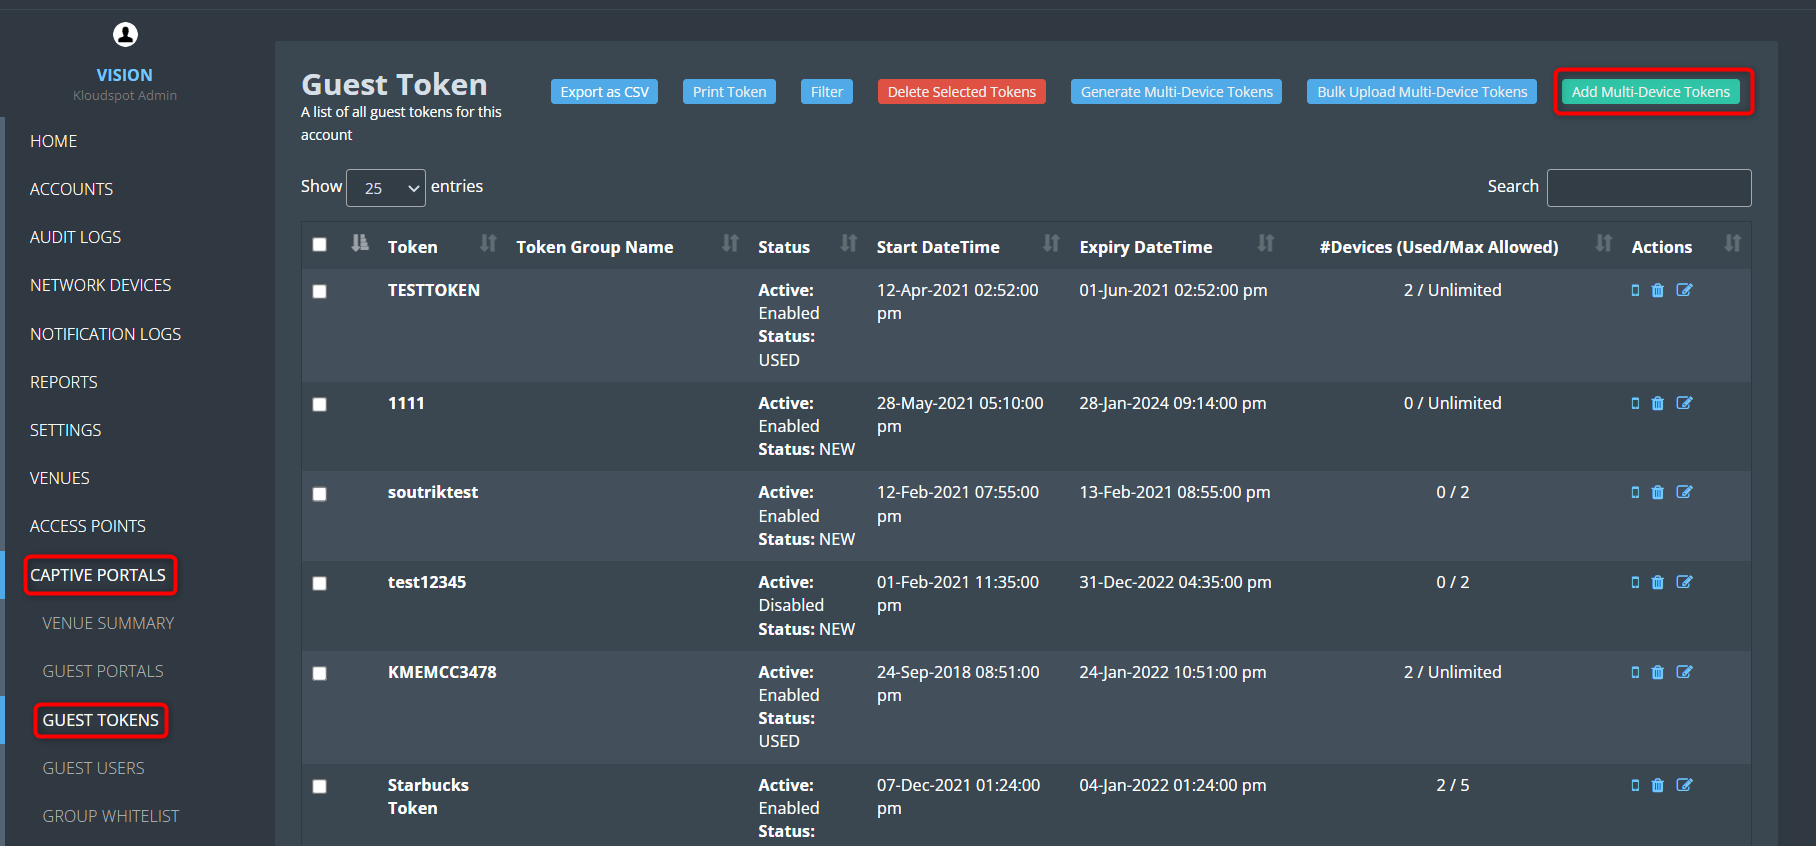
3. Then Navigate to CAPTIVE PORTAL > GUEST TOKENS > Add Multi-Device
Tokens.
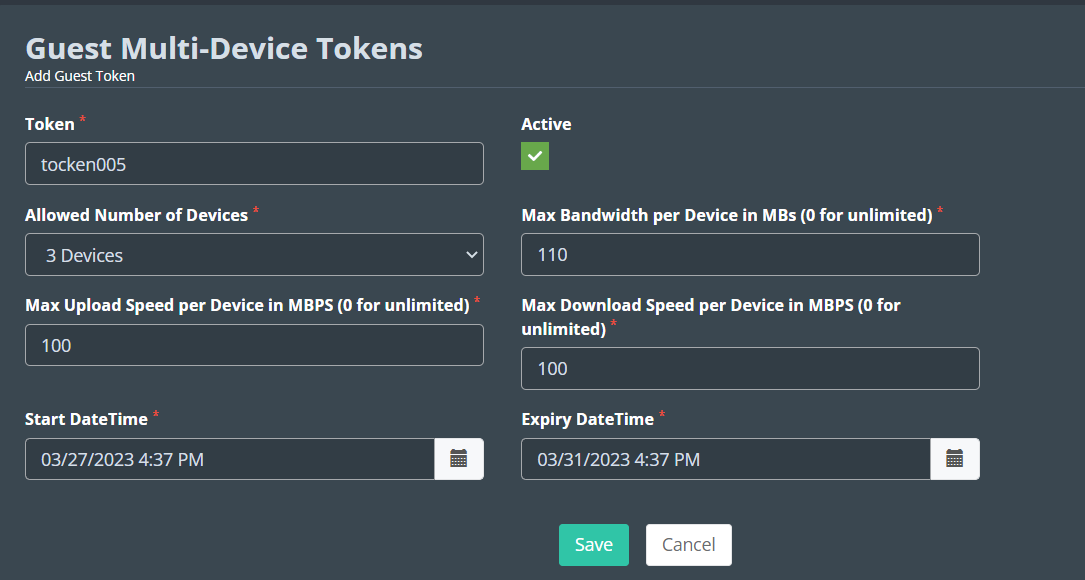
4. Fill the following in the window that opens.
Check the Active checkbox to activate the token.
Token: Enter the token you want to create here. The user will log in
using this.
Allowed Number of Devices: Enter the limit on how many devices this token
can be used on.
Max Bandwidth per Device in MBs (0 for unlimited): Enter the maximum
bandwidth available with this token.
Max Upload Speed per Device in MBPS (0 for unlimited): Enter the maximum
Upload Speed available with this token.
Max Download Speed per Device in MBPS (0 for unlimited): Enter the
maximum Download Speed available with this token.
Start DateTime: Select the date from when this token should be activated.
Expiry DateTime: Select the last date for which the token should be
active.
5. Click the Save button to save the changes.
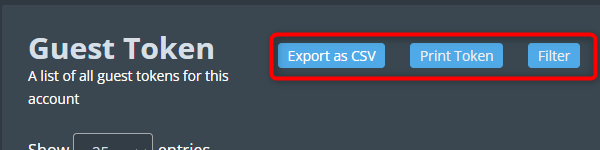
6. You can download a CSV file that contains all the registered tokens by
clicking on the ‘ Export as CSV ’ button.
7. You can print all the tokens by clicking on the ‘ Print Token ’
button.
8. You can filter tokens on the basis of their status, Token Group Name, and
Start Date Time.
9. If you want to generate tokens automatically then you can use the Generate Multi-Device Token option.
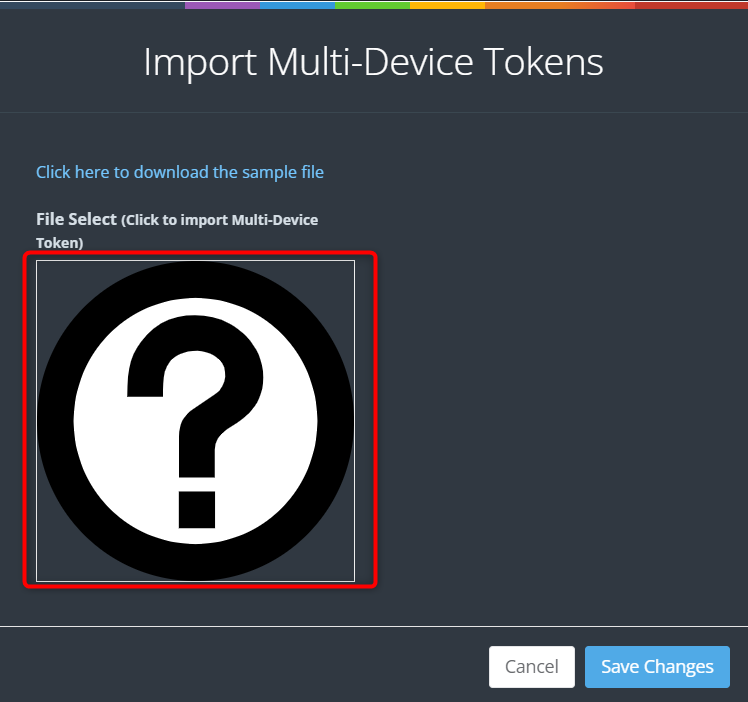
10. If you want to import multi-device tokens then you can use the Bulk Upload Multi-Device Token option.
Authenticate or decline a sponsored user
When utilizing Sponsor Email authentication in your portal, users are required to provide their email addresses, along with their sponsor’s email address, and then submit a request. Following this, both the administrator and the sponsor will expeditiously receive an email containing the authentication request. This section will provide comprehensive guidance on efficiently managing and responding to these authentication requests.
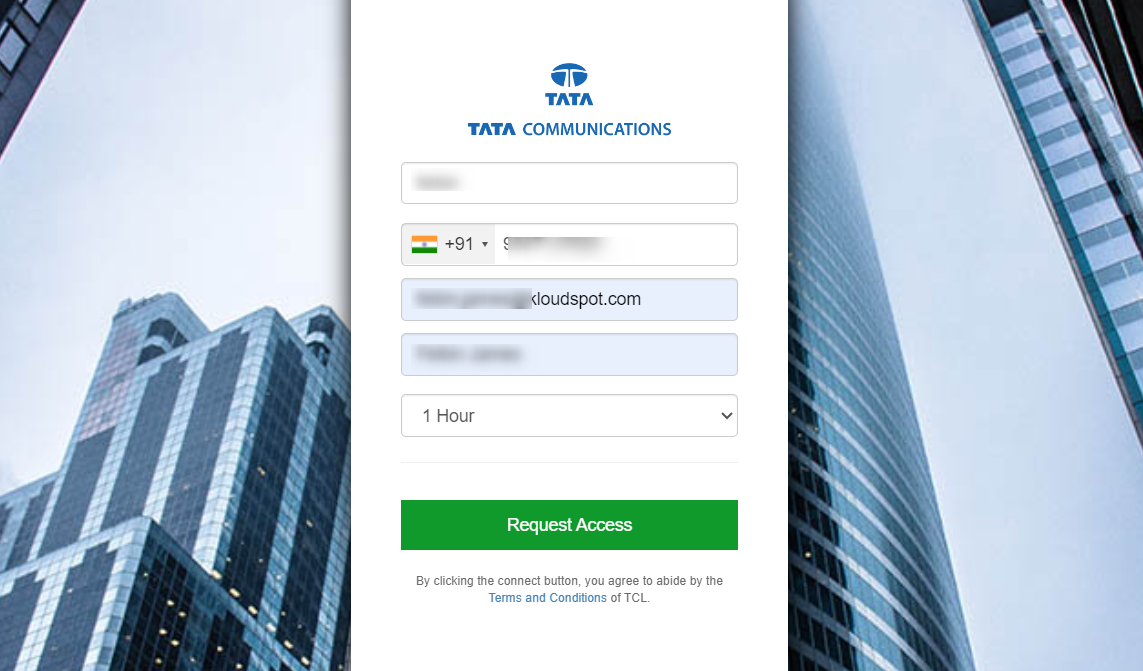
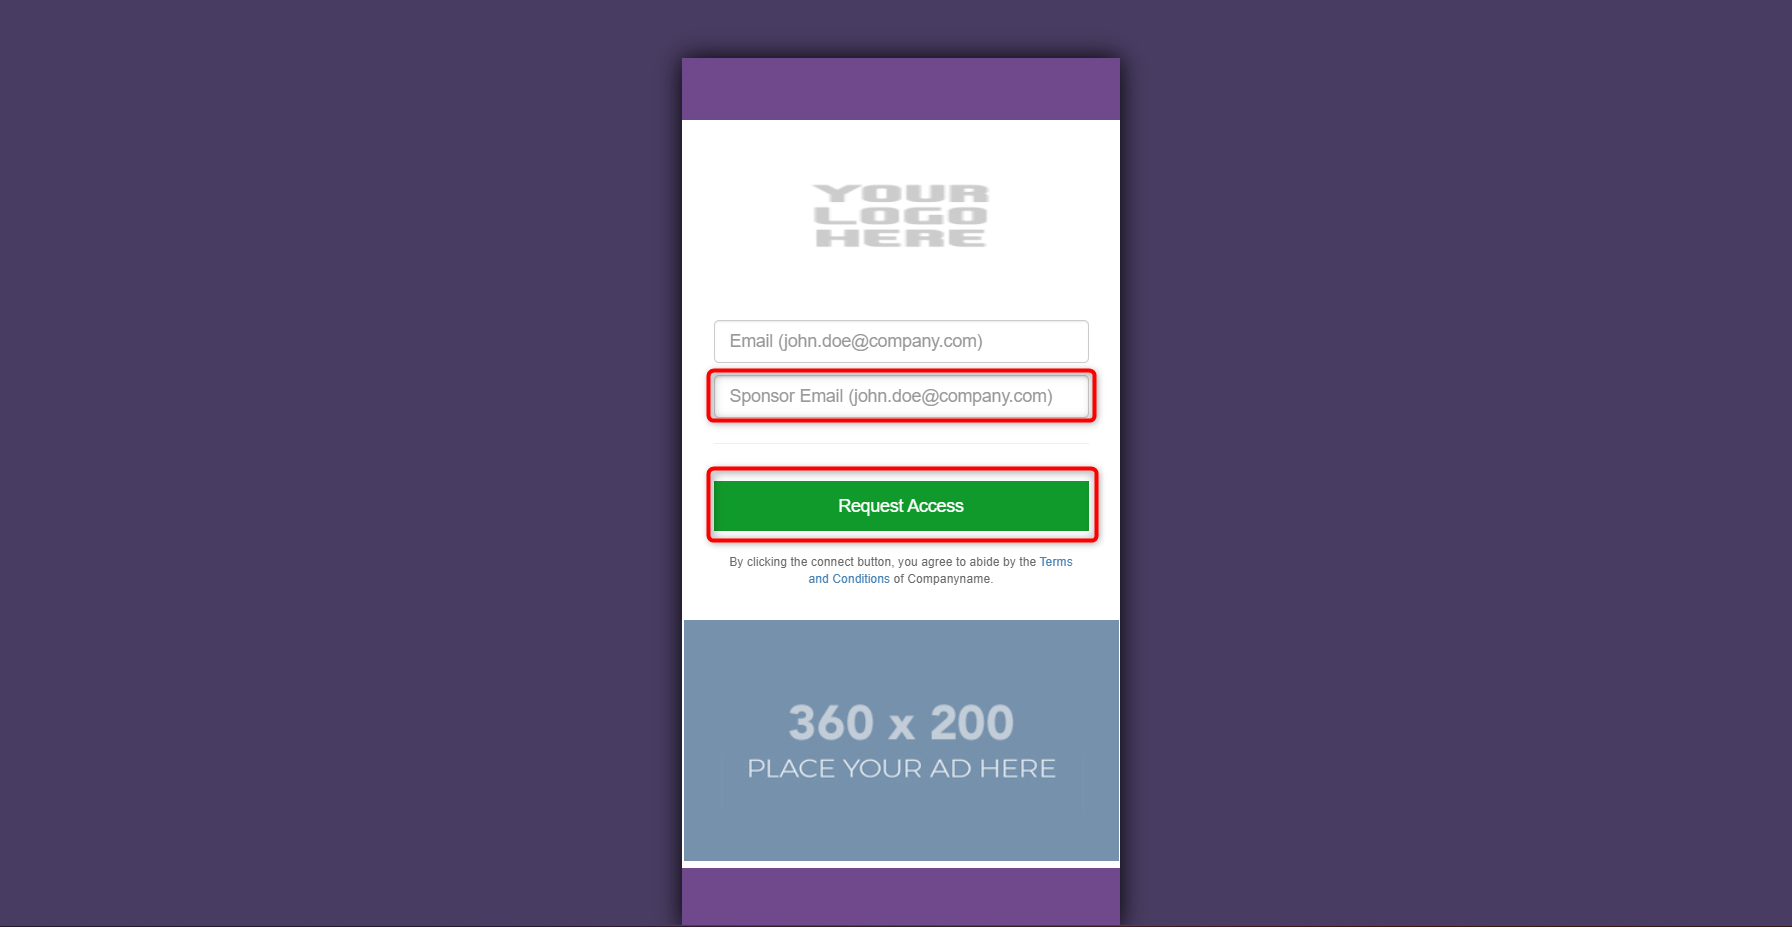
1. When a user enters the captive portal, they will be asked to enter the sponsor’s email id on the welcome page.
2. Enter the sponsor’s email address and click on the Request Access button.
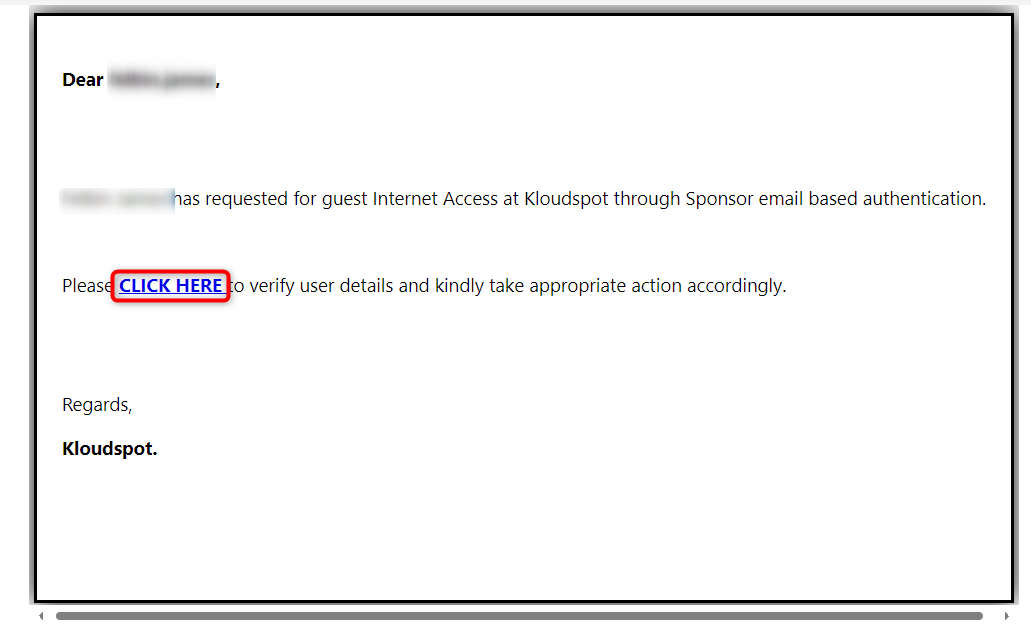
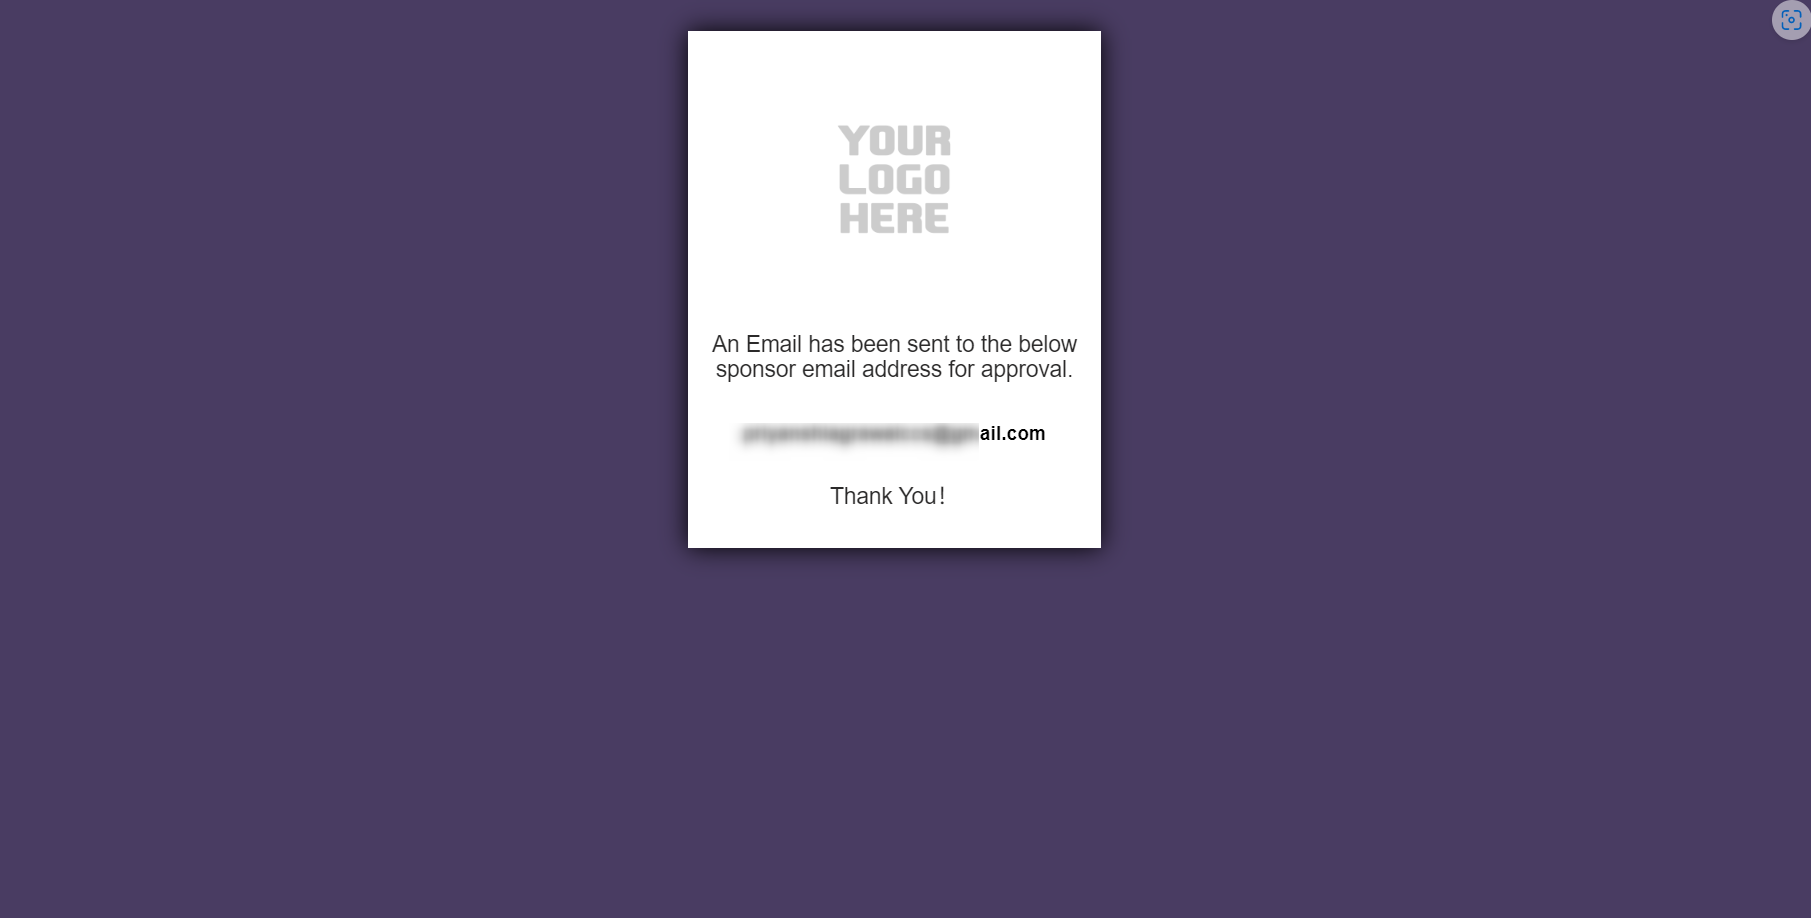
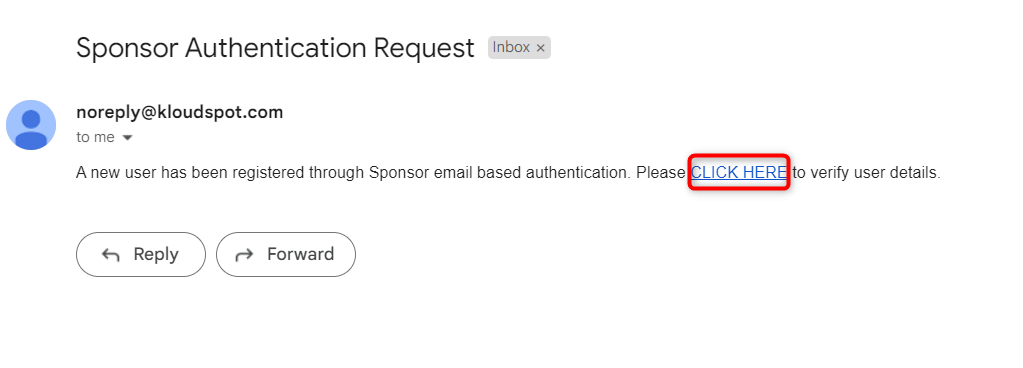
3. The sponsor will receive the requested information via email immediately.
Click on the CLICK HERE button to access the approval page.
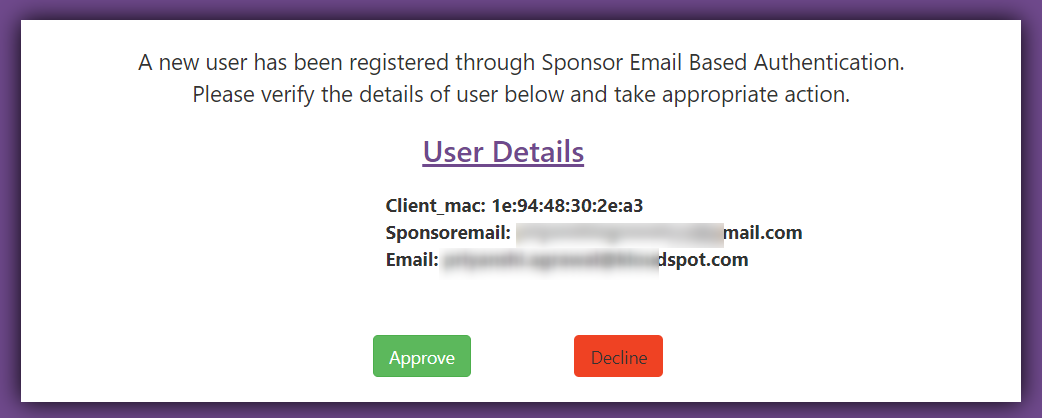
4. Sponsor can give his response by clicking on the Approve/Decline
button in the window that opens.
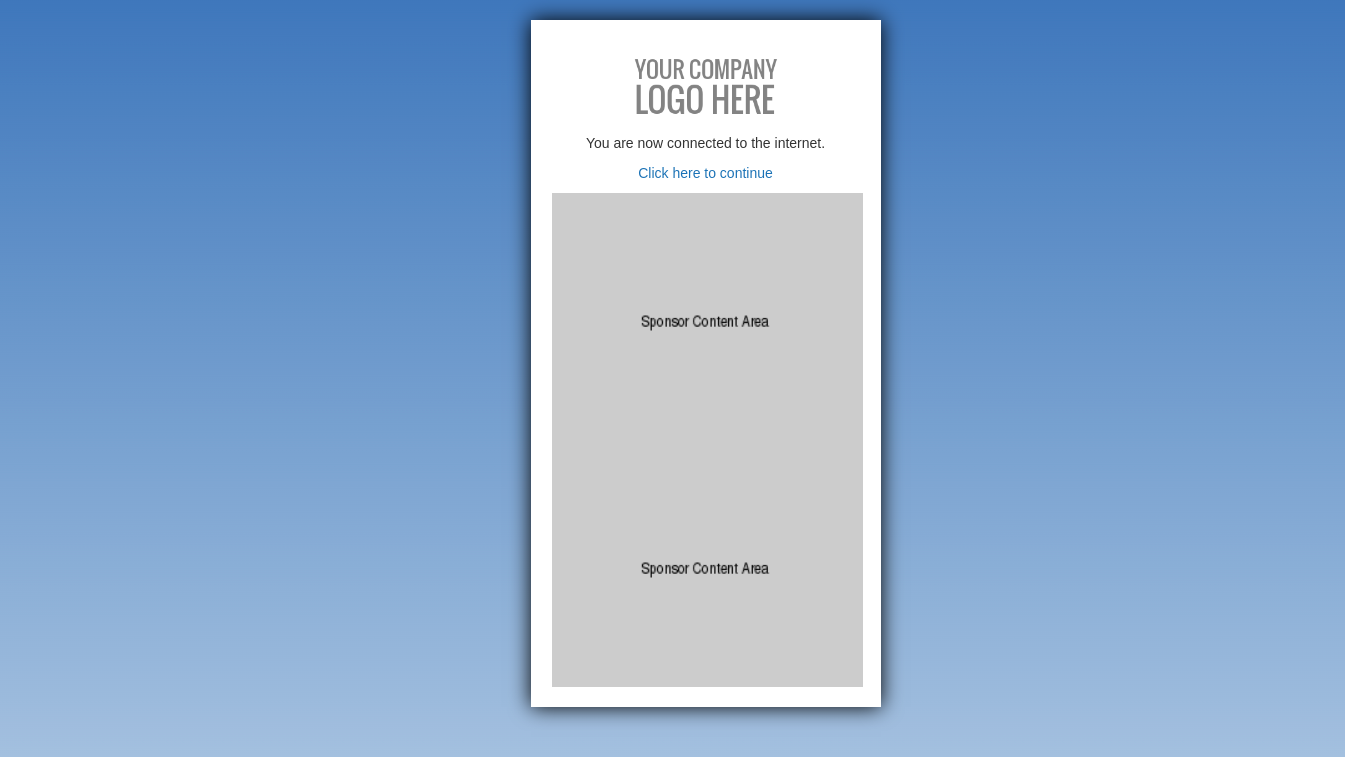
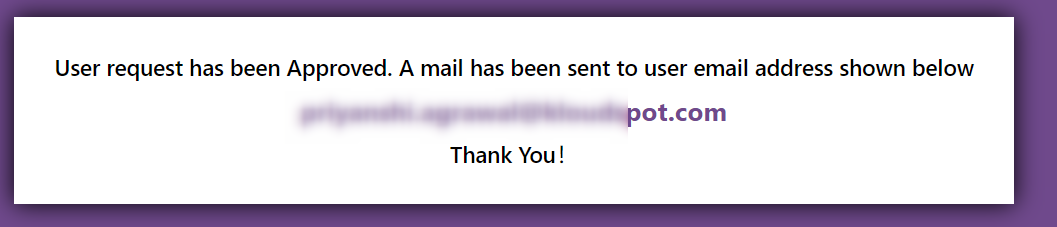
5. Once a response has been provided, the confirmation window will appear.
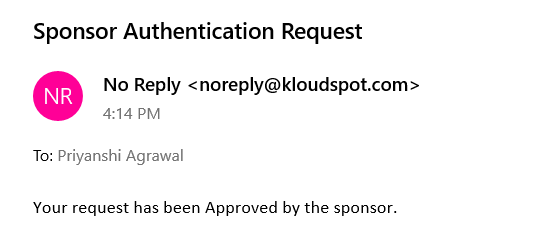
6. If it is approved, the user will get an email informing about it.
7. Then the user can use the internet by clicking the Click here to
continue button from the success page.
Campaign Management
In the area of campaign management, you get the ability to display sponsored content on the success page of your captive portal. This section will guide you through the process of creating and executing these engaging campaigns that will allow you to leverage the full potential of your captive portal’s success page.
Media resources serve as the fundamental building blocks. These resources encompass a variety of content types, from static images and slideshows to dynamic elements like YouTube videos, Twitter feeds, Google ads, and even Survey Monkey surveys. This section will guide you through the process of seamlessly integrating these diverse media resources into your campaigns, ensuring your content engages and captivates your captive portal’s audience effectively.
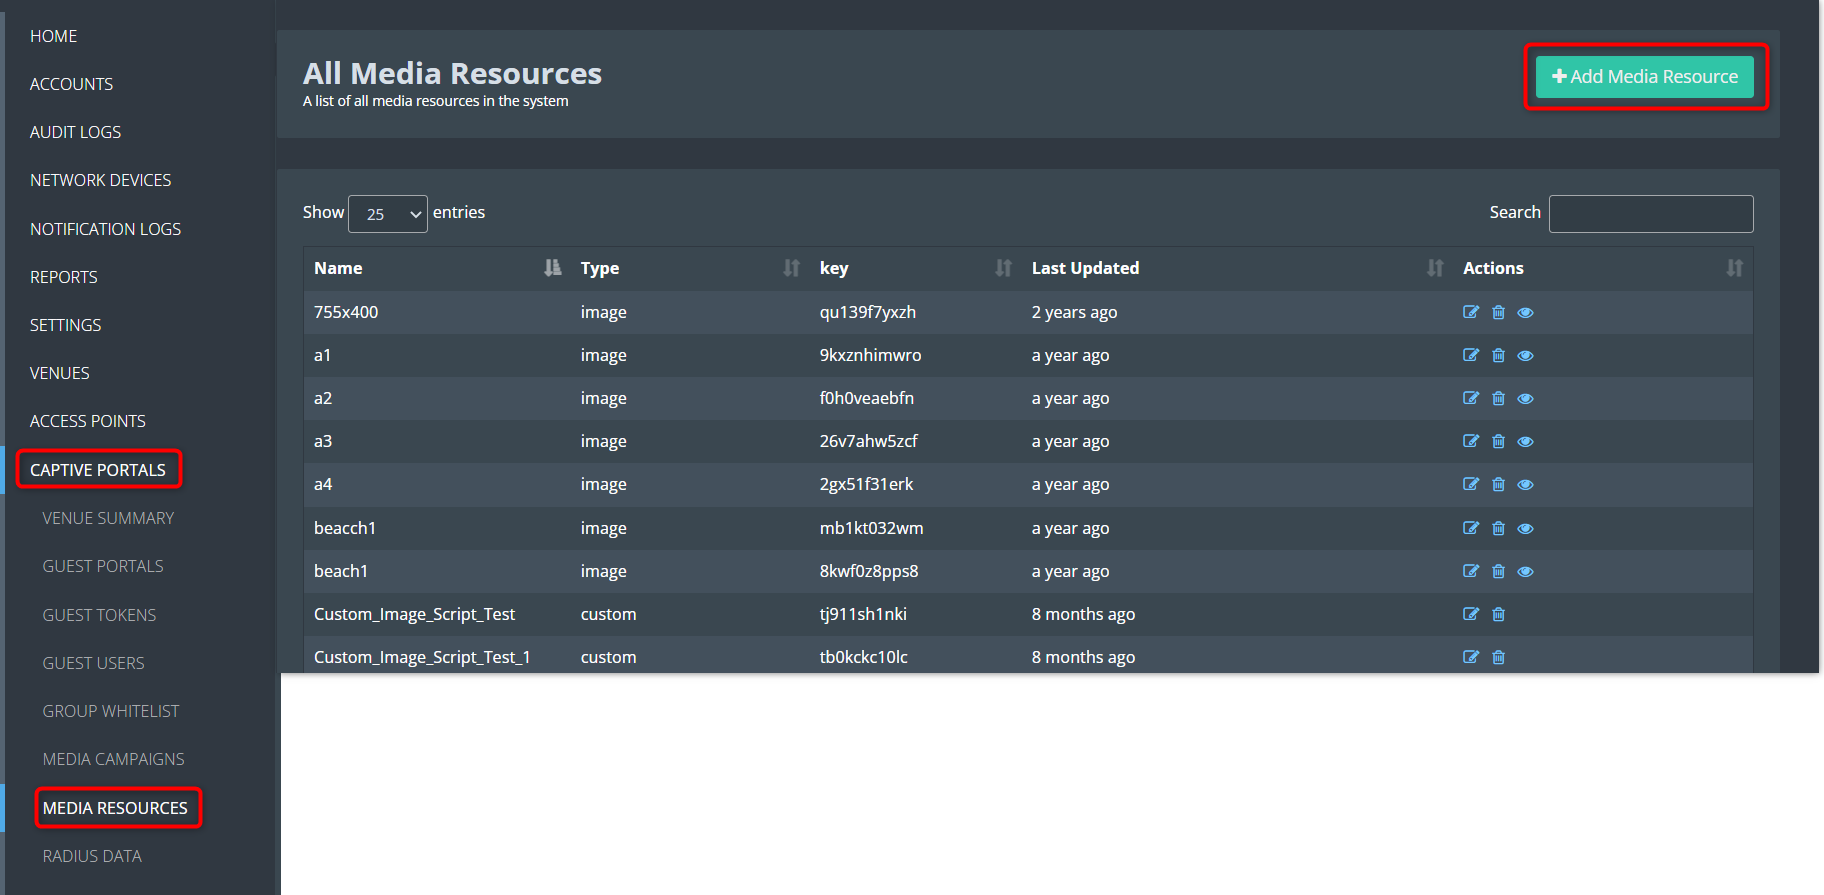
1. Resources to run in a campaign can be called as media resources.
3. Then Navigate to CAPTIVE PORTAL > MEDIA RESOURCES > Add Media
Resources.
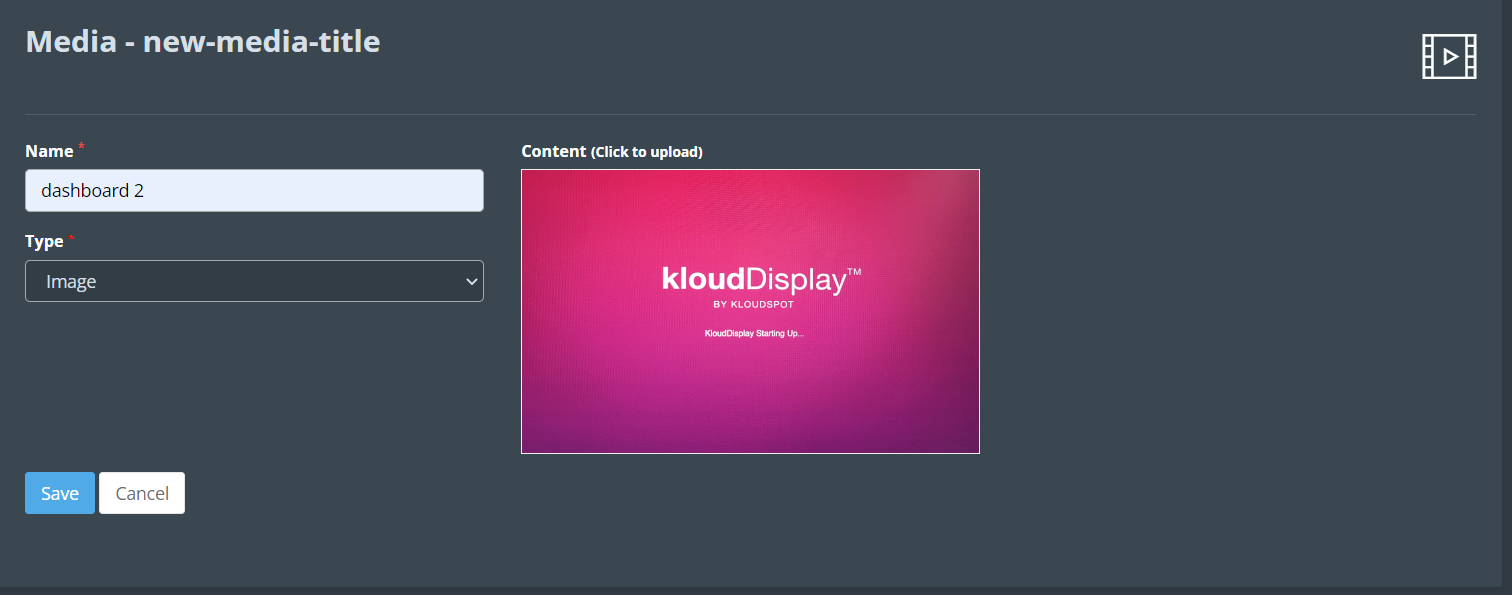
4. Enter the resource name and select the media type from the drop-down.
5. Media types supporting Images, slideshows, and videos are static content
and YouTube, Twitter, google ads, and survey monkey are external content.
6. Custom content can also be included on the web page and will be presented
on the campaign.
7. Select the type, add the content, and click on the Save button.
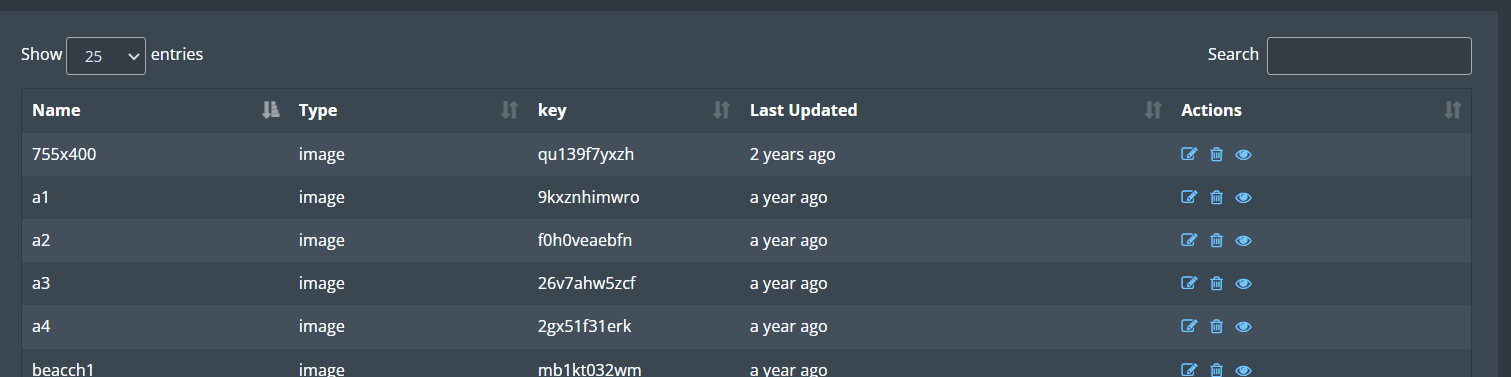
8. New added media resources will display on the table with some actions.
Edit icon: allows the user to edit the resource.
Delete icon: allows the s user to delete the added resource.
Preview icon: allows the user to view the resource.
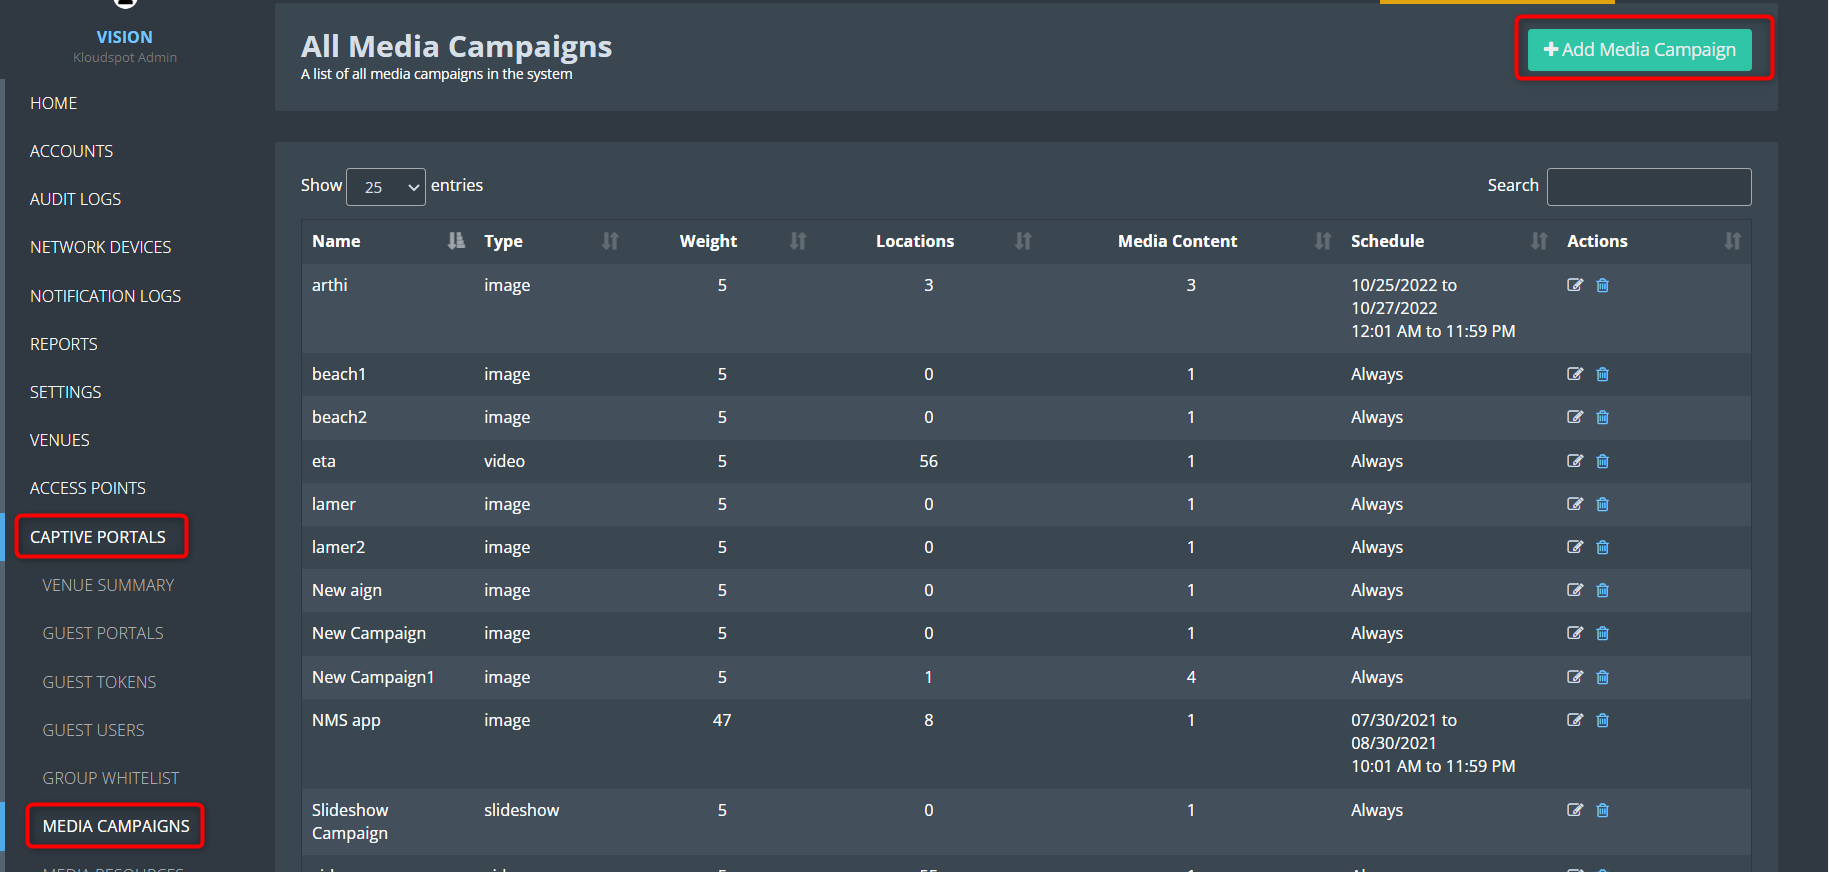
Media Campaigns
1. After adding your media resources, the next step is creating media campaigns. In this section, we’ll guide you through crafting effective campaigns that make the most of your resources. You’ll learn how to create engaging campaigns that leave a strong impression on your captive portal’s audience.
2. To set up a media campaign, it’s essential to begin by adding a media resource. You can find instructions on how to create a media resource in the “Media Resource” section.
4. Then Navigate to CAPTIVE PORTAL > MEDIA CAMPAIGN > Add Media Campaign.
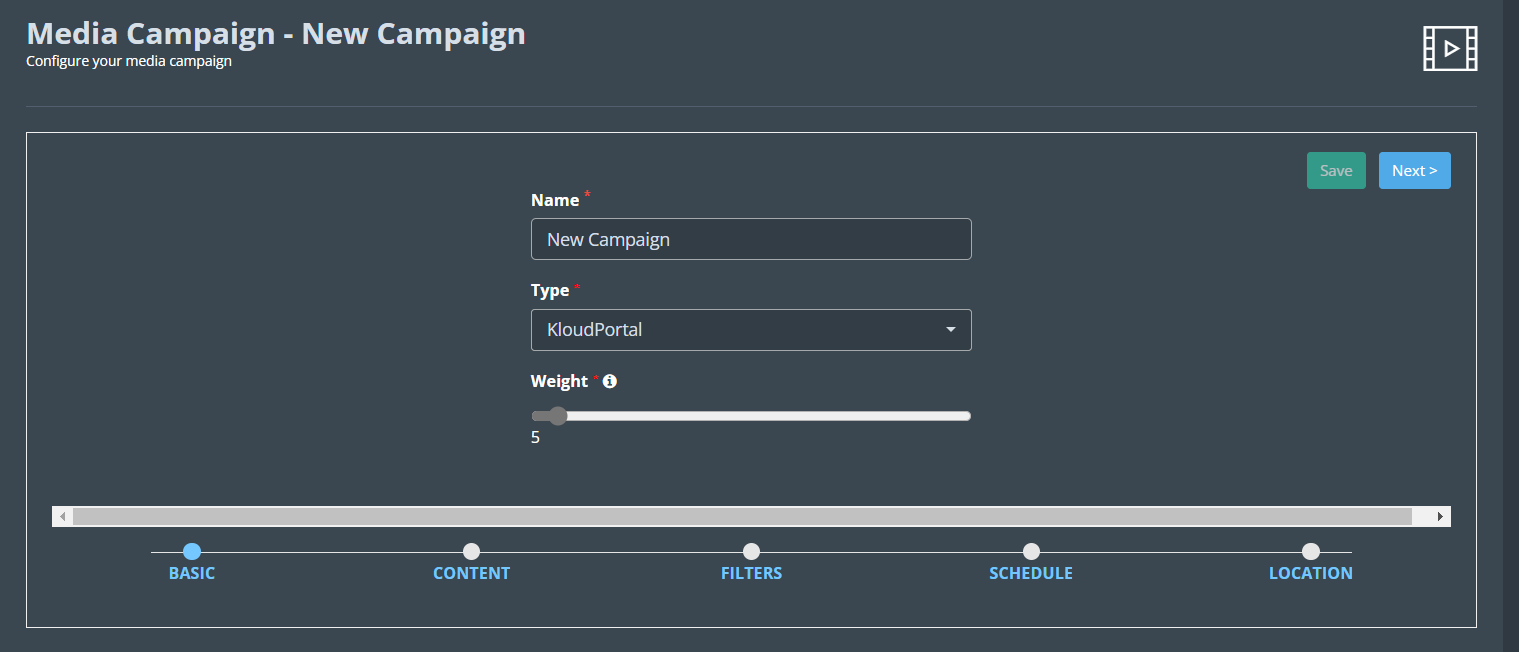
Basic
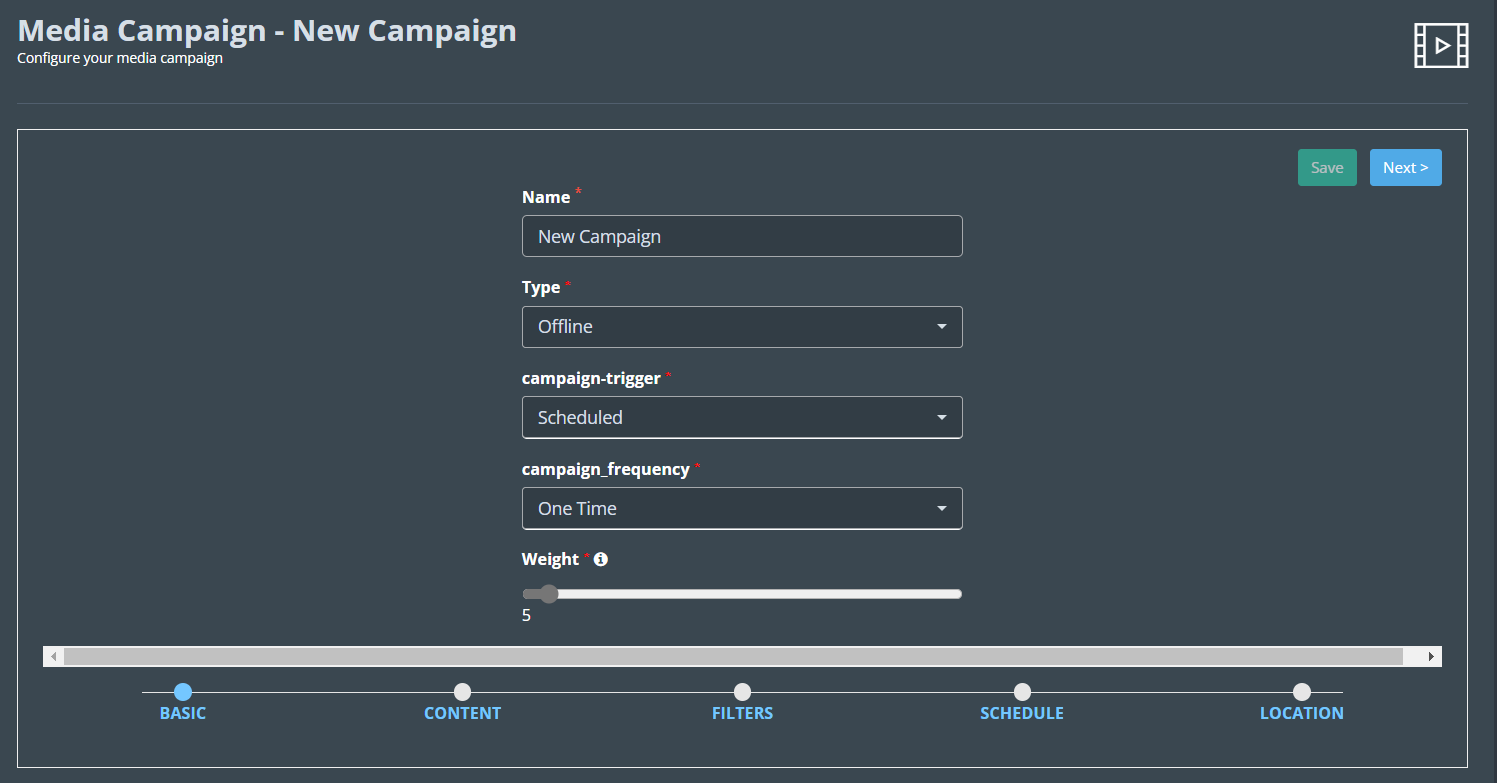
1. Add a media name and select type, two types of media campaign options are provided which are online and offline.
2. Online campaign is referred to as the Kloud portal, and it runs only when the user is connected.
3. Offline type campaign runs after the user is logged in and got out of
network, so it is scheduled
4. Trigger condition and Campaign frequency can be selected depending upon
the user’s choice to run a campaign.
5. Select a weight to prioritize the run time of the campaign.
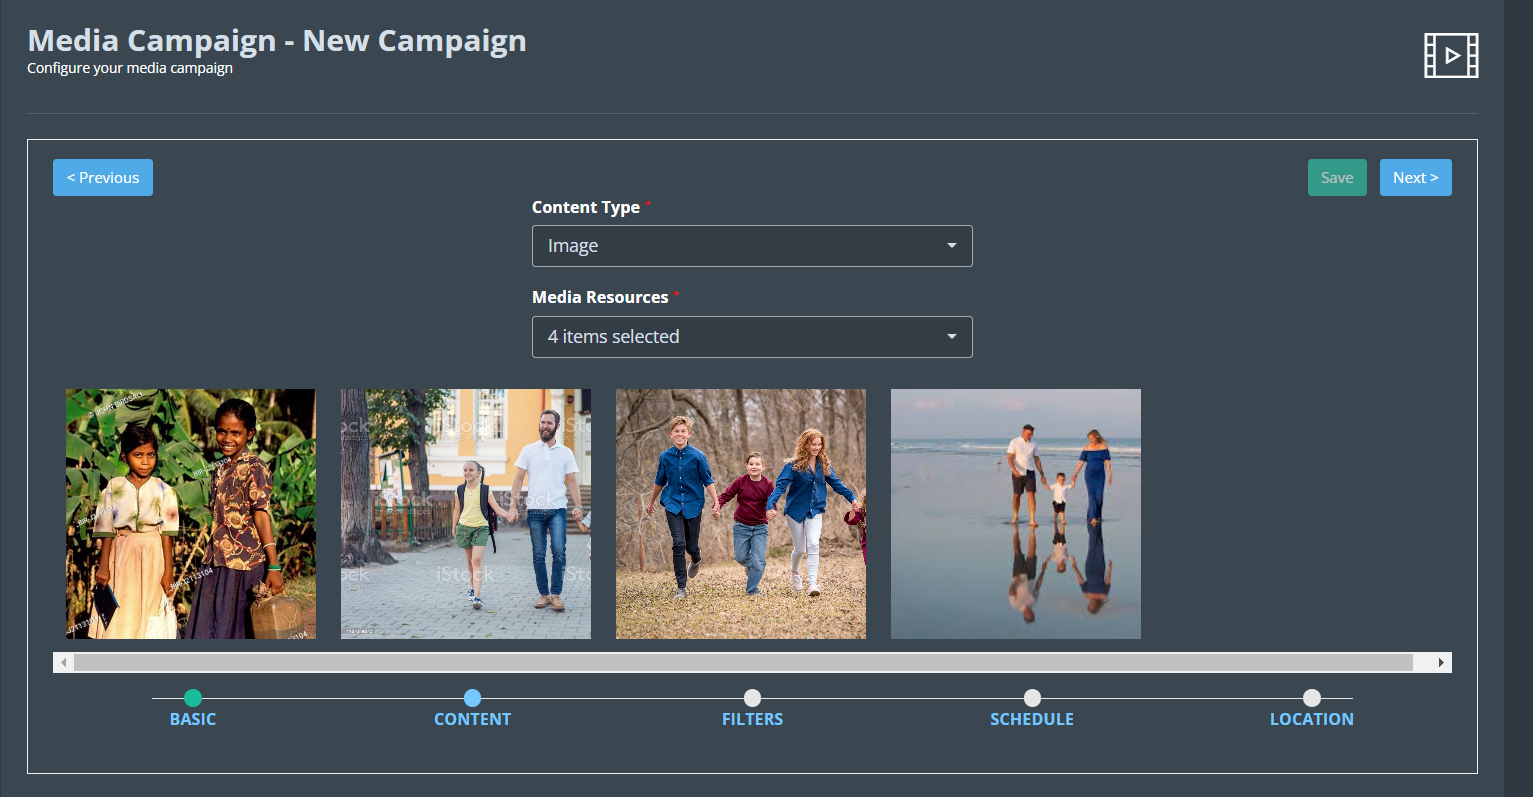
Content
1. Select Content Type and media Resources then click the Next button.
2. Content Type: it will only have static content images, slideshows, and
videos.
Filter
1. Filters to run a campaign based on some attributes such as tags.
2. Enabled access points with some tags, so that campaign run on users who are connected to those ap’s and devices.
3. User can add more demographic options to run campaigns for specific users such as gender, age group, browser, devices, OS.
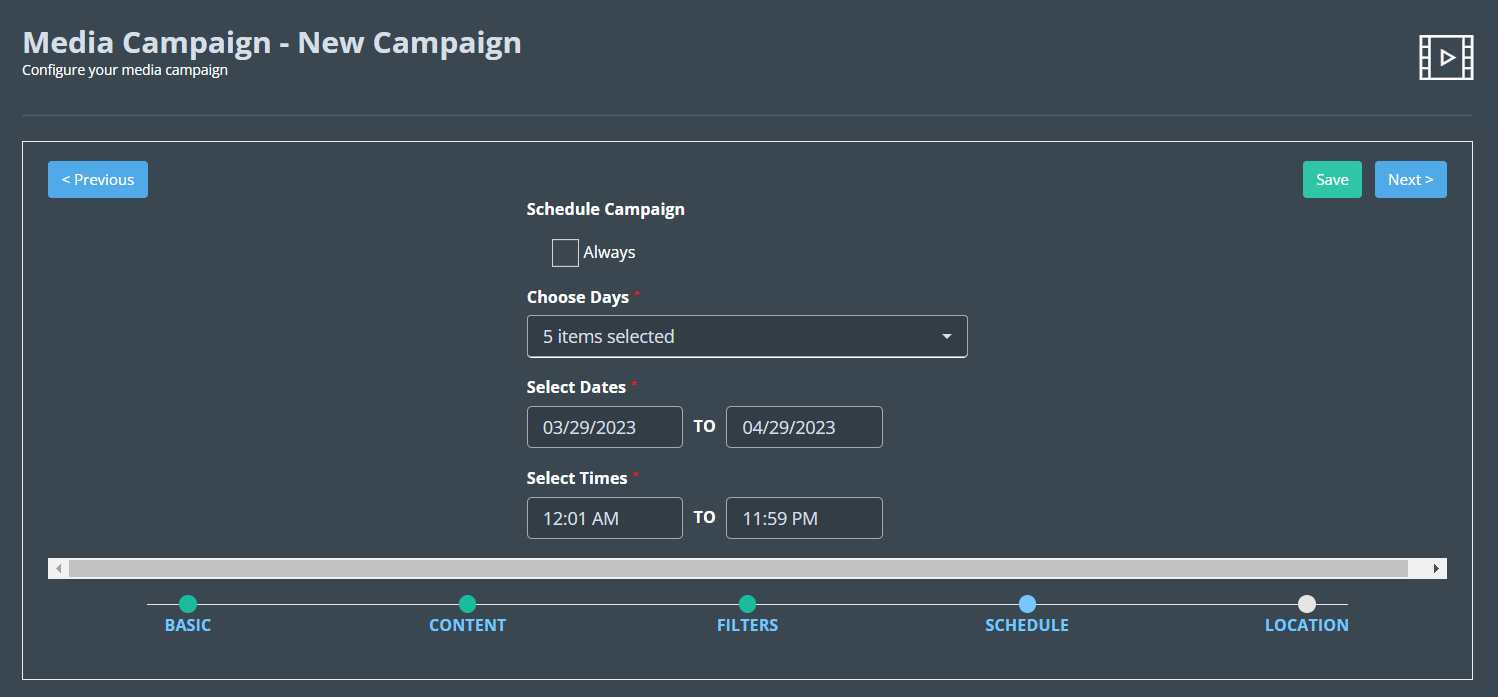
Schedule Campaign
1. Users can schedule a campaign by selecting the day and time to run a campaign and can also opt for the always option.
2. The campaign will be different depending on when the user logs in
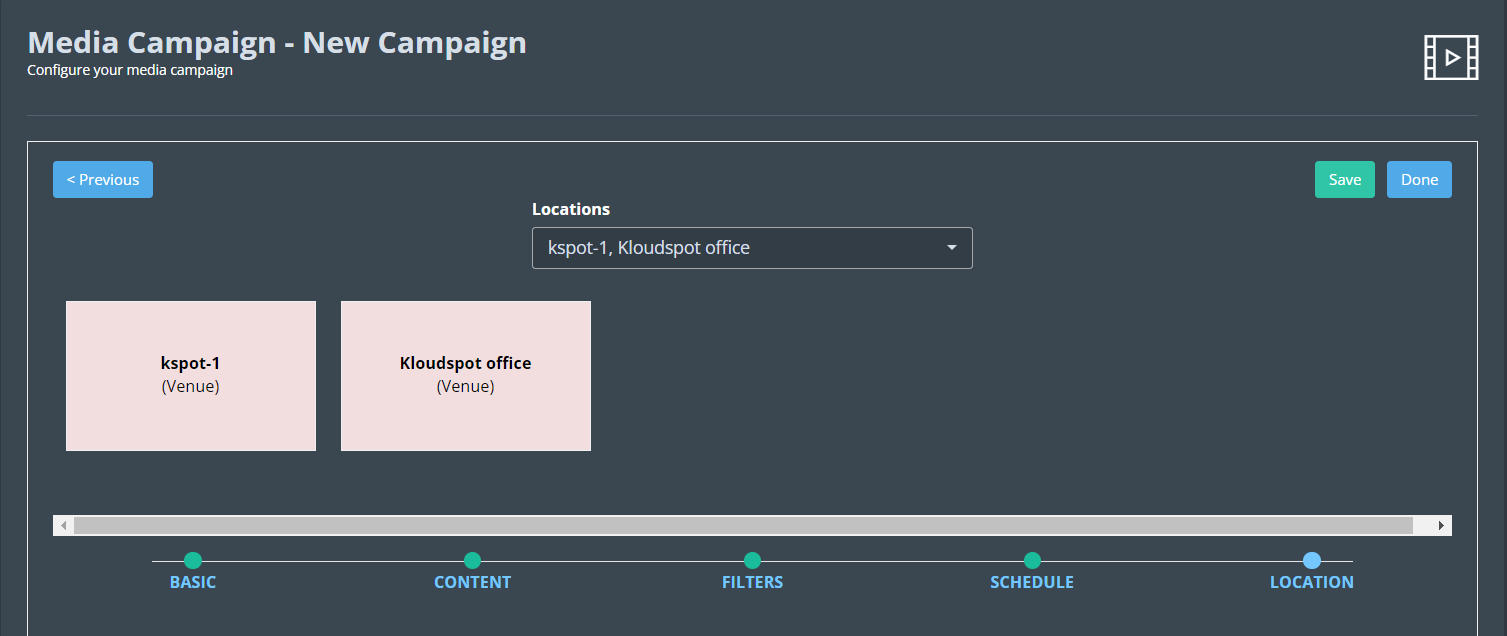
Location
1. Campaigns will run on a selected location; the user can also select the zone and the particular devices for a campaign to run.
2. Click the Save button to save the campaign.
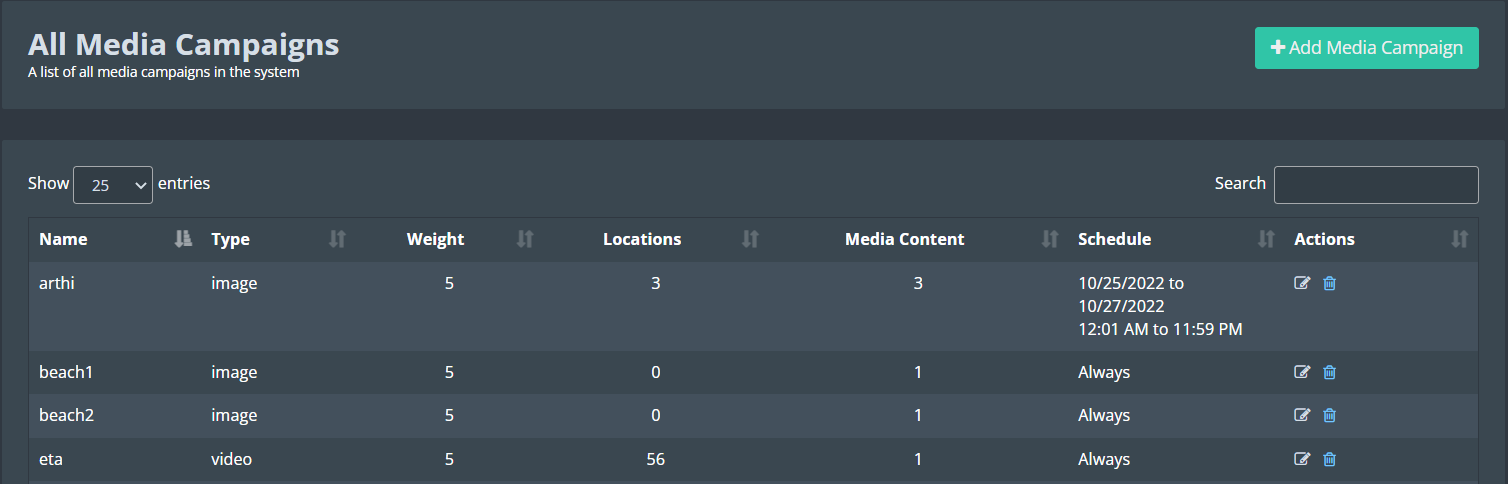
3. Once the campaign is created, it will be shown in the campaign list.
Edit icon: Allows to edit the campaign.
Delete icon: allows to delete the added campaign.
Captive Portal Usage report
You can access a variety of tools to analyze your portal’s usage. In this section, we’ll show you how to create an SMS count report as an example. You can use a similar process to generate other useful reports. Let’s get started and explore the valuable insights available in your Captive Portal Usage Reports.
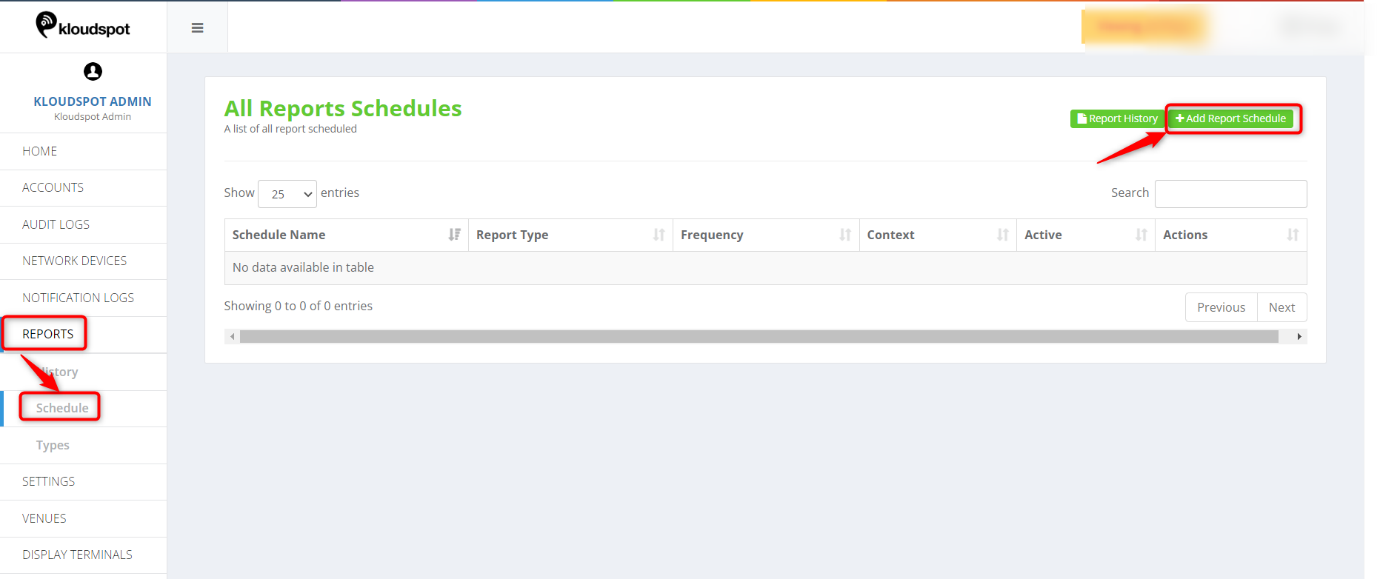
Schedule SMS count report
1. Log in to your KloudManage account. Then navigate to Report > Schedule > +Add Report Schedule.
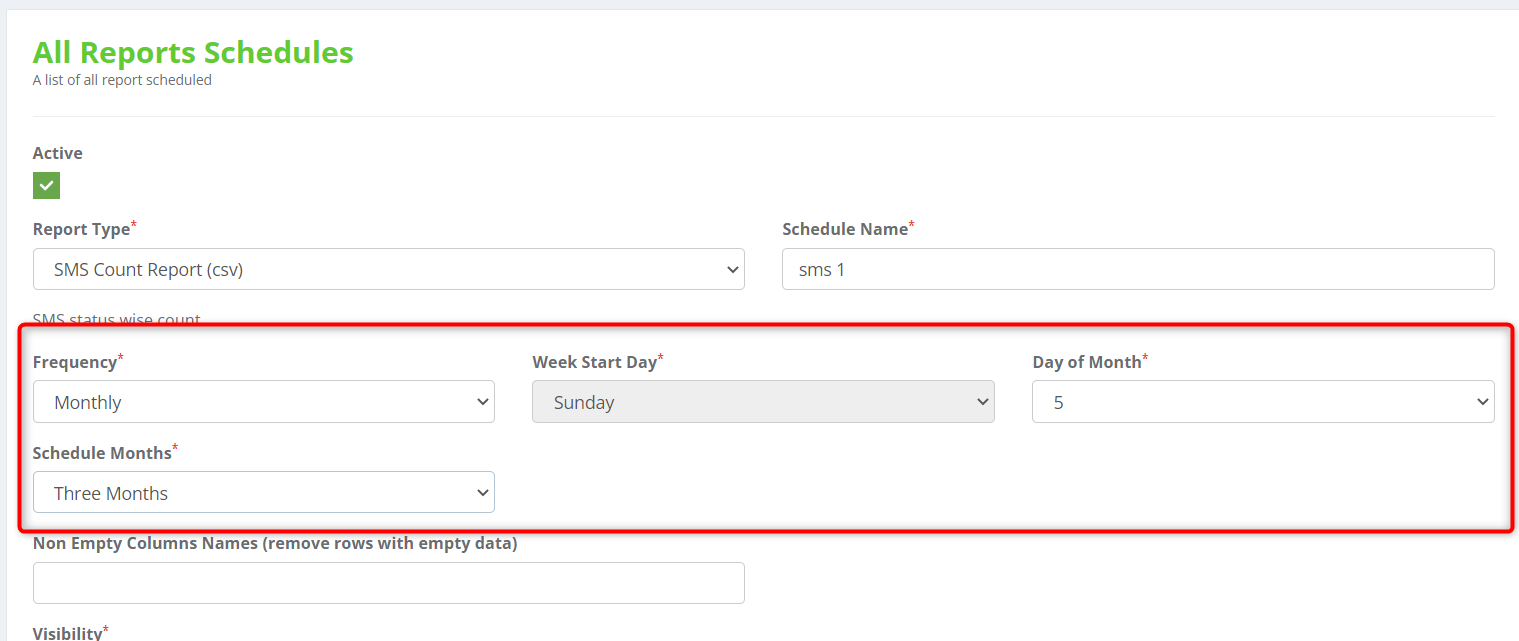
2. In the window that opens, enable the Active checkbox. It helps to
activate and deactivate the report.
3. Select the SMS count report (CSV) from the Report Type dropdown
list.
4. In the Schedule Name text box, give your report a name.
5. Then, choose SMS Frequency. There are three frequency options available.
Daily, weekly, and monthly.
6. The report for that period will be generated based on the frequency you
specify. For example, if you choose the daily frequency, you will receive a
daily report of SMS sent.
7. Then select the period for which this report should be generated from the
dropdown list.
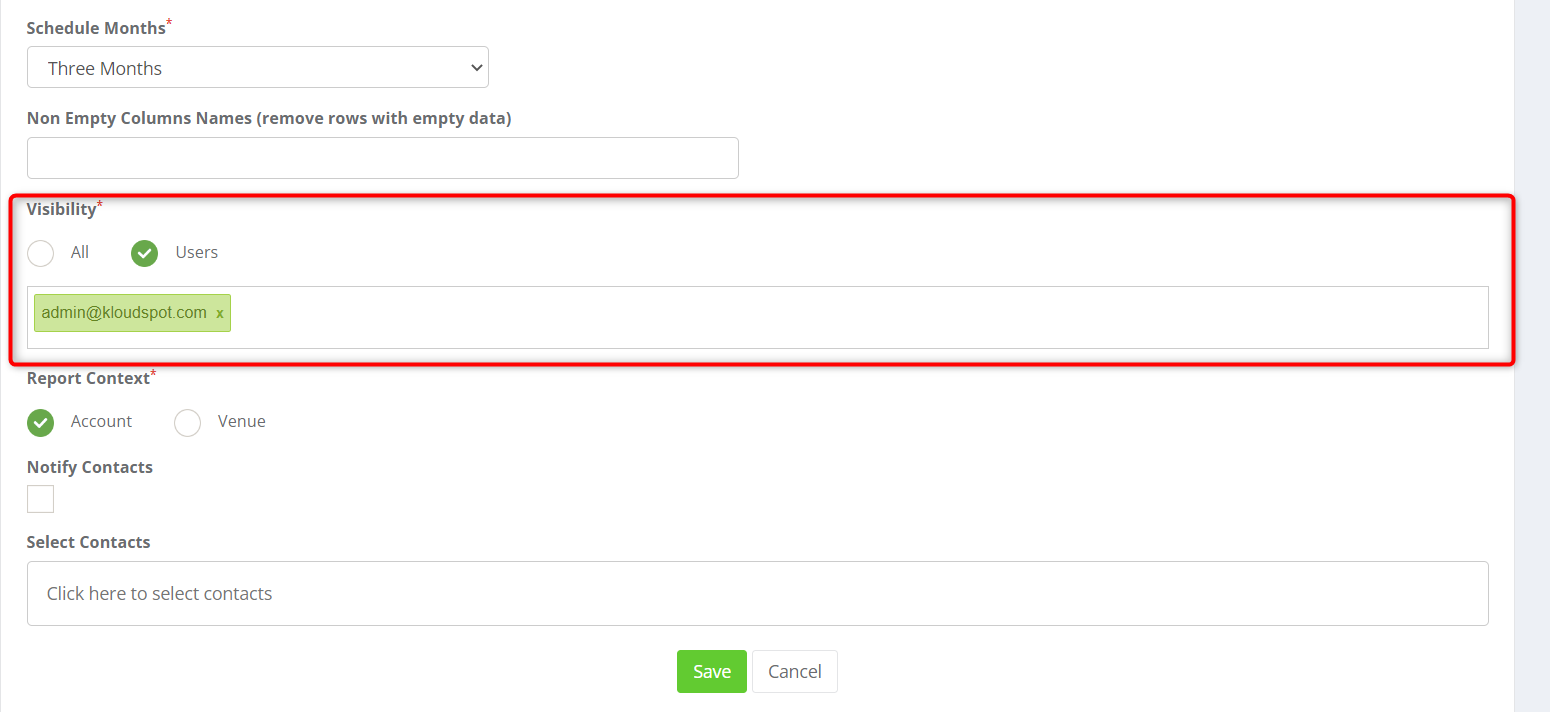
8. Report visibility can be customized. Check All check box if you
want this report to be visible to everyone. If the report is only visible to a
small number of people, users can be added by checking the Users check
box.
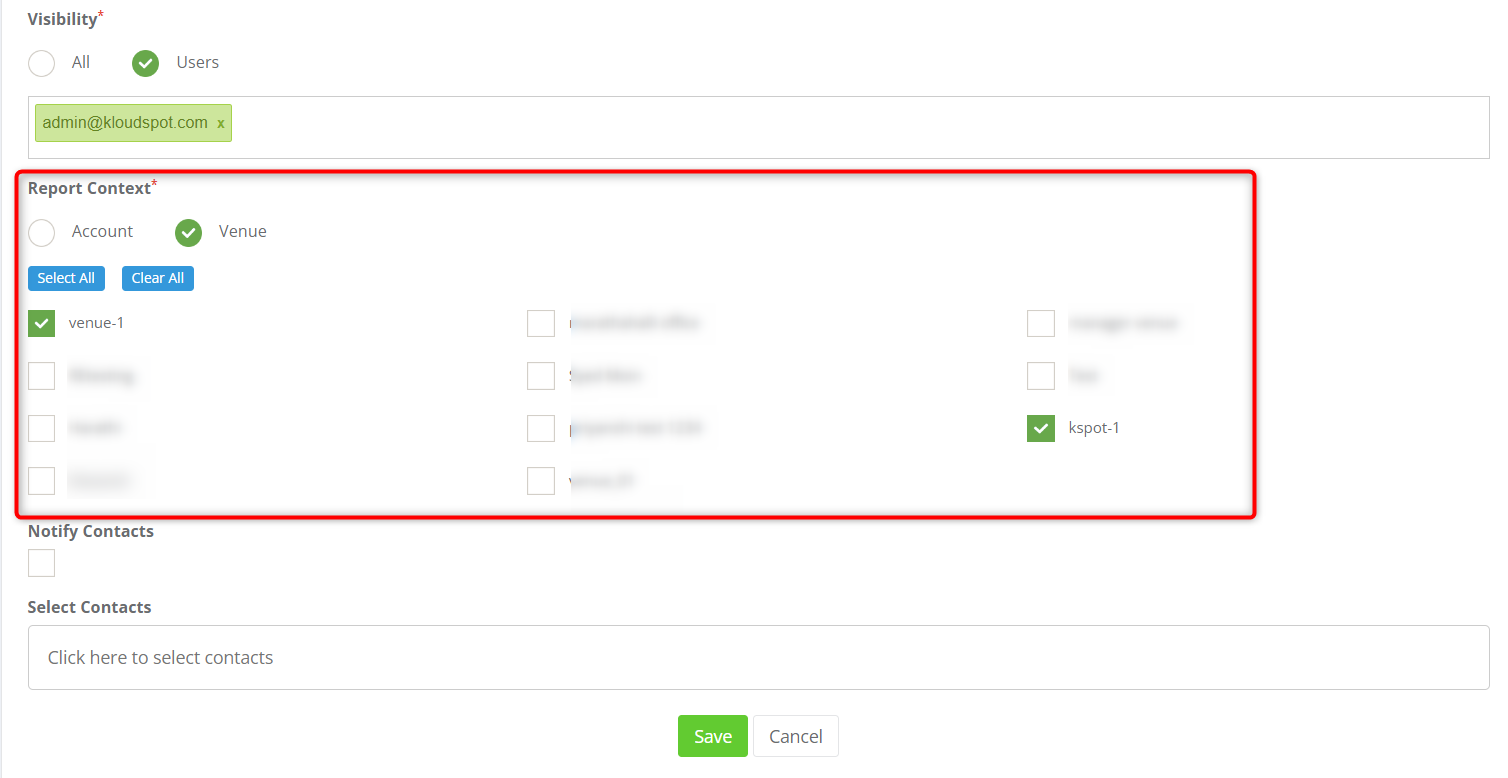
9. Then, choose the report context. Check the Account checkbox if you
want the report at the account level. If you want a report on a specific
venue, check the Venue check box and choose the desired location.
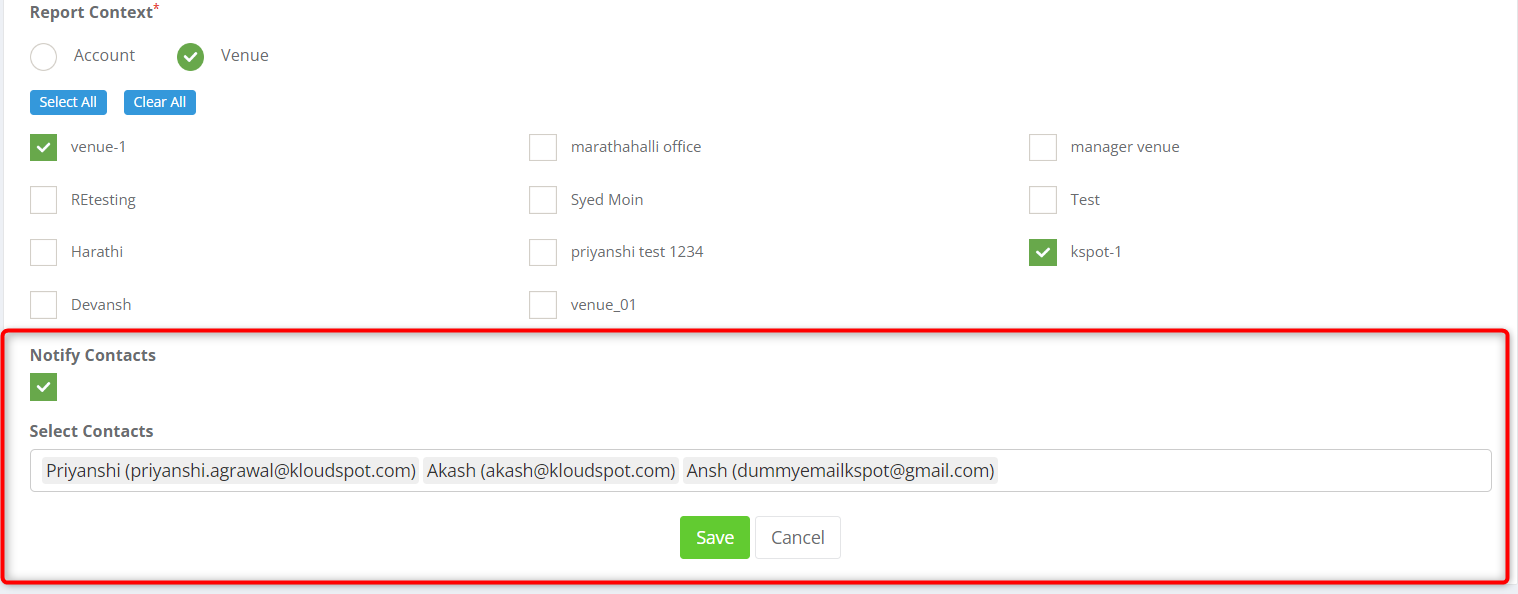
10. Then enable notify contact and select contacts from the dropdown list.
Info
Contacts will be shown in the list only if they are present in the system.
To add a contact, navigate to Settings > Contacts > +Add contact.
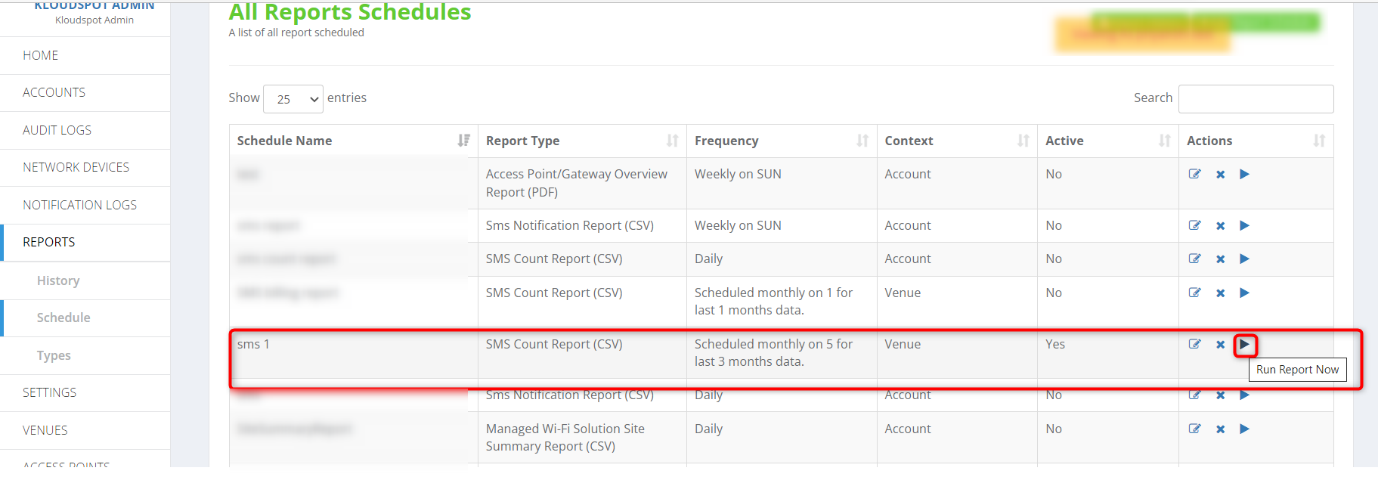
13. If you want to generate your report immediately, click the Run
button.
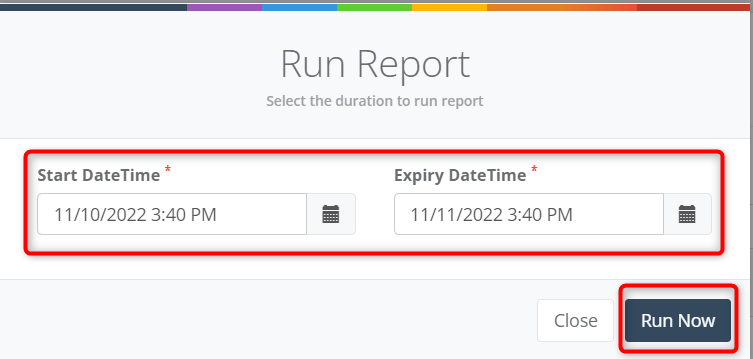
14. Select the start and expiry dates in the popup window that appears, then
click the Run Now button. The report will be generated immediately.
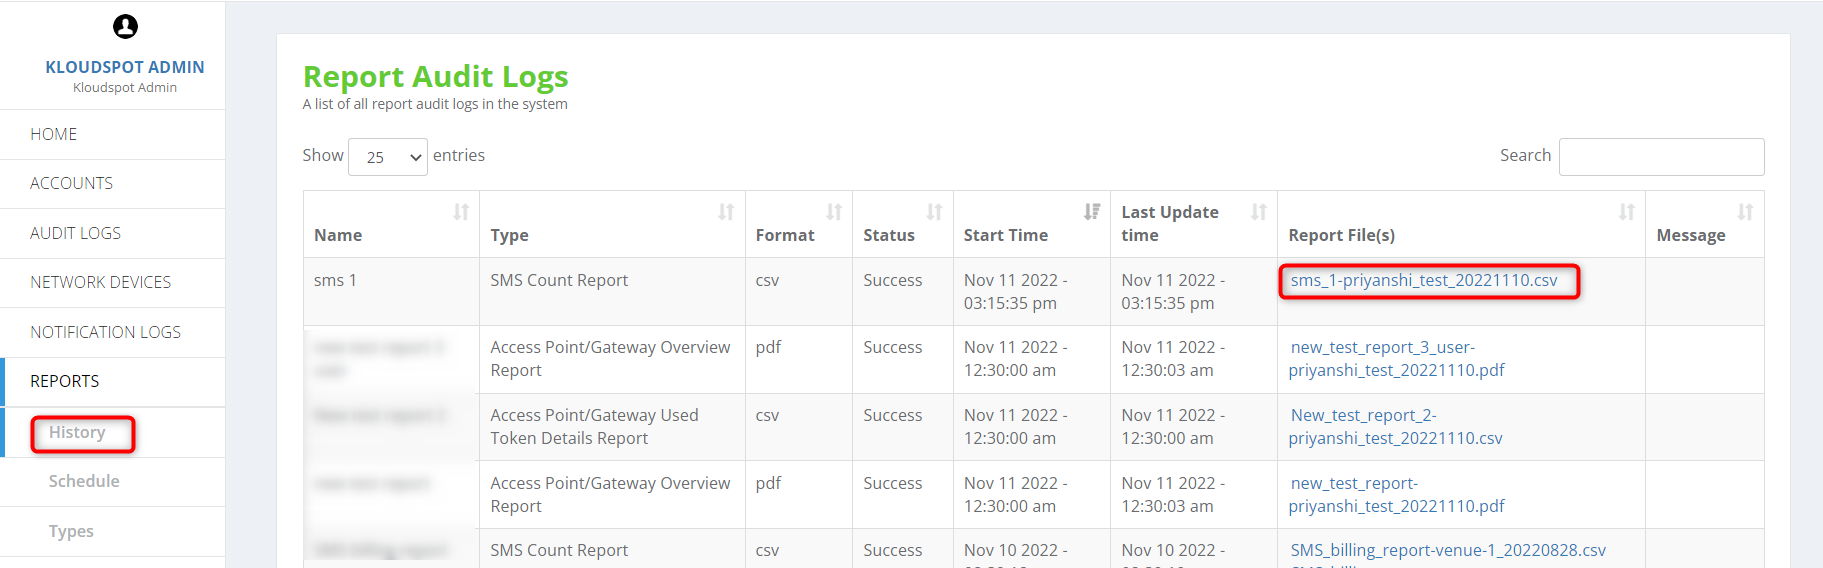
15. To view the generated report, go to the History menu. Then, click on
the report, The CSV file of the report will download immediately.
Multilingual Support
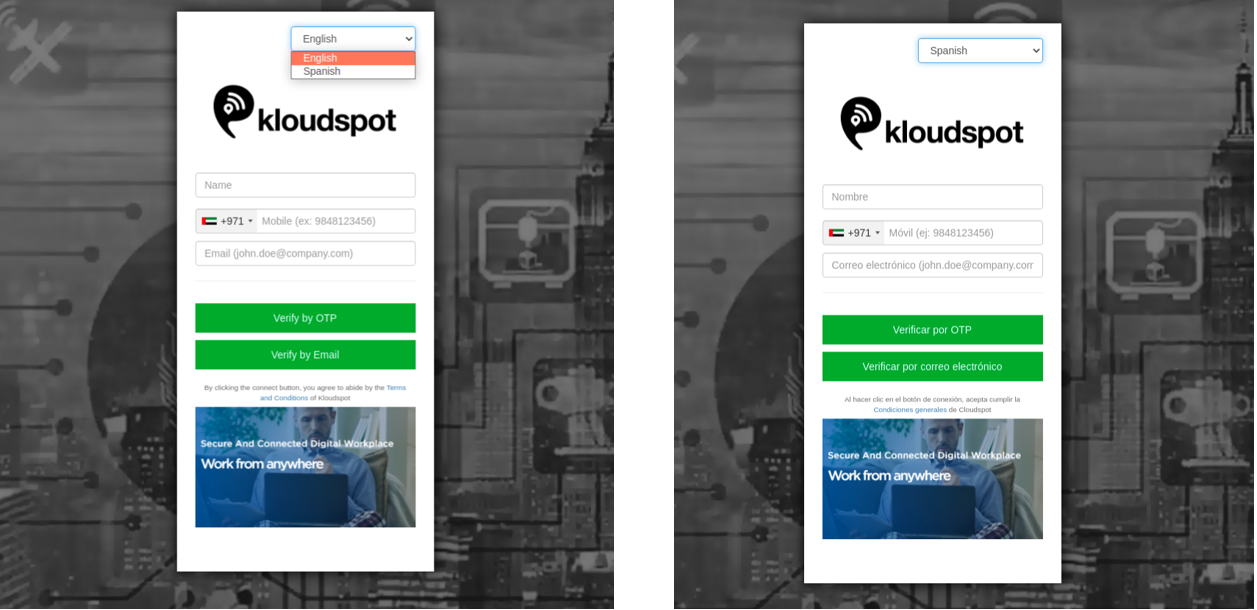
Multilanguage support in captive portals allows users to select their
preferred language from the dropdown menu. Once a language is selected, the
captive portal login page is displayed in that language.
Create a guest portal with the Siara template.
1. Login into the NMS portal.
2. From the left side panel, go to Captive Portals - > Guest Portals.
3. Click on create new to create a new portal. Give a name to the portal
and click on Create.
4. The majority of hardware also supports Multiple Language. You can select the Multiple Language support option from the Features dropdown list and find the hardware it supports and the templates it contains.
5. Configure the template as required and save the template. To learn more about template customization, refer to the Customizing Captive Portal Templates section.
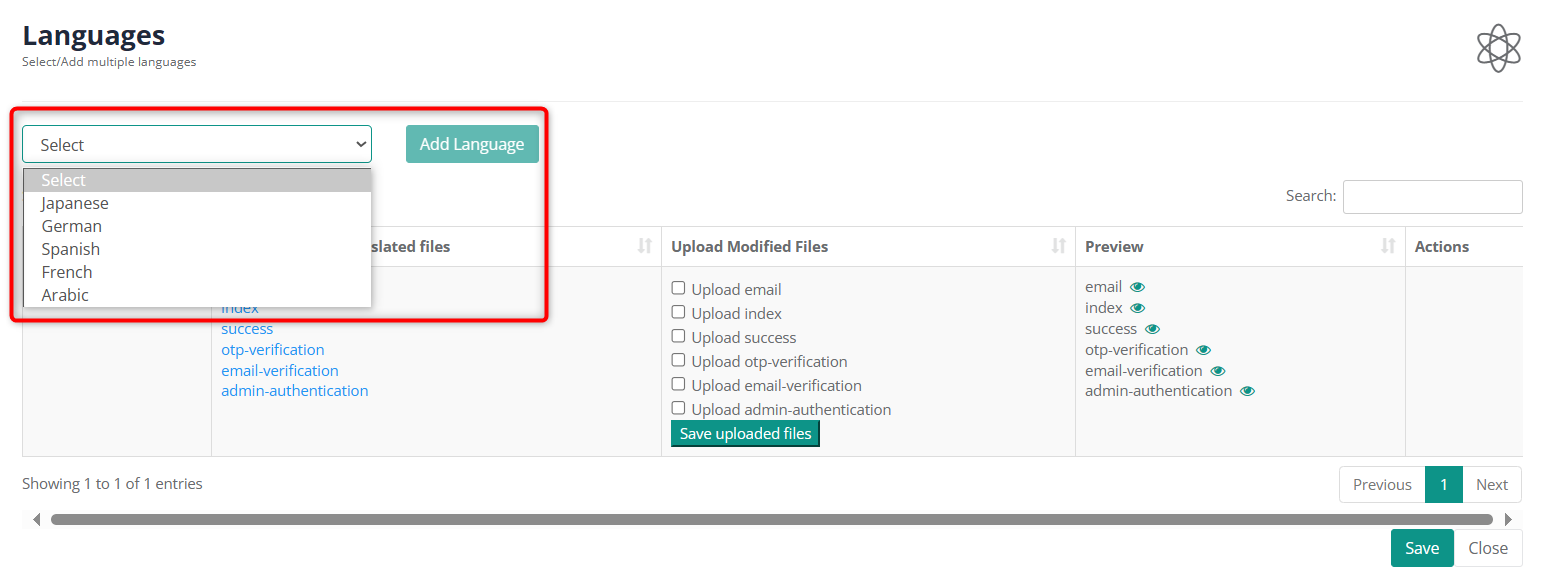
Add the desired languages.
1. After the successful creation of the templates, click on + icon (Add Languages) as shown below.
2. Choose the required language from the dropdown and click on Add Language button.
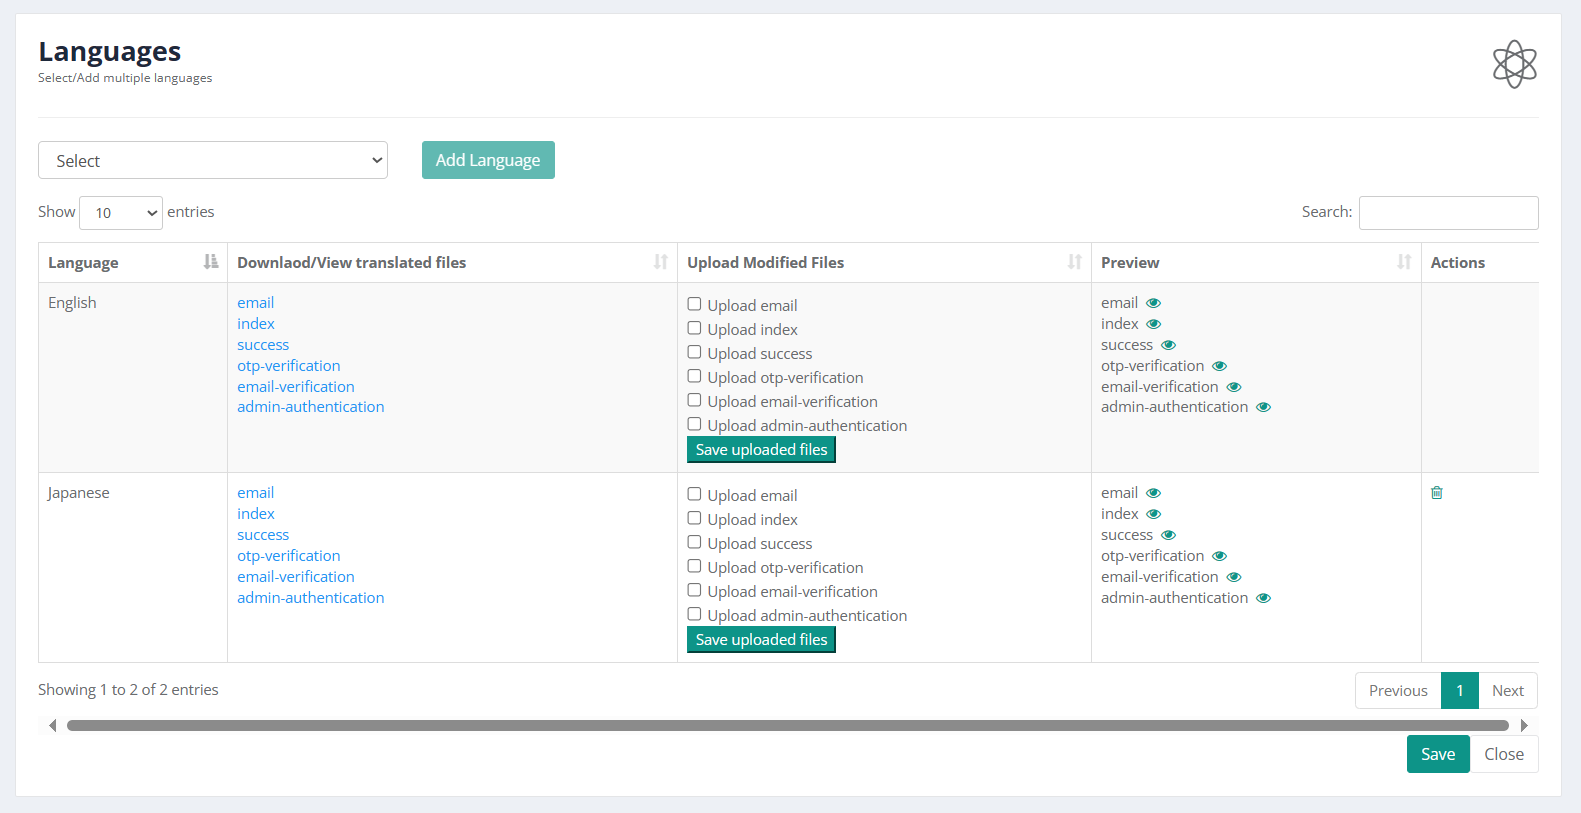
3. After the Language is translated and added, click on the Save button
below as shown.
4. After saving, click on Publish icon and now the published portal will
have selected languages.
5. The sample page may look like this. Please make sure, every time when the
page is edited, the whole process of language addition needs to be followed.
6. If necessary, the user can download and view the translated files for each
HTML page by clicking the links provided in the 2nd column with the title
download/view translated files.
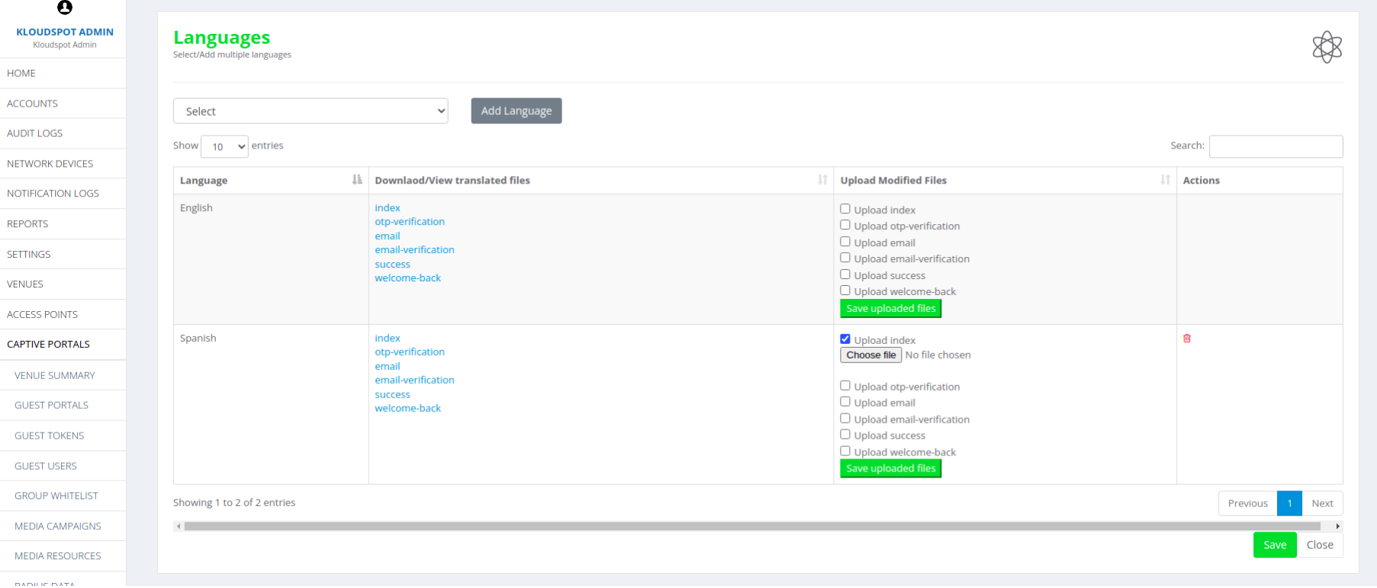
7. In any case if the user wishes to change the translation text which is
different from the translation provided. Follow the steps below.
Download the file to which the translations need to be modified (Downloading a file can be done as mentioned in the 6th point)
Search the existing translation in that file that needs to be changed.
Replace with the required text and save it.
Now click on the checkbox next to the page for which the modified file needs to be uploaded.
Click on choose file.
Upload the modified file.
Click on the save modified file button.
Click on save at the bottom of the page to go back to the portals.
Publish it.
Hardware and Templates
This document aims to provide an in-depth understanding of the hardware options offered by KloudPortal, the diverse range of templates available within each hardware, and the extensive array of authentication types and features that these solutions encompass.
KloudPortal’s commitment to excellence is reflected in its innovative hardware offerings, catering to various organizational needs and industry requirements. From the hardware selection process to the implementation stage, this document serves as an essential resource for network administrators, IT professionals, and decision-makers seeking to make informed choices about the ideal KloudPortal solution for their specific contexts.
The regional IP will be provided depending on the
region of the deployment.
Troubleshooting Guide
1. Captive Portal is Not Showing Up – Here’s Why and How to Fix it
Go to Gateway Devices.
Click on the name of your device.
On the left side menu bar, click Realtime Info.
2. MAC address showing in DHCP Lease, but Captive Portal not showing?
Click ‘Captive Portal Devices’ and check if users’ device MAC available here.
If the user’s MAC address is present here, then it should show the Splash Page.
3. MAC address showing under ‘Captive Portal Devices’ but still Splash Page
not visible?
Go to Gateway Devices -> Configurations (Network Groups in case of Access Points).
Select your Gateway Configuration (Network Groups in case of Access Points).
Click on LAN Profile (Network Profile in case of Access Points).
Verify the ‘Guest Template’ entered there. If it’s a template URL, verify if the URL is correct.
4. Splash Page still not showing or splash page not redirecting to facebook
or twitter, instead it’s just reloading?
Note: The network device configurations vary between devices. Some configurations include only a White IP list, while others feature both a White IP list and a White Domain list.
Go to Gateway Devices -> Configurations (Network Groups in case of Access Points).
Select your Gateway Configuration (Network Groups in case of Access Points).
Click on LAN Profile (Network Profile in case of Access Points).
Verify ‘White Domain List’. Check if URLs are entered correctly.
5. After successful Authentication, if you click on ‘Click Here To Continue’
the same success page reloads.
Go to Gateway Devices -> Configurations.
Select your Gateway Configuration (Network Groups in case of Access Points).
Click ‘Assigned Gateways’.
Click ‘Sync All Gws’ button -> Captive Portal. It will sync the device with the captive portal and then it should connect.
6. Gateway Device is synced with the Captive Portal but still after
successful Authentication, if you click on ‘Click Here To Continue’ the same
success page reloads?
Go to Gateway Devices.
Click on the name of your device.
From the menu, click Realtime Info.
Click Captive Portal Active Devices.
If you get the users’ MAC address here, that means the Authentication is successful and it should get access to the internet.
7. How to troubleshoot if authentication fails?
Go to Gateway Devices -> Configurations (Network Groups in case of Access Points).
Select your Gateway Configuration (Network Groups in case of Access Points).
Click on LAN Profile (Network Profile in case of Access Points).
Verify ‘Guest Template’ and ‘White Domain List’. Check if URLs are entered correctly.
If this is correct, Click ‘Assigned Gateways’.
Click the ‘Sync All Gws’ button -> Captive Portal. It will sync the device with the captive portal and then it should connect.
If it still fails, click Captive Portals -> Radius Data.
From the ‘Device Type’ drop-down, select ‘Radius Account Mapping’.
Search for your Gateway Device MAC address.
If the Gateway Device MAC address is present, then your Gateway Device is Authenticated with the Radius Server.
Now, select ‘Radius User Authentication’ from the ‘Device Type’ drop-down.
Search for users’ MAC address. If present, then the user is Authenticated.
8. If the user is Authenticated, but the internet not working
If it still fails, click Captive Portals -> Radius Data.
From the ‘Device Type’ drop-down, select ‘Radius User Attributes’.
Search for your users’ MAC address.
This page will tell if internet is not working due to ‘Session-Timeout’
If it still doesn’t help, select ‘Radius Post Authentication Logs’ from the ‘Device Type’ drop-down.
This page will display the result after Radius Authentication. It will display whether the authentication is Accepted or Rejected.
Select ‘Kloudspot Radius Authentication’ from the ‘Device Type’ drop-down.
Search Users’ Mac address.
It will display the information regarding Authentication Start-time, Expiry- Time, First seen, and Last Seen.
9. Where to get User History?
Click on Gateway Devices (or Access Points) -> User Search.
Search User with User’s MAC Address.
It will provide all history of the user.
User Activity: when users connect to AP or Gateway Device.
Login: When the user login successfully. You can invalidate the user here. Access Expired: Internet access has expired or the user is invalidated.
Here, you will see the list of all the connected devices.
Check if the users’ MAC address of the device is showing or not. If the users’ MAC address is available, then the device is connected, else the device is not connected.
Kloud Portal FAQs
What is a Kloud portal?
A Kloud portal is a web page that appears when you connect to a public Wi-Fi network. It requires user interaction, such as accepting terms and conditions or providing login credentials, before granting access to the internet.
Why do I see a Kloud portal page?
You see a Kloud portal page to authenticate and authorize your usage of a public Wi-Fi network. It ensures that you comply with the network’s terms of use before accessing the internet.
How do I access the internet through a Kloud portal?
To access the internet through a Kloud portal, connect to the Wi-Fi network, and open a web browser. The Kloud portal page should automatically appear. Follow the instructions on the page to gain internet access.
What information is typically required to log in on a Kloud portal?
Commonly, the Kloud portal may require you to provide your name, email address, or password. Sometimes, you might need to accept the terms of service or enter an access code.
Is using a Kloud portal network secure?
Using KloudPortal is 100% safe and secure.
Why doesn’t the Kloud portal page load automatically?
There could be various reasons for this issue. Check if you are connected to the correct Wi-Fi network, try opening a non-HTTPS website to trigger the portal, or clear your browser cache and cookies.
What if I’m unable to access the Kloud portal page?
If you’re unable to access the Kloud portal page, try restarting your device, forgetting the Wi-Fi network and reconnecting, or contacting the network administrator for assistance.
Can I use a VPN with a Kloud portal?
While utilizing a VPN is possible, access to the internet will only be granted once you’ve successfully authenticated through the captive portal.
How long does my internet access last through a Kloud portal?
The duration of your internet access through a Kloud portal varies based on the network’s policies. Some networks offer free access for a limited time, while others require you to renew or extend your session periodically.
Do I need to go through the Kloud portal every time I connect?
It depends on the network’s settings. Some Kloud portals may remember your device for a certain period, allowing you to bypass the portal on subsequent connections within that timeframe.
Can I use my social media account to log in to a Kloud portal?
Absolutely, you have the capability! We provide the option to log in using a variety of social media channels, including Facebook, Twitter, Instagram, Microsoft, Azure, Google Workspace, and LinkedIn.
What if I encounter technical issues with the Kloud portal?
If you experience technical issues, such as page errors or connectivity problems, try refreshing the page, clearing your browser cache, or restarting your device. If the problem persists, seek assistance from the network administrator or customer support.
Can I access local resources like printers or shared drives through a Kloud portal?
For the devices like printers which can’t go through the splash page login process, we can whitelist the MAC addresses of those devices. So those devices will be using the internet without going through the login process.
Is my personal information safe on a Kloud portal?
Yes, your personal information is safe on a Kloud portal and will not be visible to anyone.
Can I use a Kloud portal on my mobile device?
Yes, Kloud portals are accessible on mobile devices. Connect to the Wi-Fi network, open a browser, and the Kloud portal page should appear.