KloudManage is a comprehensive management platform within the Kloudspot ecosystem, designed to provide powerful control and configuration capabilities for a wide range of intelligent edge devices. This platform empowers users to efficiently oversee and optimize their network infrastructure, ensuring seamless operation and delivering a superior user experience.
Key Features:
Device Management:
KloudManage offers centralized control over various intelligent edge devices, including KloudDisplays, KloudVision, KloudPortal, KloudGateway, KloudSensors, and Access Points. This enables users to efficiently configure, monitor, and manage their entire device fleet from a unified interface.
Configuration and Control:
The platform facilitates essential configuration and control functionalities, including guest portal web pages and advertising control. This ensures a tailored and engaging experience for end-users while maintaining control over promotional content.
Multi-Tenant Support:
KloudManage introduces a hierarchical multi-tenant structure, that provides distinct account types:
Distributors: Empowered to create and manage customers and resellers.
Resellers: Capable of creating and managing customers, as well as overseeing their devices.
Customers: Equipped to manage devices specific to their account.
Both resellers and distributors can seamlessly access the portal on behalf of their customers for enhanced support.
Audit Logging:
The platform maintains detailed audit logs, offering records of all activities within the system. This includes device alerts, user interactions, configuration changes, and reports generated. This feature serves as a valuable tool for tracking system activity and ensuring security.
Notification Logs:
KloudManage provides a comprehensive log of all notification messages sent through various channels, including Email, Slack, and SMS. This log offers transparency and traceability for crucial system communications.
Reporting Capabilities:
Users can generate and schedule reports, allowing for both on-demand and automated reporting. Reports can be customized based on selected date ranges, providing valuable insights into system performance and user engagement.
Account Settings:
KloudManage’s Account Settings section empowers users to customize and fine-tune their account details. This includes basic information editing, integration with third-party services, configuration of notification mechanisms, and contact setup for notifications.
Venue Management:
The Venues feature enables users to create and organize physical locations or deployment areas. Devices can be assigned to specific venues, providing a location-based view for efficient management.
Multi-Tenant User Roles:
Depending on their assigned roles, users within the multi-tenant structure have varying levels of access to accounts and resources. This includes administrators, managers, and users, each with distinct privileges and responsibilities.
Find quick answers to common KloudManage queries in this informative FAQ resource.
Subsections of Kloud Manage
Admin Guide
This detailed admin guide will teach you everything you need to know about KloudManage, including how to login, how to add devices, audit log, notification log, and scheduling reports.
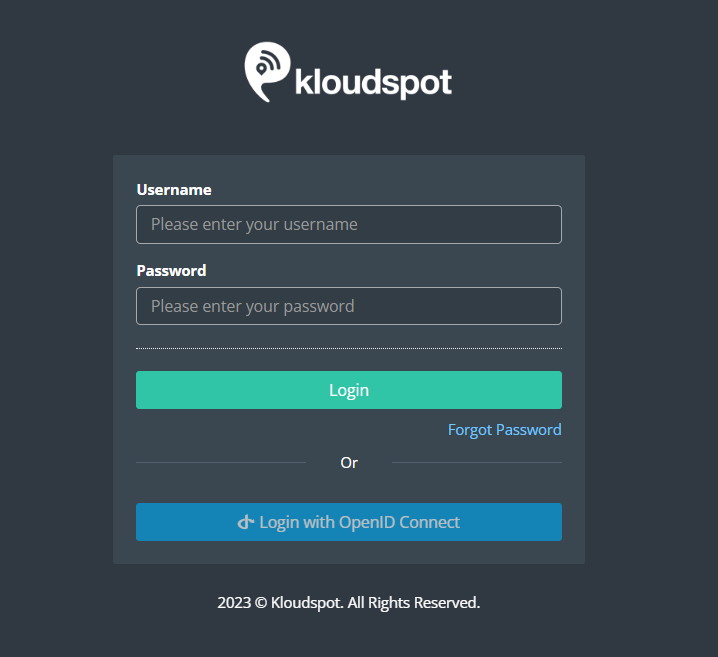
To access KloudManage, you’ll require a URL, username, and password. These details are provided at the time of product purchase. If you’re unsure about this process, refer to the “KloudSpot Product Purchase Options and Provisioning Process” section for a comprehensive guide on how to acquire a KloudSpot product. Then follow the steps outlined below:
Open your web browser.
In the address bar, type the URL provided to you upon purchase, and press Enter. This URL will lead you to the KloudManage login page.
On the login page, you will need to enter your username and password. These credentials should have been provided to you upon purchase. If you haven’t received them or have trouble logging in, please contact Kloudspot support for assistance.
Once you’ve entered your username and password, click the “Log In” button to access the KloudManage dashboard.
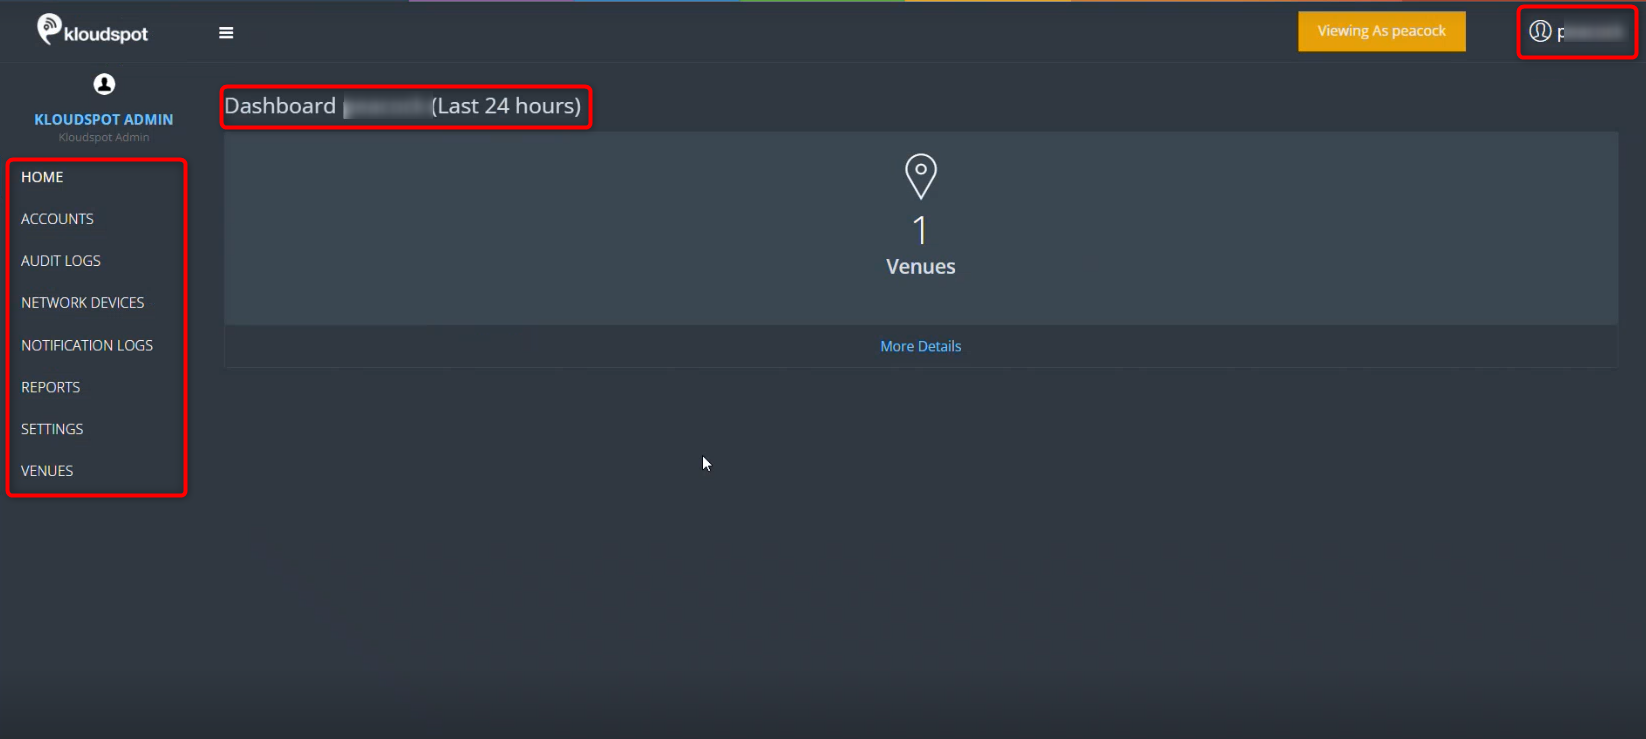
Dashboard Overview
Upon logging in, you will be directed to the KloudManage Home page. Here, you’ll find a menu bar on the left-hand side, providing navigation options.
In the top right corner, you’ll notice a profile button for accessing your account settings. Directly in the center, you’ll find the Dashboards section, which serves as the central hub for monitoring and managing various aspects of KloudManage.
Once you’ve familiarized yourself with the dashboard, head over to the account management section to explore multitenant management.
Account Management
Multi-Tenant Management
The platform provides full-featured multi-tenant support.
It provides three types of accounts:
Distributors can manage and support customers and resellers.
Resellers can manage and support customers.
Customers can manage devices.
Users created for each type can have different levels of access to accounts
and resources.
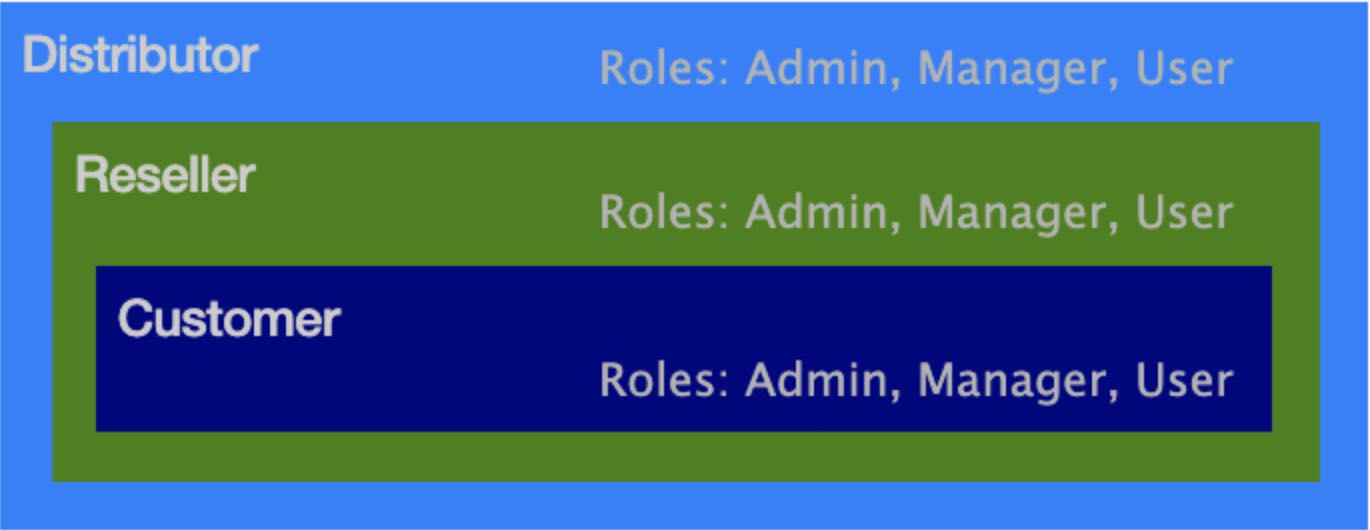
Distributor/Reseller
An Administrator user has full access to all accounts.
A Manager has full access to a subset of accounts.
A User has ‘view’ access to a subset of accounts.
Customer
An Administrator has full access to and control over the devices for the account.
A Manager has full access to and control over the devices for the account.
A User has read-only access to the system.
A distributor or reseller will typically:
Create and manage account users.
Create/Manage partner accounts.
Allocate devices to accounts.
Provide support.
A customer will :
Create and manage account users.
Manage devices.
User Roles and Permissions
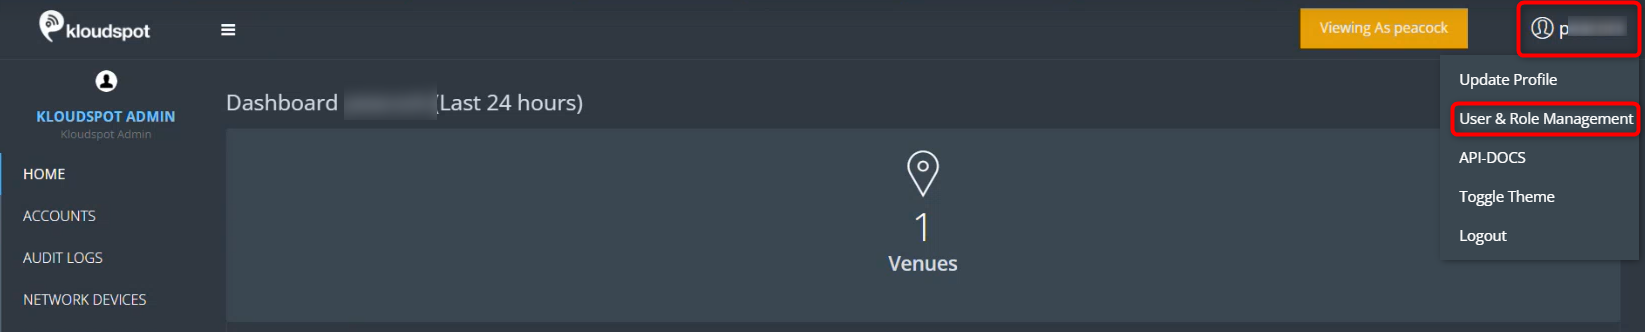
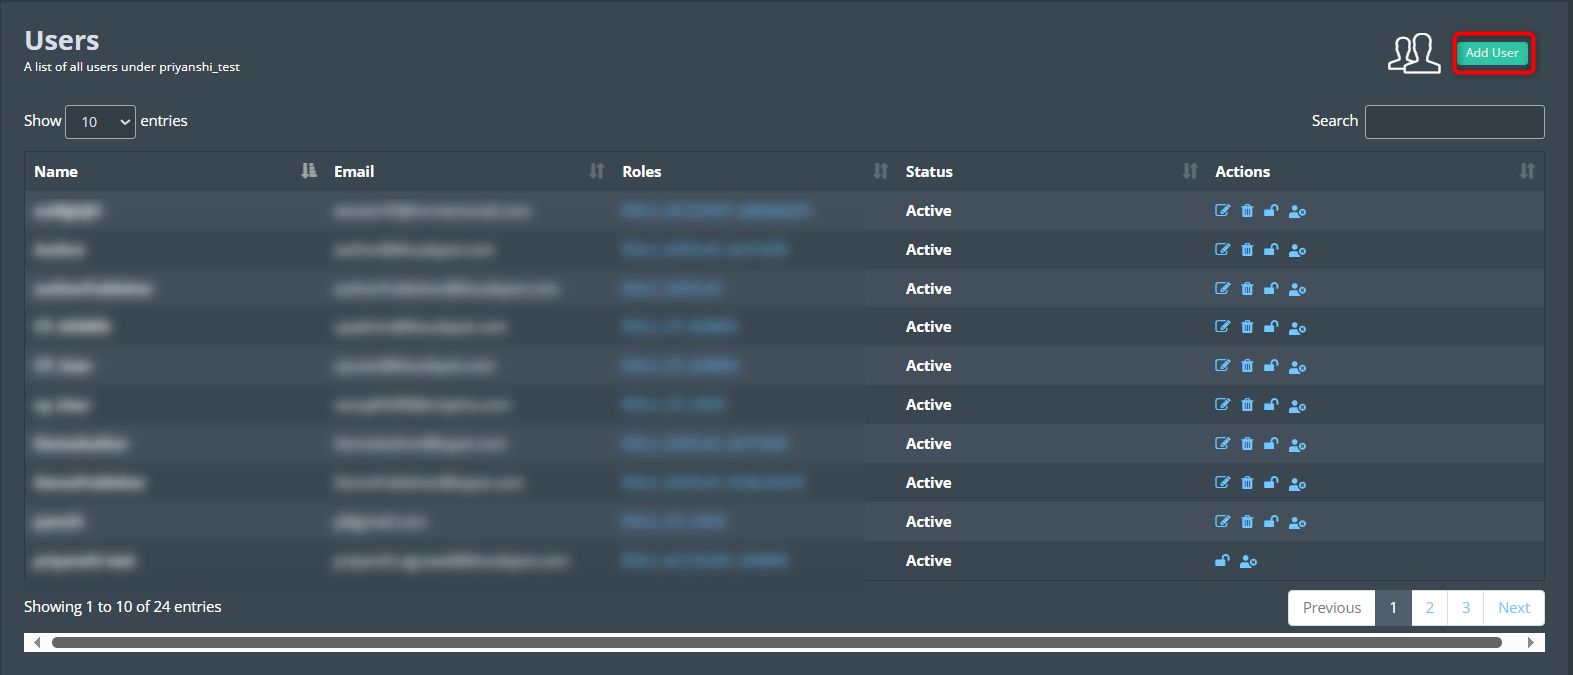
Once logged in, you have the capability to add users and assign specific roles to them, granting them varying levels of responsibility based on their designated role.
To do this, navigate to Profile > User and Role Management.
In the ensuing user window, click on the “Add User” option.
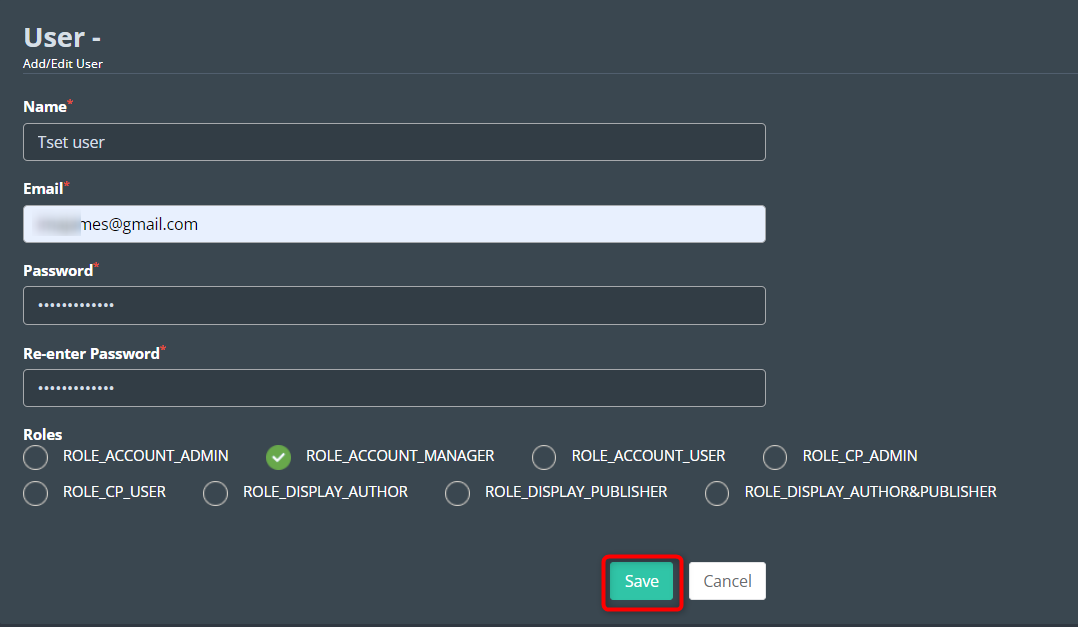
In the subsequent Add/Edit User window, input the user’s name, email, and password, and select a role.
Here are the permissions associated with each role. Familiarize yourself with these options to appropriately select a role for your user:
ROLE_ACCOUNT_ADMIN: Individuals with this role possess both read and write permissions in KloudManage.
ROLE_ACCOUNT_MANAGER: Those with this role have limited write access to KloudManage, but retain full read privileges.
ROLE_ACCOUNT_USER: Holders of this role can read all information in KloudManage, but are unable to make edits.
ROLE_DISPLAY_AUTHOR: This role grants access to and editing capabilities for display terminals.
ROLE_DISPLAY_PUBLISHER: People with this role have the authority to approve changes made by authors.
ROLE_DISPLAY_AUTHOR&PUBLISHER: This dual role empowers you to perform the duties of both an author and publisher.
ROLE_CP_ADMIN: Individuals with this role possess comprehensive read and write permissions related to the captive portal.
ROLE_CP_USER: Those with this role have the authority to read and perform all tasks related to the captive portal, but lack editing privileges.
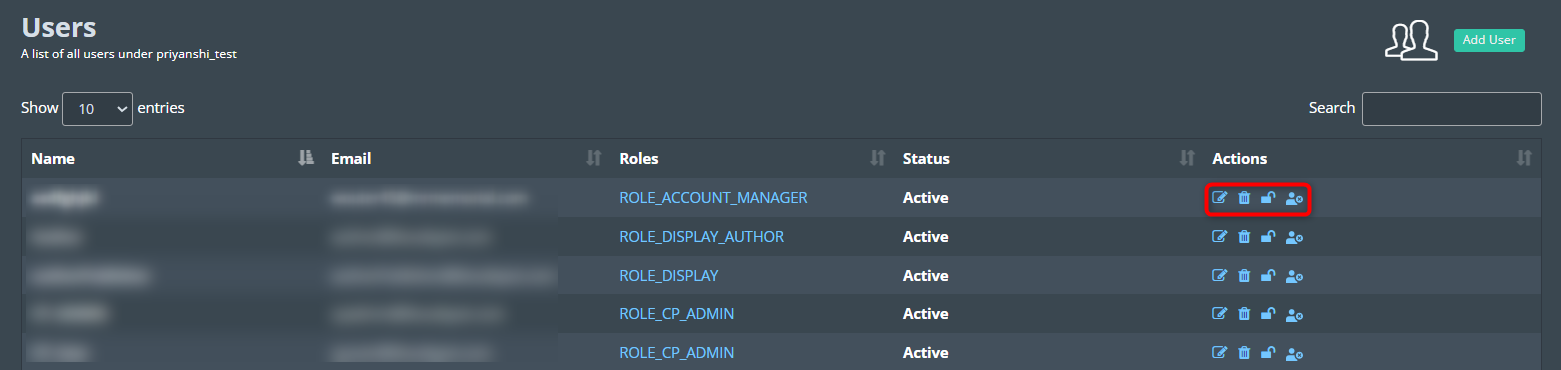
Modify, remove, reset password, and enable or disable a user account. Utilize the icons located in the action column to execute these operations.
Once a user is added, you can proceed to add your office venue. For further guidance, please refer to the Venue section.
Create Partner Accounts
The accounts screen (only available to distributors and resellers) lists the
accounts to which the currently active user has been active.
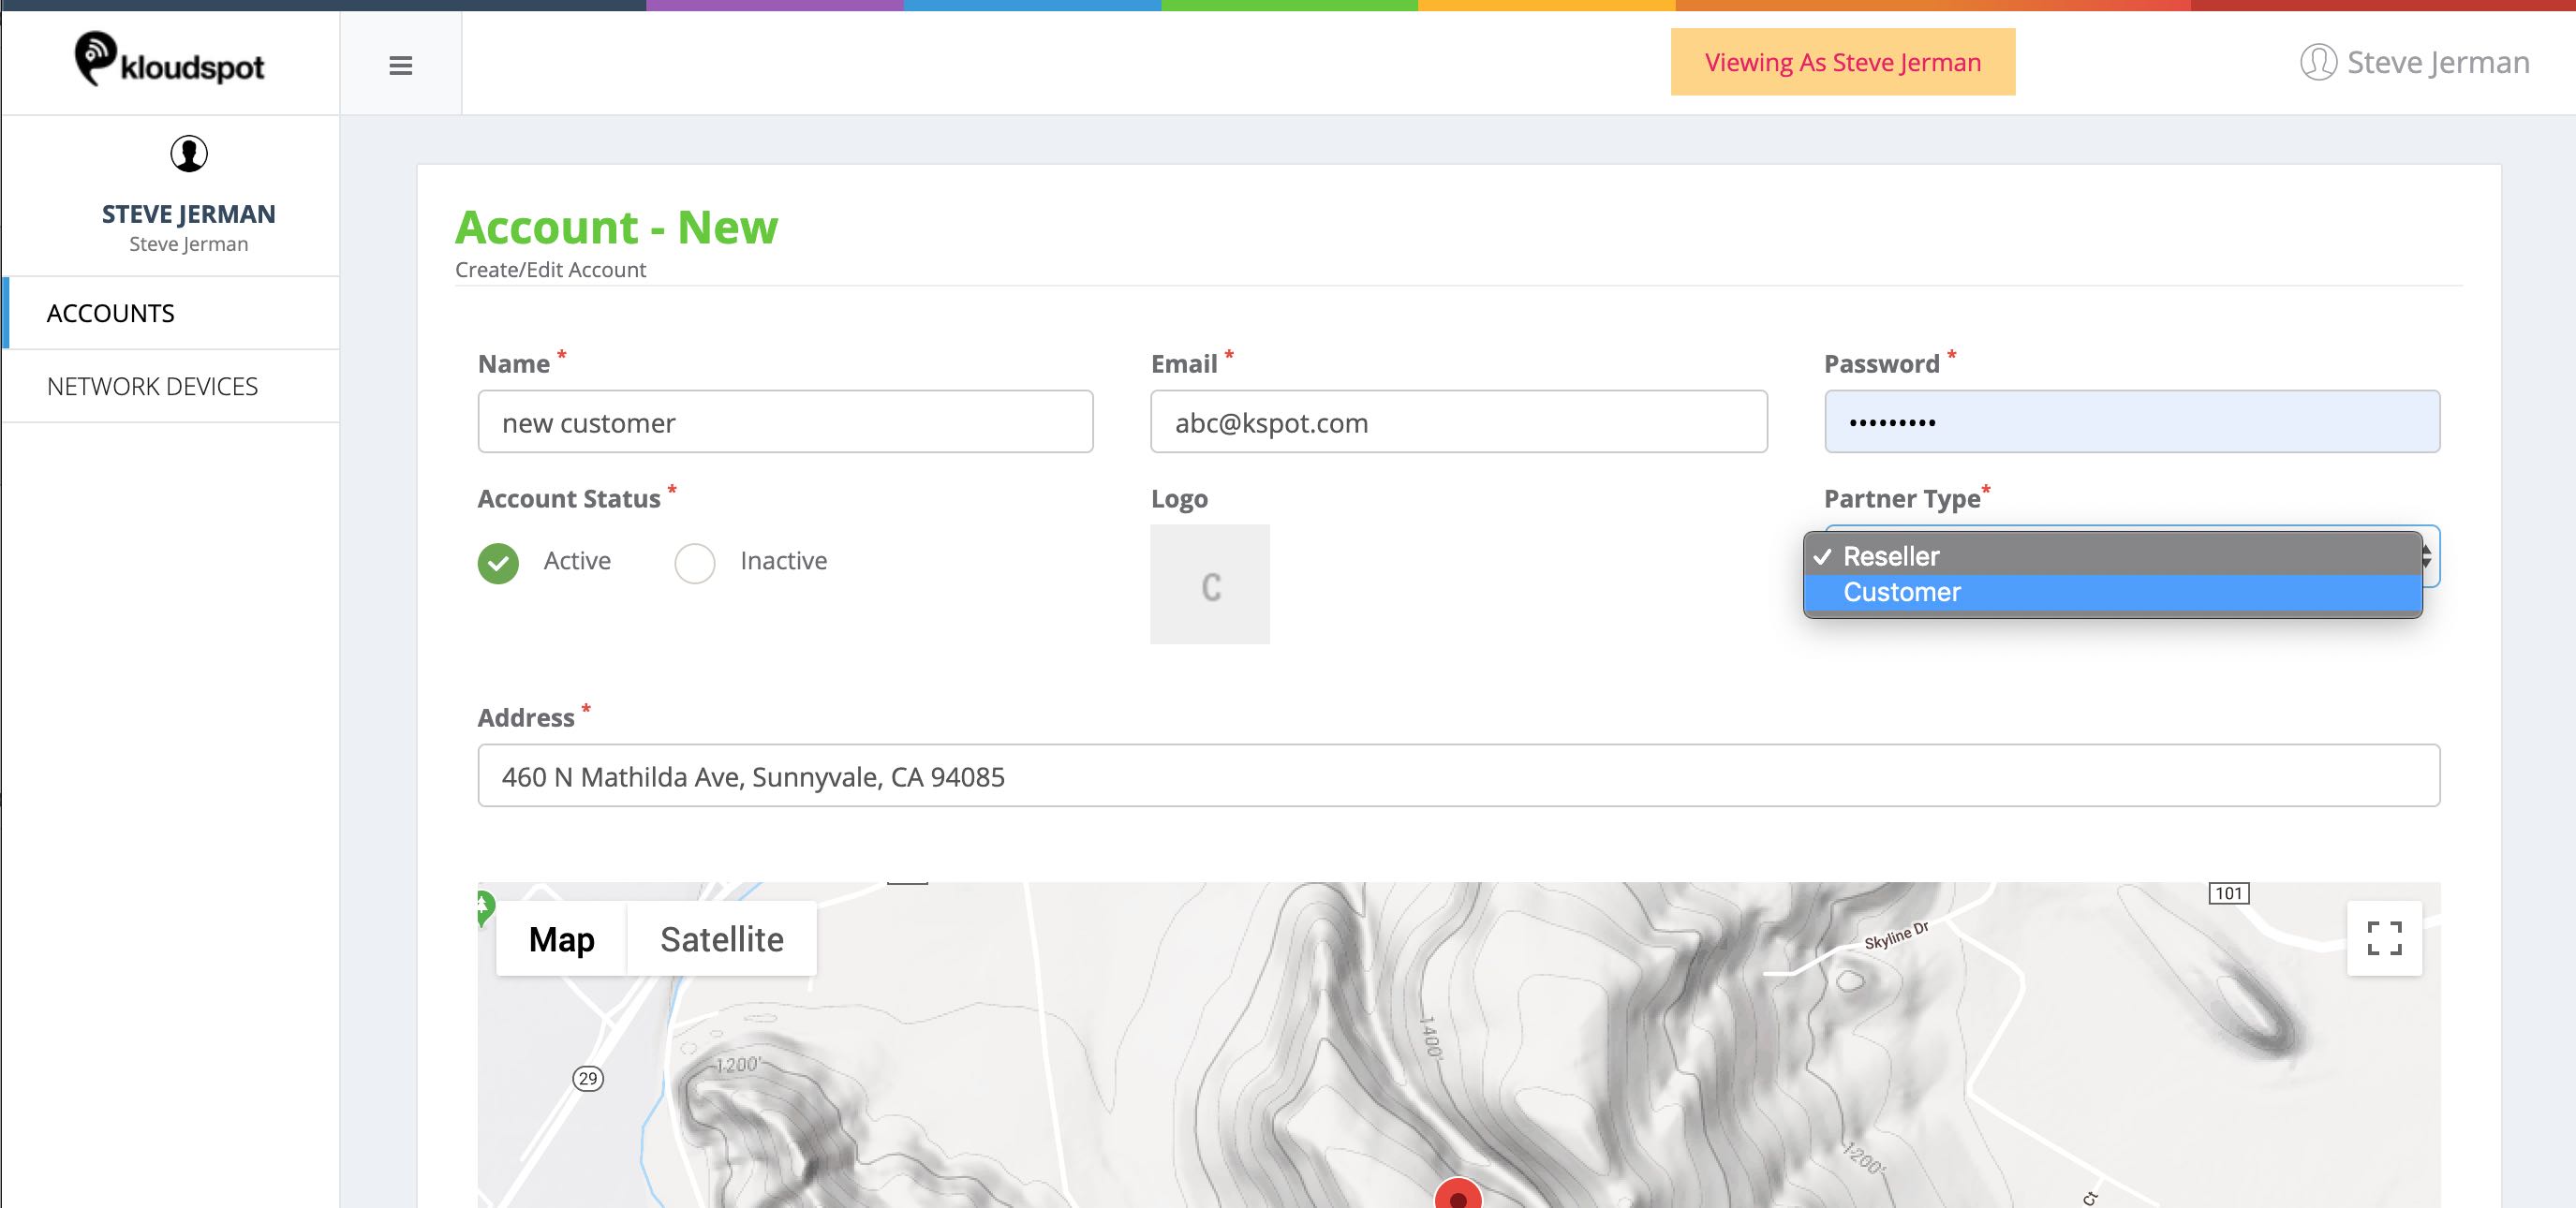
If the user has the appropriate permission, the Add Partner/Customer button will
be present. This allows a distributor or reseller to add new accounts.
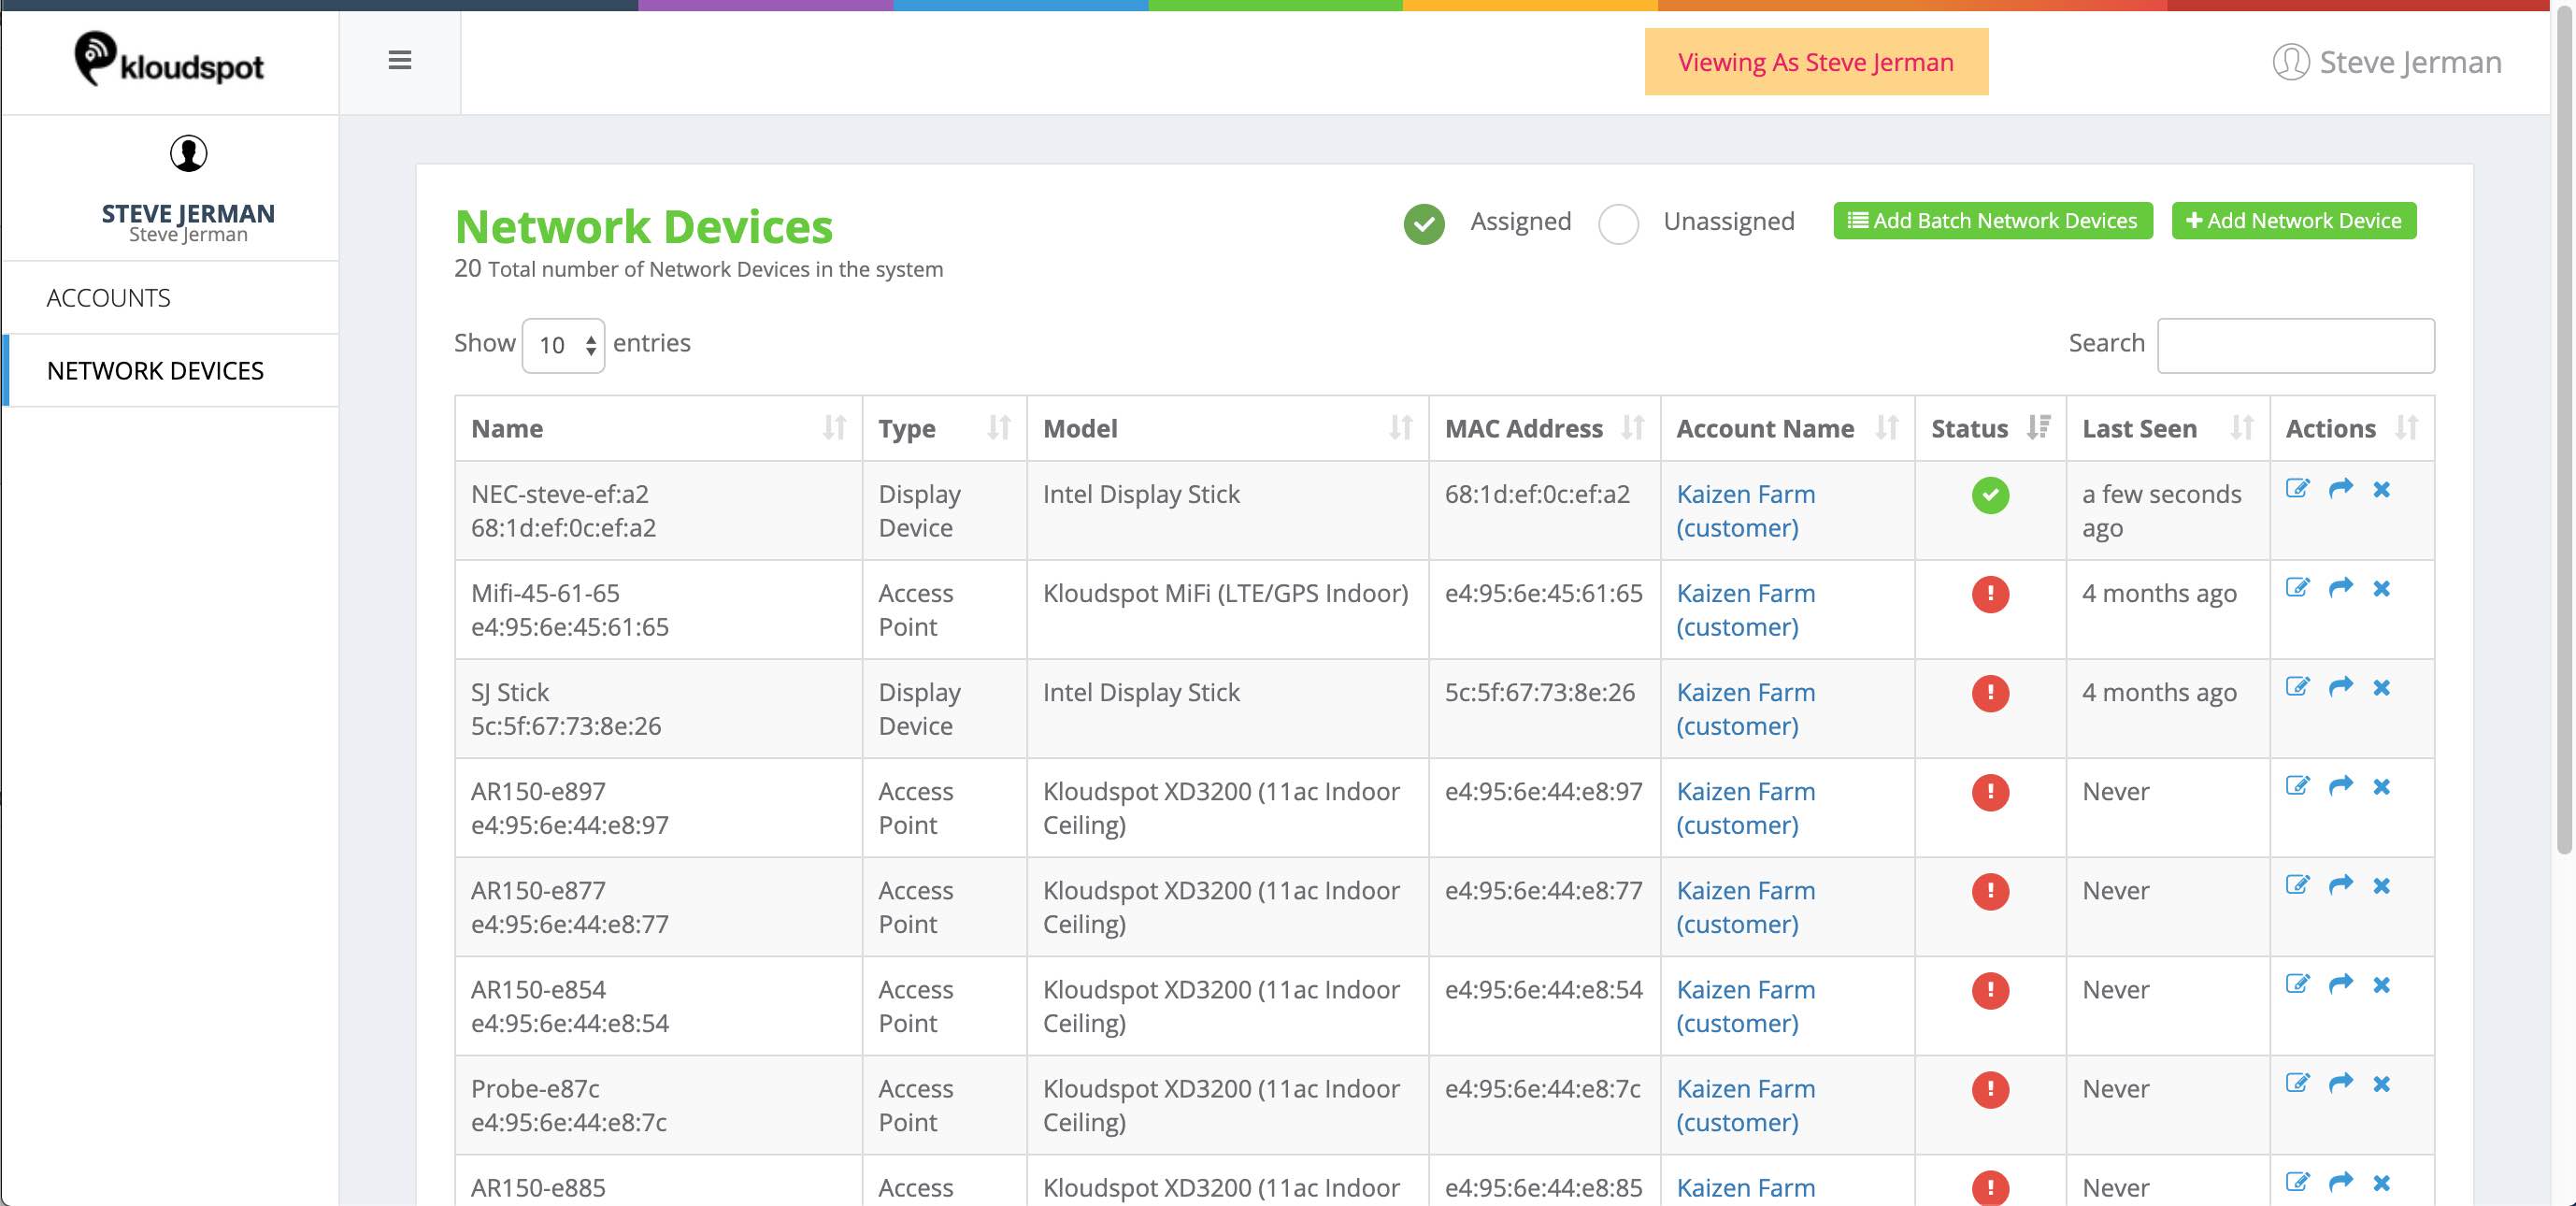
Allocate Devices to Accounts
The devices screen shows the assigned and unassigned devices for the account.
They can be assigned to resellers or customers. A reseller could then reassign
the devices to their customers.
Resellers and distributors can add new devices to their accounts by using the
Add Network Device and Add Batch Network Device buttons. Refer to the
Assigning and Managing Network Devices section to learn how to add devices.
Creating and Editing Venues
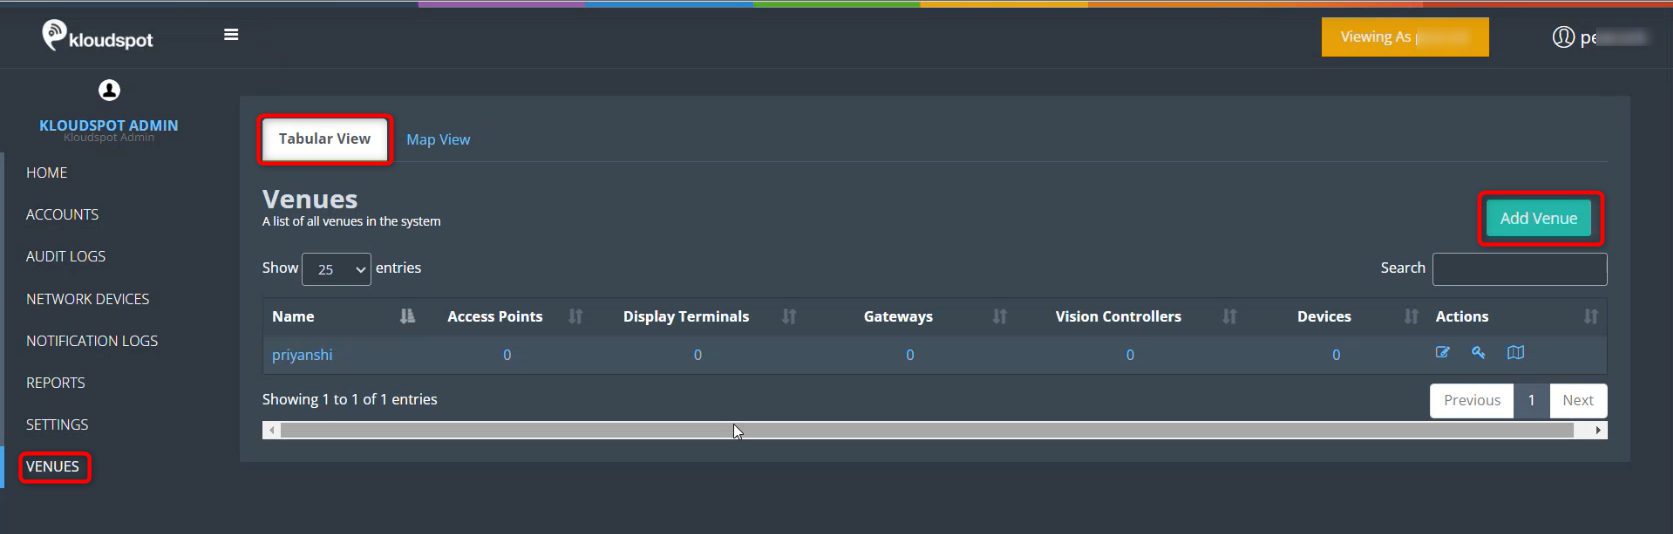
By default, a KloudManage account will already have a venue associated with it. To add additional venues, click on the “Venues” button.
In the “Tabular View” tab of the window that opens, locate and click on the “Add Venue” button.
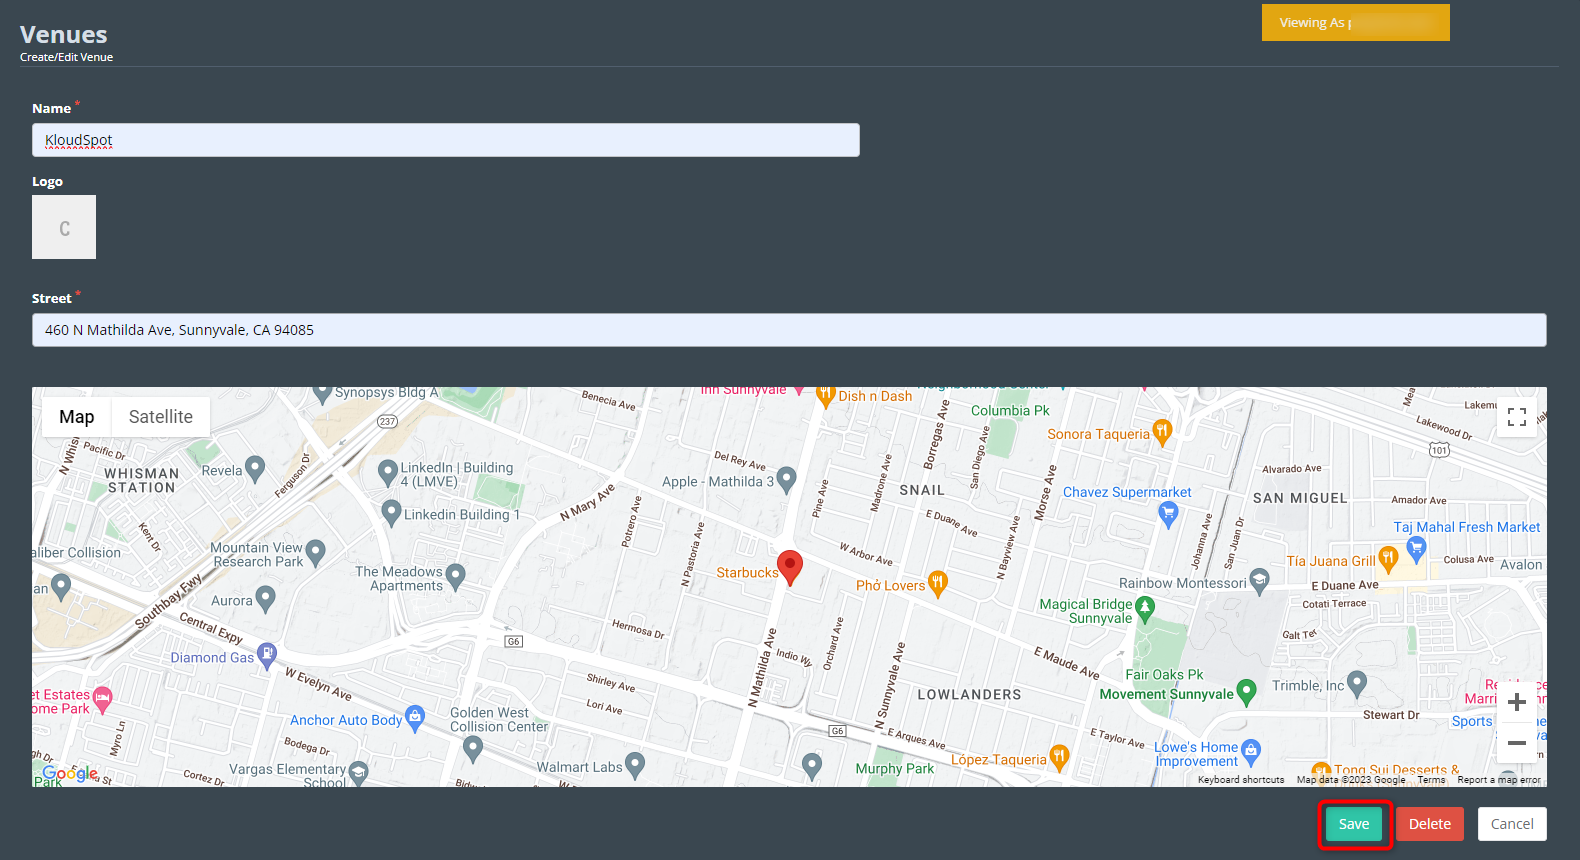
Enter the venue name, and optionally, add a logo. Also, provide the street address in the window that appears. Click “Save” to confirm. As soon as you enter the address, your location will be pinpointed on the map view.
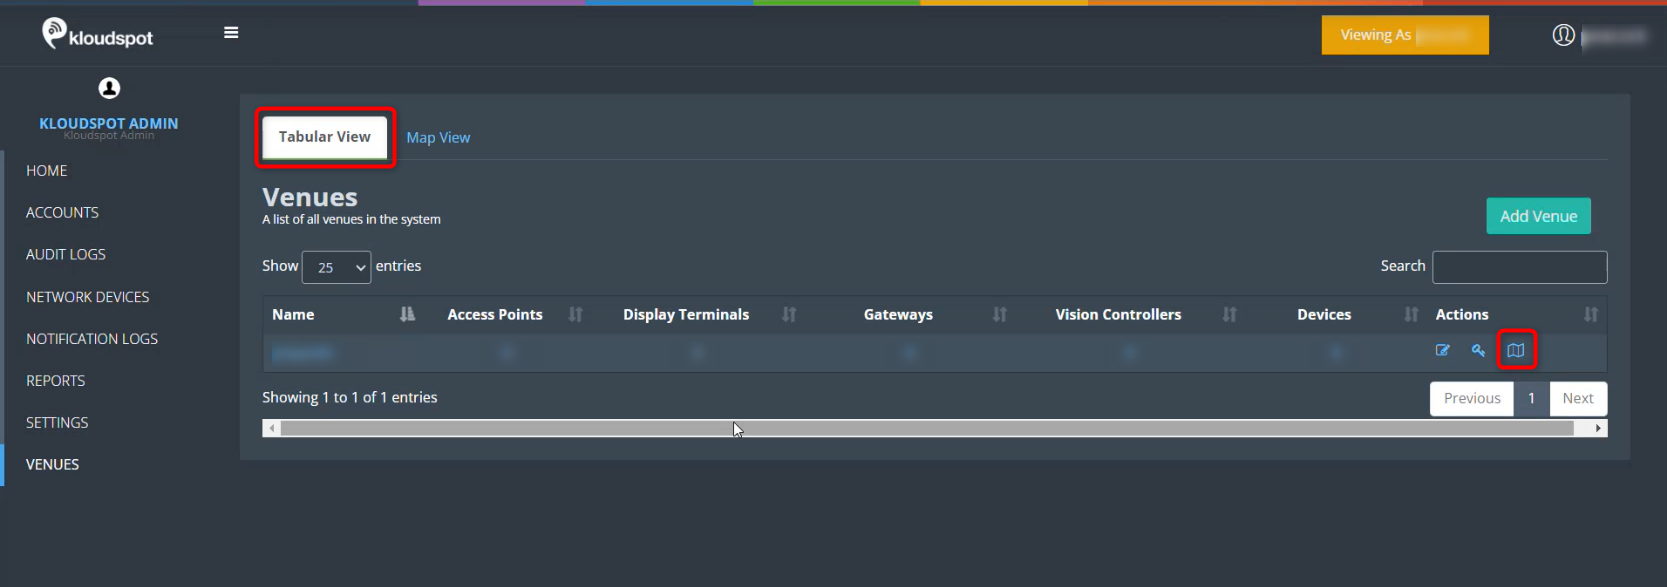
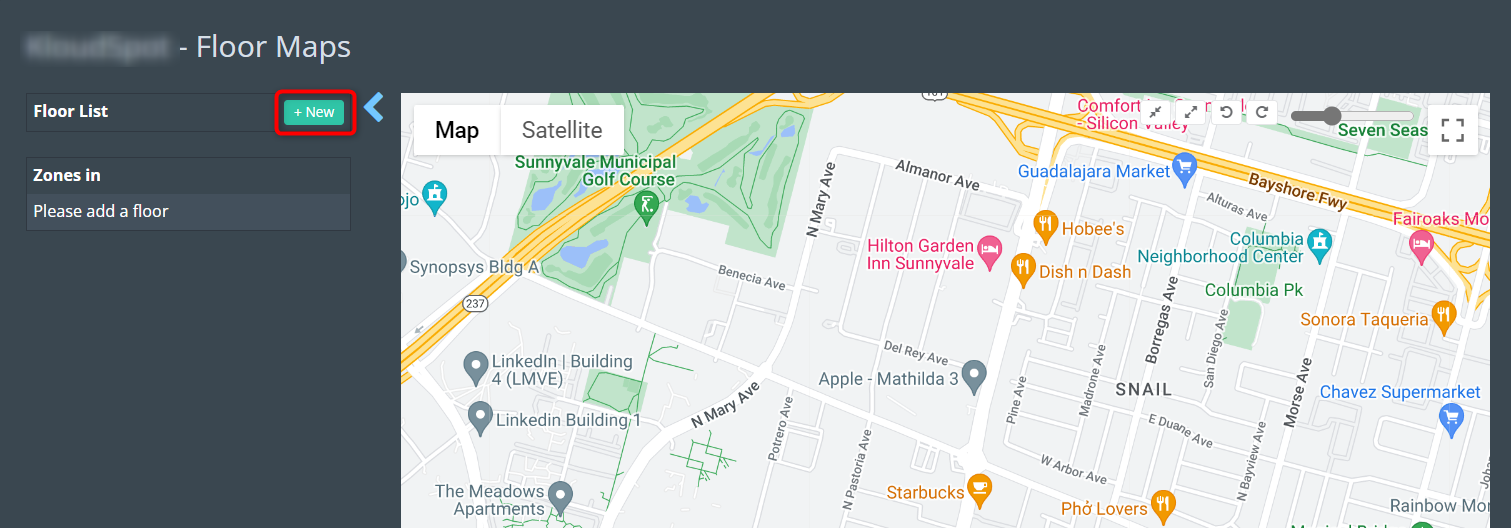
If needed, you can incorporate a floor map for the location. Click on the “Floor Map” button found in the action column.
In the subsequent window, click “New” to add a new floor.
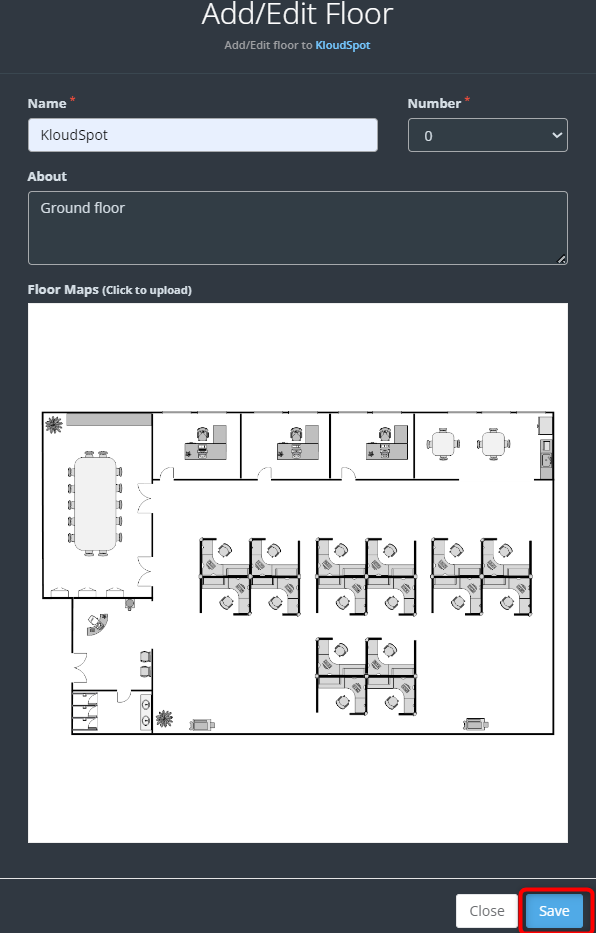
When adding a new floor, enter the floor name and floor number. To include a map, click on the “Floor Maps” button and upload the map.
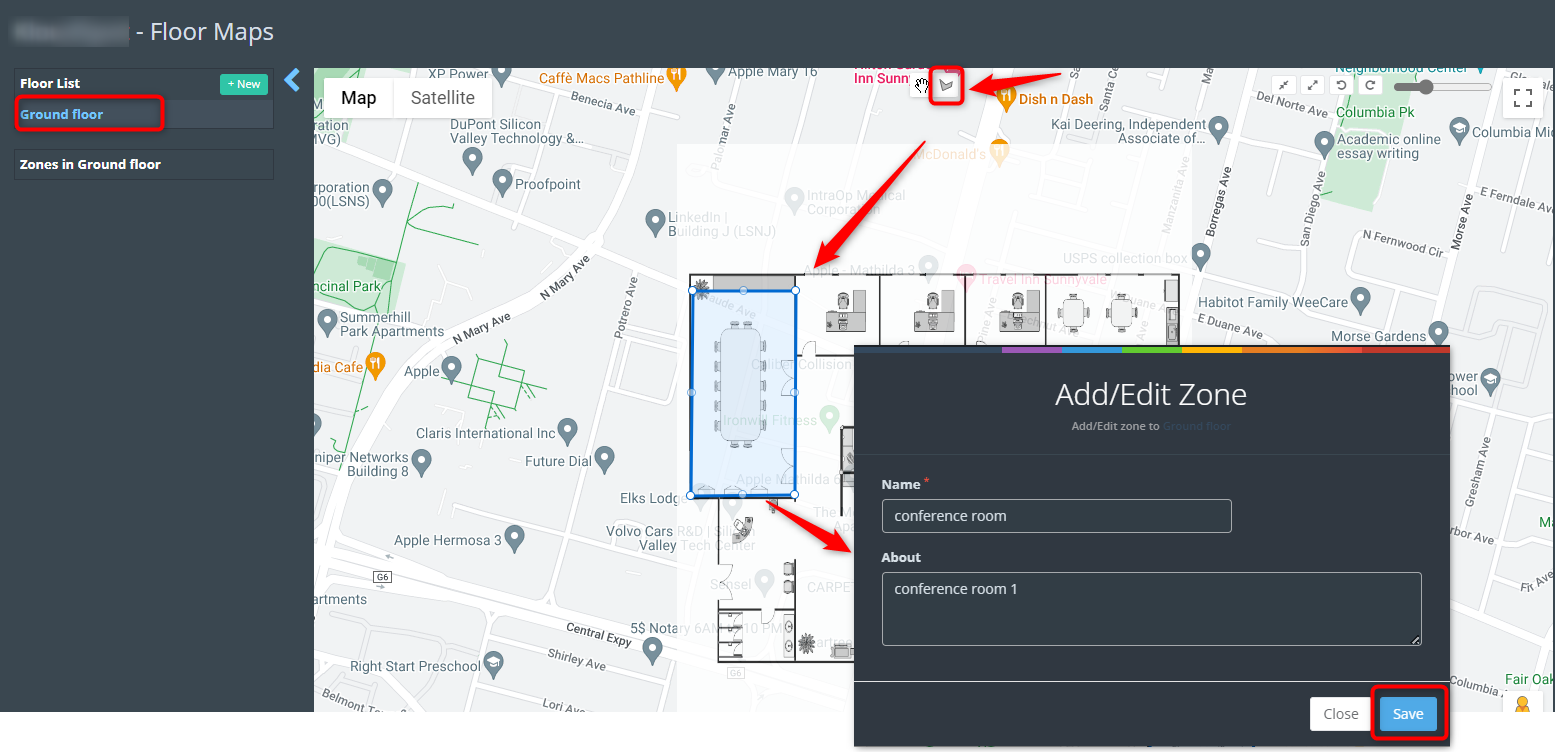
You can use the “Draw a Shape” tool to define zones on the map for more level of detail.
All venues can be viewed in the Map View tab. Click on a specific location to access various insights presented in graph form.
Following the addition of users and venues, proceed to configure the settings menu according to your specific requirements. For more detailed information, refer to the Account Settings section.
Account Settings
In the Account Settings section, you will find comprehensive instructions on how to configure various aspects of KloudManage. This includes adding basic information, integrating third-party applications, incorporating contact details, setting up alert notifications, and configuring the application notification.
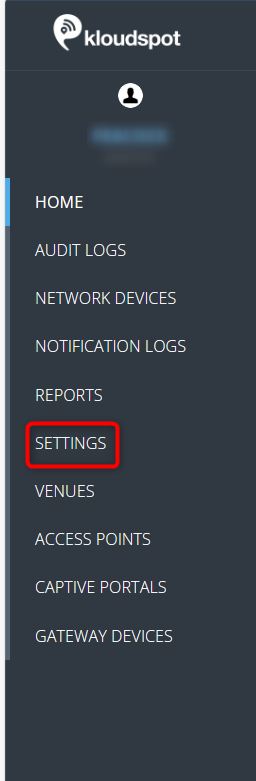
To configure the settings, navigate to the Settings menu.
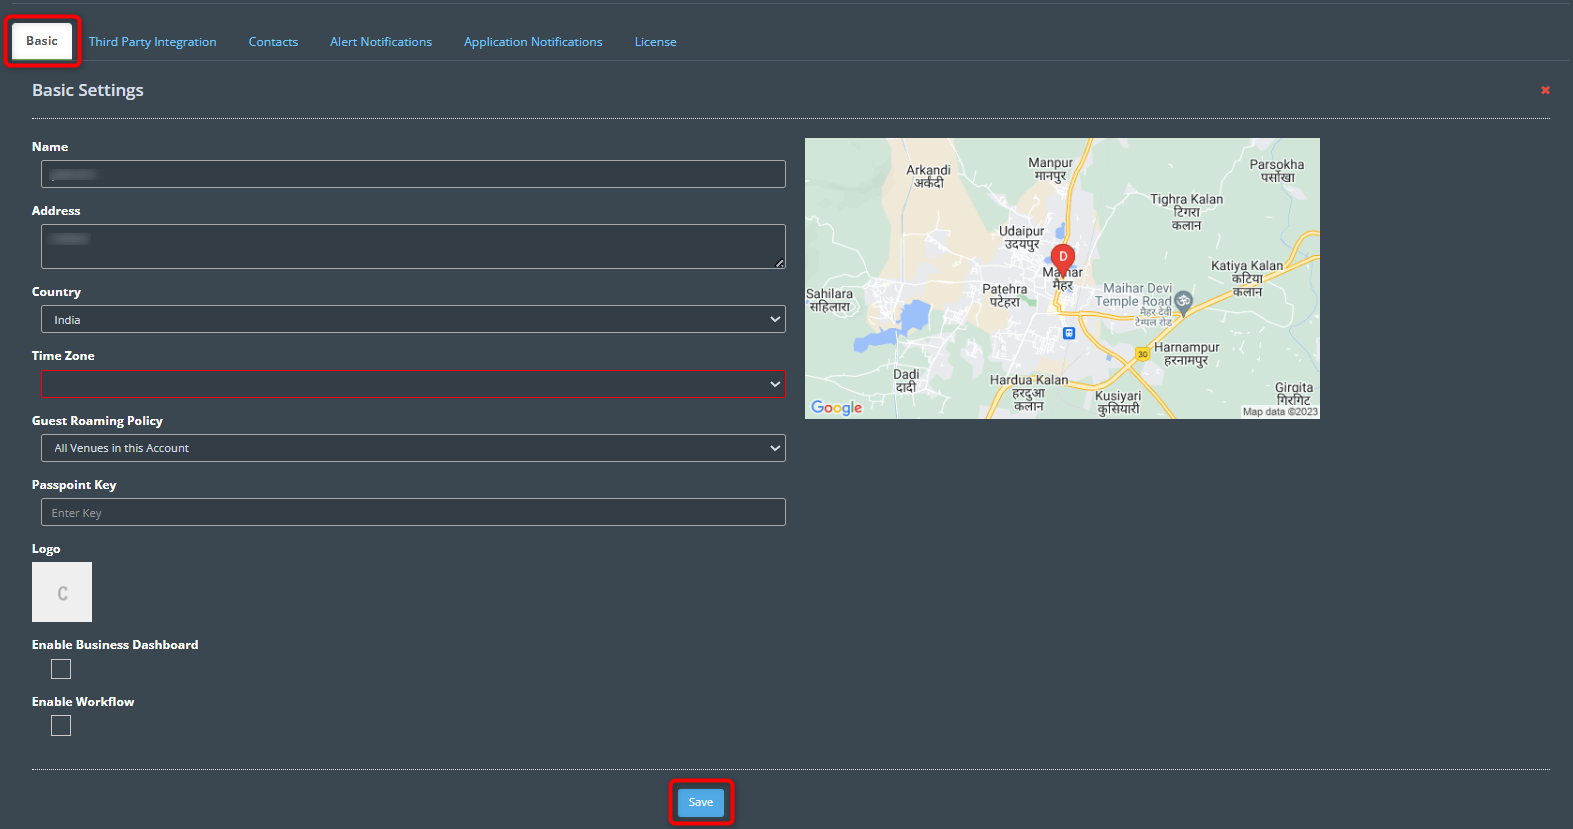
In the Basic tab, you can edit the basic details of your profile.
Click the “Edit” button to make changes. Here, you can update your Name, Address, Country, Time Zone, Guest Roaming Policy, Passpoint Key, and Logo.
Click the “Save” button to confirm the changes.
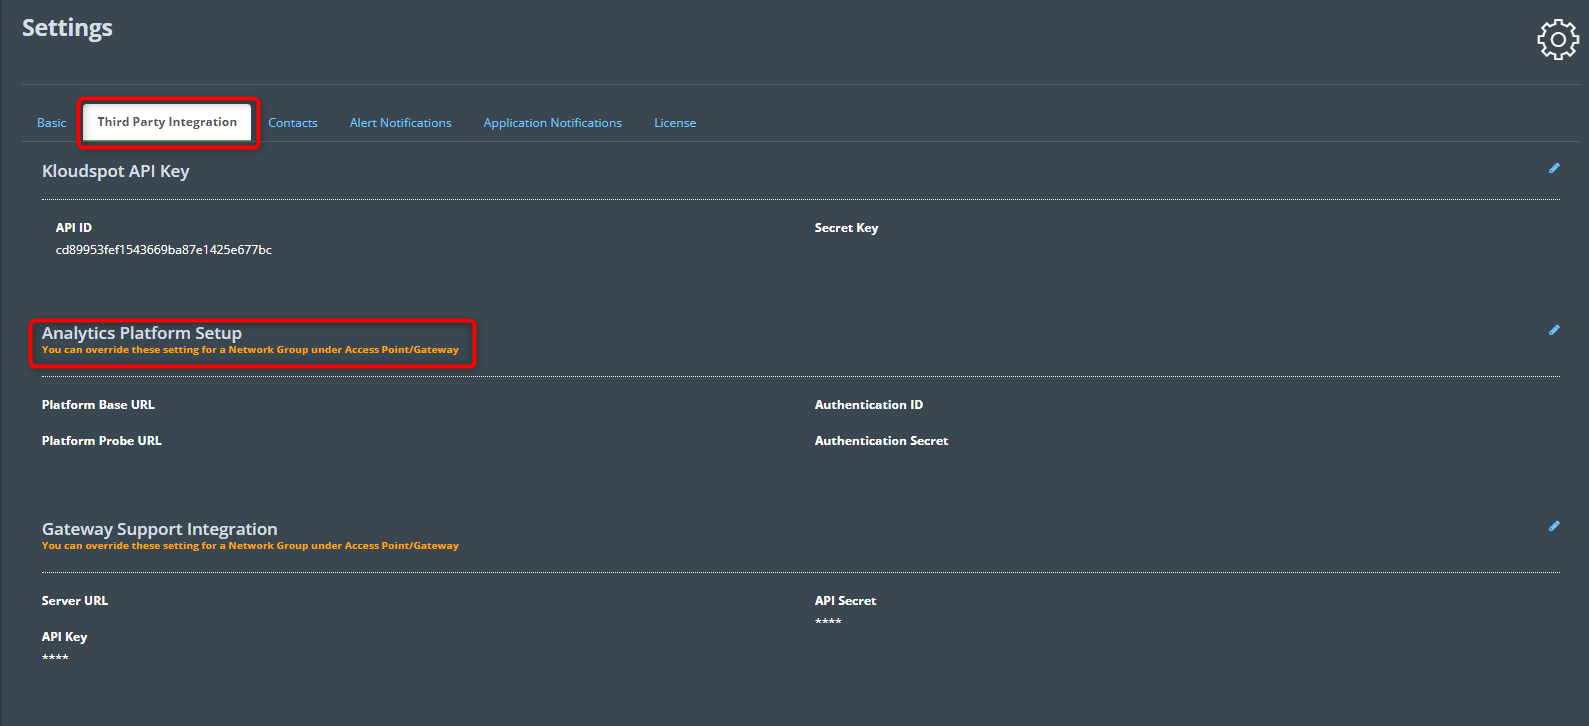
Third-Party Integrations
In the Third-Party Integrations tab, you can connect various third-party applications to your KloudManage.
Add integrations as per your specific requirements. For example, to connect KloudDisplay or KloudVision with the KloudInsights application, utilize the “Analytics Platform Setup” option.
If you want to integrate Gateway devices with KloudManage, you can configure the Gateway support integration section.
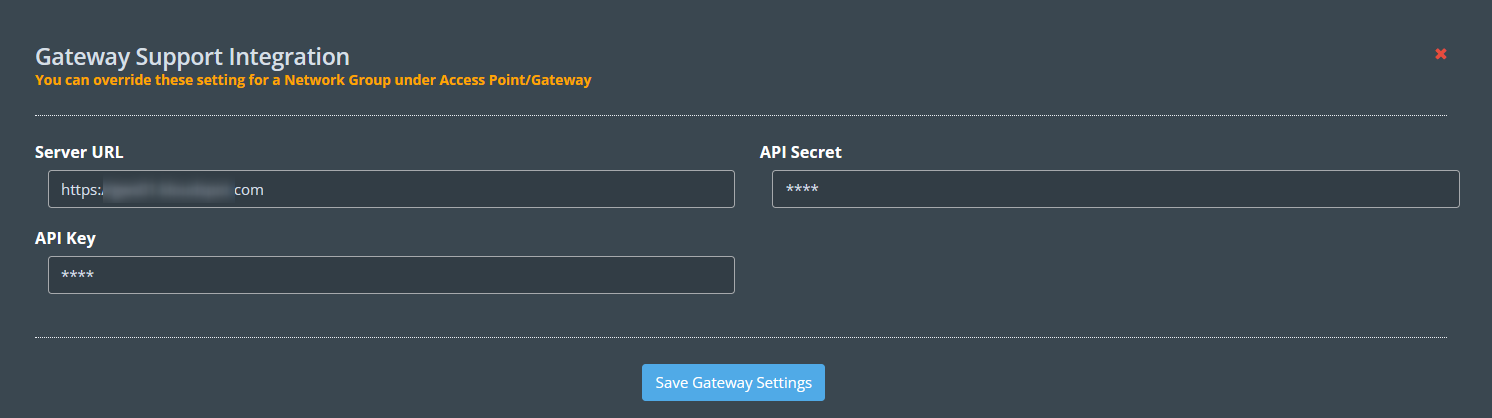
Navigate to the Gateway Support Integration section.
Click on the Edit button to initiate the configuration process.
Provide the necessary information obtained from your Gateway provider:
Server URL
API Secret
API Key
After entering the required details, click on the Save Gateway Settings button to store the configured settings.
Merakki Dashboard Integration
KloudManage supports the integration of Meraki Access Points for comprehensive network management. Follow the steps below to integrate the Meraki dashboard seamlessly.
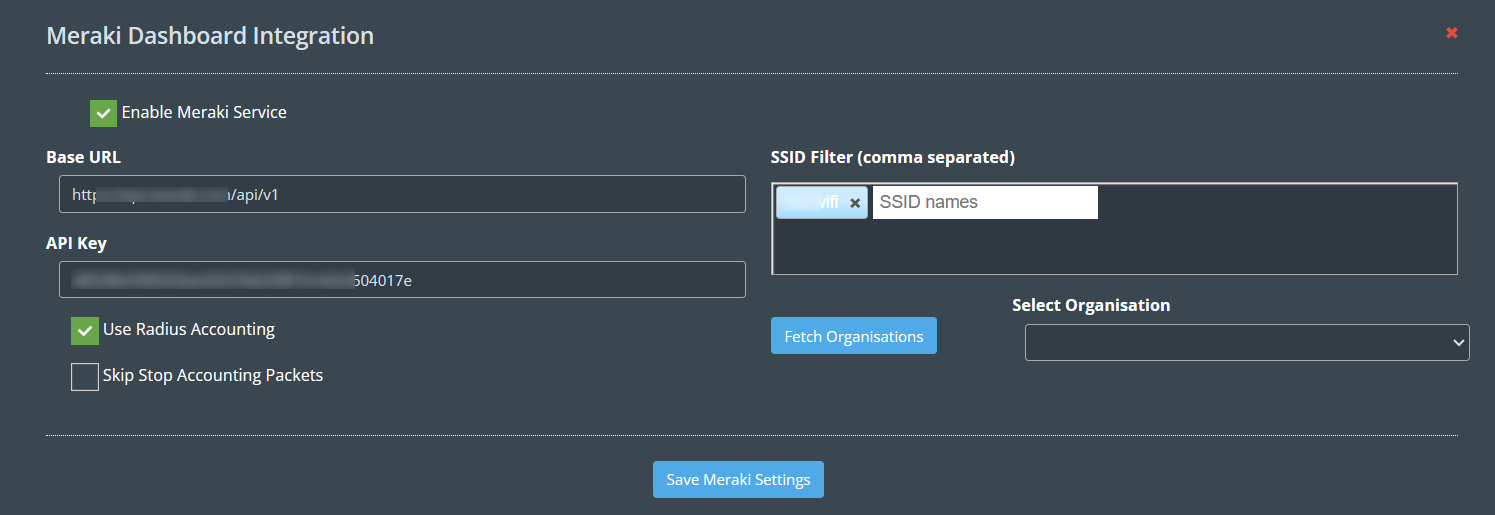
Navigate to the Meraki Dashboard Integration section.
Click on the Edit button to begin the integration process.
Check the Enable Meraki service checkbox to activate the integration.
Provide the following information sourced from the Meraki dashboard:
Base URL
API Key
SSID
Check the Use Radius accounting checkbox to track user login information and data usage.
Check the necessary settings related to stop accounting packets if required.
Click on the Fetch Organization button to retrieve organizational information.
Select the desired organization from the dropdown list.
After configuring the settings, click on the Save Meraki Settings button to store the integration details.
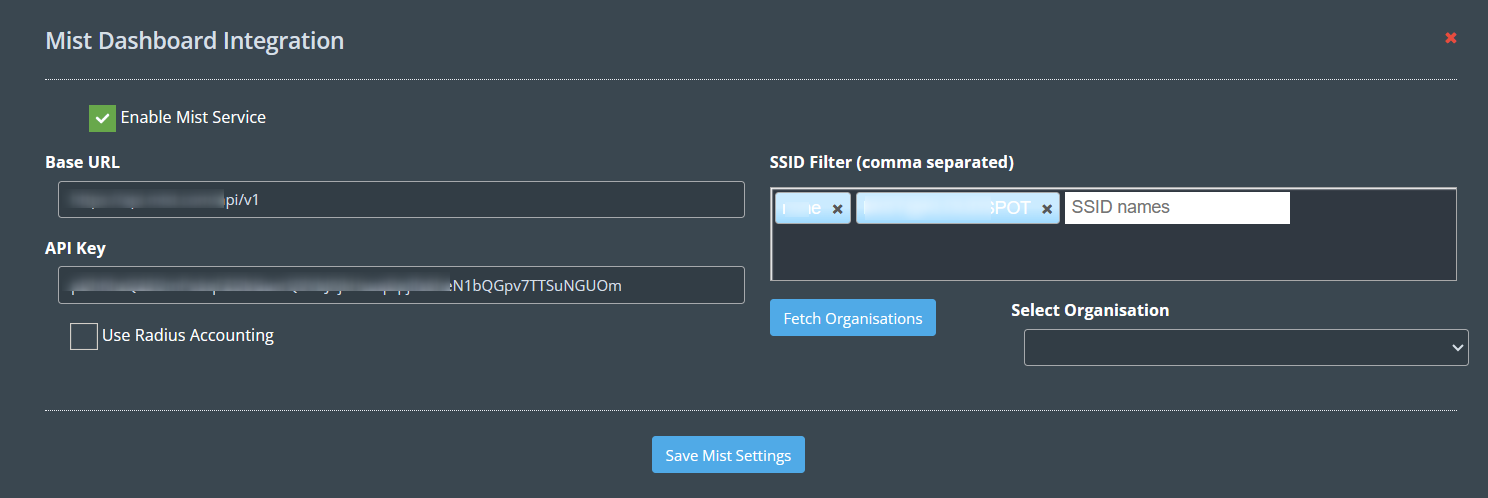
Mist Dashboard Integration
KloudManage supports the integration of Mist Access Points for comprehensive network management. Follow the steps below to integrate the Mist dashboard seamlessly.
Navigate to the Mist Dashboard Integration section.
Click on the Edit button to begin the integration process.
Check the Enable Mist service checkbox to activate the integration.
Provide the following information sourced from the Mist dashboard:
Base URL
API Key
SSID
Check the Use Radius accounting checkbox to track user login information and data usage.
Click on the Fetch Organization button to retrieve organizational information.
Select the desired organization from the dropdown list.
After configuring the settings, click on the Save Mist Settings button to store the integration details.
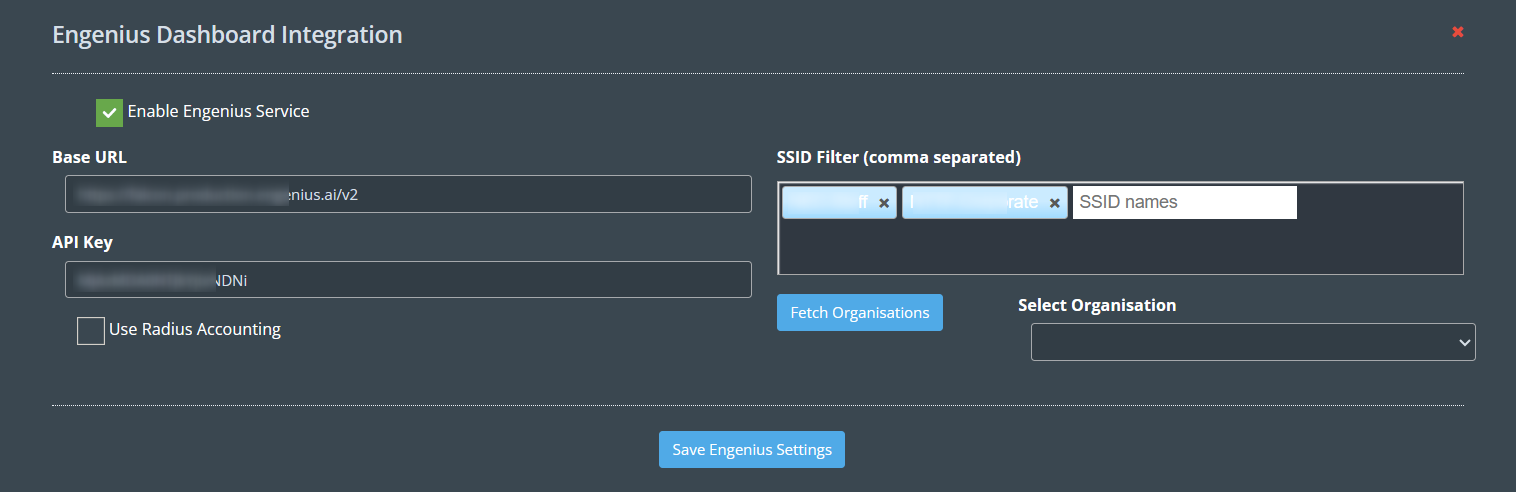
Engenius Dashboard Integration
KloudManage supports the integration of Engenius Access Points for comprehensive network management. Follow the steps below to integrate the Mist dashboard seamlessly.
Navigate to the Engenius Dashboard Integration section.
Click on the Edit button to begin the integration process.
Check the Enable Engenius service checkbox to activate the integration.
Provide the following information sourced from the Engenius dashboard:
Base URL
API Key
SSID
Check the Use Radius accounting checkbox to track user login information and data usage.
Click on the Fetch Organization button to retrieve organizational information.
Select the desired organization from the dropdown list.
After configuring the settings, click on the Save Engenius Settings button to store the integration details.
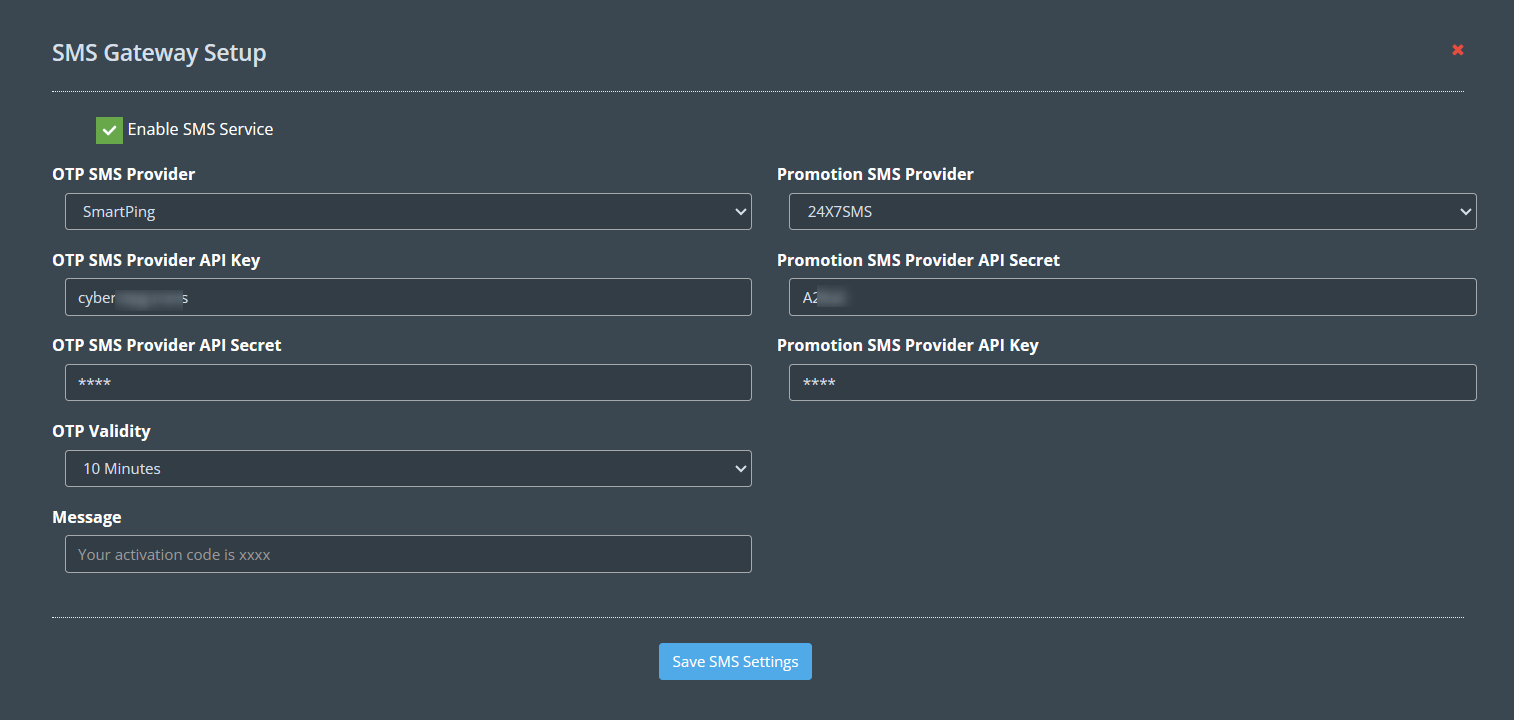
SMS Gateway Setup
Configure the SMS Gateway Setup in KloudPortal to enable the sending of OTPs and success messages to users. Follow the steps below to integrate your SMS provider details seamlessly.
Navigate to the SMS Gateway Setup section within KloudManage.
Click on the Edit button to start configuring the SMS Gateway Setup.
Check the Enable SMS service checkbox to activate the SMS integration.
Choose the OTP SMS provider’s name from the dropdown list.
Provide the necessary details from your SMS provider:
API Key
API Secret
OTP Validity
In the Message column, type the desired message to be sent with the OTP.
If needed, set up promotional SMS using the same procedure.
Click on the Save SMS Settings button to store the configured SMS Gateway settings.
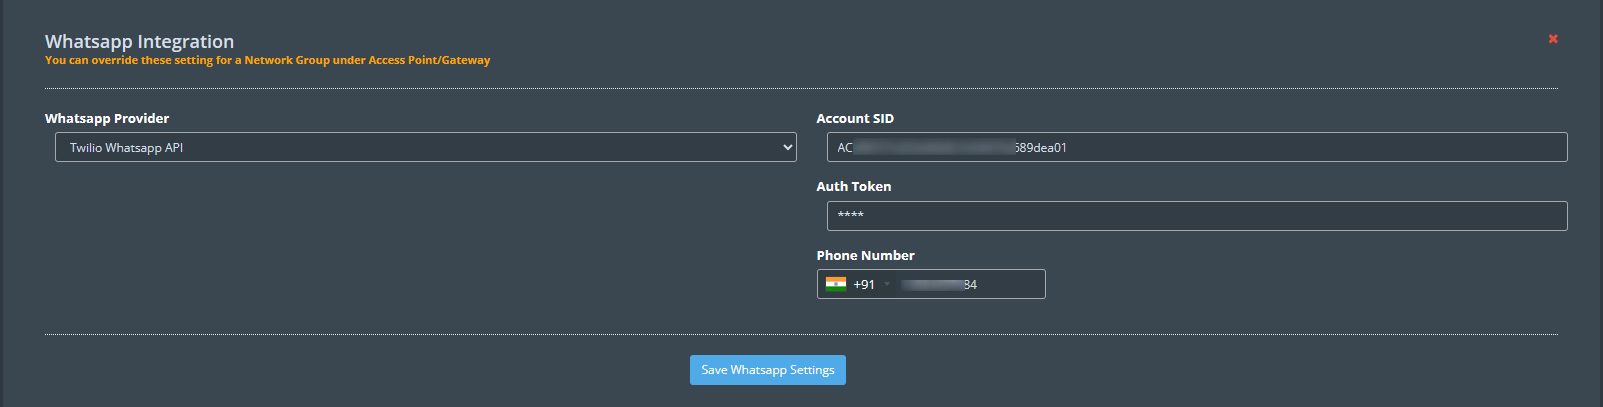
Whatsapp Integration
To receive notifications, integrate WhatsApp with KloudManage. You can also activate WhatsApp authentication for the captive portal. To easily configure WhatsApp integration, follow these steps:
Navigate to the WhatsApp Integration Setup section.
Click on the Edit button to integrate WhatsApp.
Choose the WhatsApp provider’s name from the dropdown list. At present, there are two available providers: Chat API and Twilio WhatsApp API.
Provide the necessary details from your WhatsApp provider:
Click on the Save WhatsApp Settings button to store the configured WhatsApp settings.
TikTok Integration
To add TikTok as a resource in KloudDiaplay, you must first integrate TikTok with kloudManage. Refer to the TikTok Integration
document for details on how to do this. You will then be able to display the videos you have published to TikTok on KloudDisplay.
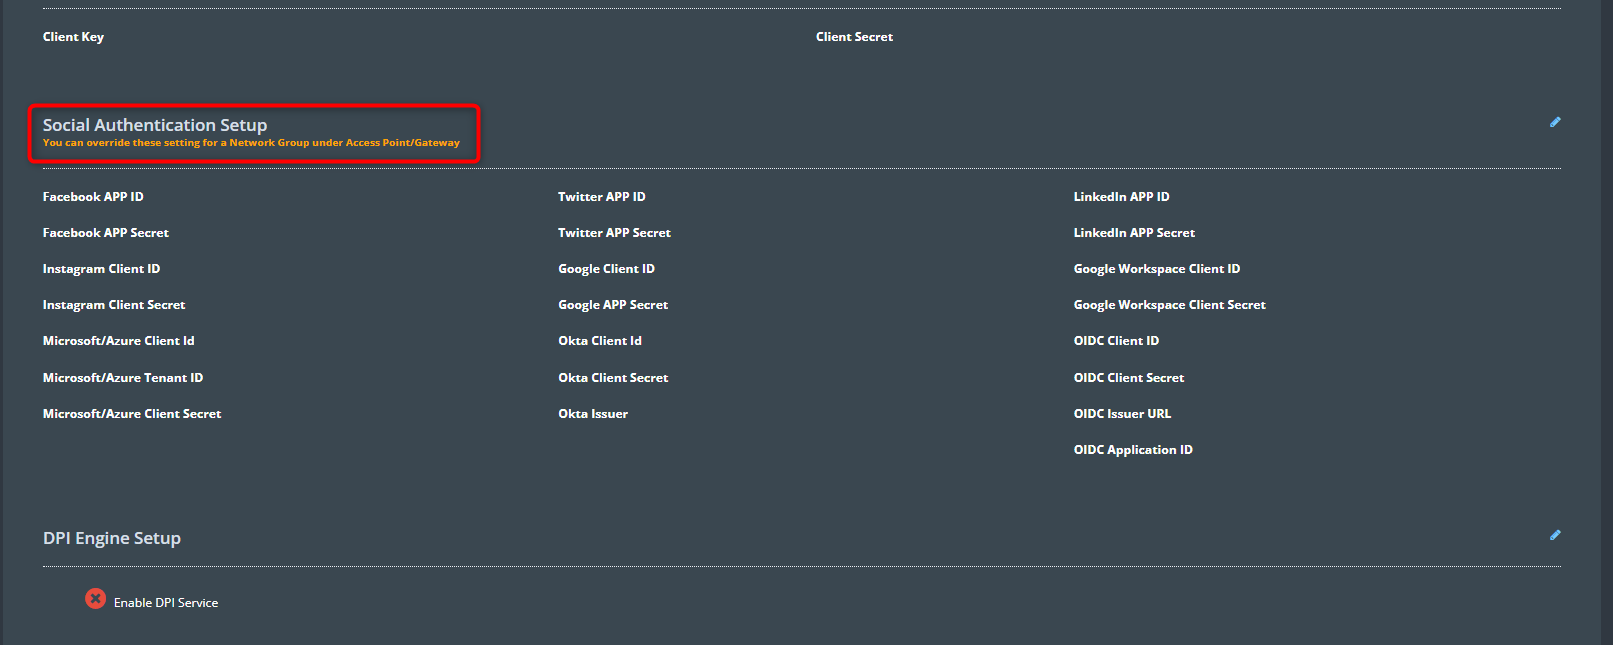
Social Autentication Setup
To integrate authentications in KloudPortal, use the Social Authentication Setup option.
a. Refer to the Facebook Authentication section to add Facebook authentication.
b. Refer to the Twitter authentication section to add Twitter authentication.
c. Refer to the LinkedIn Authentication section to add LinkedIn authentication.
d. Refer to the Microsoft Authentication section to add Microsoft/Azure authentication.
f. Refer to the Okta Authentication section to add Google authentication.
Email Setup
Configure email settings in KloudManage to receive alerts, OTPs, and enable captive portal authentication. You have the option to use KloudSpot’s Email service or integrate information from another third-party provider. Follow the steps below for a seamless Email Setup.
Navigate to the Email Setup section.
Click on the Edit button to start configuring the Email Setup.
Check the Enable Email checkbox to activate the Email setup.
If using KloudSpot’s Email service:
a. Check the Use Kloudspot Service checkbox.
b. Click on the Save button.
c. Enter a test email ID and verify functionality.
If using a third-party service
a. Uncheck the Use Kloudspot service checkbox.
b. Enter the following details from your service provider:
Host Name
Port
Username
Password
From Email
Email Sender Name
If not using SSL, uncheck the Use TLS/SSL checkbox.
Click on the Save button to store the configured Email settings.
Test the setup by entering a test email ID.
Display Setup
Player Cache Cleaner will be enabled by default in the Display Setup section. With this, your KloudDisplay player cache will be cleared in a certain time.
If you want to disable it, click on the edit button and uncheck it.
If you want to share your virtual display with a third-party IP, you can add that IP here.
Click on the Save Display Settings button to store the configured Display settings.
MYSQL Integration
Integrate KloudPortal with a MYSQL database to allow users to log in to the captive portal using their credentials stored in the MYSQL database. Follow the steps below to configure MYSQL integration in KloudManage:
Navigate to the MYSQL Integration section.
Click on the Edit button to start configuring MYSQL integration.
Provide the following MYSQL details:
MYSQL Username
MYSQL Password
JDBC URL
Configure Query:
In the Query column, enter the following SQL query:
SELECT * FROM radcheck WHERE username={uname} AND value={pass};
This query is used to retrieve user information based on the provided username and password.
Click on the Save mysql Settings button to store the configured MYSQL integration settings.
Payment Gateway Integration
Integrate the Cashfree Payment gateway with KloudManage to facilitate seamless payment transactions. Follow the steps below to configure Payment Gateway Integration:
Navigate to the Payment Gateway Integration section.
Click on the Edit button to start configuring Payment Gateway Integration.
Provide the following Cashfree Payment gateway details:
API Key
API Secret
Version
Click on the Save Payment Gateway Settings button to store the configured Payment Gateway settings.
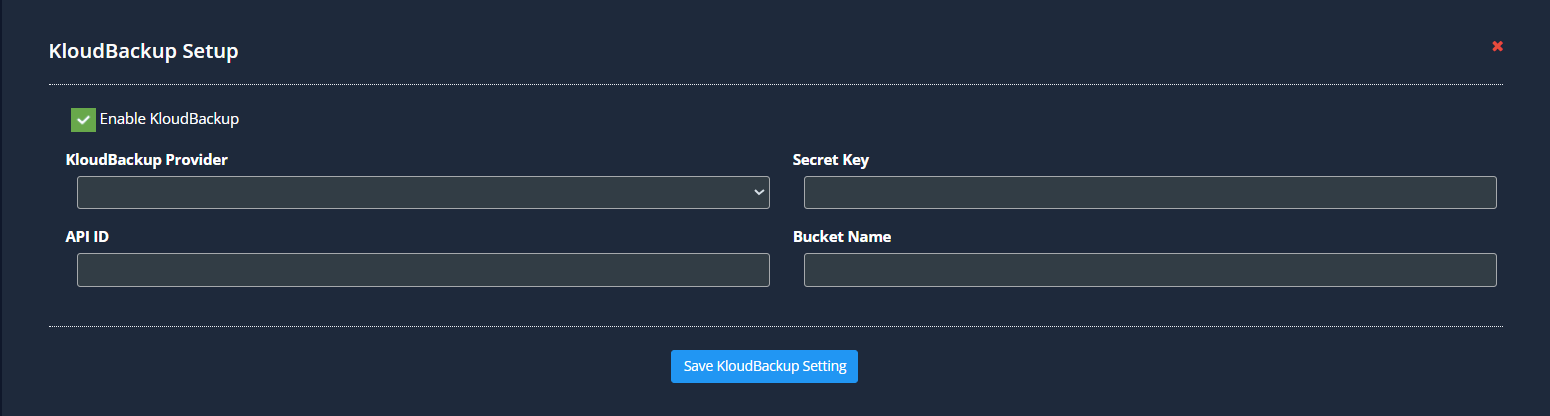
KloudBackup Setup
KloudBackup Setup allows you to securely backup the settings and data of KloudManage, ensuring data protection and disaster recovery capabilities.
Click on the Edit button associated with KloudBackup.
Check the checkbox labeled Enable KloudBackup to activate this feature.
Choose the desired KloudBackup provider from the available options.
Enter the Secret Key, API ID, and Bucket Name required for authentication with the selected KloudBackup provider.
After entering the necessary credentials, click on the Save KloudBackup Settings button to apply the configuration.
GCash Integration
Integrate the GCash Payment gateway with KloudManage to facilitate seamless payment transactions. Follow the steps below to configure GCash Integration:
Navigate to the GCash Integration section.
Click on the Edit button to start configuring GCash Integration.
Provide the following GCash Payment gateway details:
API Key
API Secret
Merchant Account
Click on the Save GCash Payment Gateway Settings button to store the configured Payment Gateway settings.
OpenID Connect configuration
To access your KloudManage account via OpenID Connect, it is necessary to configure Okta OpenID Connect with KloudManage. Consult the OpenID Connect configuration section for detailed instructions on setting up this integration.
User Details Masking Configuration
The User Details Masking Configuration feature is designed to enhance privacy and security for captive portal users. By enabling this feature, sensitive information of captive portal users can be masked, providing an added layer of protection against unauthorized access.
To do so, click the Edit button, then select the Enable connected users status checkbox, and finally, click the Save configuration button.
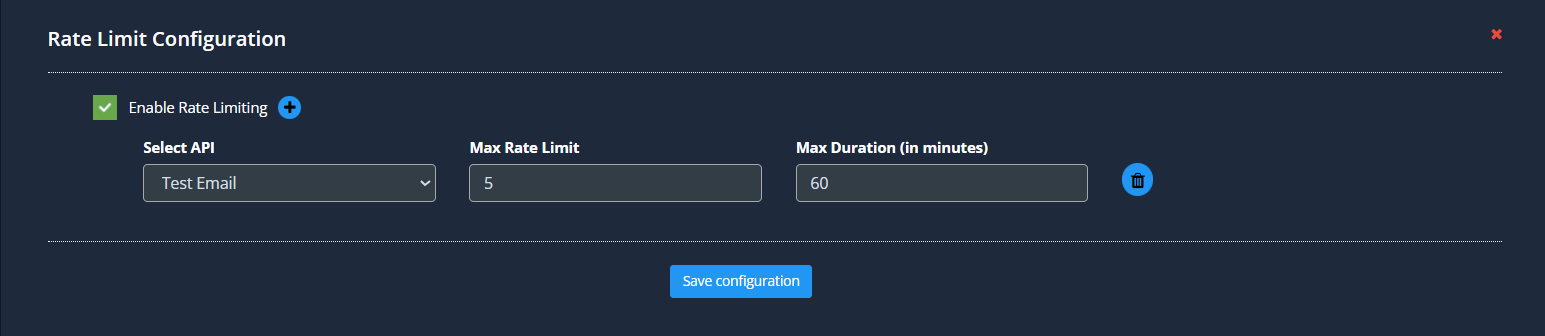
Rate Limit Configuration
Rate Limit Configuration allows you to control the rate of incoming requests to specific APIs, thereby managing the traffic flow and preventing potential overload situations.
To configure. click on the Edit button associated with Rate Limiting.
Check the checkbox labeled Enable Rate Limiting to activate this feature.
After enabling Rate Limiting, click on the Add Entry button.
Select the API for which you want to add rate limit. (e.g., Contact, Test Email, Post API, Get API, Put API, Delete API)
For selected API, enter the desired maximum rate limit and the maximum duration (in minutes) for which this rate limit applies.
Once you have configured the rate limit for the desired API, click on the Save configuration button to apply the changes.
Note: Based on this example, only 5 test emails can be sent in 60 minutes.
Contact Setup
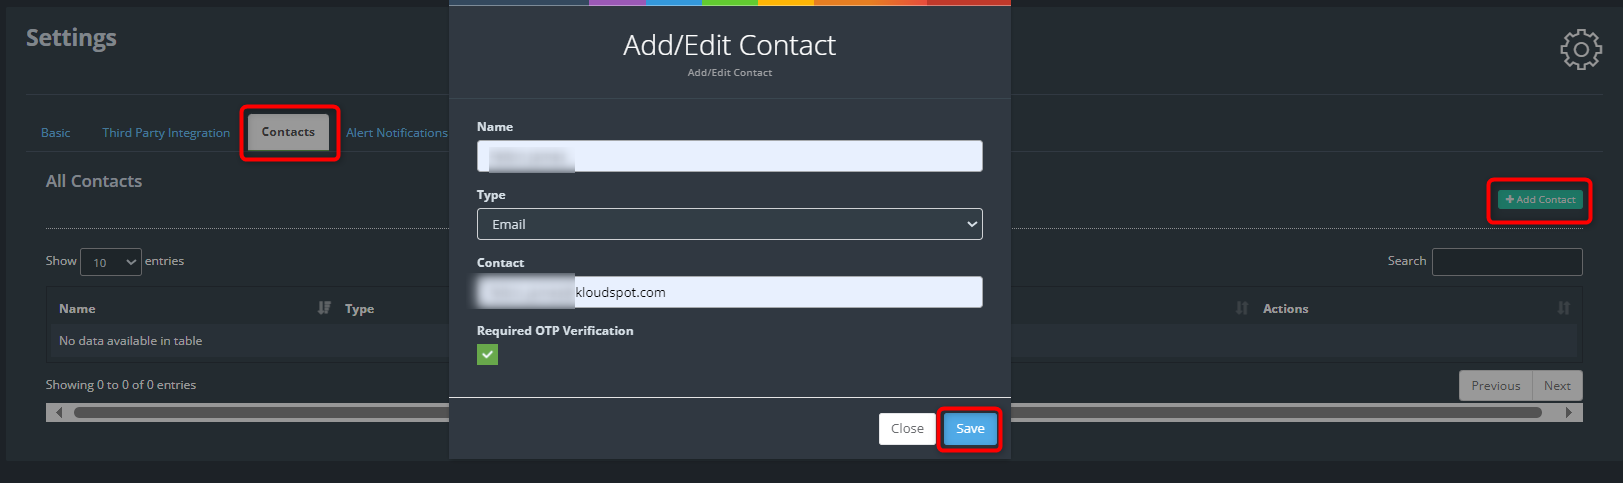
In the contact tab, you can add the contacts that need to receive notifications.
Available notification methods include Email, Slack, SMS, WhatsApp, FTP/SFTP, and UIP notifications.
Click on the +Add Contact button to include a new contact. Provide the Name, Type, and Contact information in the Add/Edit Contact popup window, and click on the Save button.
Check the Required OTP Verification checkbox if OTP verification is necessary to confirm the contact.
The contact field varies for each contact type. Enter the contact details according to the chosen type.
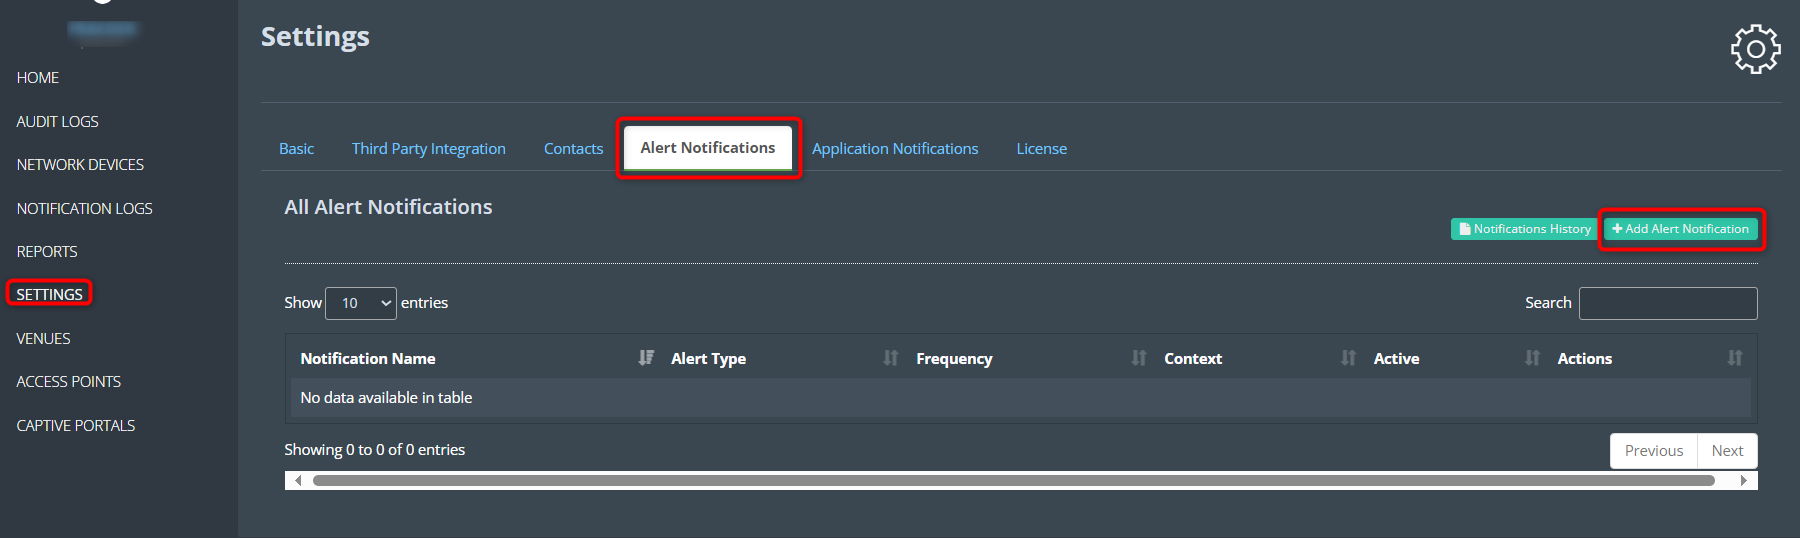
Alert Notifications
In the Alert Notifications tab, you can add various alerts as notifications. Through this, a certain alert will be sent as a notification to the selected contacts.
For this, navigate to Settings > Alert Notification > + Add Alert Notification.
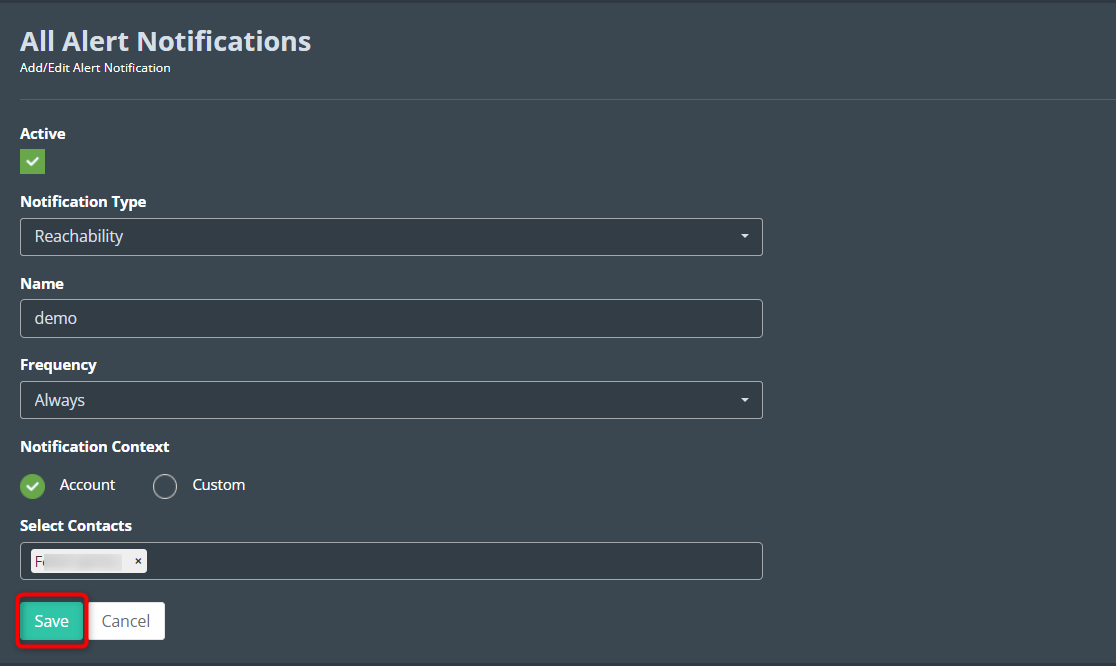
Check the Active check box to activate the notification. Then, select the notification type from the drop-down list.
• Link Capacity: Stay informed about any fluctuations or anomalies in the capacity of established links, ensuring optimal performance and stability.
• Link Jitter: Receive alerts regarding variations in the time it takes for data packets to reach their destination, enabling swift response to potential disruptions.
• Link Latency: Get notified of delays in data transmission over links, empowering you to address latency-related concerns promptly.
• OTP Not Received: Instantly be alerted if a onetime password (OTP) fails to reach its intended recipient, allowing for swift corrective action to ensure secure access.
• Link Packet Loss Reachability: Stay ahead of issues related to packet loss and reachability, ensuring seamless and uninterrupted communication.
• Reboot: Receive timely notifications whenever a system or device undergoes a reboot, keeping you informed of critical system events.
• Remote Support: Be alerted when remote support is initiated, enabling you to monitor and coordinate assistance effectively.
• Vision Camera View Change: Stay in the loop about any alterations in the view of vision cameras, providing valuable insights into changes in visual monitoring.
• Vision Motion Alert: Receive immediate notifications of detected motion through vision-based sensors, enhancing security and situational awareness.
• Vision Rule Trigger: Get alerts when predefined rules or conditions are met within vision-based monitoring, ensuring you’re promptly informed of relevant events.
Then enter the notification, name and frequency and select Notification Context. Two types of notification context are available. Account and Custom.
If you select Account, then you will receive notifications on the account level. Enter the contacts to receive notifications, and click the Save button.
If you choose the “Custom” option, you have the ability to specify the locations for which you wish to receive notifications.
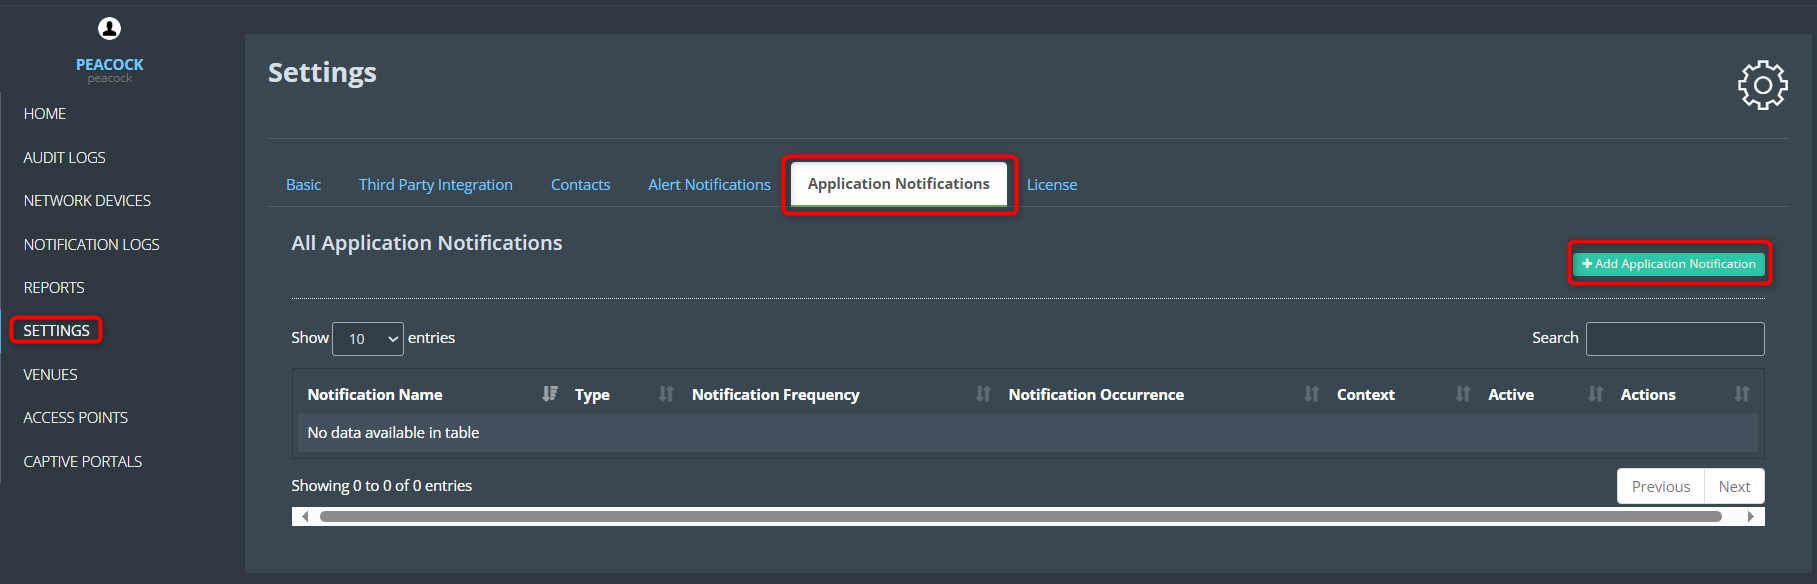
Application Notifications
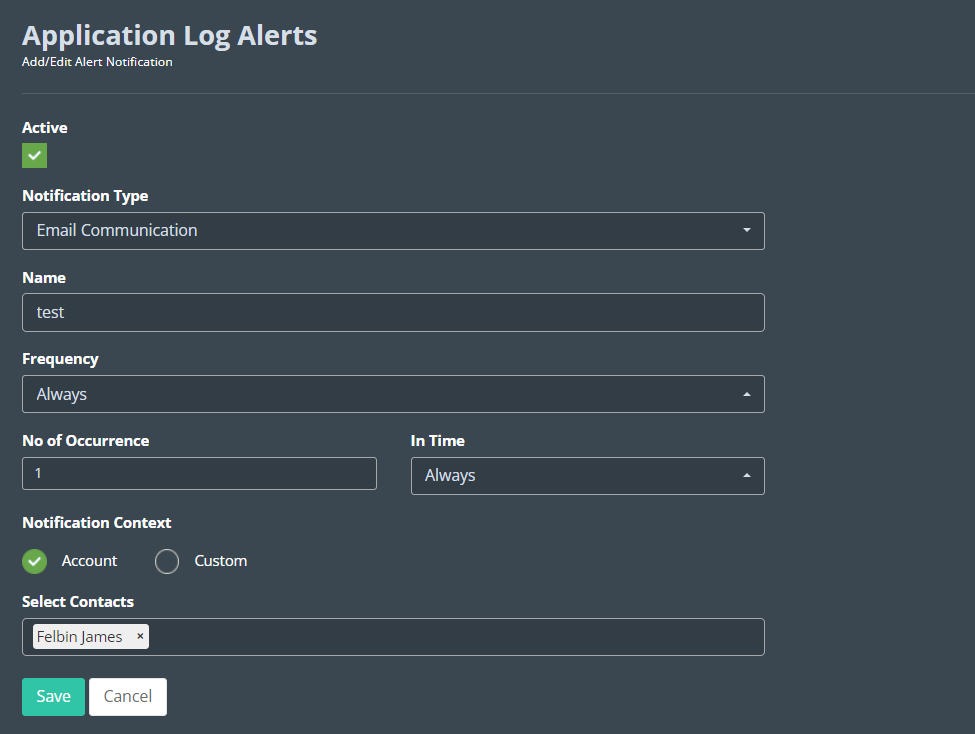
Use the Application Notifications tab if you wish to receive application log alerts as notifications.
For this, navigate to Settings > Application Notification > +Add Application Notification.
Four notification types are available: Default, Email communication, SMS communication, and wrong SMS OTP.
Adding an “Application Notification” follows the same process as adding “Alert Notifications”.
Check the Active checkbox in the window that appears. Then, select the notification type. Provide Notification Type, Name, Frequency, No of Occurrence, Notification Context, and Contacts, in the window that opens, and click on the Save button.
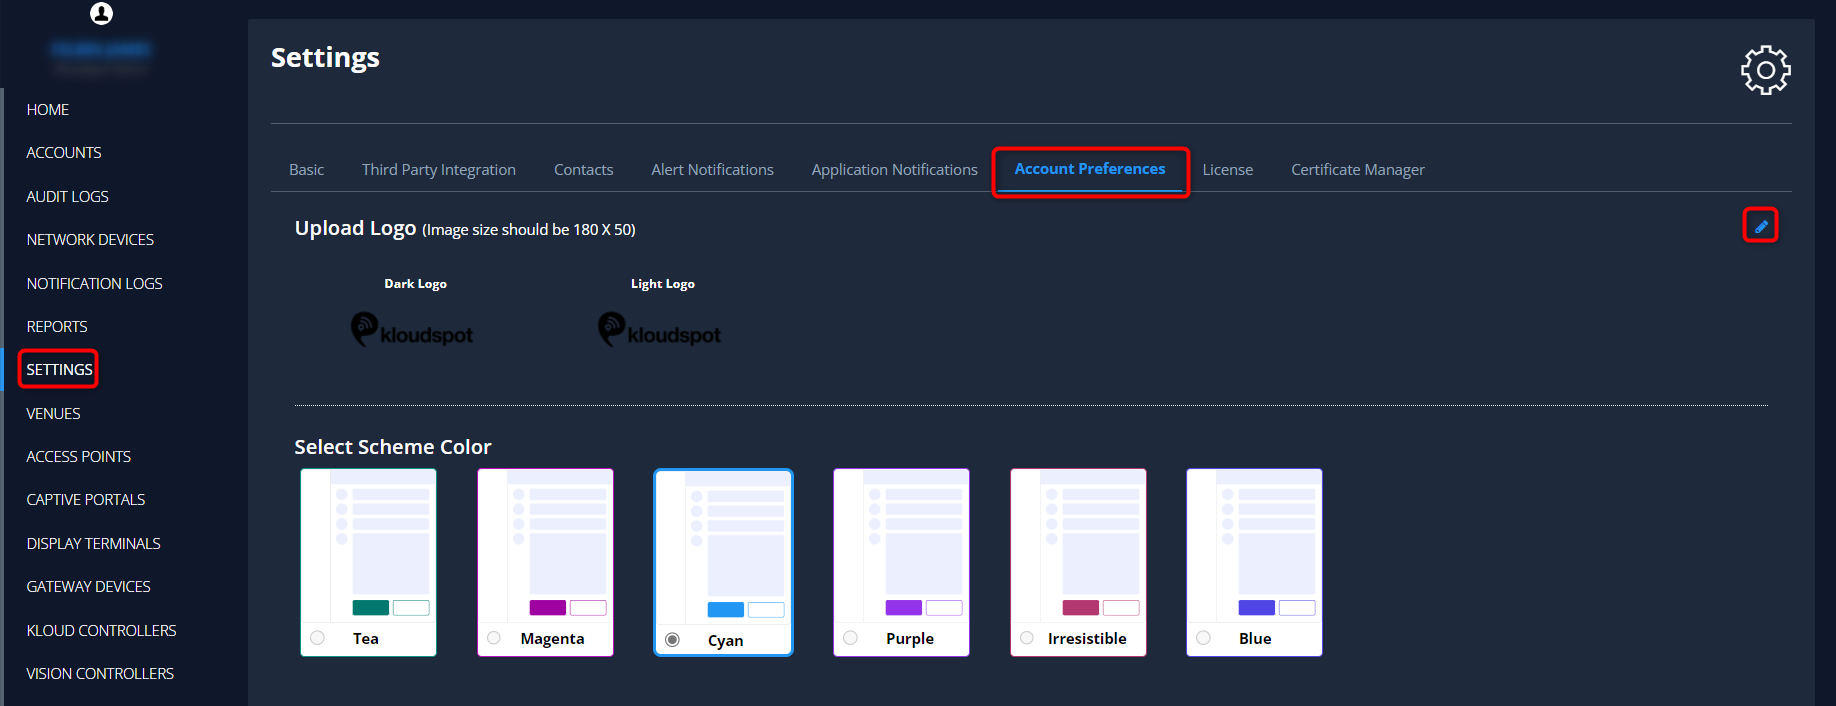
Account Preferences
Account Preferences allow you to customize your account settings, including adding your company’s Dark and Light Logos and selecting a color theme. This step helps ensure that your logo is visible in both light and dark modes and allows you to personalize the appearance of your account.
To do so, Navigate to the Settings > Account Preferences.
To add logo click Edit button and upload your dark and light logo.
Choose the color theme that best suits your preferences or brand identity.
Once you’ve added the logos and selected the color theme, click on the Save Preferences button to apply the changes.
License
License Activation
The License Activation process allows you to manage your Kloudspot license, enabling you to utilize network devices and access various features within the system.
To activate license navigate to Settings > License.
In the License settings window, locate and click on the Push Account Information button.
Once you click on the Push Account Information button. Kloudspot team will verify your purchase and activate your account.
After activating your license, click on the Sync License Information button.
This action ensures that the license information is synchronized.
Note: You can add network devices up to the limit specified in your license. To increase your license limit, please reach out to the KloudSpot support team.
To obtain a report on device usage, click on the Download device usage report button.
This report provides valuable insights into the usage patterns of your network devices.
Certificate Manager
Add Certificate
Integrating an SSL certificate can prevent the issue of SSL certificate failure due to technical glitches, allowing you to effortlessly access camera feeds with ease.
Note: This feature is for KloudVision users. If you are not a KloudVision user, you do not need to add the certificate.
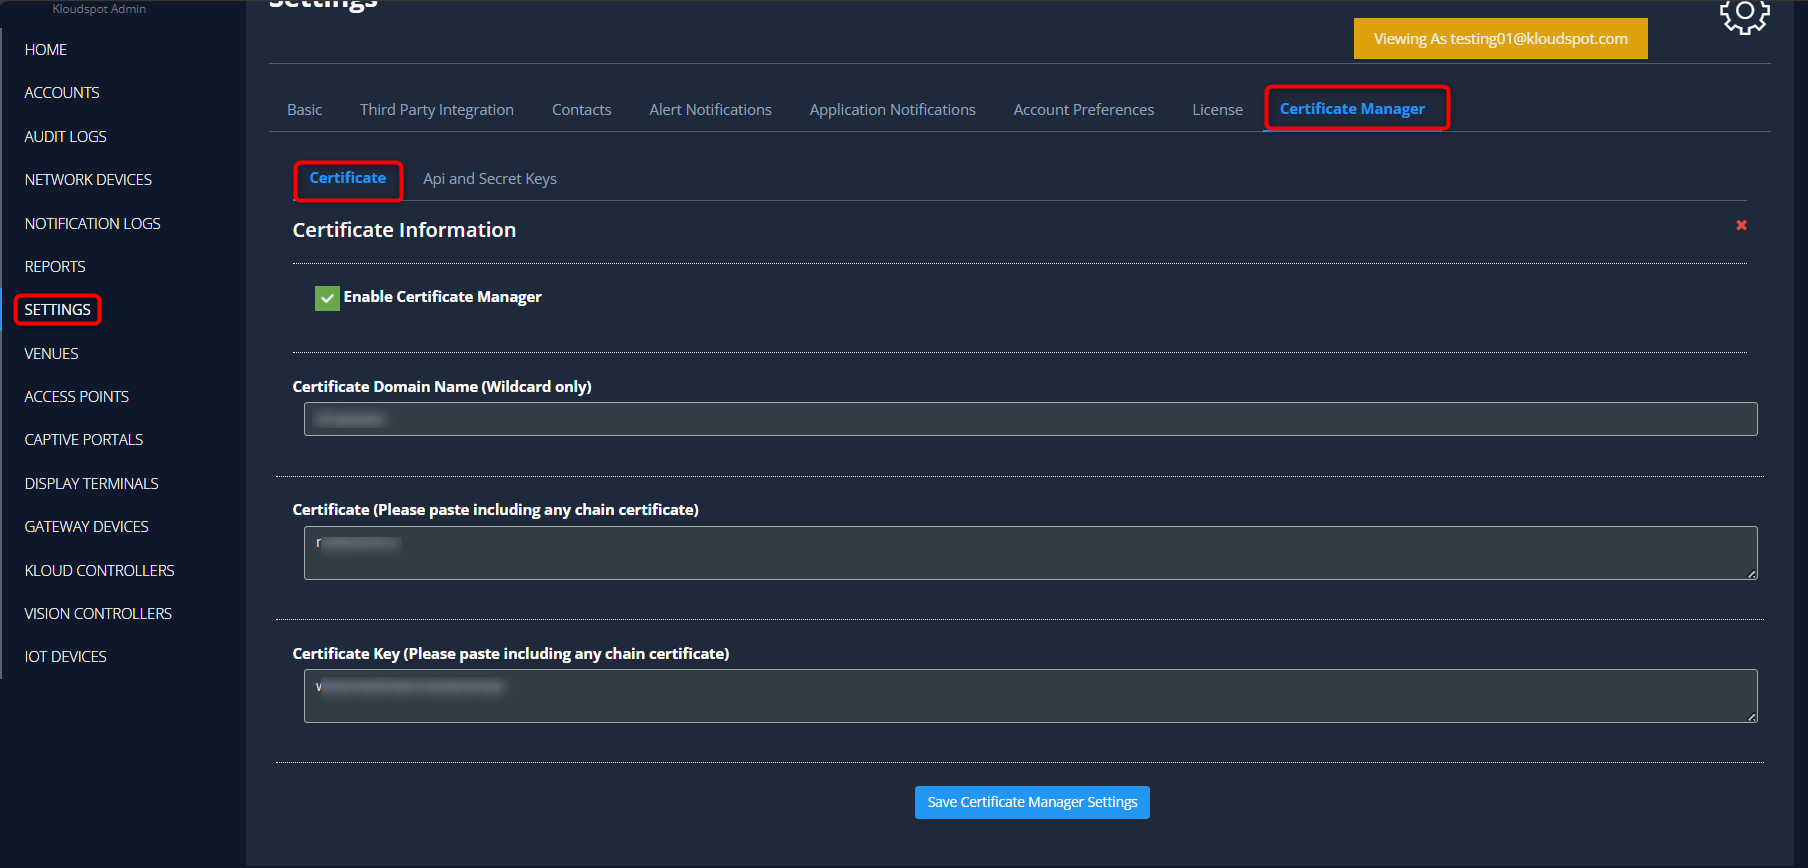
Navigate to the Settings > Certificate Manager.
Click on the Certificate tab to proceed with adding a new certificate.
Once you’re on the certificate management page, click on the Edit button.
Check the checkbox labeled Enable Certificate Manager to activate this feature.
Enter the necessary certificate details:
Certificate Domain Name: Enter the domain for which the SSL certificate is applicable.
Certificate: Paste the SSL certificate.
Certificate Key: Paste the SSL certificate key.
After entering the certificate details, click on the Save certificate manager button to save the configuration.
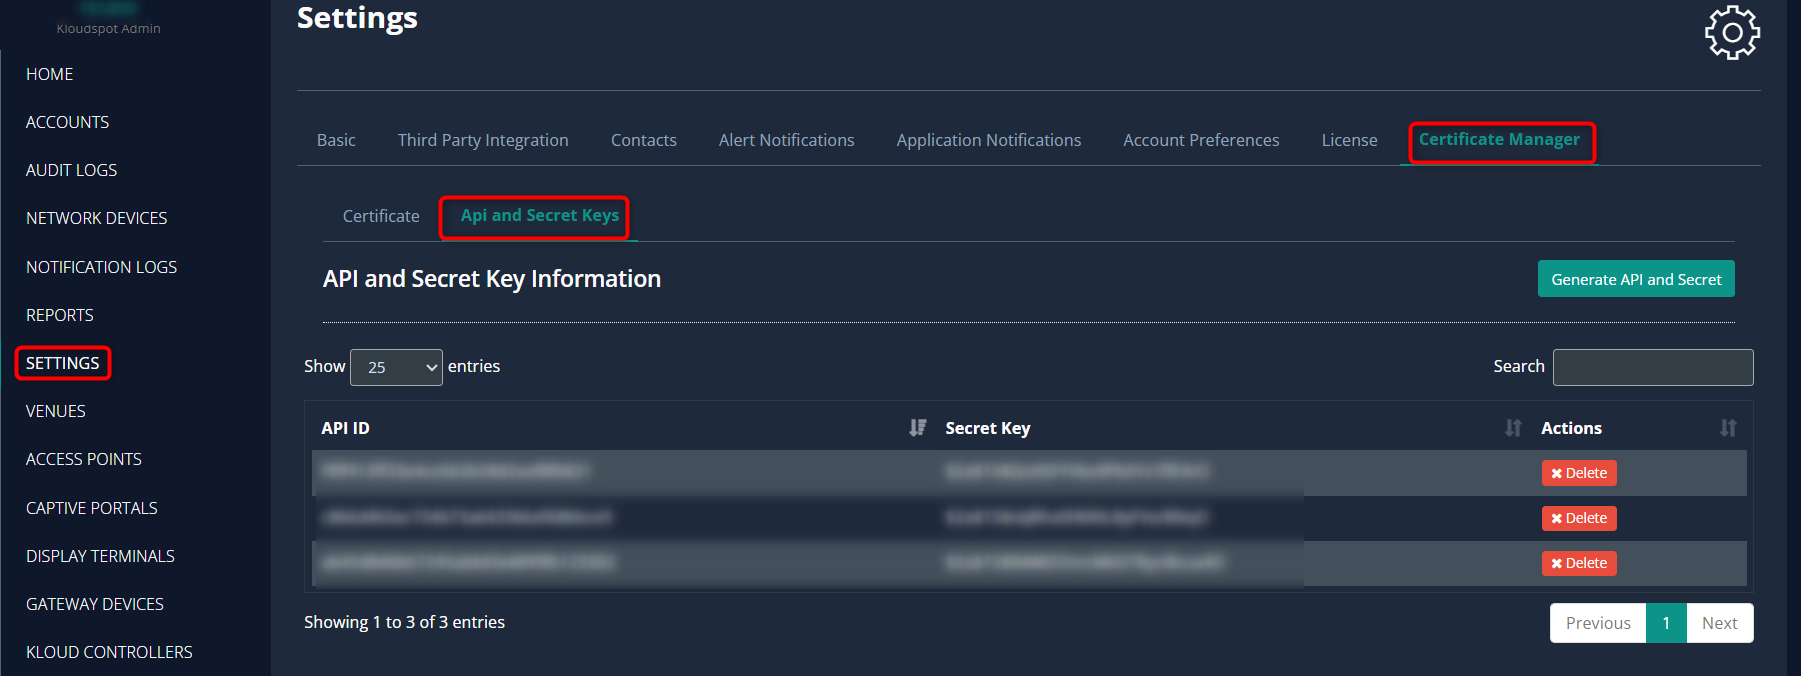
Api and Secret Keys
The Api and Secret Keys section allows you to generate an API ID and secret key, which are essential for accessing information about certificate values, domains, and keys within the system.
To do so, Navigate to the Api and Secret Key tab or section.
Within the Api and secret key tab, Click on the Generate API ID and secret key button to initiate the generation process.
Utilize the generated API ID and secret key to retrieve information about certificate values, domains, and keys within the system.
GET /public/certificate-details/certificate
GET /public/certificate-details/domain
GET /public/certificate-details/key
For more information on the API usage, Navigate to Profile > API-DOCS > Event Resource.
OpenID Connect Configuration
Overview
This document provides step-by-step instructions for configuring OpenID Connect with Okta for KloudManage integration. OpenID Connect is a secure authentication protocol that allows KloudManage to authenticate users through Okta. Follow the steps below to set up this integration.
Note: In the same way you can add Google authentication and Azure authentication.
Prerequisites
Before you begin, ensure you have the following:
KloudManage admin account credentials.
Okta developer account credentials.
Access to KloudManage settings as an administrator.
Configuration Steps
Open your web browser and navigate to KloudManage.
Log in to the KloudManage admin account using your credentials.
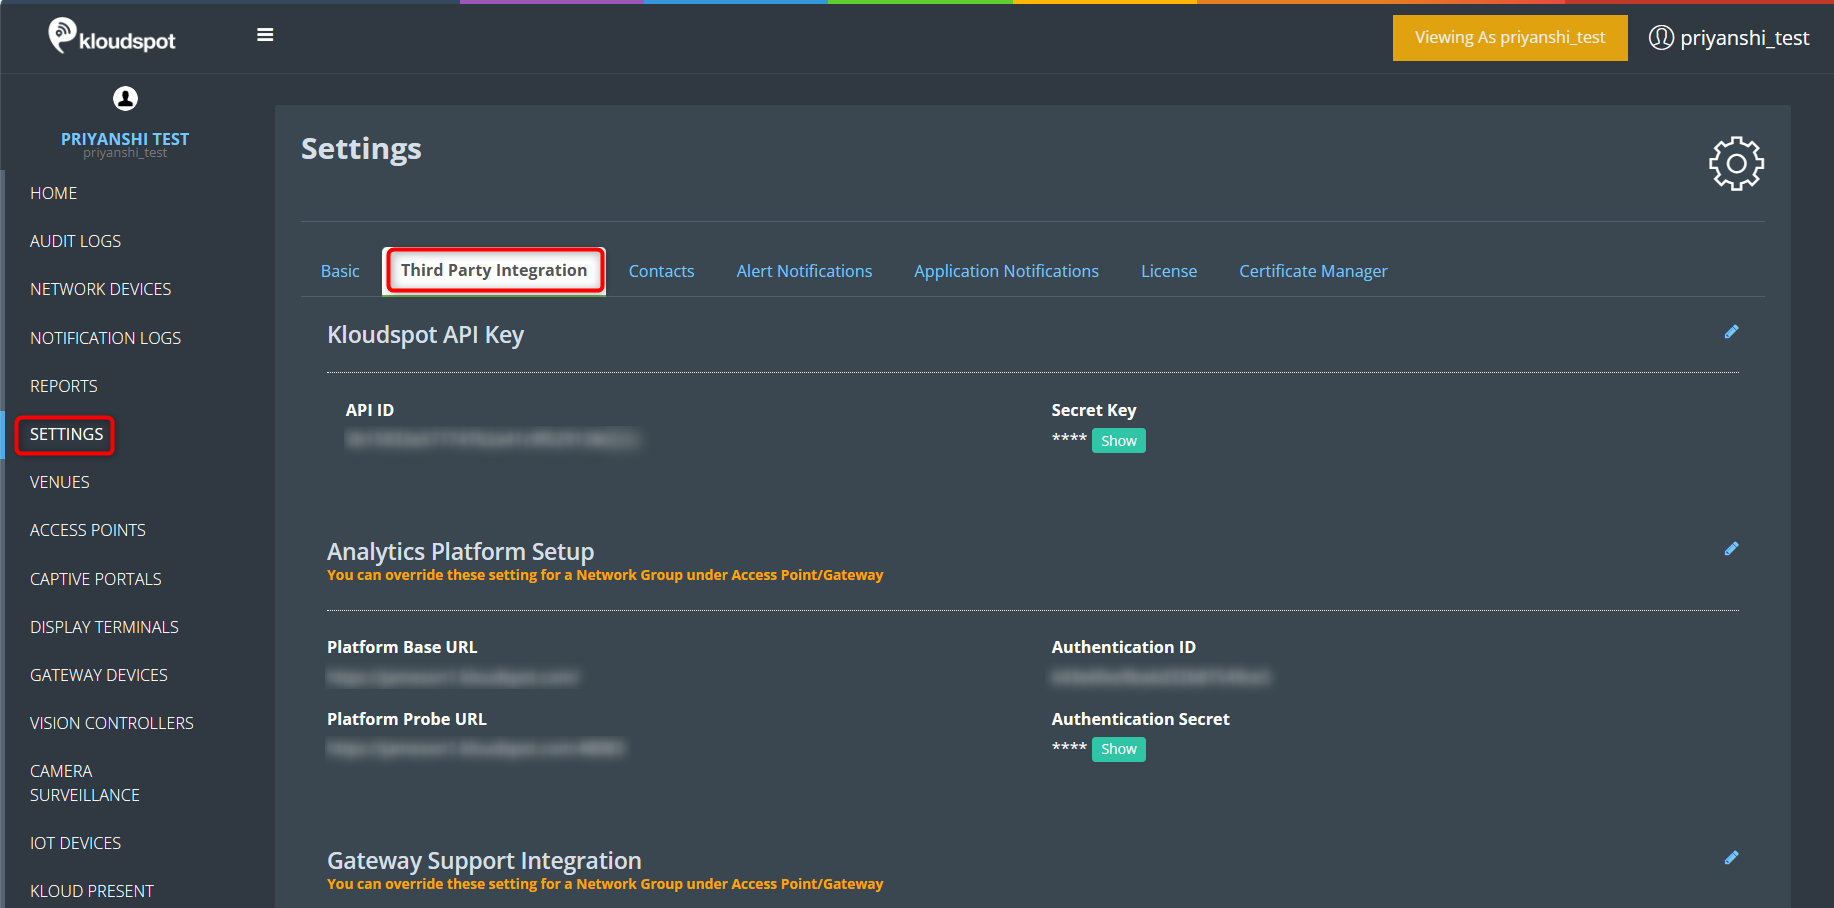
Navigate to Settings > Third Party Integration within the KloudManage admin interface.
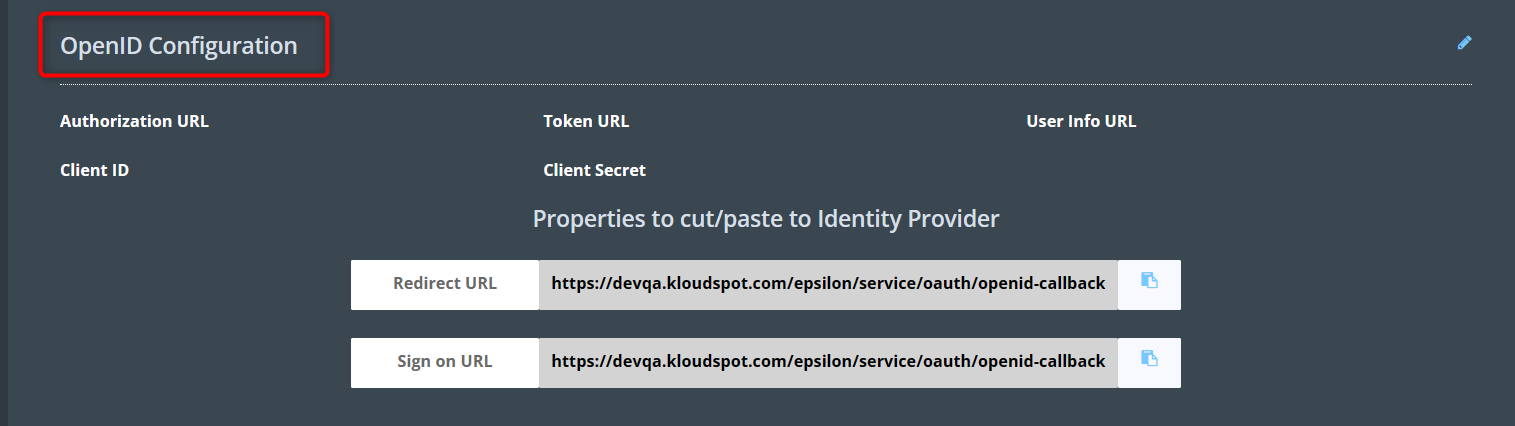
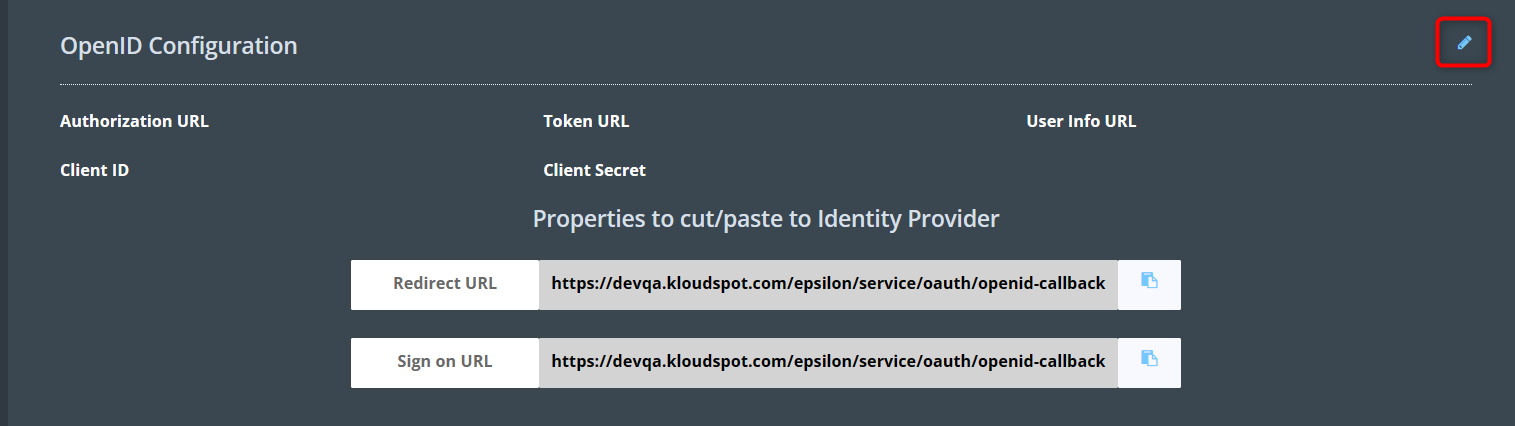
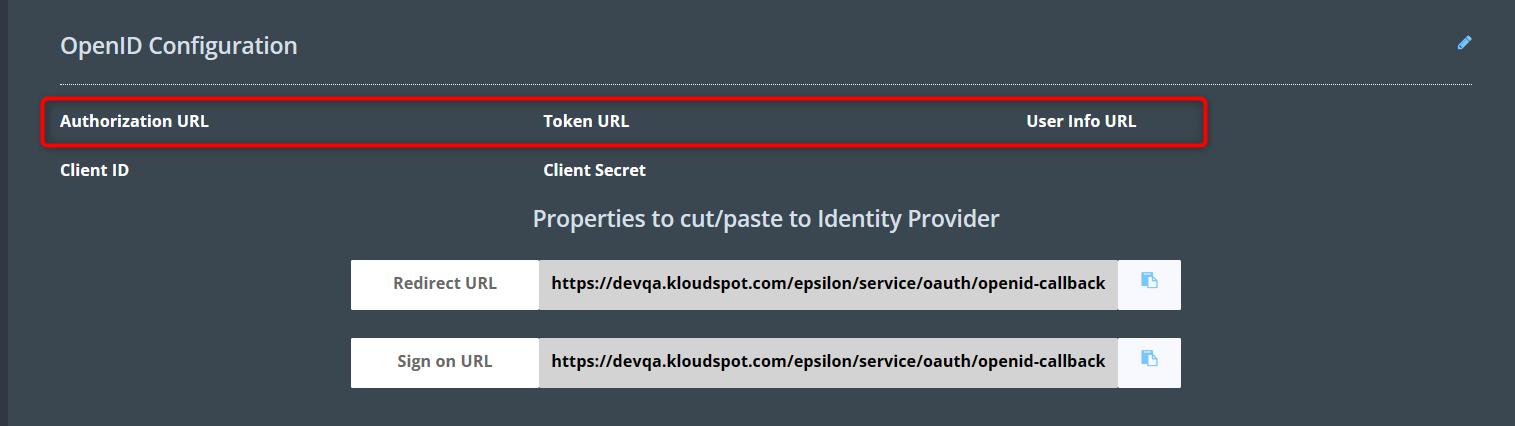
Then, Scroll down to the OpenID Configuration section.
Here click on the edit button and add the Authentication URL, Token URL, User Info URL, ClientID, and Client secret.
Log in to your OKTA developer account to get this information.
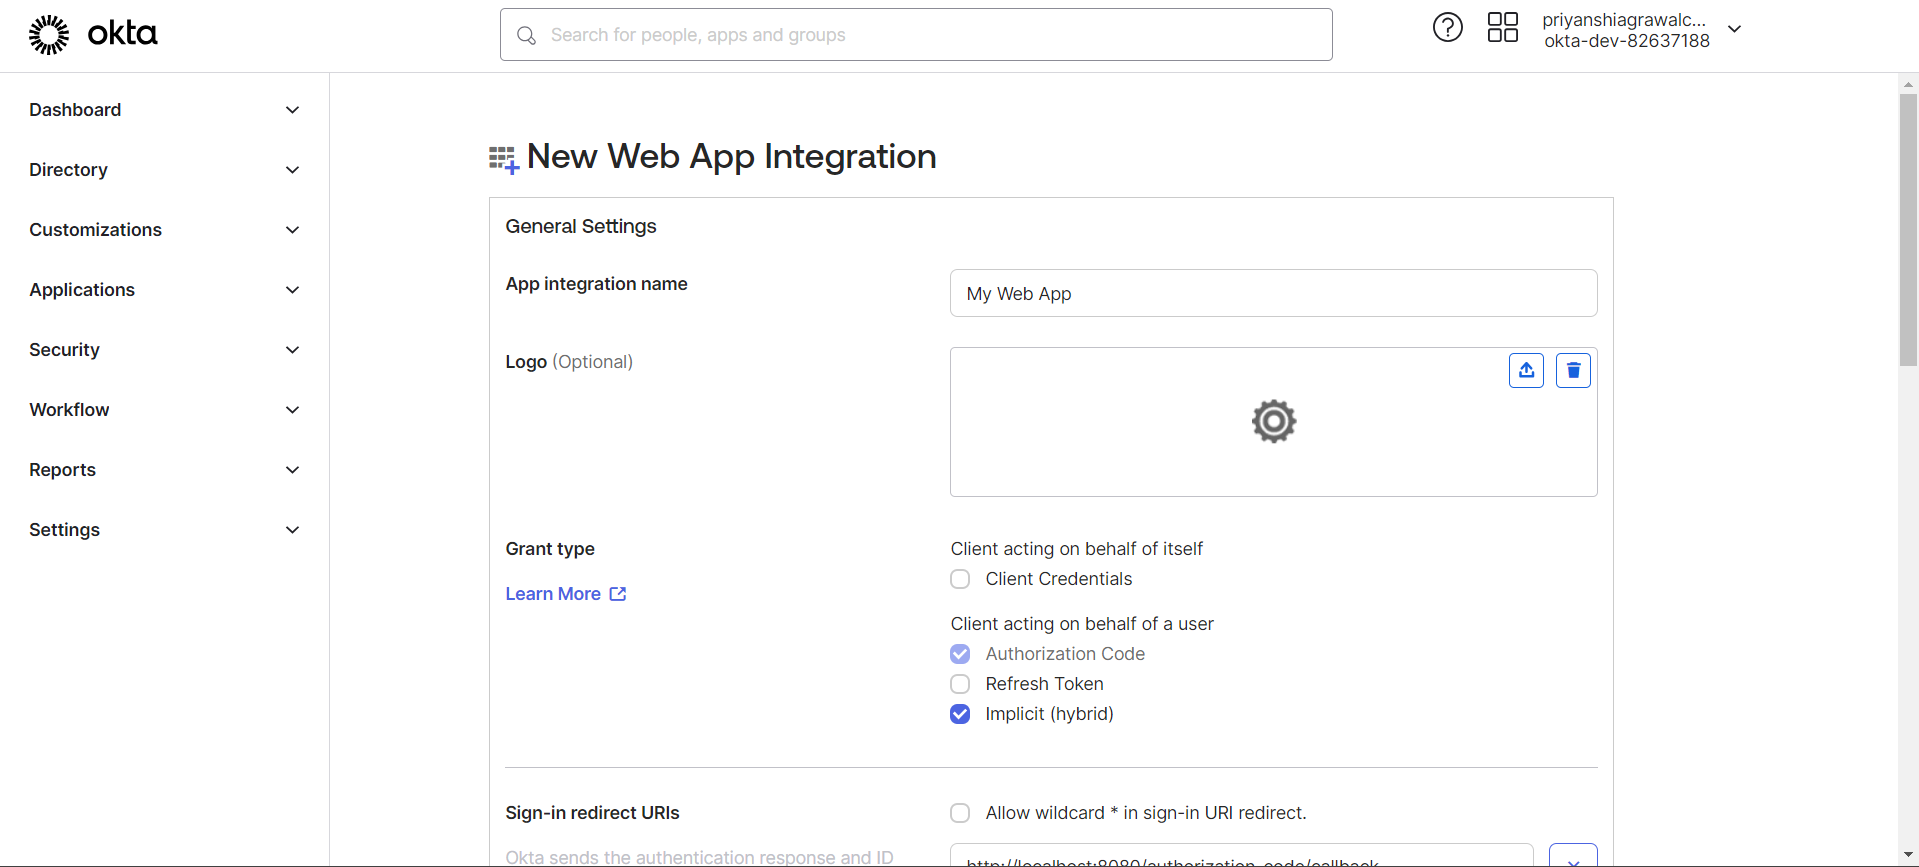
In your Okta developer account, create a new app with the sign-in method OpenId Connect > Web Application.
Then fill the general settings section in the OKTA and configure as shown in the image.
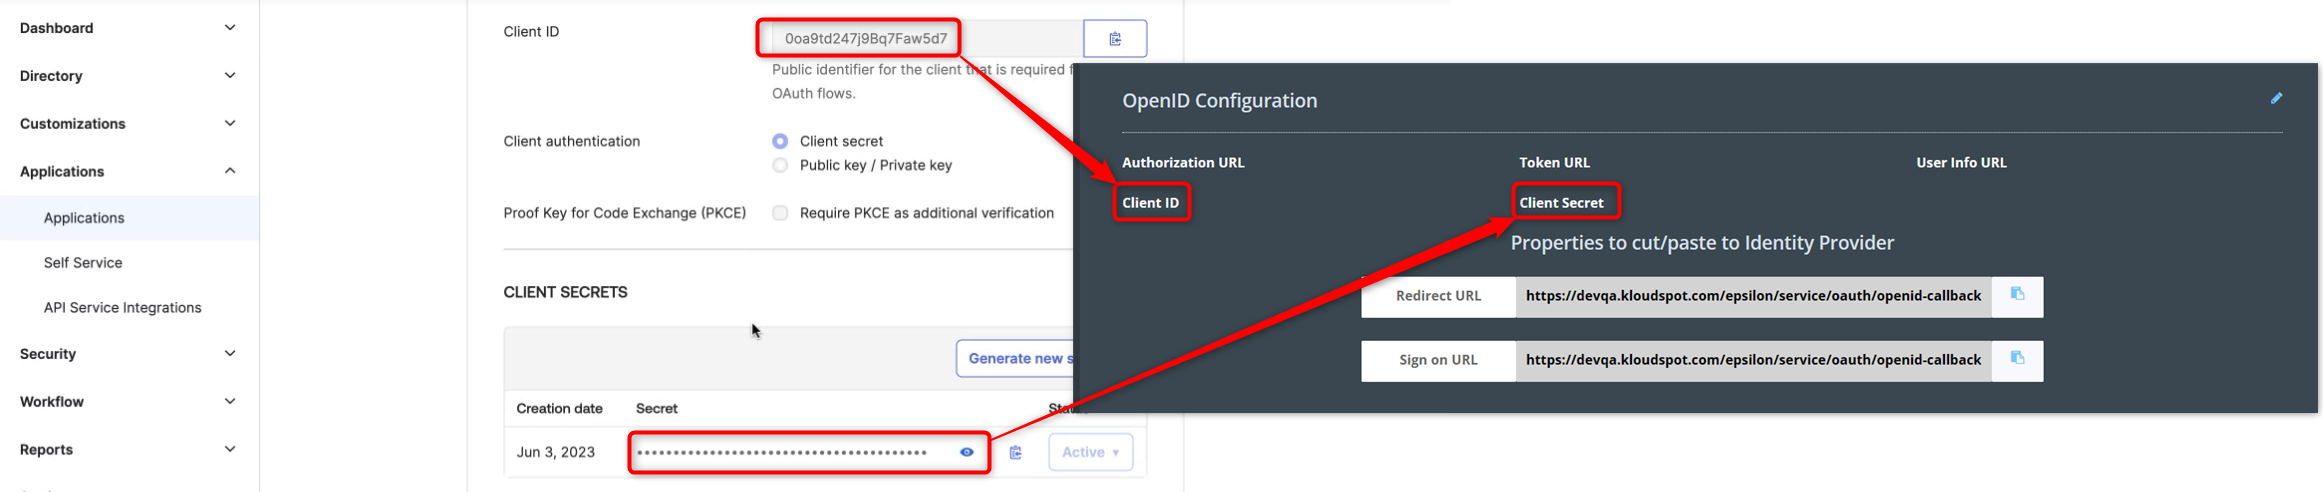
Click on the +Add URI button in the Login section and add the Redirect URL. You can find the Redirect URL from KloudMange. Finaly, click the save button to save the changes.
Copy the Client ID and Client Secret from the Okta app.
Return to KloudManage.
Click on the Edit button in the OpenID Configuration section.
Paste the Okta Client ID and Client Secret.
Provide the Authentication URL, Token URL, and User Info URL in the following format, where ${baseUrl} represents the issuer URI of your OKTA account. For additional details, refer the OKTA developer documentation
Authorization URL: ${baseUrl}/oauth2/v1/authorize
Token URL: ${baseUrl}/oauth2/v1/token
User info URL: ${baseUrl}/oauth2/v1/userinfo
Click the Save button to save the changes in KloudManage.
Users can now log in to KloudManage using OpenID Connect. Refer to the User Roles and Permissions section to learn how to add a new user.
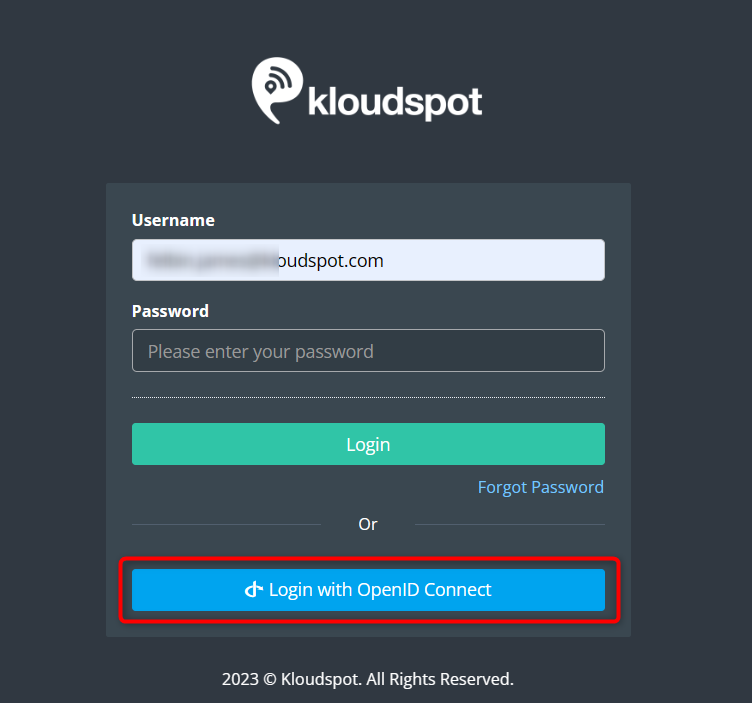
On the KloudManage login page, enter the user’s company email ID.
Click on the Login with OpenID Connect button.
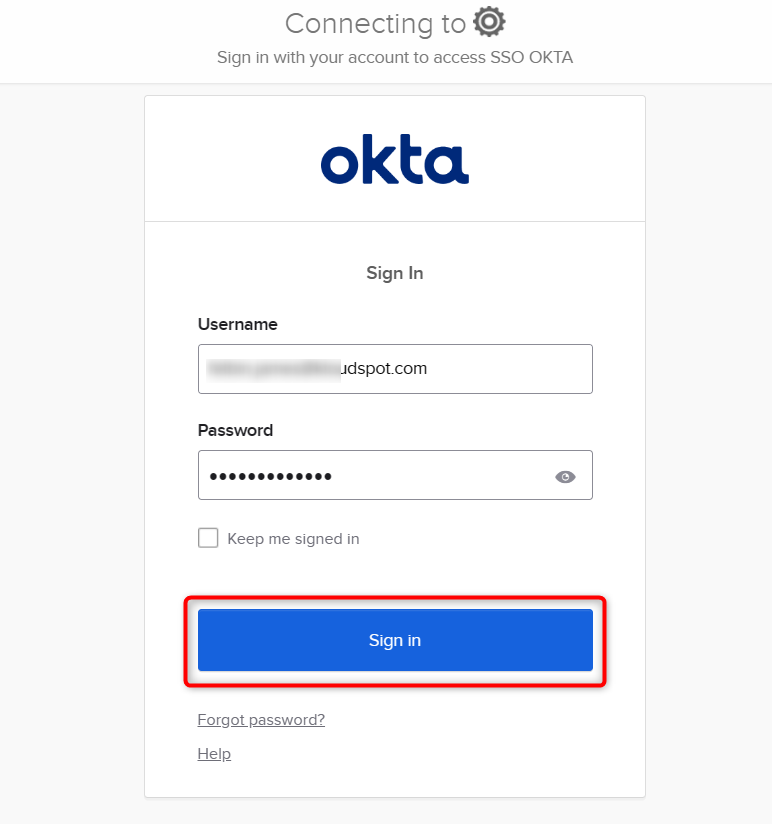
Users will be redirected to the Okta login page.
Enter the Okta username and password and click on the Sign In button.
Assigning and managing Network Devices
Once you have configured the Settings menu according to your requirements, you can start adding devices to KloudManage.
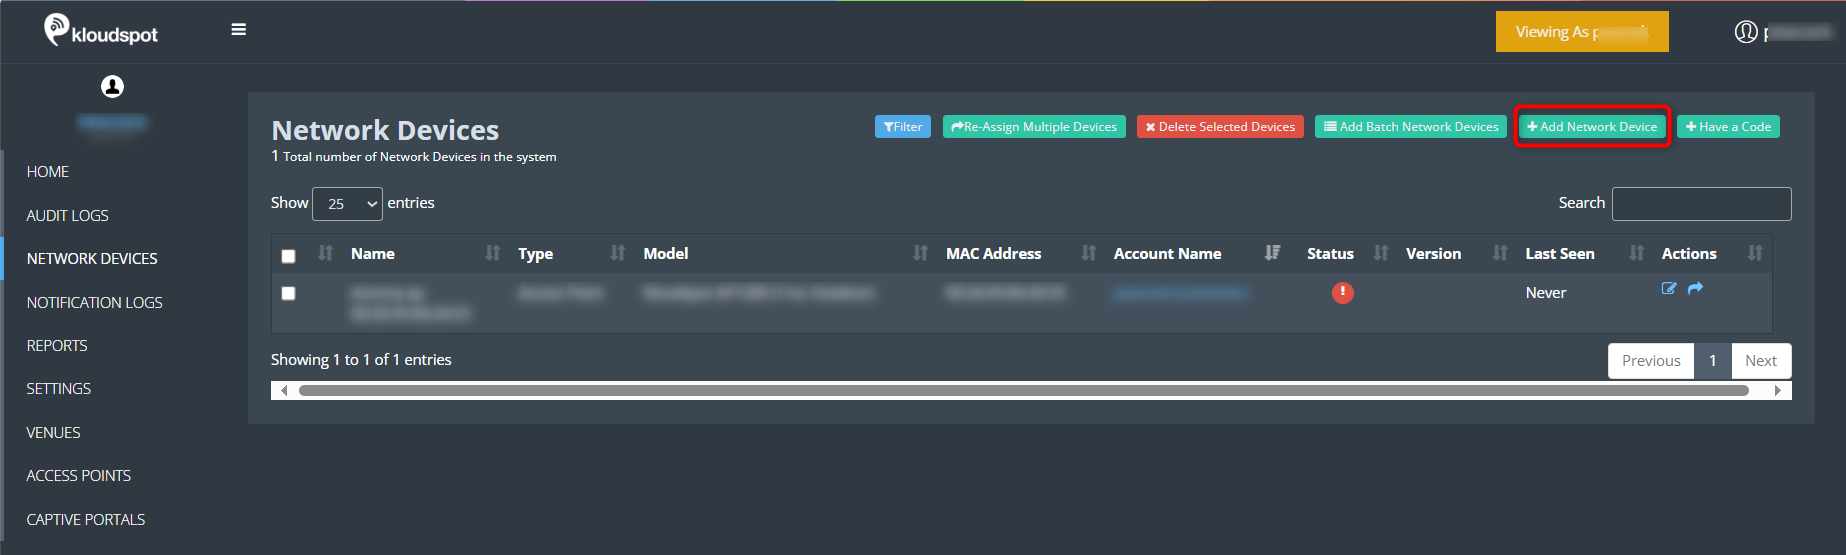
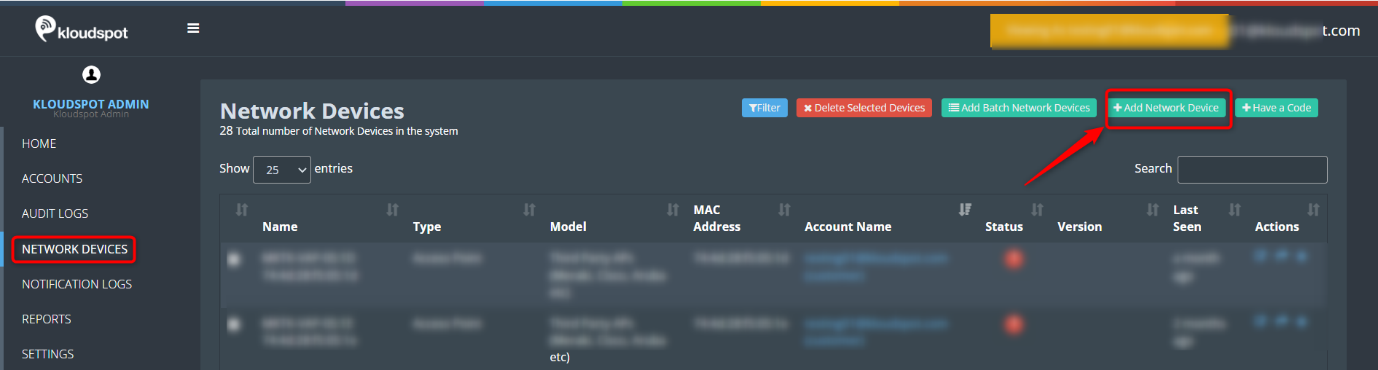
Navigate to the “Network Devices” menu. You will be directed to the Network Devices page, which displays the devices you have added.
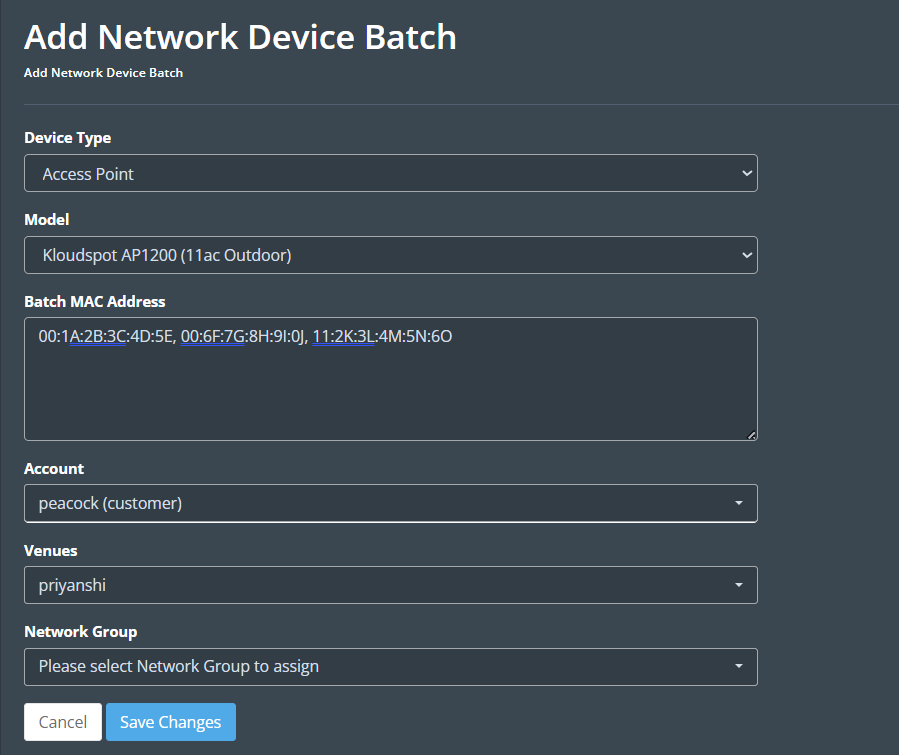
To add multiple devices simultaneously, you can use the “Add Batch Network Devices” option. It’s important to note that the device type should be the same when adding multiple devices together. Provide the Mac addresses of the devices you want to add, separating them with commas. For example: 00:1A:2B:3C:4D:5E, 00:6F:7G:8H:9I:0J, 11:2K:3L:4M:5N:6O.
Alternatively, you can use the “Add Network Device” option to add a device individually. Depending on the type of device you’re adding, refer to the respective sections for detailed instructions:
• Refer to the “NMS User Guide” to add a gateway device.
• Refer to the “Add a network device” section from the S10 Device Configuration guide to add the IOT device.
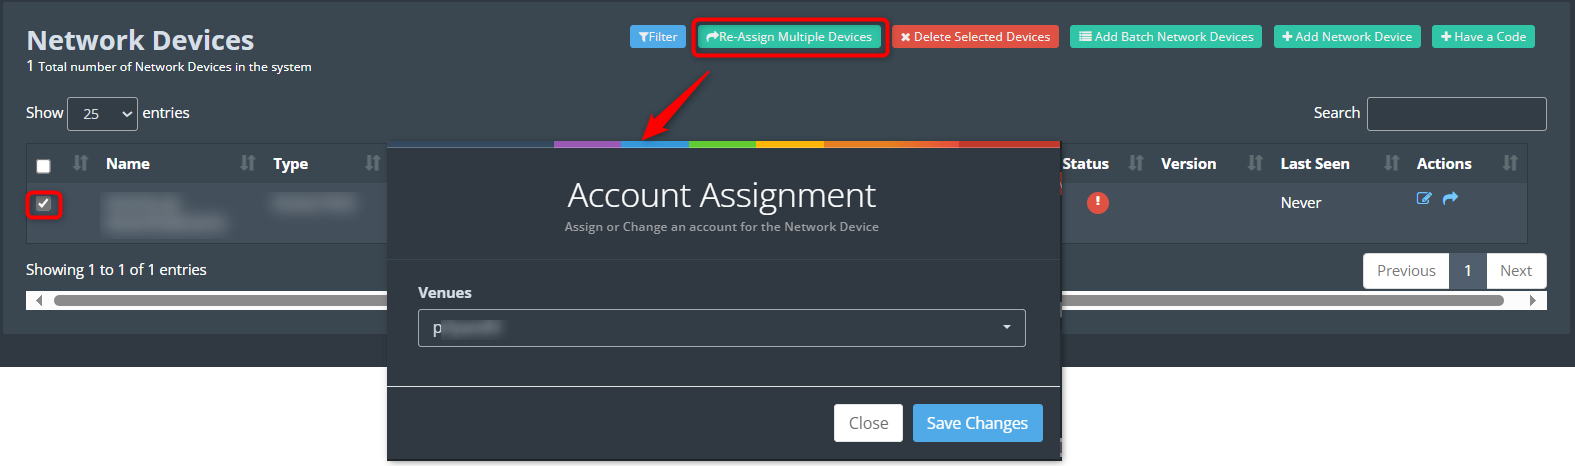
If you need to change the location of multiple devices, select those devices and click on the “Re-Assign Multiple Devices” button to modify their location.
To add an Android TV, click on the “Have a Code” button. In the popup window that appears, enter the Hosting Platform, Orientation, Rotation, TV Code, Name, Account, and Venues. Finally, click on the “Save Changes” button.
Note: The Android Studio application issues an 8-digit code called the TV Code during installation.
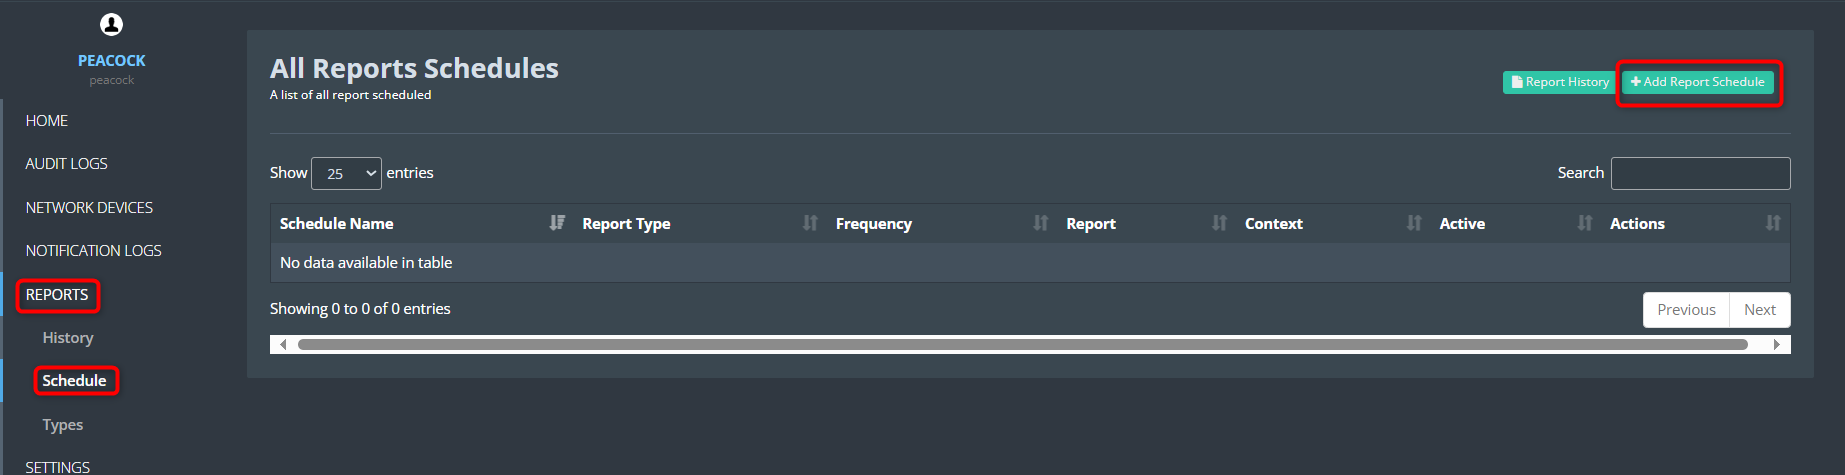
Reports
This report section tells you about reports and how to schedule them, make your own report types, and see the reports that have already been created. Different reports can be made based on the device you’re using. For instance, if you use KloudVision, you can make a report called “vision face overview.” This will give you the face analytics data report that was made at the time frame you choose.
Refer to the sections given below for more details.
In the window that opens, click on the + Add Report Schedule button.
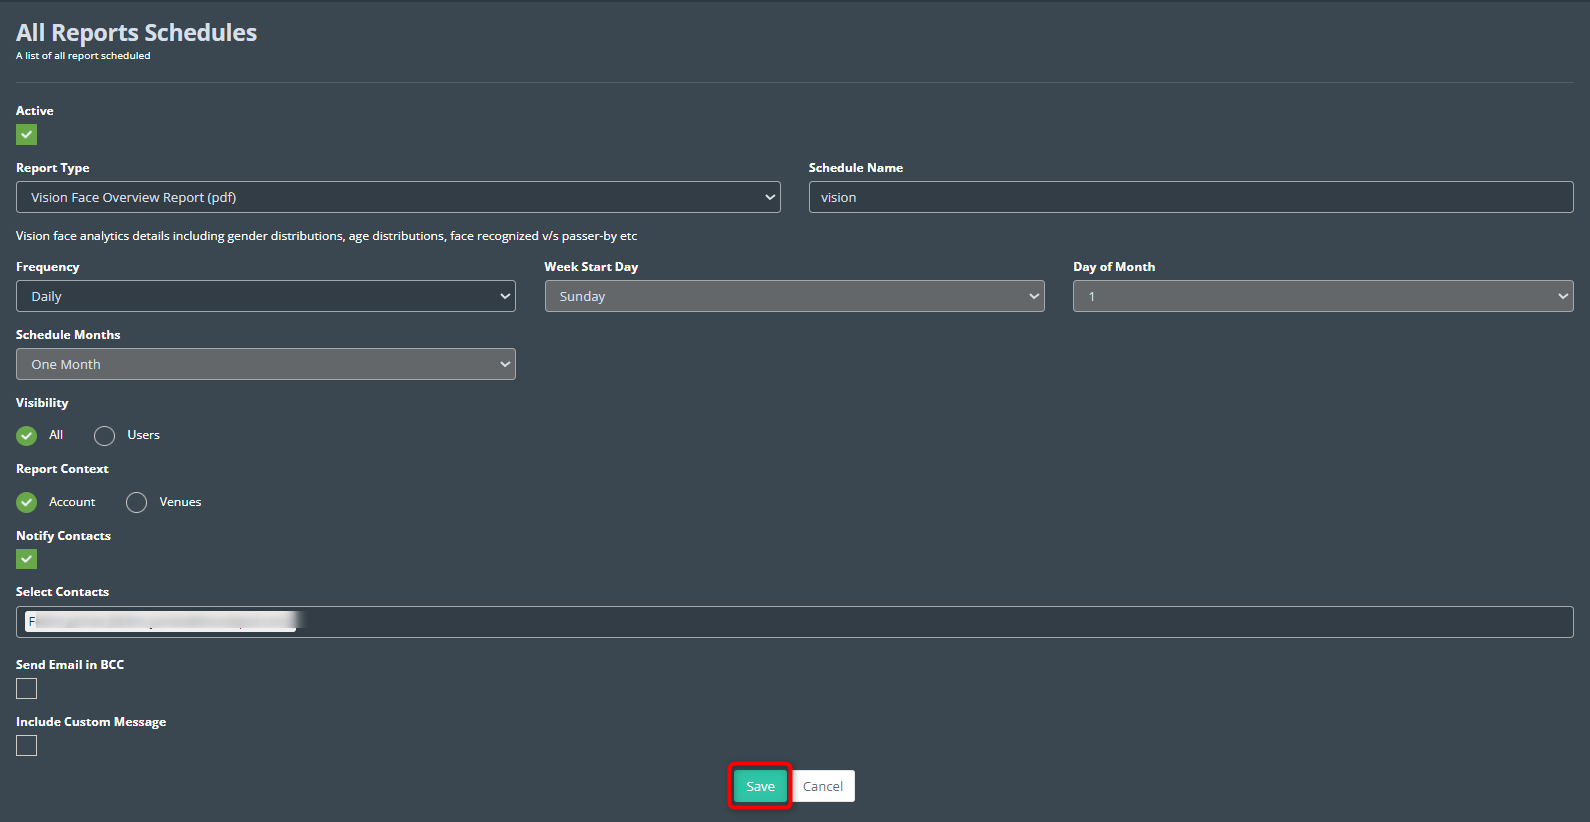
Enter the required information in the window that appears.
Using this process, various report types, including access point/gateway, device, display, vision, captive portal, notification, and others, can be scheduled. For detailed instructions, please refer to the “Captive Portal Usage Report” document.
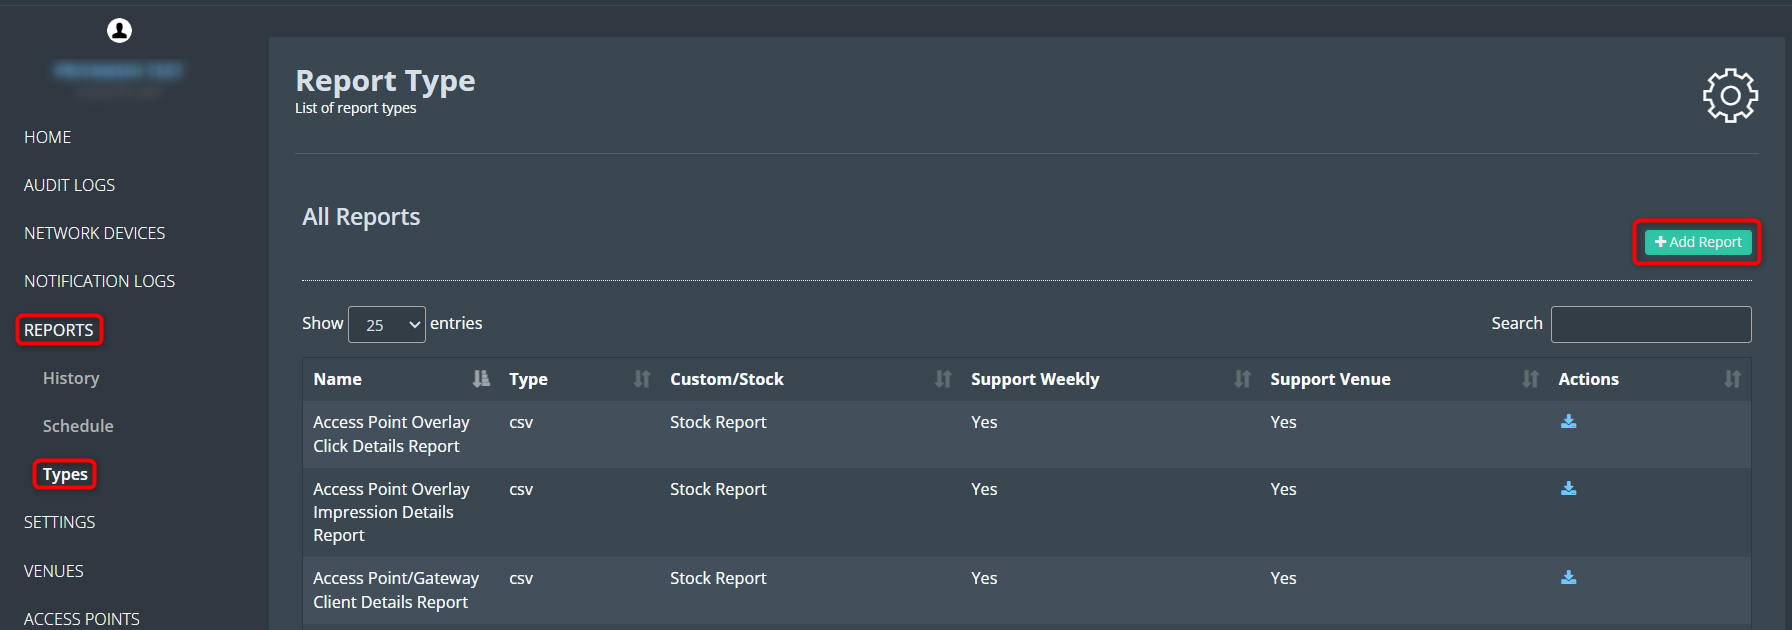
Create a Report Type
Apart from the default stock report types, you have the option to create a custom report type. Follow these steps:
Click on the Types button.
In the window that opens, click on the Add Report button.
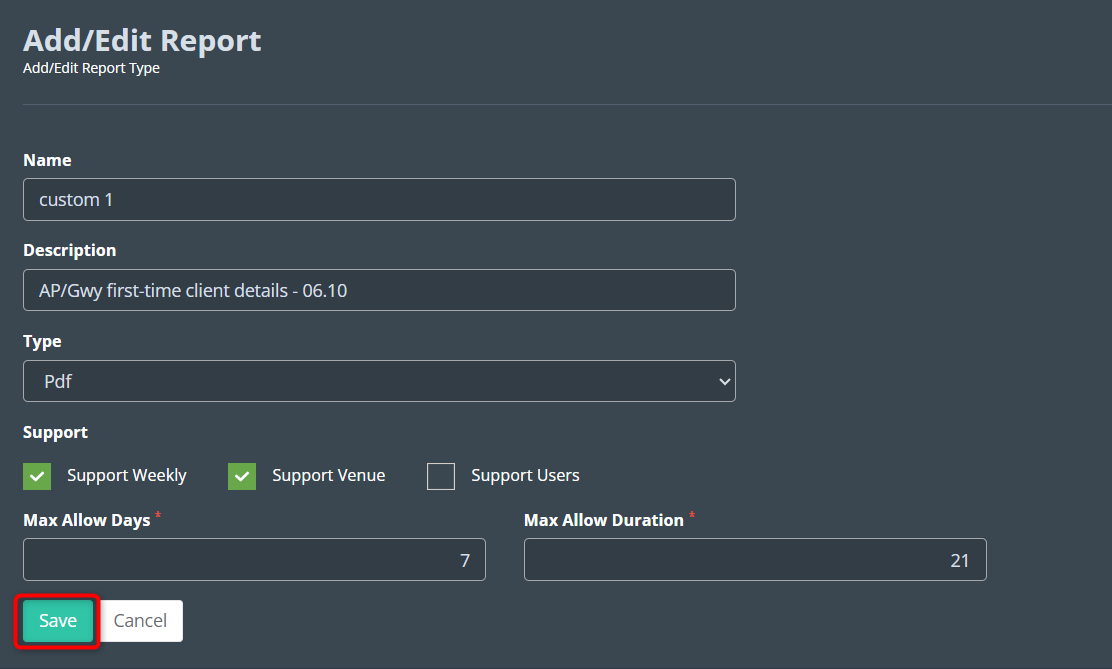
Enter the Name, Description, Type, Support, and Duration in the Add/Edit Report window. Click on the “Save” button.
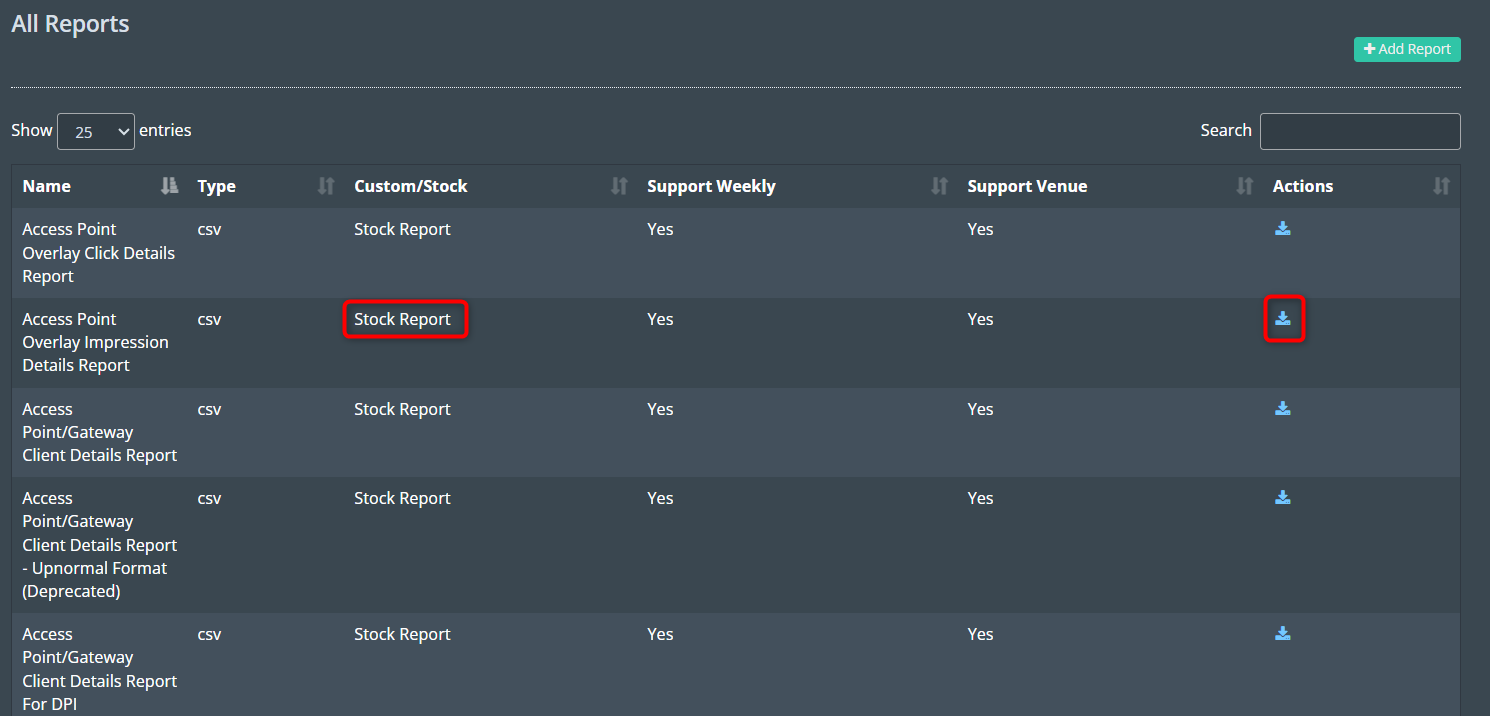
Next, customers can download the stock reports and customize them according to their needs.
Click on the download button in the action column to download.
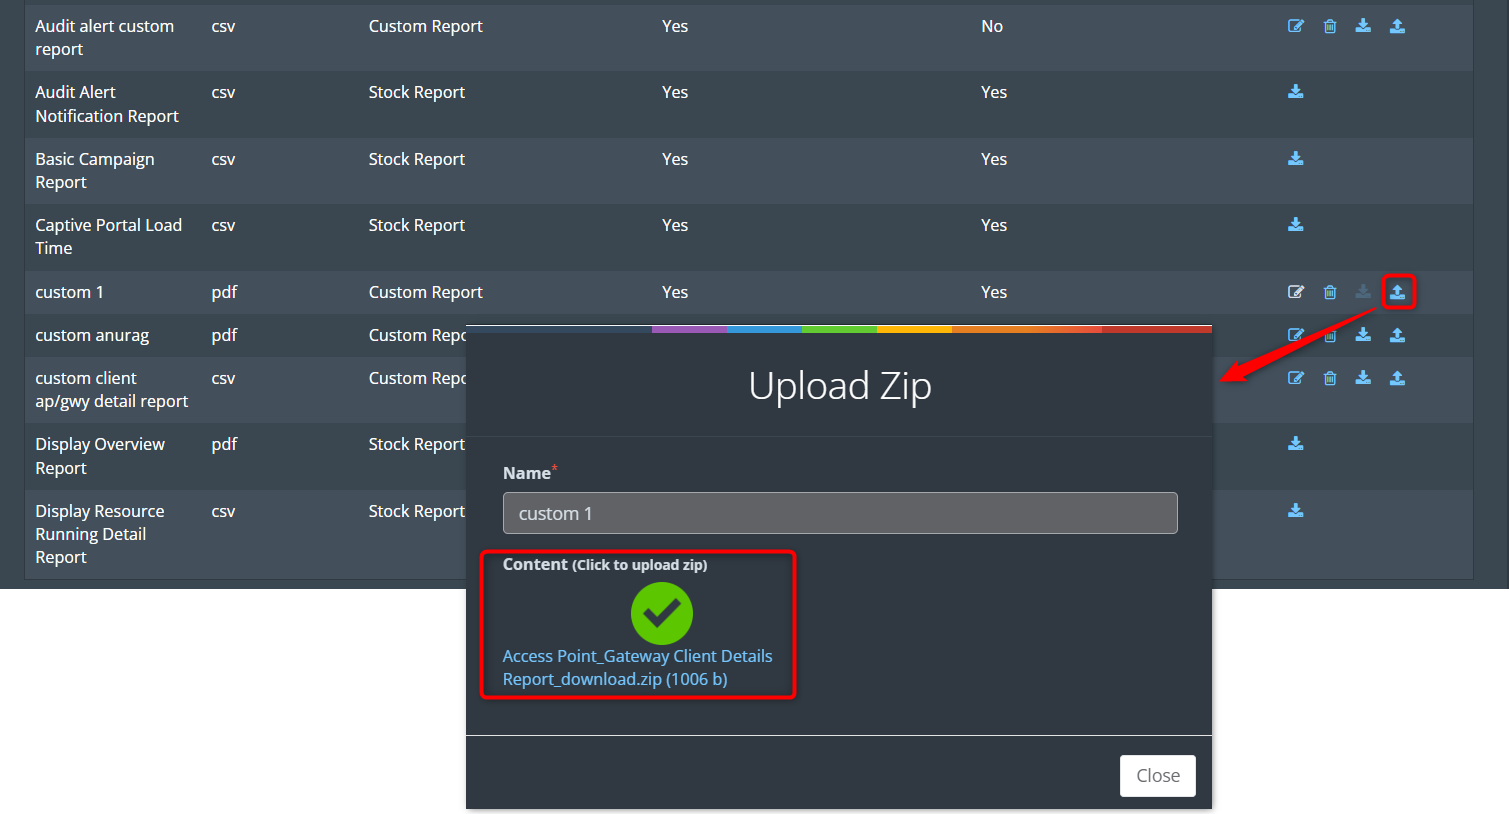
After downloading, the customized reports can then be uploaded into the custom reports that the user has created.
Click on the upload button found in the action column of the custom report.
In the popup window that opens, click on the Content button and upload the zip file that you have downloaded.
Your custom report has been successfully added. You can now use this report type when scheduling a report.
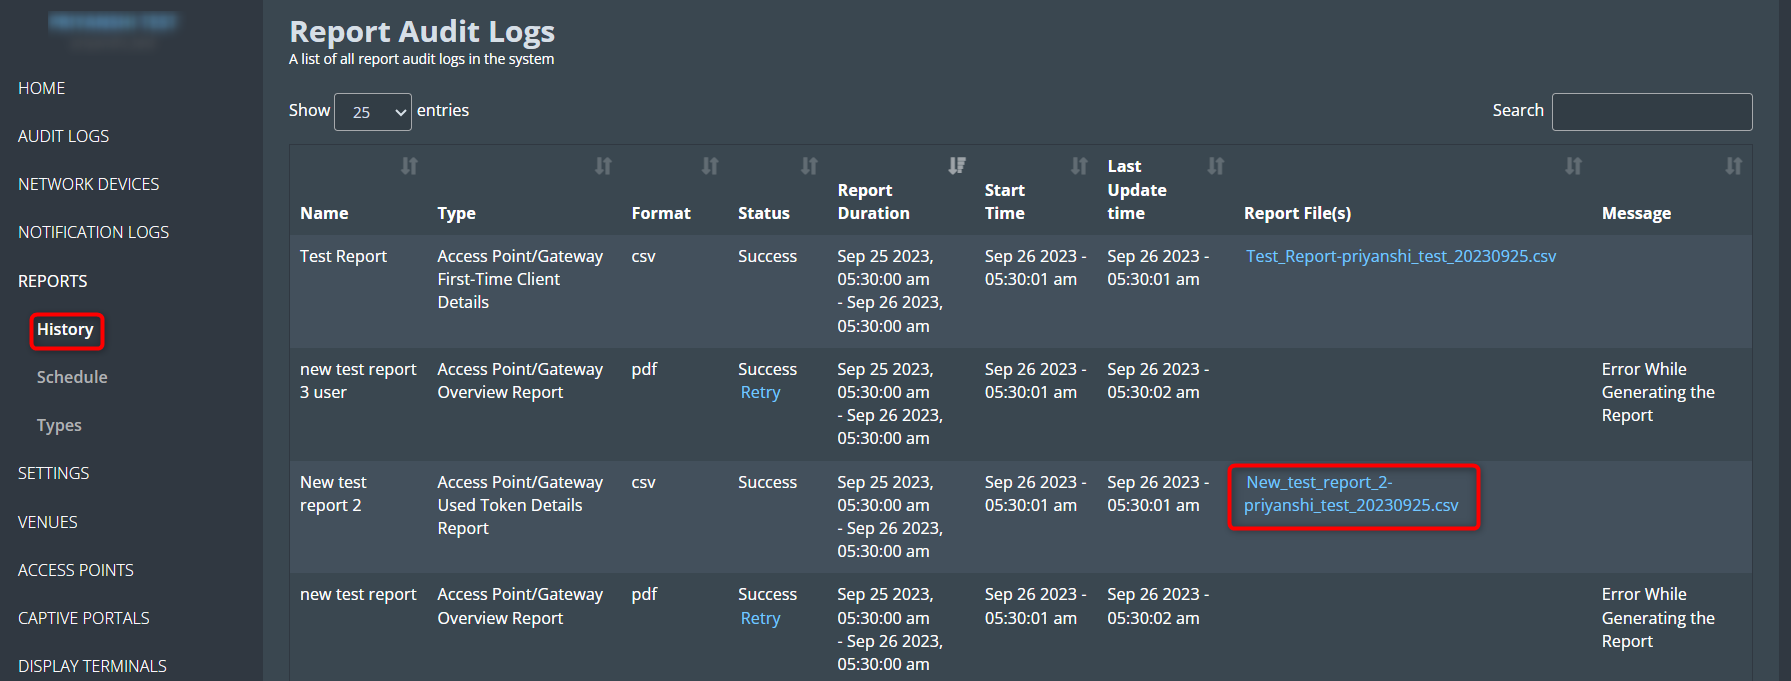
View Report History
If you wish to review the history of reports that have been created thus far, follow these steps:
Click on the History menu.
This action will open the Report Audit Logs window, where you can access information about previously generated reports.
In the Report Audit Logs window, you will find a list of reports that have been generated. To download any of these reports, click on the link provided in the Report Files column.
Audit Logs
The Audit Logs page offers comprehensive insights into every activity within the system. This includes a detailed record of various operations and interactions, providing a transparent view of system-wide actions. The logs encompass a wide range of events, such as:
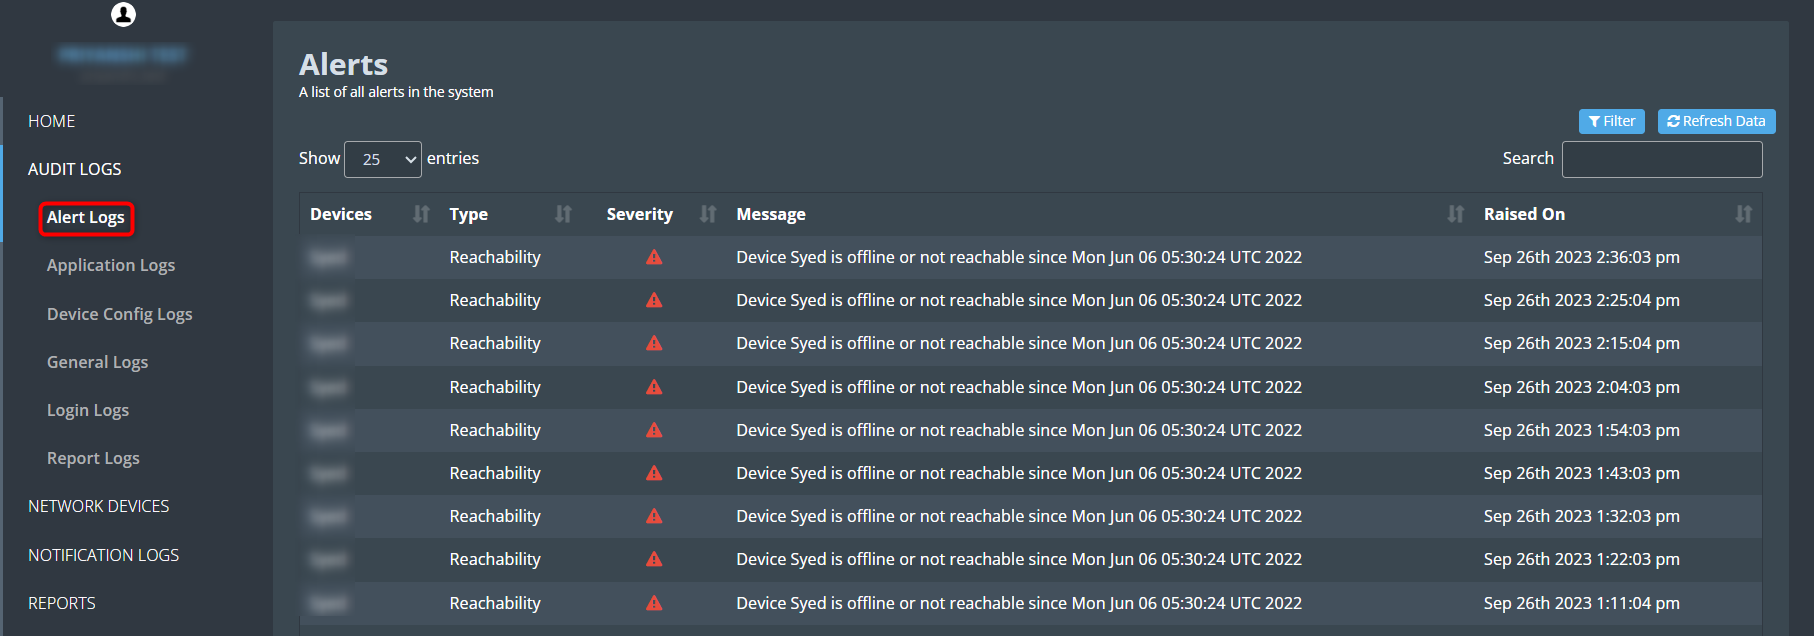
Alert logs
The Alert Log function serves as a vigilant sentinel, promptly notifying users of critical events and potential issues within specified categories. This invaluable feature provides real-time alerts for the following scenarios:
• Link Capacity, Link Jitter, Link Latency, OTP Not Received, Link Packet Loss Reachability, Reboot, Remote Support, Vision Camera View Change, Vision Motion Alert, Vision Rule Trigger. Refer to the Alert Notifications section to learn more about these.
Application logs
The application log function is a crucial component of your system’s monitoring and alerting capabilities. It specializes in providing timely alerts for specific types of issues that pertain to essential communication channels. Here are the key categories for which you can expect alerts:
• Email Communication: This feature ensures you stay informed about any anomalies or disruptions in your email communication system. Whether it’s a delay in delivery, failed transmissions, or other email-related issues, the Application Log function will promptly alert you.
• SMS Communication: Receive instant notifications regarding any irregularities in your SMS communication channels. This includes alerts for failed message deliveries, delays, or other SMS-related concerns, allowing for swift resolution and minimal disruption.
• Wrong SMS OTP: Stay ahead of security concerns with immediate alerts for instances where an incorrect One-Time Password (OTP) is provided. This crucial notification enables you to take rapid action to rectify the situation and ensure secure access.
Device configuration logs
The Device Configuration Audit Logs function stands as a cornerstone in ensuring the integrity and security of your system’s settings and configurations. This vital feature meticulously records and reports changes made to device settings, providing you with a detailed account of system adjustments over time.
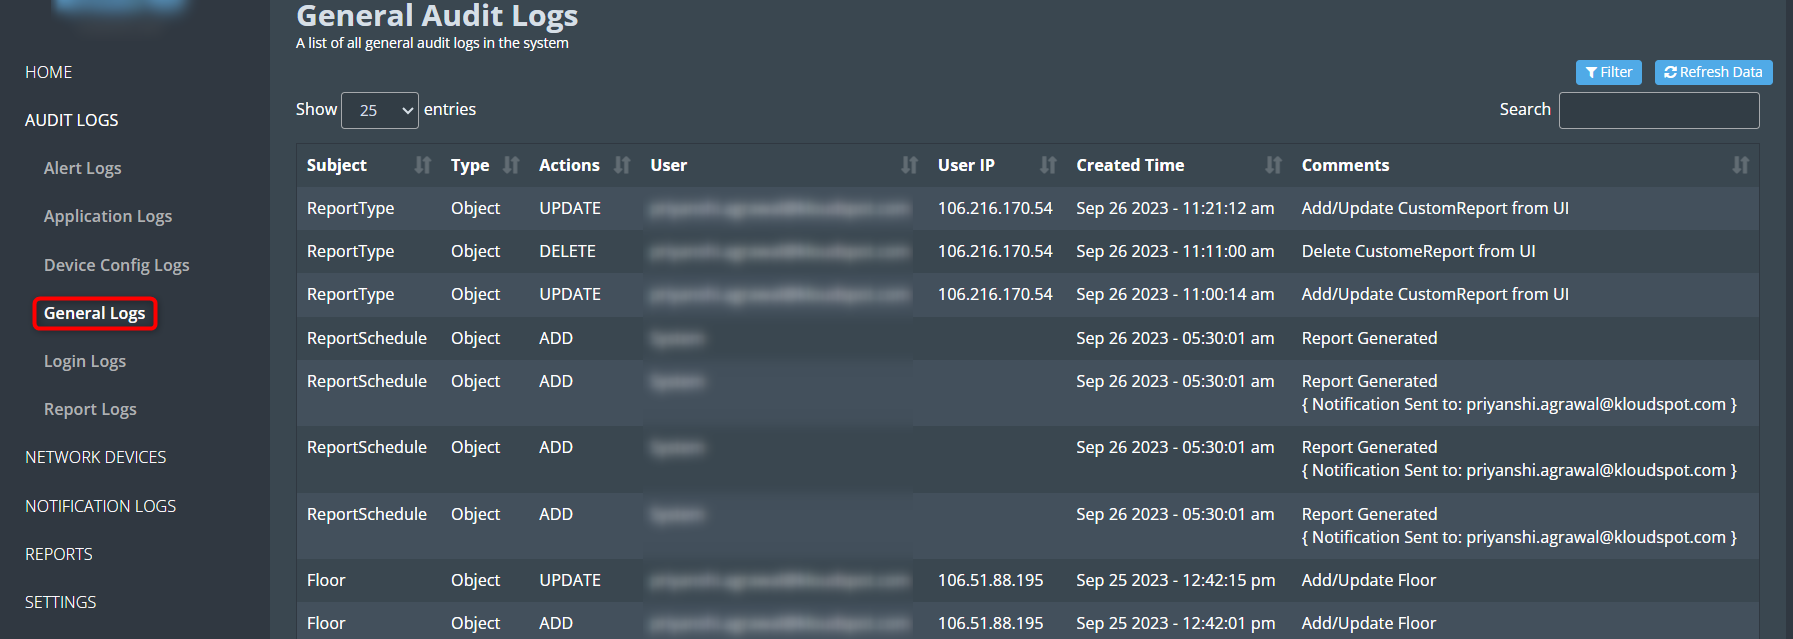
General logs
The General Audit Logs function serves as a comprehensive record-keeping mechanism for all critical actions performed within Kloudmanage. This indispensable feature meticulously captures and reports any additions, updates, deletions, and changes in location that occur within the platform.
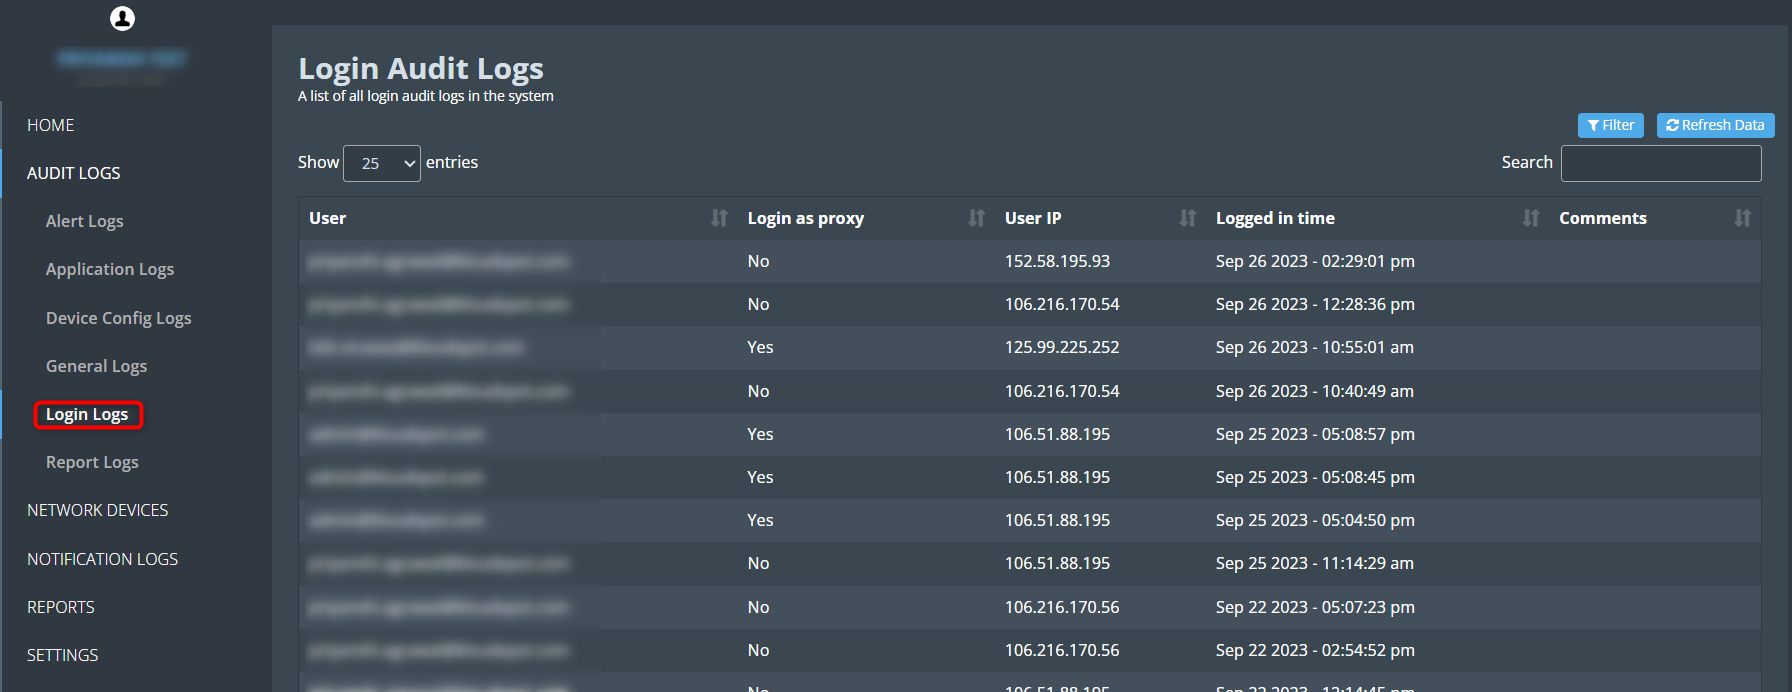
Login logs
The Login Logs function is a critical component in tracking user interactions and system access within your platform. This feature provides a detailed record of user logins and their engagements with the system, ensuring comprehensive visibility into user activities.
Report logs
The Report Audit Logs function is a valuable resource for information about the creation and management of reports in your system. This feature keeps a detailed record of different aspects, such as report types, formats, status, start times, and last update times.
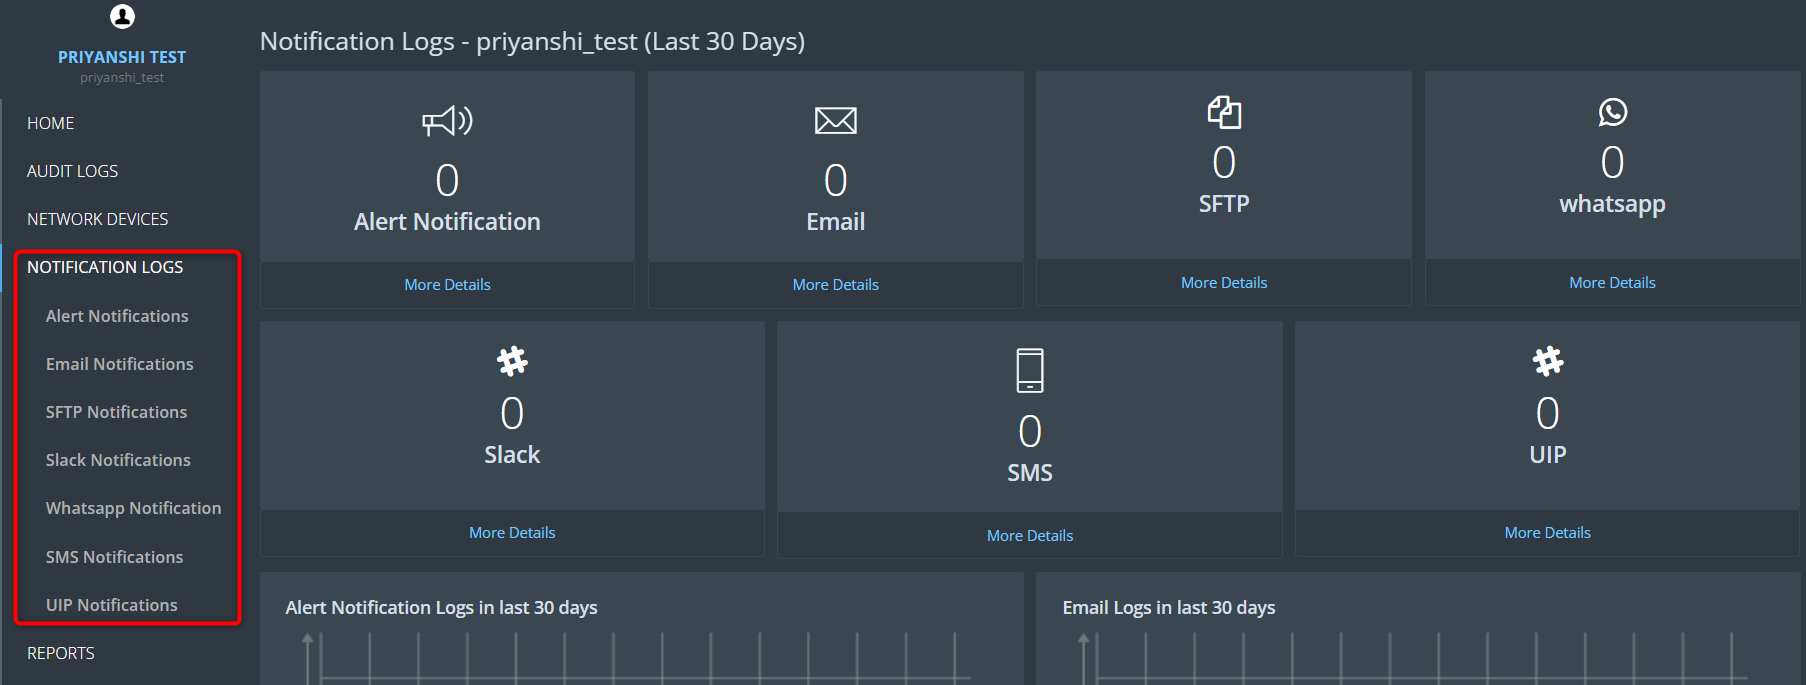
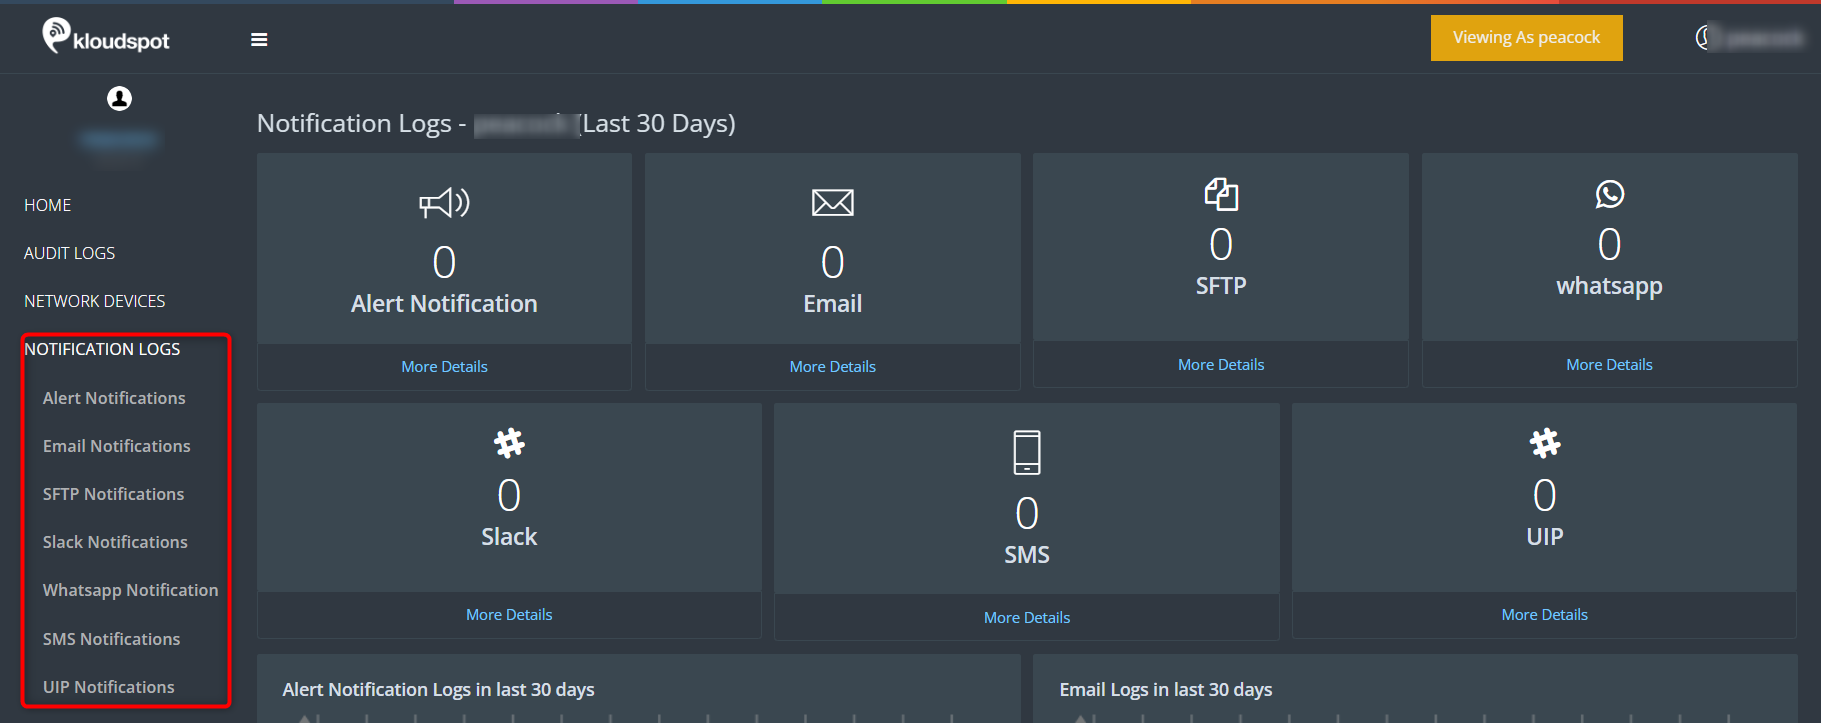
Notification Logs
The Notification Log screen serves as a comprehensive repository of all outgoing notification messages dispatched by the system. These notifications are transmitted through various communication channels, ensuring timely and efficient delivery. The supported notification mediums encompass:
This feature offers users an invaluable resource to track and review every notification communication, providing a clear record of all outgoing messages.
S10 device configuration
This document explains how to configure an S-10 device to Kloud management
account. This is an IoT (Internet of Things) device. This allows for Bluetooth
and WiFi probing.
Add a network device
1. The first step in configuring the S-10 device is to add a network device. To do so follow the steps below.
2. Log in to your Kloud manage account and then navigate to NETWORK DEVICES > Add Network Device.
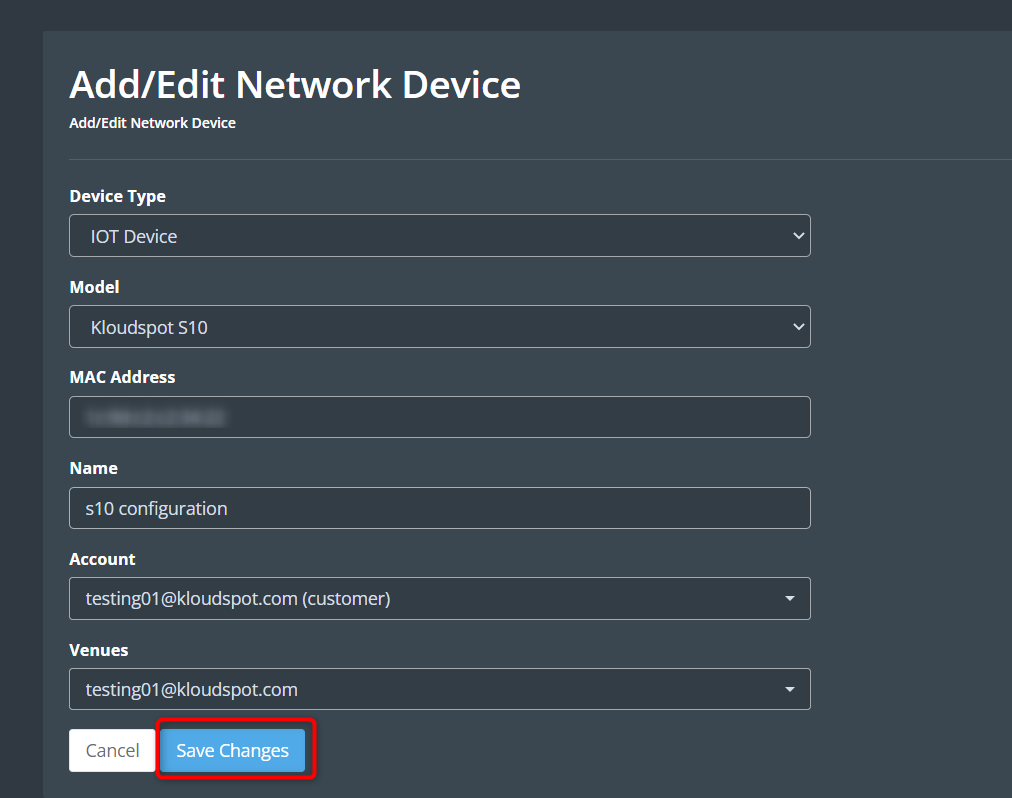
3. Enter the required information in the Add/Edit Network Device window
that opens.
Device Type: Select the IoT device from the drop-down menu.
Model: Kloudspot S10.
Mac Address: Enter your device’s Mac address.
Name: Enter a name for your network device.
Account: Select your account and venues.
4. Click the Save Changes button to save the device.
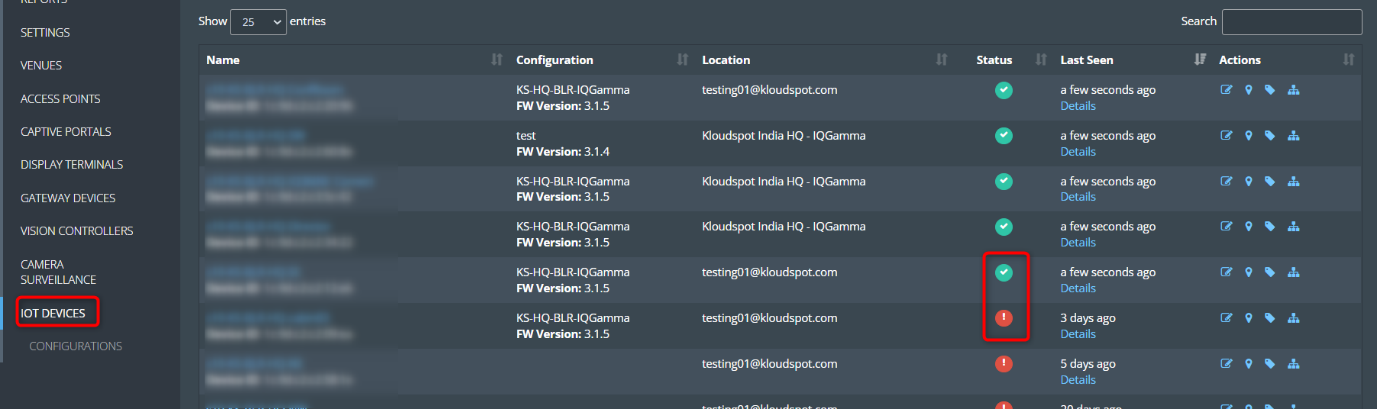
5. After you’ve added a network device, click the IoT DEVICE menu button
to see if it’s online. If you see a green dot in the status column of the
device you have added, the device is online. But if you see a red dot, it
means that the device is offline.
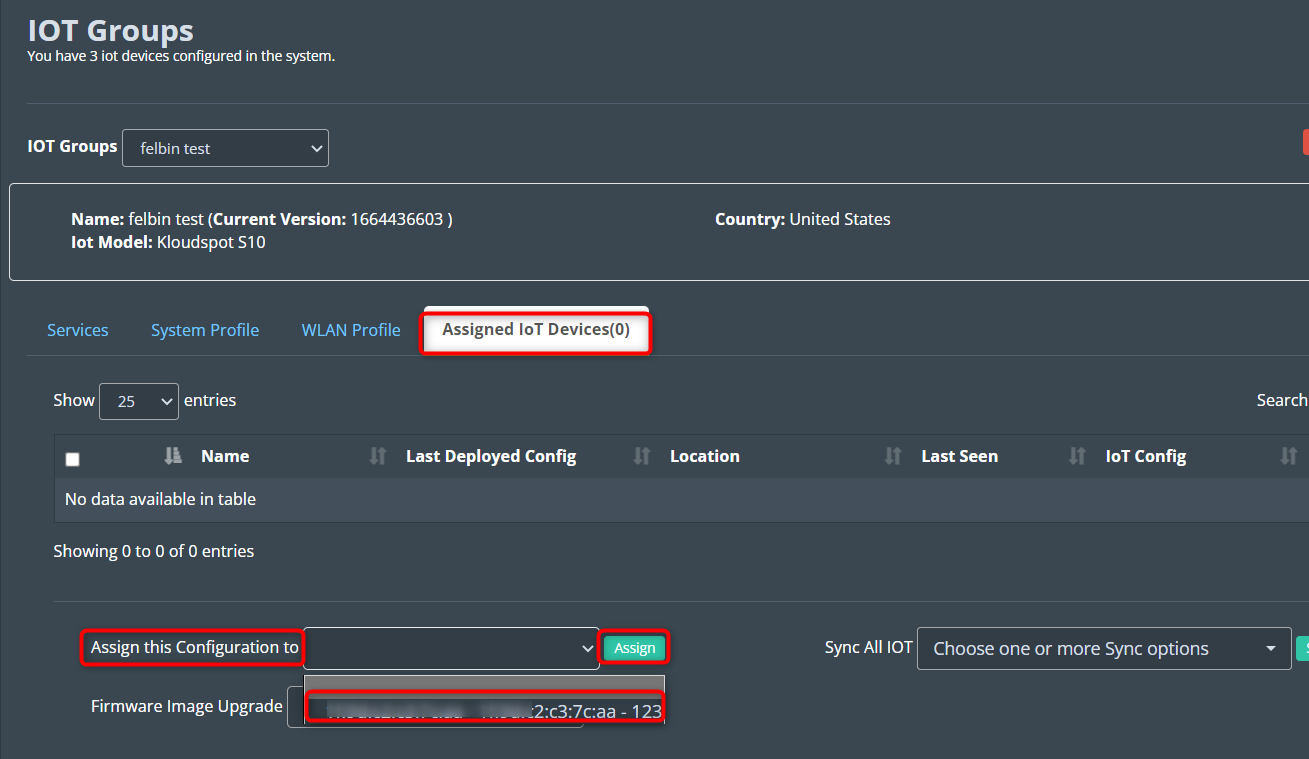
Assign a network device to an IoT group
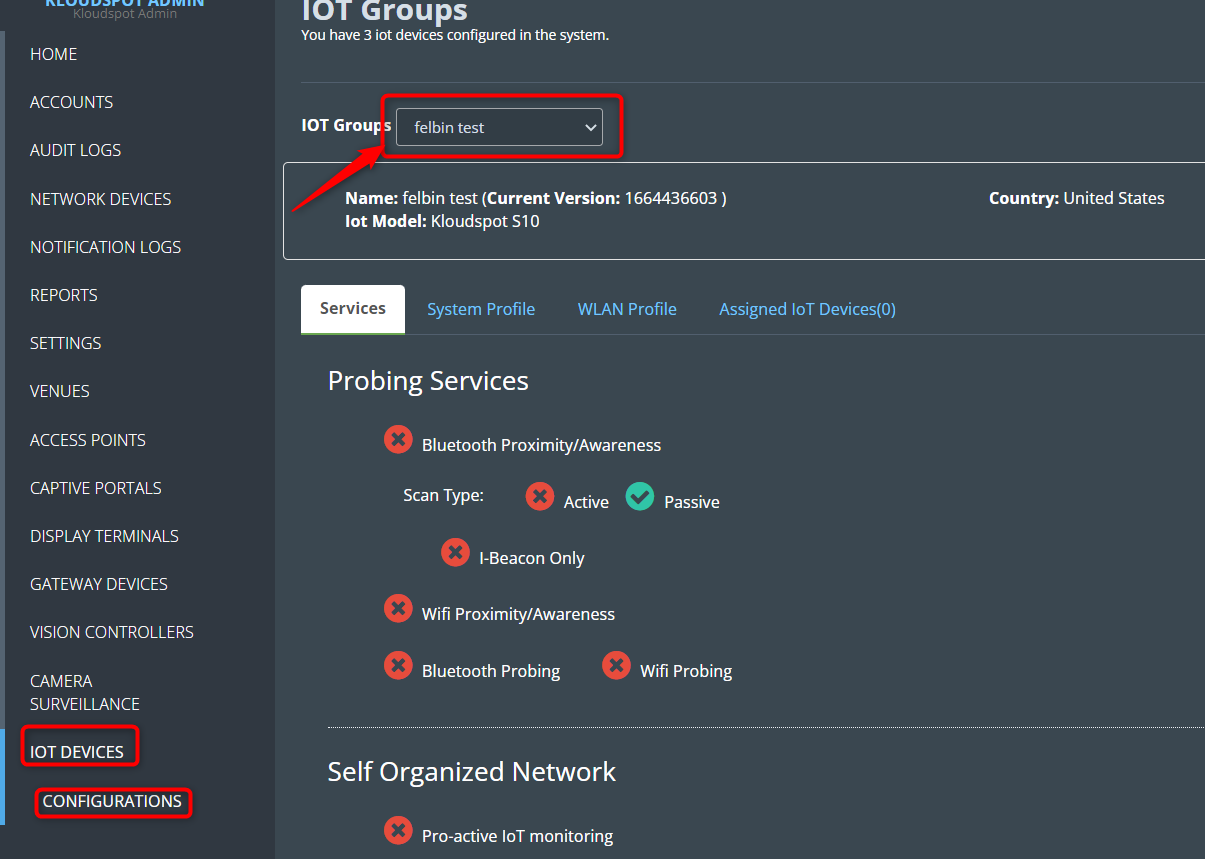
1. After adding the network device, the next step is to assign it to an IoT group.
2. To do so, navigate to IOT DEVICES > CONFIGURATIONS. and select the IOT group from the drop-down list.
3. Then go to the Assigned IoT Devices tab.
4. Select the network device you added from the Assign this Configuration
to drop-down list.
5. Then click on the Assign button.
6. Network device is added to an IoT group.
How to create an IoT group
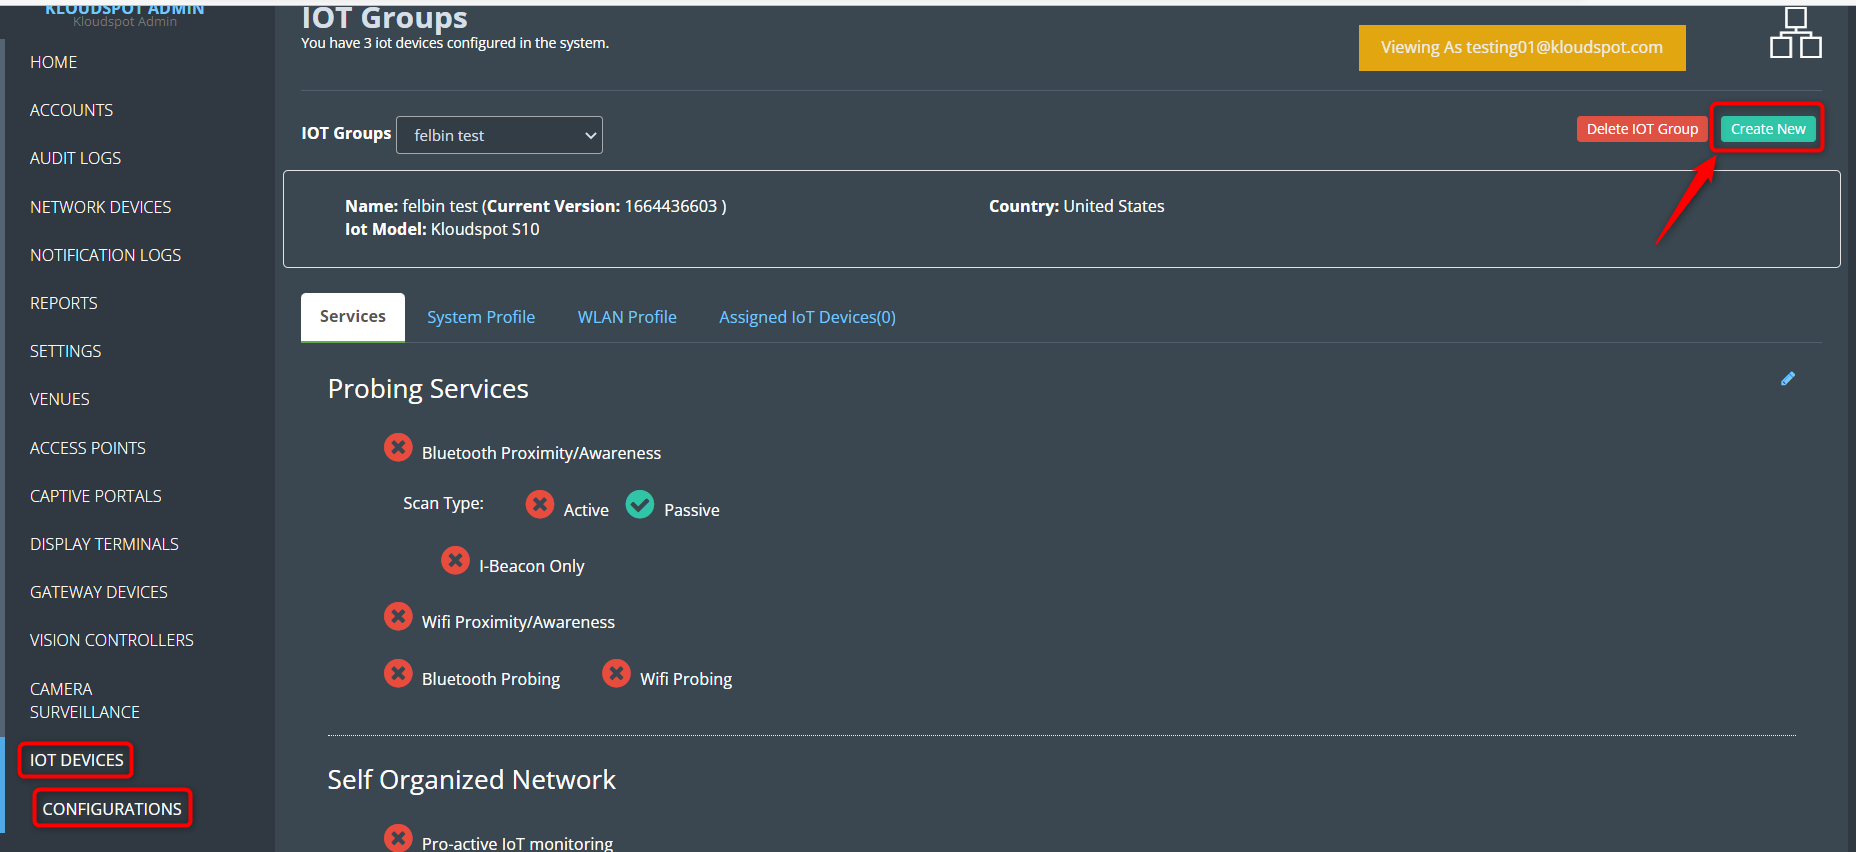
1. Navigate to IOT DEVICES > CONFIGURATIONS > Create New.
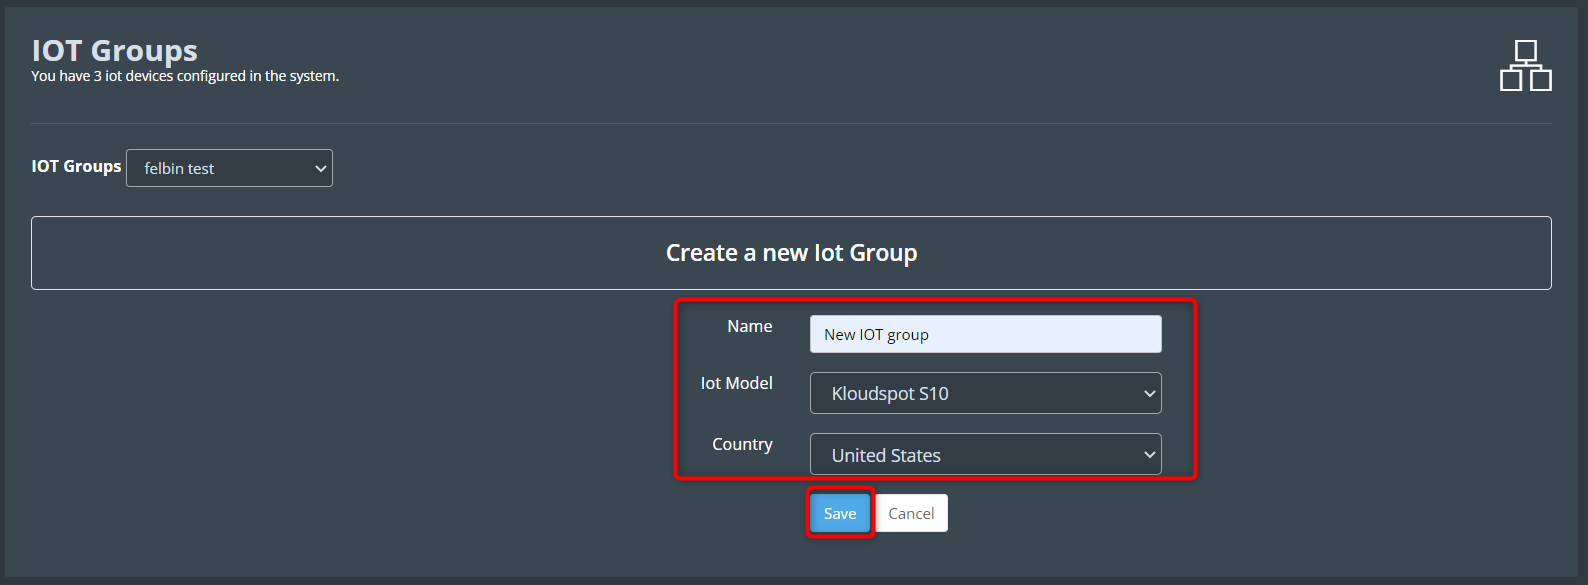
2. In the window that opens, enter the Name, Iot Model, and Country then
click the Save button.
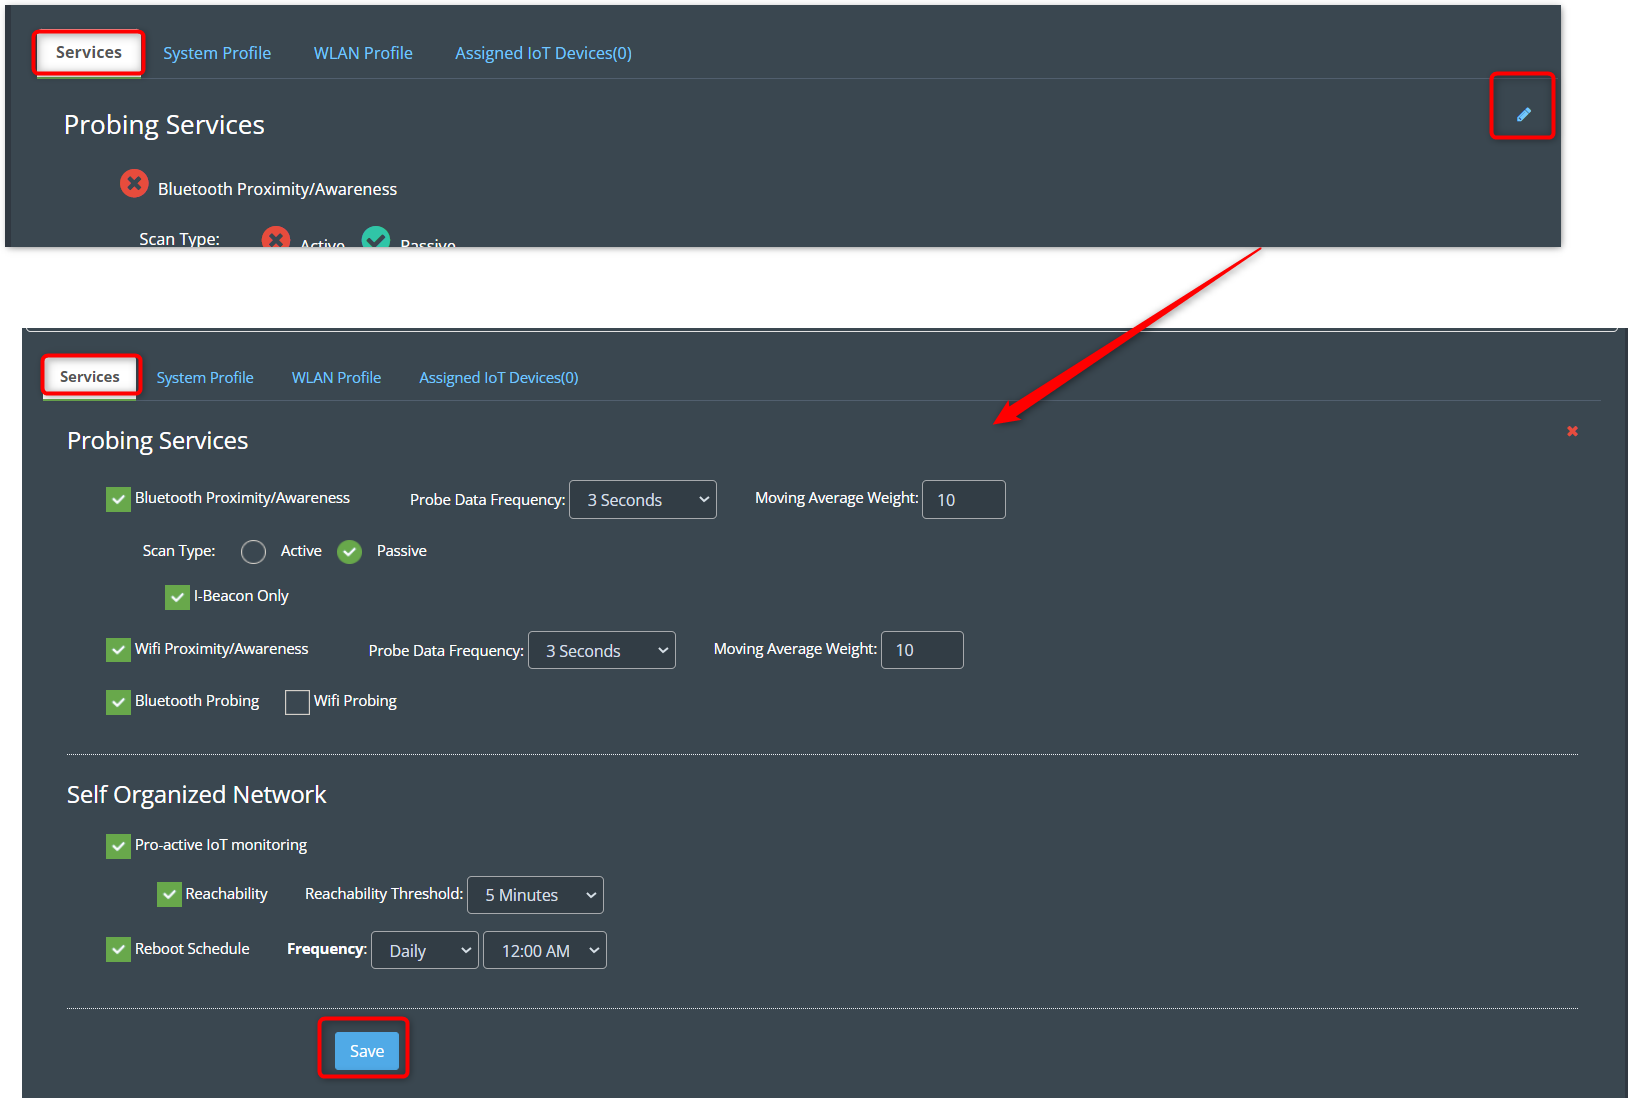
3. In the window that opens, click the Edit button to configure Probing
Services and Self Organized Network on the Services tab. Then an
editable window will open.
4. Check the checkboxes you want to enable and click the Save button.
Note:Bluetooth probing is only possible if the Bluetoothproximity/awareness check box is enabled. Similarly, wifiprobing
is only possible if Wifi proximity/awareness check box is enabled.
Bluetooth proximity/awareness: Decides whether to send data received via
Bluetooth to kloudInsights.
Scan Type
Active: Information is updated frequently and sent immediately.
Passive: Information is provided only when we ask for it.
I-Beacon Only: This is for I-Beacon devices.
Wifi proximity/awareness: Decides whether to send data received via Wi-Fi
to kloudInsights.
Bluetooth probing: Decides whether to send Bluetooth data from
KloudInsights to NMS.
WiFi Probing: Decides whether to send Wi-Fi data from KloudInsights to
NMS.
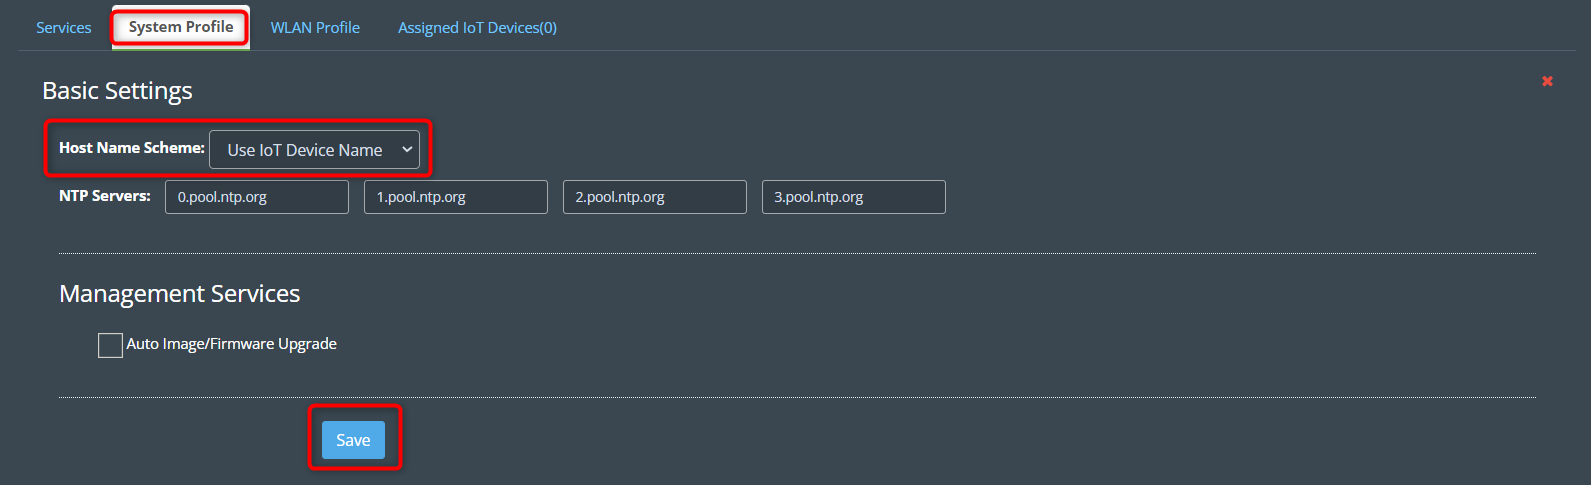
5. Then go to the System Profile tab and click on the Edit button. An
editable window will open.
6. Make the necessary changes and click on the Save button.
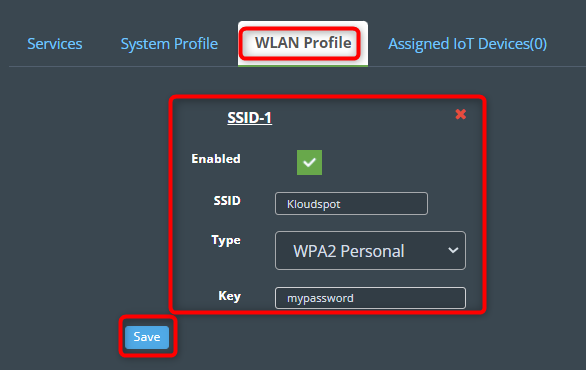
7. Next, go to the WLAN Profile tab and click on the Edit button. It
helps to decide which network the device should connect to.
8. Check the Enabled check box. And enter your SSID name. Then select the
Type as WPA2 Personal.
9. Then enter the key (password) and click on the Save button.
10. Finally, go to the Assigned IoT devices tab, select the network
devices to be added from the drop-down list, and click the Assign button.
11. A new IoT group has been added successfully. As mentioned in step 10,
other network groups can be added to this group.
Kloud Manage FAQs
What is the KloudsManage application?
The Kloudspot Edge Device Management application is a powerful tool designed to efficiently monitor, configure, and manage edge devices within the Kloudspot ecosystem. It enables seamless control over devices such as access points, sensors, displays, and more.
How do I access KloudsManage?
You can access the KloudsManage application through a web-based interface. Simply enter the provided URL in your web browser and log in using your credentials.
What types of devices can be managed using this application?
This supports various edge devices, including access points, sensors, display controllers, vision controllers, captive portals, and IoT devices. It provides a centralized platform to monitor and configure these devices.
Can I schedule reports for device performance?
Yes, you can schedule and generate reports on device performance. KloudManage offers a versatile reporting platform where you can select specific date ranges for tailored data analysis.
How can I add multiple devices at once?
You can use the “Add Batch Network Devices” option to add multiple devices simultaneously. Ensure that the devices have the same type when adding them together.
What if I need to add a device individually?
For individual device addition, you can use the “Add Network Device” option. Depending on the type of device, refer to the corresponding section in the user manual for detailed instructions.
How do I change the location of multiple devices?
To change the location of multiple devices, select the desired devices and click on the “Re-Assign Multiple Devices” button. This allows for easy and efficient management.
How can I add an Android TV to the system?
Click on the “Have a Code” button and enter relevant details like Hosting Platform, Orientation, Rotation, TV Code, Name, Account, and Venues. Ensure to use a unique 8-digit TV Code provided by Android Studio.
What is the purpose of the Audit Logs?
The Audit Logs provide a detailed record of all activities within the system, including device alerts, user interactions, configuration changes, and more. It serves as a tool for monitoring system performance and ensuring accountability.
How can I review the history of generated reports?
Navigate to the “History” menu to access the Report Audit Logs. Here, you can find a list of previously generated reports and download them for review.
Can I customize and create my own report types?
Yes, you have the option to create custom report types. Simply click on the “Types” menu and follow the steps outlined in the user manual to add and upload custom reports.
How do I receive notifications from the system?
You can set up contacts to receive notifications via various channels, such as Email, Slack, SMS, WhatsApp, SFTP, and UIP. Refer to the Account Settings section for detailed instructions.
How does the KloudManage ensure security and accountability?
The Audit Logs and Notification Logs play a crucial role in maintaining security and accountability. They provide transparent records of system activities and outgoing notifications, ensuring a secure and well-functioning environment.
Where can I find additional resources and support?
For additional resources and support, refer to the Kloudspot documentation or contact Kloudspot support for assistance.
How can I integrate third-party applications with the Kloudspot Edge Device Management application?
You can seamlessly integrate third-party applications by navigating to the “Third-Party Integrations” section in the Account Settings. Here, you’ll find options to connect various applications and authentication setups.
What are the different user roles and permissions in the Kloudspot Edge Device Management application?
The kloudManage provides distinct user roles, each with specific access levels:
ROLE_ACCOUNT_ADMIN: Full read and write permissions.
ROLE_ACCOUNT_MANAGER: Limited write access, with full read permissions.
ROLE_ACCOUNT_USER: Read-only access.
ROLE_DISPLAY_AUTHOR: Access and edit capabilities for display terminals.
ROLE_DISPLAY_PUBLISHER: Authorization for changes made by authors.
ROLE_DISPLAY_AUTHOR&PUBLISHER: Dual roles of author and publisher.
ROLE_CP_ADMIN: Full read and write permissions for the captive portal.
ROLE_CP_USER: Only read permissions for the captive portal.
Can I create multiple venues and assign devices to them?
Absolutely. The “Venues” section allows you to create and manage various locations. Once created, you can easily assign devices to specific venues, providing a location-based view of managed devices.
How does multi-tenant management work in the Kloudspot Edge Device Management application?
The KloudManage supports three types of accounts: Distributors, Resellers, and Customers. Each type has varying levels of access and responsibilities. Distributors manage and support both customers and resellers, while resellers manage and support customers. Customers have the ability to manage their devices.
What is the purpose of the Notification Logs?
The Notification Logs serve as a centralized record of all outgoing notification messages, sent via different channels including Email, Slack, SMS, SFTP, WhatsApp, and UIP. This feature provides a comprehensive overview of all communication from the system.
How can I schedule and run reports in KloudManage?
You can easily schedule and run reports in KloudManage. Navigate to the “Reports” section, where you have the option to schedule reports or run them on demand. When running reports on demand, you can select a specific date range to customize the data according to your requirements.