Face Recognition System (FRS)
Overview
The Face Recognition System (FRS) is a powerful feature integrated with KloudVision that enables seamless entry and exit to premises using facial recognition technology. This document provides an overview of the registration and instructions on how to customize and utilize it effectively within your system. It consists of six key steps that ensure optimal performance and functionality.
Step 1: Configure FRS Camera
Before setting up the Facial Recognition System (FRS) in KloudInsights, it’s essential to configure the camera intended for FRS integration. This process is facilitated through KloudVision, enabling seamless setup and alignment of your chosen camera for optimal FRS functionality.
Step 2: Customize FRS Workspace Settings to Suit Your Needs
To make the FRS align with your specific requirements, it is essential to customize the workspace settings. This step allows you to configure various options and features, tailoring the system to your desired specifications. By accessing the FRS workspace settings, you can enable or disable specific functionalities.
Step 3: User Management and Invitation
Efficient user management is critical for the smooth operation of the FRS. This step provides instructions on how to manage users effectively and send invitations for FRS registration. Additionally, the document explains two methods for user invitation: Bulk FRS Registration: This method allows you to send registration links to multiple users simultaneously. It is particularly useful when onboarding a large number of users. Individual User Invitation: With this method, you can send personalized invitation links to specific individuals, enabling a more targeted approach to user registration.
Step 4: Face Registration Process for Users
At this stage, users have the opportunity to register their faces using the unique link received in the email invitation. Following the instructions provided, users can seamlessly provide the necessary images for registration. By adhering to these instructions, users can ensure the successful enrollment of their facial data, enabling a smooth and reliable check-in and check-out process within the system.
Step 5: Human Management
As users successfully complete their registration in the FRS (Facial Recognition System), they are automatically added to the Human section. This section serves as a comprehensive repository of all registered users, providing essential information about each individual, including their identity, first name, last name, email ID, tags, namespace, image, ID image, and status.
Step 6: User Check-in and Check-out
During this stage, when a user enters or exits a designated location, their face is automatically detected and matched with the entries in the FRS database. The system records the exact entry and exit times for each user, ensuring accurate check-in and check-out data is maintained. This seamless process not only enhances security measures but also enables efficient monitoring and management of user movements within the specified area.
Step 7: Tracking Check-In and Check-Out Status with the Widget
To efficiently monitor the check-in and check-out activities of users, the FRS provides a widget that displays summarized information. This step guides you on how to utilize the widget effectively. By using the widget, you can track the real-time status of users, view their check-in and check-out times, and quickly identify any discrepancies or unusual patterns. The widget serves as a convenient tool for monitoring and managing user activity, ensuring the smooth operation of the FRS.
To know the camera specifications suitable for face recognition, refer to the System Requirements document.
Step 1: Configure FRS Camera
-
Facial Recognition System (FRS) functionality within KloudInsights requires configuration of the FRS cameras.
-
If you’re already a KloudVision user, proceed to log in using your credentials.
-
If you do not have KloudVision access, contact Kloudspot’s support team to obtain the necessary access credentials.
-
Once logged into KloudVision, refer to the FRS configuration document. This document provides detailed instructions on configure the FRS cameras.
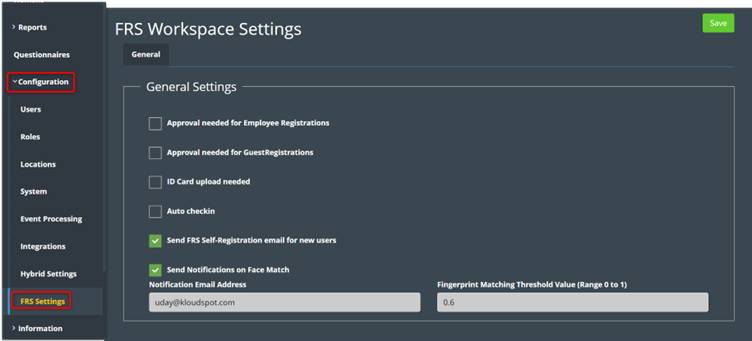
Step 2: Customize FRS Workspace Settings to Suit Your Needs
Note: To proceed with these steps, make sure you have access to your KloudInsights account.
-
Log in to your KloudInsights account using your credentials.
-
Once logged in, navigate to the Configuration menu. You can find it in the menu bar of the KloudInsights dashboard.
-
From the Configuration menu, select “FRS Settings.” This will open the FRS Workspace Settings page.
-
On the FRS Settings page, you will see a General Settings section. This section contains six customizable options. Let’s go through each option:
a. Approval needed for Employee Registrations: Enable this option if you want the admin to approve newly registered employees before activating their face ID. If this option is disabled, employee registrations will be automatically activated.
b. Approval needed for Guest Registrations: Enable this option if you want the admin to approve newly registered guests before activating their face ID. If this option is disabled, guest registrations will be automatically activated.
c. ID Card upload needed: If you enable this option, registered users will be prompted to upload their ID card during the face registration process. Face registration will only be activated if the user provides the ID card.
d. Auto check-in: Enable this option if you want registered users to be able to check in to a premise using their face without any physical contact. Enabling this feature allows for a touchless check-in process.
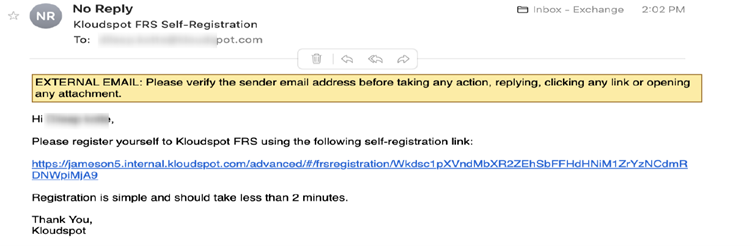
e. Send FRS Self-Registration email for new users: By enabling this option, the FRS Self-Registration email will be automatically sent to newly added users. This email contains instructions and a registration link for users to complete their face registration process.
f. Send Notifications on Face Match: Enabling this option allows you to receive notifications whenever there is a face match in the FRS. This can help you stay informed about potential security events or user activities. Provide the email address in the corresponding field where you want to receive these notifications.
-
After configuring the desired settings, click on the “Save” button to save the changes you made to the FRS Workspace Settings.
Step 3: User Management and Invitation
Note: Before proceeding, ensure that you have configured the FRS Workspace Settings as per your requirements.
-
Log in to your KloudInsights account.
-
From the menu bar, go to Configuration and select “Users”. This will redirect you to the User Management page.
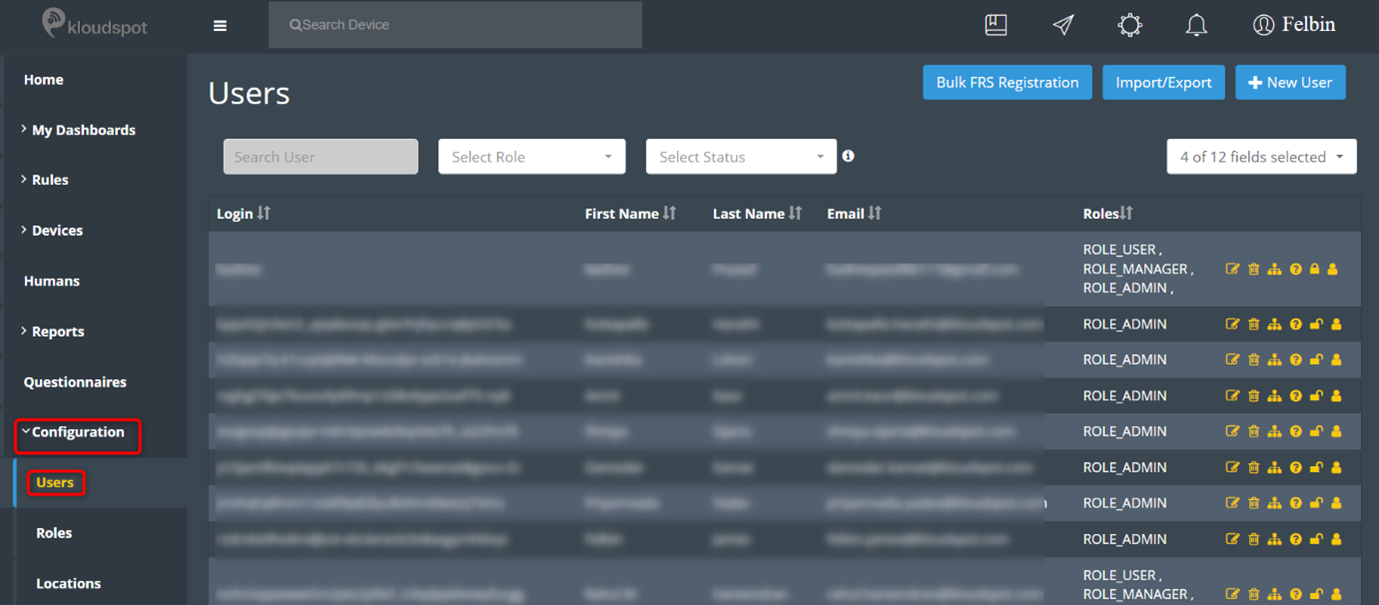
- On the User Management page, you have two options to send the FRS registration links: Bulk FRS Registration and Individual User Invitation.
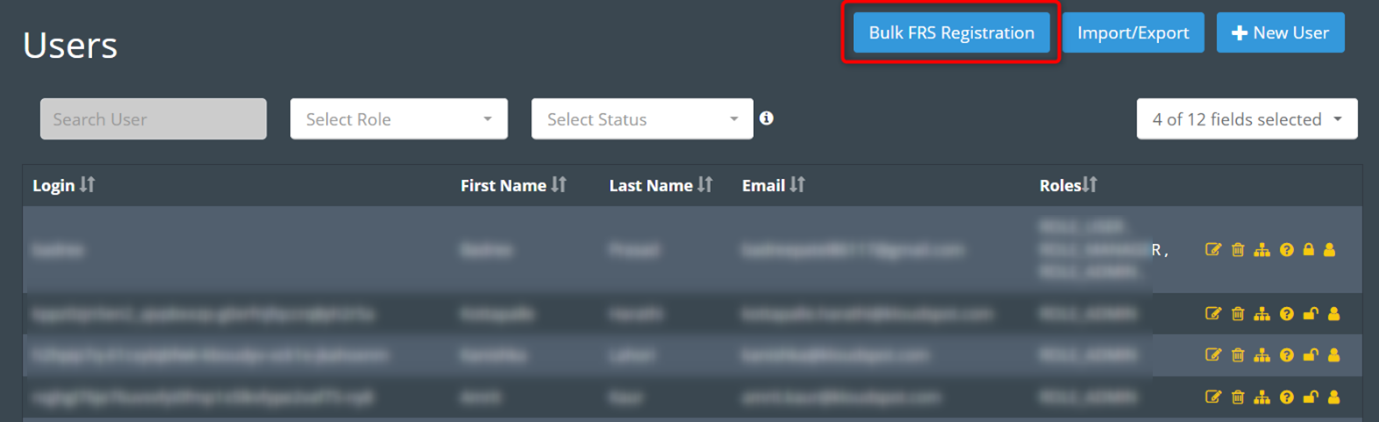
a. Bulk FRS Registration:
-
Locate the “Bulk FRS Registration” option on the User Management page.
-
Click on the option to initiate the process of sending invitation links to all users simultaneously.
-
This method is useful when you want to send registration links to multiple users at once.
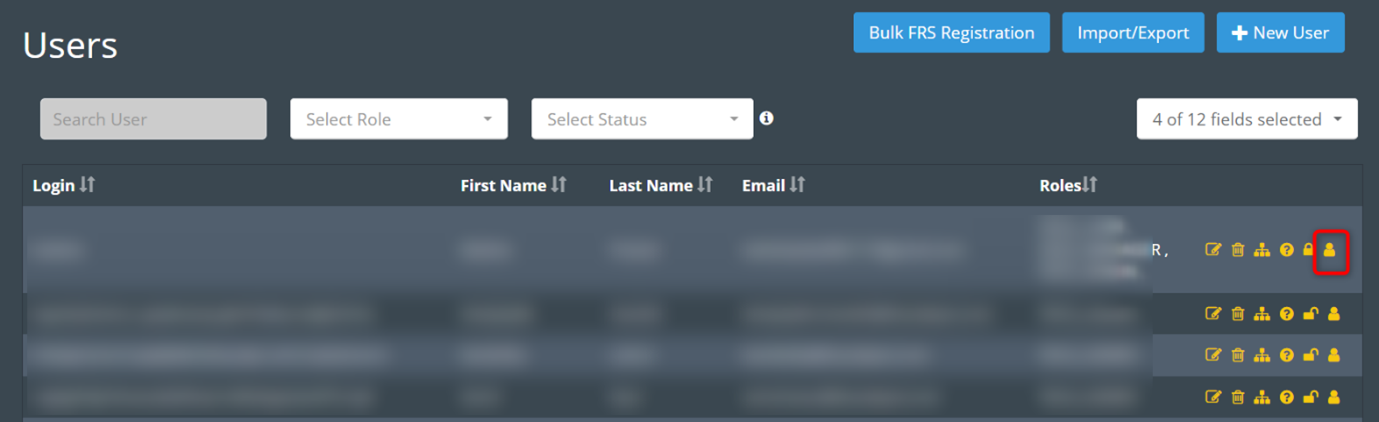
b. Individual User Invitation:
-
On the User Management page, find the user whom you want to invite for FRS registration.
-
Locate the FRS registration icon (usually represented by a human symbol) located on the left side of the user’s profile.
-
Click on the FRS registration icon to access the individual user invitation option.
-
This method allows you to send personalized invitation links to specific individuals.
Step 4: Face Registration Process for Users
By following below steps, users can successfully complete the face registration process. The provided information and captured images will be used for check-in and Check-out purposes within the system. This enhances the accuracy and reliability of the face recognition system.
Note: Users should have received an invitation email with a registration link before proceeding with the face registration process.
- Once users receive the invitation email with the registration link, they should click on the provided link. This will redirect them to the registration page.
-
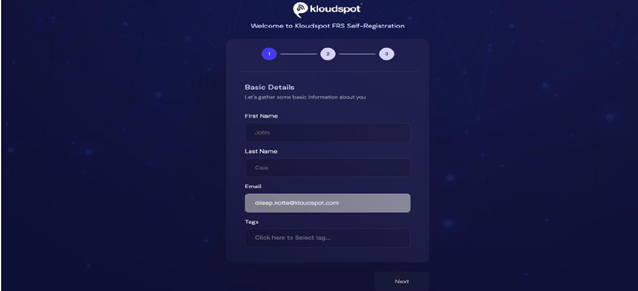
On the registration page, users need to provide their personal details. Typically, this includes entering their name and any additional information specified by the system. Fill in the required fields accordingly.
-
Users may also have the option to add tags that describe their profile or interests. This is an optional step to enhance their profile information.
-
After providing the required information, users can proceed to the next step by clicking on the “Next” button.
-
In the registration process, users may be prompted to capture a series of pictures for further verification or identification purposes. Look for a camera icon or similar indication.
-
Click on the camera icon to initiate the image capture process. Users should take 5 pictures of good quality, ensuring clear and well-lit images.
-
Once the user has given the images as per the given instructions, they can proceed to the next step by clicking on the “Next” button.

- To finalize their registration, users should click on the “Submit” button.

Step 5: Human Management
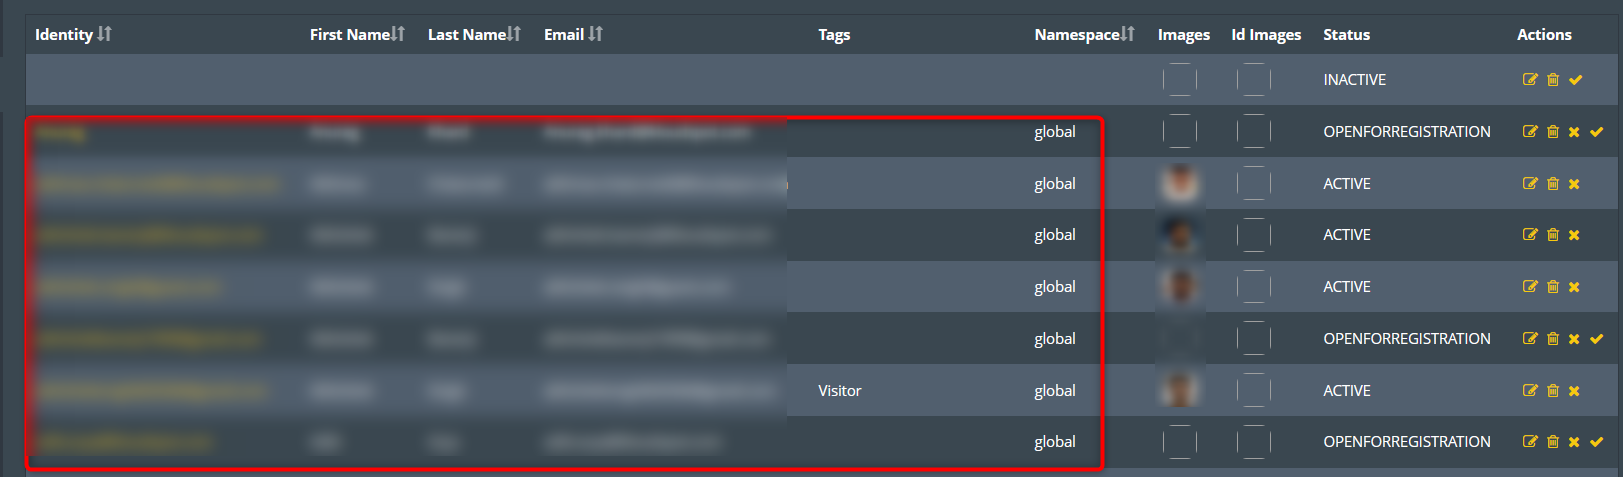
As users successfully complete their FRS (Facial Recognition System) registration, they are added to the Human section. The Human page serves as a comprehensive repository of registered users, providing essential information about each individual. This includes their identity, first name, last name, email ID, tags, namespace, image, ID image, and status. The Human section plays a vital role in maintaining and organizing user profiles within the FRS. By accessing this page, administrators can effectively manage and monitor registered users, ensuring accurate identification and facilitating seamless interactions within the system.
Human Activation and Deactivation
-
To activate a user, navigate to “Human” page from the KloudInsights application.
-
Then, find the corresponding user in the list and click on the Activate button.

- To deactivate a user, find the corresponding user in the list and click on the deactivate button.
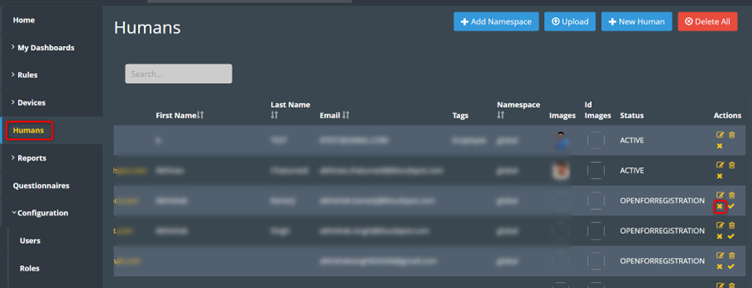
- Activation grants access to the system and its functionalities, while deactivation temporarily restricts access.
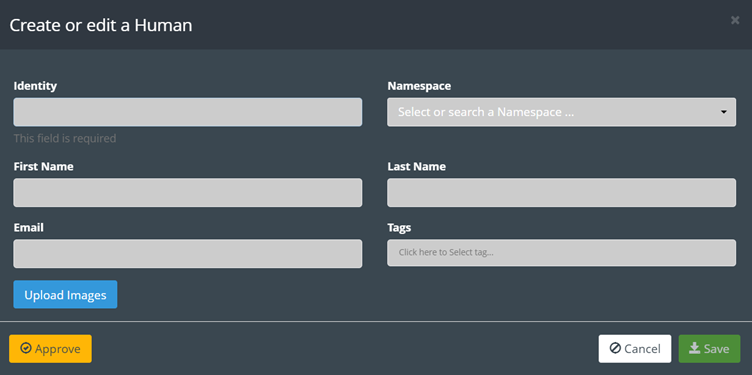
Add a New Human
-
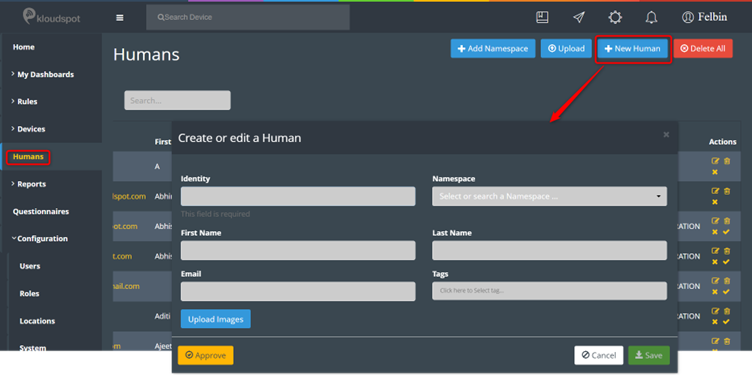
An admin can manually register a user’s face other than through the registration link.
-
Navigate to the Human page within the KloudInsights.
-
On the Human page, locate the “New Human” button and click on it. This will open the “Create or edit a Human” popup window.
-
In the “Create or edit a Human” window, provide the necessary information about the new user. This typically includes identity details, such as first name, last name, and email ID. Fill in the required fields accordingly.
-
Next, you need to upload images of the user’s face. Click on the “Upload Image” button within the “Create or edit a Human” window. This will open a file selection dialog.
-
Select the images you want to upload for the user’s face. It is recommended to capture images from at least five different angles to ensure accurate facial recognition. These angles may include front-facing, left profile, right profile, top, and bottom views.
-
Once you have selected the images, click on the “Save” button to save the new human profile with the associated images.
-
The system will process the uploaded images and add the new human to the FRS database. The user will now be available for identification and verification through facial recognition.
Human Bulk Upload
This section provides detailed steps to efficiently perform a bulk upload of human profiles in the FRS (Facial Recognition System). This feature streamlines the registration of multiple users, enhancing the effectiveness of the FRS within your system. The process consists of three main steps.
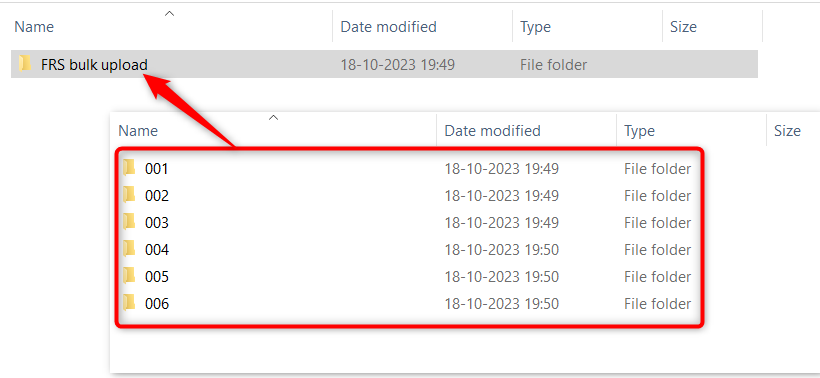
Step 1: Collect the User Image
-
Before initiating the bulk upload process, ensure you have images of individuals from five different angles for accurate facial recognition.
-
Save these images in separate folders, with each folder containing images of a specific person. Consider naming each folder according to the person added to it (e.g., name of the user, email ID, employee ID, etc.).
-
Create a common folder where you will consolidate these individual folders.
Step 2: Upload Images to FRS Human Page
-
Log in to your KloudInsights account and navigate to the Humans page.
-
On the Humans page, locate the “Upload” button and click on it to open the “Upload Images” popup window.
-
In the “Upload Images” popup window, click on the “Choose file” button and navigate to the common folder where you have saved the individual image folders.
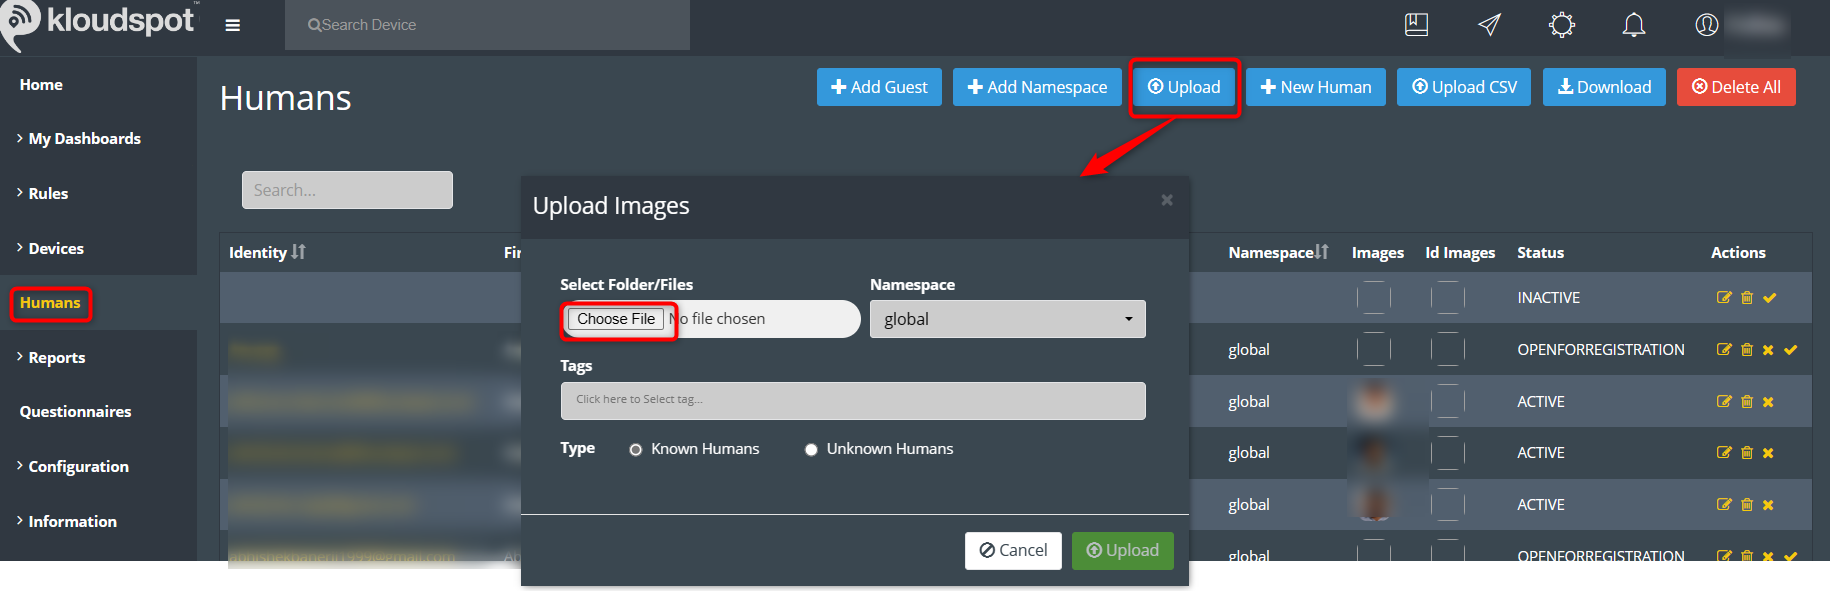
-
Select the common folder, which contains the individual folders named after the respective individuals.
-
In addition to image upload, provide additional details for the bulk upload. Select the appropriate “namespace” and “tag” that you want to assign to the uploaded human profiles.
-
In the “Type” field, select the “Known Humans” option to indicate that these individuals are already known, and their profiles should be created based on the uploaded images.
-
Click on the “Upload” button to initiate the bulk upload process. The system will process the images and create individual human profiles.
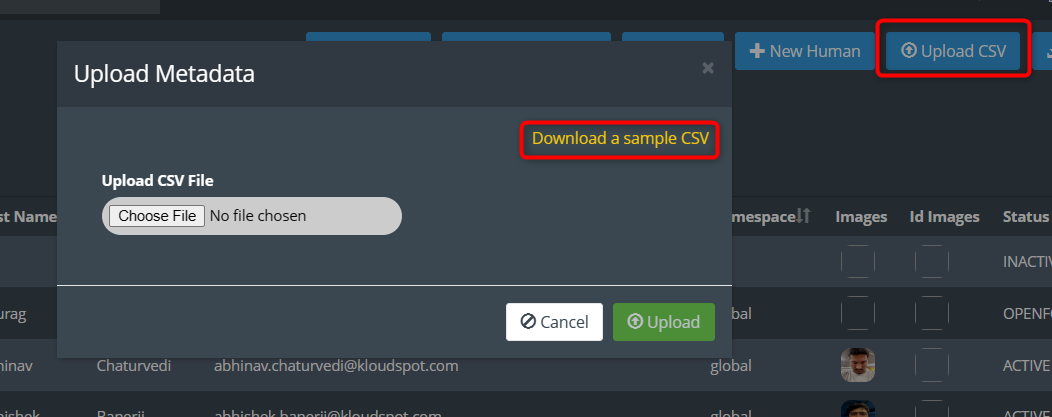
Step 3: Upload a CSV File with Information
-
After adding the required images to FRS, proceed to upload the CSV file containing additional metadata.
-
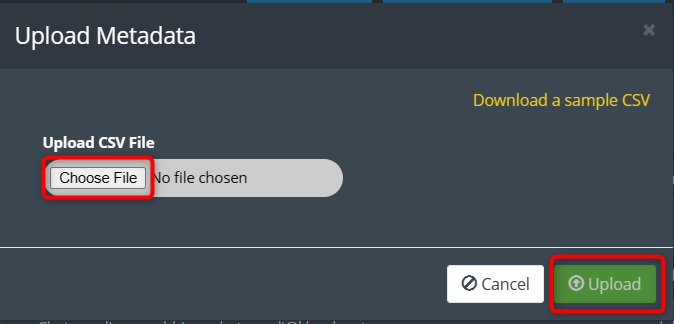
Click on the “Upload CSV” button from the Humans page. In the Upload Metadata popup window that opens, click the “Download a sample CSV” button to download the sample CSV file.
-
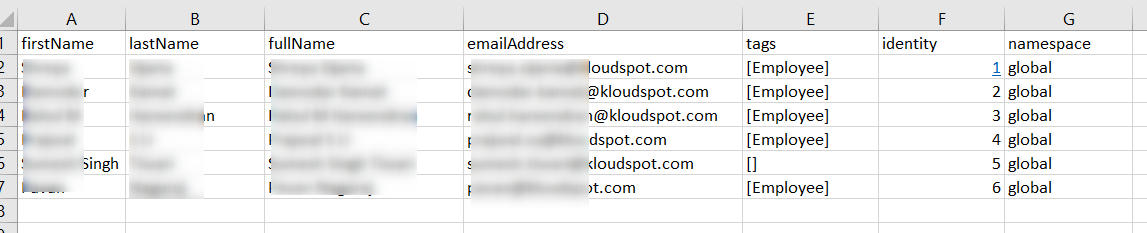
Populate the CSV file with the required information:
a. Add first name, last name, full name, email Address, tags, and namespace in their respective columns.
b. Enter the unique folder name (where the user’s image has been added) in the identity column.
- Save this CSV file. Upload the CSV file by clicking the “Choose File” button in the Upload Metadata popup window.
- The information provided in the CSV file will be associated with the uploaded images.
- The FRS will utilize this information for recognition. When individuals in the uploaded images are detected by the camera, their entry and exit will be recorded.
Step 6: User Check-in and Check-out
There are three methods available for users to perform check-in and check-out. To know the camera specifications suitable for face recognition, refer to the System Requirements document.
-
Check-in and check-out using the kiosk.
-
Check-in and check-out using the camera.
-
Seamless entry and exit.
Check-in and check-out using the kiosk.
Note: Ensure that the kiosk or tablet is properly set up and connected to the FRS system before proceeding with the check-in and check-out process.
-
Position the kiosk or tablet at the entry gate where users will perform the check-in and check-out process.
-
Prompt the user to stand in front of the kiosk or tablet, ensuring that their face is properly positioned within the camera’s view.
-
The FRS system will automatically scan the user’s face and compare it with the faces in the FRS database to find a match.
-
If the user’s face matches a face in the FRS database, it indicates a successful match, and the check-in process can proceed. If there is no match, the user may not be registered in the system or may need further verification.
-
To perform the check-in process, instruct the user to tap on the check-in button displayed on the kiosk or tablet’s interface.
-
Once the user taps the check-in button, the system will record the check-in time and update the user’s check-in status accordingly.
-
For the check-out process, instruct the user to tap on the check-out button displayed on the kiosk or tablet’s interface.
-
When the user taps the check-out button, the system will record the check-out time and update the user’s check-out status accordingly.
Check-in and check-out using the camera.
Users can easily perform check-in and check-out using a camera installed at the entry gate, integrated with the FRS.
-
Install the camera at the entry gate in a position that allows it to capture the faces of users as they approach.
-
Ensure that the camera is connected to the FRS system and properly configured to perform facial recognition.
-
When a user comes in front of the camera, the camera will automatically scan their face.
-
The FRS system will compare the scanned face with the faces stored in the FRS database to find a match.
-
If the user’s face matches a face in the FRS database, it indicates a successful match, and the check-in process can proceed. If there is no match, the user may not be registered in the system or may need further verification.
-
If an auto-open door or other security system is installed, it can be triggered at this point to allow access for the checked-in user.
-
The FRS system will record the check-in time and update the user’s check-in status accordingly in the system.
-
Similarly, for the check-out process, instruct the user to approach the camera again to have their face scanned.
-
Once the user’s face has been scanned, the FRS system will compare it with the faces stored in the FRS database to find a match.
-
The FRS system will record the check-out time and update the user’s check-out status accordingly in the system.
Seamless entry and exit.
Users can achieve seamless entry and exit using cameras placed at the entry gate and exit gate.
-
Place cameras at both the entry gate and exit gate in positions that allow users to capture their faces as they approach.
-
Ensure that the cameras are connected to the FRS system and properly configured for facial recognition.
-
As a user approaches the entry gate, the camera placed there will automatically scan their face.
-
The FRS system will compare the scanned face with the faces stored in the FRS database to find a match.
-
If the user’s face matches a face in the FRS database, it indicates a successful match, and the check-in process can continue.
-
In this case, there is no need for a security check or any other obstacles. The user can check in seamlessly.
-
The FRS system will record the check-in time and update the user’s check-in status accordingly in the system.
-
Similarly, when the user approaches the exit gate, the camera placed at the exit gate will automatically scan their face.
-
The FRS system will compare the scanned face with the faces stored in the FRS database to find a match.
-
If a match is found, it indicates a successful match for check-out.
-
The FRS system will record the check-out time and update the user’s check-out status accordingly in the system.
Step 7: Tracking Check-In and Check-Out Status with the Widget
To efficiently monitor and view the check-in and check-out status of all users, a dedicated widget is available. The widget offers a convenient and summarized display of users’ check-in and check-out information. Below is an example of how the widget might appear:
For guidance on creating a dashboard and adding a widget to it, refer to the “Creating Dashboards” document.
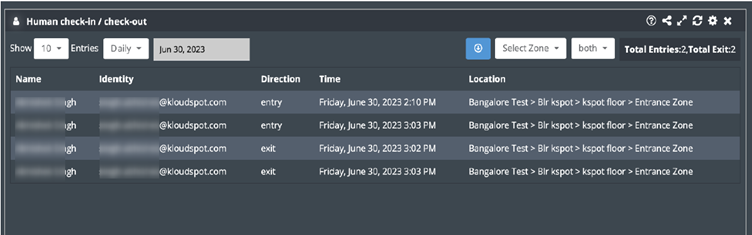
The widget showcases essential details, such as usernames, identity, direction, Time, and location. With this simplified presentation, administrators can easily track user movements and identify any anomalies or discrepancies.