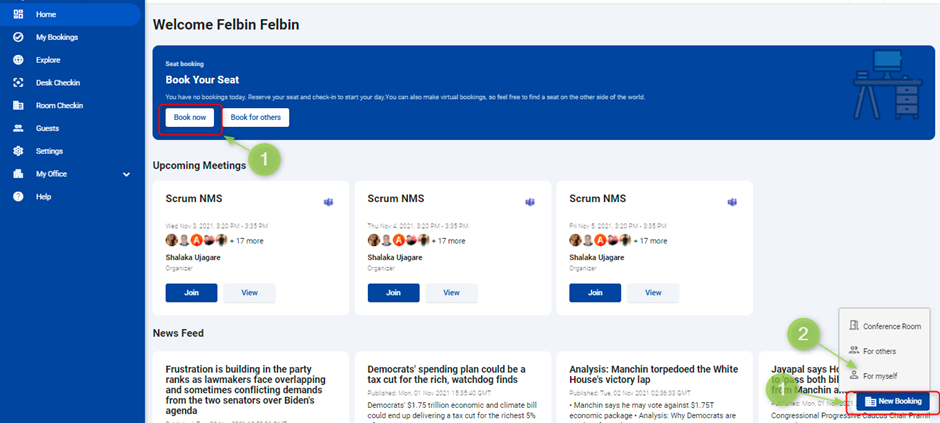
Book a seat for myself
- Click Book now or New Booking from the home screen.
- A pop-up menu is displayed.
- Click “For myself” to book a seat for you.
-
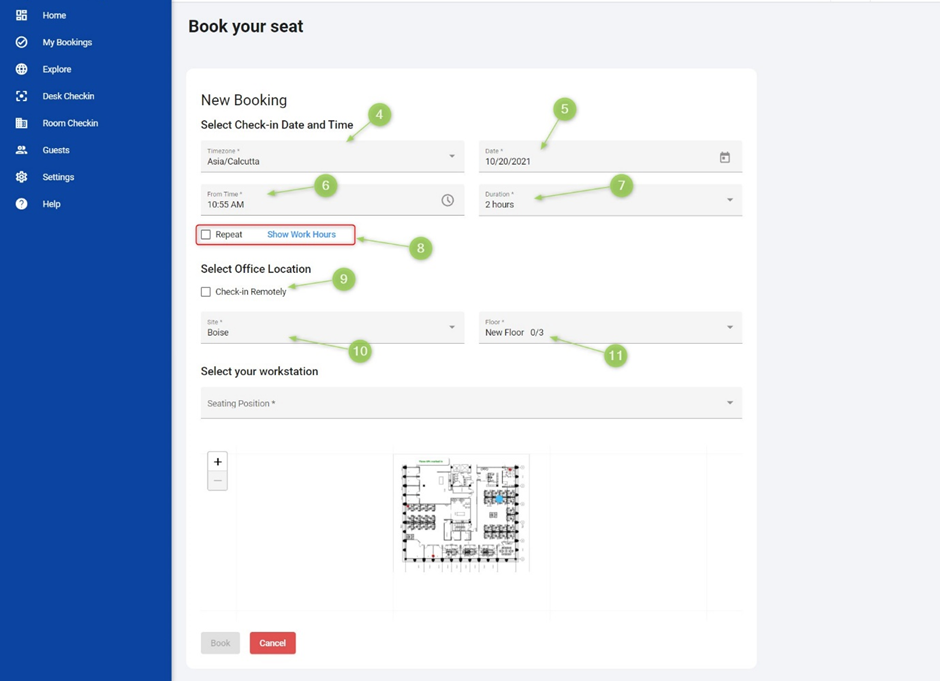
The “Book your seat” window is displayed.
-
Click Timezone to select the zone.
-
Click Date to select the date. It allows selecting a date from present-day and future dates.
-
Click, From time to select the time.
-
Select the Duration from the drop-down menu, you wish to book a seat for.
-
Check the “Repeat” checkbox to enable the repeat booking feature. Note that this step is optional, and you can proceed without repeating the booking.
To enable Repeat booking
- After checking the “Repeat” checkbox, the **“Frequency”**and “End Date” fields will become available.

- In the “Frequency” field, select the desired repetition frequency from the drop-down list. The system provides three options:
- Daily: Choose this option if the booking needs to be repeated every day.
- Every weekday: Select this option if the booking should only be repeated on weekdays (Monday to Friday).
- Weekly: Choose this option if the booking should be repeated on specific days of the week.
- If you selected the “Weekly” frequency, a list of days will appear. From this list, select the specific days on which the booking should be repeated.
Note: This step is only applicable if the “Weekly” frequency is selected.

- In the “End Date” field, select the date on which the repetition of the booking should end. This serves as the termination point for the recurring booking.
- Check the “Repeat” checkbox to repeat the booking frequently. This is an optional step, and you can use this feature if you want to repeat your booking for some time.
Note: You can know the work timing that the company prefers by clicking on show work hours. You can hide this by clicking on Hide work hours.

-
Check the checkbox, “Check-in Remotely” to select the virtual seat. If you need to log in physically. Uncheck the “Check-in Remotely” option.
-
Select the location from the Site drop-down menu.
-
Select the floor from the Floor drop-down menu.
When you click on the drop-down menu, the available floor details in that location are displayed. Along with the floor details, it also displays the booked/total available seats as shown in Figure.
It is possible to book a seat when seats are available on the floor. If seats are available, the green status bar is displayed, else the red status bar is displayed.

For example:
As shown in the above diagram, the 1st floor is occupied with more than 50% capacity which is not allowed in the current COVID 19 scenario. Therefore, it is not possible to book a seat on this floor. However, the 2nd floor is empty which can be booked.
- Choose your workstation from the Seating position drop-down menu.
- All the vacant workstation numbers are displayed to choose from. The selected seat is highlighted in red. A hand symbol is displayed which allows to drag and view the entire floor view.
- You can also choose a vacant seat when you view it. When you choose a different seat, the workstation number is also updated and marked as occupied by highlighting with red.

- Finally, Click the Book button to book your seat.
- You will receive a confirmation message from KloudHybrid for the successful booking.
Note: You will receive a notification just 5 minutes before your booked seat is going to expire. This reminds you to extend the currently booked seat or book a new seat if you need to use it further. The notification triggers your Email/SMS/Push or all channels as you preferred in the Preferences Settings menu. In case, any of these channels and the checkboxes provided to filter the notifications are not selected, then you will not receive the notifications.