Periodic Management

Objective

The objective of the Periodic Management guide is to empower users with the necessary knowledge and instructions to carry out occasional adjustments and updates within their KloudHybrid workspace. After completing the initial configuration, it is common for organizational requirements to evolve over time. The Periodic Management guide aims to provide comprehensive and efficient solutions for implementing these changes.

Audience

A technically aware person with the right to configure Kloudhybrid.

Periodic Management

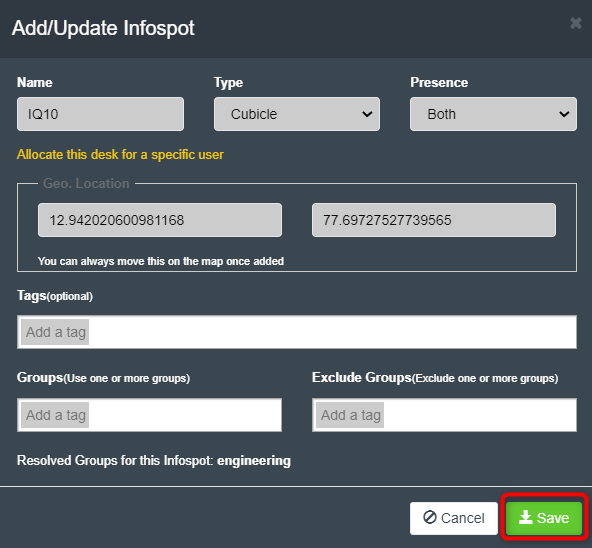
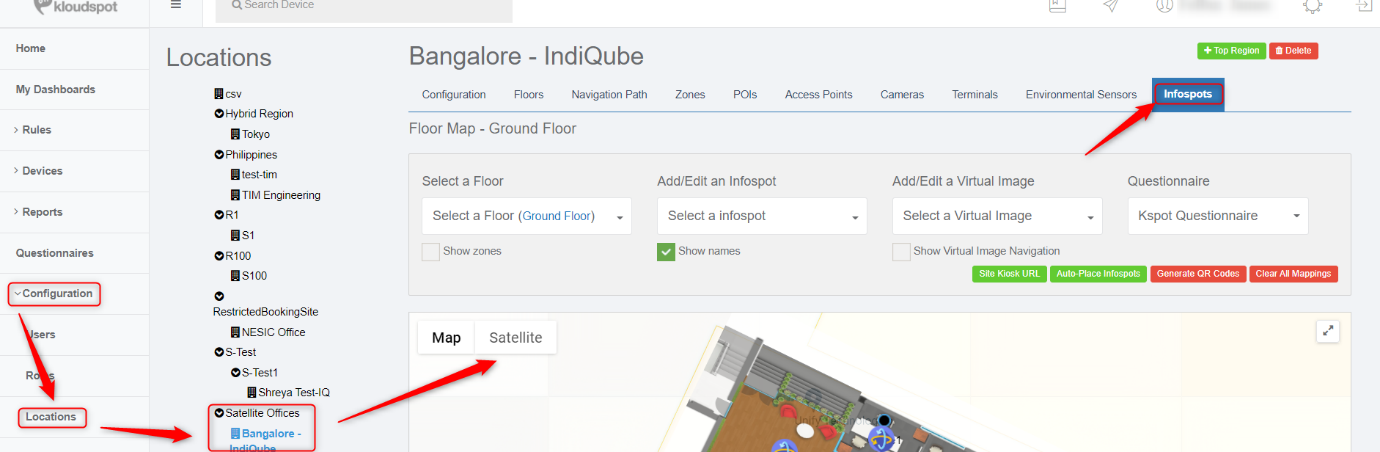
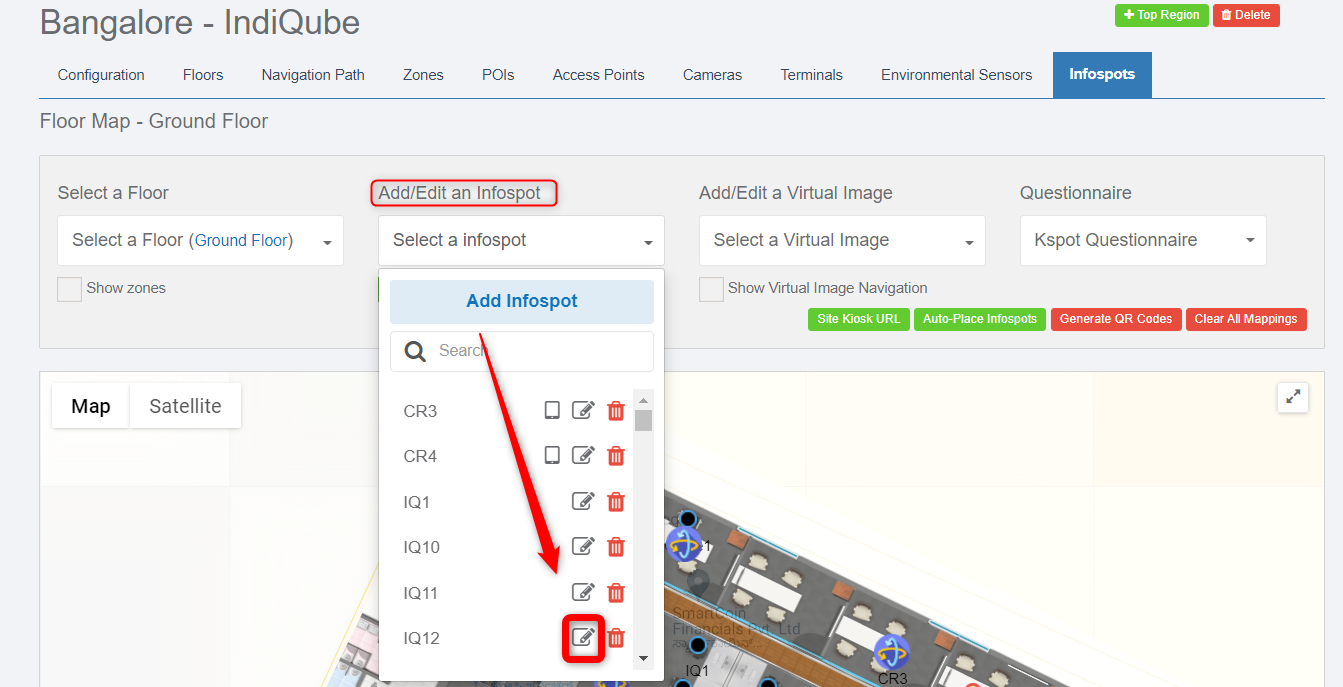
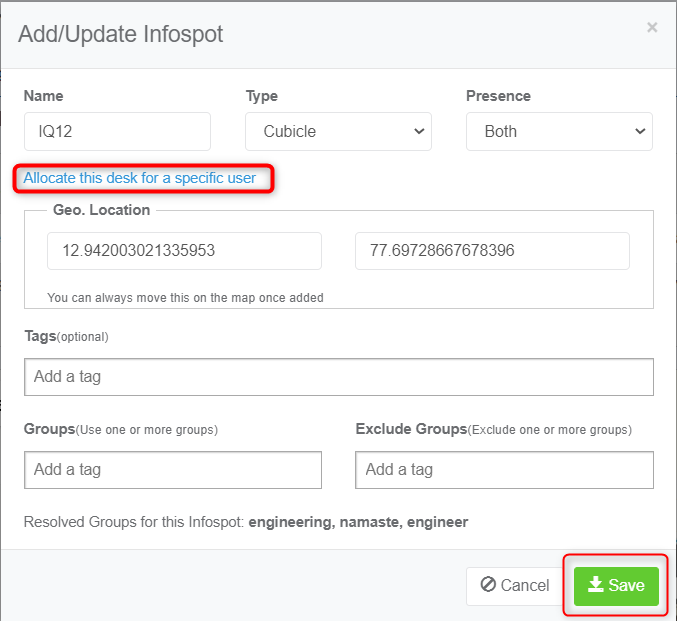
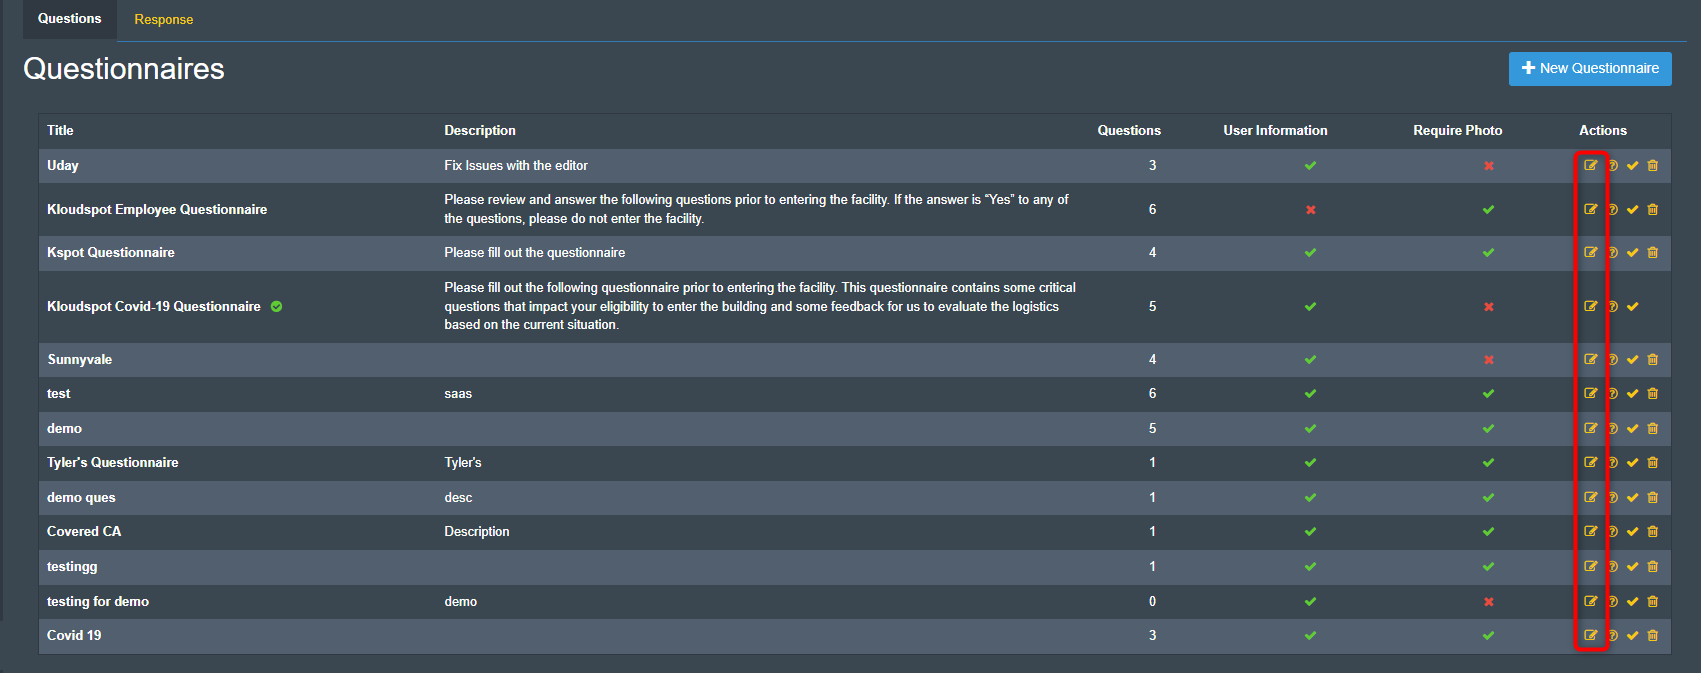
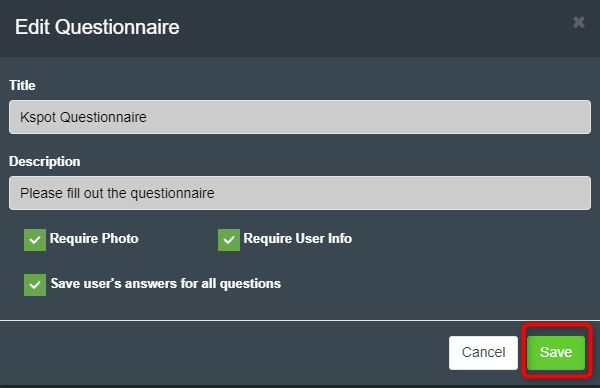
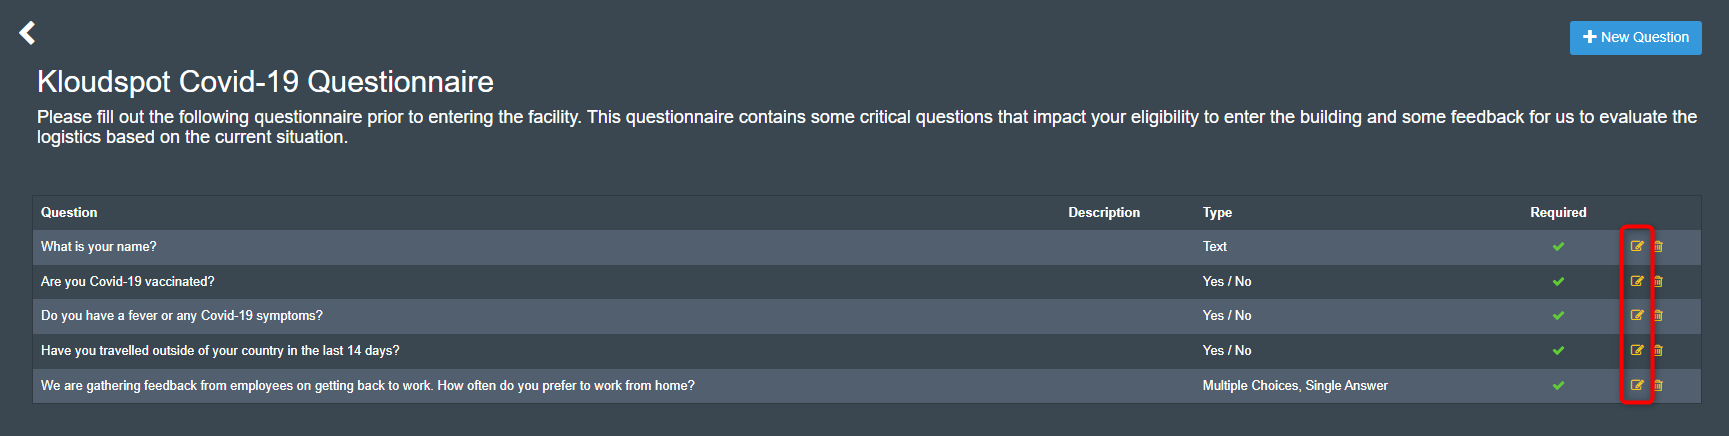
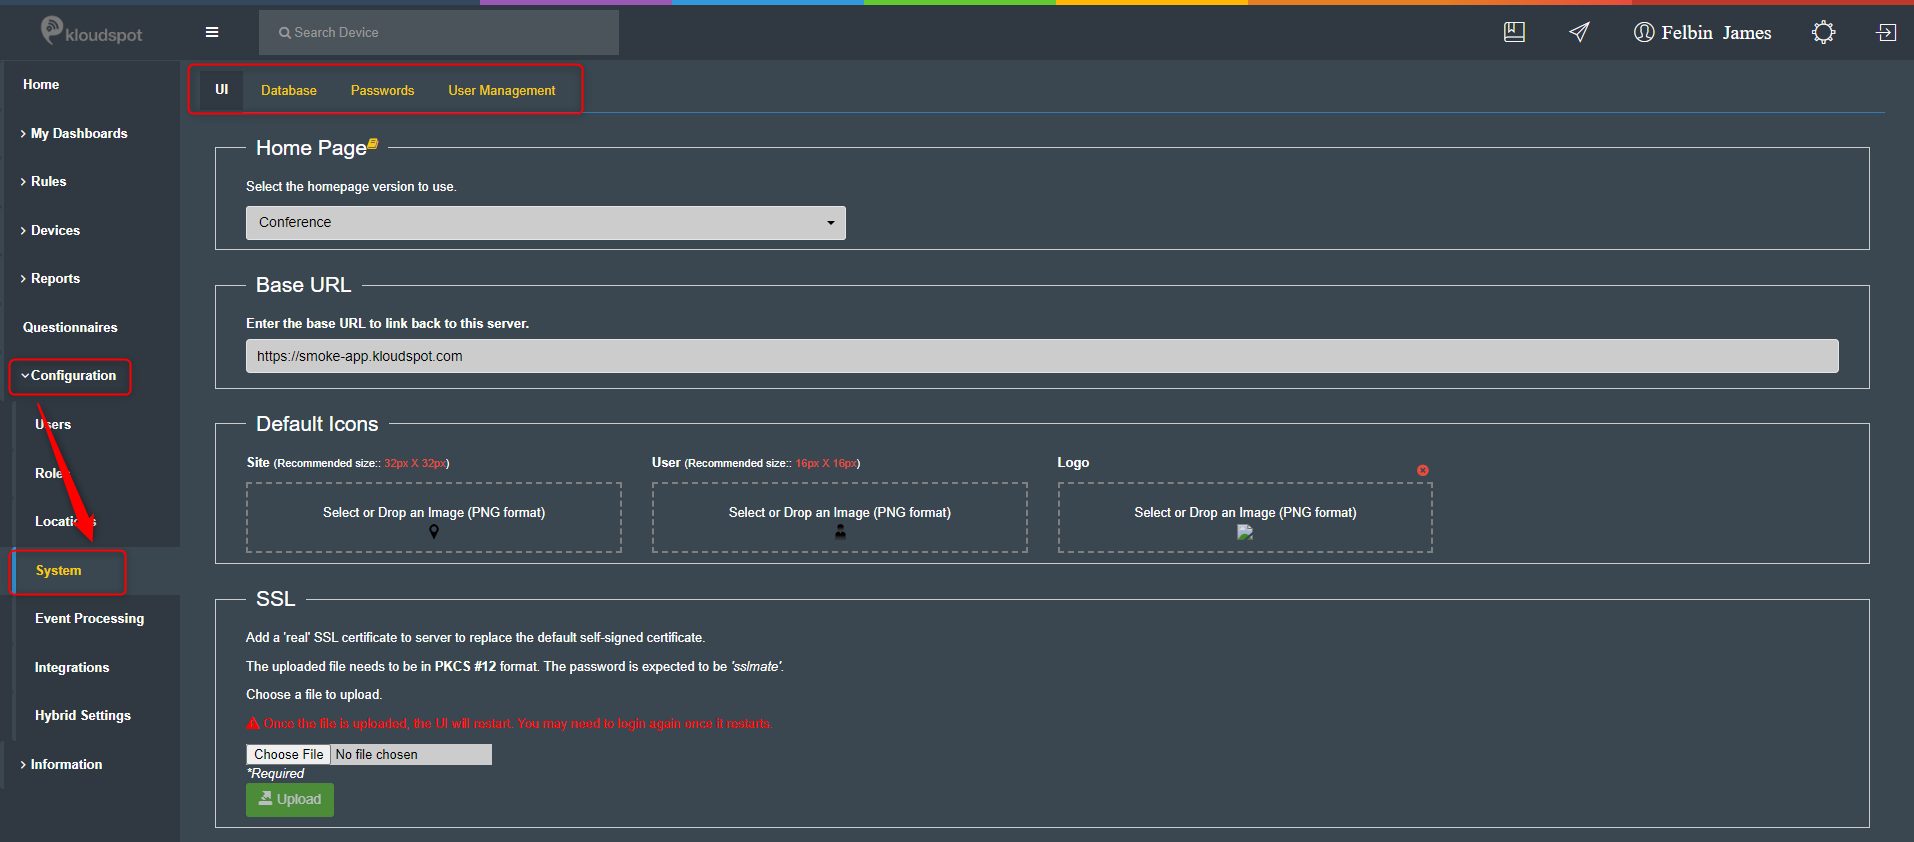
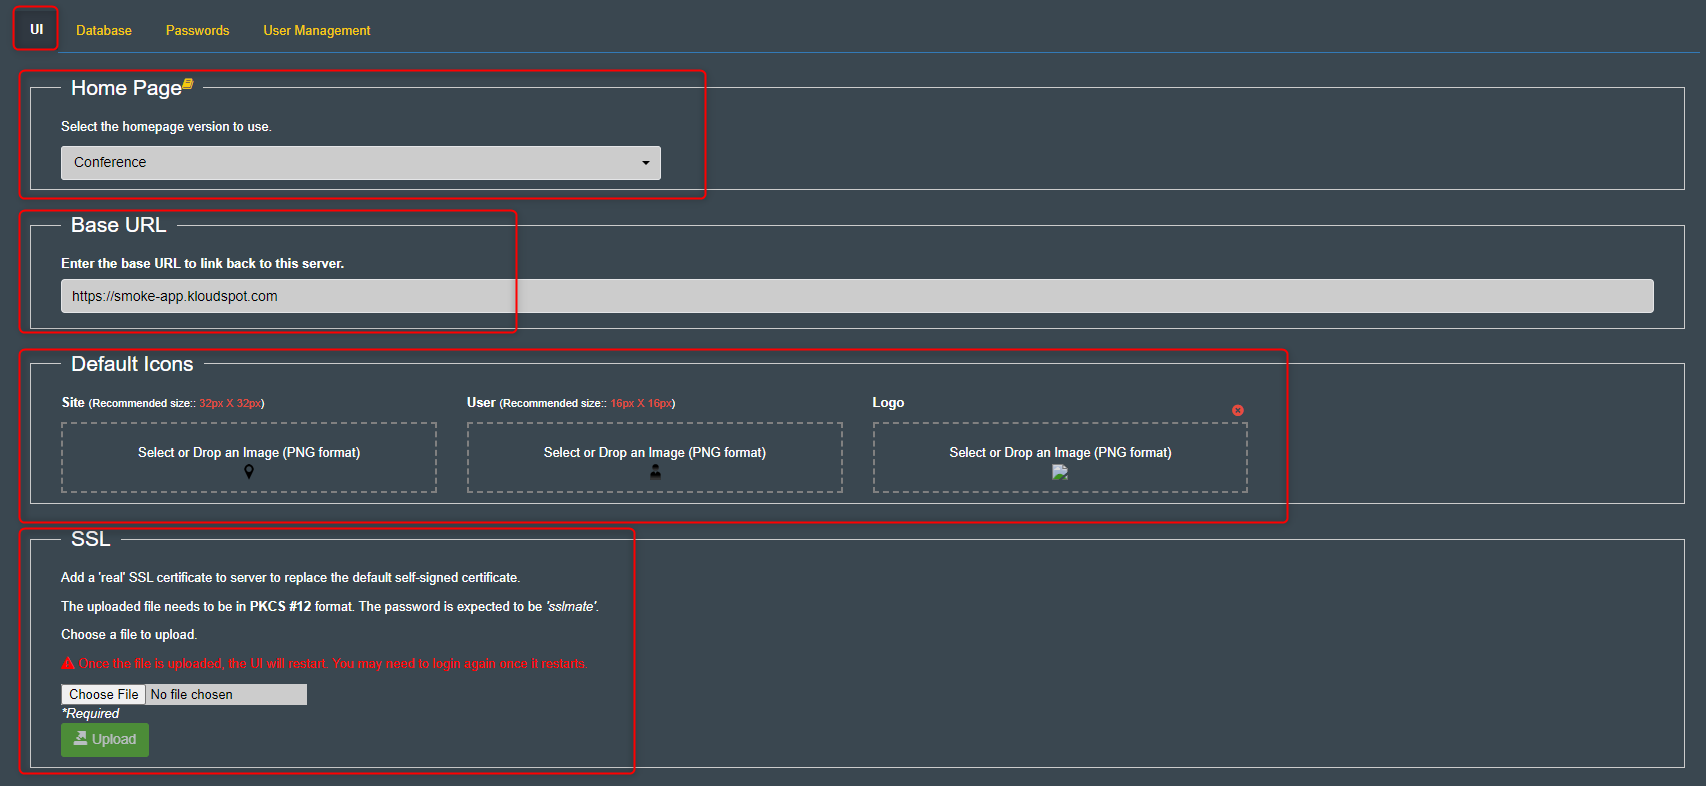
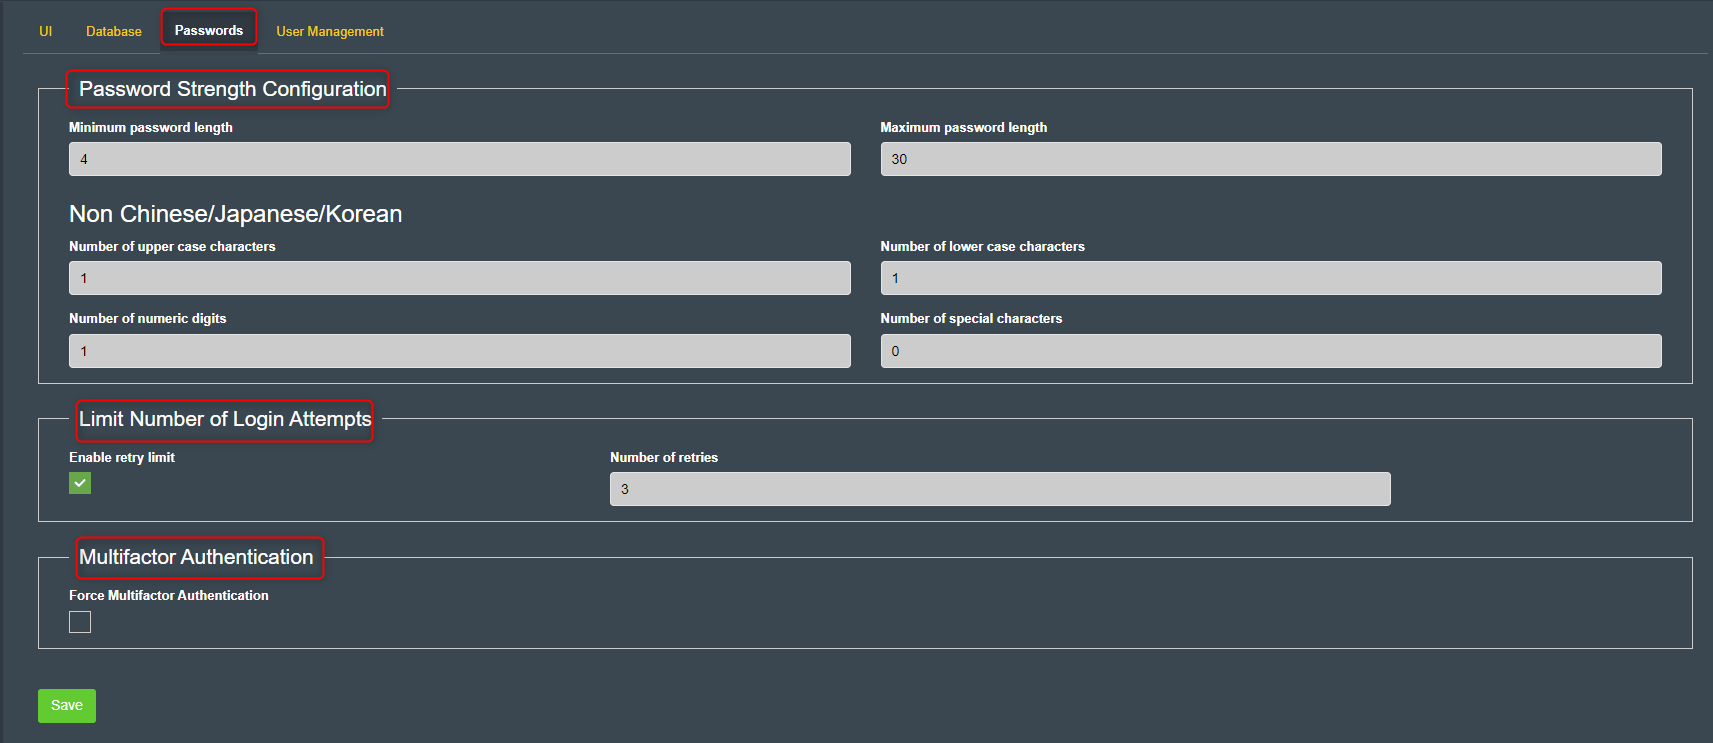
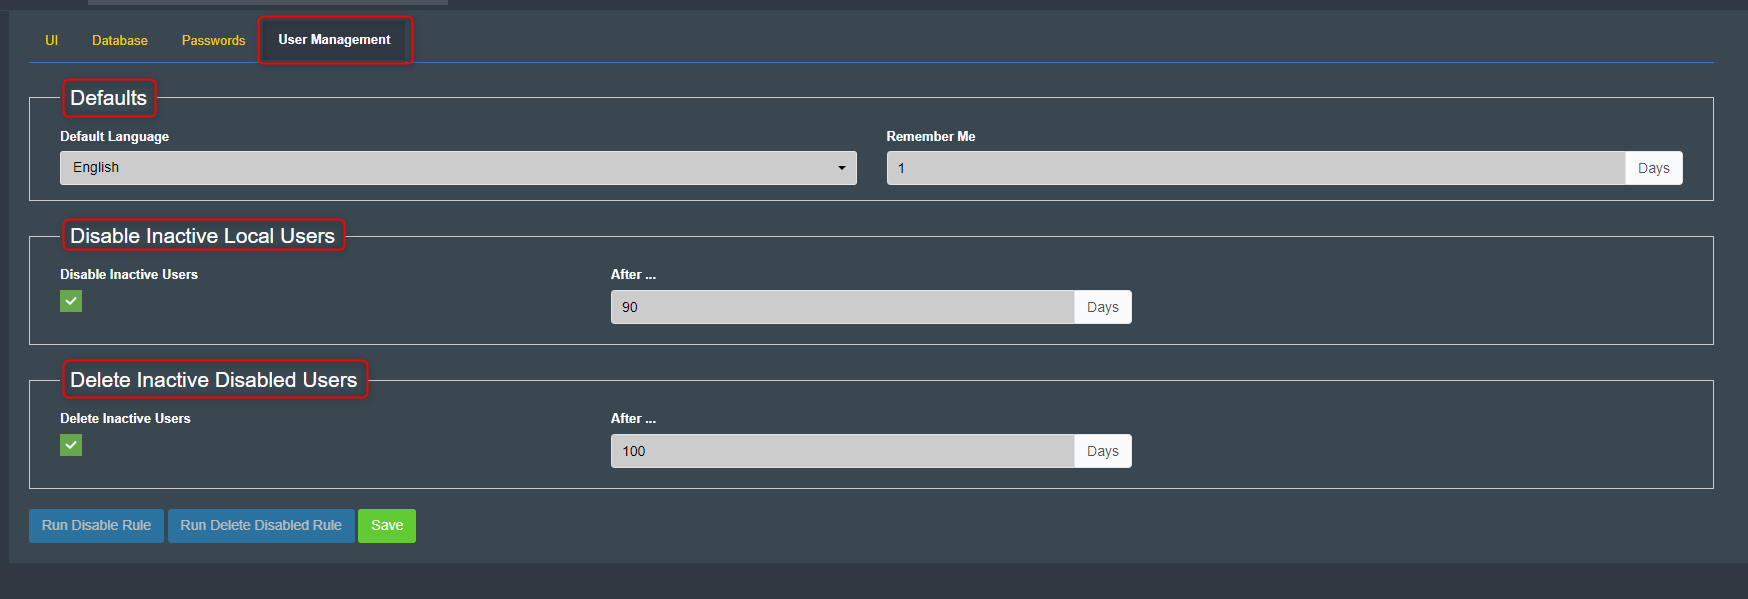
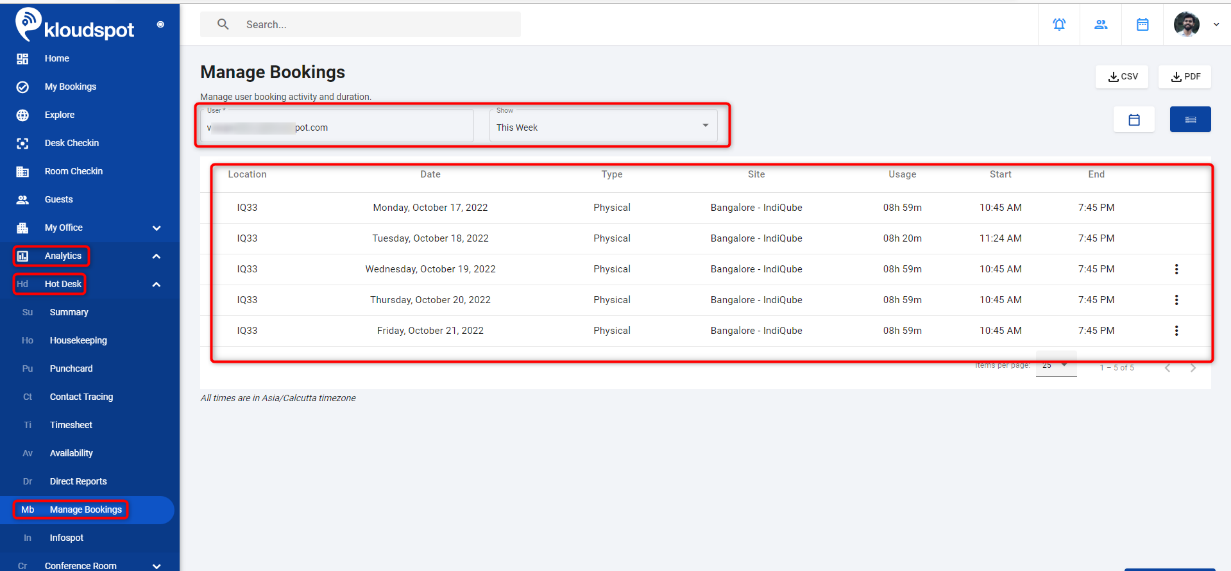
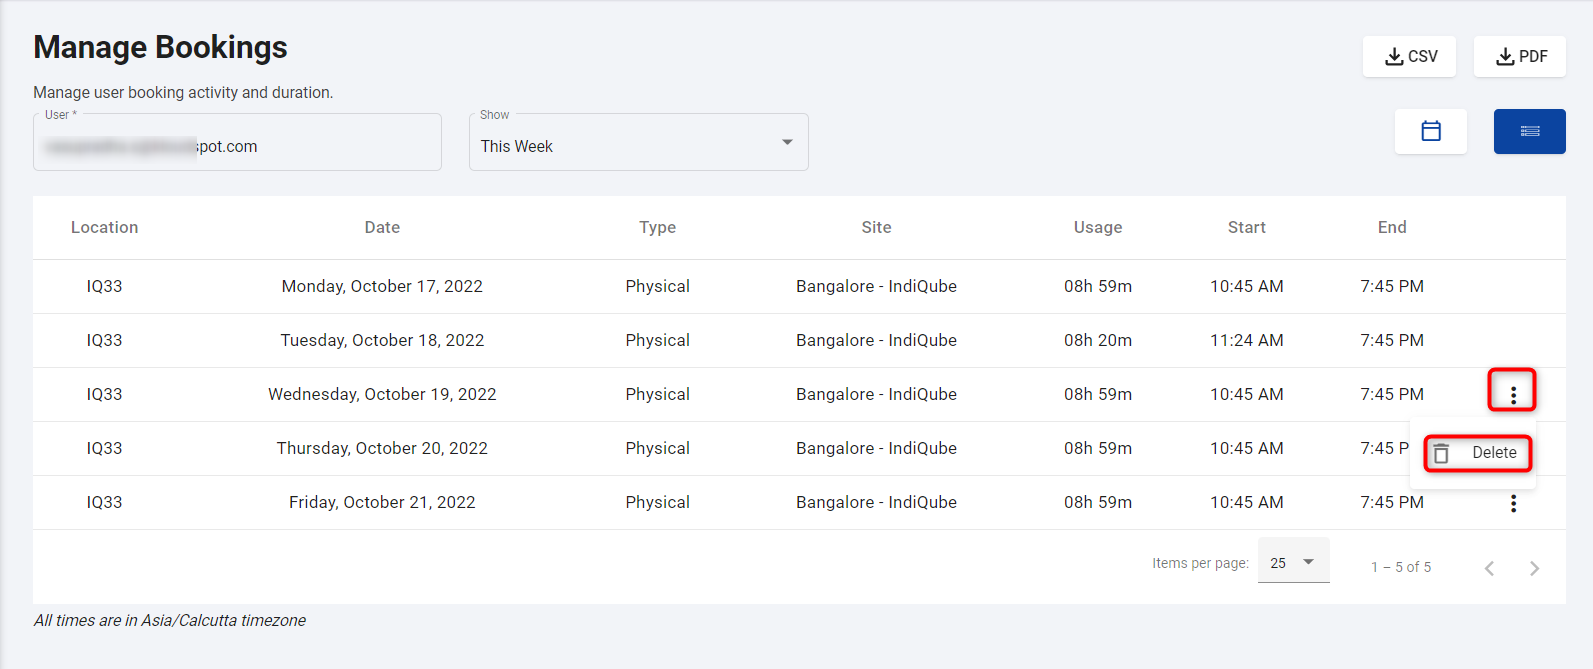
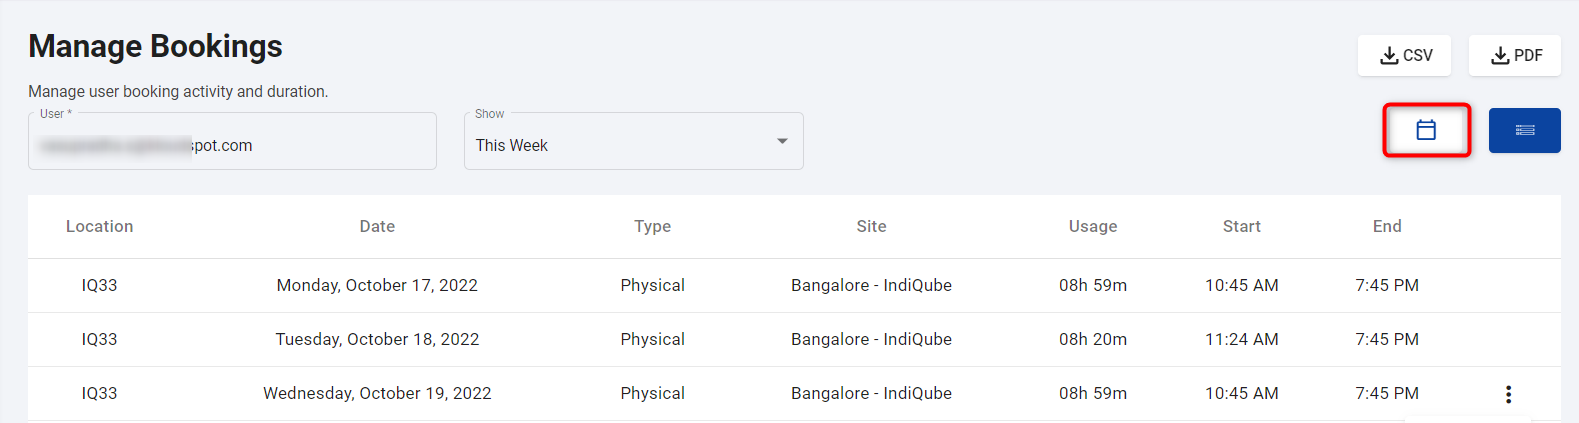
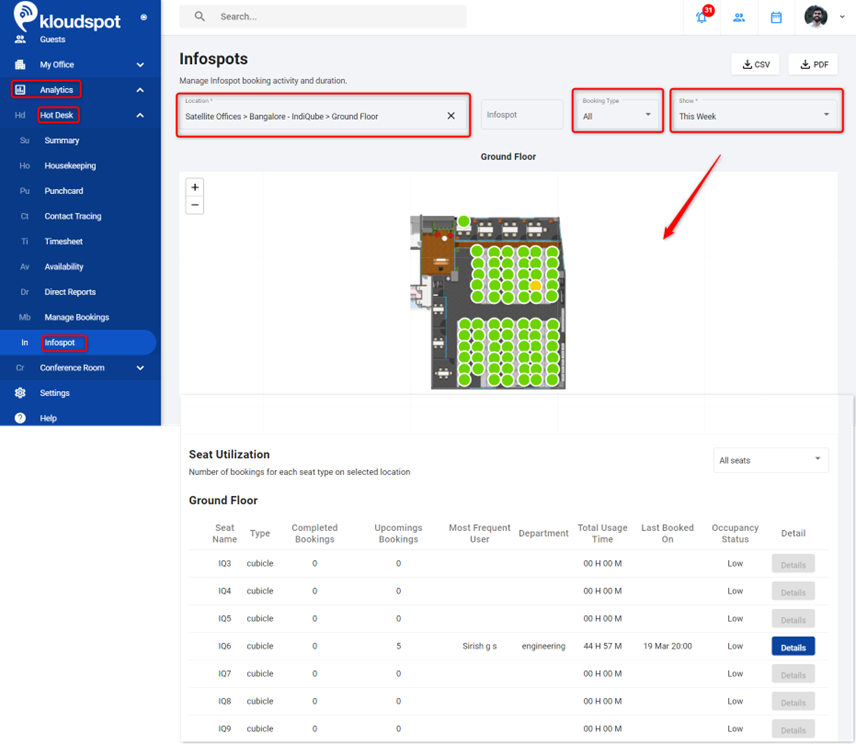
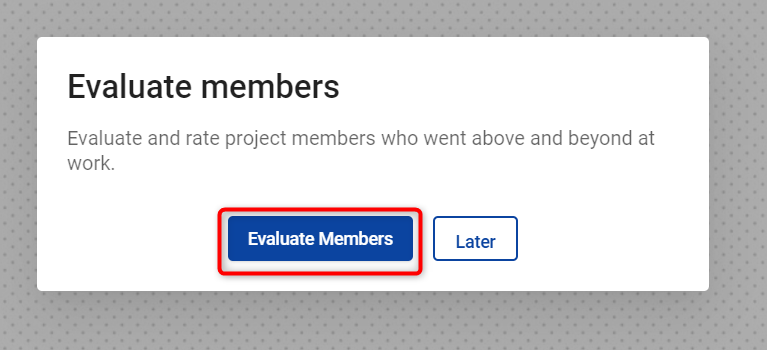
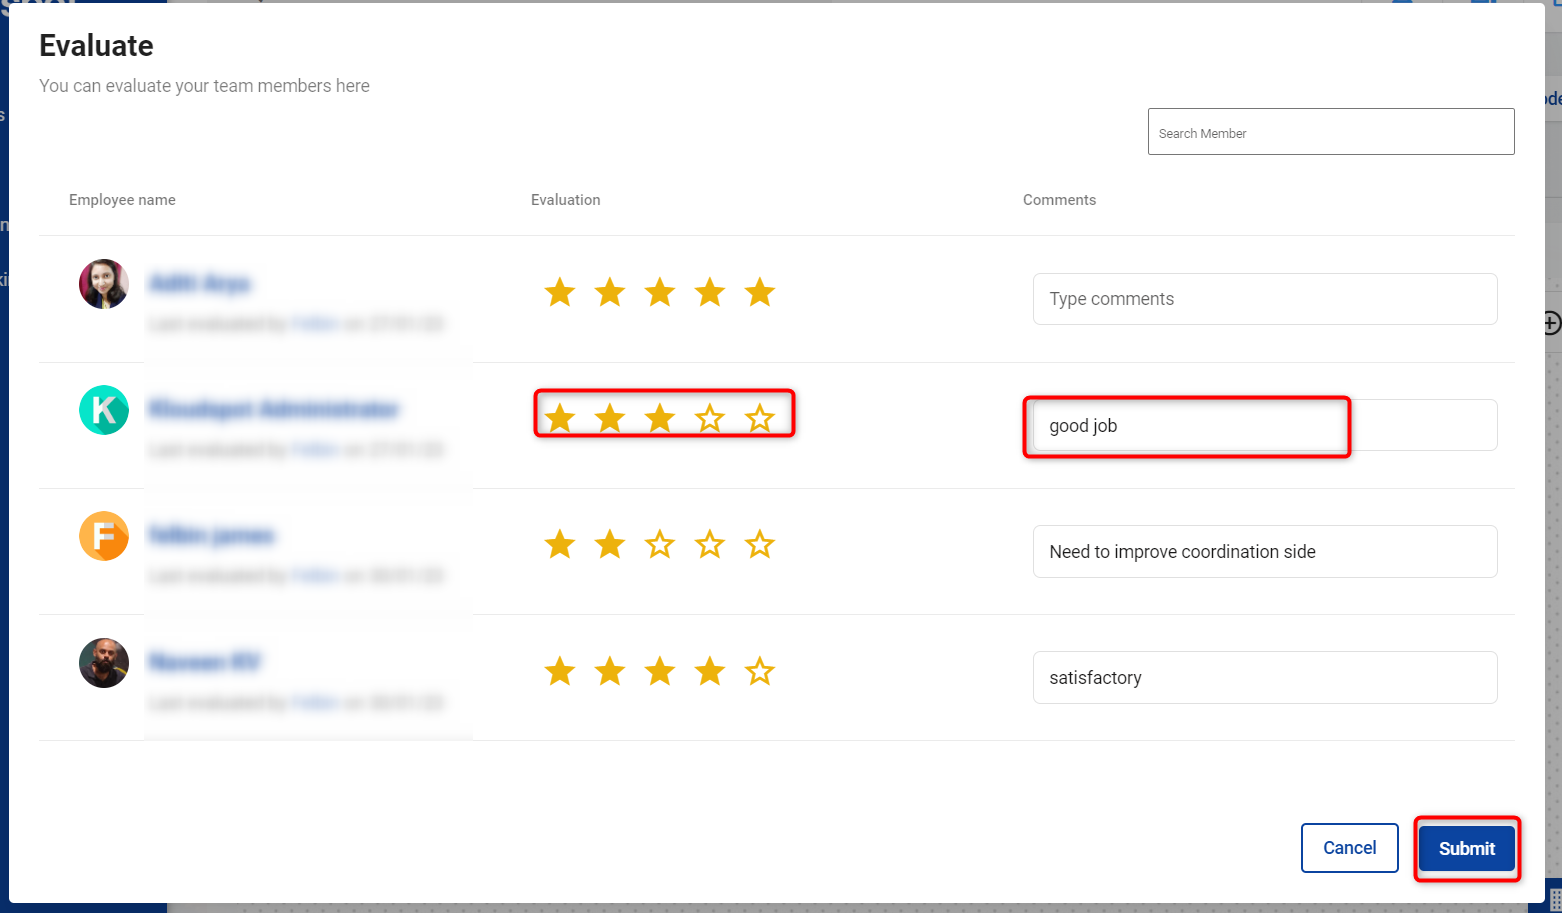
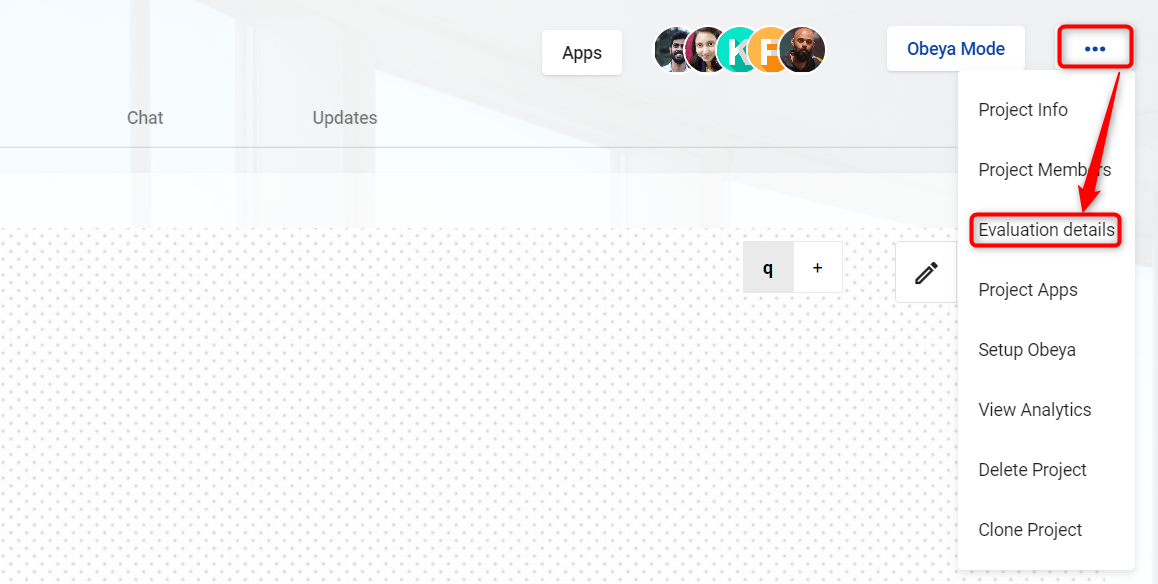
Once the initial configuration of your KloudHybrid workspace is completed, you may need to make occasional adjustments to cater to your evolving needs. The Periodic Management guide is designed to assist you in efficiently implementing these changes. It offers detailed instructions and step-by-step guidance on how to modify and fine-tune various aspects of the application to ensure it aligns perfectly with your specific requirements.

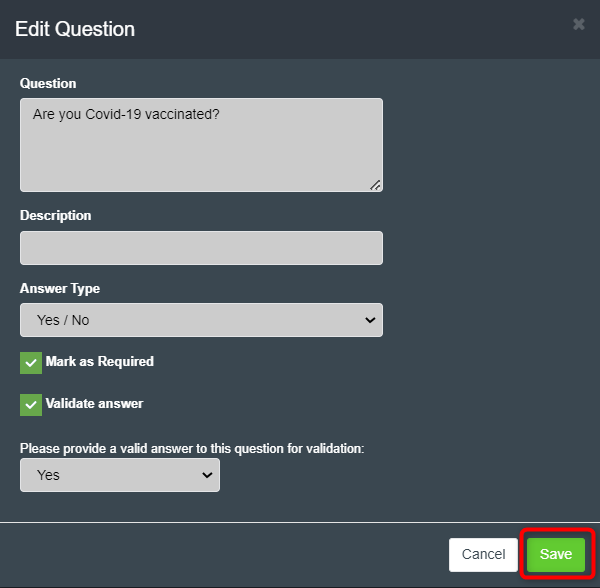
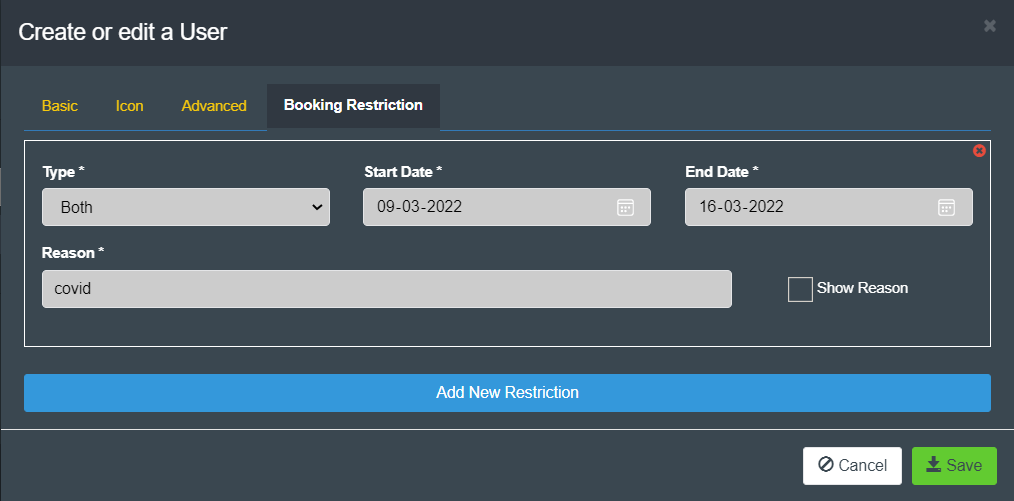
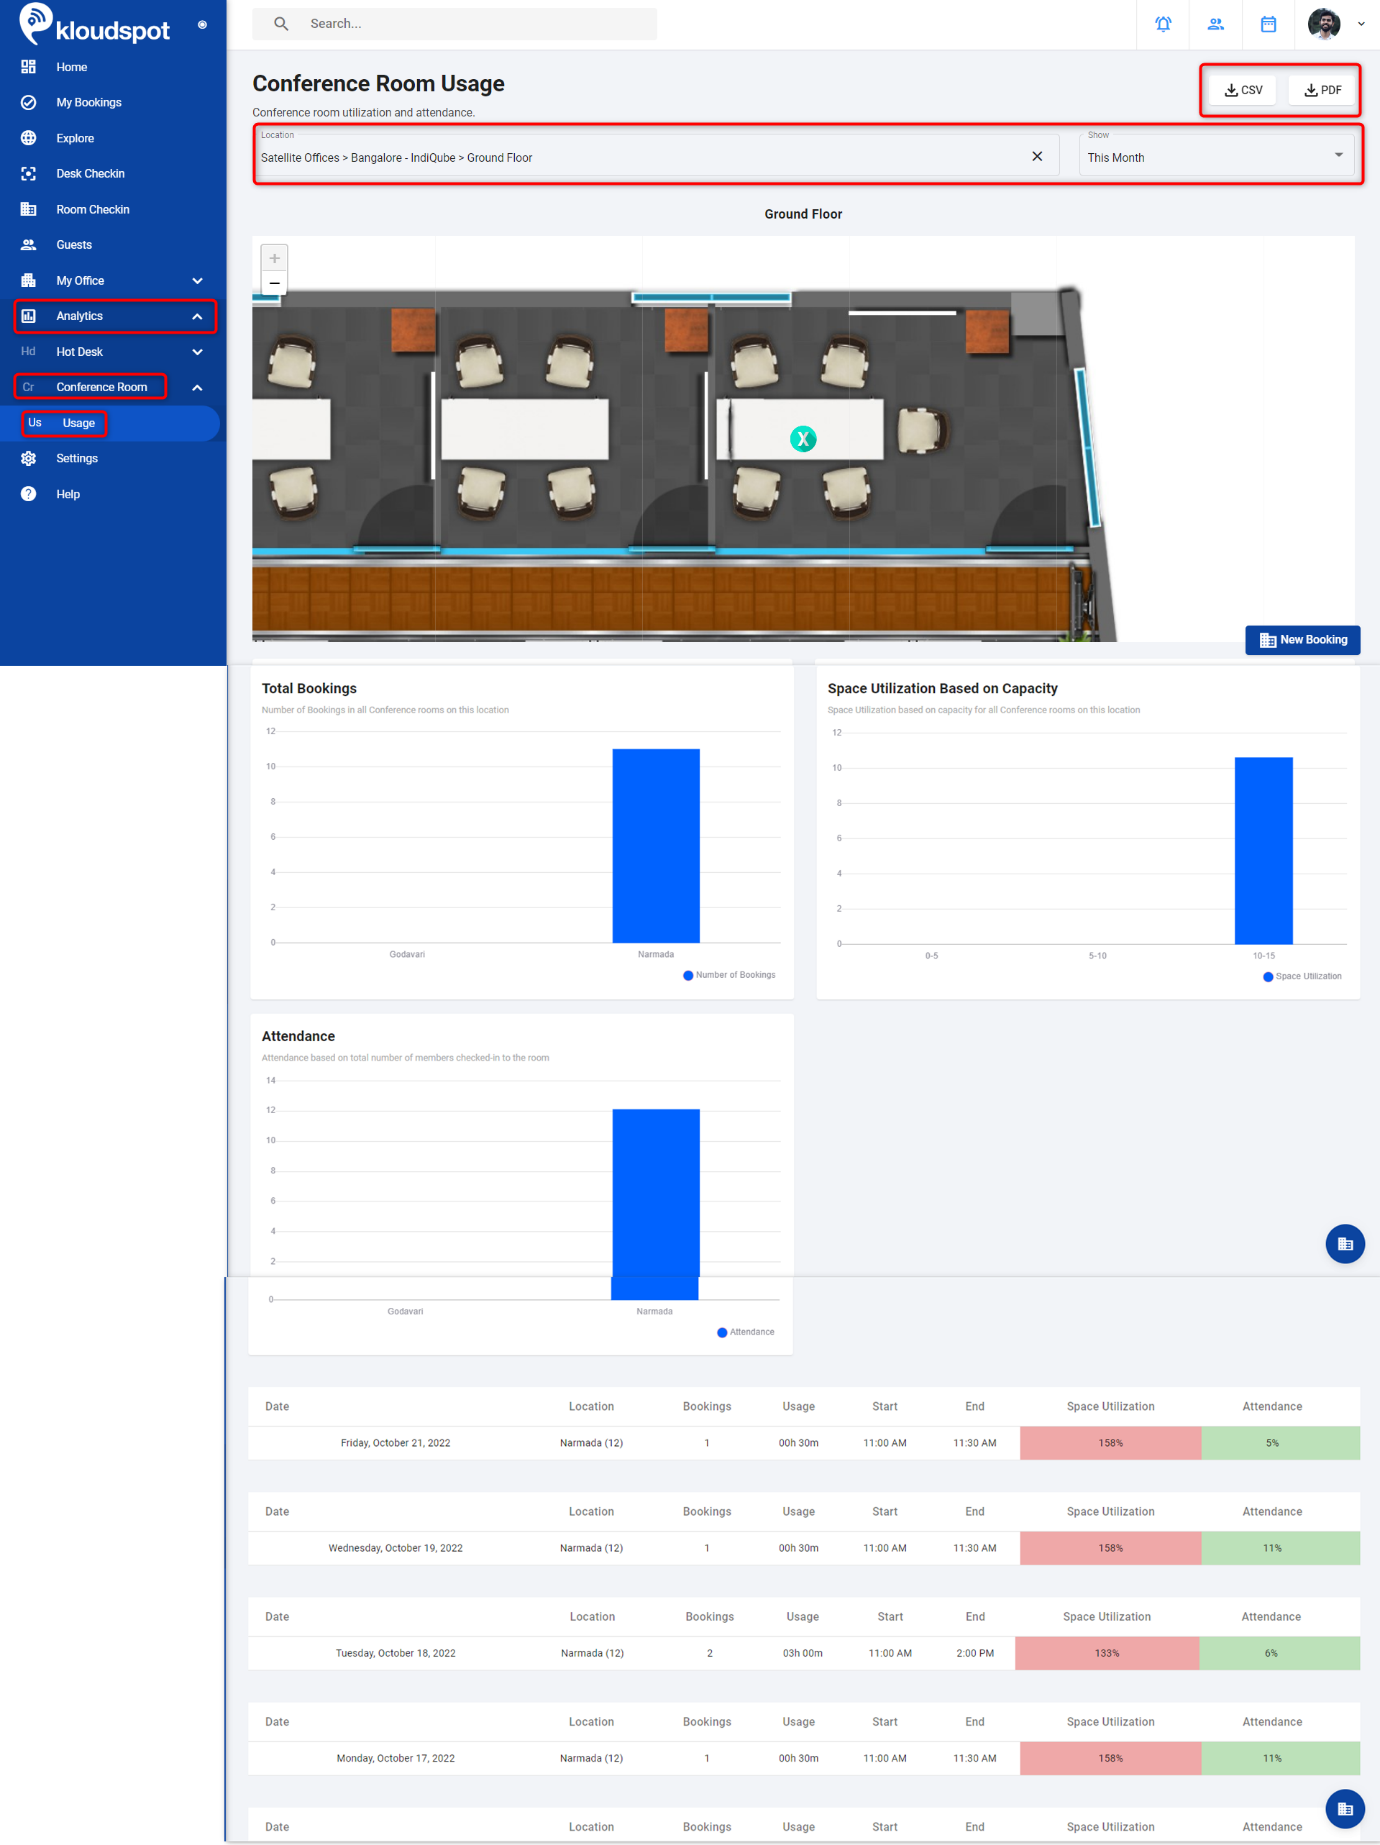
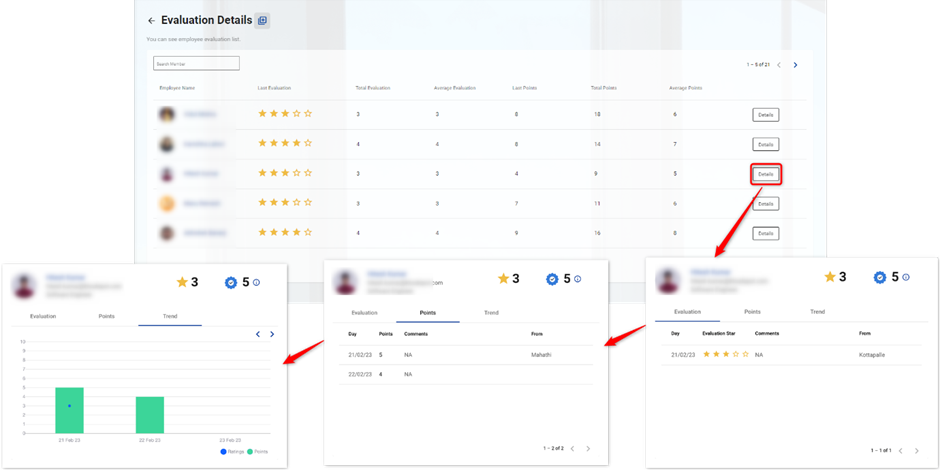
Periodic changes are essential for keeping your KloudHybrid workspace up-to-date and tailored to your organization’s needs. This includes managing seats and bookings, updating health questionnaires to reflect changing health protocols, fine-tuning system settings for optimal performance, and leveraging data analytics to gain valuable insights into workspace utilization. Whether you need to add more seats, adjust booking policies, or analyze workspace trends, the Periodic Management guide equips you with the necessary knowledge and tools to implement these changes seamlessly.

Table of content

Subsections of Periodic Management

Seat Management

To modify existing infospots created during the Hybrid office setup or to assign seats to specific users, follow the instructions in the Seat Management document. You can refer to the Adding Infospots section in the Creating Your Hybrid Office guide for creating new infospots.

In addition to this, refer to the following steps to understand how to take a seat offline and permanently assign a seat to a user.

Taking seats offline or editing existing seats

  1. The added seats can be modified as needed. To do so, follow the steps below.
  2. Navigate to the Advanced settings and then go to the Configuration > Location > click on your site > Infospots tab.
  3. Select a floor from the drop-down menu.
  4. Click on Add/Edit an Infospot dropdown menu. Then click on the Edit button next to the infospot you want to edit.
image
  1. Add/Update Infospot window will open. Here you can edit the seat information. Check out the adding infospot section to learn more about infospot.

  2. To take a seat offline change the Presence to “none”

  3. Click the Save button to save the changes.

image image

Assign a permanent seat to a person

  1. Navigate to Advanced Settings > Configuration > Locations > (Select your location) > Infospots.
image
  1. Select the Infospots from the Add/Edit infospot dropdown list and click on the Edit Infospot button.
image
  1. Then in the window that opens, click on the Allocate this desk for a specific user button and enter the name of the user. Then click Save.

image image

Updating & managing health questionnaires

For any changes to the health questionnaire you’ve already added, follow the steps given below. If you haven’t created a Health Questionnaire yet, refer to the Creating & Assigning Health Questionnaires guide.

  1. Once the questionnaire has been added it is possible to make the necessary changes to it.
  2. To edit questionnaires, navigate to Advanced settings, then go to Configuration > Questionnaires.

Edit Basic Information

  1. Click on the Edit button from the right corner of the questionnaire. Edit Questionnaire window will open. Here you can edit the basic information related to the questionnaire, Title, Description, Required checkboxes, etc…
image
  1. Make the necessary changes and click the Save button. See the Creating & Assigning Health Questionnaires section to know more about the editing field.

image image

Edit questions

  1. Click on the question button at the far right of the questionnaire.
image
  1. A window with questions will open. In it, click on the edit button next to the question you want to edit.
image
  1. In the Edit Question window that opens, you can make any changes you want. See the Creating & Assigning Health Questionnaires section to know more about the editing field.
  2. Click the Save button to save the changes.

image image

Booking restriction

To impose booking restrictions in your office, you can follow the instructions given below.

Add booking Restriction

  1. This allows you to add conditions to a user’s booking.
  2. To add restrictions. Navigate to Advanced Settings and then go to Configuration > Users.
  3. Search for the user to whom you want to apply the Restriction and then click the Edit button.
image
  1. The Create or edit a User window will open. Click the Booking Restriction tab from the window.

  2. Click Add New Restriction button to add restriction.

image
  1. Select the Type from the dropdown menu. 3 types are available. Both, physical and virtual.

    • Both: Prevent the user from making all kinds of bookings.

    • Physical: Prevents the user from making physical bookings.

    • Virtual: Prevents the user from making virtual bookings.

  2. Choose the Start Date and End Date from the calendar dropdown.

  3. Explain why the restriction was imposed in the reason text box.

  4. Check the Show Reason checkbox if you want to show the reason when the user attempts to book a seat.

  5. Click the Close button at the top right corner to delete the restriction.

  6. Click the Save button to save the restriction.

image
  1. When a restricted user attempts to book a seat, a booking restriction notification appears on the screen.

  2. You can contact the manager by clicking on the contact manager button for more information.

image image

Configure the System settings

If you wish to adjust system settings such as UI, database, password, language, etc., follow the steps given below.

System settings

  1. Go to the System configuration page from the Configuration Drop down menu. The “System” page allows to configure the following:
  • UI
  • Database
  • Passwords
  • User Management
image

UI

The UI tab allows configuring the following:

image

Homepage

Select the homepage version from the drop-down menu. This is applicable to Advanced Settings home page.

image

Base URL

Enter the base URL (for eg. https://smoke-app.kloudspot.com/en/login) to link back to this server.

image

Default Icons

  1. You can add an icon for a site or a user or upload a logo for an application in .png format.
  2. You can either browse and select an image or drag and drop an image in the provided box for each item.
image

How to add SSL?

  1. You can add an SSL (Secure Sockets Layer) certificate in PKCS #12 format.
  2. You can choose the file and click Upload to upload it.
  3. Please note that the application will be restarted once you upload a certificate. You may need to log in again once it restarts.
image

Database

  1. The Data Retention Period can be set as per the data backup and retention policy. You can either increase or decrease the number of days for the aggregated data retention and short data retention period. Once you make the changes, click Save and Apply.
image

Password

  1. In this tab, you can make the configuration so that the user can create a strengthened password for the application.
  2. It is also possible to enable or disable the retry limit. By default, it is enabled and ‘3’ retry limits are given.
  3. You can also enable or disable Multifactor Authentication from this Tab.
  4. With this, you can make your login a little more secure. Google Authenticator is used for this. If it is enabled, all users must use multifactor authentication.
  5. You can make the changes and click Save to save the changes.
image

User Management

  1. There are 3 settings that can be done using user management.

    • Set default language
    • Set Remember me days
    • Disable inactive users
    • Delete inactive users
image

Set default language

  1. Select the language from the dropdown menu and click Save.
  2. This will be the language that opens when you log in to the hybrid workspace.
image

Set Remember me time

  1. Once logged in, it determines how long it takes to auto-log out. For that enter number in the ‘Remember me’ text box and click Save button.
image

Disable inactive users

  1. Check the ‘Disable Inactive Users’ checkbox. Enter the time range in the text box that appears. Inactivity beyond this limit will result in disabling the user.
  2. You can make the changes and click Save to save the changes.
image

Delete inactive users

  1. Check the ‘Delete Inactive Users’ checkbox. Enter the time range in the text box that appears. Inactivity beyond this limit will result in Delete the user.
  2. You can make the changes and click Save to save the changes.
image

Analytics

For generating and processing various types of reports, refer the given document. You can use this feature to create the following reports:

  • Summary
  • Housekeeping
  • Punchcard
  • Contact Tracing
  • Timesheet
  • Availability
  • Direct Reports
  • Manage booking
  • Infospots
  • Conference Room usage

This menu is enabled only in the Admin privileges.

It has the following sub-menus:

  • Hot Desk
  • Conference Room

image image

Hot Desk

  1. It helps to understand how effective space utilization is. It allows you to review the physical and virtual login of employees.
  2. It is also possible to trace the contact of physically logged employees in case of an emergency. Functions with Hot Desk are added below.
    • Summary
    • Housekeeping
    • Punchcard
    • Contact Tracing
    • Timesheet
    • Availability
    • Direct Reports
    • Manage booking
    • Infospots

image image

Summary

  1. The summary report generates the overall report with respect to the location and the period selected.
  2. Based on the location and the period selected, the report is generated which comprises of Overview, Utilization, Peak Utilization Statistics. The Peak Utilization Statistics has Space Utilization, Booking Hours Distribution, Usage Days Of the Week, Hours Of The Day. The report is generated for both physical and virtual bookings.

To generate the summary:

  1. Navigate to Analytics > Hot Desk > Summary.
  2. Select the location from the Location drop-down menu. And select the report generation period
  3. When you select Custom Date Range, select a range of dates you want in the calendar.
  4. The summary report will be generated immediately.
  5. The generated report can be saved as a PDF by clicking on the PDF button.
  6. The generated report can be saved as a CSV by clicking on the CSV button.
image

The report has 3 sections.

  • Overview
  • Utilization
  • Peak Utilization Statistics

Overview

  1. The overview section shows the seat booking details for the selected period.
image

Utilization

  1. In the utilization section, we get physical and virtual seat booking information for a specific period at the selected location.
image

Peak Utilization Statistics

Peak Utilization Statistics provide valuable insights into the usage of seats at a selected location. These statistics are presented through various graphs and highlight important information, including:

  1. Space utilization: This graph displays the total number of seats that were booked at the selected location over a specific period. It gives an overview of the overall demand for seats and can help identify peak booking periods.

  2. Booking Hours Distribution: This graph showcases the number of hours each seat was used or occupied during the selected time frame. It provides an understanding of how long seats were utilized, which can be useful for optimizing seat allocation or identifying underutilized seats.

  3. Usage days of the Week: This graph illustrates the daily booking trends, showcasing the number of seats that were booked each day. It allows for the analysis of daily fluctuations in seat demand and helps identify patterns or recurring trends.

  4. Hours of the day: This graph focuses on the hourly distribution of seat bookings. It provides a breakdown of how many seats were booked during each hour of the day. This information can be particularly useful for understanding peak hours of seat utilization or identifying any specific time slots with consistently high or low demand.

These statistics play a crucial role in facilitating data-driven decision-making for managing seat availability, optimizing resources, and improving overall customer satisfaction. By analyzing these graphs, organizations can identify patterns, trends, and potential areas for improvement in their seat booking systems.

image

Housekeeping

  1. The Housekeeping report generates the data based on the location (floor wise) and the date selected.
  2. The Housekeeping report shows how many users physically logged in to the selected location and which seat they occupied.
  3. Cleaning can be done at utilised workplaces depending on the usage.

To generate the housekeeping report:

  1. Navigate to Analytics > Hot Desk > Housekeeping.
  2. Select the location from the location drop-down menu. And select the date.
  3. The House Keeping report will be generated immediately. The occupied Seats are indicated by a blue circle with an x mark as shown in the figure.
  4. The generated report can be saved as a PDF by clicking on the PDF button.
  5. The generated report can be saved as a CSV format by clicking on the CSV button.
image

Punchcard

  1. This page displays the attendance sheet of all your friends and colleagues added to your circle. Refer “My Circle/My Schedule Details” section to know about My Circle.

  2. To view the working hours for each day, navigate to Analytics > Hot Desk > Punchcard.

  3. Then Pachcard report will be generated, from which you can see the attendance sheet of users in your circle for a week.

  4. The generated report can be saved as a PDF by clicking on the PDF button.

image

Contact Tracing

  1. Admin can use this to determine who is most likely to be contacted directly by a given user on a given day.

To generate the report for the contact tracing:

  1. Enter a name in the User field and then select a user from the search results.
  2. Then Select Date. The report is generated.
  3. The report displays a list of people who are likely to contact the selected person on the selected day.
  4. In addition, the User Booking List column contains information about the user’s bookings. The details of the user’s bookings made in the last month or week can be obtained using this.
  5. The generated report can be saved as a PDF by clicking on the PDF button.
  6. The generated report can be saved as a excel format by clicking on the CSV button.
image

Time Sheet

  1. This page displays information on everyone (virtual and physical) that logs into a location at a specific time. It provides information about the user’s seating location, booking type, total usage, and start and end times.

To generate the timesheet Report

  1. Navigate to Analytics > Hot Desk > Time Sheet
  2. Select the location from the location drop-down menu. And select the report generation period
  3. When you select Custom Date Range, select a range of dates you want in the calendar.
  4. The summary report will be generated immediately.
  5. The generated report can be saved as a PDF by clicking on the PDF button.
  6. The generated report can be saved as a CSV format by clicking on the CSV button.
image

Availability

  1. This page displays the available infospots on the date selected.
  2. To do so, Navigate to Analytics > Hot Desk > Availability.
  3. Select the location from the location drop-down menu and select the Date.
  4. Available infospots are displayed. The available infospots are indicated by a blue circle with an x mark as shown in the figure.
  5. The generated report can be saved as a PDF by clicking on the PDF button.
image

Direct Reports

  1. Direct ​​​​report helps a manager to see the booking details of the users under them.
  2. To do so, navigate to Analytics > Hot Desk > Direct Reports.
  3. Then in the window that opens you will get the booking details of the users in your team.
  4. The time can be selected from the dropdown list here based on your needs.
image

Manage Bookings

  1. It can be used to delete a user’s pending bookings.
  2. To do so, navigate to Analytics > Hot Desk > Manage Bookings.
  3. In the window that opens, search for the user’s name and select the time range.
  4. Then the bookings for the selected period will be opened.
image
  1. If you want to delete any existing booking, click Delete from the menu button.
image
  1. Click the Calendar button to change list view to calendar view.

  2. The generated report can be saved as a PDF by clicking on the PDF button.

  3. The generated report can be saved as a CSV by clicking on the CSV button.

image

Infospot

  1. Use the Infospot option to get information about all the Infospots in your office.
  2. You can use this to view the booking history of a specific infospot and to delete upcoming bookings in an infospot.
  3. To do so, navigate to Analytics > Hot Desk > Infospot.
  4. Select the location and booking type from the dropdown list.
  5. Then select the period to display the list. Information about infospots will appear immediately.
image
  1. If you want to know information about a particular infospot, you can enter infospot’s name in the infospot column. You will receive the booking details made in that infospot during the selected period immediately.

  2. The generated report can be saved as a PDF by clicking on the PDF button.

  3. The generated report can be saved as a CSV by clicking on the CSV button.

  4. Click on the Details button to get date-wise information.

image
  1. If you want to delete any existing booking, click the Delete button and confirm it.
image

Conference Room

  1. It helps to get reports related to the conference room. The conference room menu contains the following option.

Usage

  1. It provides information related to the usage of the conference room.
  2. It can be used to find out how many times a conference room has been used, how much space has been used, how many people have attended, and so on.

To generate a Usage report

  1. Navigate to Analytics > Conference room > Usage.
  2. Select the location from the location drop-down menu and Select the report generation period.
  3. When you select Custom Date Range, select a range of dates you want in the calendar.
  4. The usage report will be generated immediately.
  5. The generated report can be saved as a PDF by clicking on the PDF button.
  6. The generated report can be saved as a CSV file by clicking on the CSV button.
image

My Office Document

  1. My Office is a powerful tool that enables seamless project management and facilitates various project-related tasks within the office environment. To fully explore and utilize the potential of My Office, refer to the comprehensive My Office Guide.

  2. In this document, you will find detailed instructions on how to add a project to My Office, streamlining project organization and collaboration. Discover how to create open rooms, enabling employees to interact and discuss topics of interest in a collaborative and engaging environment.

image image

Table of content:

Subsections of My Office Document

My Space

  1. My space is a place where a user can see what is going on in their department. With this, you will get messages related to your project, Upcoming meetings information, and information about the ongoing project.
  2. To know more about My space, see the My Space article in the user manual.
image

My Project

Open My Projects

  1. Navigate to My Office > My Projects.
  2. This section contains information about all the projects.
  3. You can search for Projects using the search bar
  4. You can sort projects using the drop-down menu.
  5. You can also change the view to list view and grid view.
  6. This sub-category only describes what you can do as an admin in the My Project menu. More information can be found in the My project section of the user manual.
image

How to Create New Project?

  1. Navigate to My Office > My Projects.
  2. Click on the New Project button from the top right corner.
image
  1. Fill out all the information in the Create New Project window and click on the Save & Proceed button.

    • Project Title: Enter the title of the project.
    • Project Description: Explain the project details.
    • Project Tag: You can give different tags to identify the project.
    • Project code: Type a project code to find your project easily.
    • Start Date and End Date: Enter the project start date and end date.
    • Evaluate: If you want to enable the Evaluation feature, check the checkbox, and select the time period. The Time Period is the duration of the evaluation cycle. For example, if you select 2 weeks, the new evaluation cycle starts 2 weeks after project creation. Refer How to evaluate a project member? section for more details.
    • Thumbnail Image: The image to be displayed on the project card in the My Project window can be added here.
image
  1. This will take you to the Add Members page. Here you can add project members.

  2. To add members, click on the + Add Members button.

image
  1. From the list of members that opens, click the Add to project button and add members.

Note: You can search for members using the search bar. Also, it is possible to filter members using the filter option.

  1. After adding the members, click on the Done button, and from the add members page, click on the Save & proceed button.
image
  1. The next step is to add integrated apps. To add meeting rooms, click add button below the meeting room section.

Note: See the How to set up meeting room section for more information on adding a meeting room.

  1. To add integrated apps, click add button below the integrated apps section.

Note: See the How to add Integrated Apps section for more information on adding integrated apps.

  1. After adding the meeting rooms and Apps, click the Done button. A new project has been successfully added.

How to set up meeting room?

  1. Three meeting rooms are available. It helps to conduct project related meetings.

    • Zoom
    • Teams
    • Webex

To set up a Zoom meeting.

  1. Click add button below the meeting room section.
  2. Then select Zoom in the popup window that opens.
  3. Then enter your meeting ID, meeting passcode, and meeting URL, and finally, click the Submit button.
  4. Zoom has been successfully integrated.
image

To set up a Teams meeting.

  1. Click add button below the meeting room section.
  2. Then select Teams in the popup window that opens.
  3. Then enter your Teams meeting URL, and finally, click the Submit button.
  4. Teams has been successfully integrated.
image

To set up a Webex meeting.

  1. Click add button below the meeting room section.
  2. Then select Webex in the popup window that opens.
  3. Then enter your Webex meeting URL, and finally, click the Submit button.
  4. Webex has been successfully integrated.
image

How to add Integrated Apps?

  1. You can add required apps to the project by adding resources. There are multiple apps available; read on to learn how to integrate each one.
  2. To integrate My Space, Bulletin board, Zoom, and Tasks, no configuration is required. It can be added directly by clicking the Submit button.
image

To add Outlook into a project

  1. Click add button below the integrated apps section.
  2. Then select Outlook in the resource popup window that opens.
  3. Then enter your Resource Name and Resource URL, and finally, click the Submit button.

Note: By default, the Name will be Outlook you can change it as per your requirements.

  1. Outlook has been successfully added.
image
  1. Click add button below the integrated apps section.
  2. Then select Embed in the resource popup window that opens.

Note: Some URLs may not work directly, in this case, embed link can be used.

  1. Then enter your Embed link, and finally, click the Submit button.

Note: By default, the Name will be Embed you can change it as per your requirements.

  1. Embed link has been successfully added.
image
  1. Click add button below the integrated apps section.
  2. Then select URL/Link in the resource popup window that opens.
  3. Then enter your Resource URL, and finally, click the Submit button.

Note: By default, the Name will be Url you can change it as per your requirements.

  1. URL/Link has been successfully added.
image

To add Confluence into a project

  1. Click add button below the integrated apps section.
  2. Then select Confluence in the resource popup window that opens.
  3. Then enter your Resource Name and Resource URL, and finally, click the Submit button.

Note: By default, the Name will be Confluence you can change it as per your requirements.

  1. Confluence has been successfully added.
image

To add GitHub into a project

  1. Click add button below the integrated apps section.
  2. Locate and click on the GitHub app, in the pop-up window that appears.
  3. Copy the GitHub Repository URL and paste it into the URL section.

Note: When you click on the GitHub App Icon from the home page, this URL helps you determine which page to redirect.

  1. Check the Enable Notifications checkbox in the Resource window that opens.

  2. Select the Repository name from the drop-down list and click submit button. Updates to that Repository will be notified to project members.

image
  1. GitHub notification is enabled successfully.

To add Jira into a project

  1. Click add button below the integrated apps section.
  2. Locate and click on the JIRA app, in the pop-up window that appears.
  3. Copy the JIRA Repository URL and paste it into the URL section.

Note: When you click on the JIRA App Icon from the home page, this URL helps you determine which page to redirect.

  1. Check the Enable Notifications checkbox in the Resource window that opens.

  2. Select the project name from the drop-down list and click submit button.

  3. Updates to that project will be notified to project members.

image
  1. JIRA notification is enabled successfully.

To add Slack into a project

  1. Click add button below the integrated apps section.
  2. Locate and click on the Slack app, in the pop-up window that appears.
  3. Copy the Slack group URL and paste it into the URL section.

Note: When you click on the Slack tab from the home page, this URL helps you determine which group to redirect.

  1. Check the Enable Notifications checkbox in the Resource window that opens.

  2. Select the channel name from the drop-down list and click submit button.

  3. Updates to that channel will be notified to project members.

image
  1. Slack notification is enabled successfully.

To add Trello into a project

  1. Click add button below the integrated apps section.

  2. Locate and click on the Trello app, in the pop-up window that appears.

  3. Copy the Trello Repository URL and paste it into the URL section.

    Note: When you click on the Trello App Icon from the project page, this URL helps you determine which page to redirect.

  4. Check the Enable Notifications checkbox in the Resource window that opens.

  5. Select the Board name from the drop-down list and click submit button.

  6. Updates to that Board will be notified to project members.

image
  1. Trello notification is enabled successfully.

To add YouTube into a project

  1. Click add button below the integrated apps section.
  2. Then select YouTube in the resource popup window that opens.
  3. Then enter your Resource URL, and finally, click the Submit button.

Note: By default, the Name will be YouTube you can change it as per your requirements.

  1. YouTube has been successfully added. image

To add Yammer into a project

  1. Click add button below the integrated apps section.
  2. Then select Yammer in the resource popup window that opens.
  3. Then enter your Resource URL, and finally, click the Submit button.

Note: By default, the Name will be Yammer you can change it as per your requirements.

  1. Yammer has been successfully added.
image

To add Microsoft Stream into a project

  1. Click add button below the integrated apps section.
  2. Then select Microsoft Stream in the resource popup window that opens.
  3. Then enter your Resource URL, and finally, click the Submit button.

Note: By default, the Name will be Stream you can change it as per your requirements.

  1. Microsoft Stream has been successfully added.
image

To add OneDrive into a project

  1. Click add button below the integrated apps section.
  2. Then select OneDrive in the resource popup window that opens.
  3. Then enter your Resource URL, and finally, click the Submit button.

Note: By default, the Name will be OneDrive you can change it as per your requirements.

  1. OneDrive has been successfully added.
image

To add SharePoint into a project

  1. Click add button below the integrated apps section.
  2. Then select SharePoint in the resource popup window that opens.
  3. Then enter your Resource URL, and finally, click the Submit button.

Note: By default, the Name will be SharePoint you can change it as per your requirements.

  1. SharePoint has been successfully added.
image

To add Microsoft Planner into a project

  1. Click add button below the integrated apps section.
  2. Then select Microsoft Planner in the resource popup window that opens.
  3. Then enter your Resource URL, and finally, click the Submit button.

Note: By default, the Name will be Planner you can change it as per your requirements.

  1. Microsoft Planner has been successfully added.
image

To add Tableau into a project

  1. Click add button below the integrated apps section.
  2. Then select Tableau in the resource popup window that opens.
  3. Then enter your Resource URL, and finally, click the Submit button.

Note: By default, the Name will be Tableau you can change it as per your requirements.

  1. Tableau has been successfully added.
image

To add MS Teams into a project

  1. Click add button below the integrated apps section.
  2. Locate and click on the MS Teams app, in the pop-up window that appears.
  3. Check the Enable Notifications checkbox in the Resource window that opens. Select the Team name from the drop-down list, then select the channel.

Note: When you click on the Teams tab, you will be redirected to the team given here, so select the team related to the project.

  1. Then click submit button.

  2. MS Teams is added successfully.

image

To add Box into a project

  1. Click add button below the integrated apps section.

  2. Locate and click on the Box app, in the pop-up window that appears.

  3. In the resource window that opens, there are 2 options.

    • Create Project Folder: Helps to create a new folder in the box.

    • Link Project to existing folder: Helps to select a folder that exists in the box.

Note: If another folder with the same name of the project exists in the box, the new folder cannot be created. In this situation, you can select the folder from the select folder drop-down.

image

Create Project Folder

  1. Check the Create Folder Check box and click Submit button.
image
  1. A folder with the project name will be created in the box.

  2. The created folder will contain all the project members. Project members will be notified if anything is added, deleted, or edited in this file.

image
  1. Select the folder name from the drop-down list and click submit button.

  2. project members will be added to the selected folder. members will be notified of updates that appear in that folder.

image
  1. Box App is added successfully.

To add Wrike into a project

  1. Click add button below the integrated apps section.
  2. Locate and click on the Wrike app, in the pop-up window that appears.
  3. Copy the Wrike folder URL and paste it into the URL section.

Note: When you click on the Wrike App from the home page, this URL helps you determine which page to redirect.

  1. Check the Enable Notifications checkbox in the Resource window that opens.

  2. Select the folder name from the drop-down list and click submit button. Updates to that folder will be notified to project members.

image
  1. Wrike notification is enabled successfully.

To add Google Drive into a project

  1. In the Project App window that opens, click the Add button in the Integrated Apps section.

  2. Locate and click on the Google Drive app, in the pop-up window that appears.

  3. Check the Enable Notifications checkbox in the Resource window that opens, there are 2 options.

    • Create project folder: Helps to create a new folder in Google Drive.

    • Link project to existing folder: Helps to select a folder that exists in Google Drive.

Note: If another folder with the same name of the project exists in Google Drive, the new folder cannot be created. In this situation, you can select the folder from the select folder drop-down.

image

Create Project Folder

  1. Check the Create Project Folder Check box and click Submit button.

Note: Enter https://drive.com in the URL text box.

image
  1. A folder with the project name will be created on google drive.
image
  1. The created folder will contain all the project members. Project members will be notified if anything is added, deleted, or edited in this file.

image image

  1. Select the folder name from the drop-down list and click submit button.

  2. project members will be added to the selected folder. members will be notified of updates that appear in that folder.

image
  1. Google Drive is added successfully.

To add Video to a project

  1. Click add button below the integrated apps section.
  2. Then select the Video option from the resource popup window that opens.
  3. In the popup window that opens, click on the Choose file button and select the video file you want to add. Then click on the Submit button.
  4. Video has been successfully added.
image

How to setup Obeya Mode?

  1. The admin can configure the obeya mode according to the project requirements when creating the project. If the administrator has not configured it. The Obeya will be created automatically with an overview tab, task tab, and Project members.
  2. To configure Obeya mode click the Project Details button on the project card.
image
  1. This will take you to the project dashboard.

  2. Here you can click on the Setup Obeya option from the Menu button.

image
  1. In the window that opens, click on the Edit Screen button on the screen to be edited. image

  2. Select the layout from the layout list.

  3. Click the Add New button to add resources. Then a popup window with resources will appear. Add the resource you want to add from there.

  4. Refer How to add Integrated Apps section for resource integration.

  5. Click on the save button to save the changes.

  6. Configure the other screens in the same way.

image

How to clone a Project?

  1. If you want to start another project with the same team members, you can use the clone project option.
  2. To do so, Click the Clone Project option from the menu button.
image
  1. Then a popup will open asking for the project key, enter a key with a maximum of 3 letters or numbers and click the Clone button.

image image

  1. Immediately a project containing the same team members will be created.

image image

How to Invite users?

  1. If you want to add a member to an already created project, you can use the Invite user option.
  2. To do so, Navigate to Menu > Project Members.
image
  1. Click the Invite User button on the Project members page that appears.

  2. Then, in the popup window that appears, enter the email address and name of the user to be added, and then click the Invite button. image

  3. New user added successfully. As soon as the invite is done, the user will receive that information as an email and push notification.

Note: Notifications will be delivered based on your chosen notification preference. If you are not receiving notifications, please verify your notification settings.

  1. When you invite an individual outside the KloudHybrid Application, they will receive an email containing a password reset link. By clicking on that link, they can reset their password and access the hybrid application.
image

How to evaluate a project member?

  1. The purpose of the project member evaluation is to offer a fair and open assessment of the team members’ performance and to assist them in strengthening their abilities and contributions to the project.
  2. In an evaluation cycle, a project member can only be evaluated once. Even if a project has multiple administrators.
  3. To evaluate a member in a project, open the desired project.
image
  1. If you are entering the project for the first time in an evaluation cycle, a popup will open to evaluate members. Click on the Evaluate member button.
image
  1. Also, you can open the evaluate popup by clicking on the members button from the project home page.
image
  1. In the evaluate popup window that opens give a rating to each member, if there are any comments, can be added in the Comments column.

  2. Click Submit button to save the changes.

image
  1. If you want to see the evaluation details after the evaluation, follow the steps below.

  2. Select the Evaluation details option from the menu items on the project home page.

image
  1. In the Evaluation Details window, you can see the details of all team members.

  2. To learn more about a particular team member, click the Details button next to the member’s details.

  3. In the popup window that opens, you can see the ratings received by that member in each evaluation cycle, thanks points awarded by other members and the bar chart based on the points and ratings you received.

image

Company Hub

  1. This will assist you in finding a coworker, learning more about him, and, if necessary, requesting his mentorship.
  2. To know more about company Hub, refer Discover a colleague or mentor section from the user manual.
image

Project Analytics

  1. Project analytics can be used to get insights about the project. To go to the project analytics page, click on Project Analytics from the My Office dropdown menu.
  2. To know more about Project Analytics, refer Project Analytics section from the user manual.

Open Room

  1. It helps employees interact with coworkers about topics of interest in Open Rooms created by the admin. Only the admin can create rooms.

    To access further details regarding the utilization of open rooms, refer to the Open Rooms document outlined within the user manual.

How to create an Open Room

  1. Navigate to My office > Open Rooms. Then click on the New Room button from the top right corner.
image
  1. Then enter all the details in the open room details window that opens.

    • Open Room Title: Give this open room an appropriate name based on what it represents.
    • Enter description: Briefly explain what you intend to share in it. This helps the members to have a clear idea about the group.
    • Zoom Room URL: A Zoom URL can be added if a meeting room is required for group discussions. This can be provided if required, not mandatory.
    • Teams Room URL: A Teams URL can be added if a meeting room is required for group discussions. This can be provided if required, not mandatory.
    • Administrators: Add more administrators if you want.
    • Time Zone: Choose the Time zone from the dropdown list.
    • Start Time and end time: Select the time from what time to what time the room should be open every day. Also, check the check box on which days the room should be activated.
    • Open Room Background: Select an image to be the open room background.
  2. Click the Create button once this information has been entered.

image
  1. To know more about Open Rooms, refer How to Open Rooms section from the user manual.

Add media content to open rooms

  1. Once the open room is created it will be displayed on the open room page.
  2. To add media content, navigate to the Menu button > Edit.
image
  1. In the window that opens, click the Add new button in the media content section.

  2. Then a window with media resources will appear. Add the resources you want to the open room by clicking on them.

  3. To add resources, refer to the How to add Integrated Apps? section.

image

Other General Settings

To access the general settings configuration, navigate to configuration > Hybrid Settings > general.

General Settings

Settings for Homepage Module Priority

  1. This functionality allows you to customize the arrangement of modules on the homepage based on your specific requirements.

  2. Within the “Homepage Module Priority Settings” section, simply use the drag-and-drop functionality to reposition the modules as needed.

  3. After making the desired adjustments, click the “Save” button to apply and save the changes.