The first essential task is to create your office in KloudHybrid, providing the foundation for managing your workspace efficiently.
To accomplish this, you will need a 2D map and 3D images of your office layout, allowing KloudHybrid to accurately represent your physical environment.
For detailed instructions on how to create a new office in KloudHybrid, please refer to the following sections.
Overview
Creating a hybrid office can revolutionize the way we work, offering a productive and flexible environment that blends physical and virtual spaces seamlessly. This innovative approach empowers organizations to adapt to evolving work dynamics. As you embark on the journey of building your own hybrid office, there are key elements that can transform your space into an efficient and harmonious ecosystem.
One essential element is the Location Hierarchy, which allows you to organize your office space in a structured manner. By importing Floor Maps, you can visualize and manage different areas within your office, maximizing their utilization. With Zone Creation, you can define specific regions and assign unique functionalities to each, creating a customized and tailored environment.
To enhance the immersive experience, Importing 360 Pictures adds a whole new dimension to your hybrid office. By incorporating Infospots, interactive elements that provide valuable information, you can engage and captivate users. Navigation Path simplifies movement within your office, making it easy for employees and visitors to navigate with ease.
The addition of Terminals ensures seamless connectivity and interaction, while Points of Interest (POIs) highlight significant areas or resources within your hybrid office. Lastly, miscellaneous settings allow for further customization and fine-tuning, ensuring your hybrid office perfectly aligns with your organization’s unique requirements.
By embracing these features and crafting your hybrid office, you can create an environment that fosters collaboration, boosts productivity, and adapts effortlessly to changing needs. Let’s explore each component and discover the remarkable possibilities that lie ahead as you embark on the exciting journey of creating your own hybrid office.
Kloudspot has a tired and hierarchical system for organizing sites. It is important to understand how your organization’s sites are organized globally and map that organization into the hierarchy explained below. The location hierarchy in the Kloudspot system is used to logically organize sites based on geographical location, this is also used in data aggregation metrics. So, for example, if you want to view occupancy data for all sites in America, you can view it as a whole.
Top regions: are the highest level of the hierarchy, they would normally be the country or region you are in, for example, the United States, or North America. You can have as many top regions as you like, and each top region can have any number of child regions or sites under it.
Child regions: are under the top regions in the hierarchy, they generally denote a state or territory, for example, California. You can create as many child regions as you need. Child regions can have both child regions and sites underneath them.
Sites: are where things really start to get interesting. Sites are generally specific locations, like 1285 Oakmead Parkway, Sunnyvale California (the Kloudspot HQ!). A site will generally be a specific building or location, with one or many floors.
Go to the locations menu from the Configuration Drop down menu.
Click, Create a region to get started. If this is not your first region, click + Top Region on the top right corner of the page.
Enter the Name of a region. Select the time zone from the drop-down menu where the new region is located. Other settings can be ignored for now.
Click Save. A top-level region has been added.
Click on the top-level region you just created, then click + Child Region on the top right corner of the page. Repeat steps 4 – 5 for the new child region.
Once the child region is added, click on the child region, Then, click + Child site. Repeat steps 3 – 4 for the new child site.
Click on the Site name, a Configuration window will open. Then fill in the Name, Address, and Time zone. When you enter an address, it will be reflected on the map, this may take a moment. Click Save.
Import Floor Maps
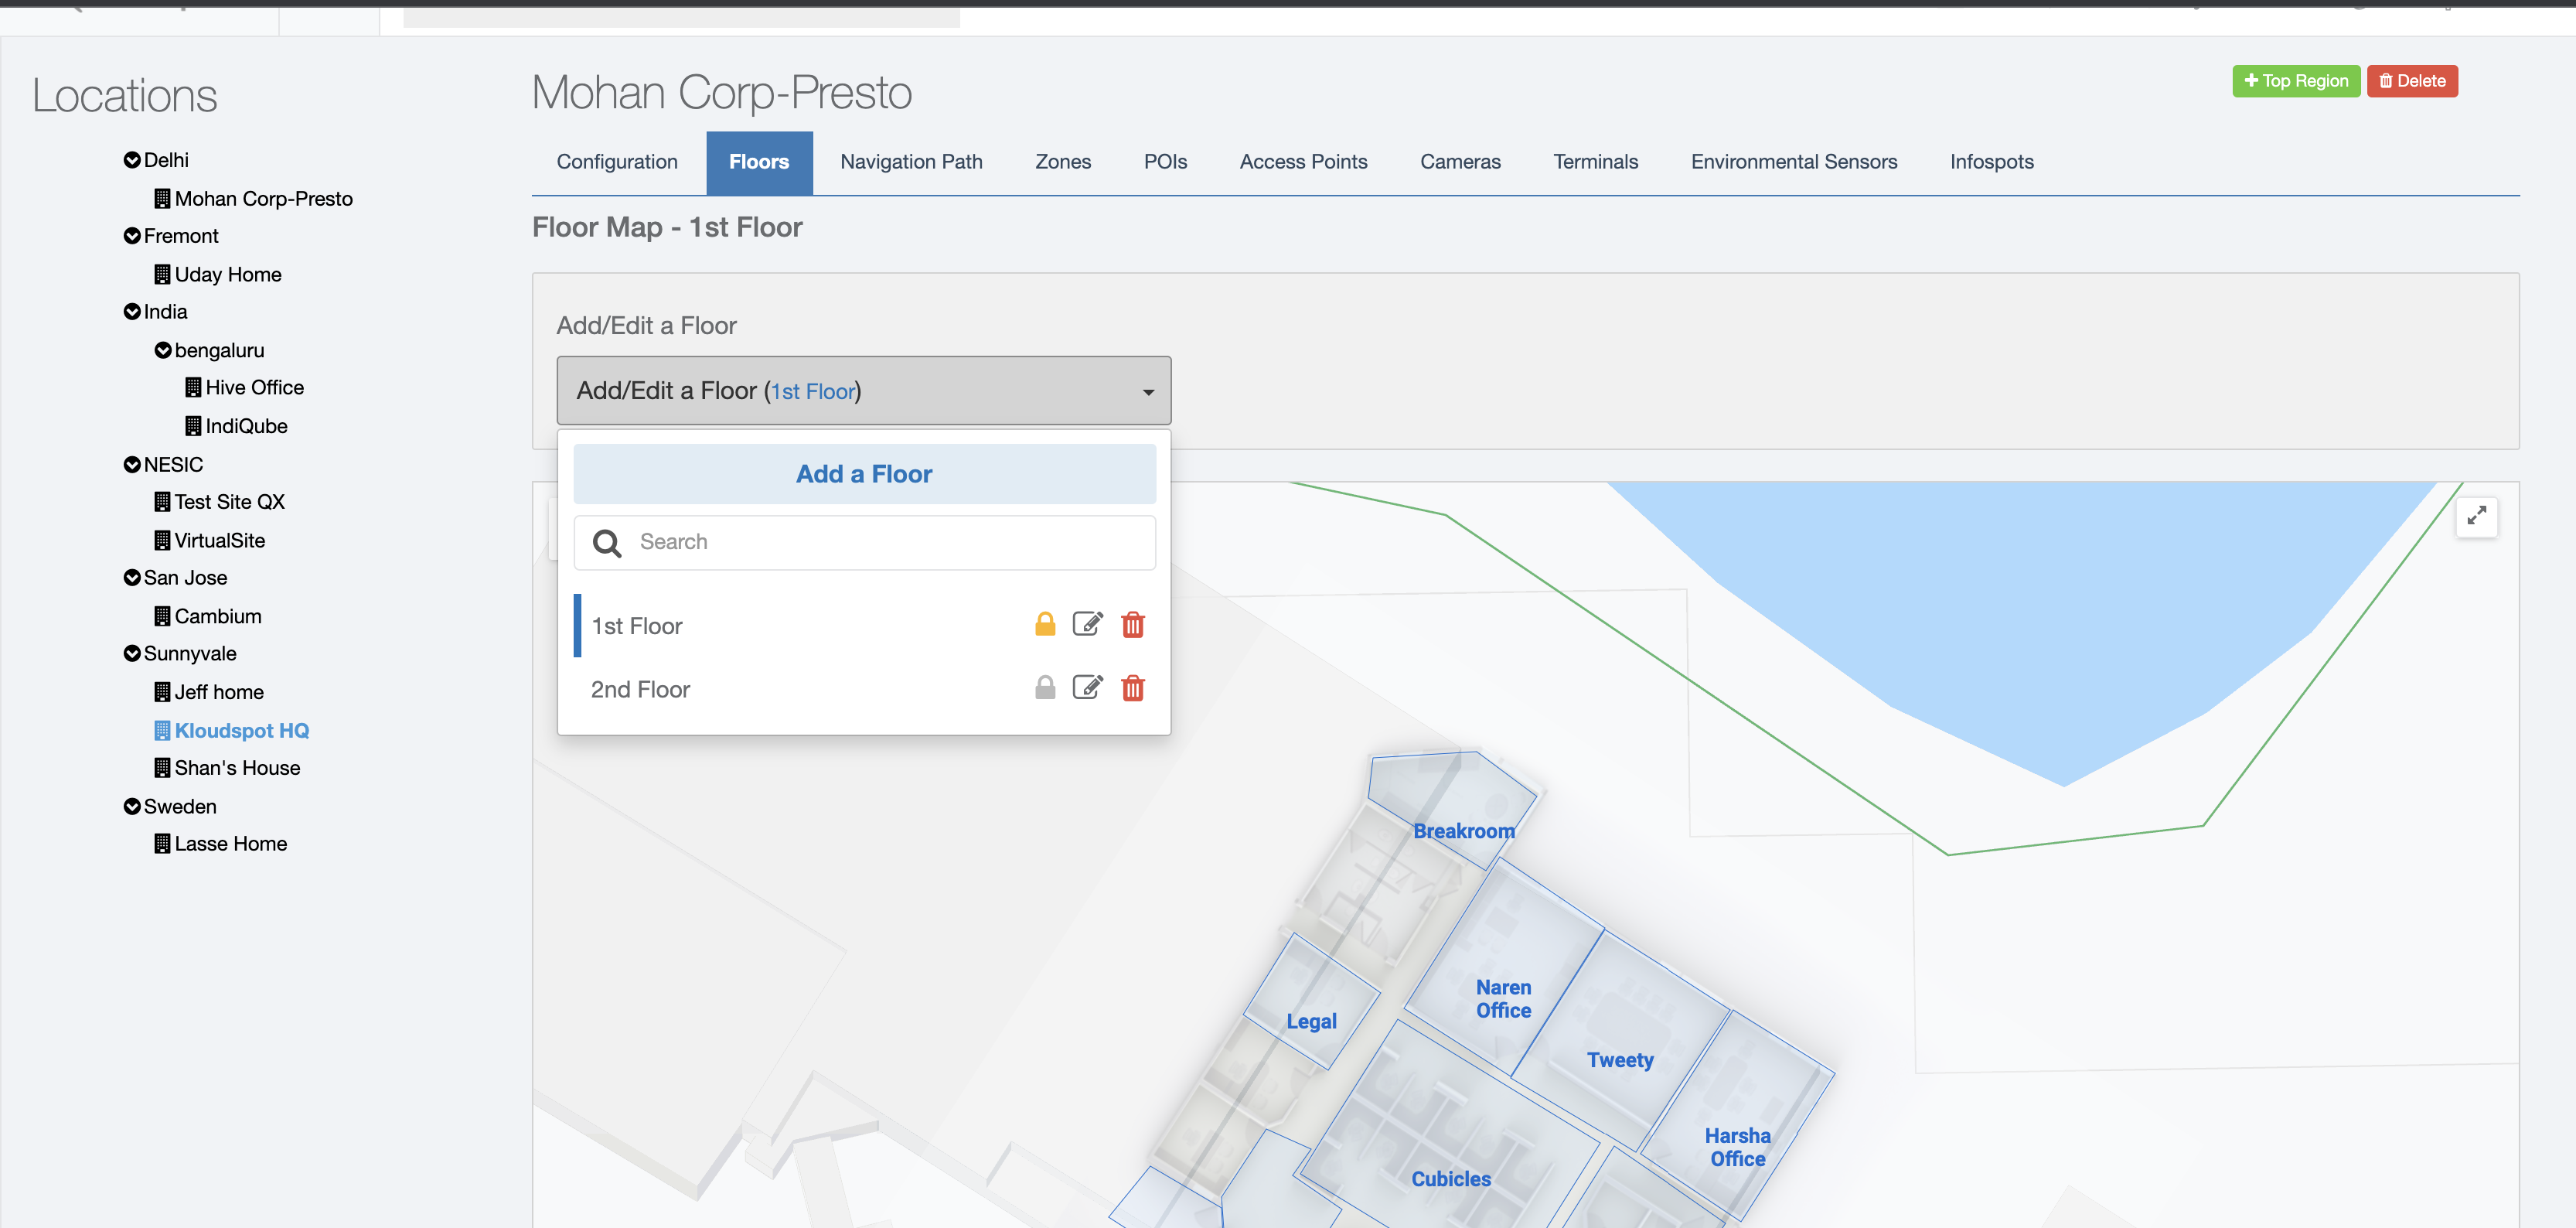
Click on the site name in the location hierarchy and navigate to the Floors tab. Click Add/Edit a floor, then click Add a floor.
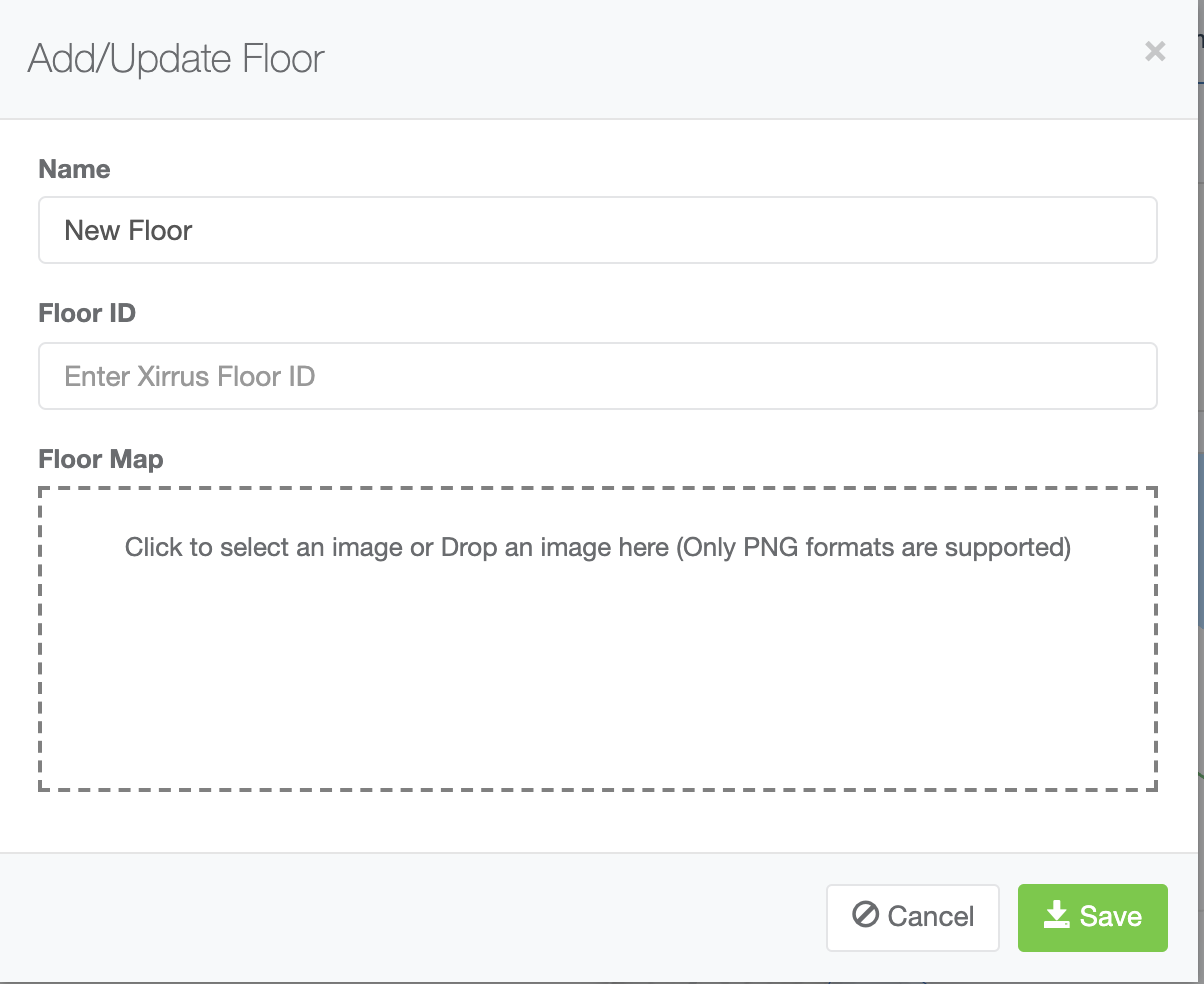
Enter in a name for the floor and click the floor map area to upload your floor map. Ignore the Floor ID for now. Click Save.
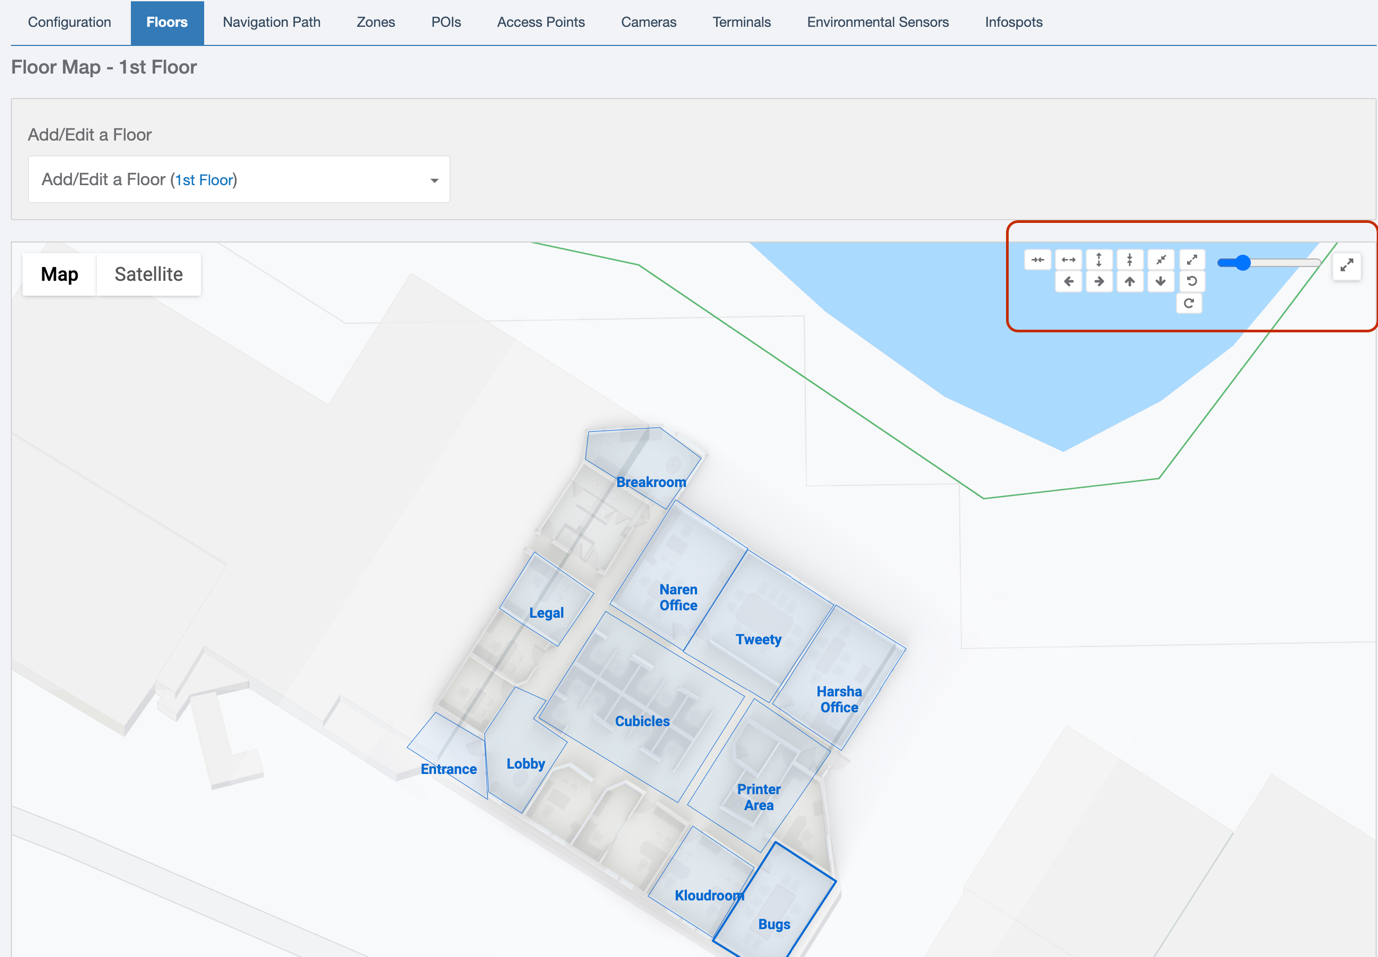
Next, edit the floor orientation overlay on google map, as well as size, rotation, and scale. To do this, click the Add/Edit floor dropdown. Then click the icon. This will allow you to make edits to the map. Once you’re done making edits, click the Add/Edit floor drop down again, and click the icon to lock the map. Edits can be made in the upper right-hand corner of the map view as seen in the figure below.
Zone Creation
Zones are an important part of the location setup process, and you will need to create zones for each floor of each building you have configured in the system.
Zones are a way to logically group different elements placed on top of the floor map (such as hot desks and points of interest) or to designate specific areas of the floor map, such as an office, conference room, or cafeteria. In addition to this, zones are searchable so if enable wayfinding, users will be able to search for specific zones. Finally, zones can be used to set up booking neighborhoods, which allows employees of the same grouping to sit in designated zones (for example sales can only sit in the designated sales area).
In general, you will want to create separate zones for individual rooms such as conference rooms or offices, logical groups of cubicles, and open areas designated for specific purposes such as break rooms or restrooms.
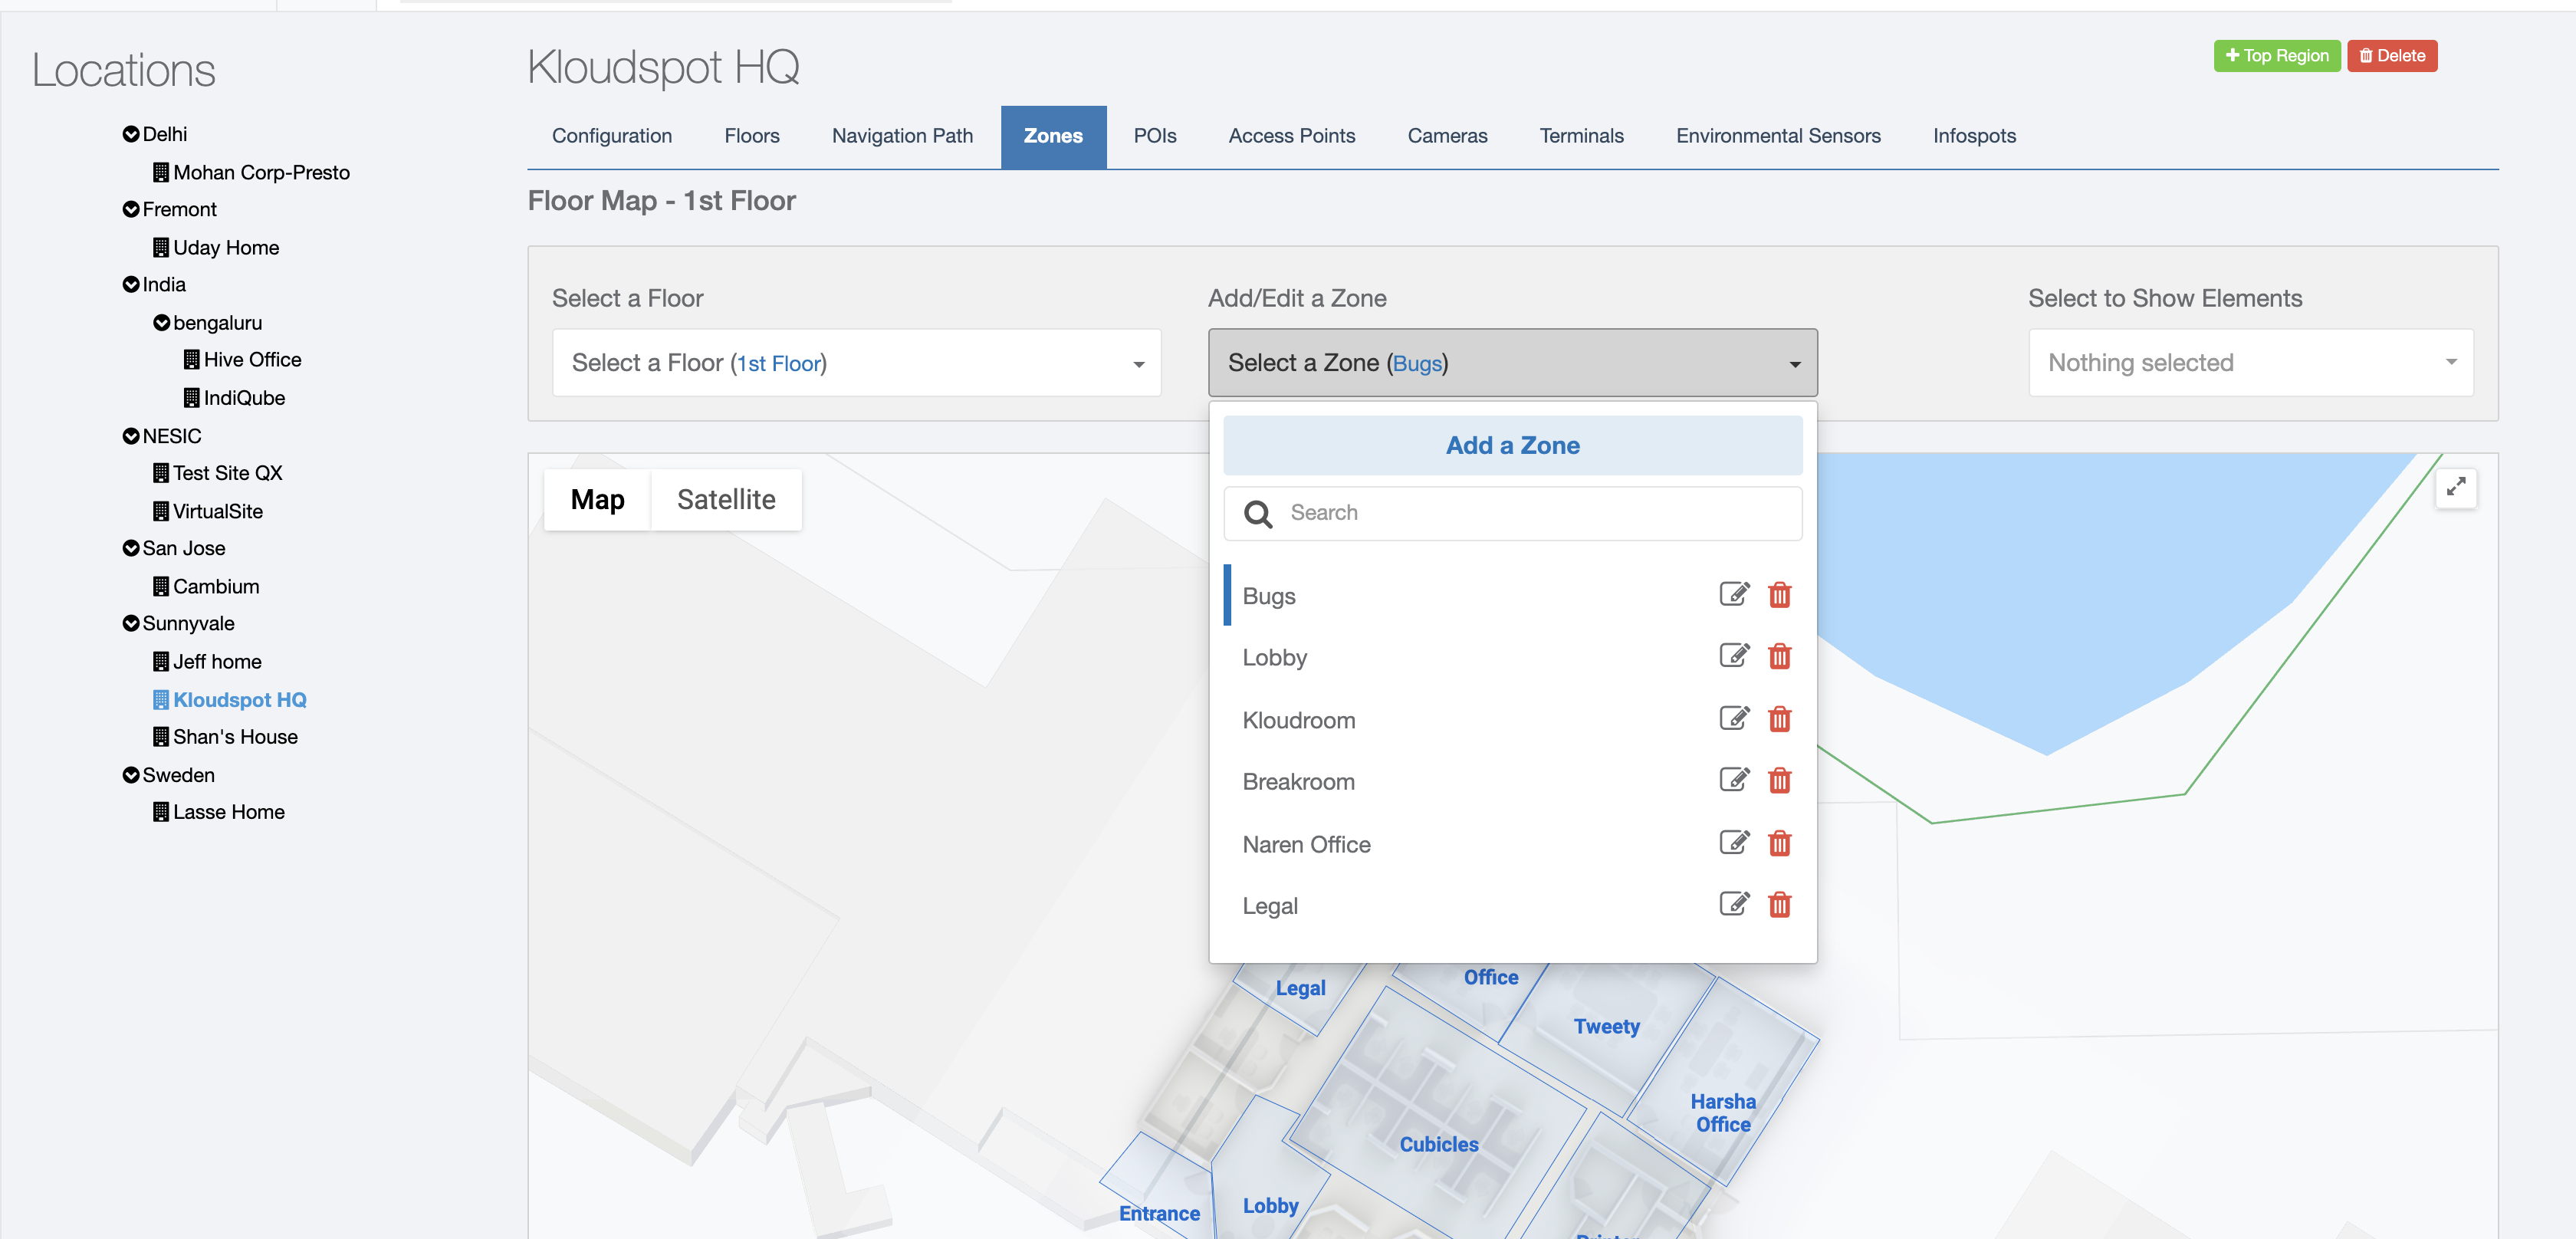
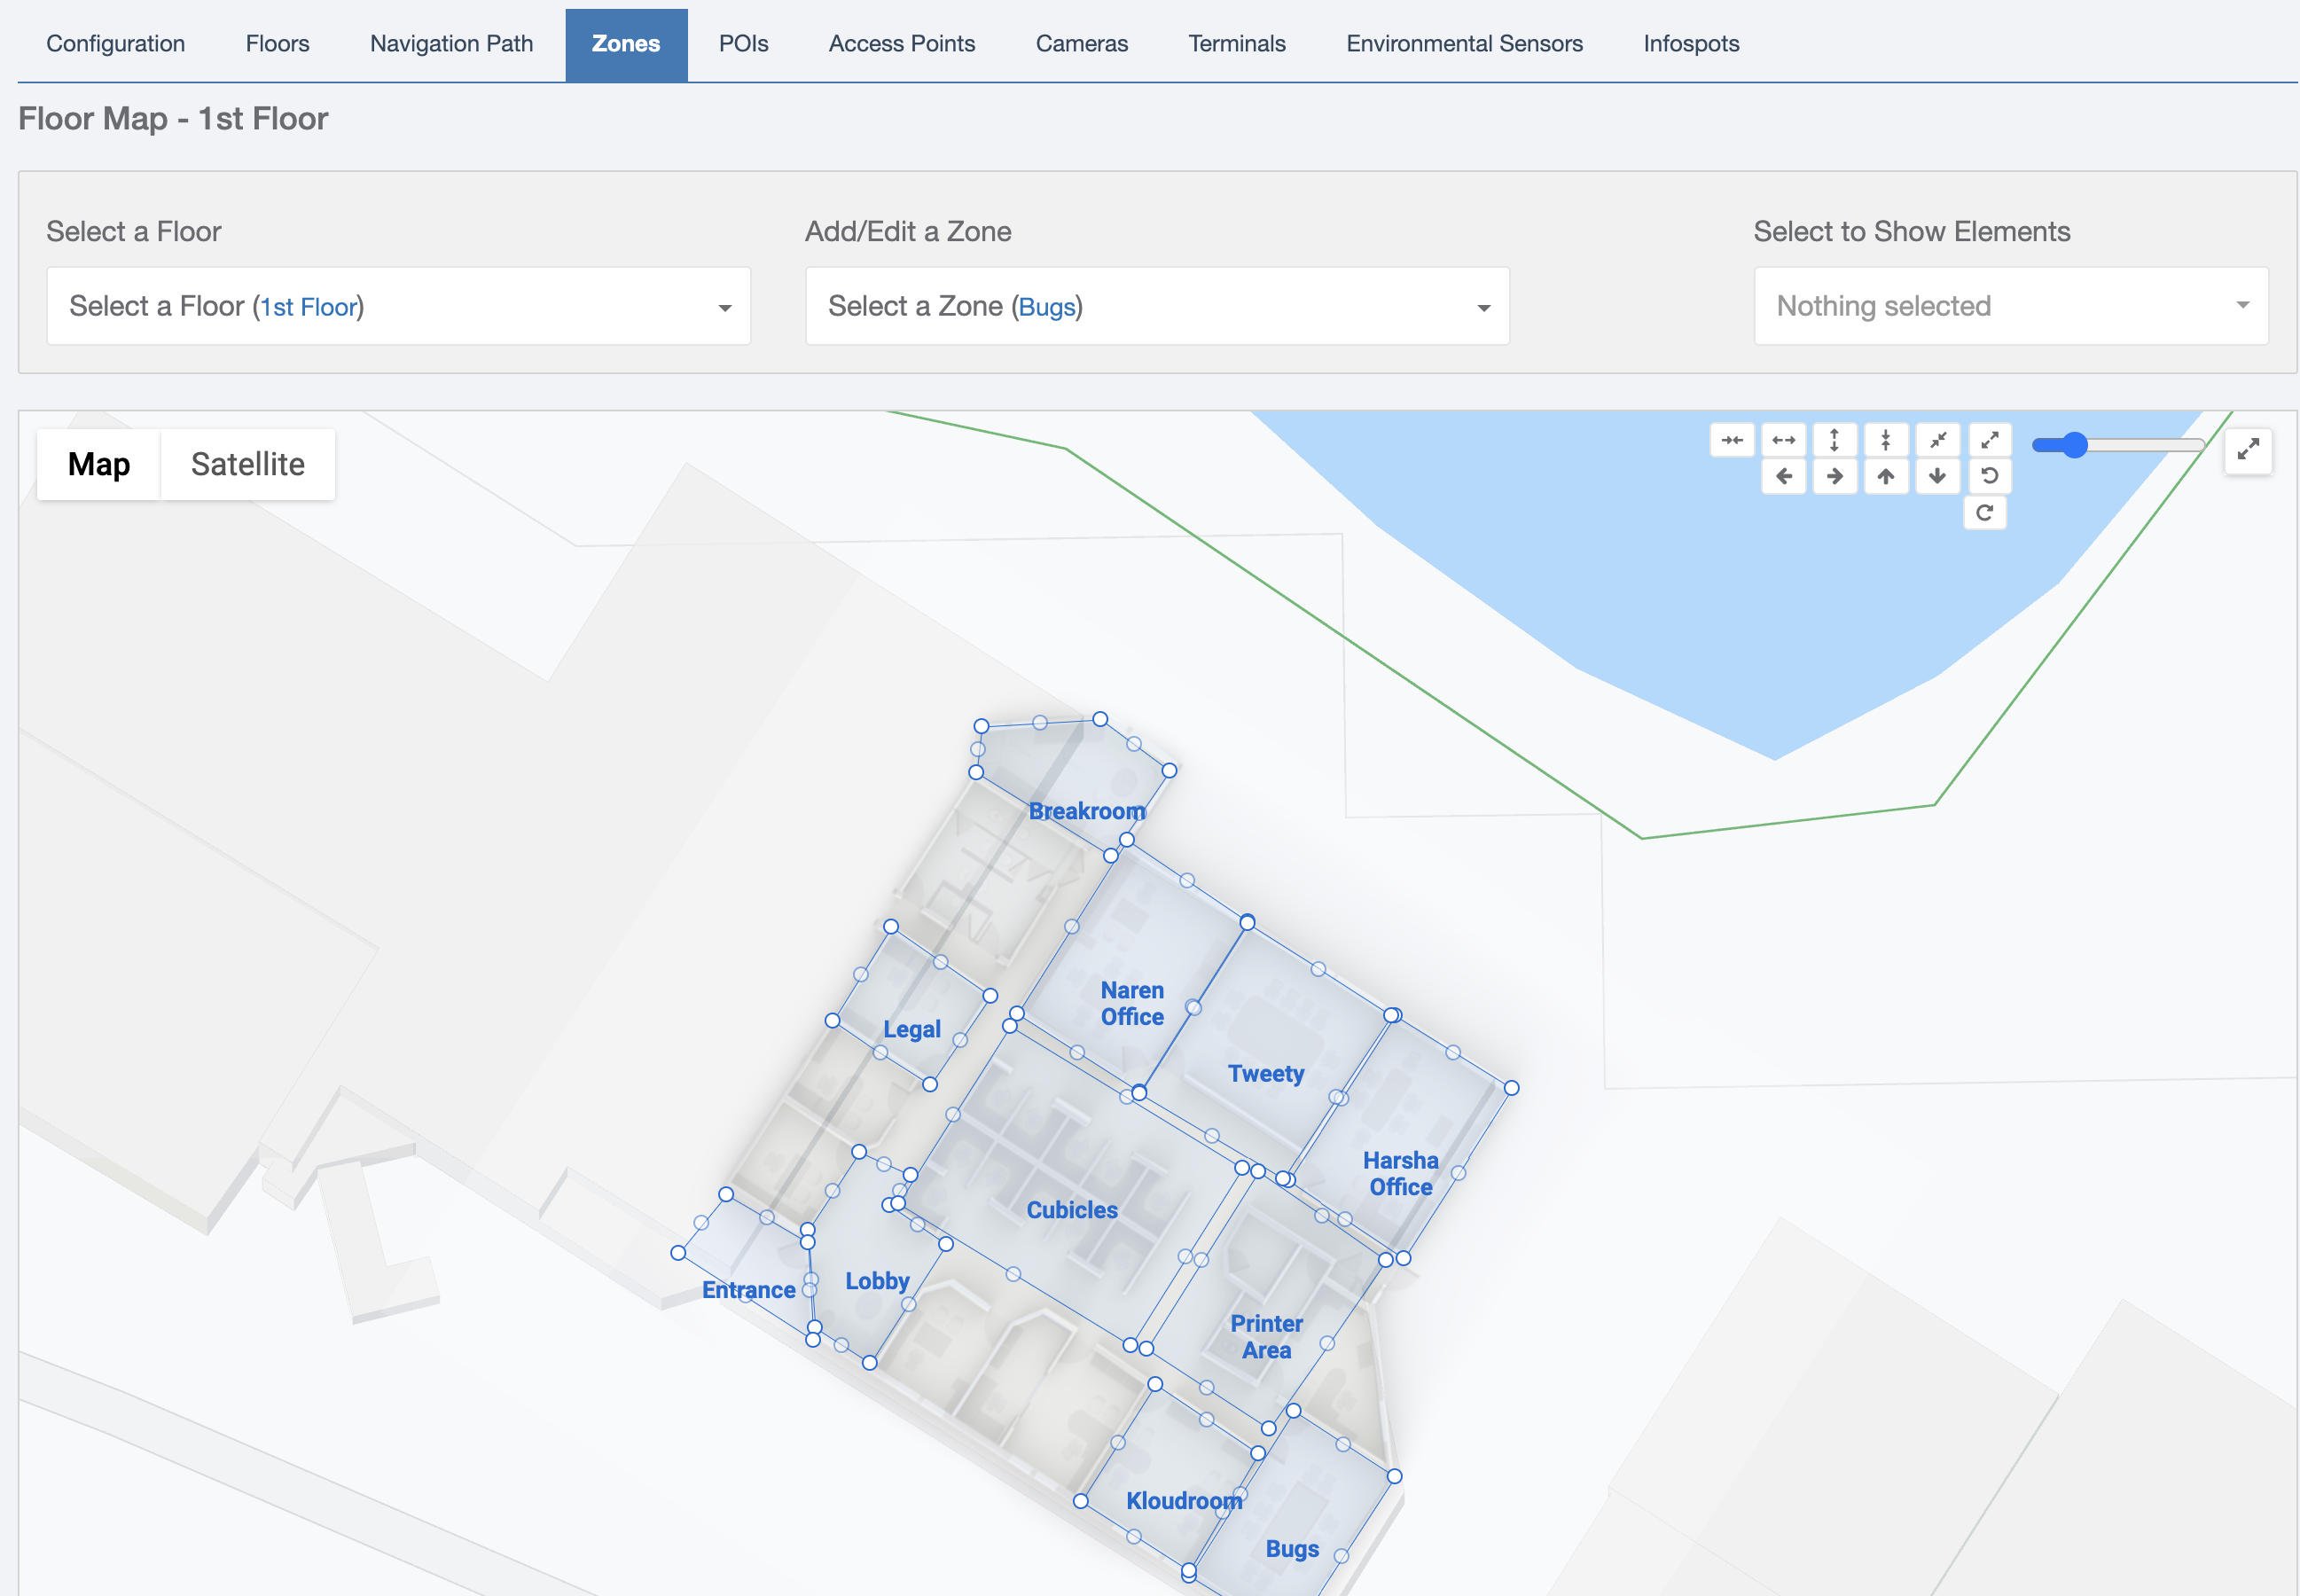
Navigate to the zones tab. Click on the floor you want to add zones for. Click the ‘Add/Edit zones’ drop down and click ‘Add a zone’.
Once you do this, hover over the 2D map view with your mouse and begin to draw a zone. You can draw a zone by clicking to drop down a dot. Continue clicking until you have the entire area of the zone boxed in. You can terminate this sequence by clicking back on the first dot you dropped down.
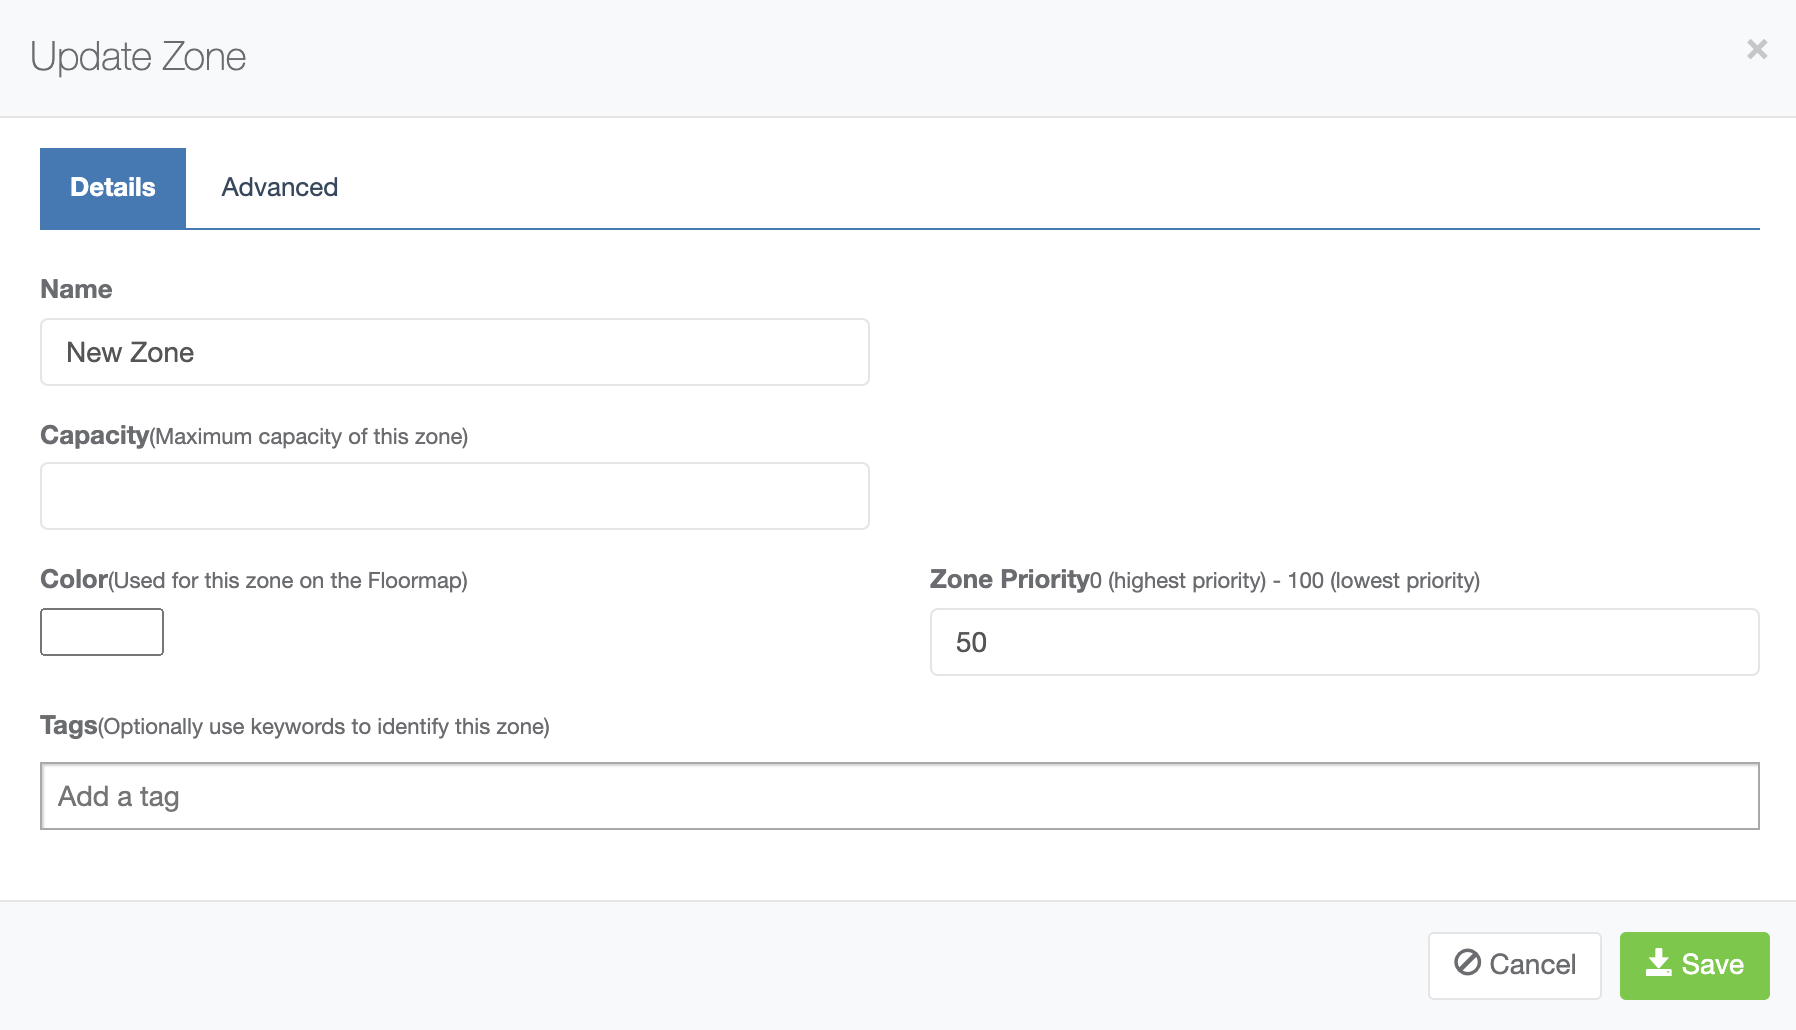
Once the drawing sequence is completed, enter in the Zone Name, Capacity (optionally/if applicable), and color (if you want different zones to display with different colors on the floor map). Leave the other fields as default for now. The tag field can be used in the future to configure booking neighborhoods, as described in the Configuring Neighborhoods section.
Optionally, if needed, you can edit the zone area on the floor map. To do this, click the select a floor dropdown. Then click the unlock icon. This will allow you to make edits to the map. Once you’re done making edits, click the ‘select a floor’ drop down again, and click the lock icon to lock the map. Zones can be edited by clicking on the less transparent vertices of the zone and dragging them to the appropriate location. If you need to add a new vertex, click one of the more transparent vertices. This will add a new vertex to the zone polygon, which can be then moved to the appropriate location.
Importing 360 Pictures
360 pictures allow users to navigate in virtual space throughout the office, physically see where they might be sitting, create quick bookings in the 360 walkthroughs, and interact with colleagues in virtual space.
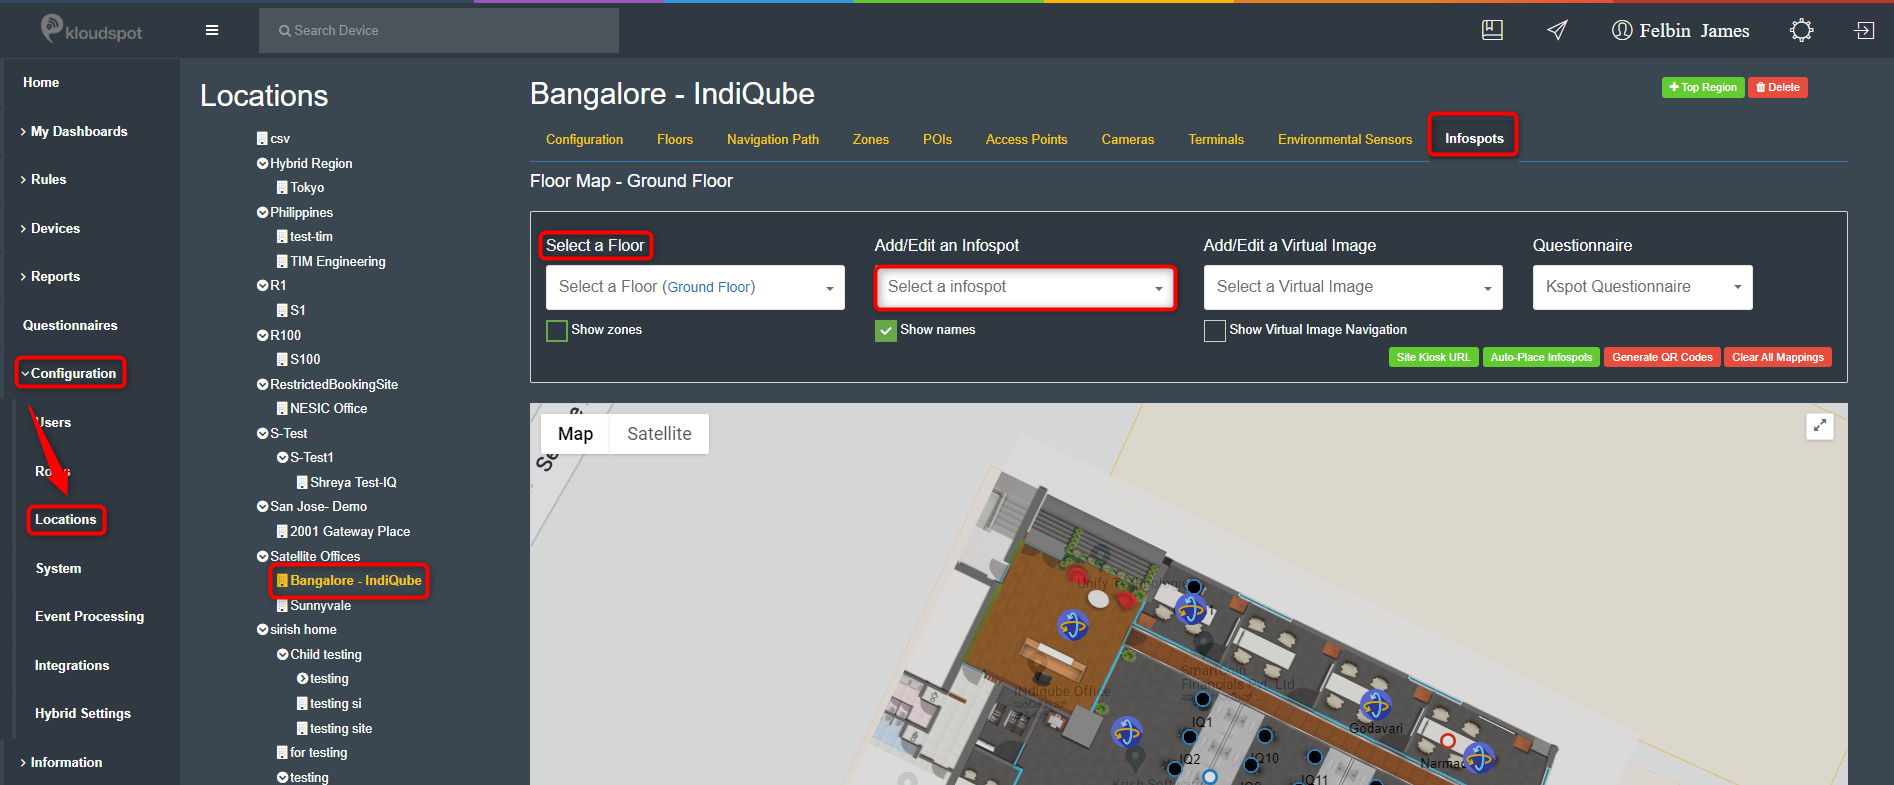
To import 360 images into the system, navigate to the Configuration > Location > Child Region > Infospots tab.
Select a floor from the drop-down menu.
Click Add Virtual Image from the Add/Edit Virtual Image drop-down menu.
Click where you want to add the virtual image on the floor map.
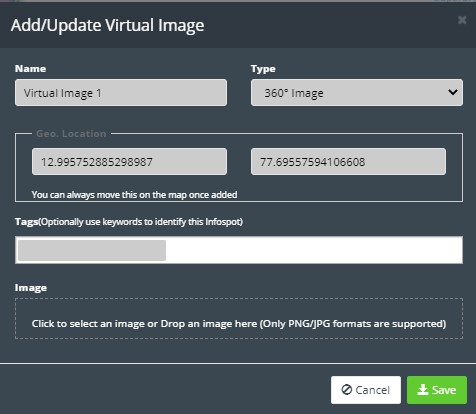
The Add / Update Virtual Image window will open.
Enter the Name for the virtual Image.
Specify the Type as 360° Image or Panorama. By default, “360° Image” is selected.
Upload your 360° or panorama image by clicking in the Click to select an image or Drop an image here area. Only PNG/JPG formats are supported. Click Save.
Click Save to make the changes:
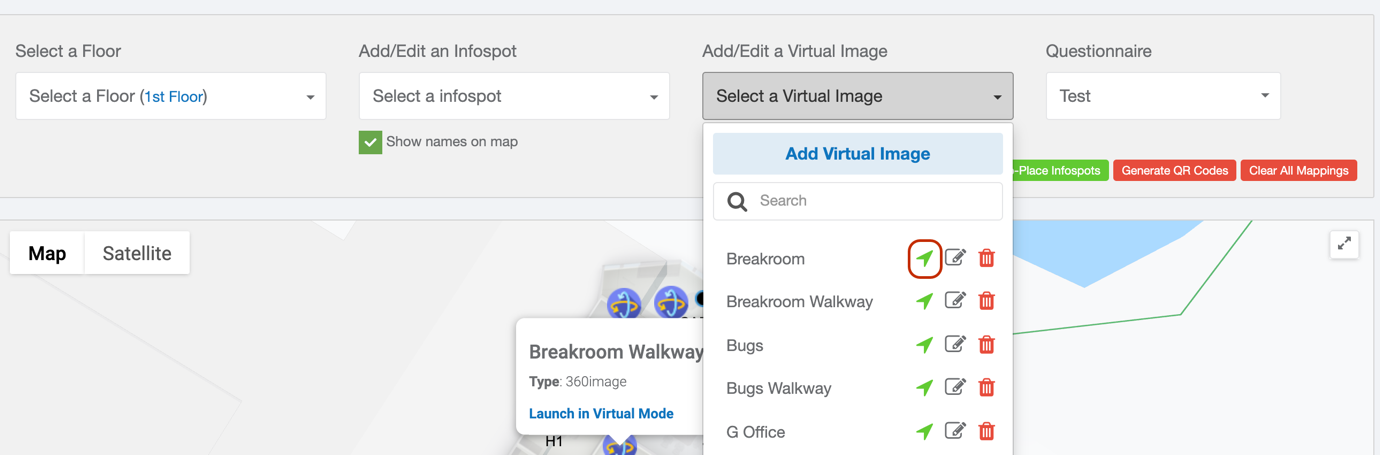
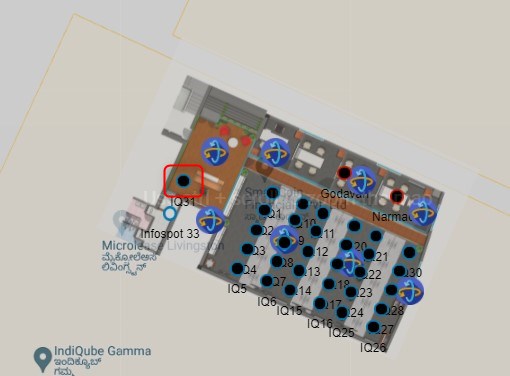
After completing steps 1 -6 for all the virtual images, next we will add navigation between the different virtual images. To do this click on the Add/Edit Virtual Image drop-down, then click the icon.
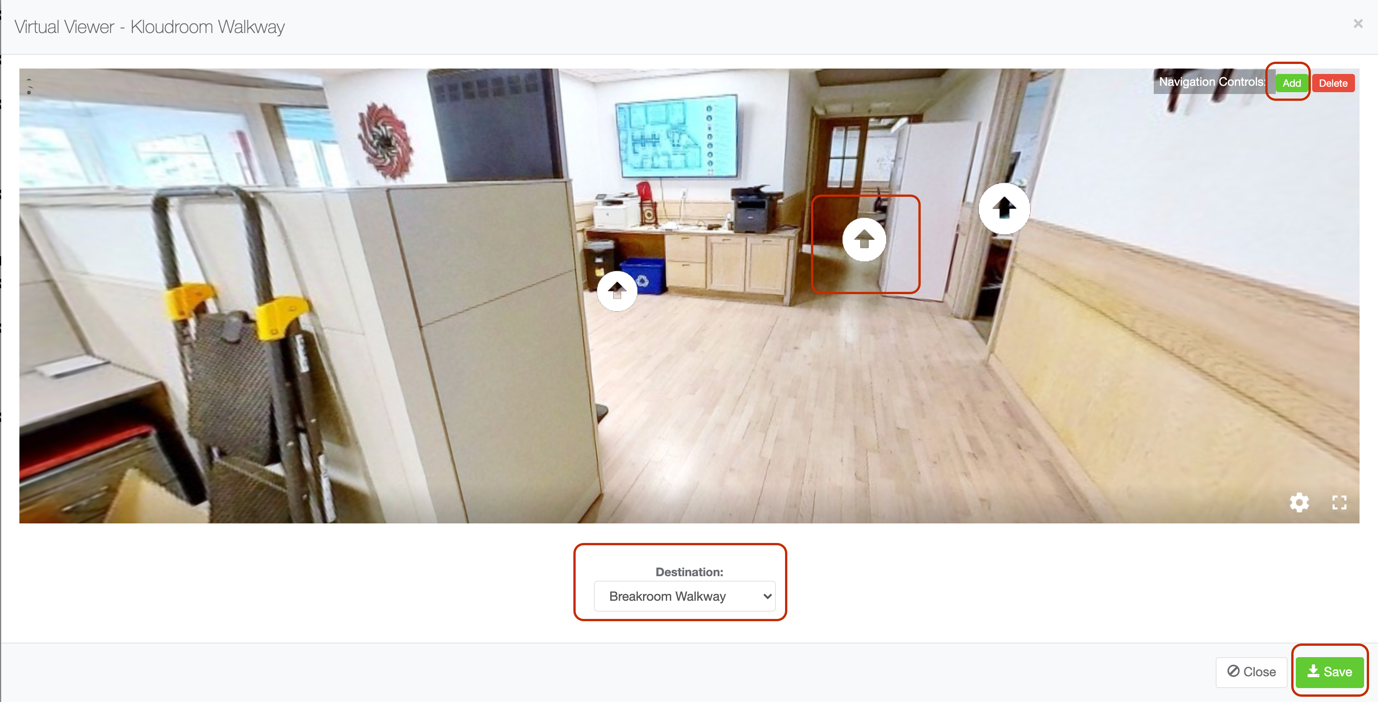
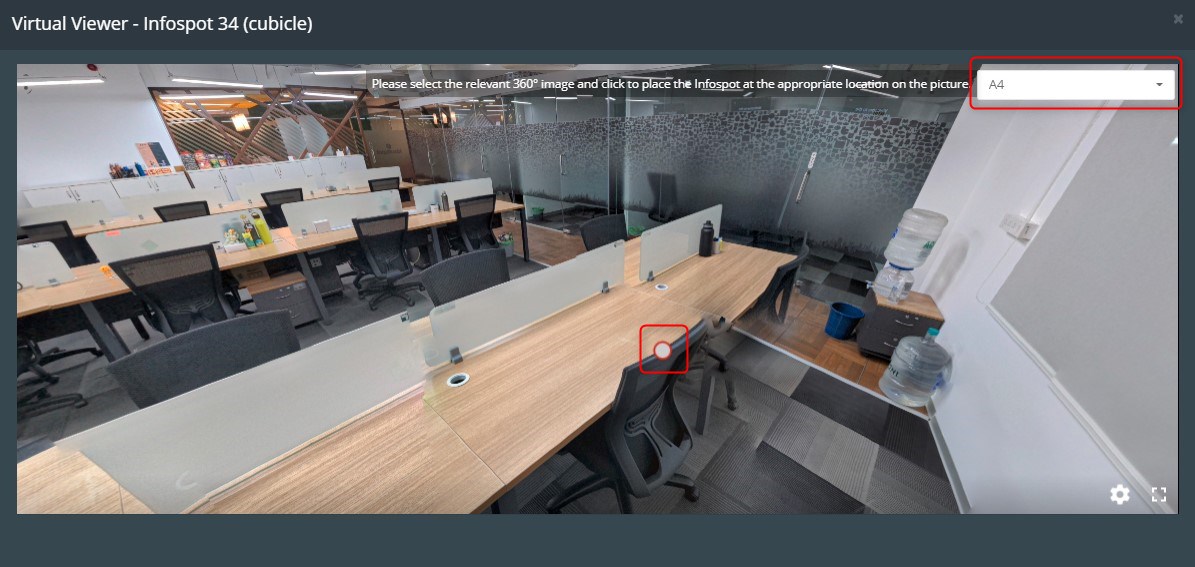
Click the Add button in the top right corner of the virtual viewer that opens. Then click on the area of the image you wish to place the navigation point. Then, select the destination from the drop-down in the center bottom. Remember you can click and hold in this view to spin around.
Once you click on an area, an arrow will appear, as shown above, click on the arrow, and then at the bottom of the screen select the proper destination in the destination dropdown. This will enable users to navigate between the two virtual zones in the virtual viewer using the navigation points. Click Save. Repeat this step for all virtual images and all navigations.
Adding Infospots
Infospots are bookable spots at your site. To create infospots, navigate to the Location > click on your site > Infospots tab.
Select a floor from the drop-down menu.
Click Add Infospot from the Select a Infospot drop-down menu.
Click on the location on the floor map where you want to put the infospot.
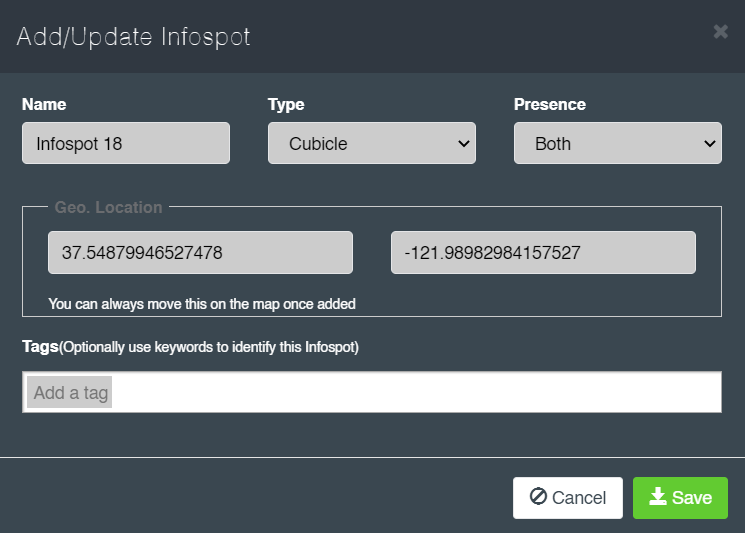
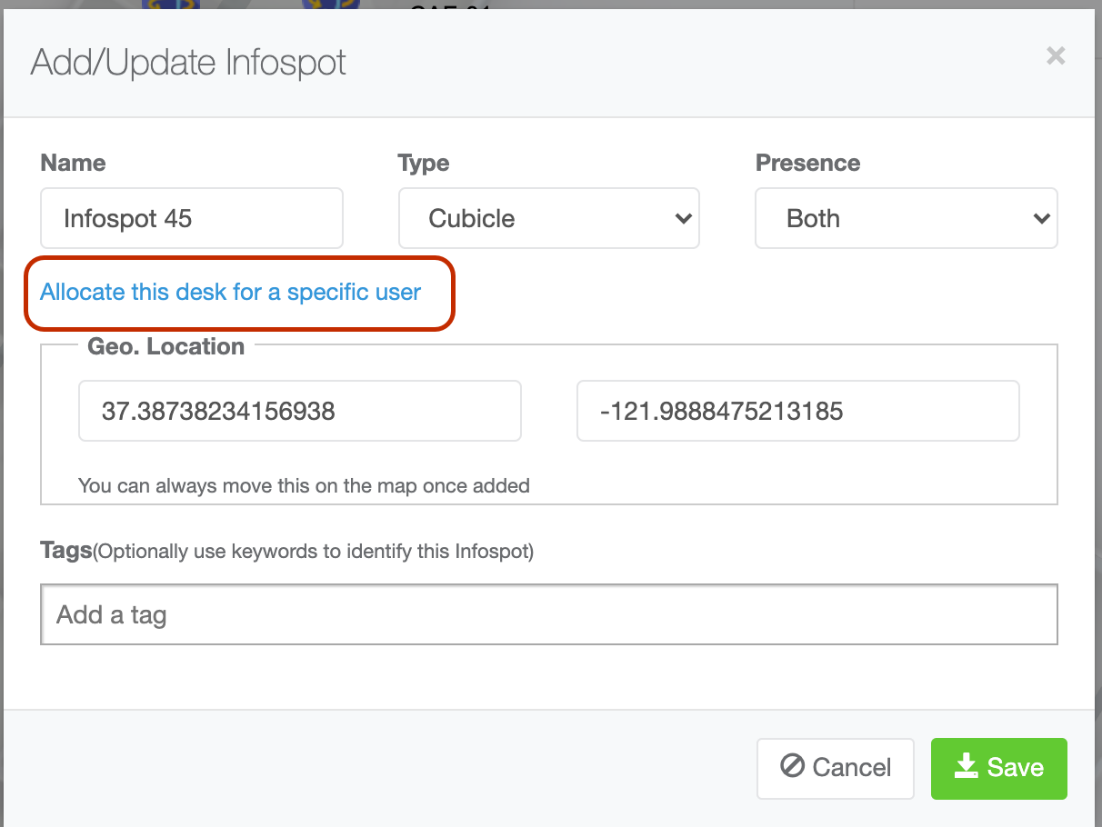
The Add/Update Infospot dialog box is displayed.
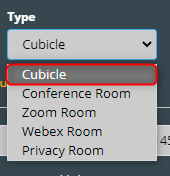
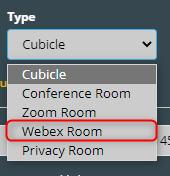
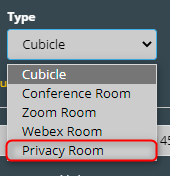
At this point, there are multiple different types of infospots that can be added, such as Cubicle, Conference Room, Zoom Room, Webex Room, and Privacy Room. Please see the corresponding section below for more information about and how to configure the different types of infospot.
Cubicle
Cubicles are bookable seats configured in the system that are made available to bookable pool for the users.
Once the “Add/Update Infospot” dialog box is displayed follow the instructions below to complete the configuration for a cubicle.
Enter the Name for the infospot.
Specify Cubicle as the type in the drop-down menu.
Select the Presence of the infospot. By default, Both is selected. If Both is selected, the seat will be bookable by both physical and remote employees. If Physical is selected the seat will only be bookable to physical employees. If Virtual is selected, the seat will only be bookable to remote employees. If None is selected, the seat will not be bookable but will be input into the system for later use once the seat is returned to the bookable pool of seats.
Provide the tags by adding the keywords to identify the infospot. This step is optional.
Note: You can specify a department in Infospot by adding tags. For example, if you add the “Engineering” tag here, this infospot will only be visible to the user who is in engineering department.
Check out the Configuring Neighborhoods section to learn more about the user department.
Note: Tags can also be added to the infospot that describes additional details about the infospot, and make the infospot keyword searchable by the user. For example, you could add the tags, “Disability Accessible”, and “Docking Station”. So if a user searches for seats that are disability accessible or have a docking station, this seat will show up in the search.
Cubicles can be allocated to specific users by clicking the Allocate this desk for a specific user button. Then enter in the associated email address of the user that this desk will be allocated to.
Click Save to make the changes.
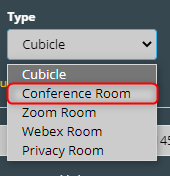
Conference Room
Conference rooms are integrated with conference rooms set up in outlook & azure to make them visible to the KloudHybrid system. The Microsoft Graph API needs to be integrated to use conference rooms. Once you do this, the conference room will be bookable In KloudHybrid, and will have a bidirectional sync with user calendars.
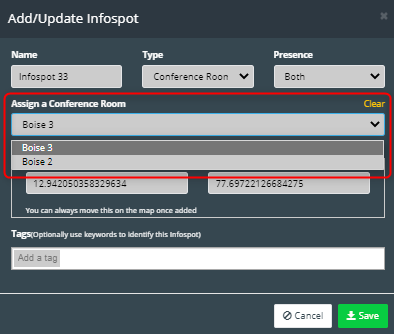
Once the Add/Update Infospot dialog box is displayed follow the instructions below to complete the configuration for a cubicle.
Enter the Name for the infospot.
Specify Conference Room as the type in the drop-down menu.
Assign a Conference Room from the dropdown menu.
Leave the Presence as its default Both.
Optionally, add tags to the conference room to make the conference room searchable by attributes. Click Save.
Zoom Room
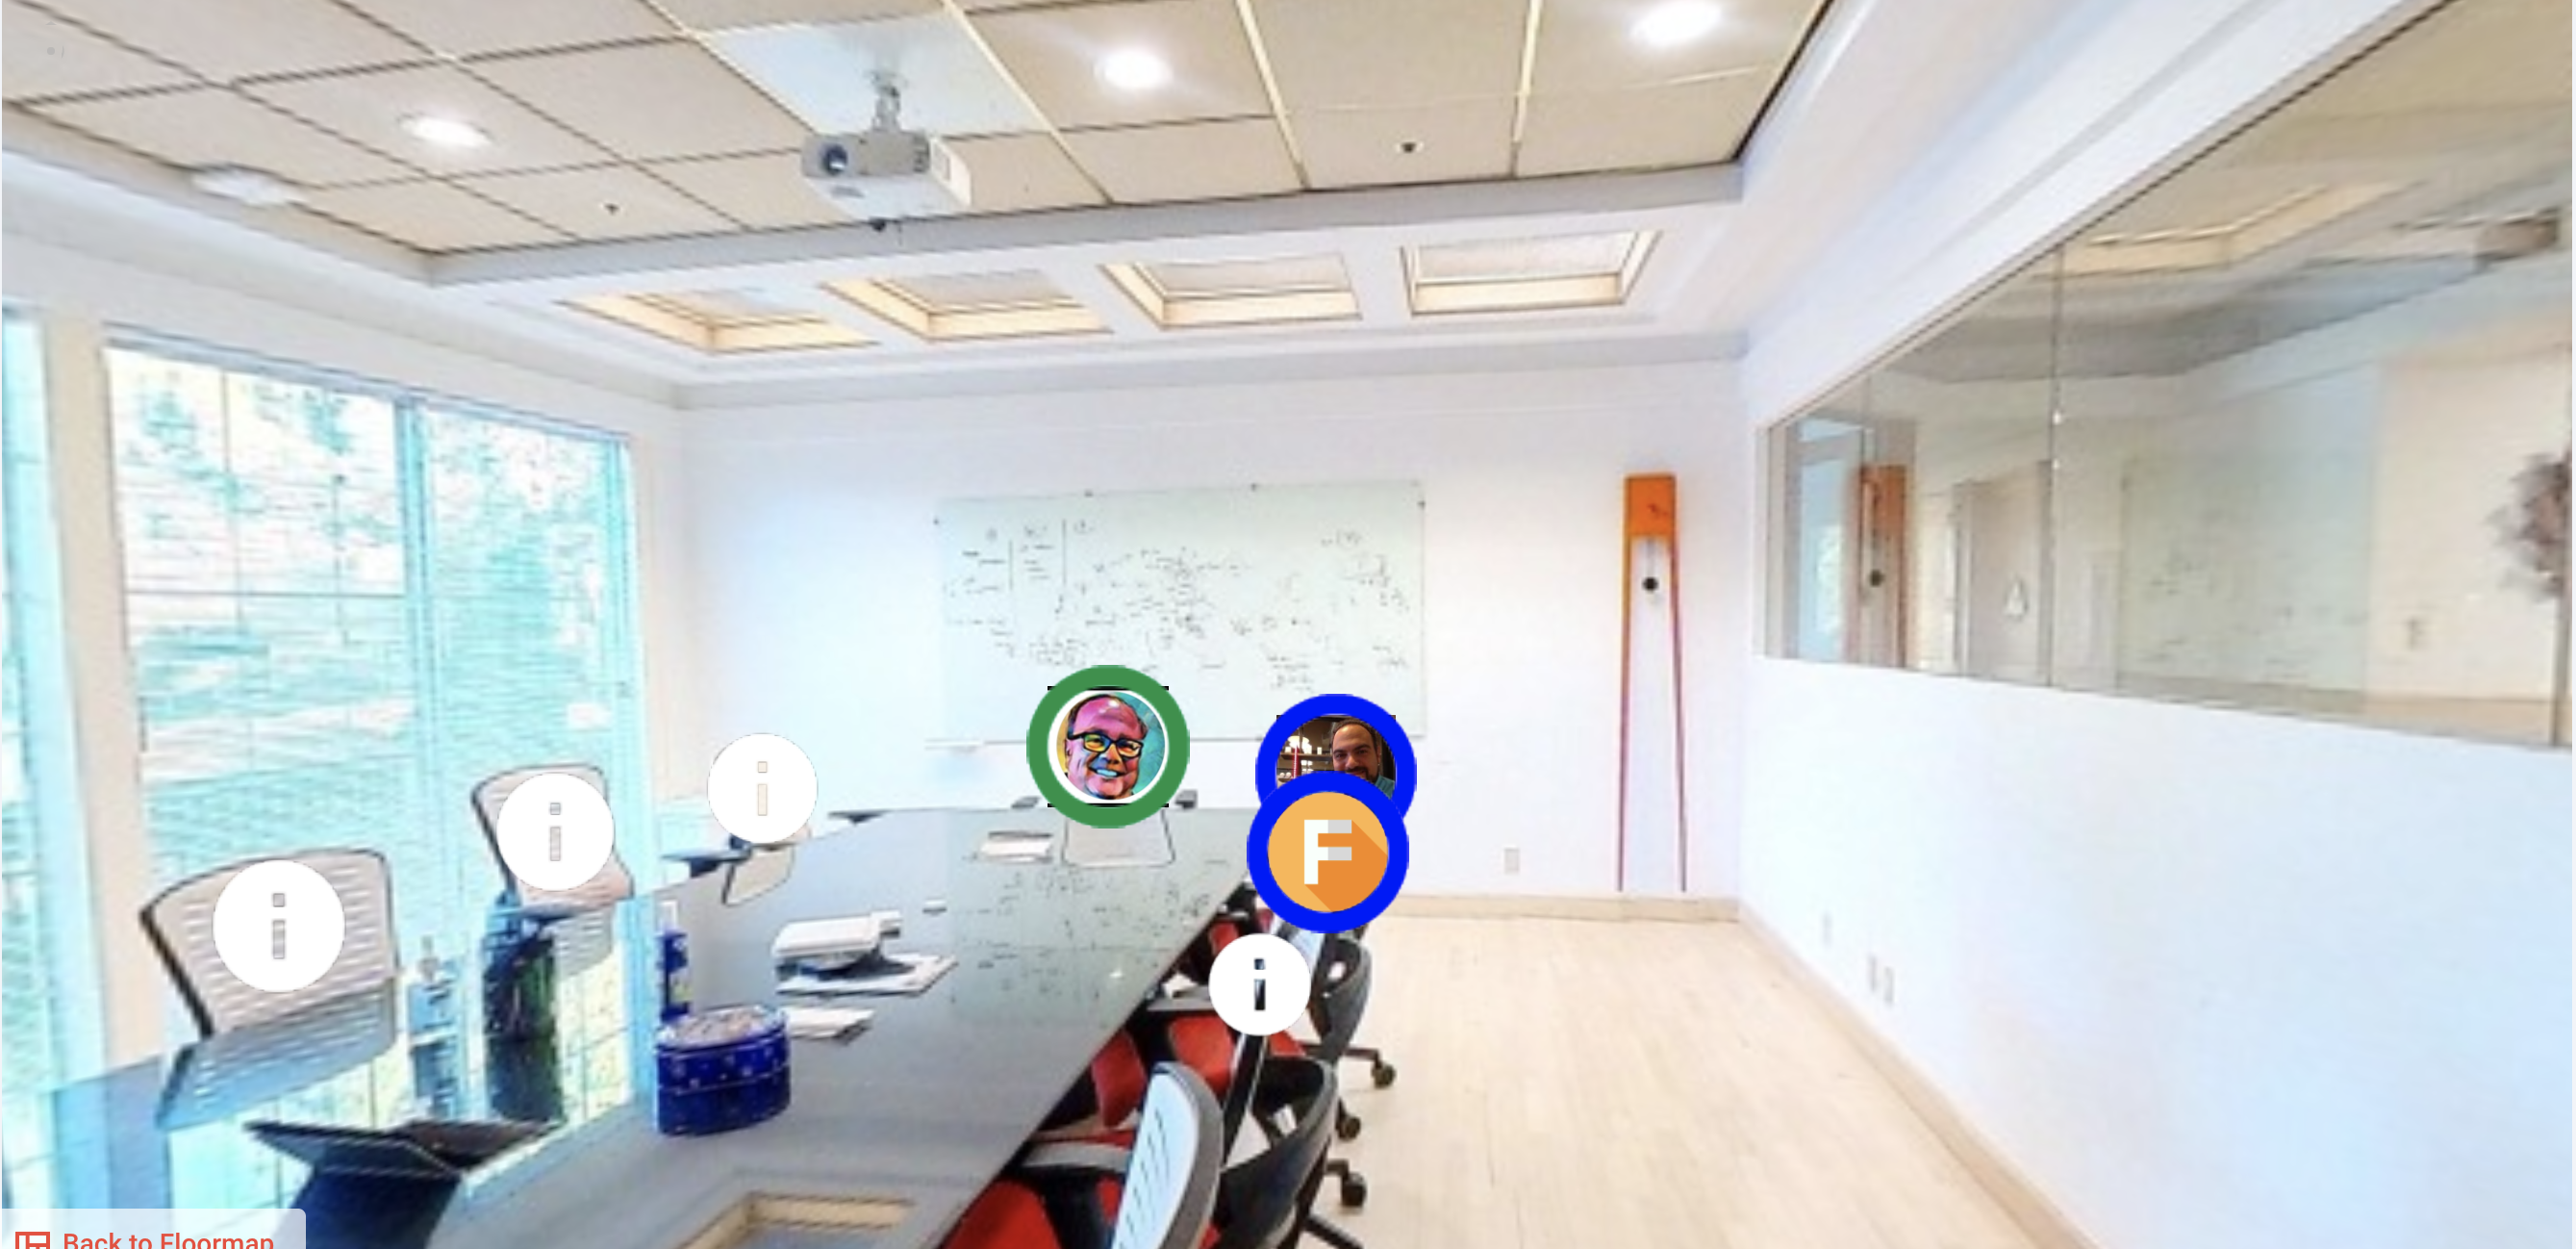
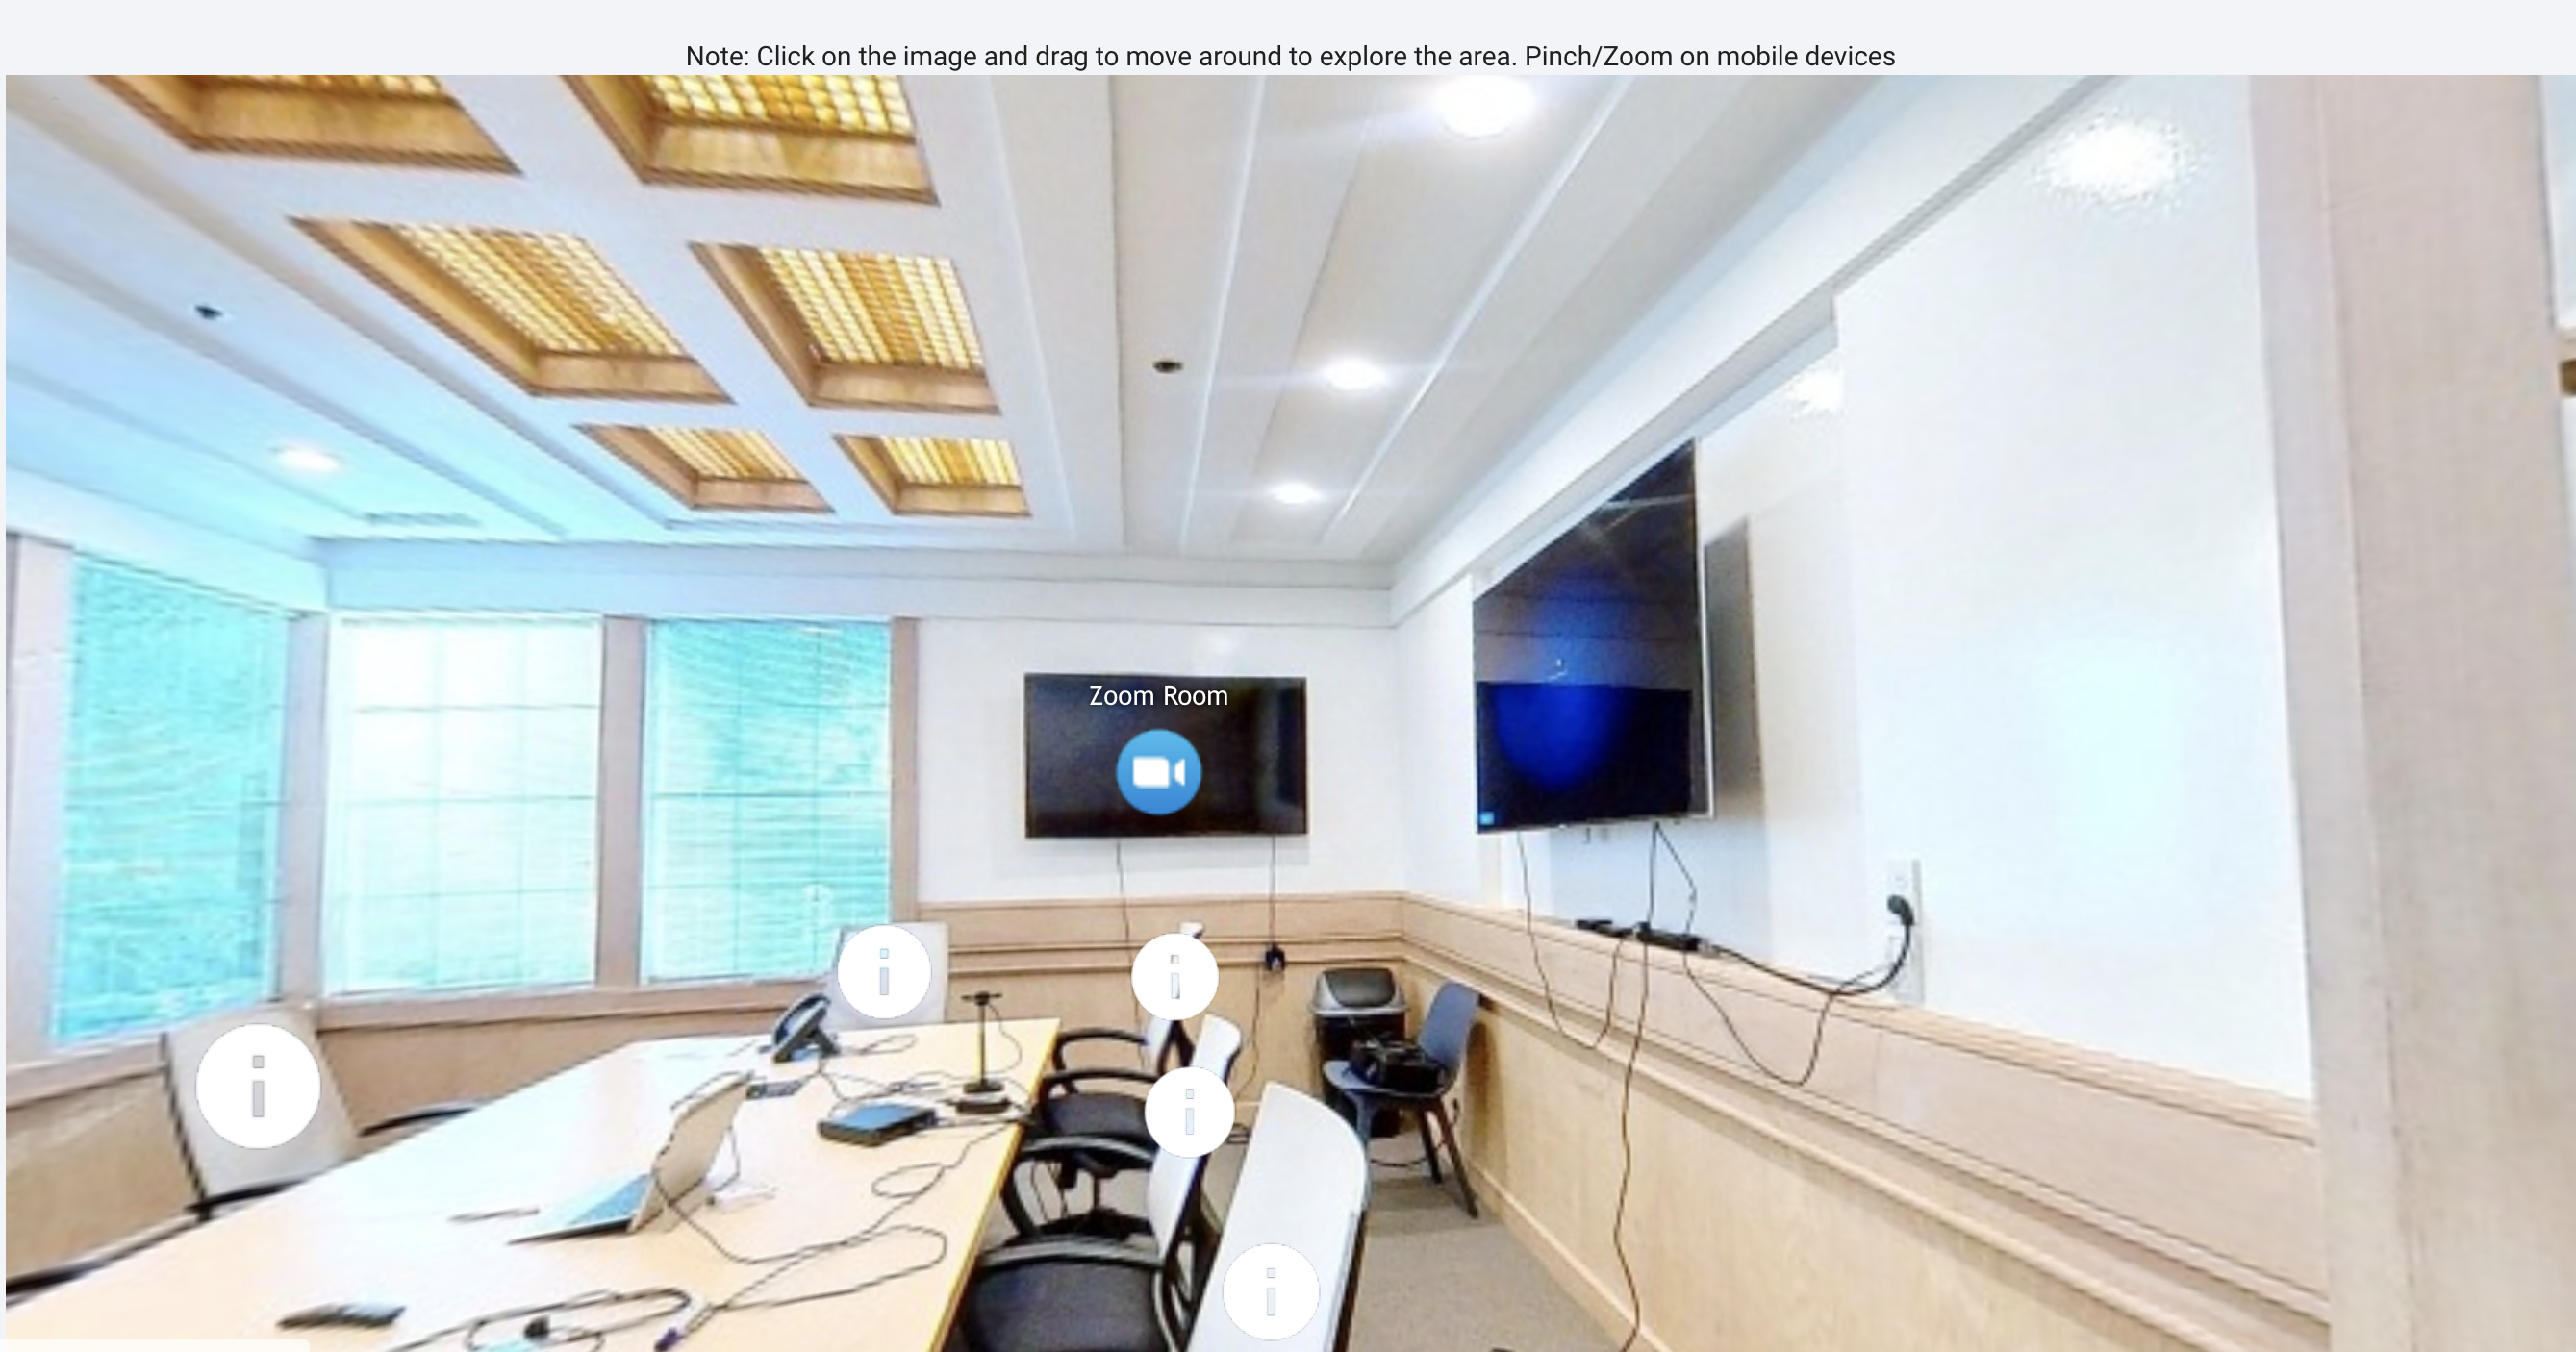
Zoom room infospots can be added so that users can join a zoom room link from the virtual walkthrough mode after booking into a meeting as seen below.
Enter the Name for the infospot.
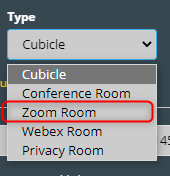
Specify Zoom Room as the type in the drop down menu.
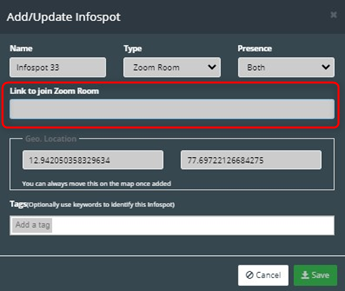
Leave the Presence as it’s default Both.
Enter zoom Link to the text box.
Optionally, add tags to the conference room to make conference room searchable by attributes. Click Save.
Webex Room
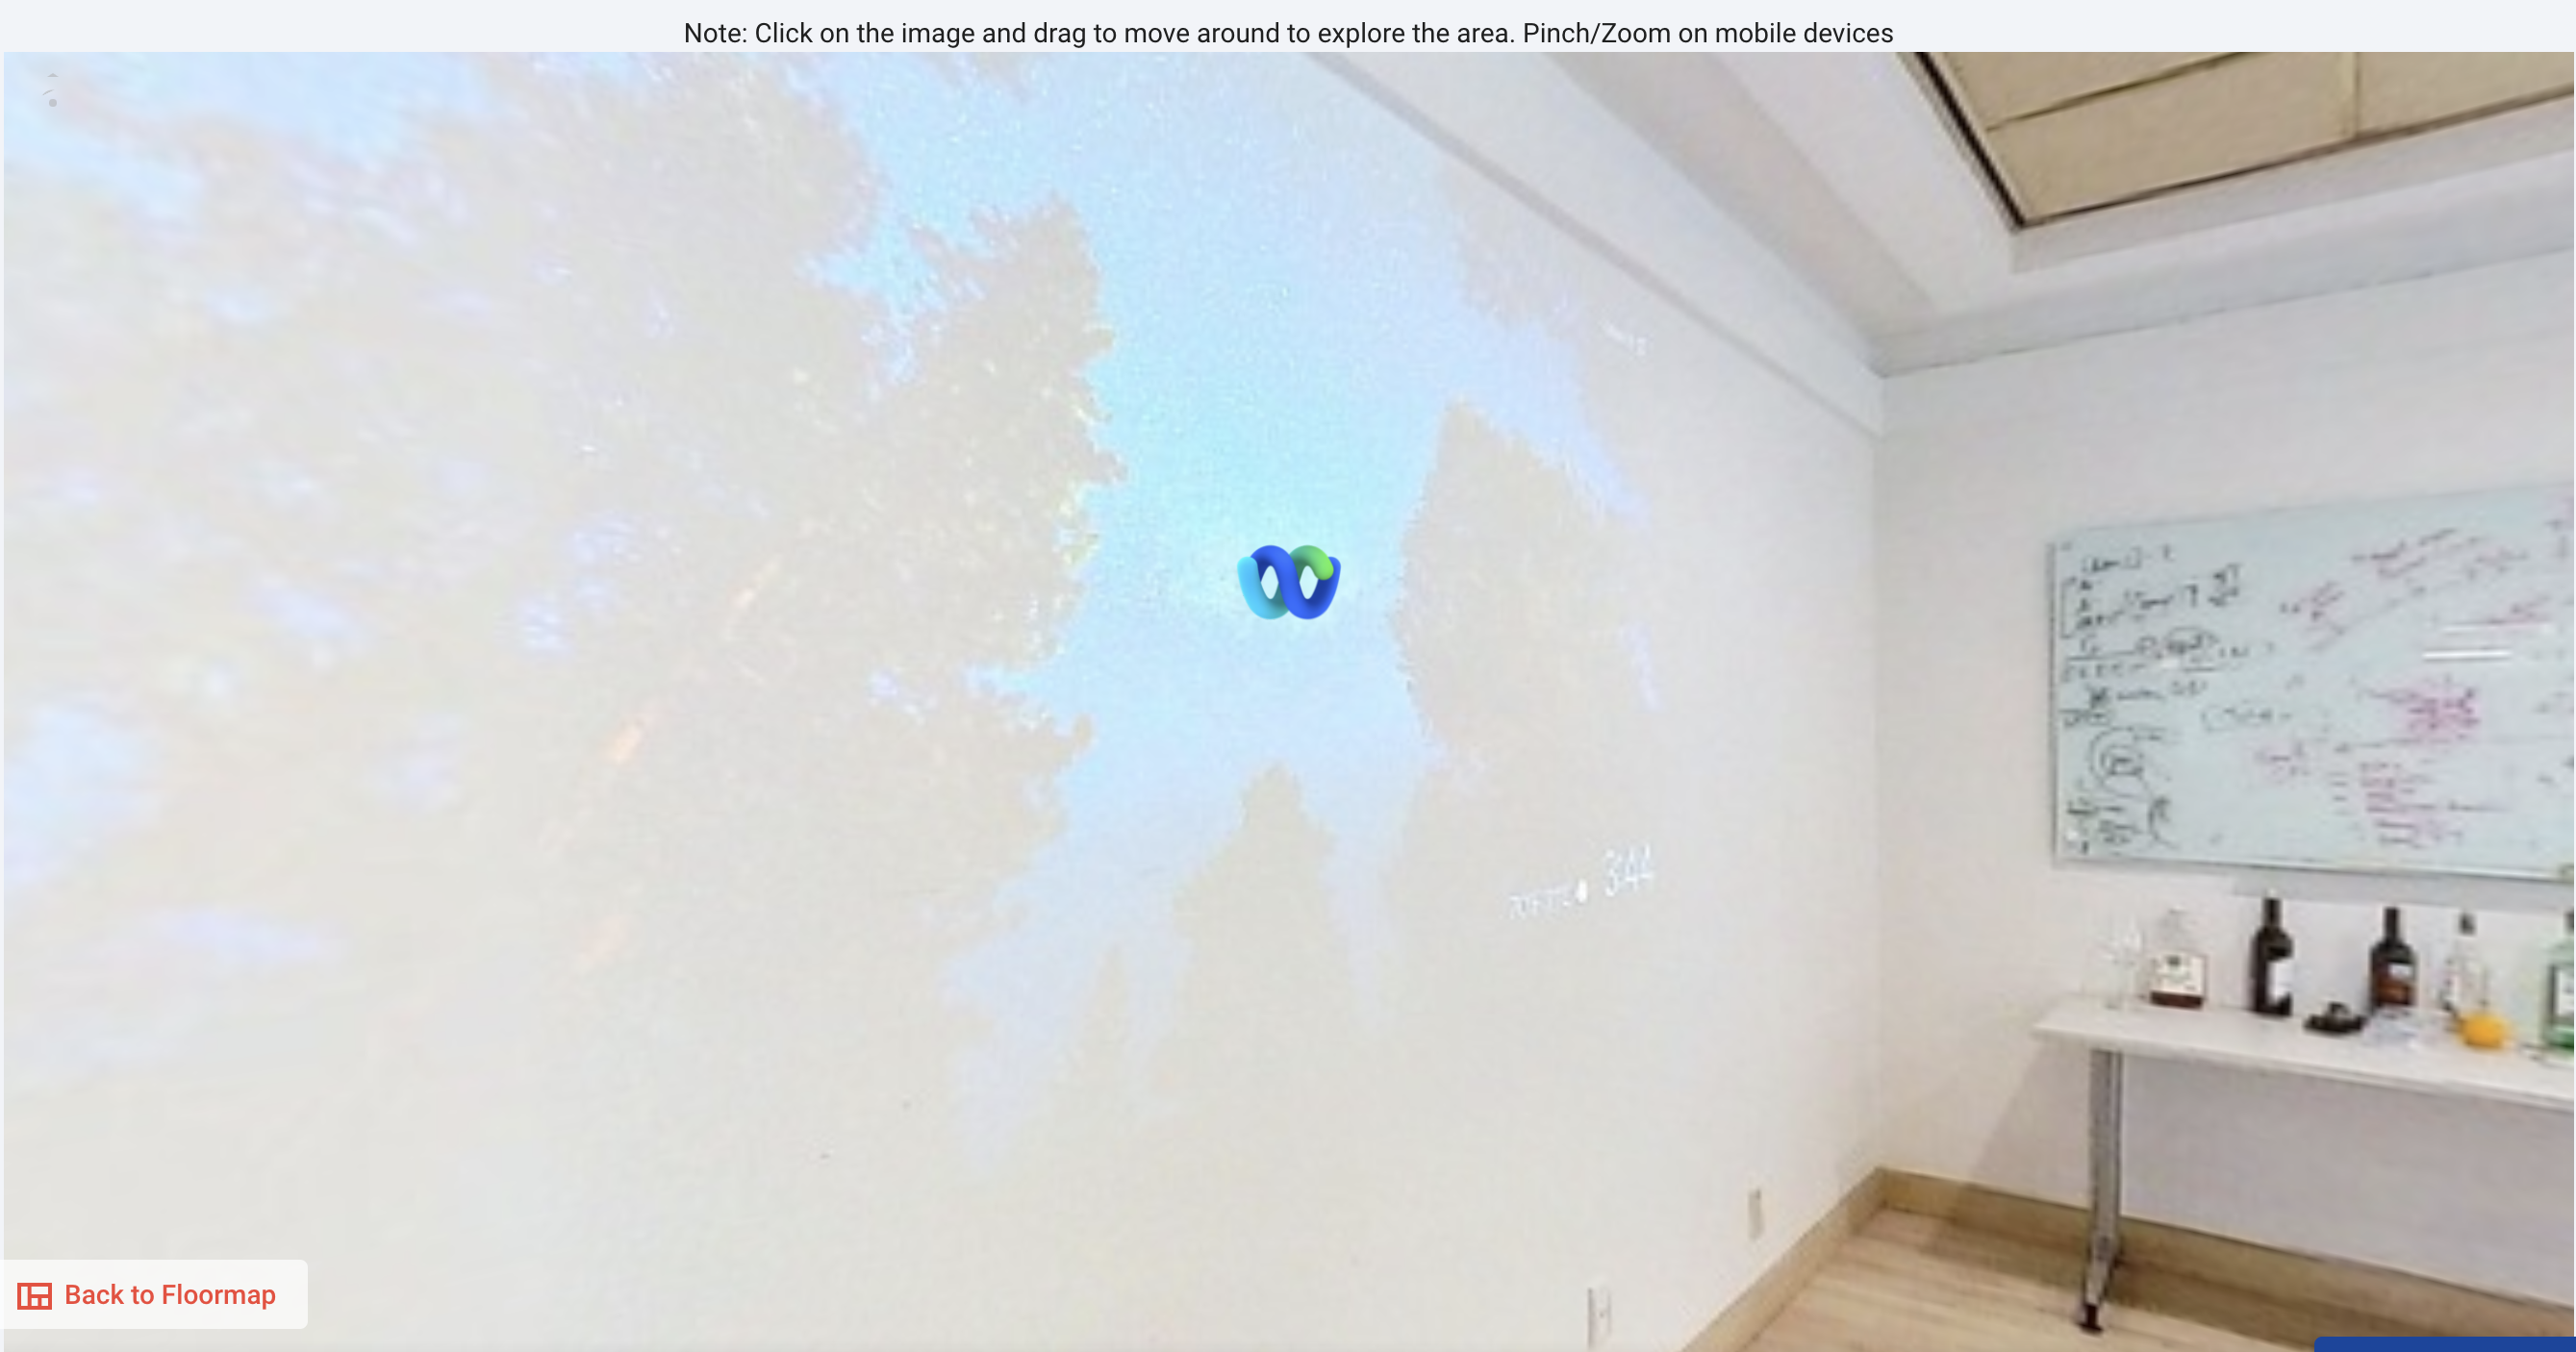
Webex room infospots can be added so that users can join a webex room link from the virtual walkthrough mode after booking into a meeting as seen below.
Enter the Name for the infospot.
Specify Webex Room as the type in the drop down menu.
Leave the Presence as it’s default Both.
Enter Webex Link to the text box.
Optionally, add tags to the conference room to make conference room searchable by attributes. Click Save.
Privacy Room
Privacy rooms are separate rooms build for privacy or focus rooms. These rooms are bookable in the same way cubicles are bookable but allow users to search for more private spaces to book.
Once the Add/Update Infospot dialog box is displayed follow the instructions below to complete the configuration for a cubicle.
Enter the Name for the infospot.
Specify Privacy Room as the type in the drop down menu.
Select the Presence of the infospot. By default, Both is selected. If Both is selected, the seat will be bookable by both physical and remote employees. If Physical is selected the seat will only be bookable to physical employees. If Virtual is selected, the seat will only be bookable to remote employees. If None is selected, the seat will not be bookable but will be input into the system for later use once the seat is returned to the bookable pool of seats.
Provide the tags by adding the keywords to identify the infospot. This step is optional.
Note: You can specify a department in Infospot by adding tags. For example, if you add the Engineering tag here, this infospot will only be visible to the user who is tagged under the engineering department.
Check out the Configuring Neighborhoods section to learn more about the user department.
Note: Tags can also be added to the Infospot that describes additional details about the Infospot, and make the Infospot keyword searchable by the user. For example, you could add the tags, Disability Accessible, and Docking Station. So if a user searches for seats that are disability accessible or have a docking station, this seat will show up in the search.
Click Save to make the changes.
Camera Infospot
Cameras can be added as infospots in the same way that cubicles and conference rooms can. This allows the hybrid workspace to view live camera feeds.
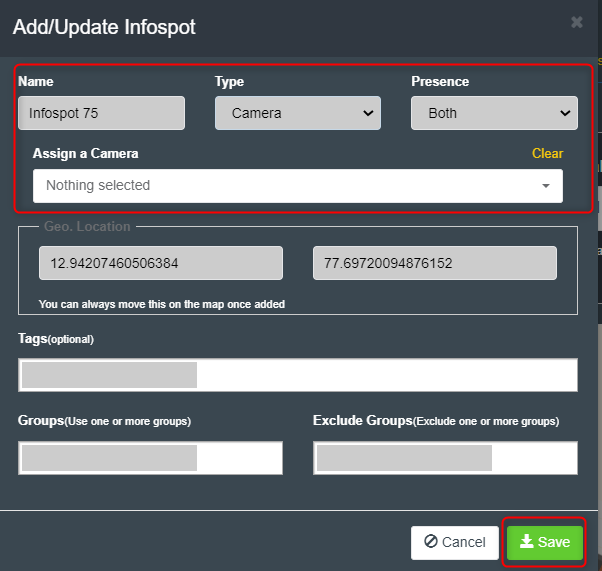
Once the Add/Update Infospot dialog box is displayed follow the instructions below to complete the configuration for a camera Infospot.
Enter the Name of the infospot.
Specify the Camera as the type in the drop-down menu.
Then select the previously added camera from the drop-down list.
Geo location will take automatically.
Tags can be added if required. Then click the Save button.
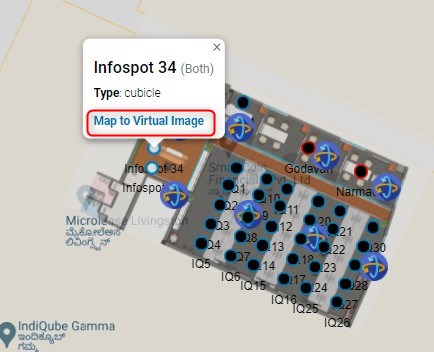
Finally, to complete the setup of the infospots, we need to map them to the virtual images.
Click on an Infospot. Select Map to the virtual image from the popup window that appears.
Then select the correct virtual image from the drop down in the top right corner of the window that opens.
Click on the location where you want to place the infospot. Click save.
Once mapped, the infospot will fill in to signify it has been mapped.
Navigation Path
The navigation path is an optional piece of configuration that is used if wayfinding terminals are being used. The navigation path will be used to find paths between the user and their desired location.
Once you have configured the navigation path, if you wish to deploy the wayfinding application to a screen, please see the Deploying Hybrid Wayfinding to a Screen section.
To configure the navigation path, navigate to the Advanced Settings page, then to Configuration -> Locations -> click on your site -> Navigation Path.
Select a floor from the drop-down menu.
Click Add/Edit Navigation Path.
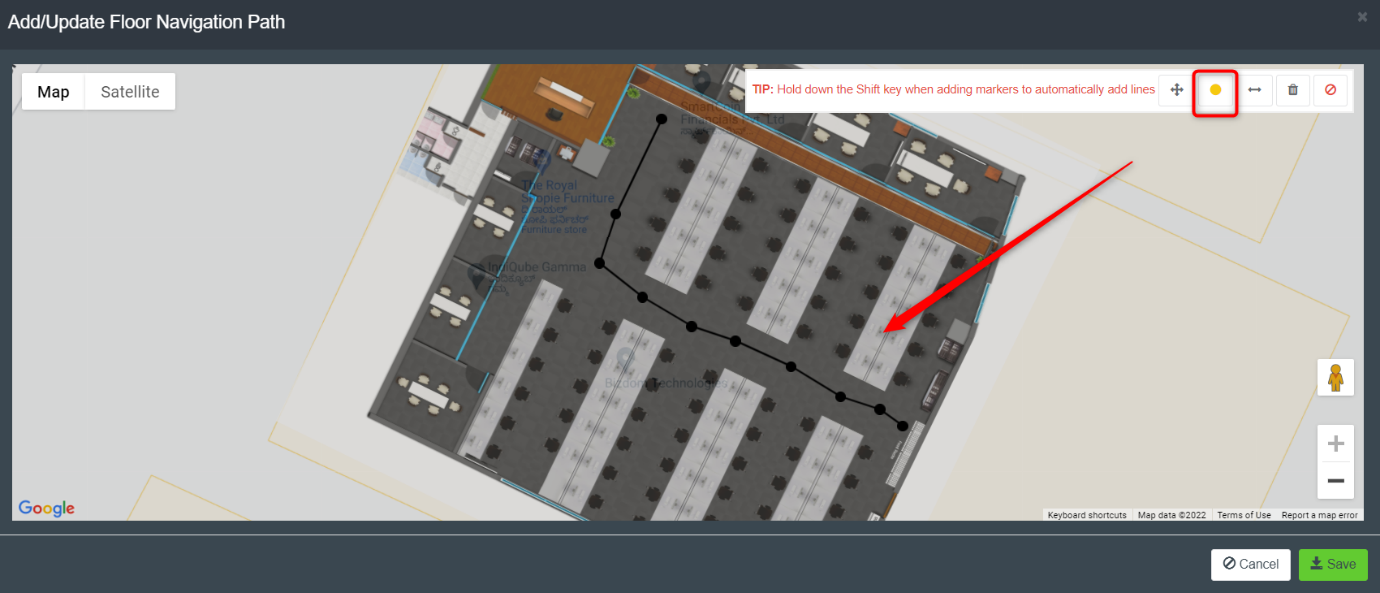
Select the Add Marker and click the map to place the marker.
Provide the link between the markers using Add Link icon. You can also hold the Shift key while adding markers and automatically add lines between them.
Note: You can clear the selection, delete the added markers/links, or clear the entire path by clicking on icons located at the top right corner of the map.
Click Save button to save the changes.
Adding Terminals
Terminals that will be used by the system for wayfinding must be added to the location editor. Ensure you have the first setup of the terminal in KloudManage and connected KloudInsights to KloudManage before completing this step. The documentation process for this is not separate from the KloudHybrid administrator guide, so please view the relevant documentation for details.
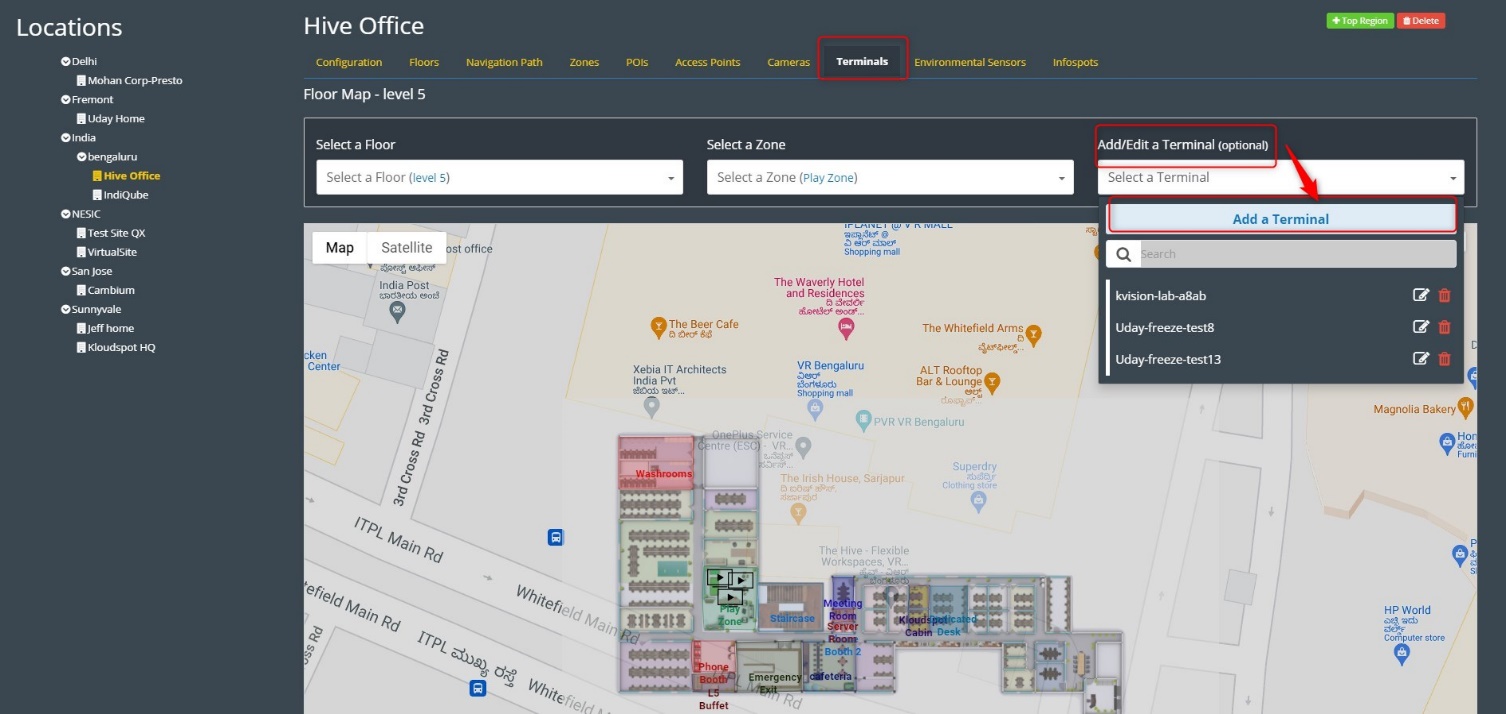
To configure the navigation path, navigate to the Advanced Settings page, then to Configuration -> Locations -> Terminals.
Select a floor and a zone from the drop-down menu.
Click Add a Terminal from the Select a Terminal drop-down menu.
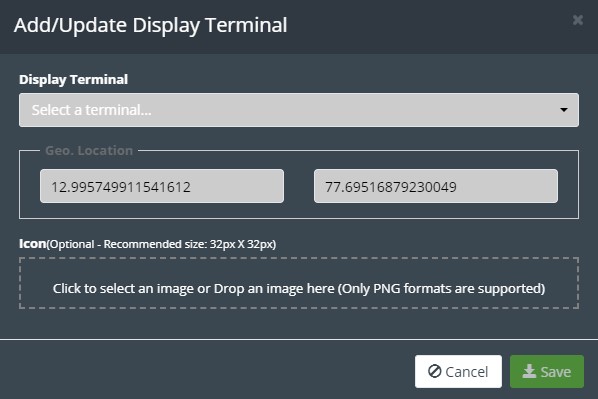
The Add/Update Display Terminal dialog box is displayed. Select the display terminal drop-down menu.
Optionally, add an icon on the map by selecting or dragging and dropping an image of .png format in the provided text box.
Click Save to save the changes.
Adding POIs
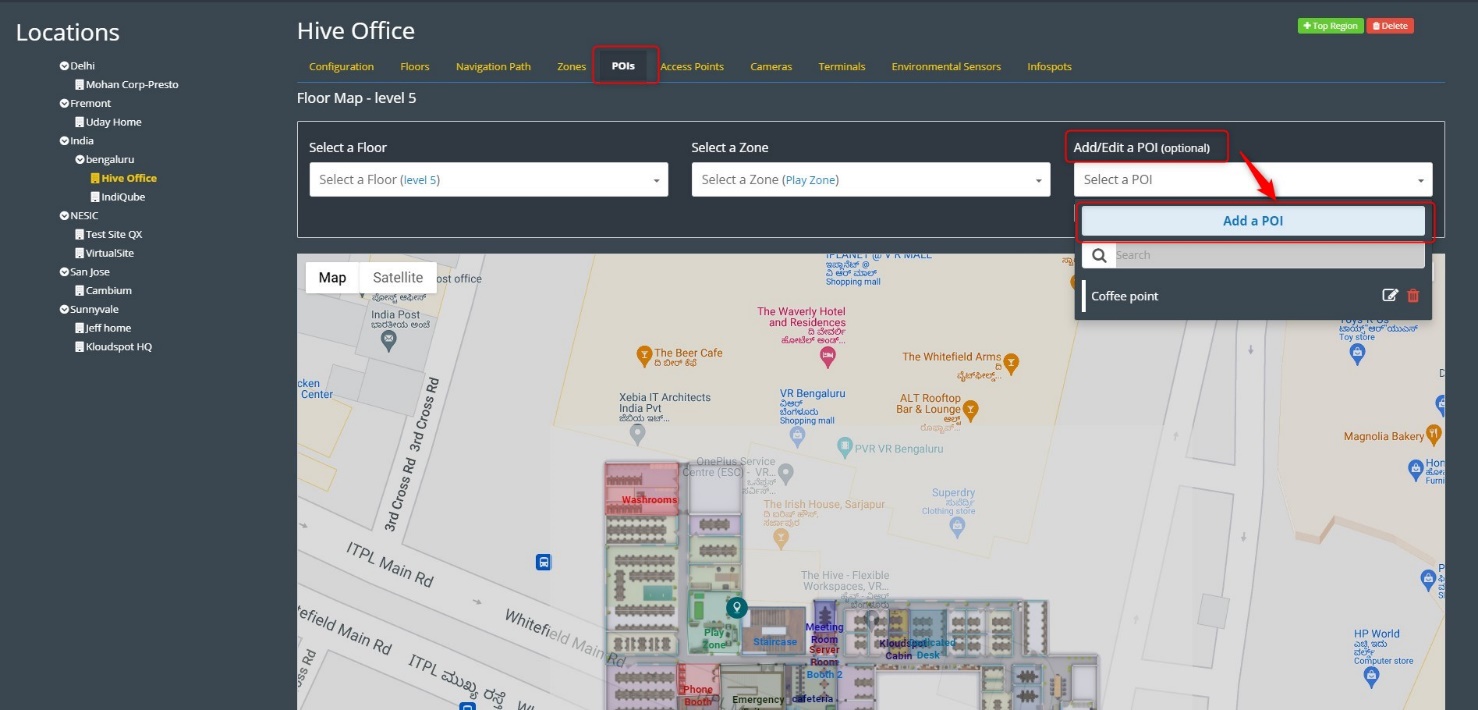
POIs are used by the system for wayfinding purposes or to search assets. POIs can be anything from printers, coffee machines, restrooms, or any other fixed location assets. Navigate to the POI tab by heading to the location editor, and then click the POI tab.
Select a floor and a zone from the drop-down menu.
Check the checkbox, to show the names of the POIs.
Click Add/Edit a POI from the Select a POI drop-down menu.
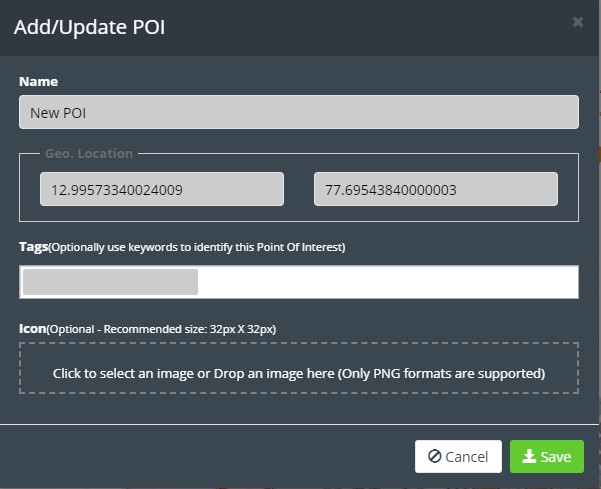
The Add/Update the POI dialog box is displayed. Enter the Name for a POI.
Provide the tags by adding the keywords to identify the POI. This step is optional.
Optionally, add an icon on the map by selecting or dragging and dropping an image of .png format in the provided text box.
Click Save to make the changes.
Drag the new icon to the correct position on the map.
Other miscellaneous Settings for Hybrid office
In the pursuit of creating a fully optimized and technologically advanced hybrid office, there are additional miscellaneous settings that can further enhance the functionality and efficiency of your workspace. These settings encompass the integration of Access Points, Cameras, and Environmental Sensors, offering a comprehensive solution to meet your organization’s specific needs.
Subsections of Other miscellaneous Settings for Hybrid office
Access Points
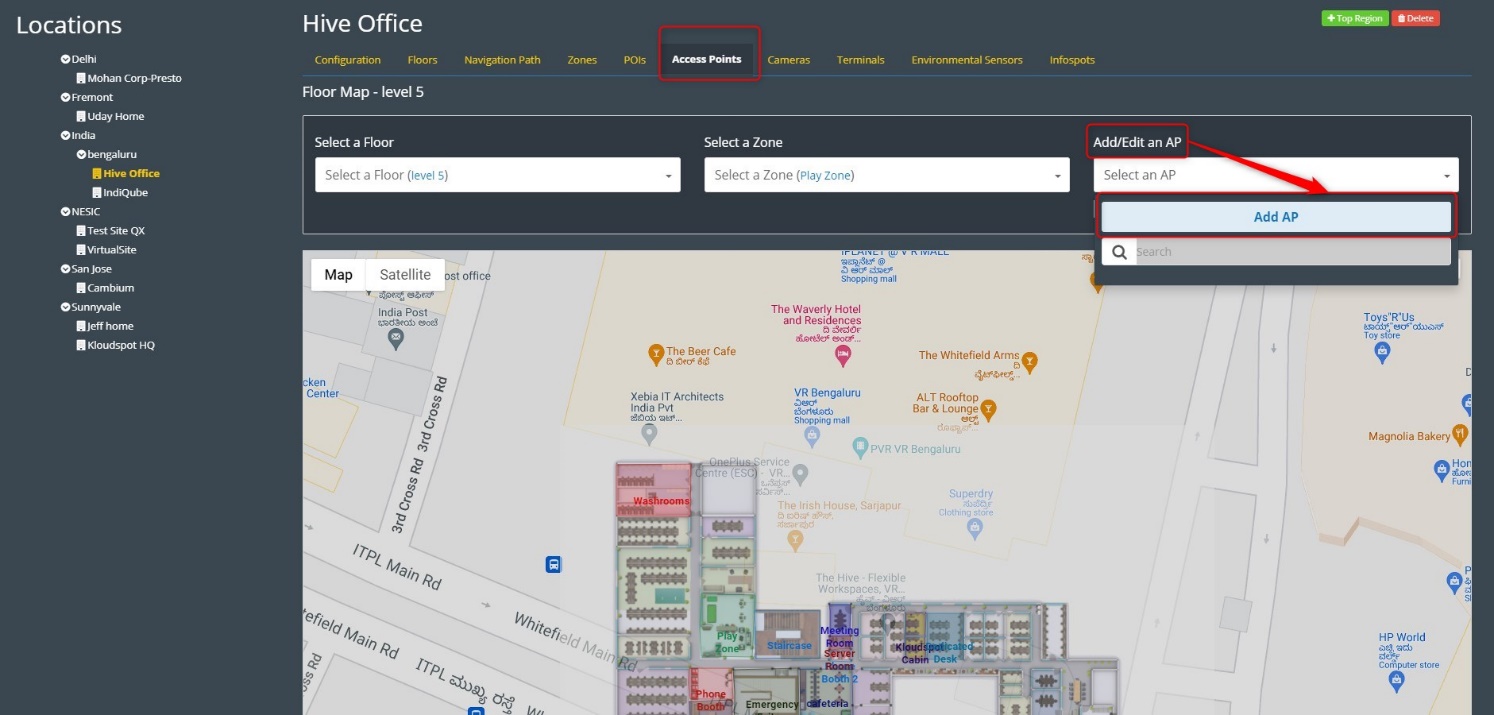
It displays the Access Points (AP) of a zone.
The ‘Add/Update AP’ allows you to add or edit access points.
To add an access point:
Select a floor and a zone from the drop-down menu.
Check the checkbox, ‘Show name on map’ to show the added POI on the map.
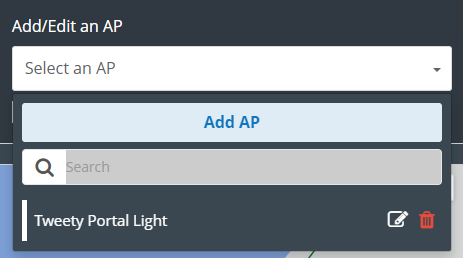
Click Add AP from the ‘Select an AP’ drop-down menu.
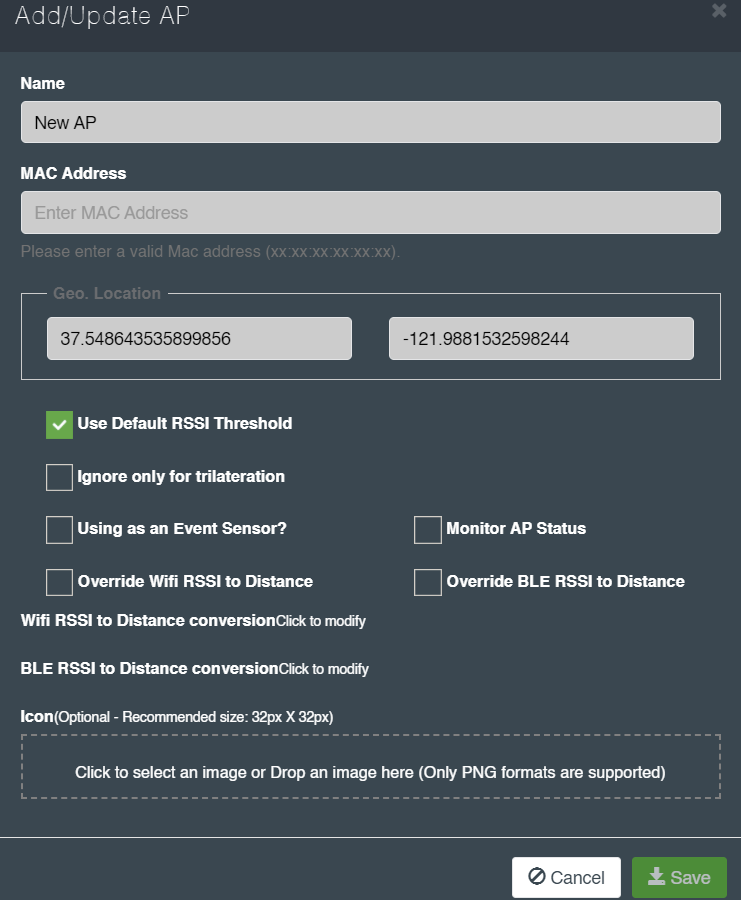
The ‘Add/Update AP’ dialog box is displayed.
Enter the ‘Name’ for an AP.
Enter the MAC address in a valid format as xx:xx:xx:xx:xx:xx
Geographical location will be selected automatically from the map.
Check the provided checkboxes as per your need.
Click to modify the ‘Wifi RSSI to Distance conversion’ to set the RSSI distance mapping for trilateration and update it.
Click to modify the ‘BLE RSSI to Distance conversion’ to update it.
Add an icon on the map by selecting or dragging and dropping an image of .png format in the provided text box.
Click Save to make the changes.
You have the option to delete or make changes using the delete and edit buttons.
Camera
It displays the available cameras in a zone.
The ‘Add/Edit a Camera’ allows you to add a camera.
To add a camera:
Select a floor and a zone from the drop-down menu.
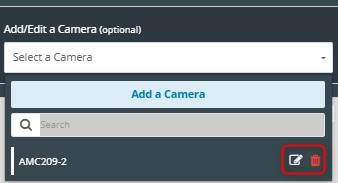
Click Add a Camera from the ‘Select a Camera’ drop-down menu.
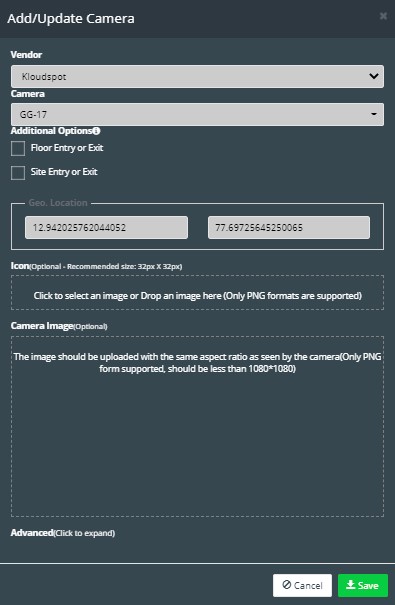
The ‘Add/Update Camera’ dialog box is displayed.
Select the Camera Vendor from the drop-down menu. By default, Kloudspot is selected.
Select a Camera from the drop-down menu and check the check box based on the camera location.
Geographical location will be selected automatically from the map.
Add an icon on the map by selecting or dragging and dropping an image of .png format in the provided text box.
Add a camera image by selecting or dragging and dropping an image of .png format (should be less than 1080*1080 pixels) in the provided text box. Please note that the image should be uploaded with the same aspect ratio as seen by the camera.
Click Save to save the changes.
You have the option to delete or make changes using the delete and edit buttons.
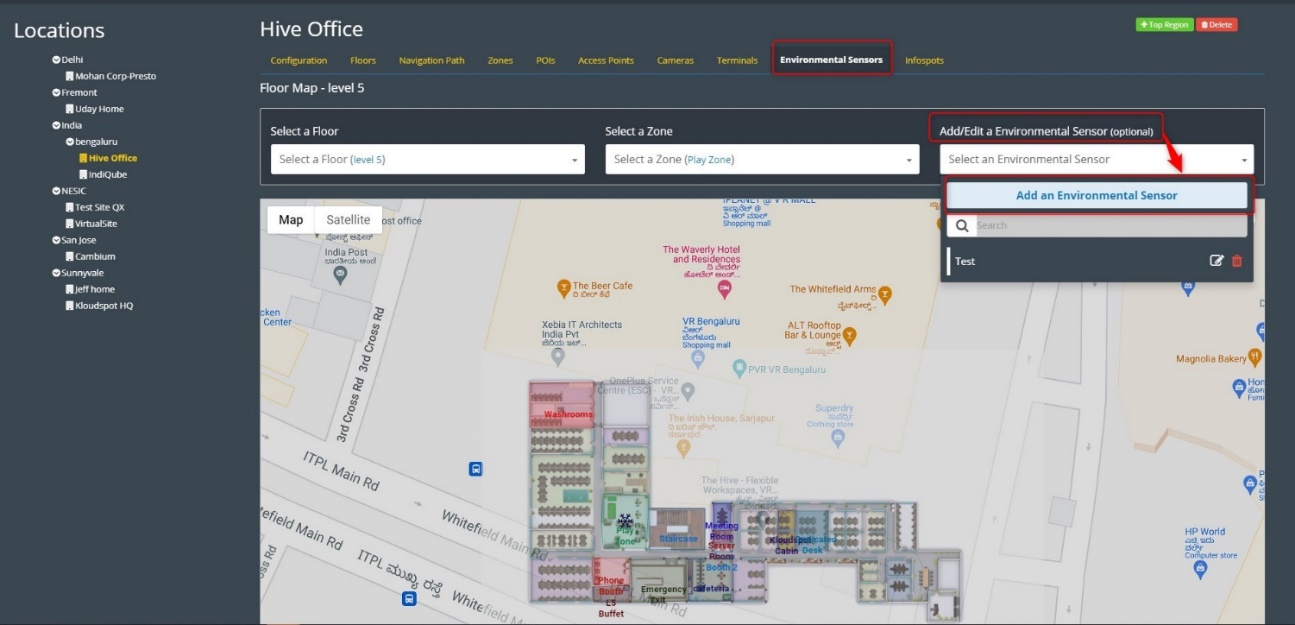
Environmental Sensors
It displays the Environmental Sensors in a zone.
The ‘Add/Edit an Environmental Sensor’ tab allows you to add Environmental Sensors.
To add an environmental sensor:
Select a floor and a zone from the drop-down menu.
Click Add an Environmental Sensor from the ‘Select an Environmental Sensor’ drop-down menu.
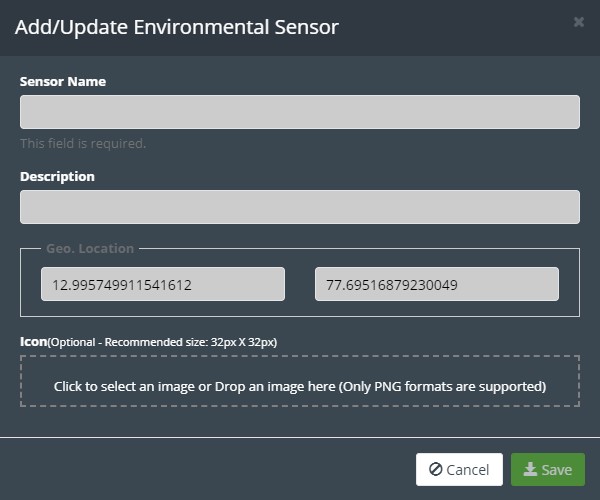
The ‘Add/Update Environmental Sensor’ dialog box is displayed.
Specify the mandatory sensor name.
Type the ‘Description’ for a sensor.
Geographical location will be selected automatically from the map.
Add an icon on the map by selecting or dragging and dropping an image of .png format in the provided text box.
Click Save to make the changes.
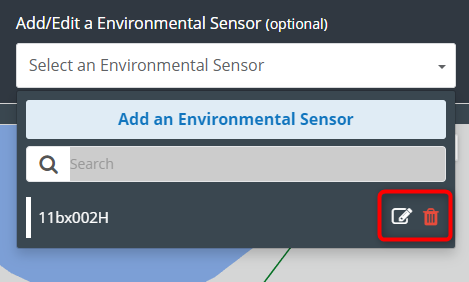
You have the option to delete or make changes using the delete and edit buttons.
Connecting to your Infrastructure
Once you have successfully created your hybrid office in KloudHybrid, the next crucial step is to establish seamless connectivity between KloudHybrid and your existing infrastructure. This enables the application to efficiently interact with your established systems and streamline various processes.
KloudHybrid offers two providers, namely OKTA and Microsoft, for establishing this connection. You can choose the provider that aligns best with your organization’s requirements and infrastructure.
Overview
In this Section, we will explore various aspects of establishing connections to your infrastructure, ensuring seamless integration and communication within your systems. We will cover essential topics such as SCIM setup, Microsoft Graph API integration, email (SMTP) setup, SMS setup, application integrations, external authentication, and other valuable integrations. Whether you’re looking to streamline your operations or enhance the functionality of your infrastructure, this section will provide you with the necessary insights and instructions to successfully connect your systems and optimize your workflows.
SCIM makes user data more secure and simplifies the user experience by automating the user identify lifecycle management process. With the addition of SCIM integration, user identifies can be created directly in a tool such as OKTA or Azure. Since it is a standard, user data is stored in a consistent way and can be communicated between the user management system and KloudHybrid. This enables IT departments to automate the provisioning/deprovisioning process while also having a single system to manage permissions and groups. Since user data is transferred automatically and communicated between the two systems, risk of errors is reduced.
Currently, KloudHybrid supports the following features when integrated with SCIM:
Create users: Users in OKTA that are assigned to the KloudHybrid app will automatically be created in KloudHybrid.
Update user attributes: Any changes to users in OKTA will automatically be made to the associated KloudHybrid user.
Deactivate users: Users deactivated in OKTA or un-assigned from the app will be disabled in KloudHybrid.
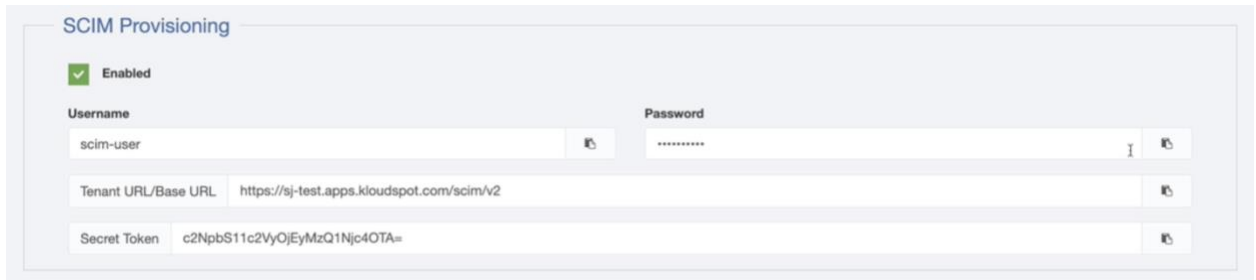
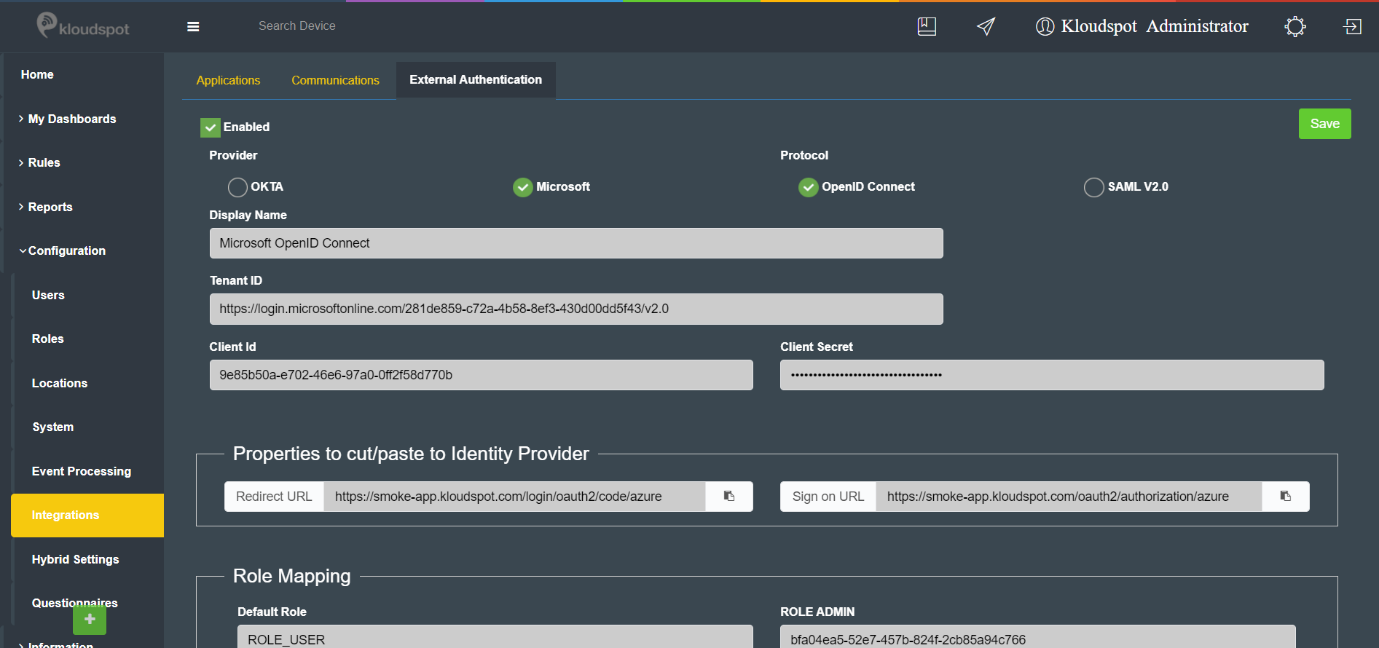
Obtain the Provisioning API credentials from KloudHybrid. In the ‘Advanced’ user interface, go to Configuration -> Integrations -> External Authentication. Enable SCIM Provisioning and click save.
NOTE: A random password will be generated by the system. You can either use the default username and password or create your own.
Configure SCIM in either OKTA or Azure, see the sections below for instructions.
Enabling SCIM in OKTA
The System for Cross-domain Identity Management (SCIM) specification is a provisioning protocol to create, retrieve, update, and deactivate users and groups between Okta and Hybrid application.
To enable SCIM in OKTA. Follow the steps below.
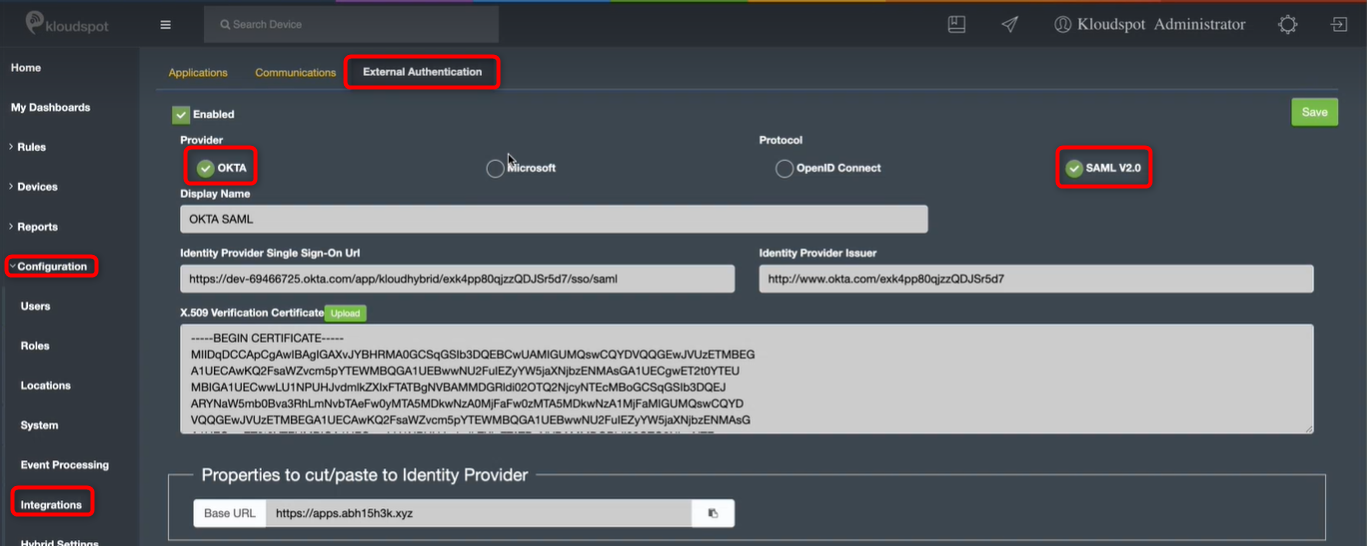
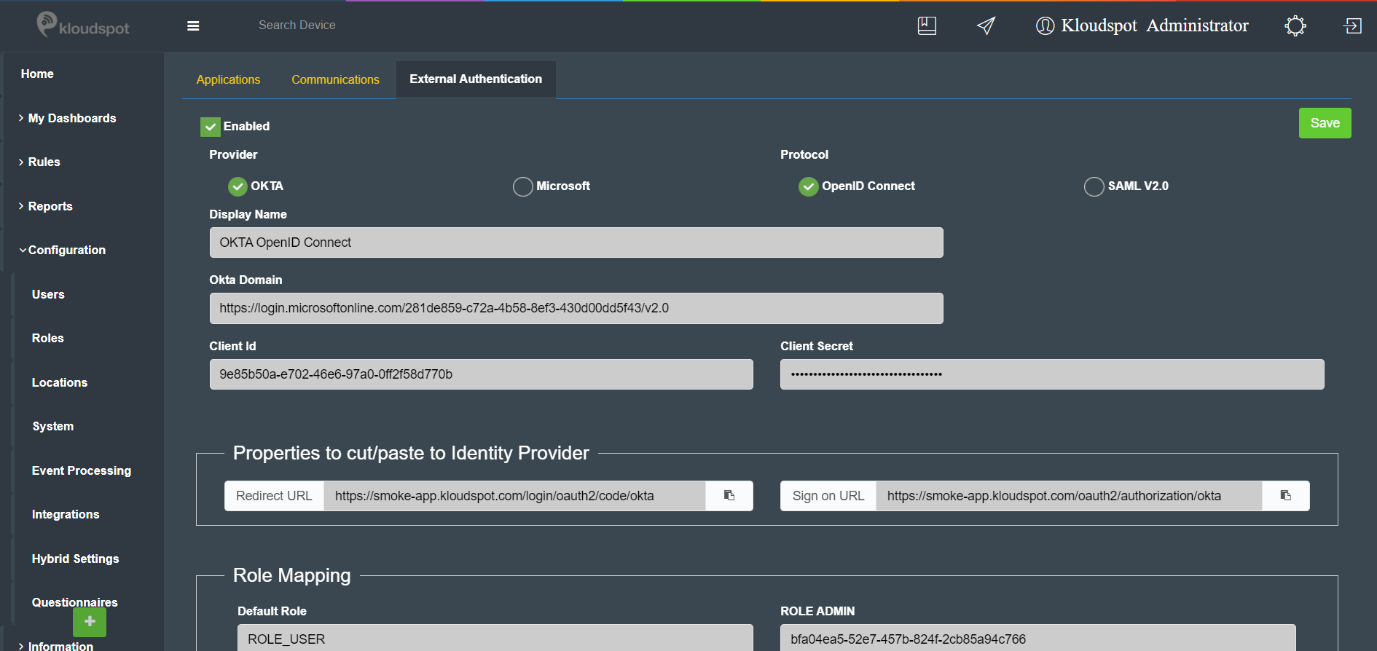
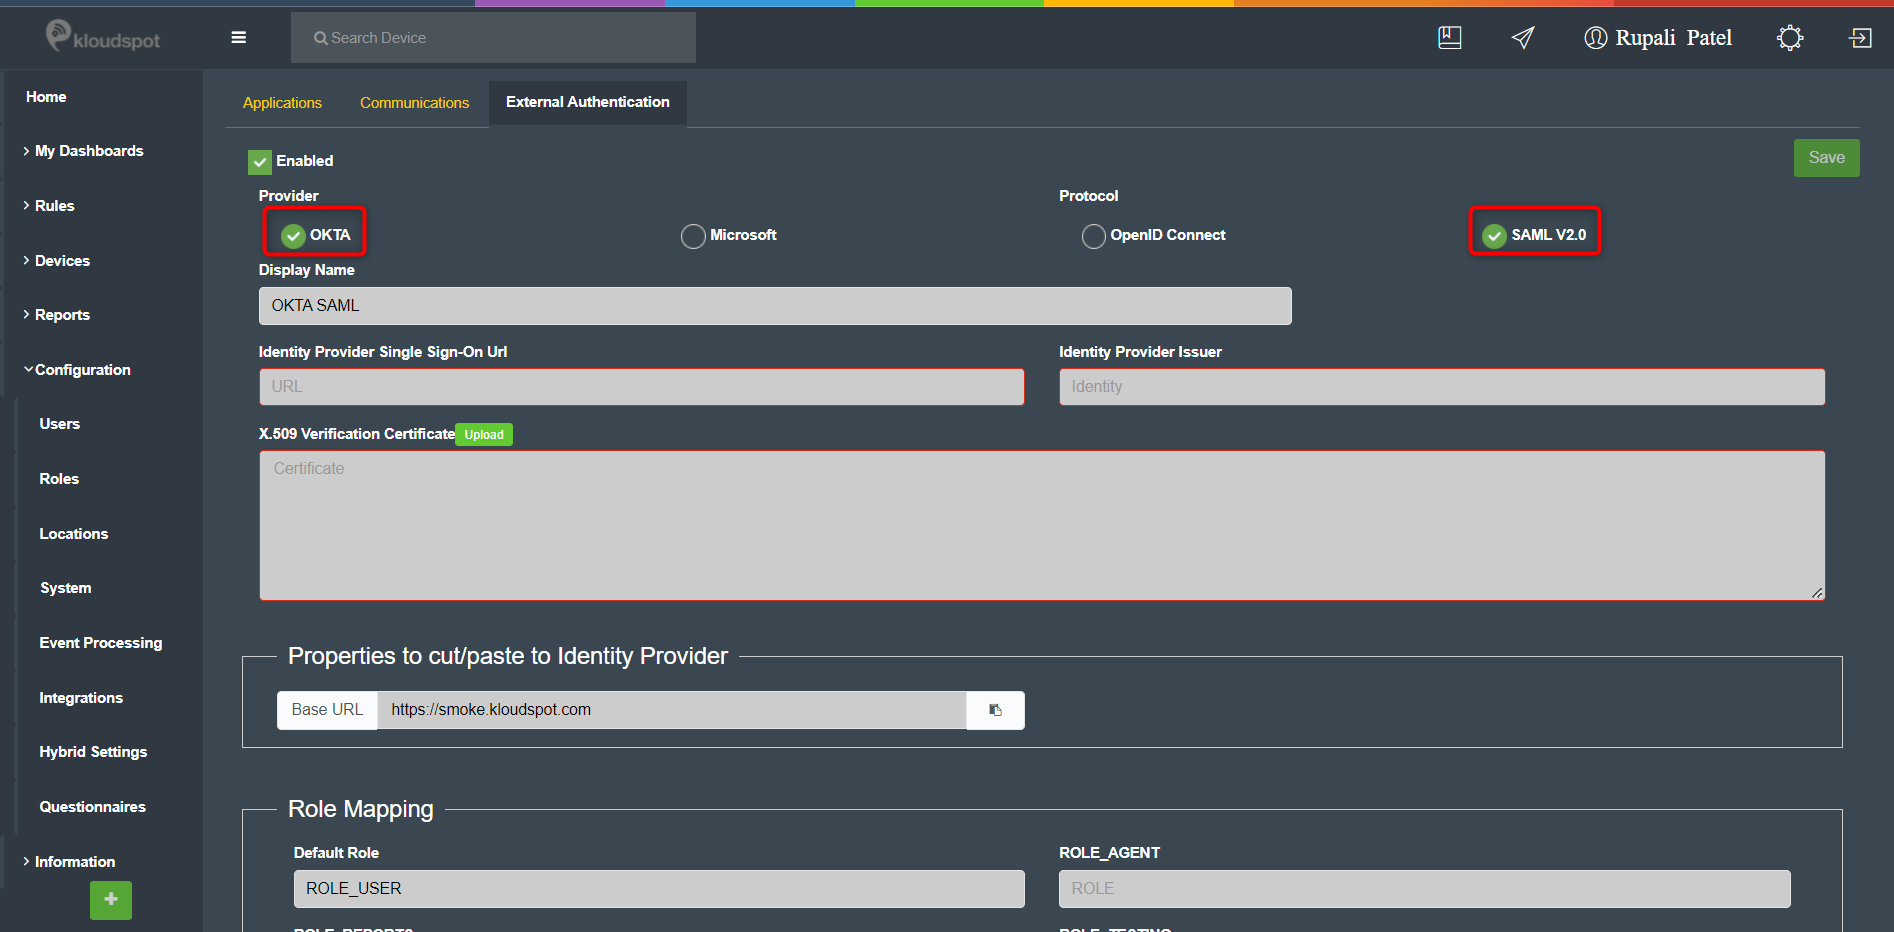
Navigate to Advance Settings and then go to Configuration > Integrations > External Authentication.
Make sure OKTA is selected in the provider and SAML 2.0 in the protocol.
Scroll down and enable SCIM provisioning. In the text box that opens, enter Username and Password. And save the changes.
Note: The username and password are decided by you and the Tenant URL and Secret token will be generated accordingly.
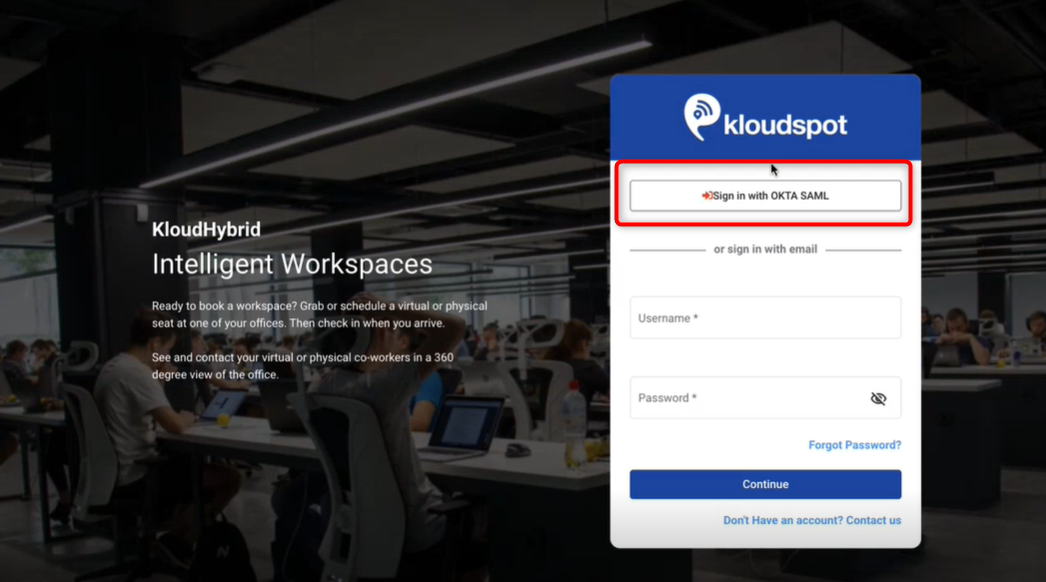
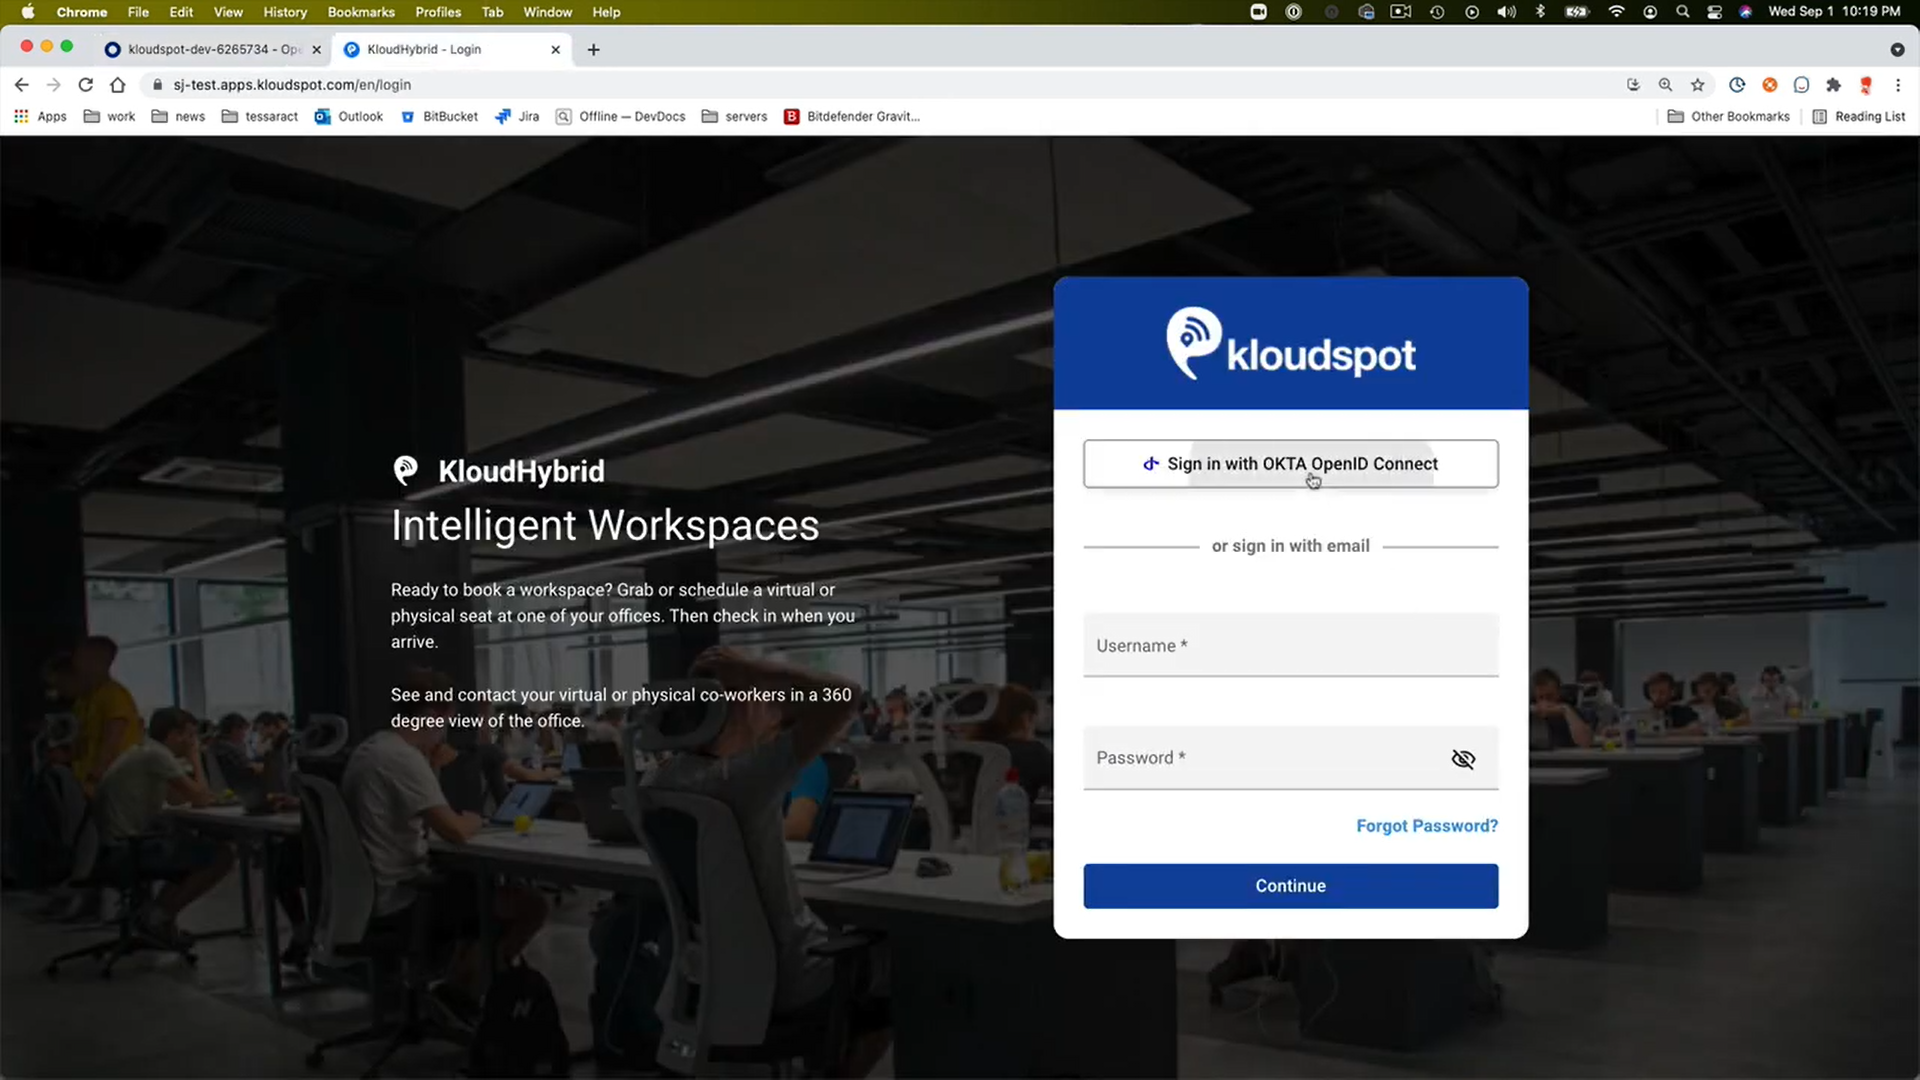
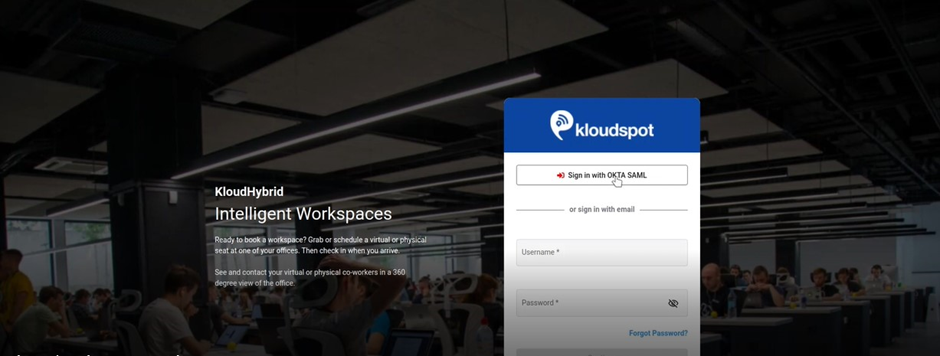
After saving the changes. Log out of the Hybrid app and double-check that the single sign on button is functional.
Then log in to your OKTA account.
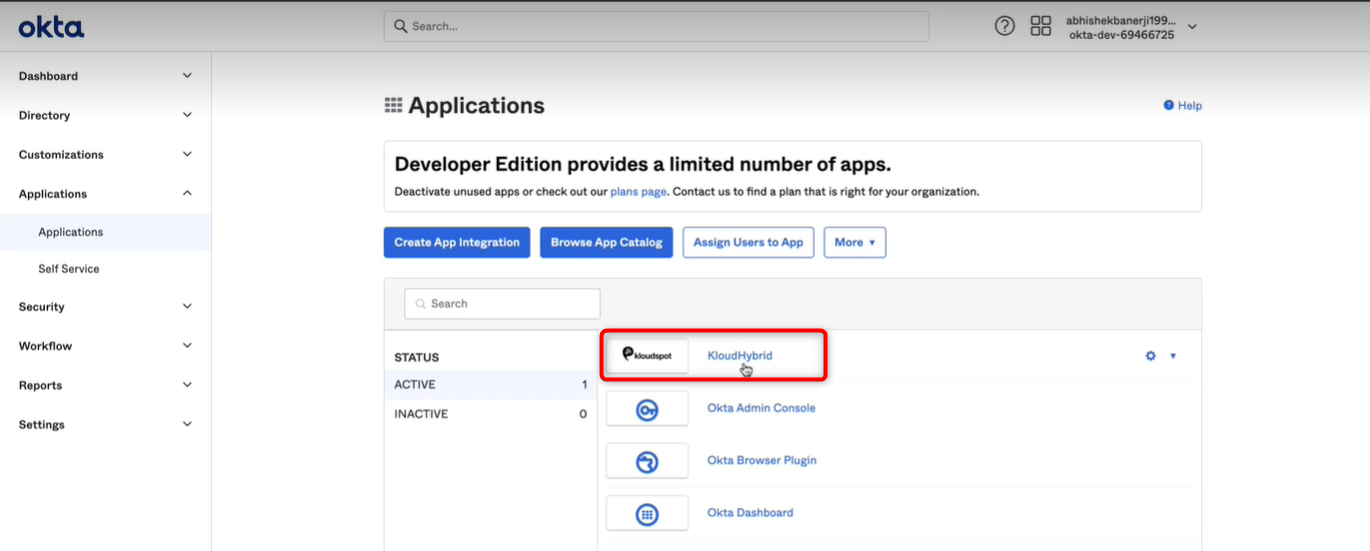
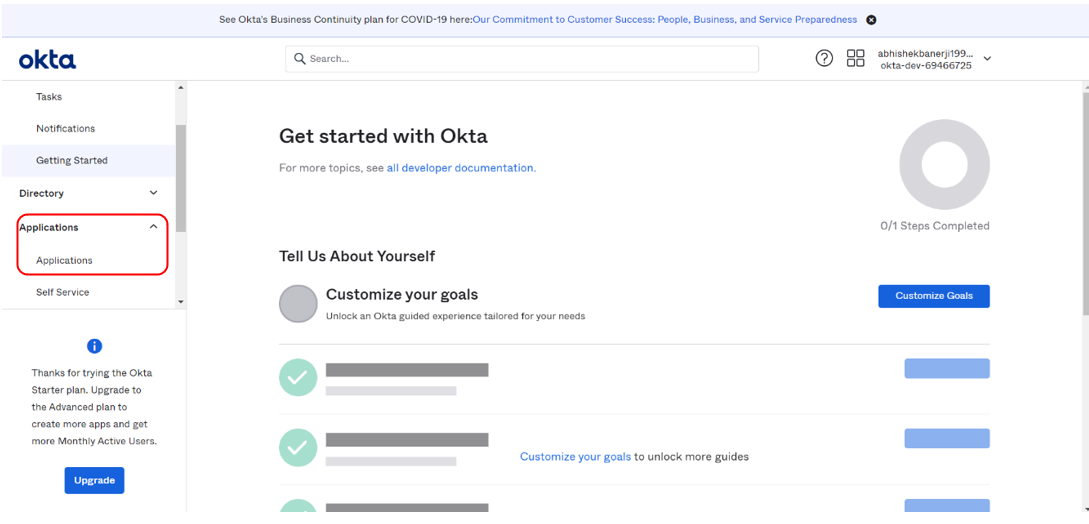
Click on Applications and from the drop-down select Applications.
Select the same application that was created when the single sign-on button was integrated. Refer Configure SAML with OKTA section for more details.
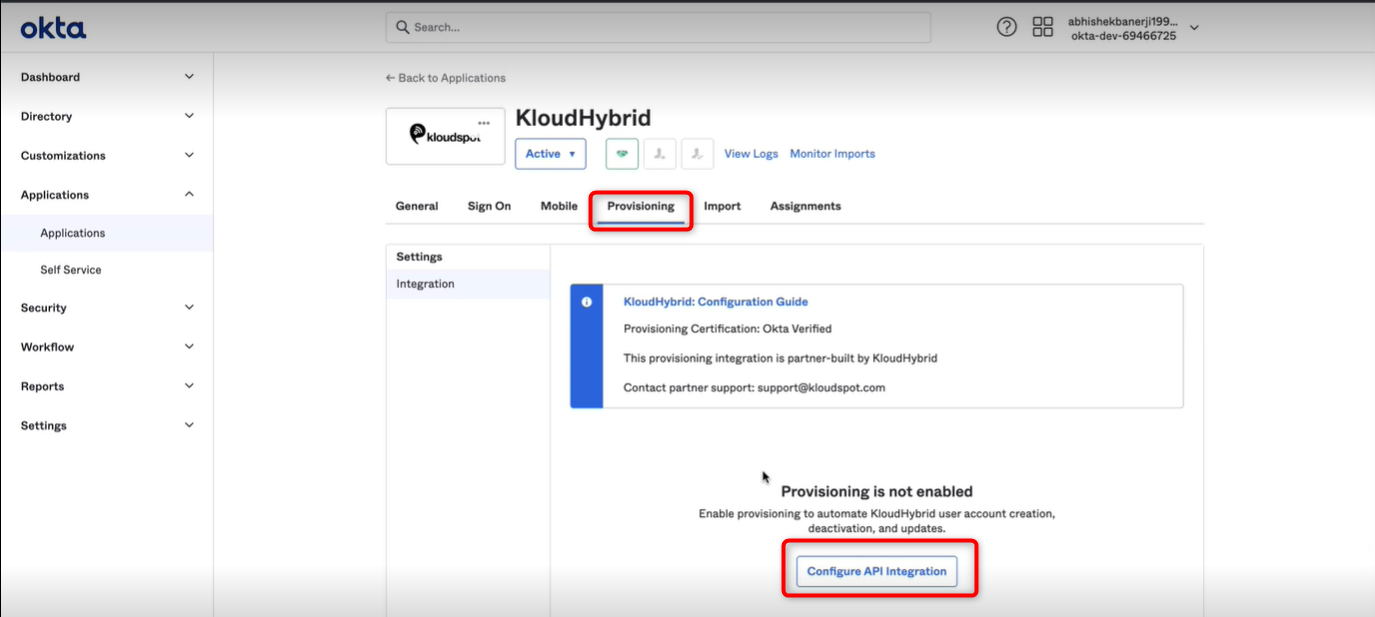
In the window that opens, click on the Provisioning tab. And click Configure API Integration button.
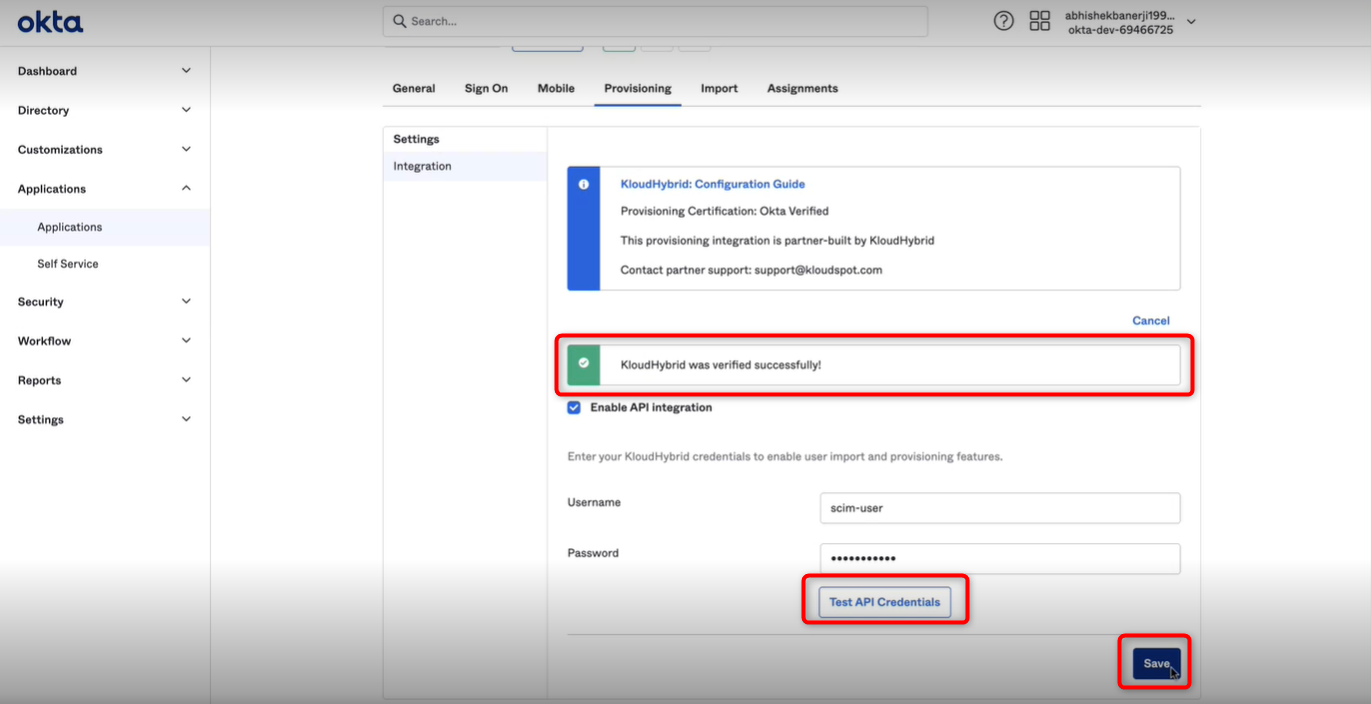
Check the Enable API integration, then in the text box that opens, enter the same username and password that you entered in the Hybrid Advanced settings.
Then click on the Test API Credentials button to verify the Application.
Once verified, you will be notified that the application has been verified successfully. If not, double-check the single sign-on configuration.
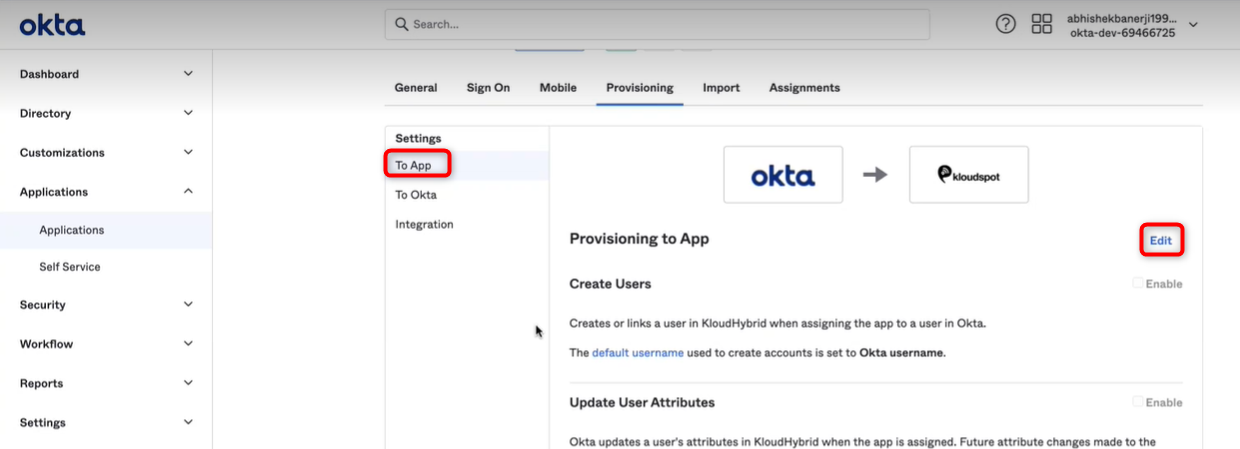
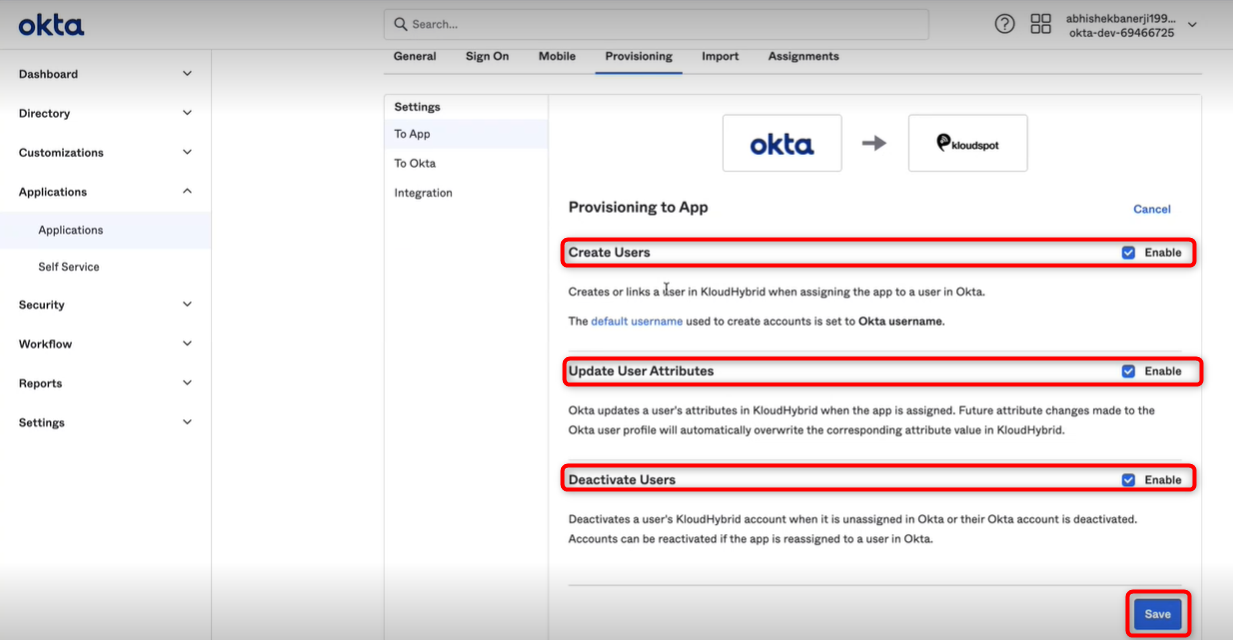
Then navigate to To App > Edit and check the three check boxes and click Save.
Note: Only the To App option is currently operational. This means that users who add to the OKTA application will also be added to the hybrid application.
SCIM in OKTA is added successfully.
Enabling SCIM IN Azure
To enable SCIM in Azure. Follow the steps below.
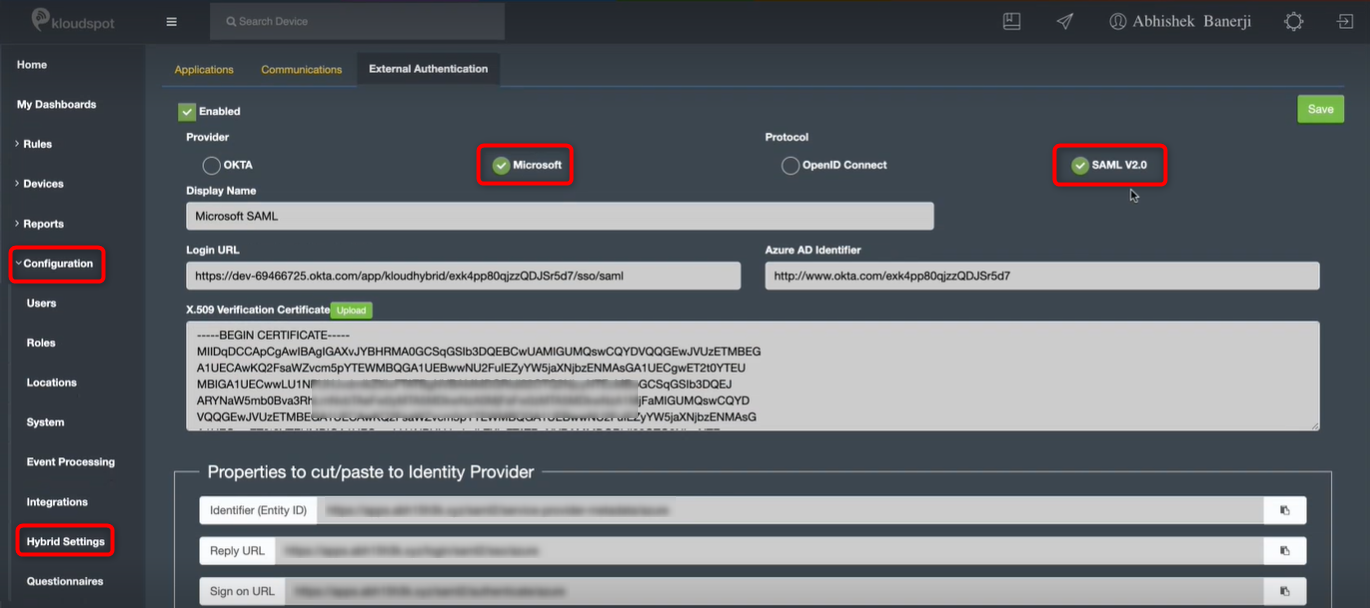
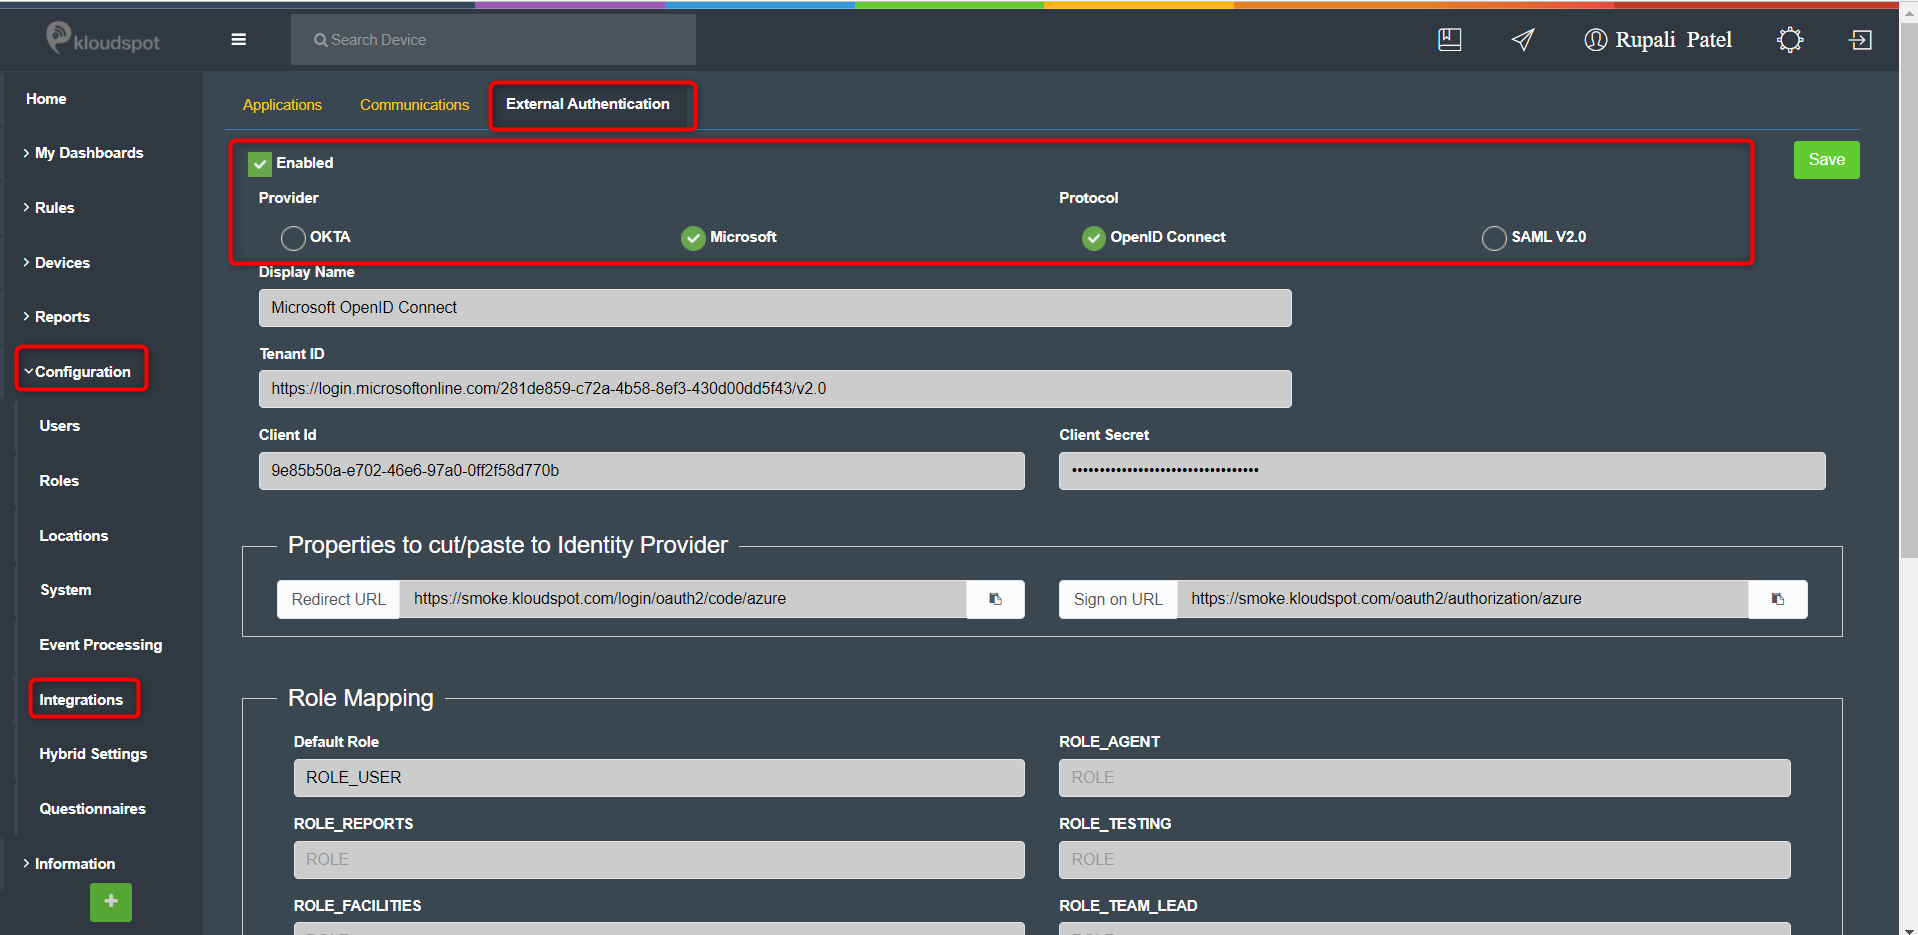
Navigate to Advance Settings and then go to Configuration > Integrations > External Authentication.
Make sure Microsoft is selected in the provider and SAML V2.0 in the protocol.
Scroll down and enable SCIM provisioning. In the text box that opens, enter Username and Password. And save the changes.
Note: The username and password are decided by you and the Tenant URL and Secret token will be generated accordingly.
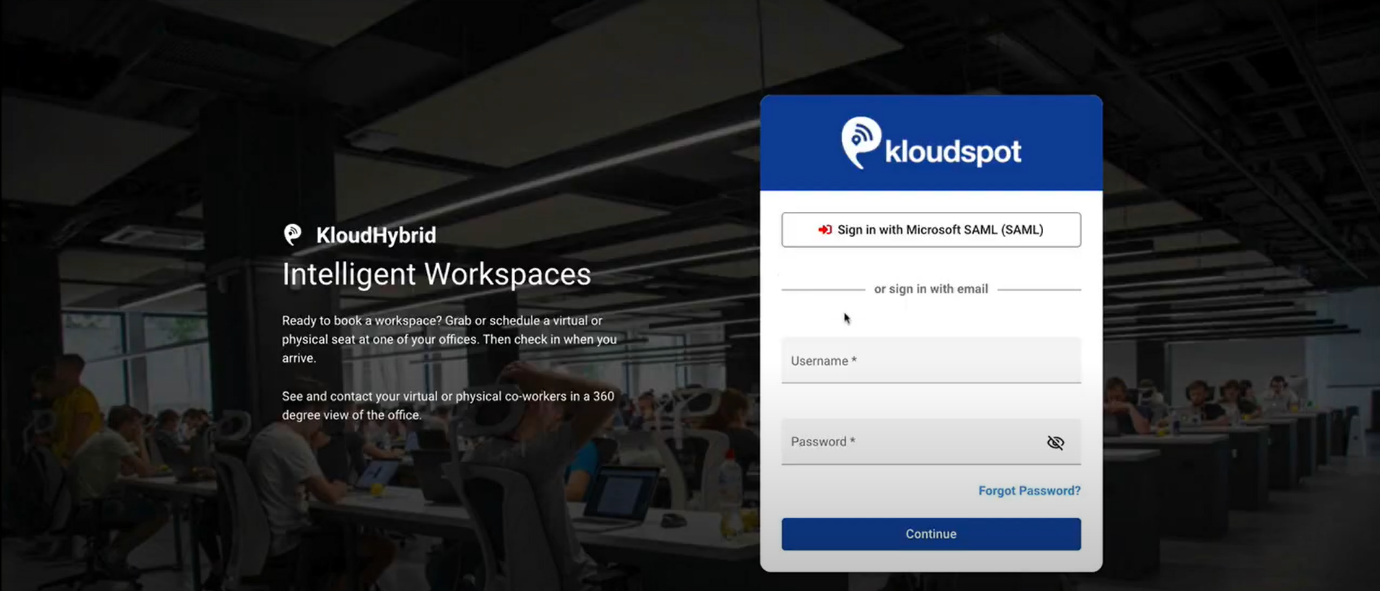
After saving the changes. Log out of the Hybrid app and double-check that the single sign on button is functional. If functional continue with steps below. Otherwise refer Configure SAML with Microsoft Azure AD section for configure SAML with Microsoft.
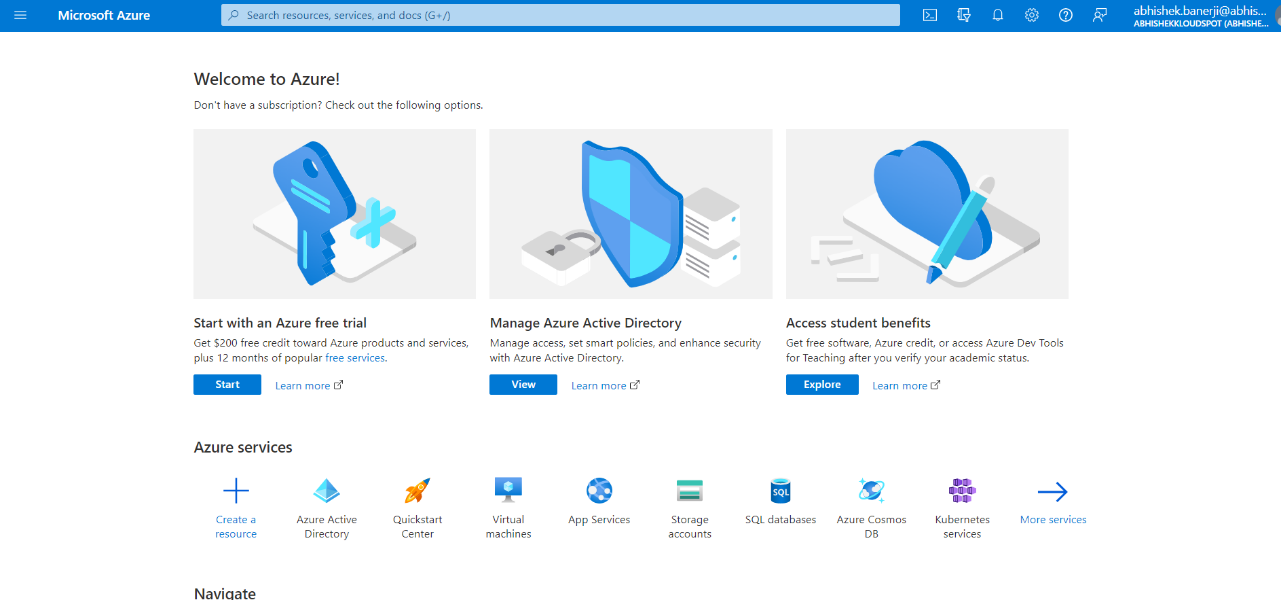
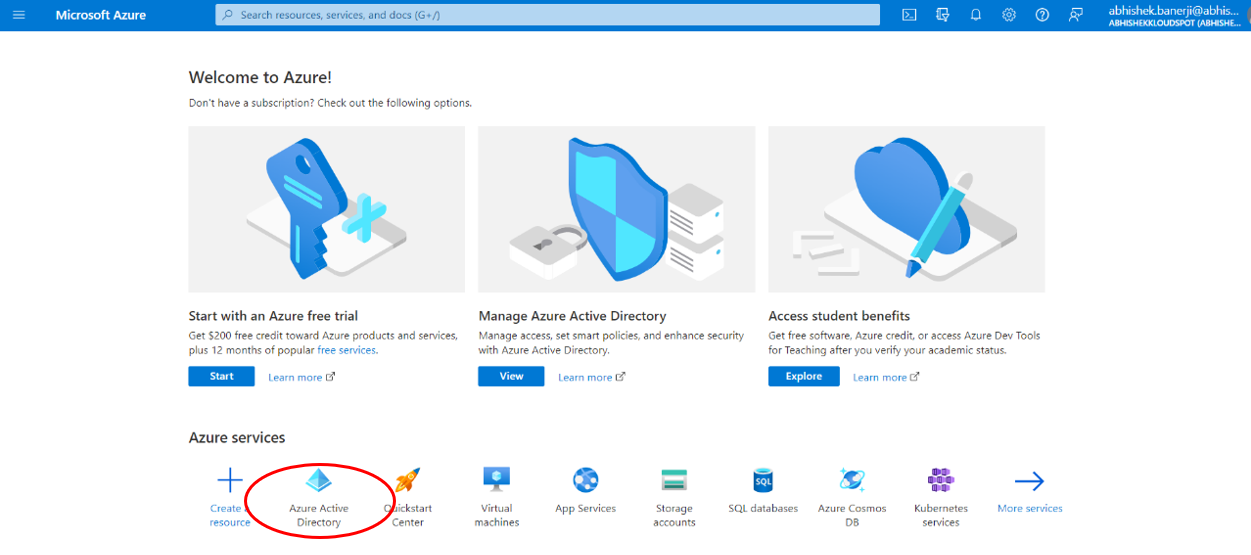
Click on Azure Activity Directory from the Azure services options as shown below.
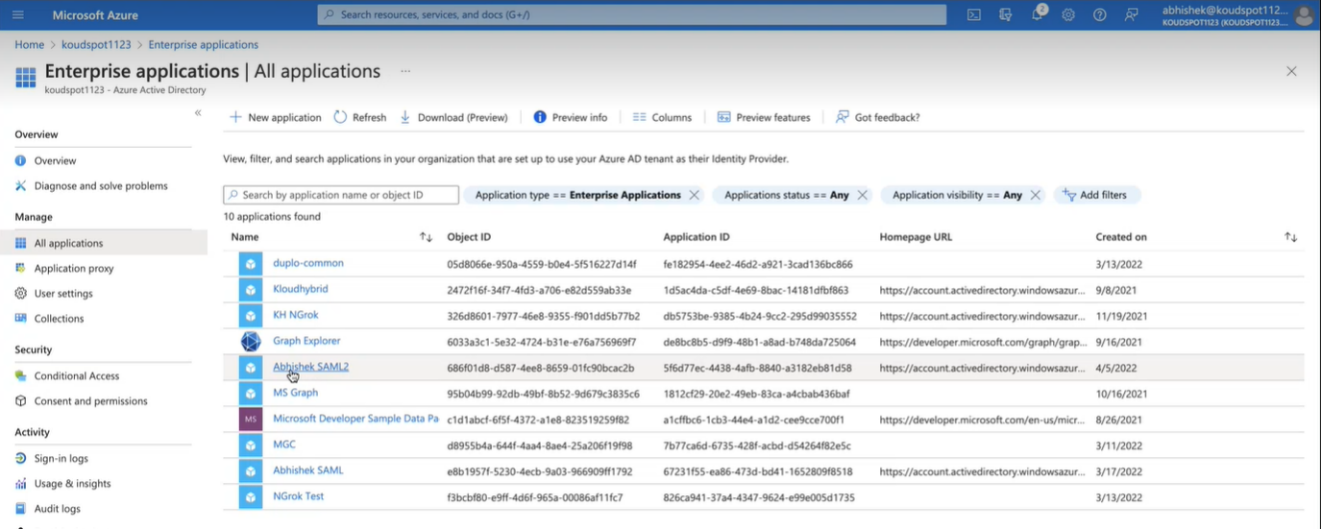
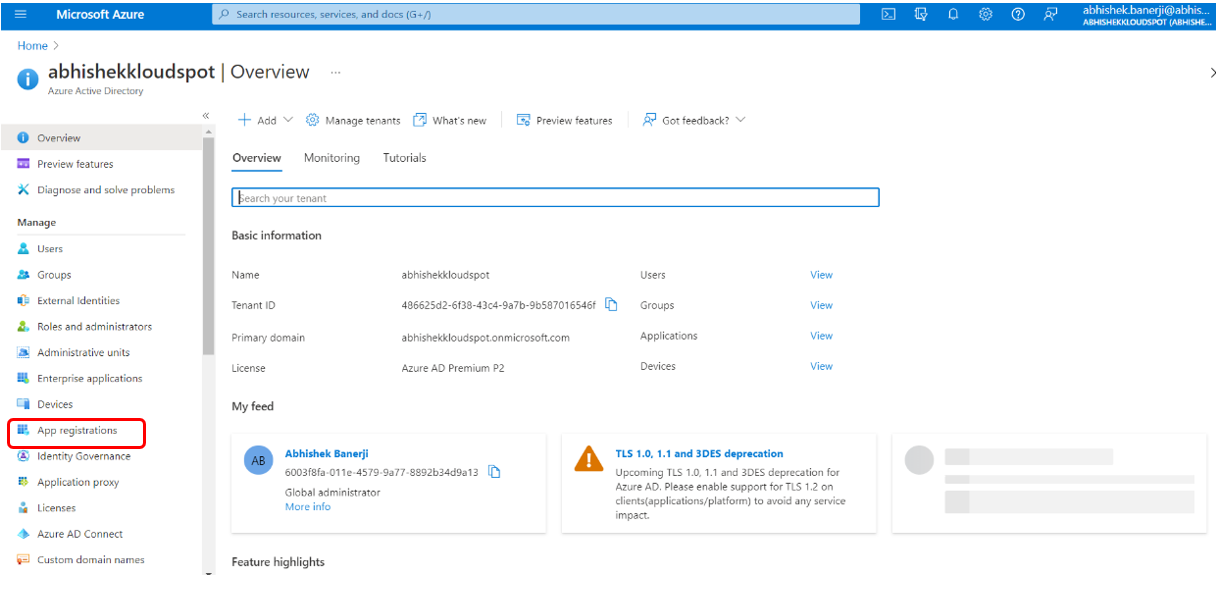
Locate and click on the Enterprise Applications on the Window.
Select the same application that was created when the single sign-on button was integrated.
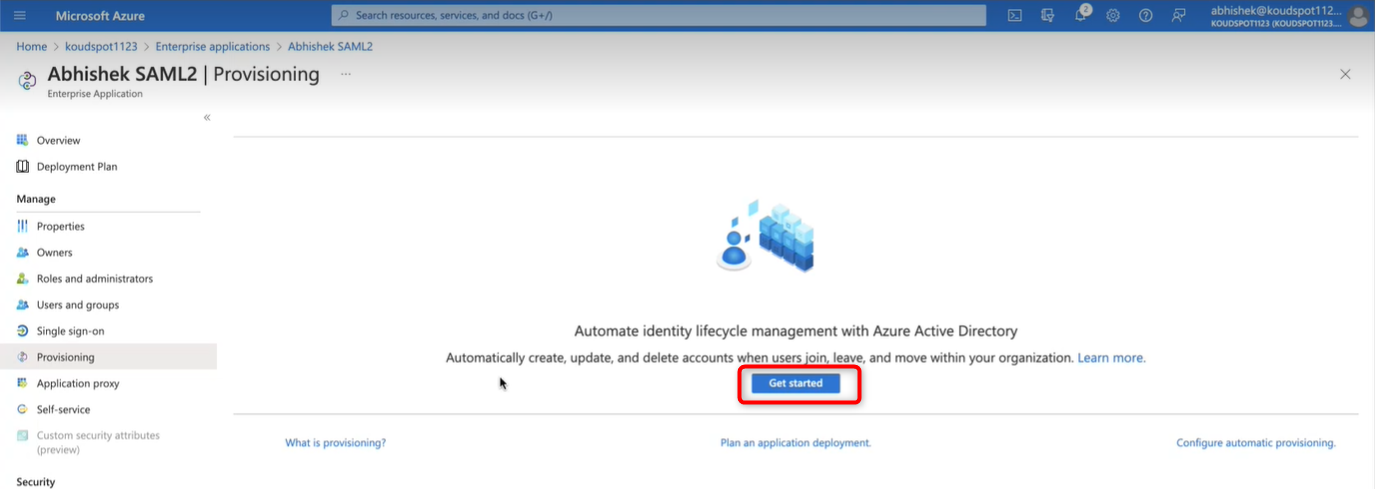
Then click on the Get Started button from the Provision User Account.
openAgain, click on Get started button from the window that open.
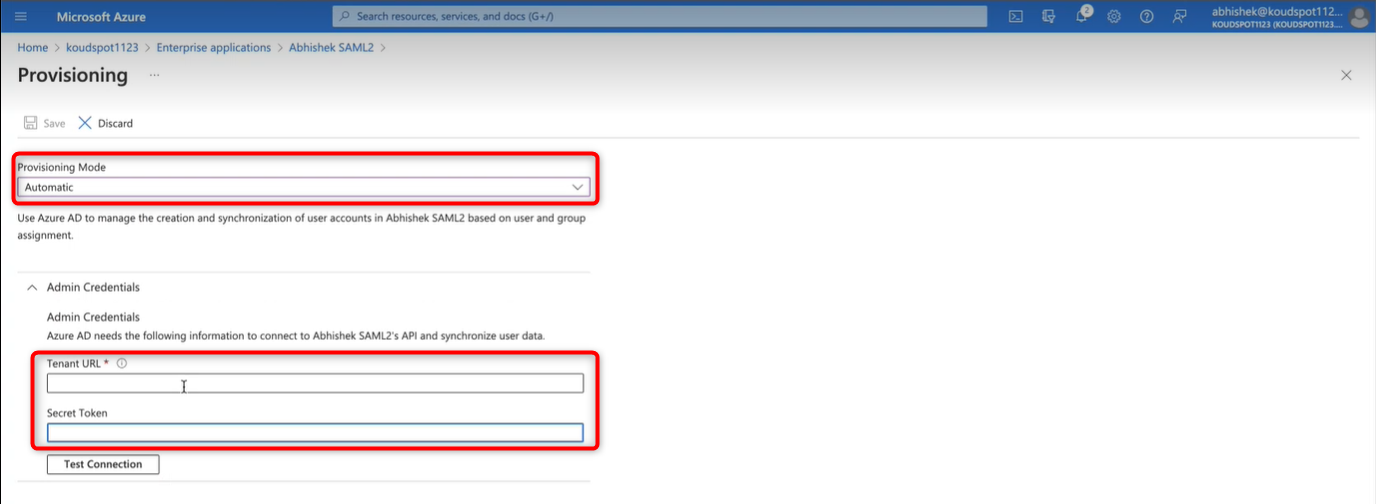
Select the Automatic provisioning mode from the drop-down list. Then copy and paste the Tenant URL and Secret Token from the Hybrid Advanced settings.
Then Click on Test Connection button to authorize the connection.
Once authorized, you will be notified that the credentials have been authorized successfully. If not, double-check the single sign-on configuration. Refer Configure SAML with Microsoft Azure AD for more details.
Click on Save button.
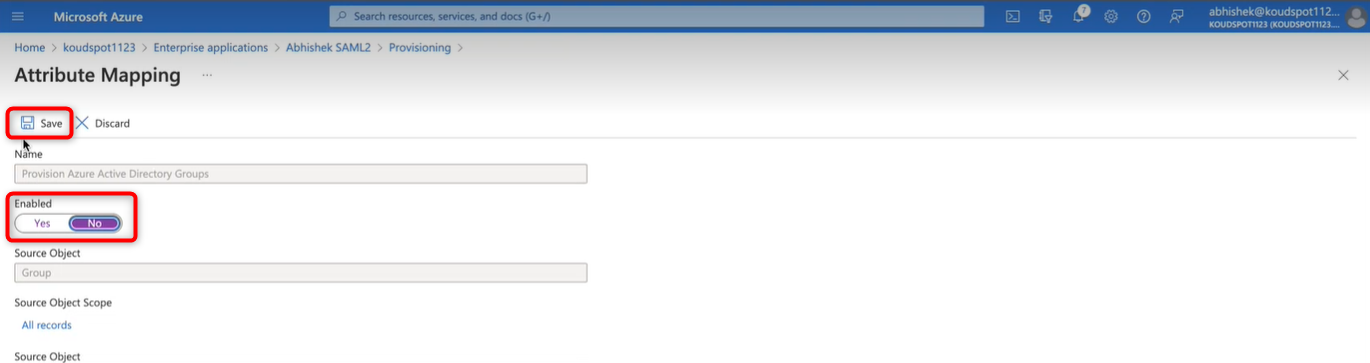
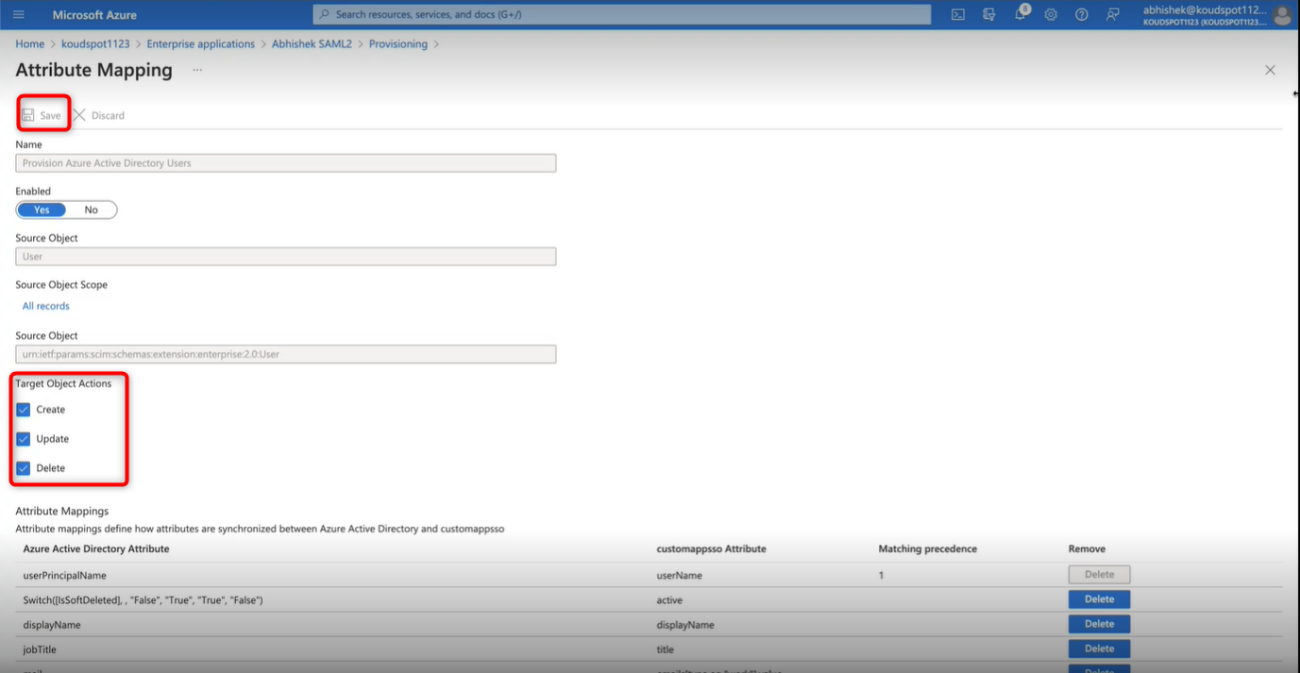
Then navigate to Provisioning > Edit Provisioning > Mappings > Provision Azure Active Directory Groups.
Disable it and click Save.
Note: Only newly created user information will be added to the hybrid automatically. No new groups will be added.
Then click on Azure Active Directory Users. Make sure Create, Update and Delete are enabled in the target object actions.
Click on Save button. SCIM in Microsoft Azure is added successfully.
Other Integrations
The “Integrations” page offers a convenient and versatile platform for configuring various aspects of your system. This page allows you to seamlessly integrate and customize applications, and communications. With these powerful features at your disposal, you can optimize your workflow, enhance communication, and ensure secure access to your system.
The following 3 options are related to KloudHybrid.
Voice Mail Settings: Helps in configuring the Voicemail provider to send messages and notifications to users.
Social Profile Integration: Helps to interact with devices connected to the network.
Kloudspot Device Management Settings: It helps to integrate the KloudSpot NMS service with KloudHybrid.
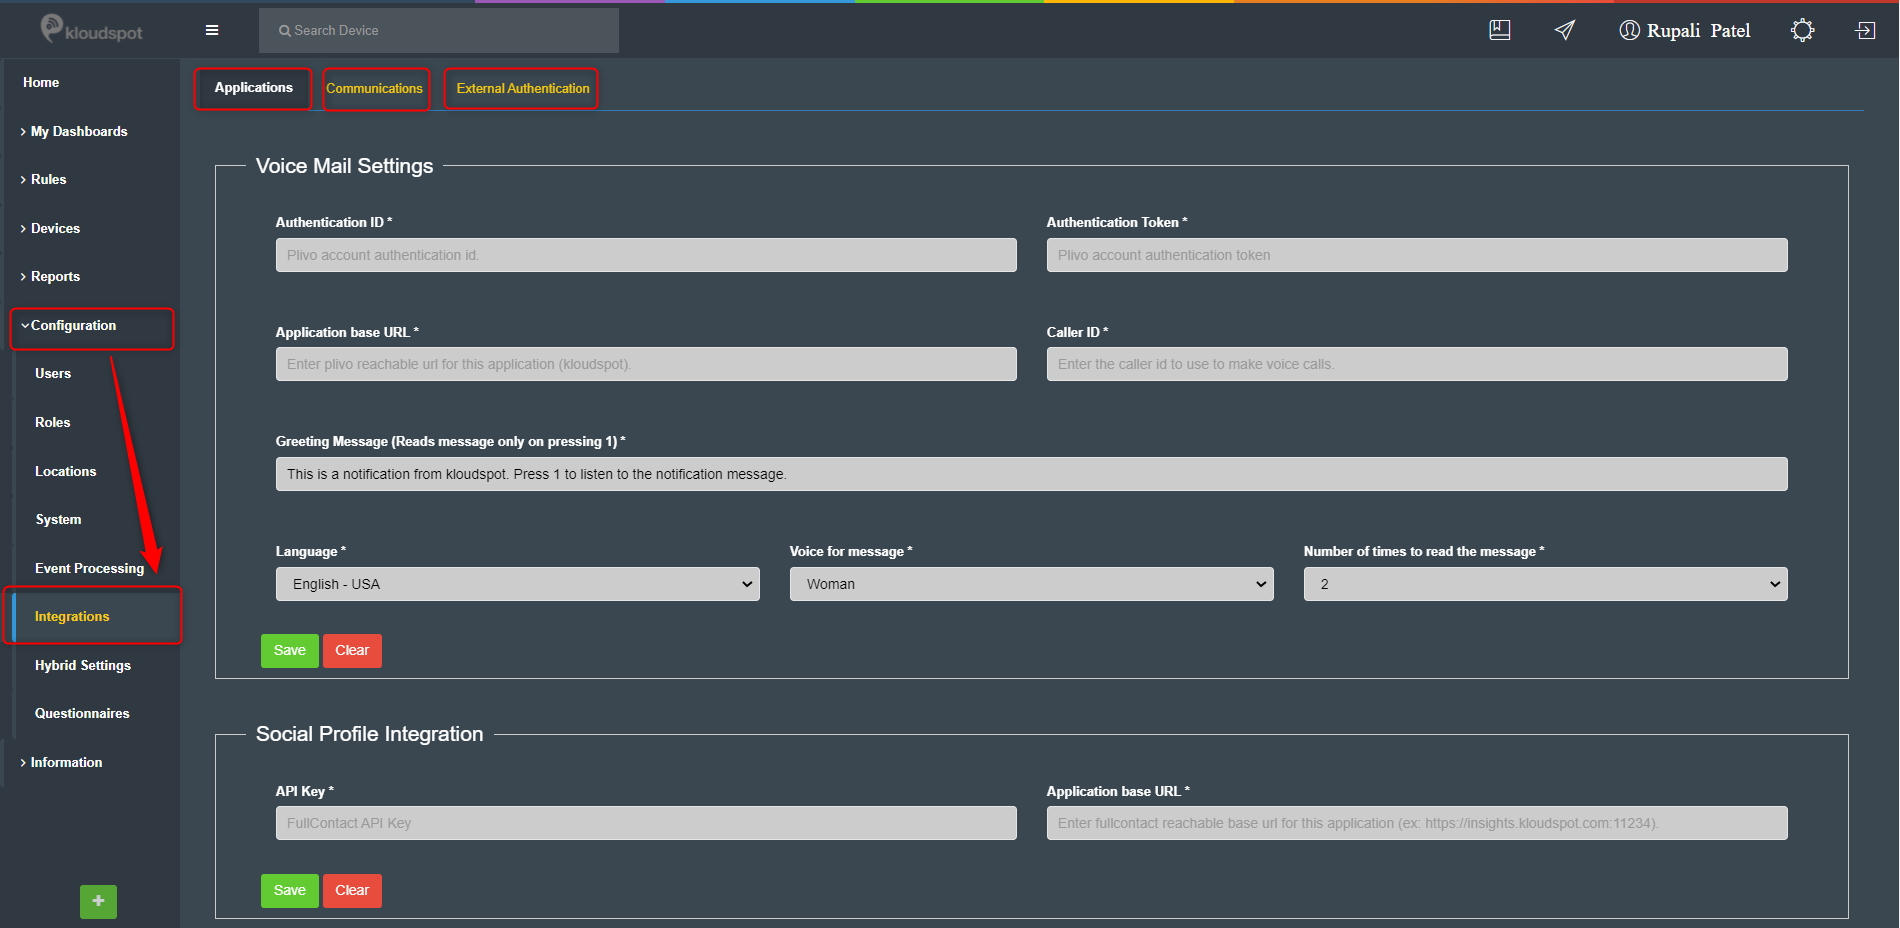
Voice Mail Settings
Get the Authentication ID, Authentication Token, Application base URL and Caller ID from the Voice Mail provider and enter it.
Write “Greeting Message” in the text box. The message is read-only when the customer presses 1.
Select “Language”, “Voice” and “Number of times to read the message” from the dropdown menu.
Click the Save button to save the changes.
Social Profile Integration
To integrate a social profile, enter the API Key and Application base URL and save the changes.
Kloudspot Device Management Settings
To integrate NMS with Hybrid workspace, 3 credentials are required.
Portal Base URL
API ID
API Secret Key
Get these Credentials from the NMS account and past it here.
Then Click on the Save & Test button to save the changes.
Communications tab
The following options are available from the Communications tab.
Email Settings: Helps in configuring the Email provider to send messages and notifications to users.
SMS Settings: Helps in configuring the SMS provider to send messages and notifications to users.
Ticketing Settings: N/A
System Health Alerts: Helps in the configuration of methods for sending System Health notifications.
Email Settings
Check the enable check box.
Obtain the provider’s Host Name, Port, Username, and Password and enter them.
Then type “from email” and “from the name” into the appropriate fields.
If necessary, an email test can be performed by providing a test email ID.
Click on Save
SMS Settings
To enable SMS settings, check the Enable check box.
Select the provider from the dropdown menu.
Enter the sender’s phone number in the “Phone number to send from” text box.
In the text box, enter the provider’s “Account key” and “Account Secret”.
If necessary, a SMS test can be performed by providing a test phone number.
Click on Save.
System Health Alerts
Helps to receive system health-related notifications.
Enable email notifications and add the email ID to receive the notification.
Enable webhook notifications to receive notifications and select the desired webhook type.
Then add a webhook Link.
Click the Save button to save the changes.
External Authentication
After SCIM configuration you can configure your external authentication setup. By enabling external authentication, you’ll empower your users to experience the convenience of one-click sign-ins, enhancing their access to your hybrid application’s features. KloudHybrid offers robust support for major SSO providers such as OKTA and Microsoft, along with comprehensive compatibility with OpenID Connect and SAML v2.0 protocols.
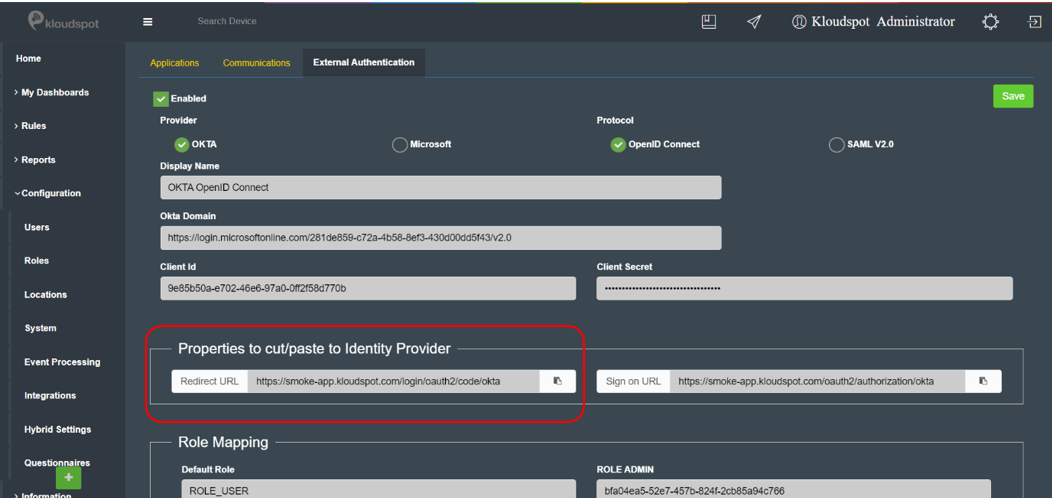
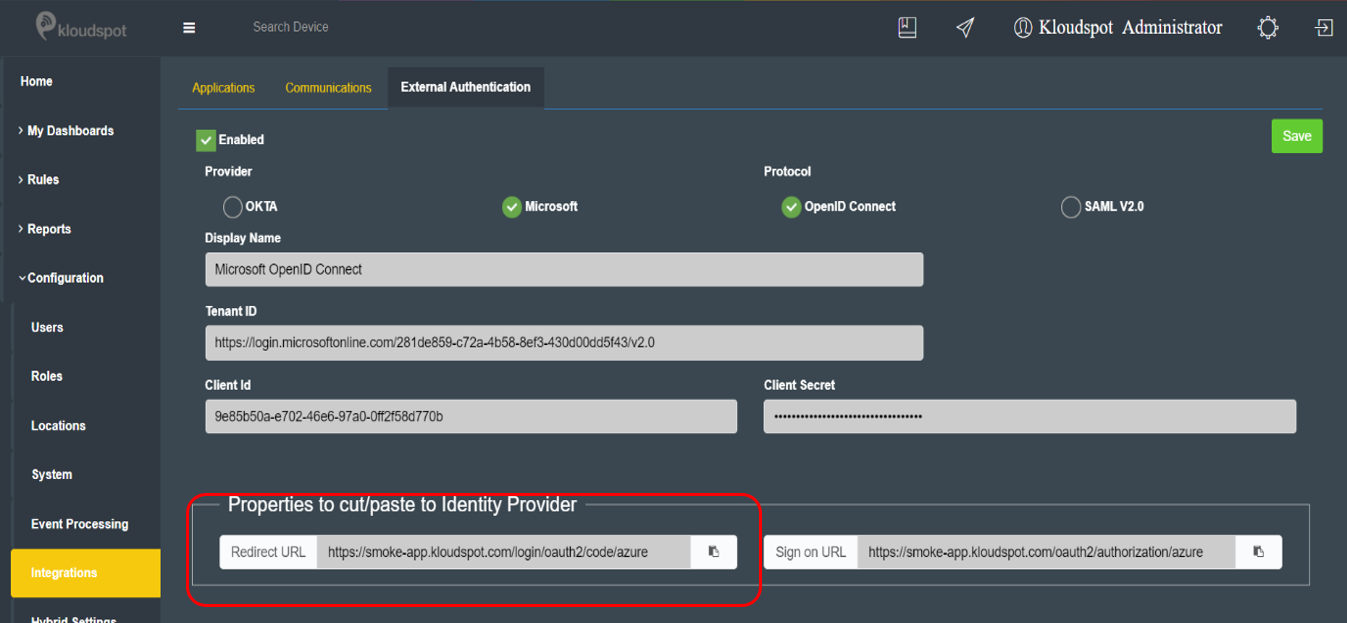
To find the External Authentication page, navigate to the Advanced Settings Page, then go to Configuration -> Integrations -> External Authentication.
Following the steps below to set up Okta and OpenID connect.
Check OKTA for the Provider option and for the Protocol click on OpenID Connect.
Log in to your OKTA account.
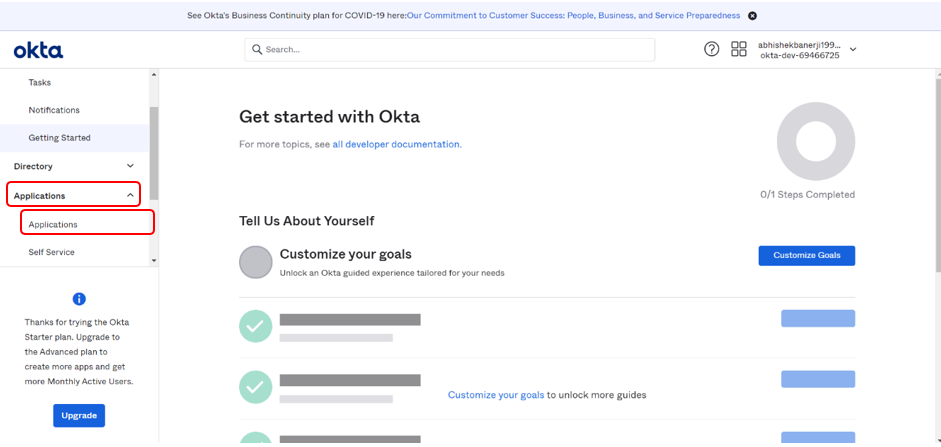
Click on Applications and from the drop-down select Applications.
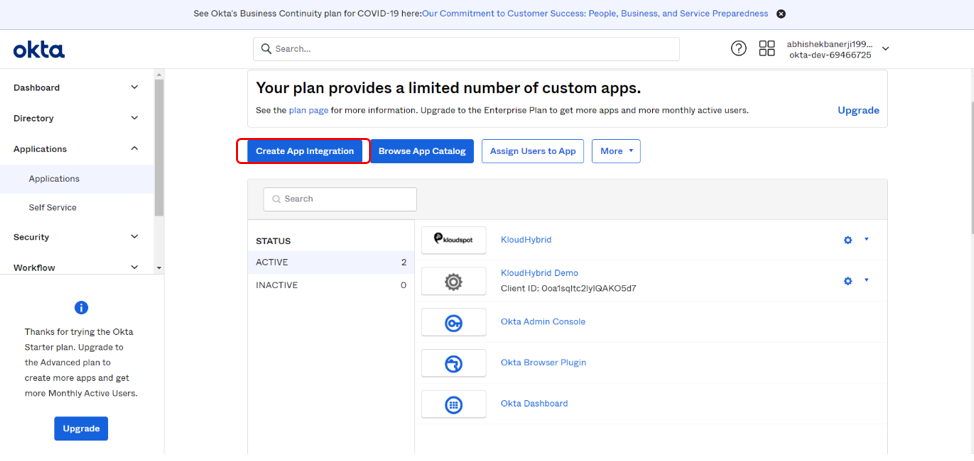
Click on Create App Integration.
As shown in the figure below, Check OIDC- OpenID Connect as the Sign-in Method and Web Application as the Application type and click on Next.
On the next page perform the following steps:
Enter an App Name in the App Integration Name section.
- Copy the Sign-in redirect URLs from OKTA, and paste that URL into the Redirect URL field in KloudHybrid.
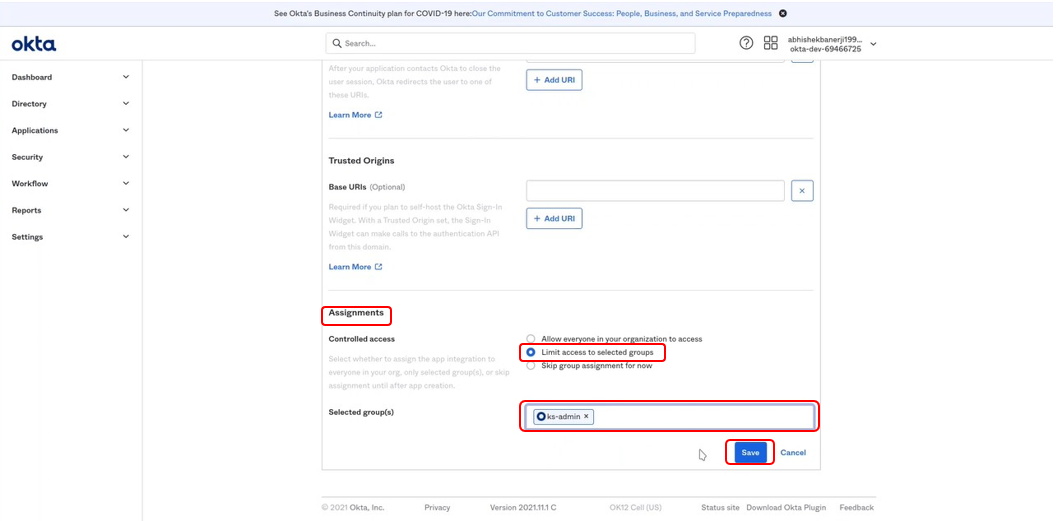
- Assignments: Scroll down the page to Assignments and click on Limited access to selected groups from the Controlled Access options.

-  Selected group(s): Enter the name of the group to grant Admin access to the application created.

-  Click on Save to save the configurations.
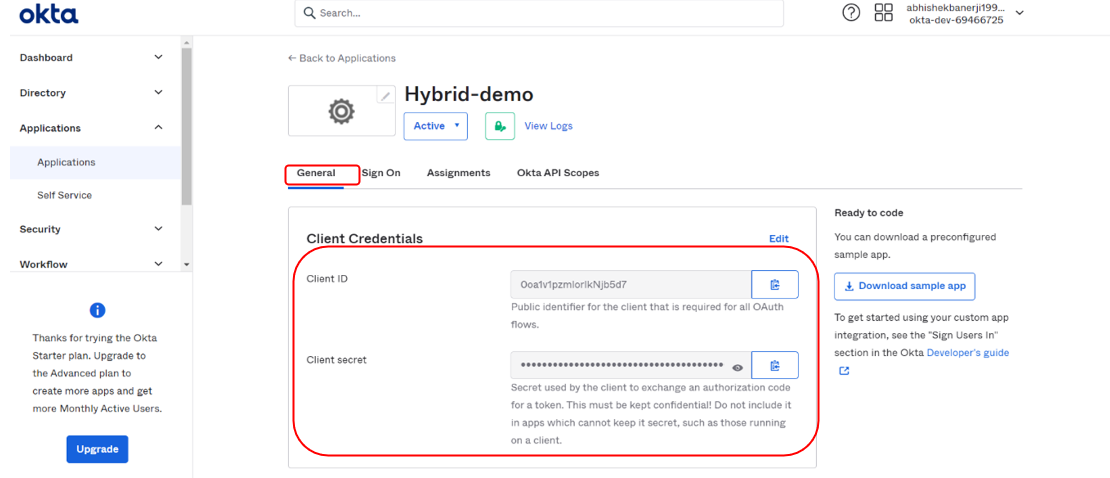
Once the Application is created successfully, the following window appears. It has detailed information for the Application.
**a. General:**
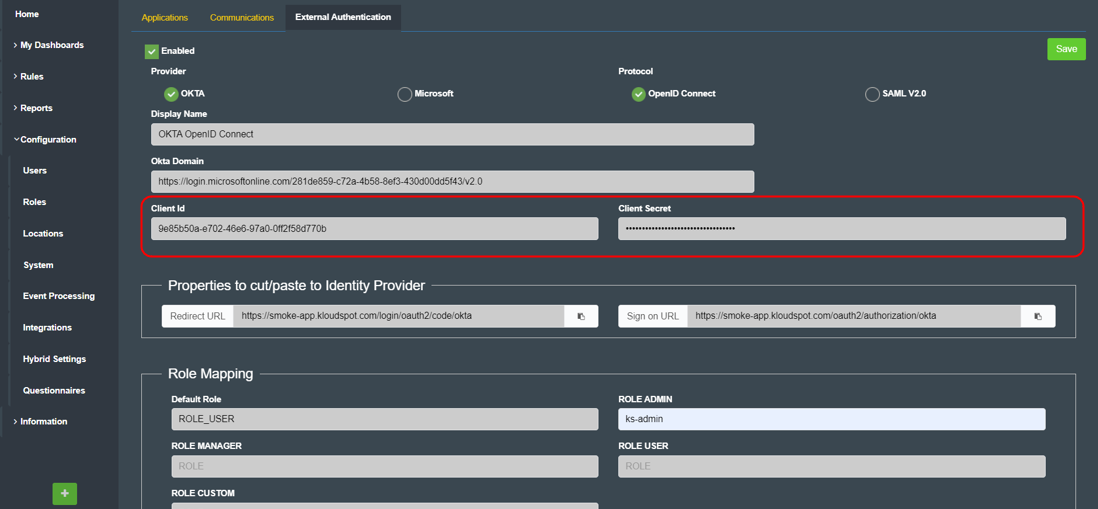
- Client Credentials: Copy the Client Id and Client Secret information and enter the same information in Insights as shown in the figure below. Also, enter the name for ROLE ADMIN as shown in the figure below.
NOTE: This ROLE ADMIN name is the group of users in the Okta portal, which will be assigned the ADMIN role once logged into the Hybrid App.
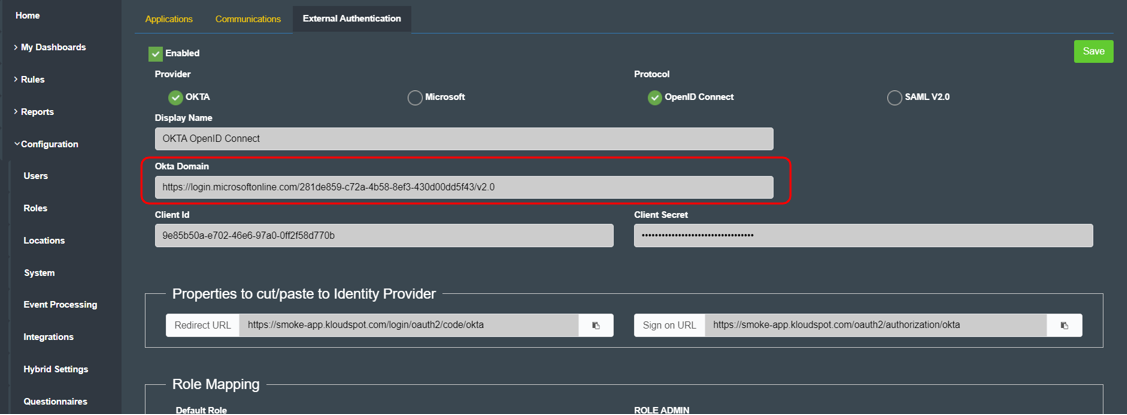
- General Settings: Enter the same Okta domain name in the Okta domain section on the “External Authentication” page in Insights as shown in the figure above.
- User Consent: The Require Consent option is checked by default, deselect if you don’t wish to require user consent to data sharing with the KloudHybrid application.
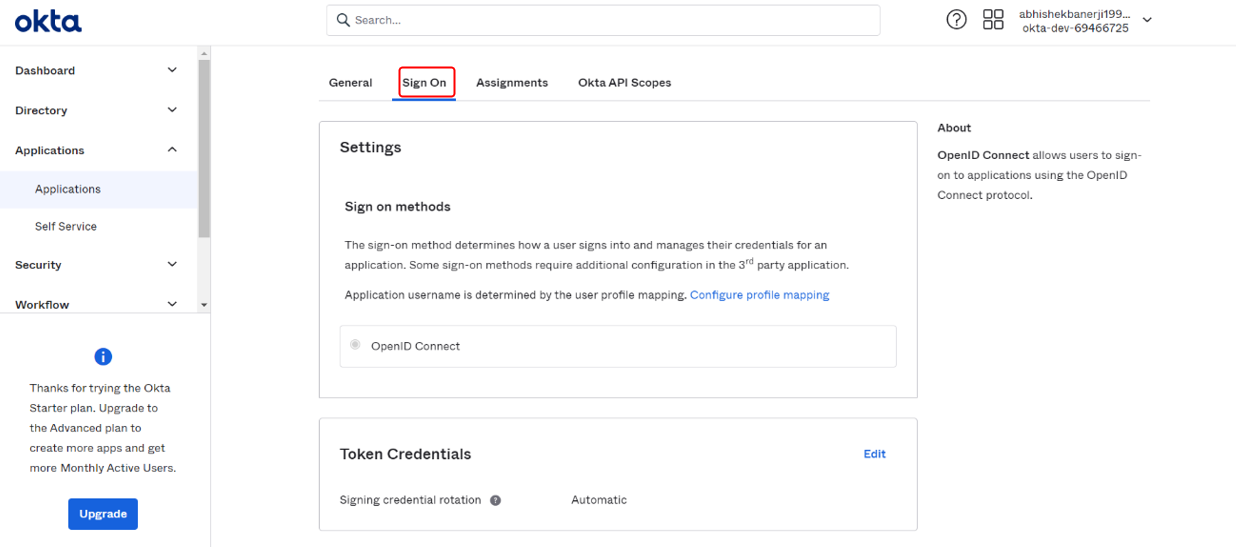
b.Sign-on: Click on Sign-on
- OpenID Connect ID Token: Scroll down and click on Edit.
- In the Groups claim filter section, select the Start with option. Then type the prefix of the group to be added (Eg.Ks-). Click on Save.
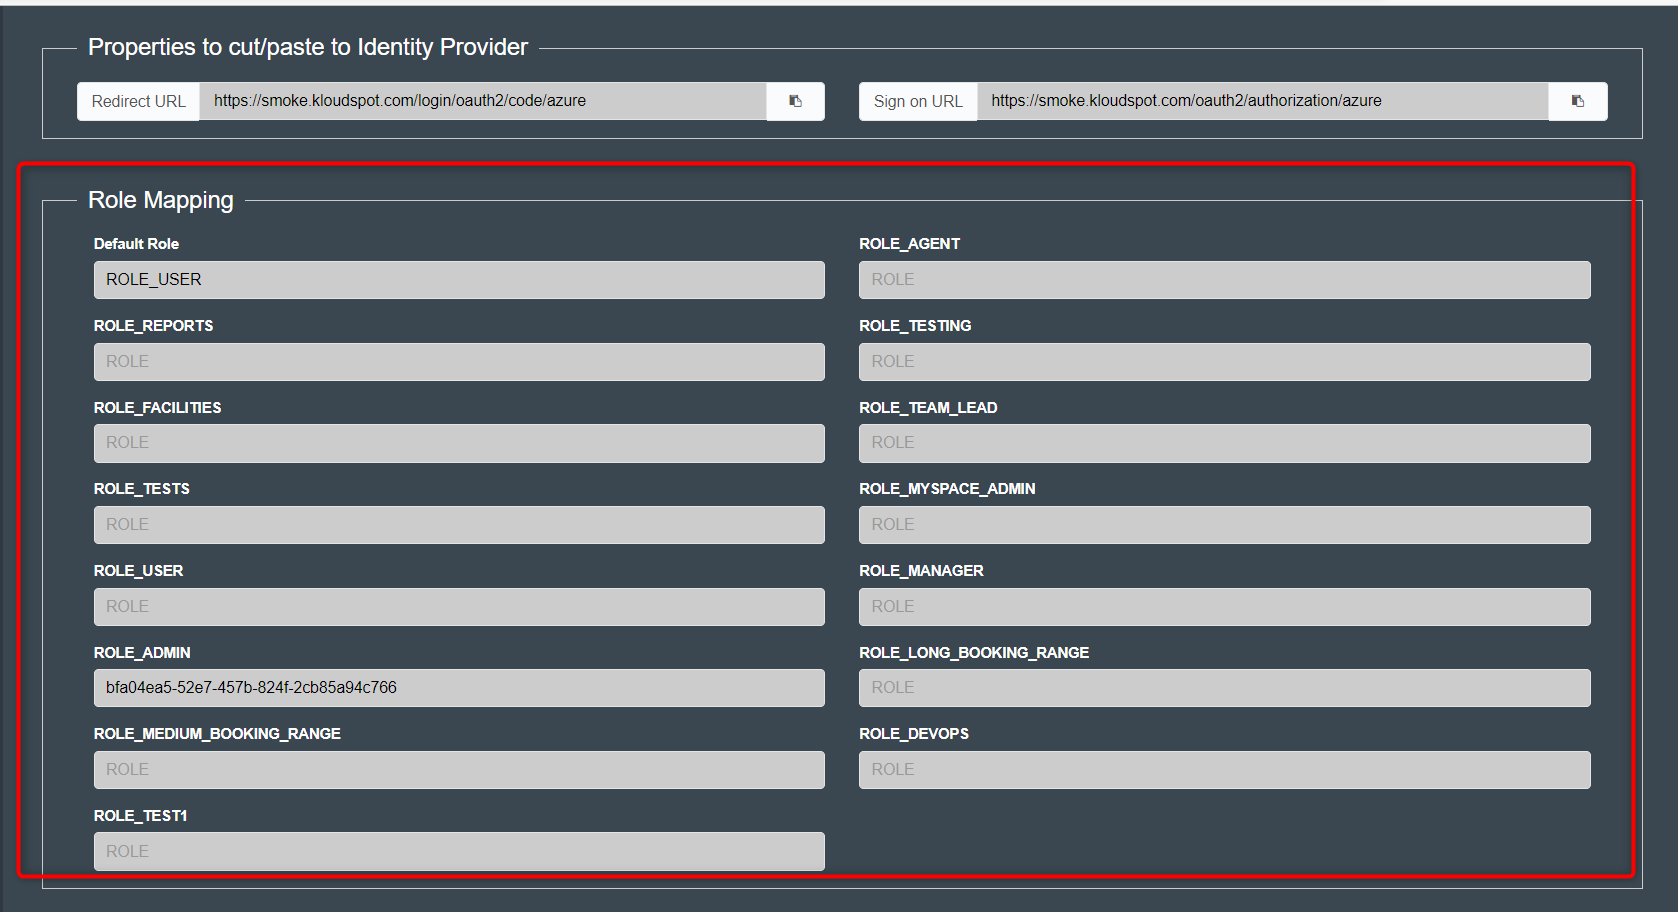
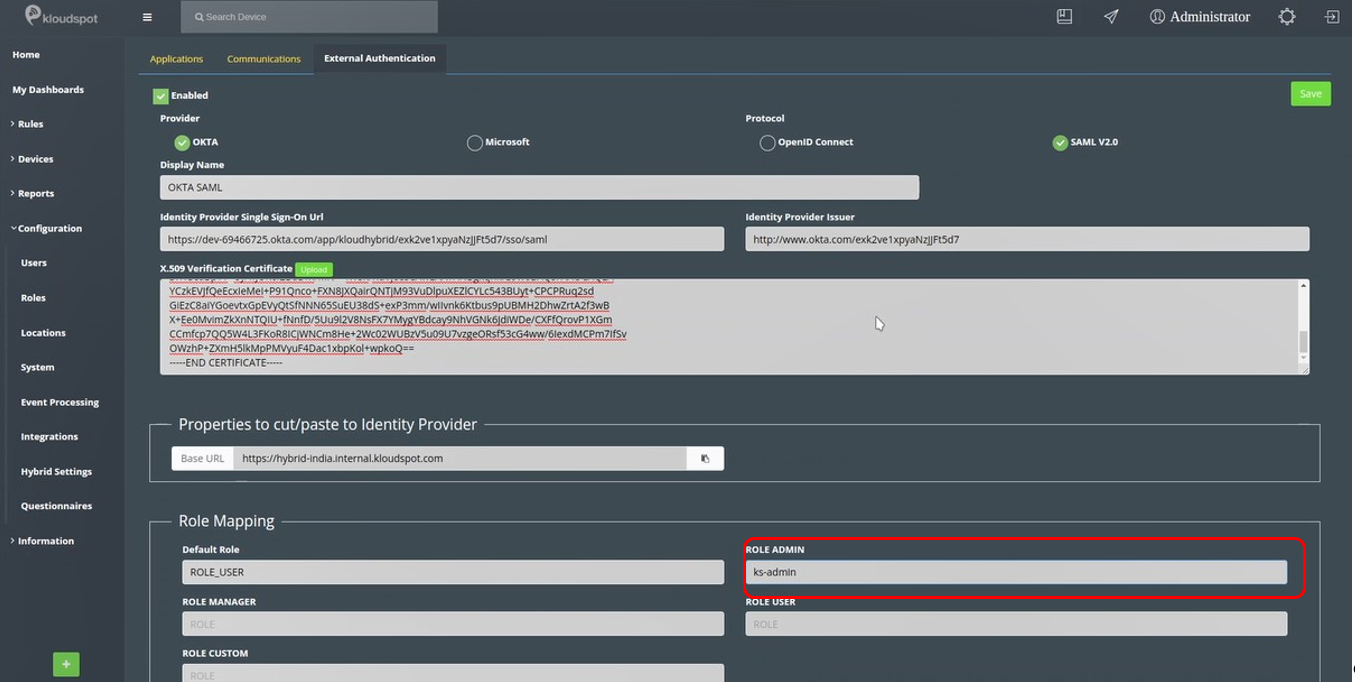
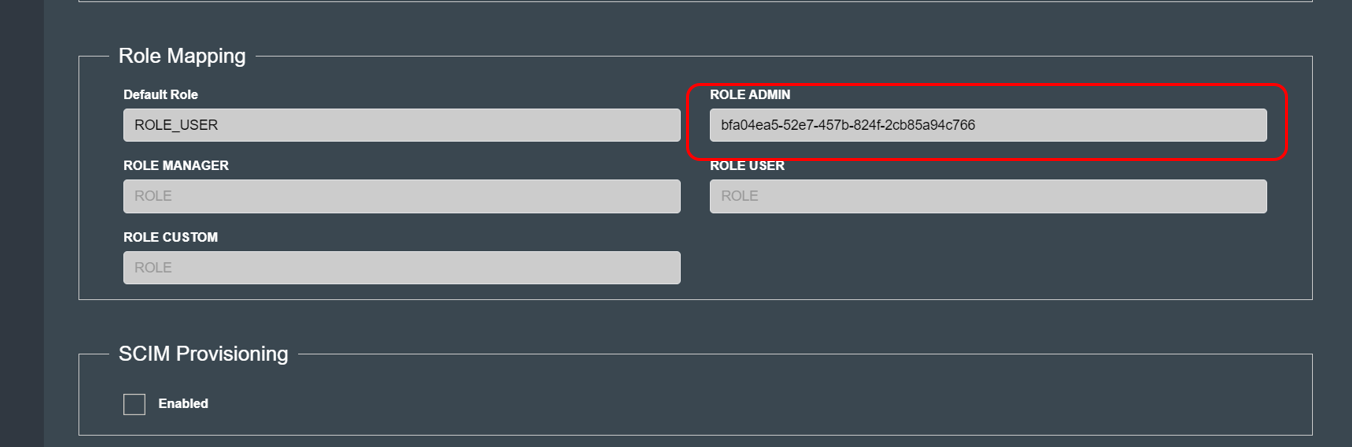
Finally. Open KloudManage. In the role mapping section, add the same name as in the OKTA group (Eg. Ks-admin). Additionally, you can set the following settings in the “Role Mapping” section.
Default Role: This is the role/permission set that SSO users will be assigned to by default the first time they login (unless other role mappings apply). The default system configuration for this is ROLE_USER, which will give all SSO users user permissions by default.
ROLE_MANAGER: If you have configured a specific group in OKTA that you would like to assign manager permissions, set this field. See the User & Permission Management section for additional details
ROLE_ADMIN: If you have configured a specific group in OKTA that you would like to assign admin permissions, set this field. See the User & Permission Management section for additional details.
ROLE_USER: If you have configured a specific group in OKTA that you would like to assign user permissions, set this field. See the User & Permission Management section for additional details.
ROLE_CUSTOM: If you have configured a specific group in OKTA that you would like to assign a custom role, set this field. See the User & Permission Management section for additional details.
ROLE_XXXX: If you have configured a specific group in OKTA that you would like to assign a specific role, set this fields. See the User & Permission Management section for additional details. XXXX represents the role name to be added.
Click on save. This allows you to login into KloudHybrid with OKTA OpenID Connect with a single click.
Configure SAML with OKTA
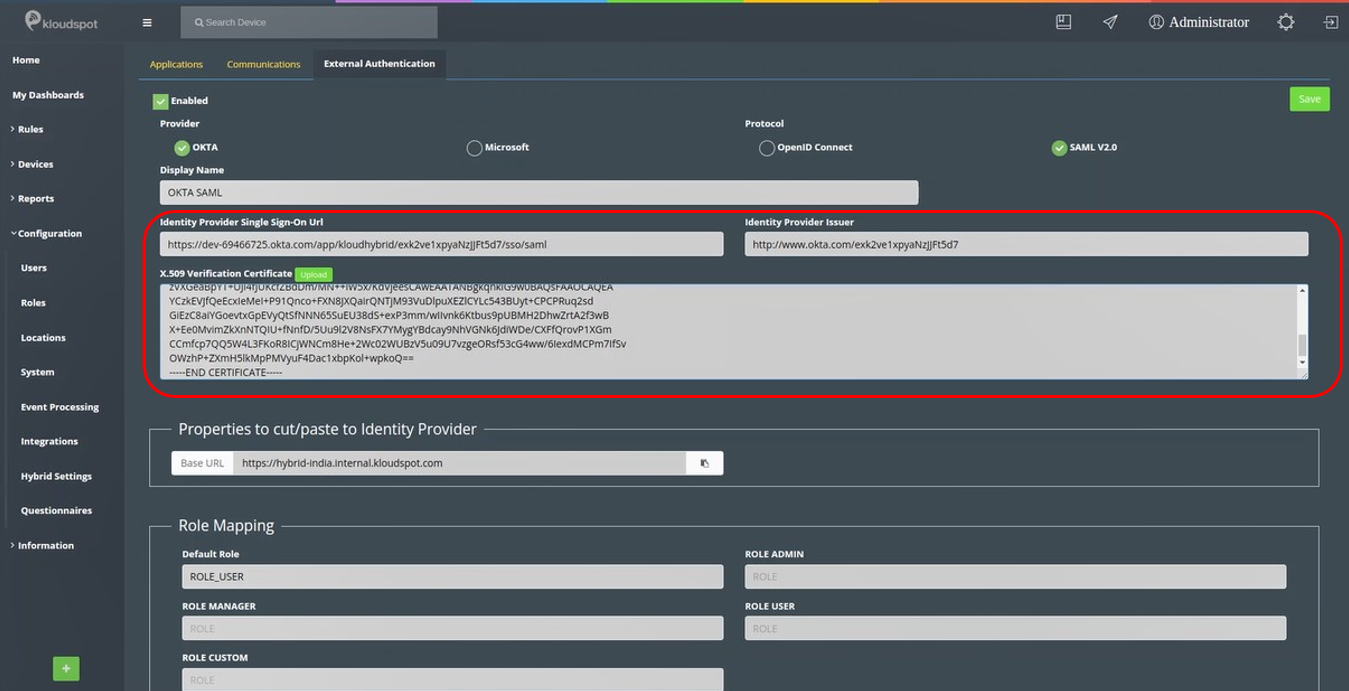
Check OKTA from the Provider option and for the Protocol select SAML V2.0 as shown in the figure below.
Log in to your OKTA account.
Click on Applications and from the drop-down select Applications.
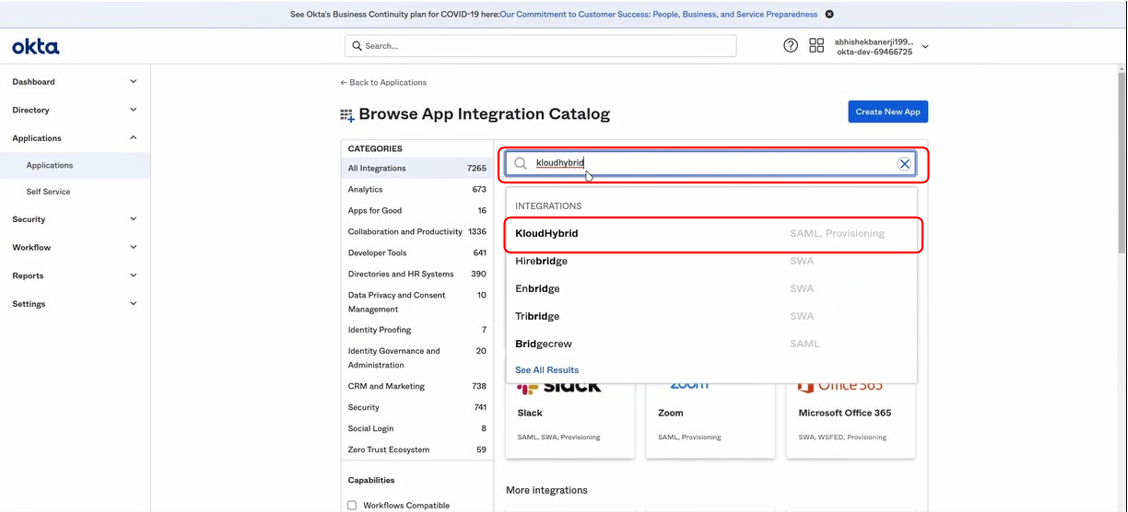
Click on Applications and select Browse App Catalog.
Search for KloudHybrid in the Browse app integration catalog window that opens.
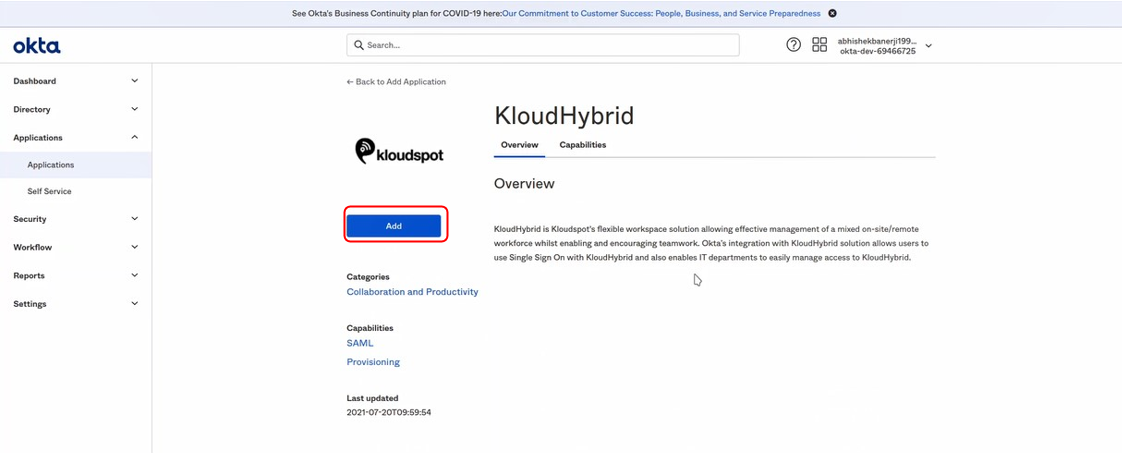
Select the KloudHybrid option with SAML, provisioning.
The KloudHybrid window will open. Then click on Add.
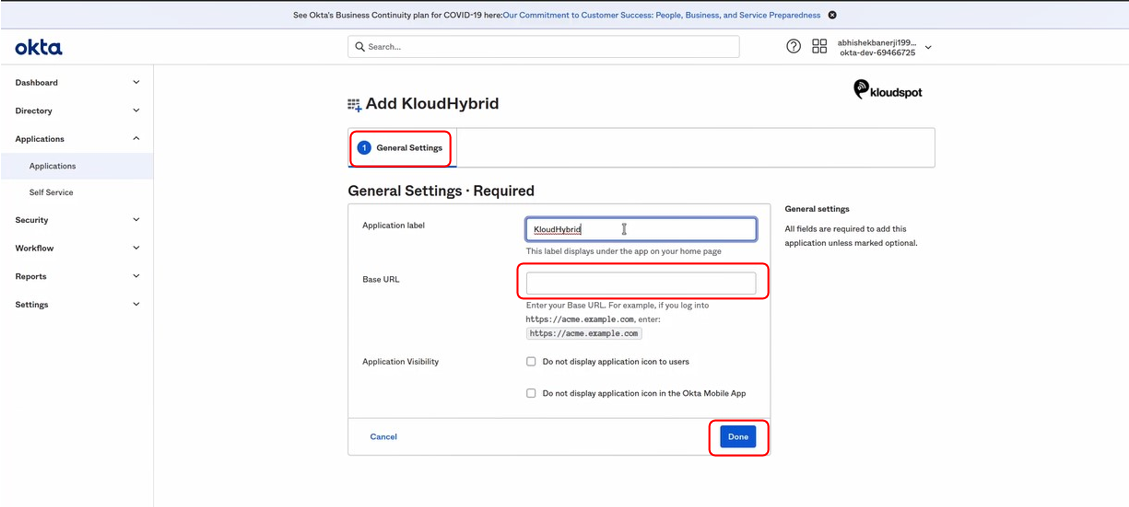
In the Add KloudHybrid window, type the Application label (Eg. KloudHybrid) under General Settings. Also, copy and paste the Base URL from the KloudHybrid application. This will look something like “https://xxxx.yyyy.kloudspot.com”.
Click on Done in OKTA.
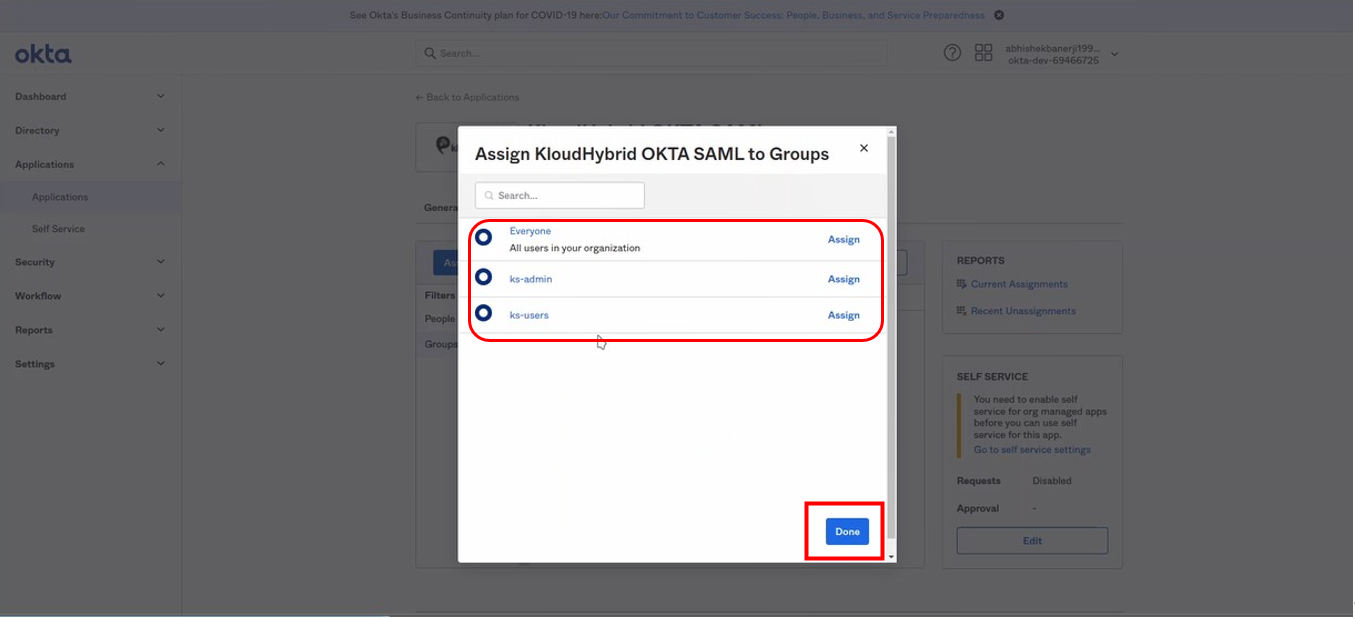
In the next window, click on the Assign button at the bottom of the Assignments tab. Select Assign to groups from the drop-down menu that appears.
A popup window will open. From there, assign the groups that will have access to the KloudHybrid Application.
Click on Done.
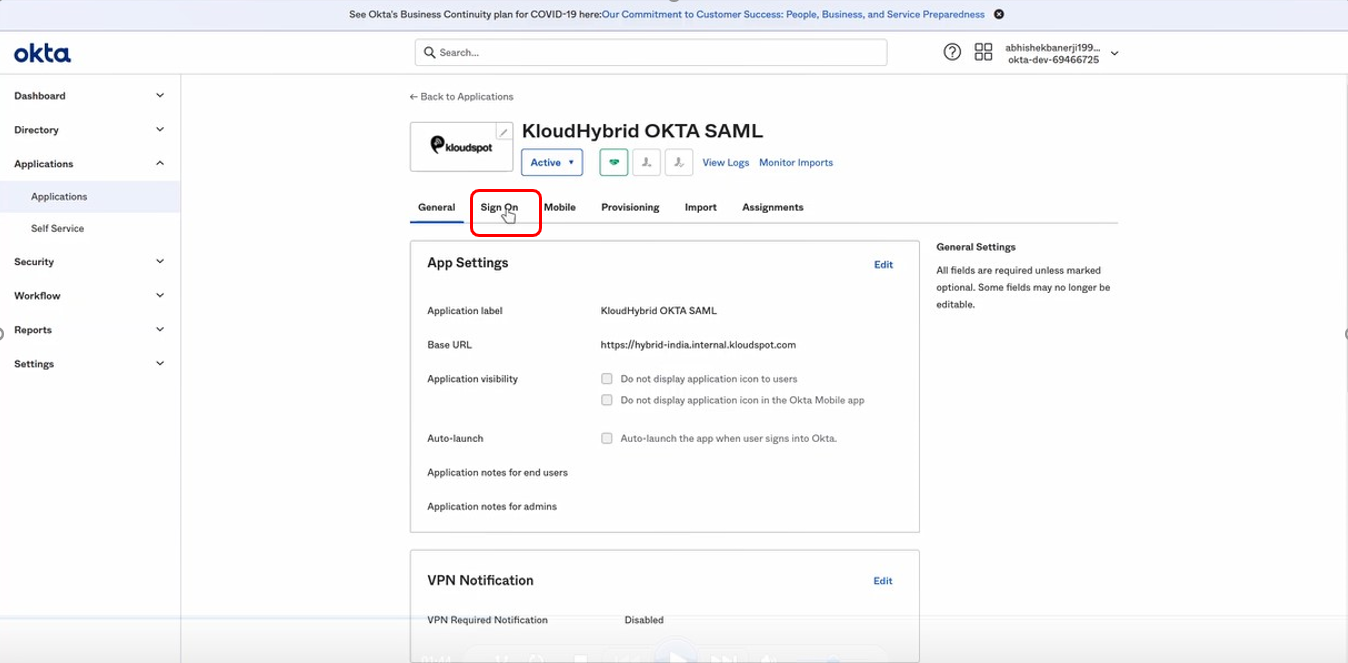
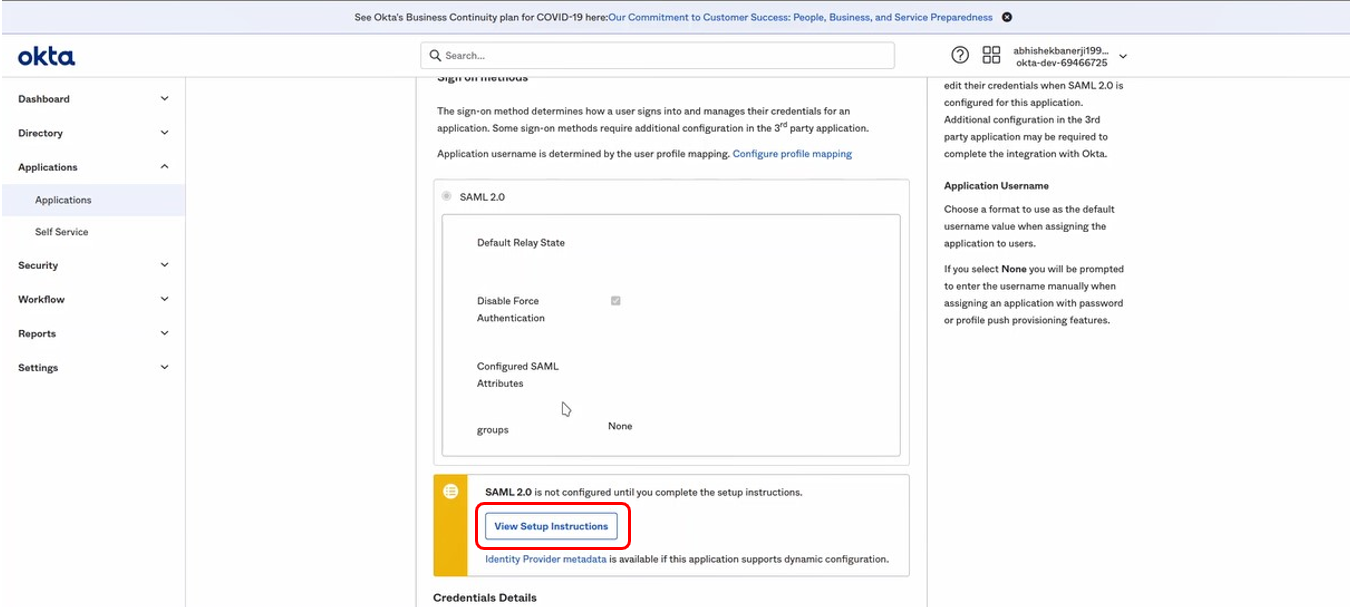
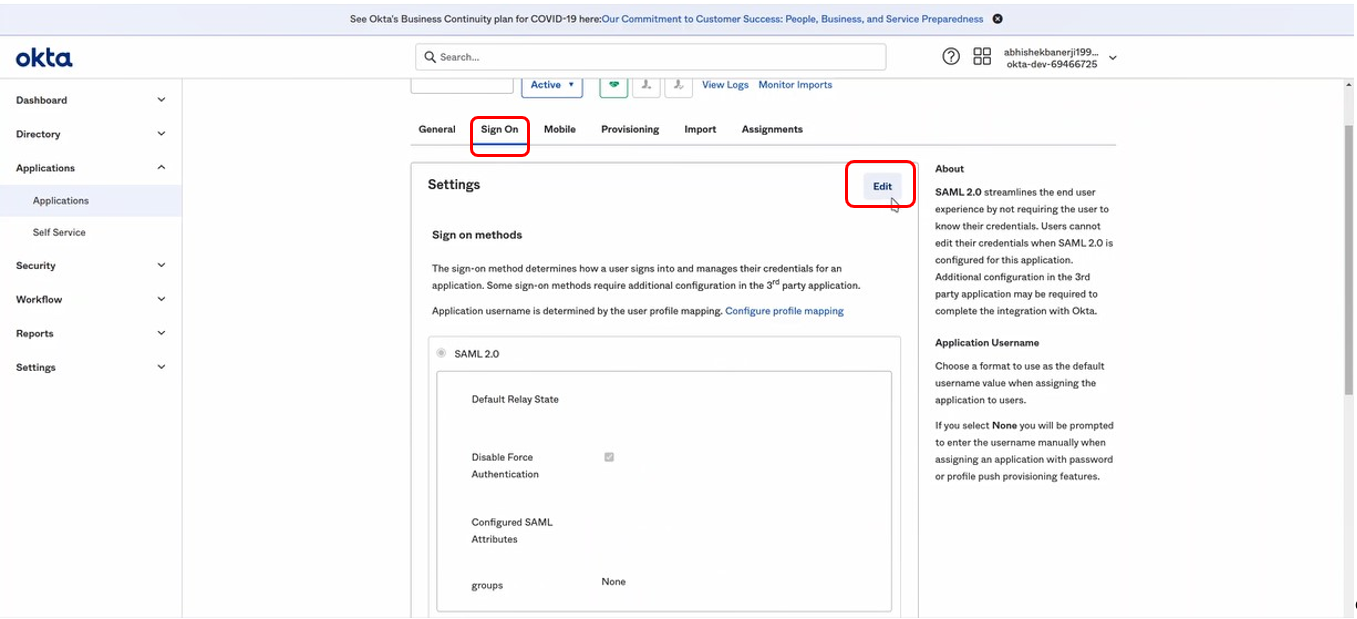
Then select the sign-on tab. In it, scroll down and click on the View Setup Instructions button.
Then a new tab will open. You will be able to complete the configuration by following the instructions given in it.
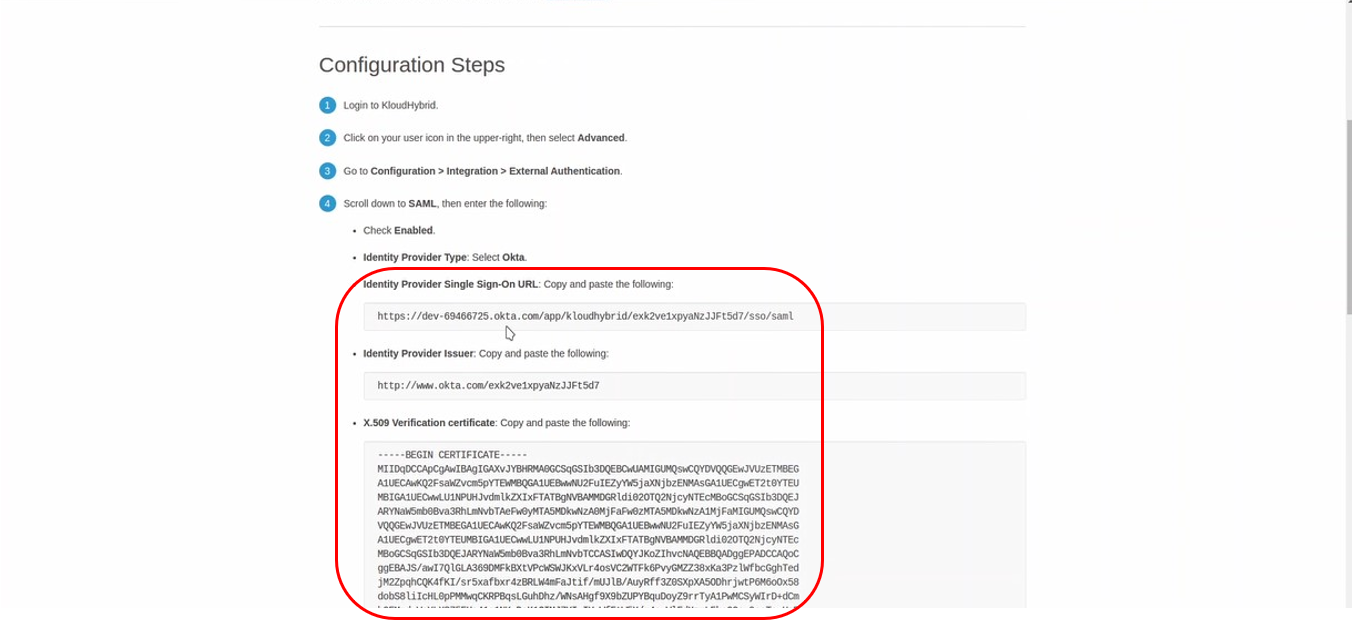
Copy the Identity Provider single sign-on-URL, Identity provider Issuer and X.509 verification certificate and paste them into KloudHybrid, respectively.
Click on the Edit button in the sign-on tab to configure SAML 2.0.
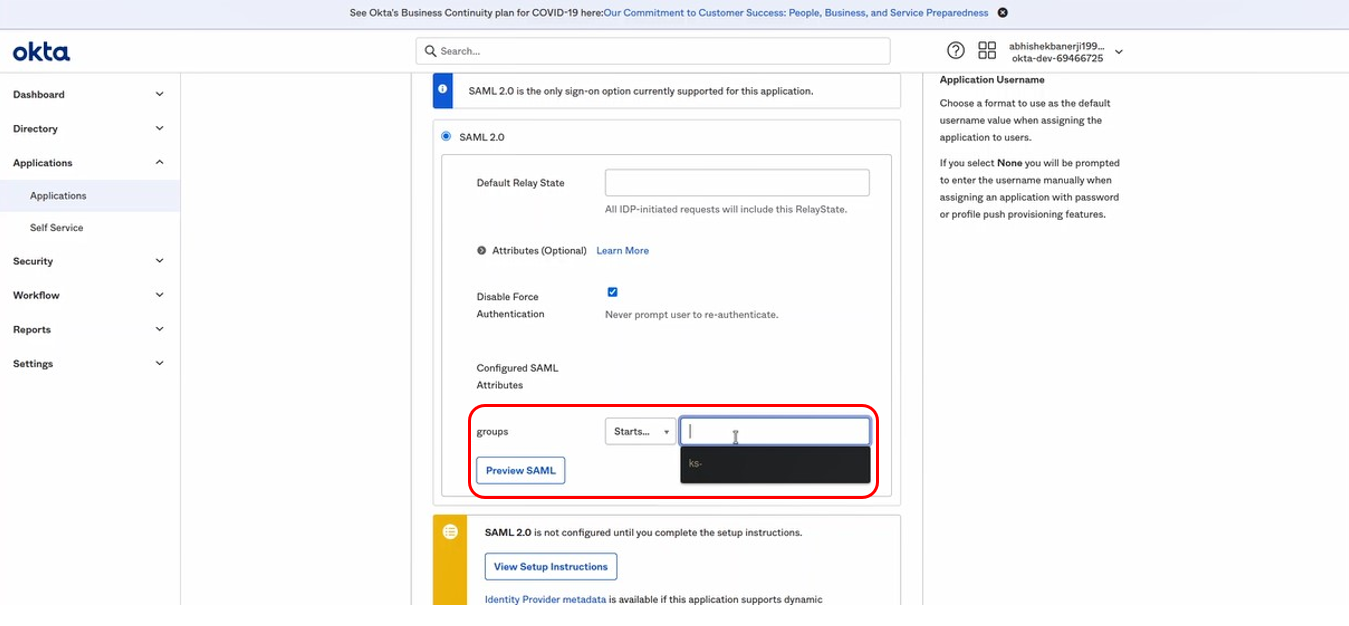
In the Groups drop-down menu, select the Start with option. Then type the prefix of the group to be added (Eg.Ks-)
Click on Azure Activity Directory from the Azure services options as shown below.
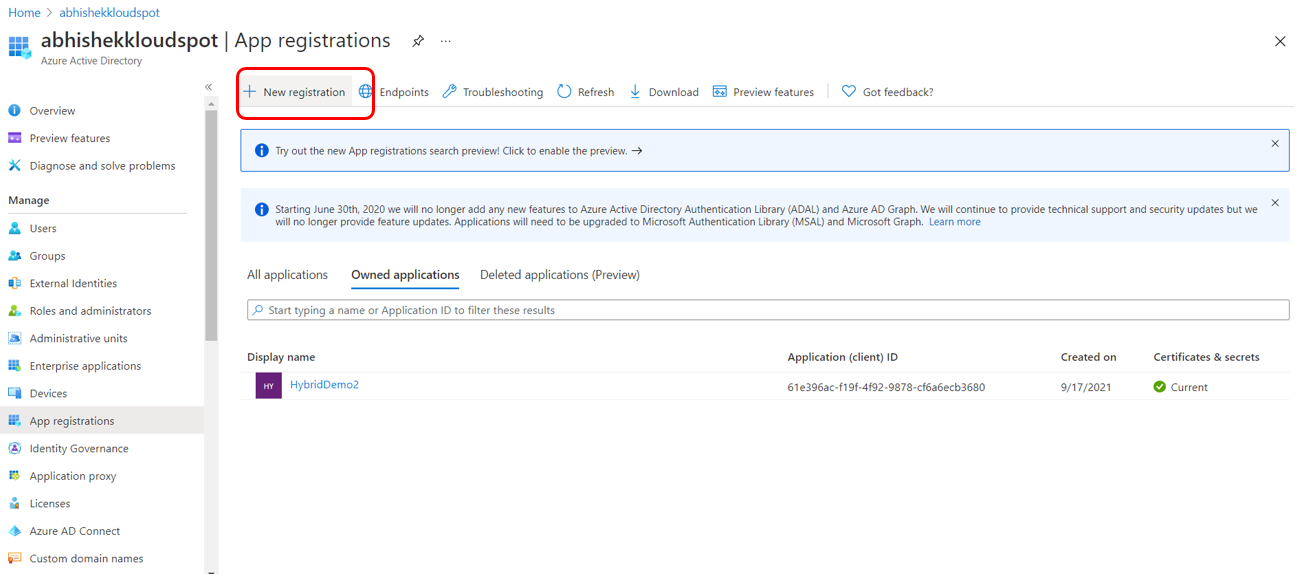
Locate and click on the App registrations on the Window.
Click on New registration on the page.
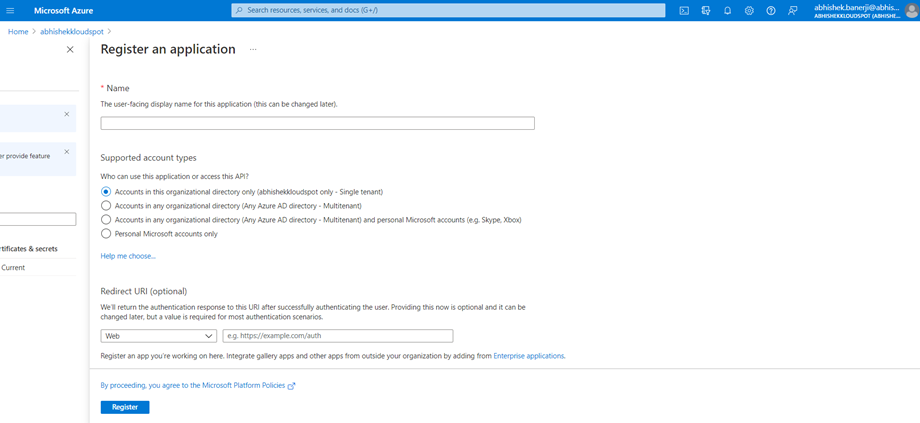
Enter the information in the blanks to create a new registration.
Name: enter a name for the application.
Supported account types: Select, Accounts in this organizational directory only
Redirect URL (optional): Choose Web copy the Redirect URL from the Properties to cut/paste to Identity Provider section in Hybrid. Paste this URL into the Redirect URL in Azure.
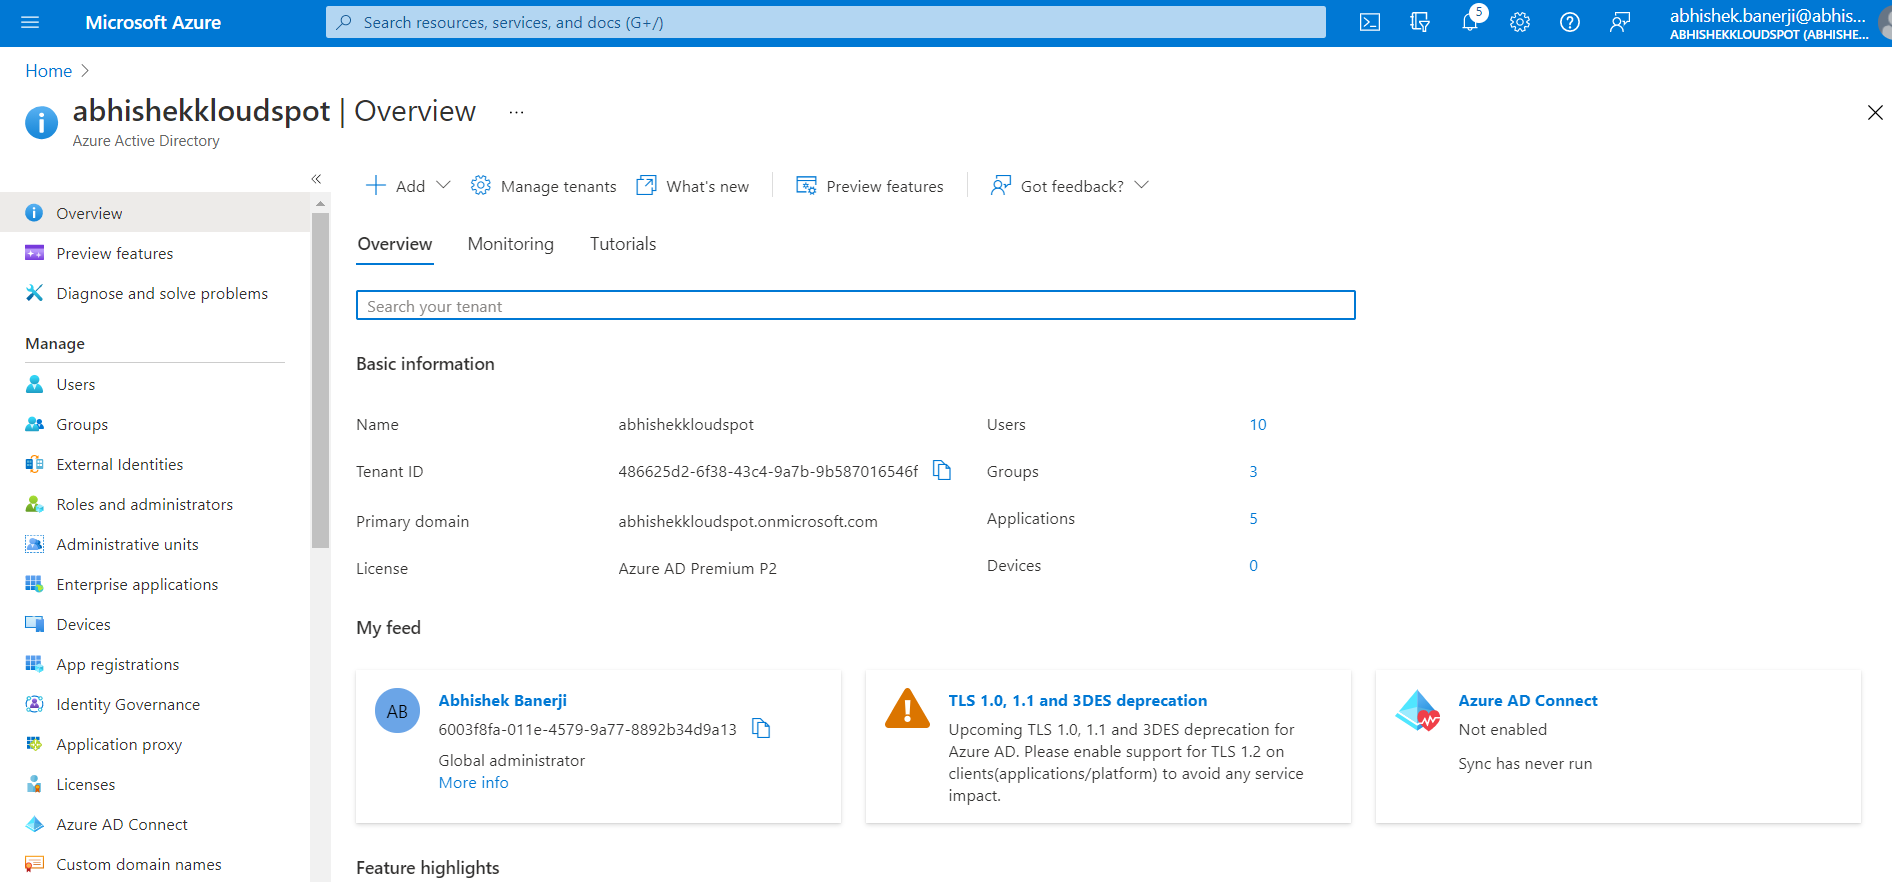
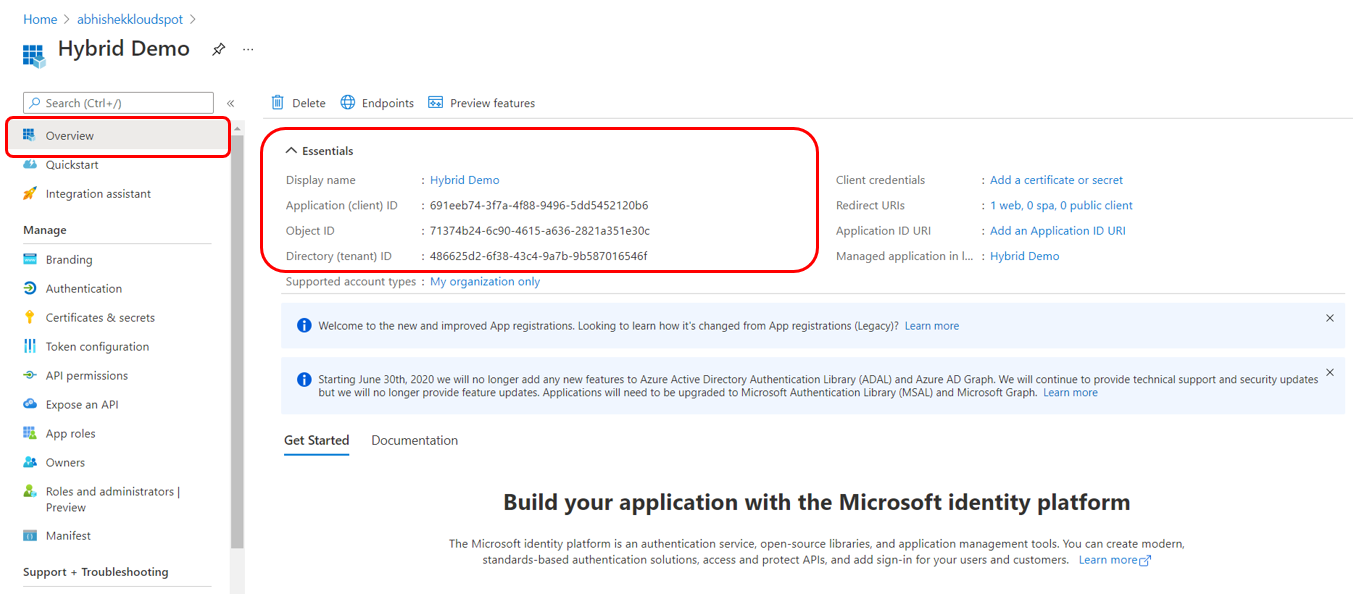
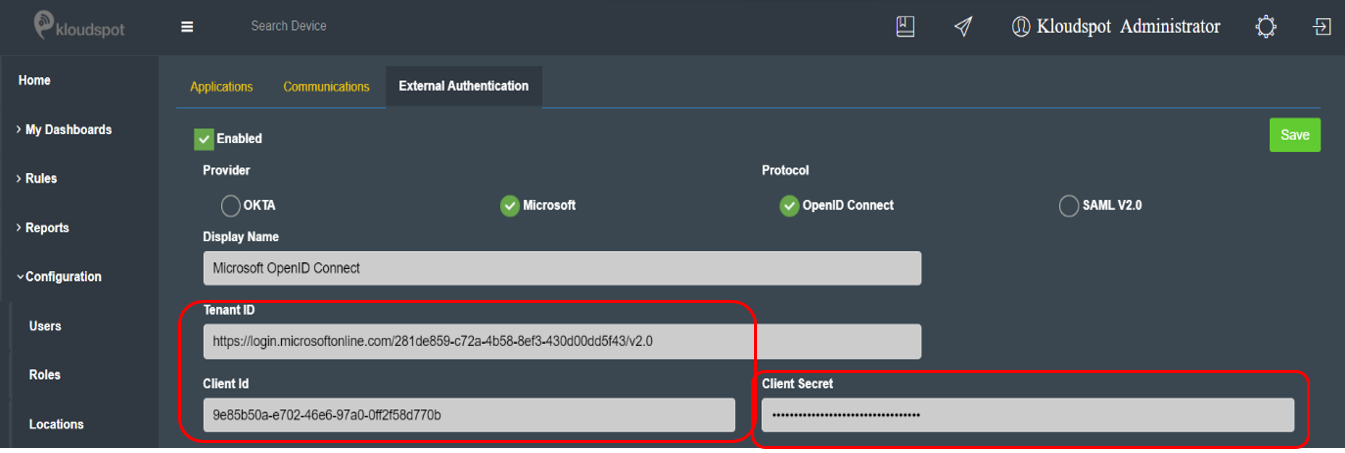
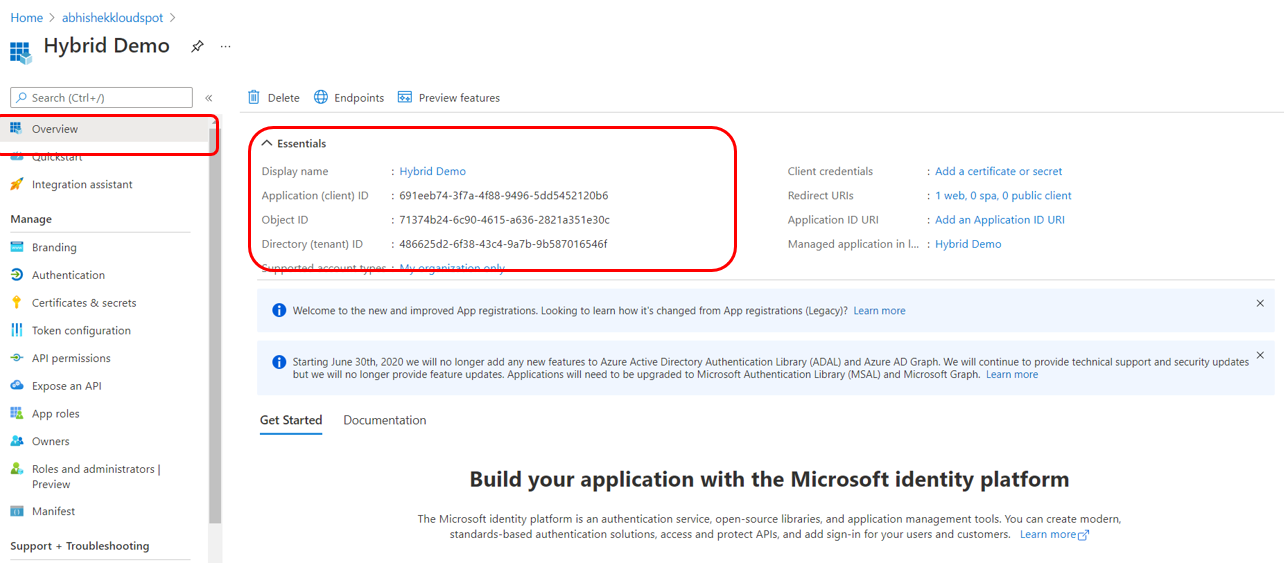
Go back to the home page and click on Overview for login information on the new application created. Pick information from the Essentials section as mentioned in the figure below and place that information in KloudHybrid.
Assigning IDs in Insights
The Tenant ID and Client Id in KloudHybrid will be the same as that on the Azure portal (map Application (Client) ID and Directory (tenant) ID in Azure to Client ID and Tenant ID in KloudHybrid, respectively). Click on Save to save the configuration.
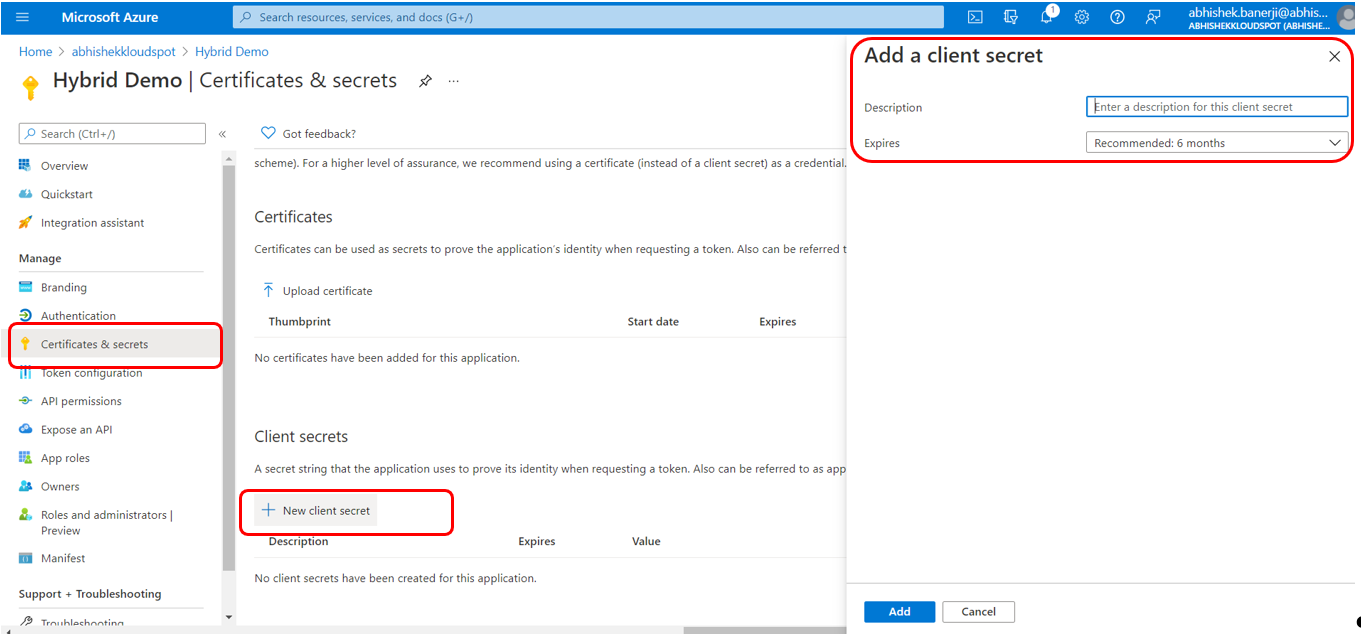
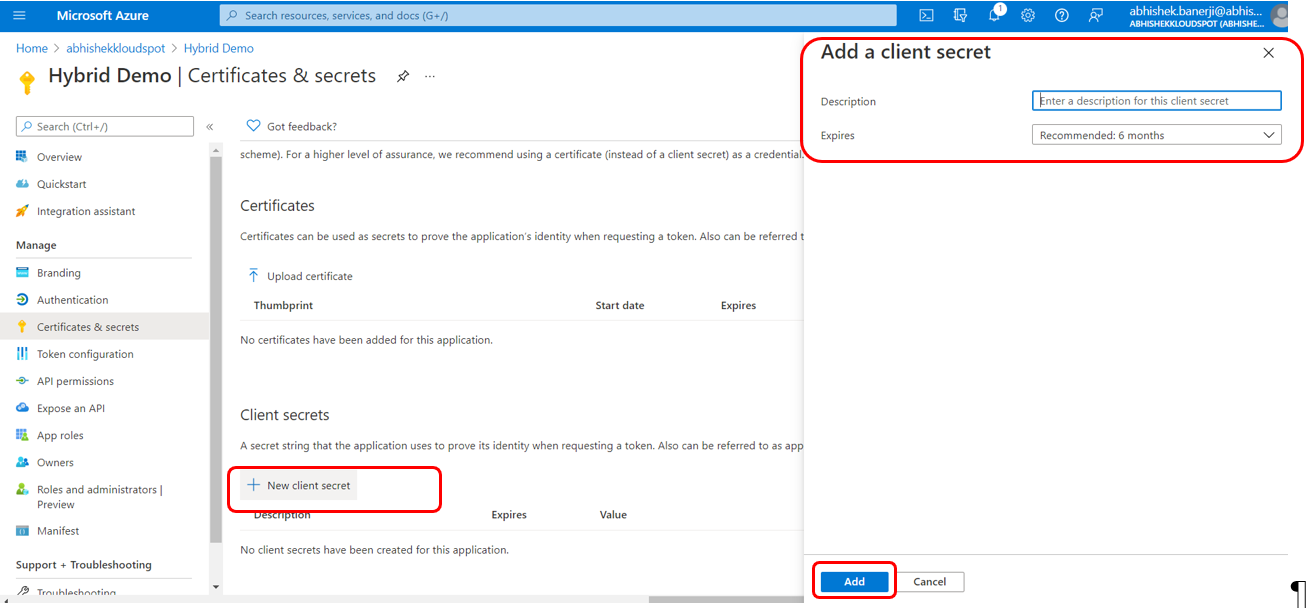
To create a Client Secret, go to Azure portal, click on Certificates & secrets and then click on + New client secret. Click on Add.
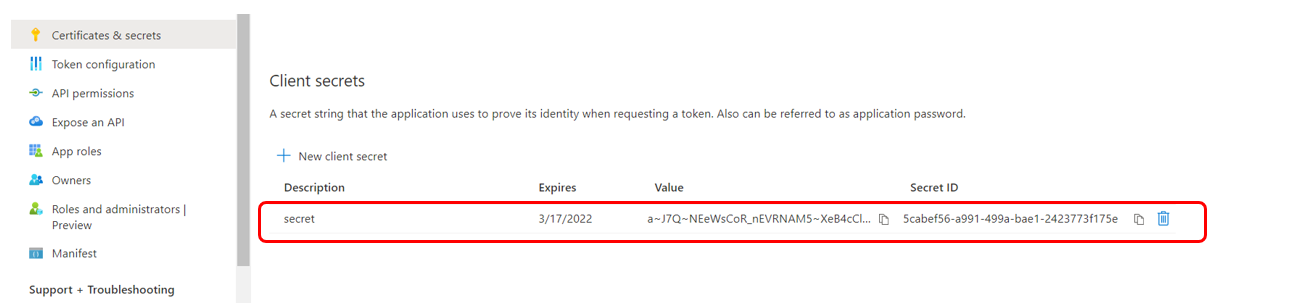
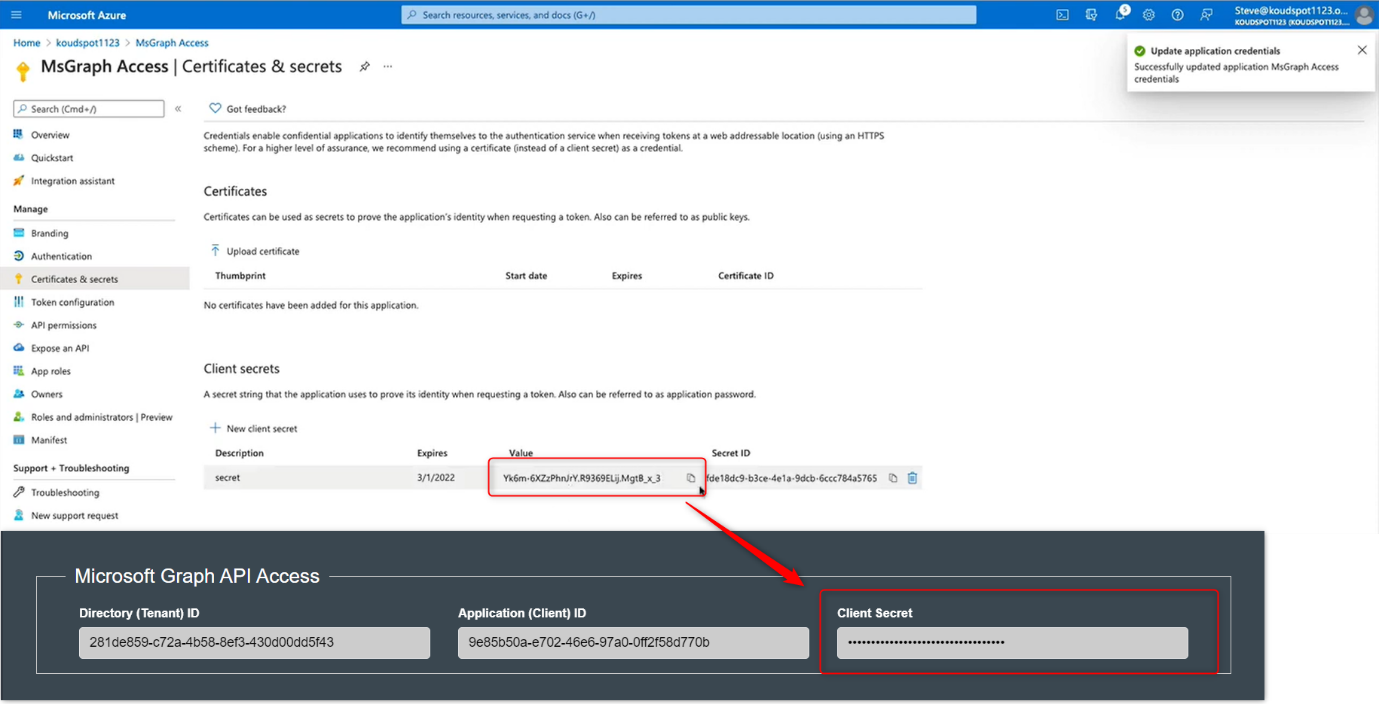
Copy the Client secret and paste it in the Client secret section in External Authentication in KloudHybrid.
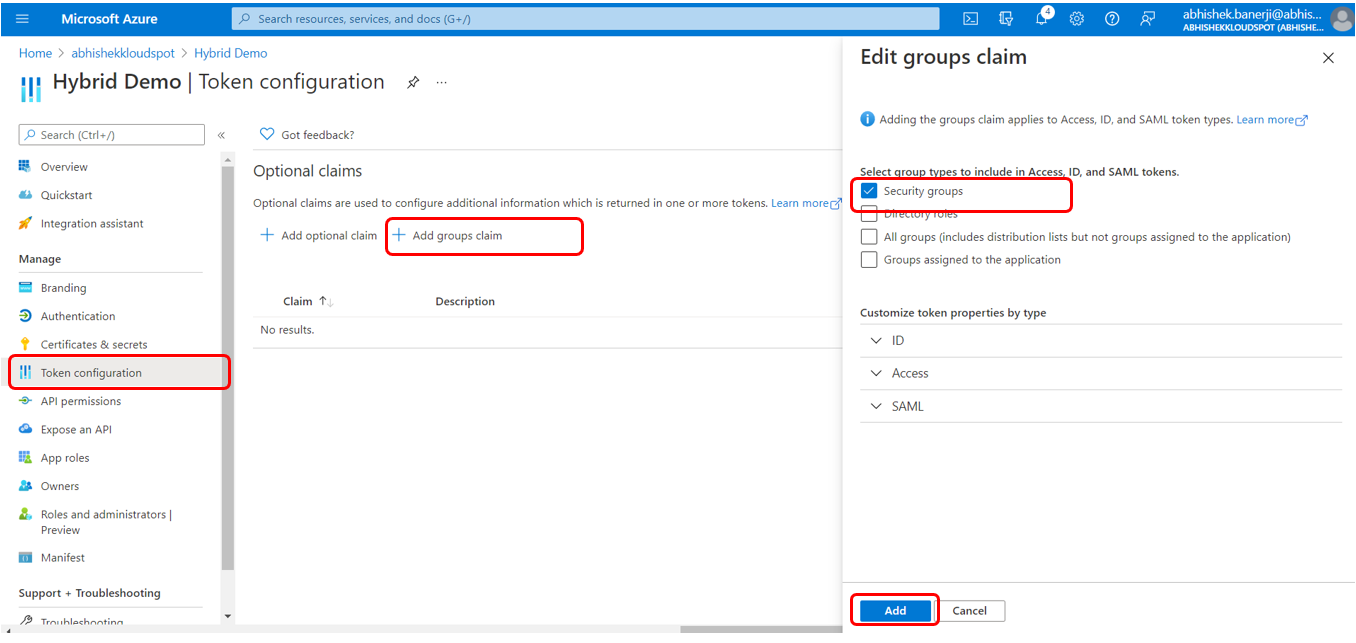
Token Configuration: Click on Token configuration, click on +Add groups claim and Select Security groups. Click on Add.
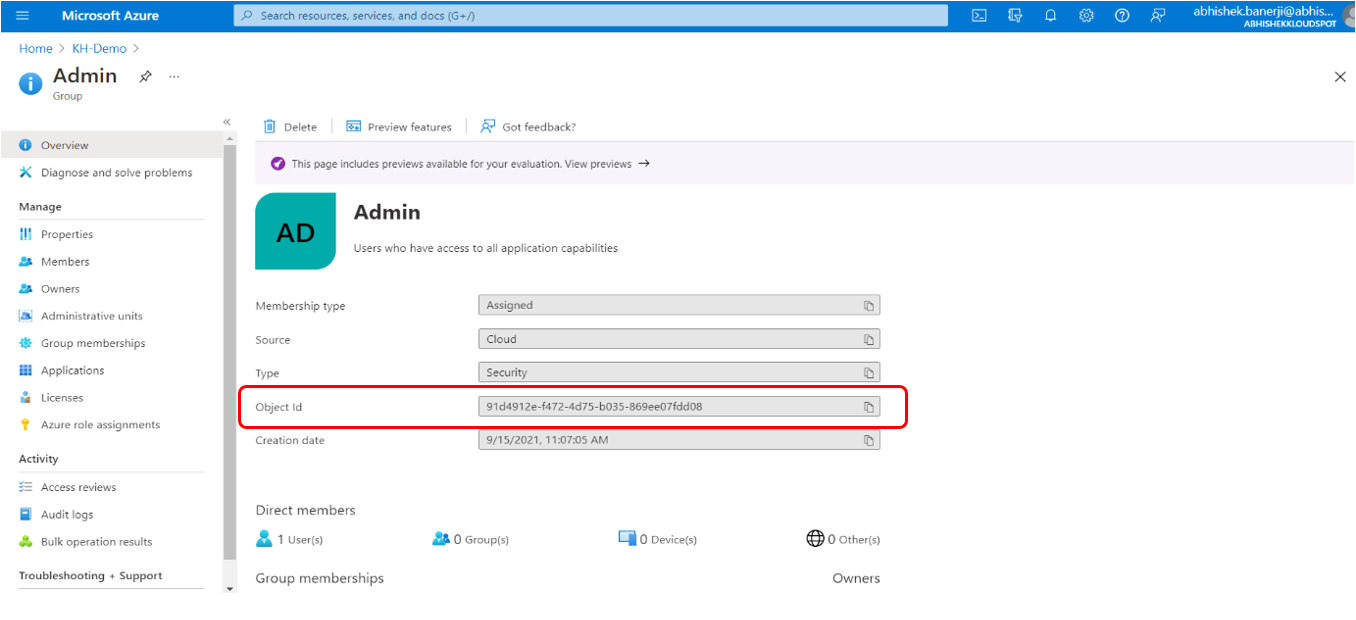
Copy the Object ID and paste it in the ADMIN ROLE KloudHybrid Role Mapping section as shown in the figure below. The Object ID for the group of Users specified in KloudHybrid will have an ADMIN Role assigned to them when logged in Hybrid App.
Logout of the KloudHybrid portal. This allows you to log in with a single click, as shown in the figure below.
Configure SAML with Microsoft Azure AD
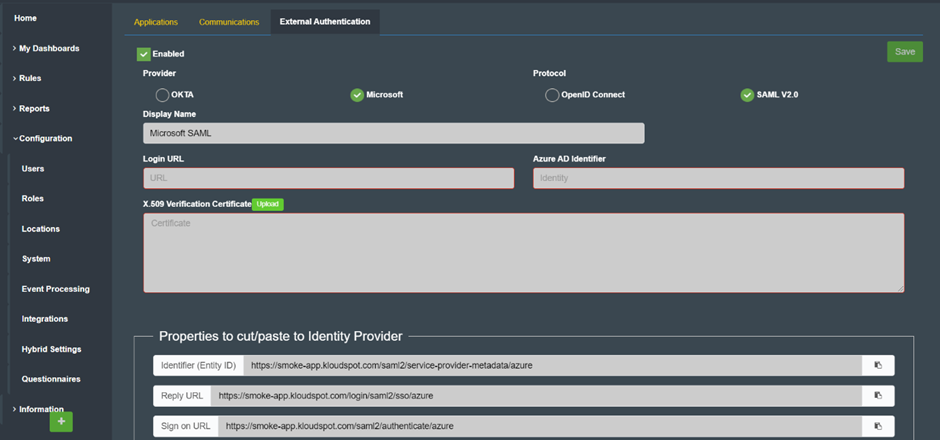
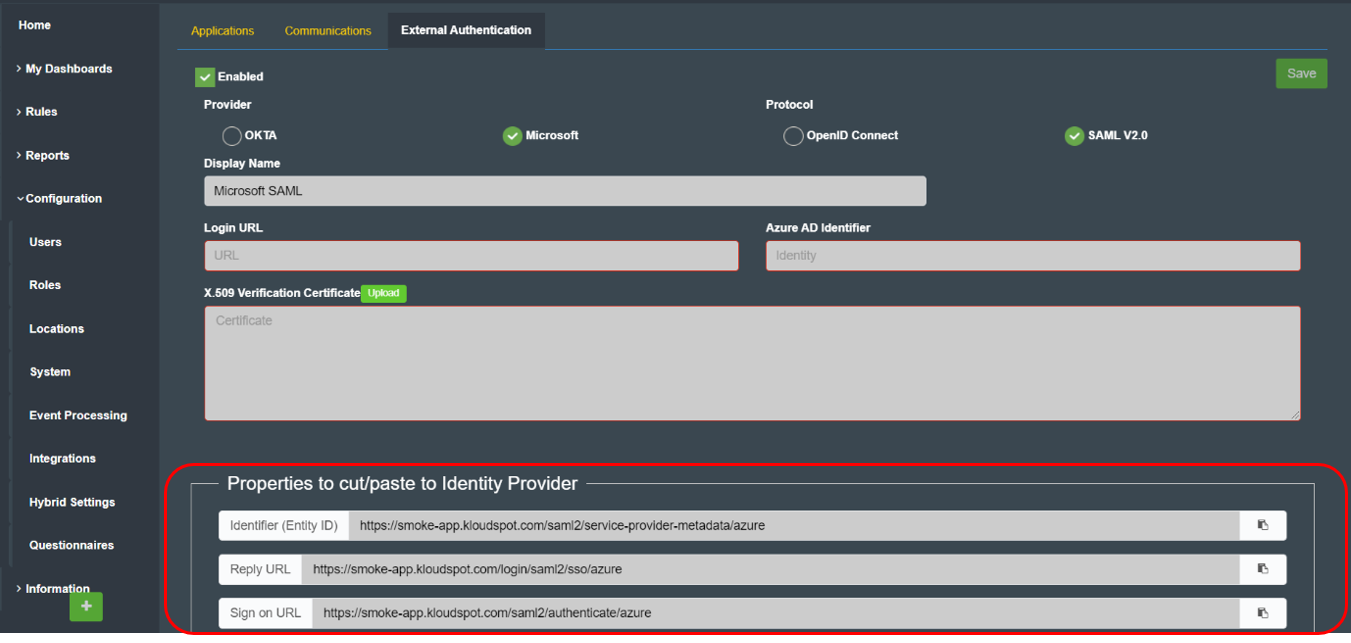
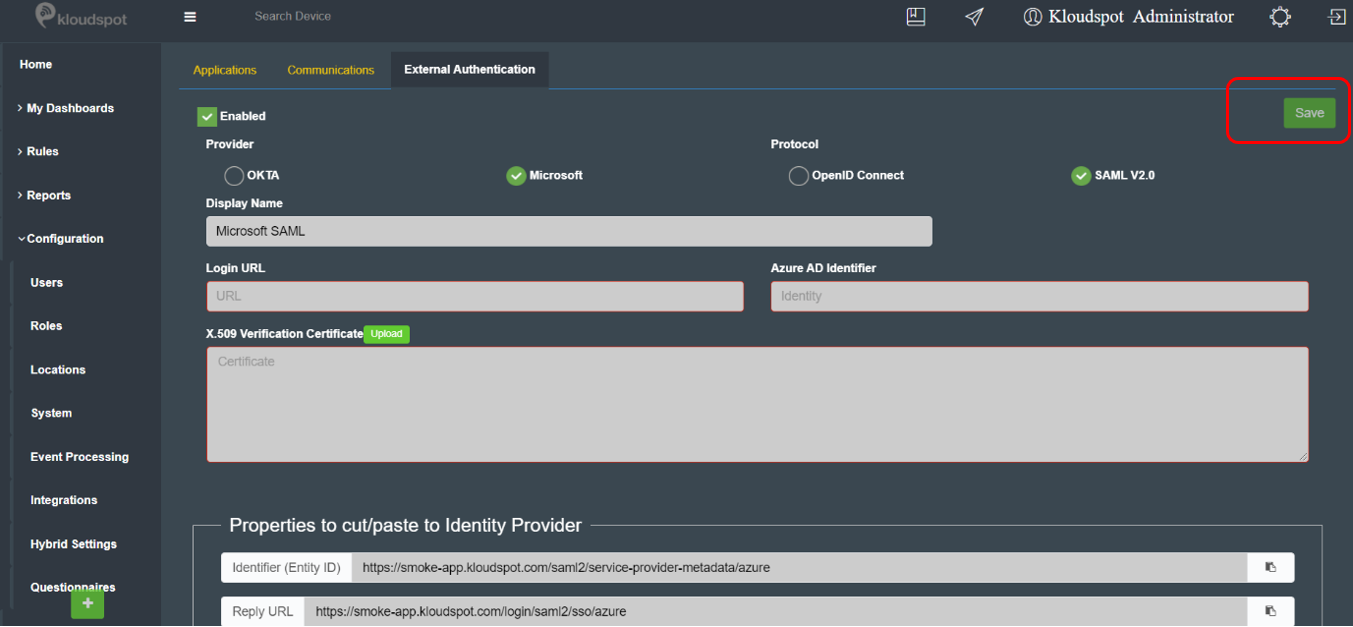
Check Microsoft from the Provider option and for the Protocol select SAML V2.0 as shown in the figure below.
Click on Azure Activity Directory from the Azure services options as shown below.
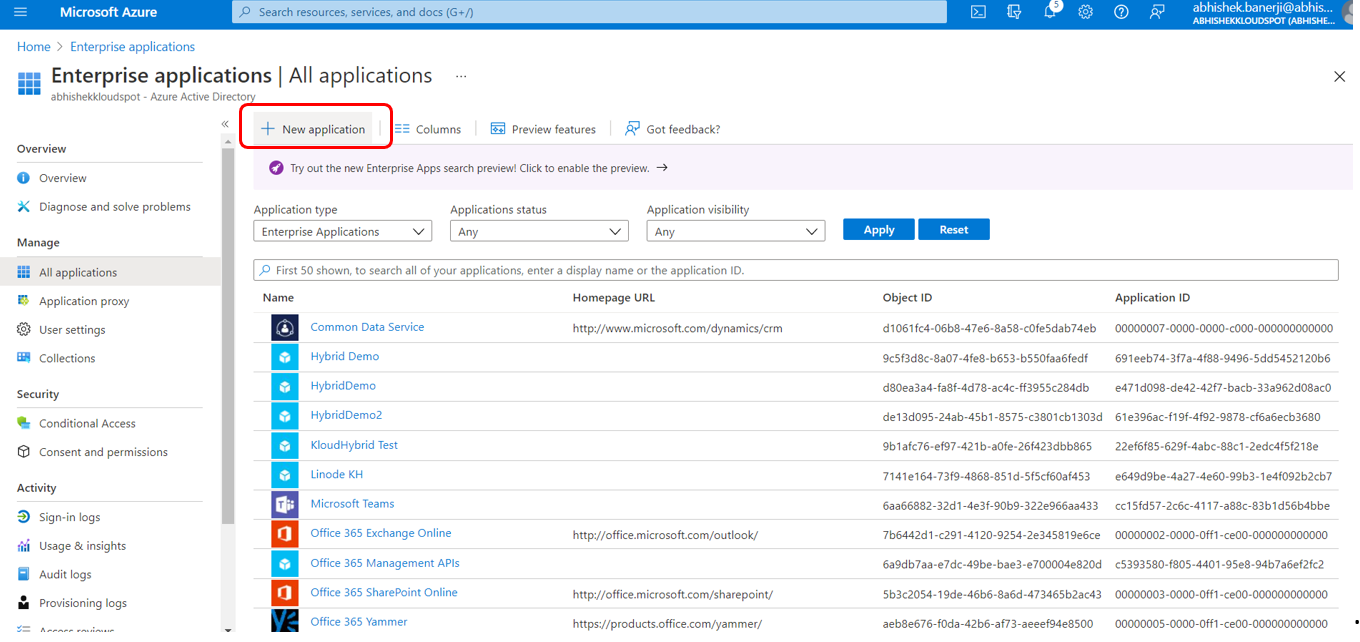
Locate and click on the Enterprise Applications on the Window.
Click on +New Application.
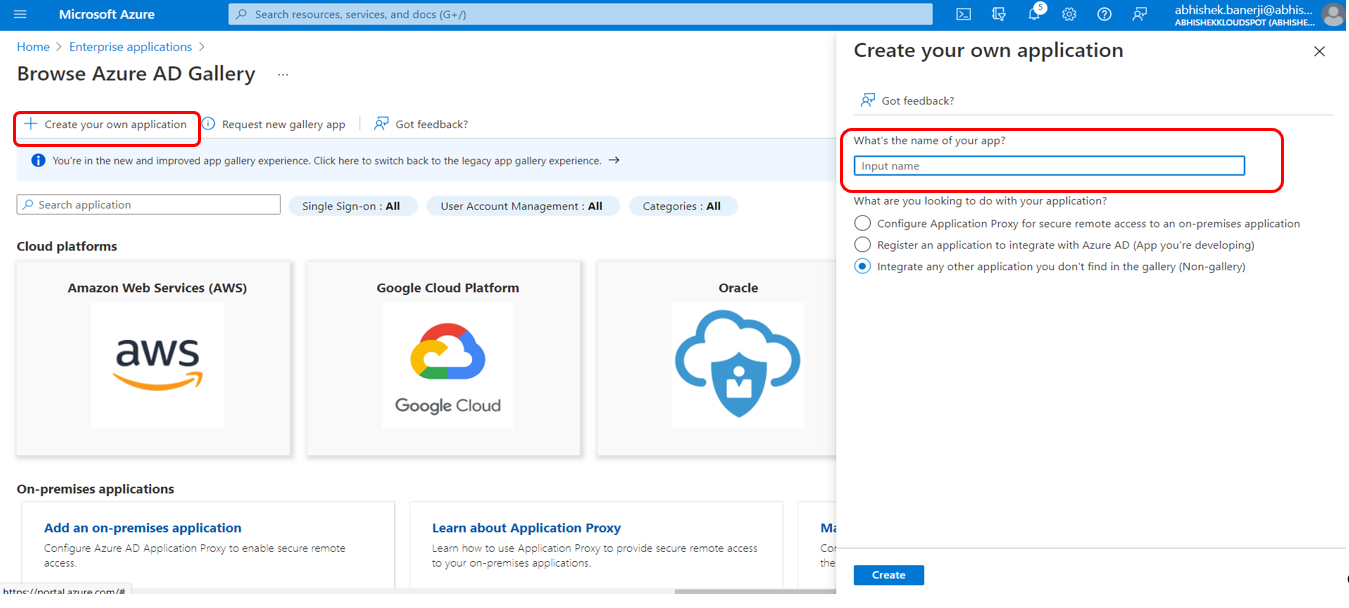
Click on Create your own application and enter a name for the new application. Click on Create.
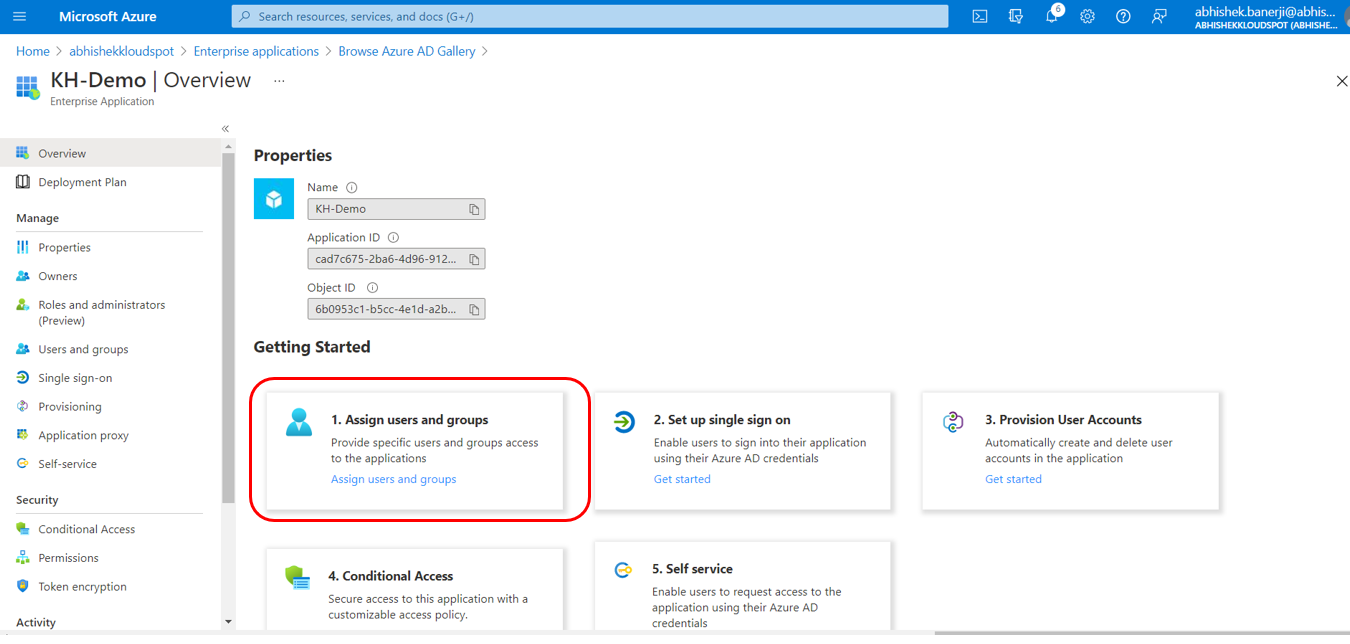
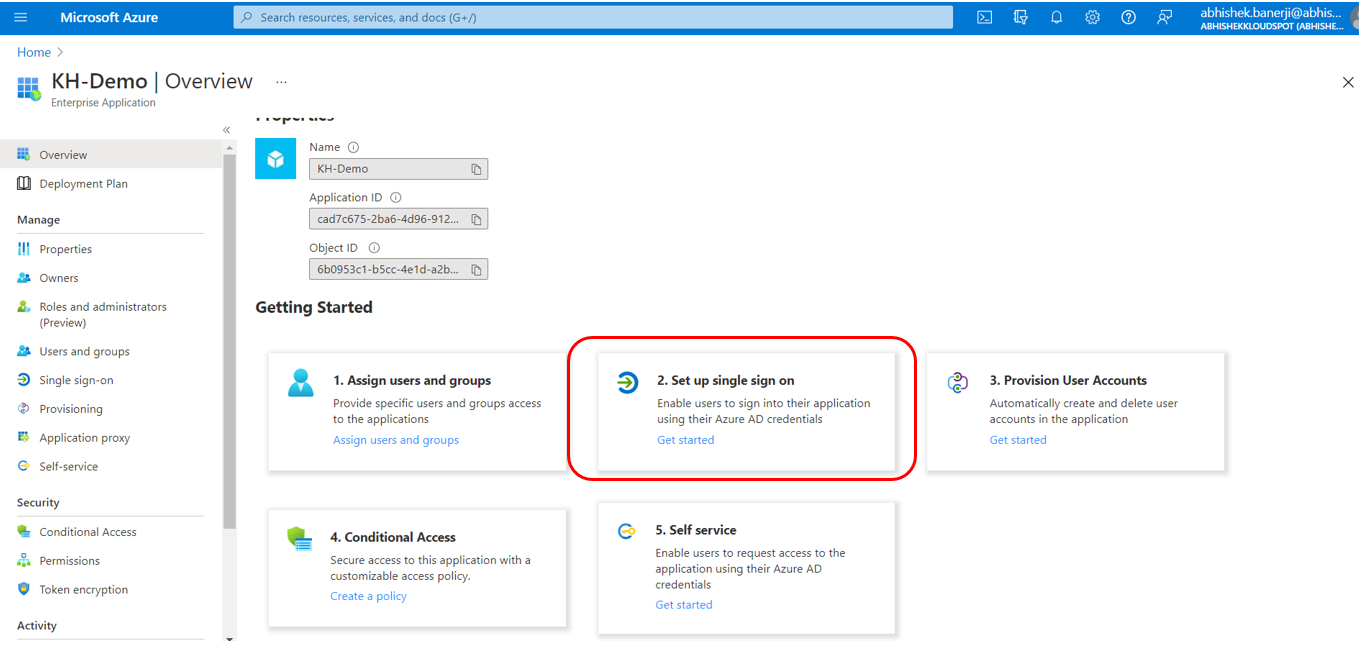
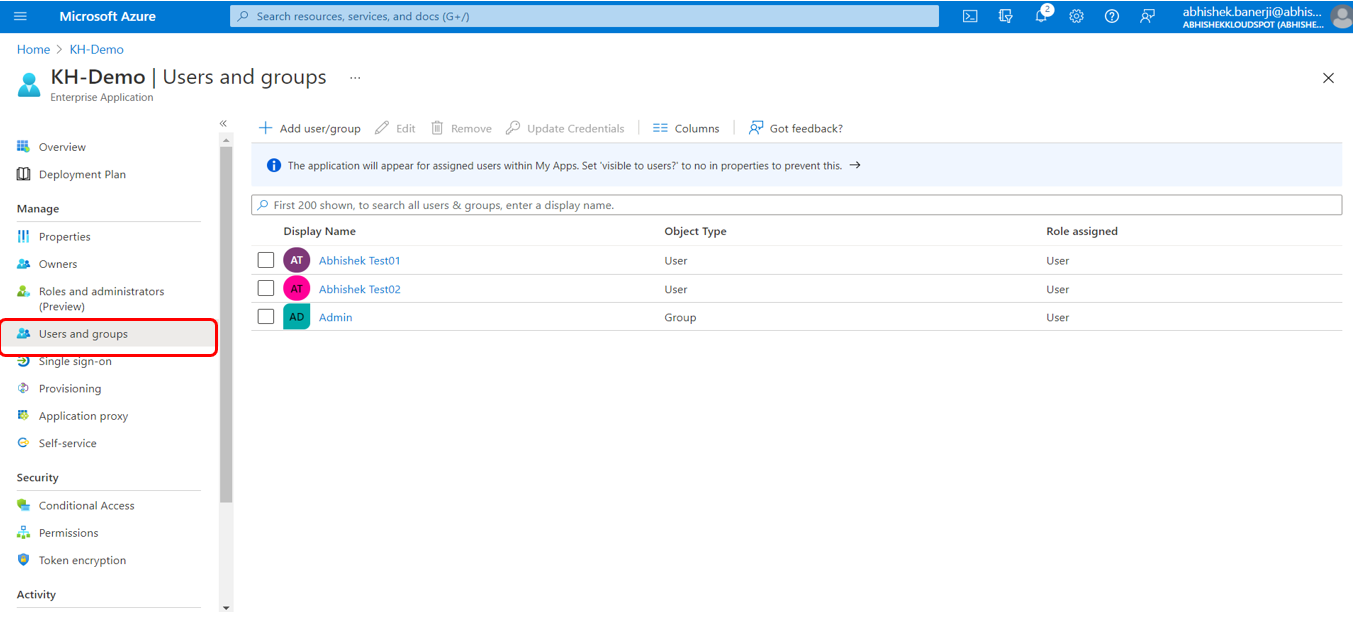
On successfully creating the application, in this case KH-Demo, the following page is displayed. Click on Assign users and groups to provide specific users access to the application.
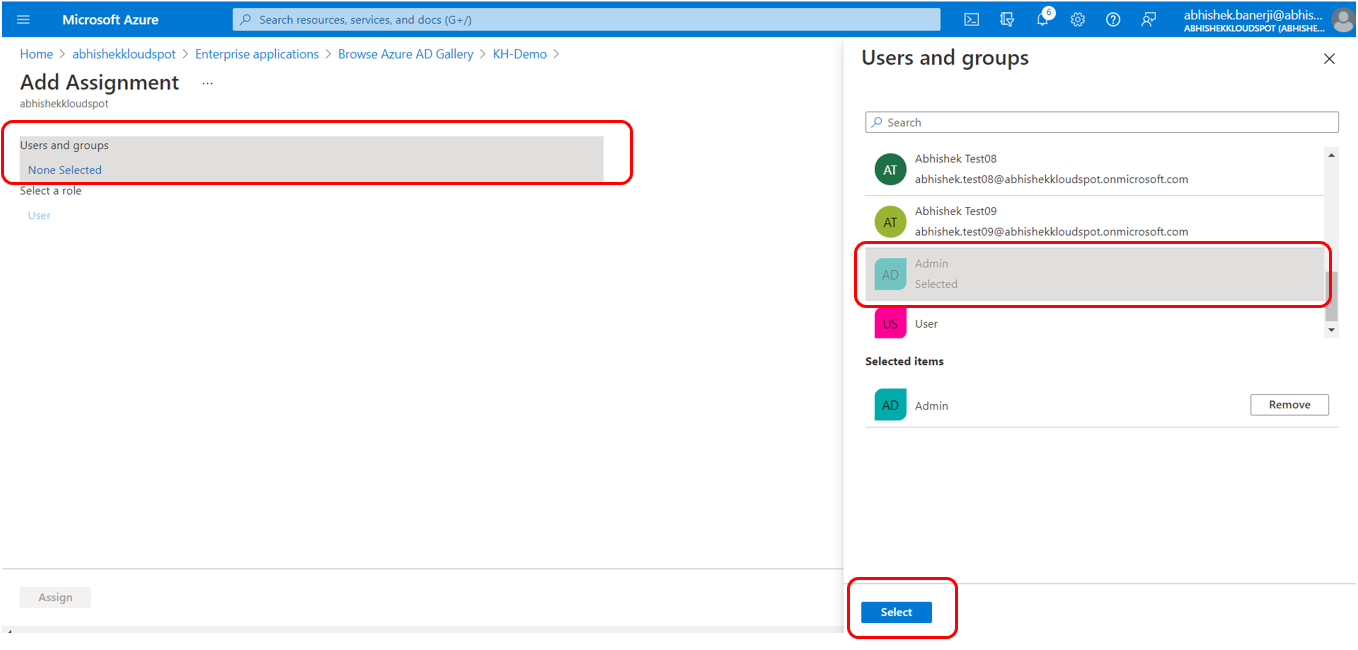
Click on Users and groups and select Users or groups from the list and click on Select as shown in the figure below.
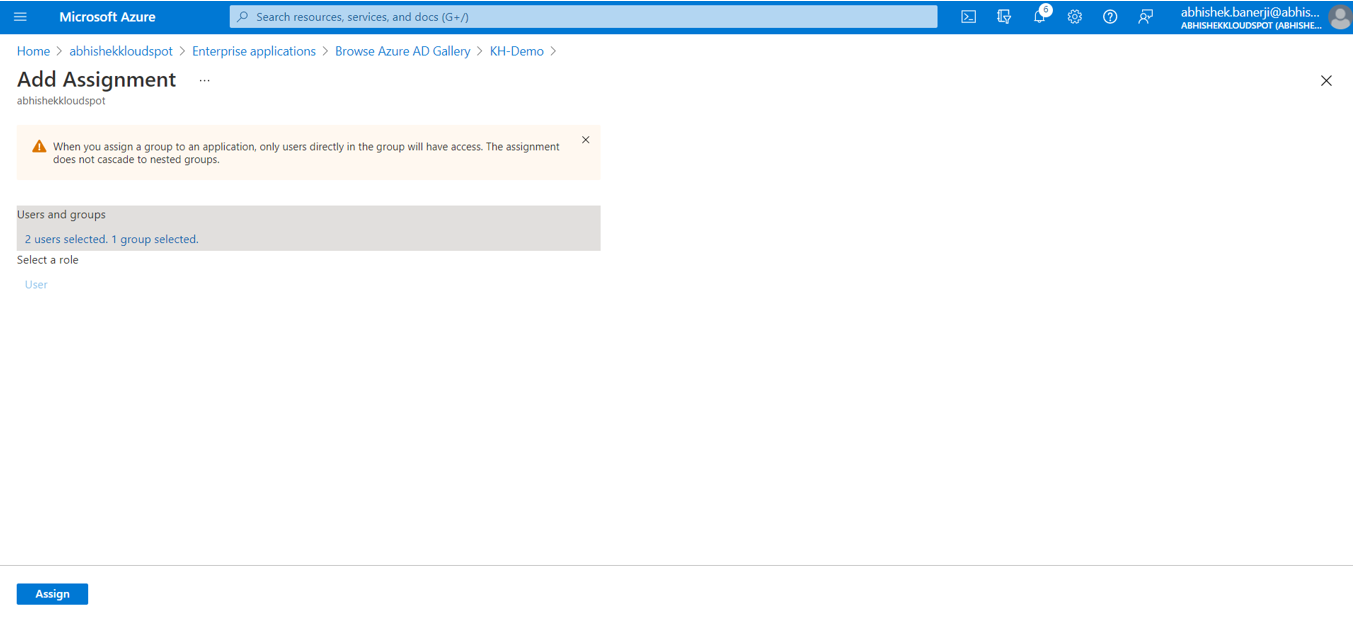
On selecting the users and groups, click on Assign.
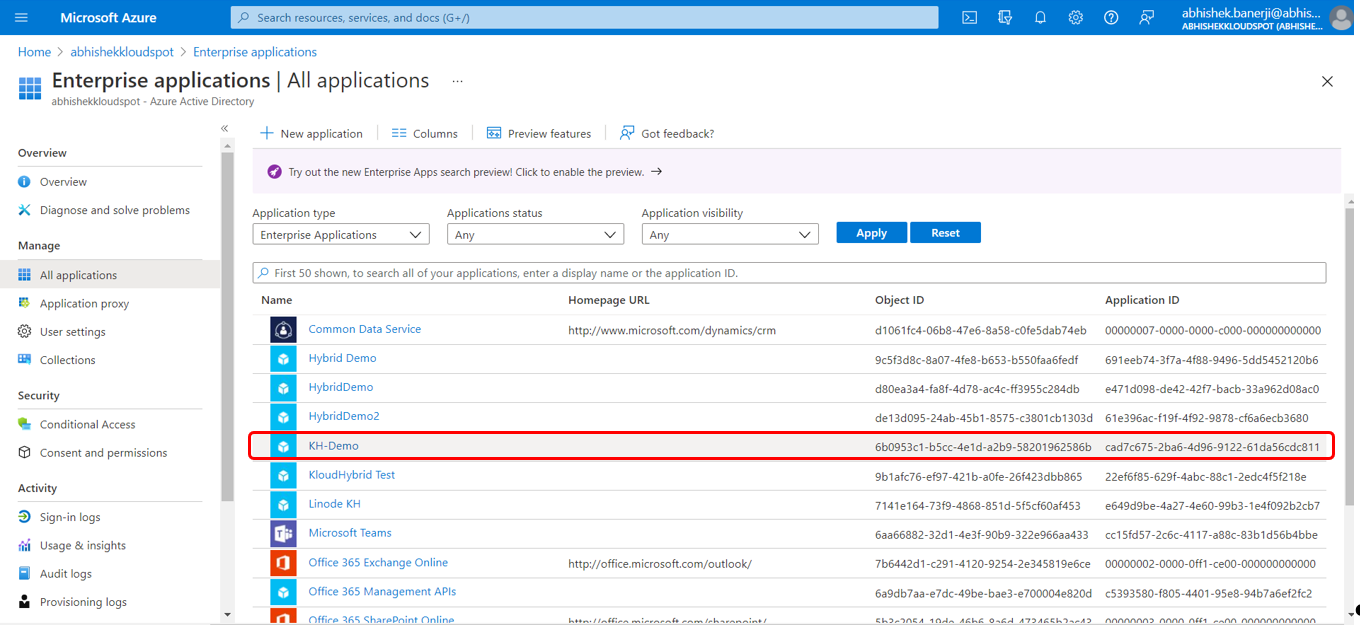
Refresh the page and the newly created application i.e KH-Demo will be added to the list of All applications.
Click on the newly created application (in this case KH-Demo), hover over Set up single sign on and click on Get started.
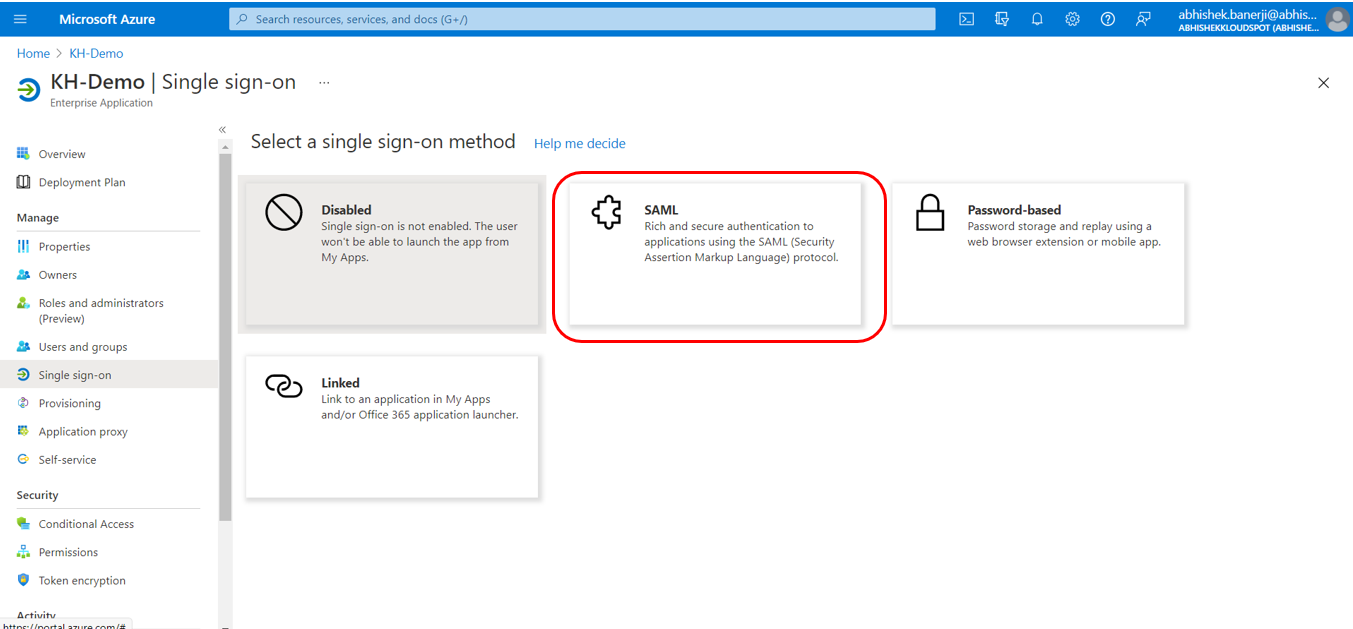
Click on SAML to set up a single sign on.
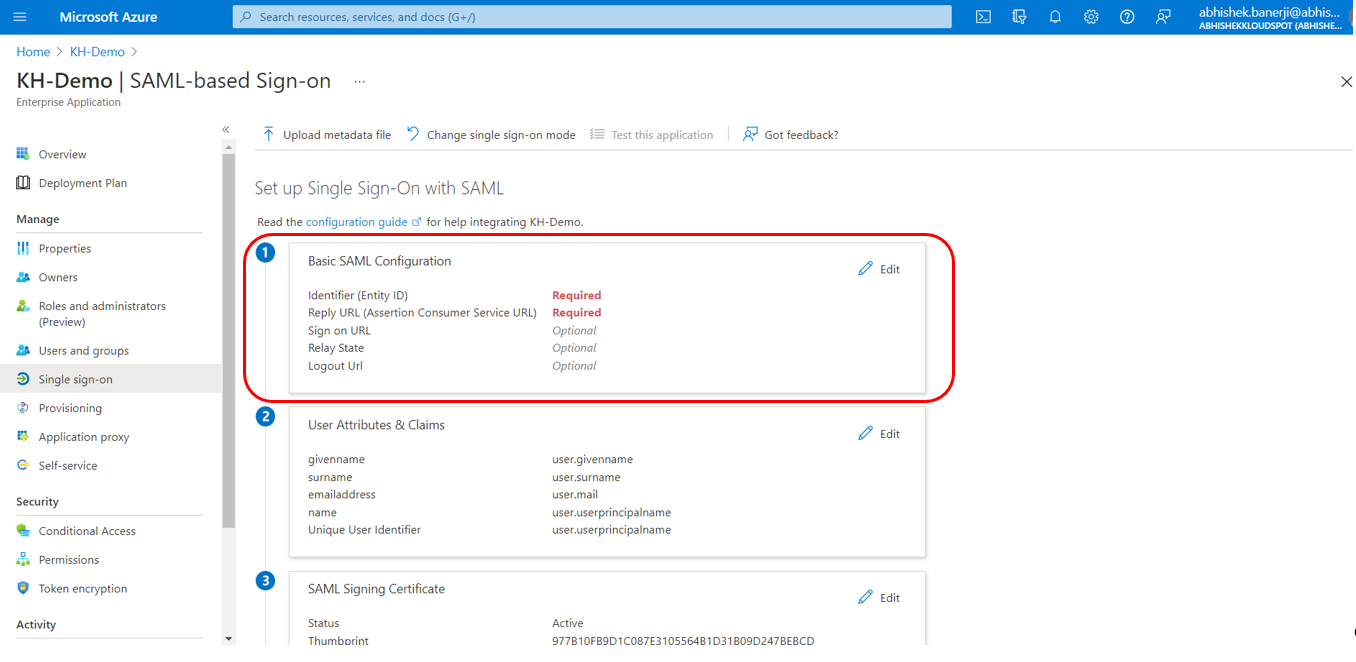
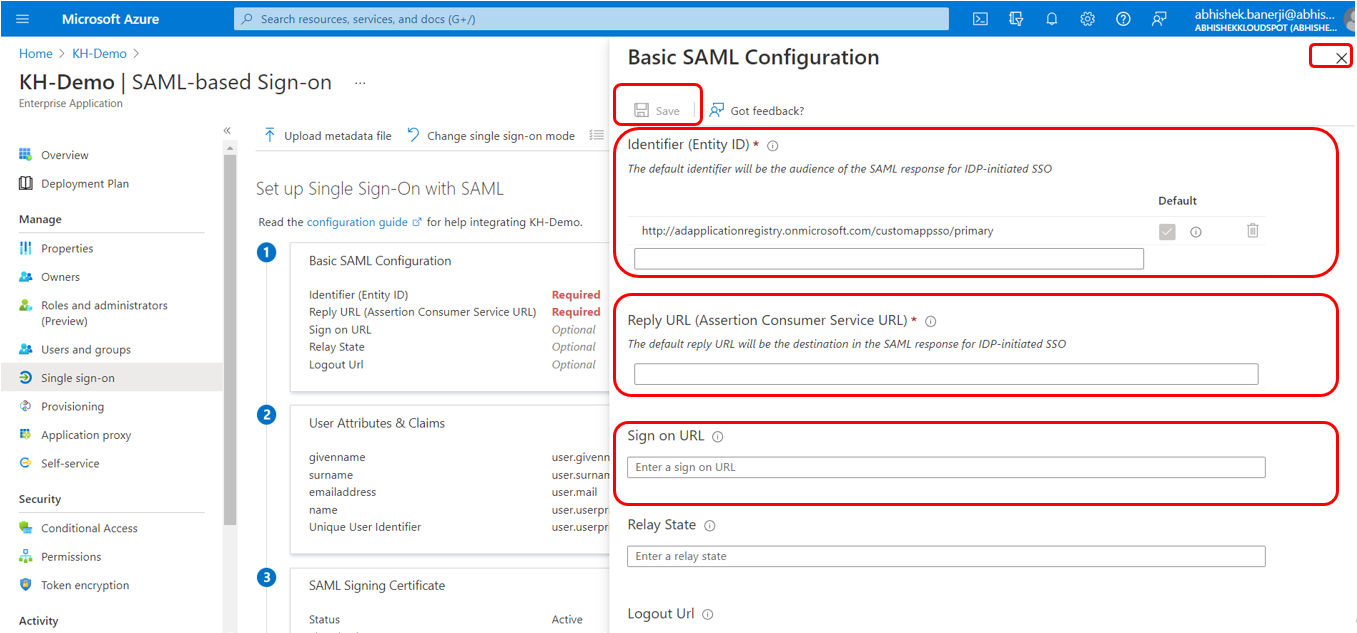
a. Basic SAML Configuration: Click on Edit from the Basic SAML Configuration section and fill in the information on the following page.
- Fill in the details to configure SAML as explained below and click on Save. Once it’s saved click ‘X’ on the top right corner of the page to close.
- The information such as Identifier (Entity ID), Reply URL, Sign-On URL is the same as it’s available in the KloudHybrid portal as shown in the figure below.
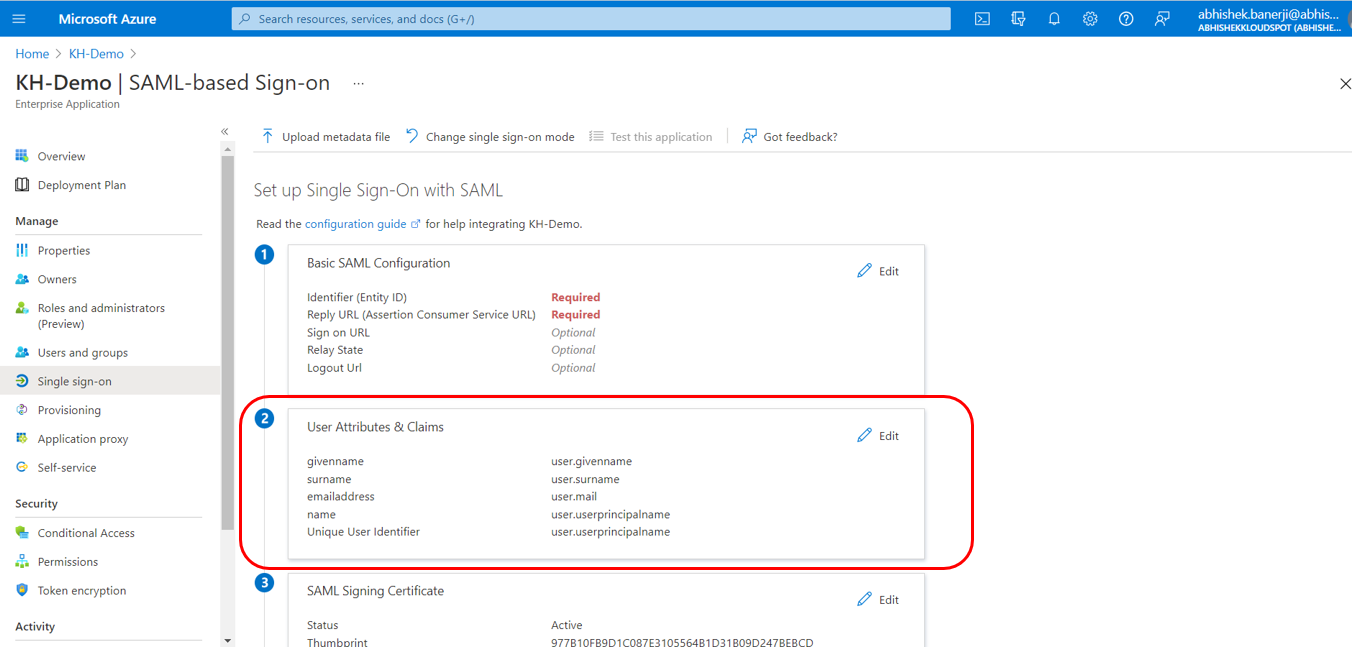
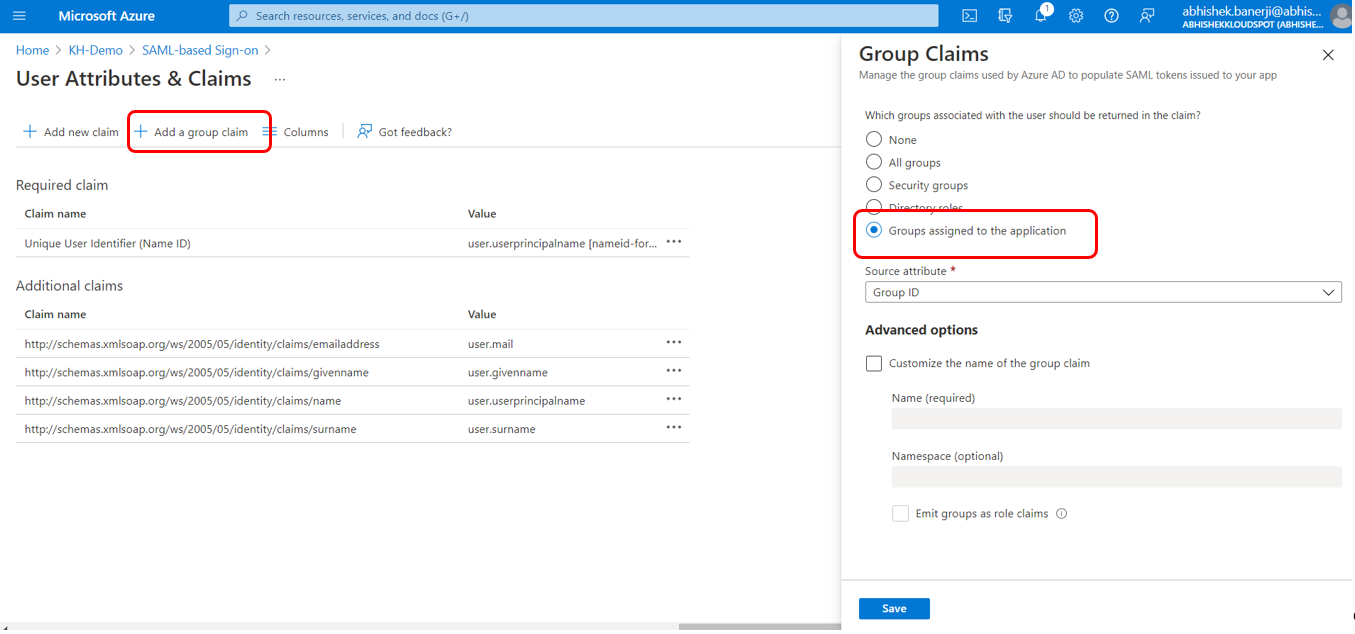
b. User Attributes and claims: Click on edit.
- As shown in the figure below, click on + Add a group claim and select Groups assigned to the application, click on Save and close the window by clicking on ‘X’ on the top right.
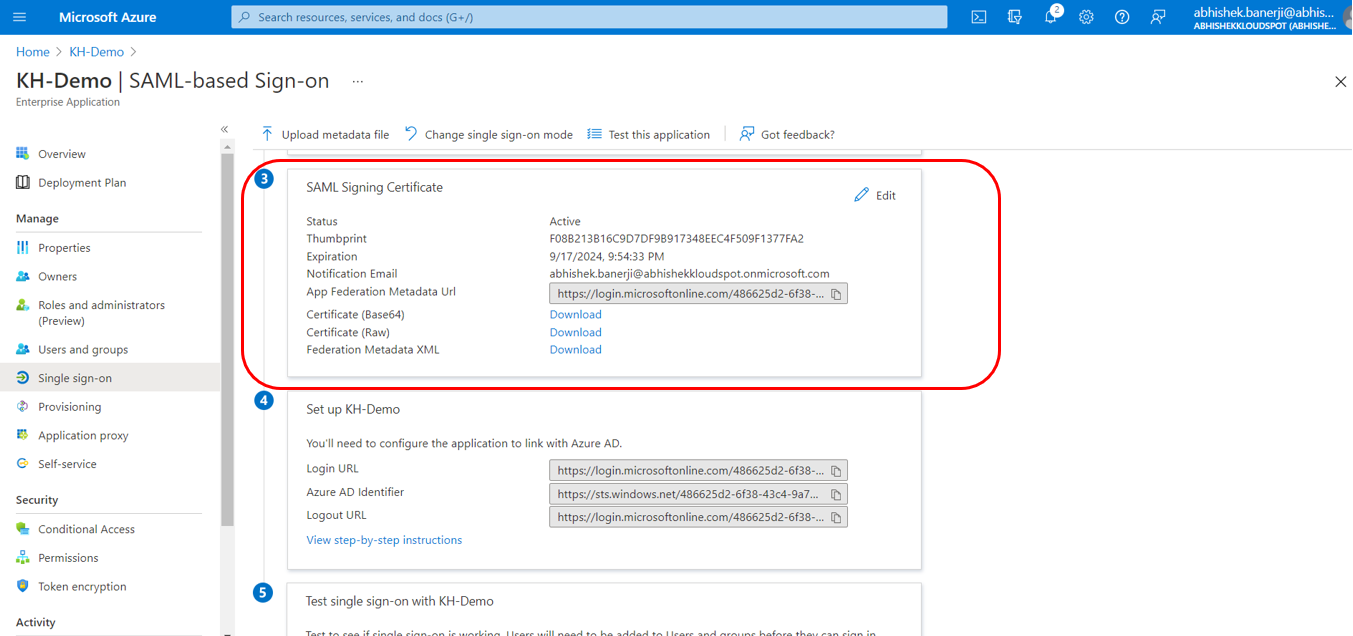
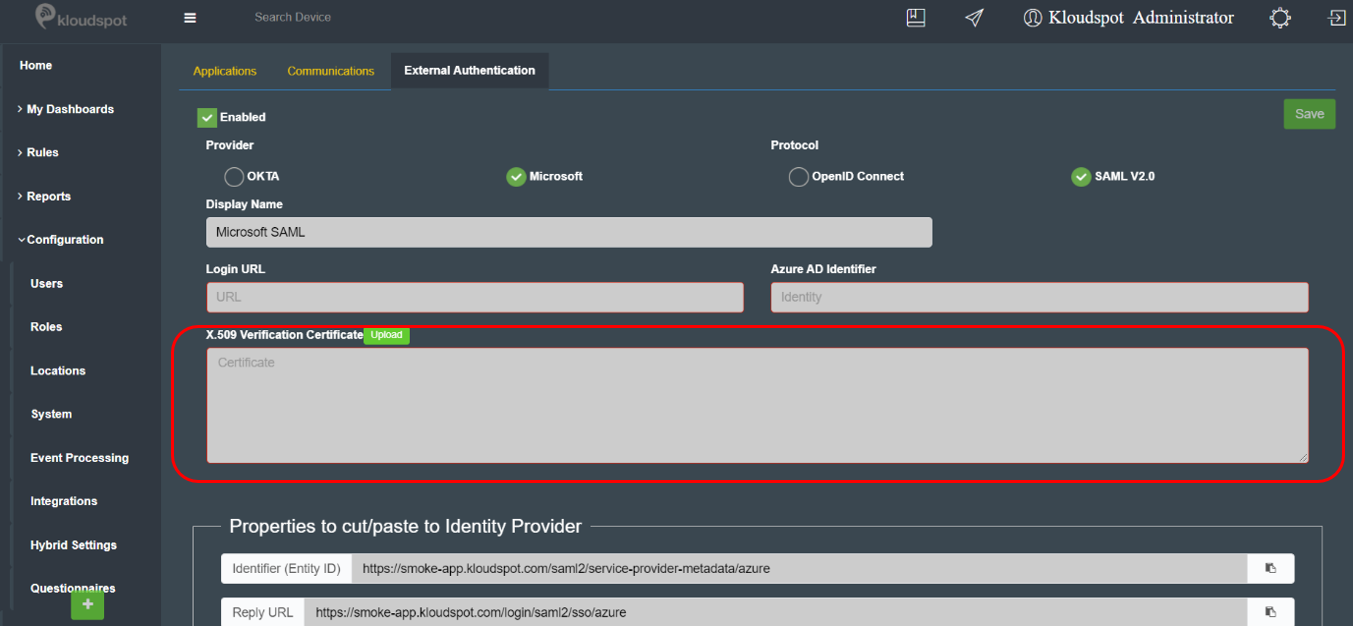
c. SAML Signing certificate: Click on Download the ‘Certificate (Base64)’.
- Upload the downloaded certificate in Insights as shown in the figure below.
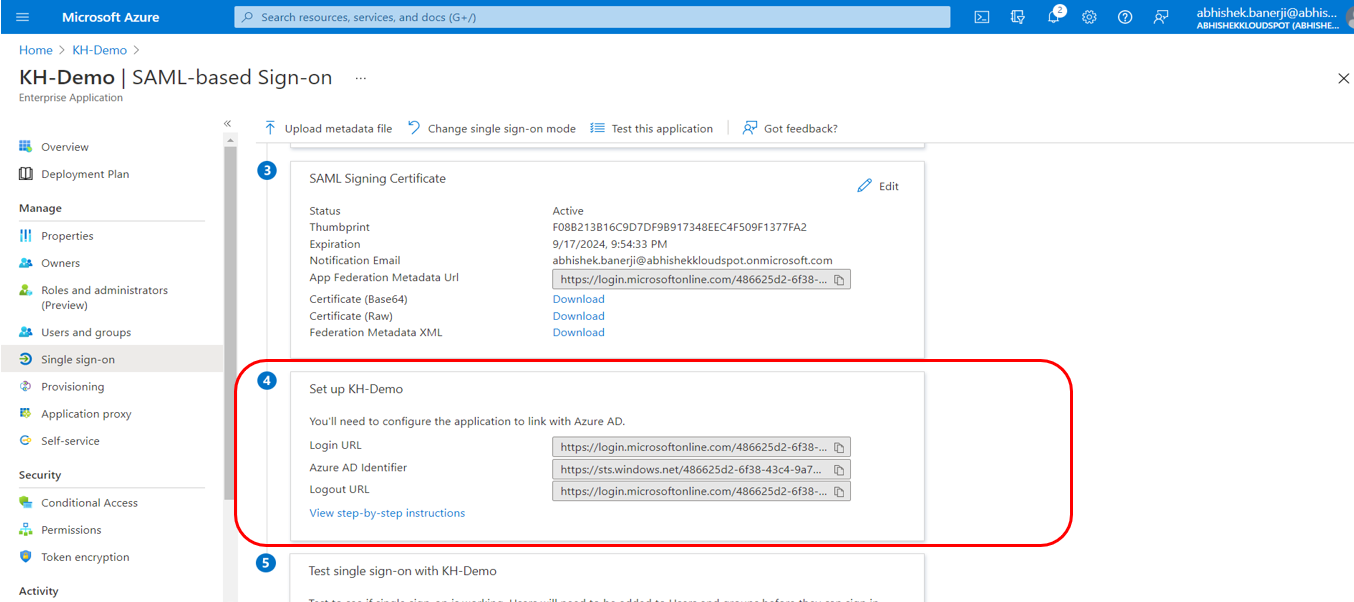
d. Set up KH-Demo (the application name):
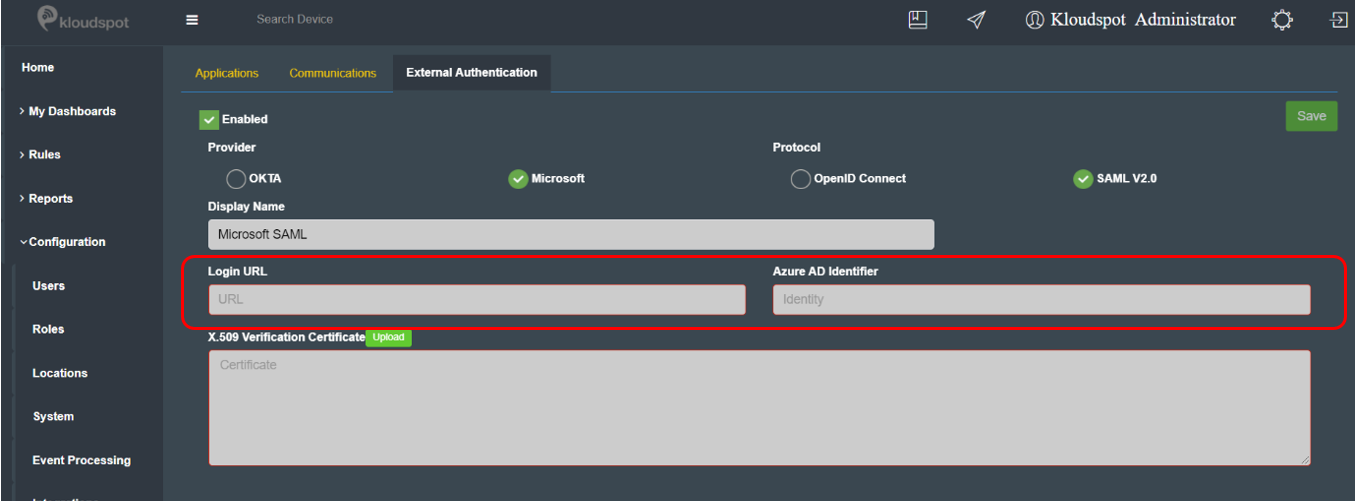
- From this section, copy the URLs for Login URL and Azure AD Identifier and paste it in Insights as shown in the figure below.
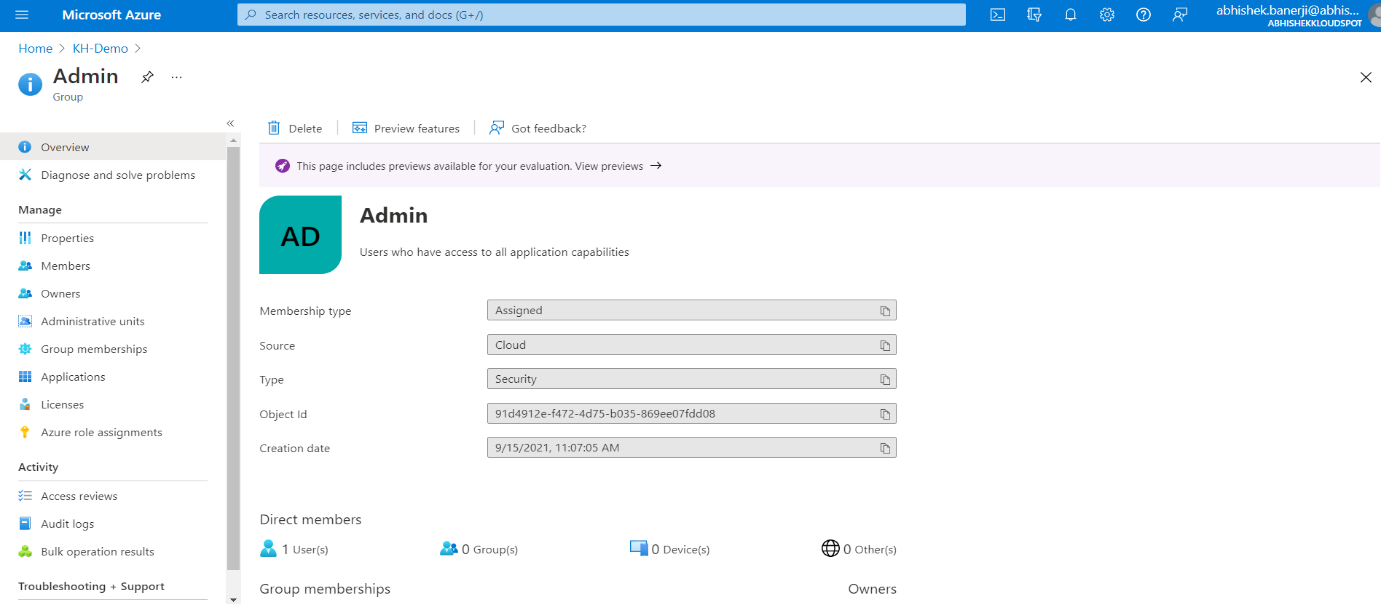
Click on Users and groups to assign Admin role in Hybrid Application. Select a group of users from the list.
Copy the Object ID and paste it in the ADMIN ROLE hybrid Role Mapping section as shown in the figure below. The Object ID for Group of Users specified in hybrid will have an ADMIN Role assigned to them when logged in Hybrid App.
After filling in all the details, click on Save on the top right to save the configurations. And log out of KloudHybrid.
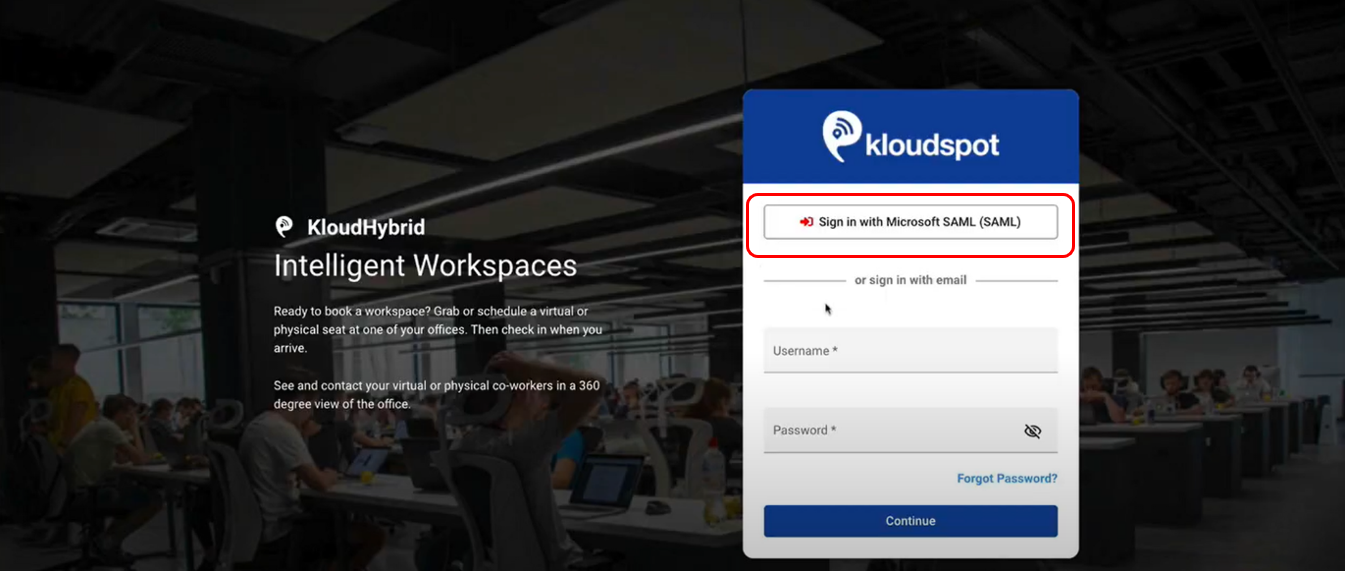
Login with a single click on Sign in with Microsoft SAML (SAML) as shown in the figure below.
Configuring Calendar Integration with KloudHybrid
In this step, we will guide you through the process of connecting your organization’s calendar to KloudHybrid. By establishing this connection, you can effortlessly synchronize meeting details, ensuring a seamless experience across the KloudHybrid application, including the homepage and My Schedule section.
To begin, it is essential to connect your preferred calendar system to KloudHybrid. Currently, KloudHybrid supports two calendar providers: Microsoft Outlook Calendar and Google Calendar. You can choose the one that suits your organization’s needs best.
Please note that only one calendar can be displayed at a time in KloudHybrid. Carefully consider your requirements and preferences before proceeding with the configuration.
For Microsoft Outlook Calendar integration, refer to the comprehensive Microsoft Graph API document given below. This document contains detailed instructions on how to configure the integration successfully.
Alternatively, if you opt for Google Calendar integration, refer to the dedicated [Google Calendar Integration document(/kloudhybrid/adminguide1/step2/calendarintegration/googlecalendar/)] given below. This guide will walk you through the steps to seamlessly configure the integration.
Subsections of Configuring Calendar Integration with KloudHybrid
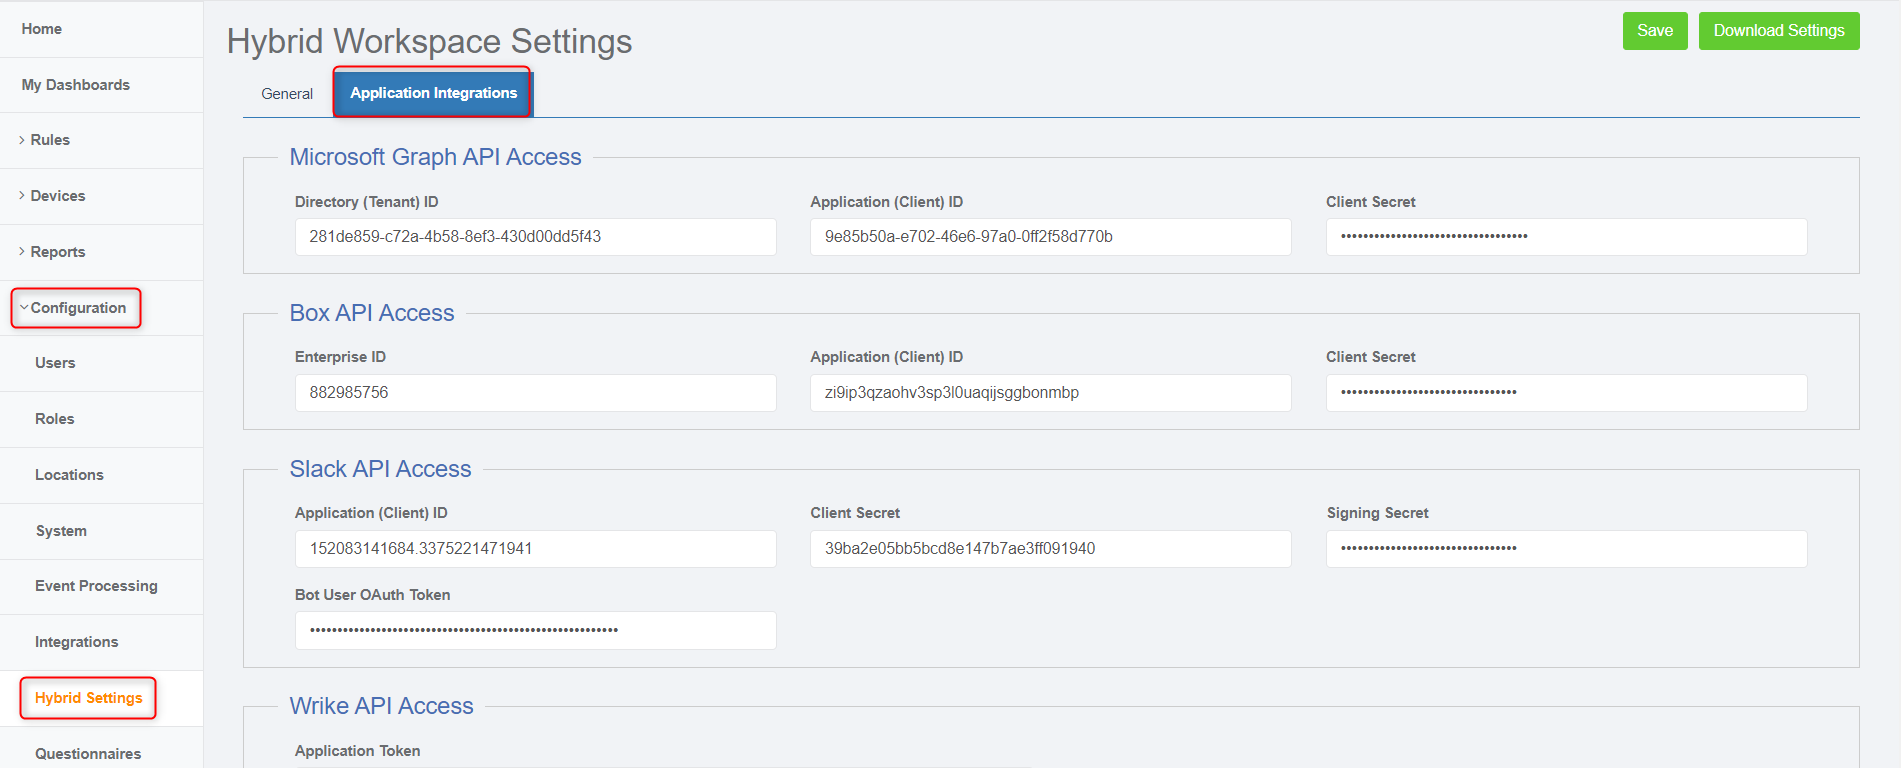
Microsoft Graph API
Integration with the Microsoft Graph API is required for integration with user calendars. Without this integration, upcoming user meetings will not show up on the home page, conference room bookings made in ‘Kloudspot Hybrid Work’ will not sync to a user’s Outlook calendar, and vice versa.
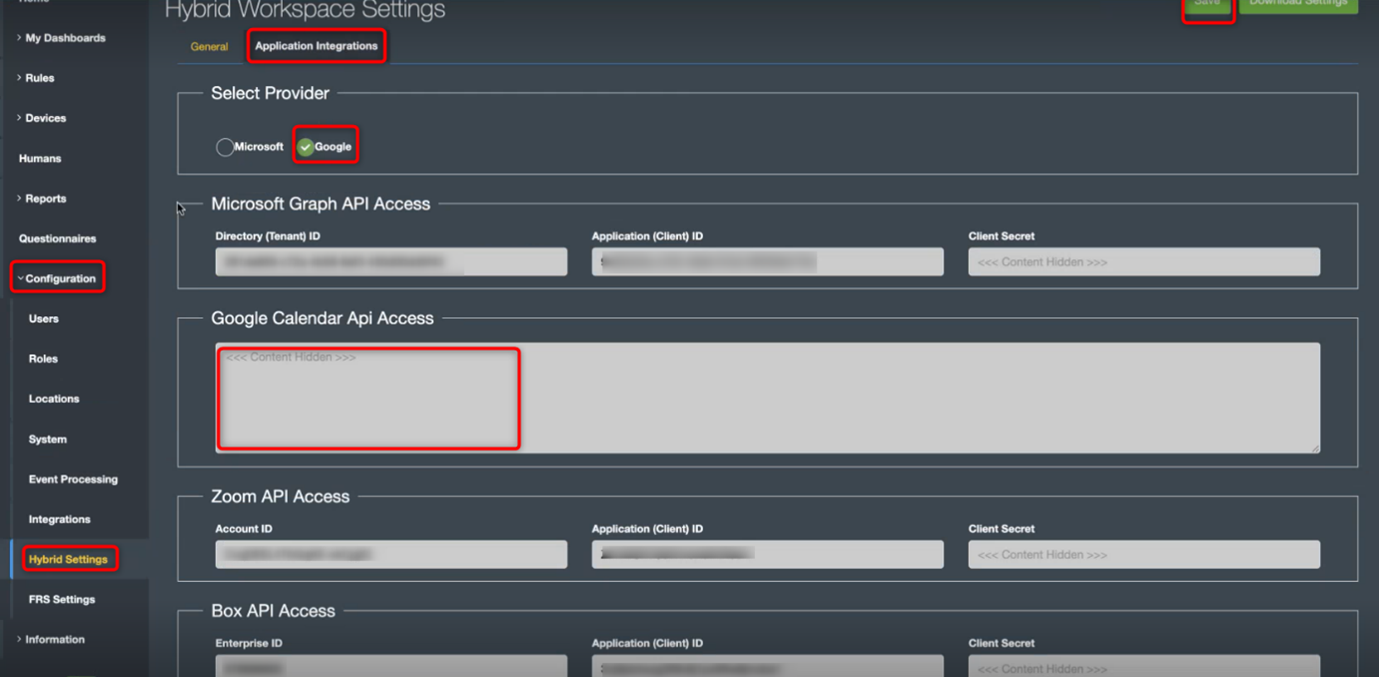
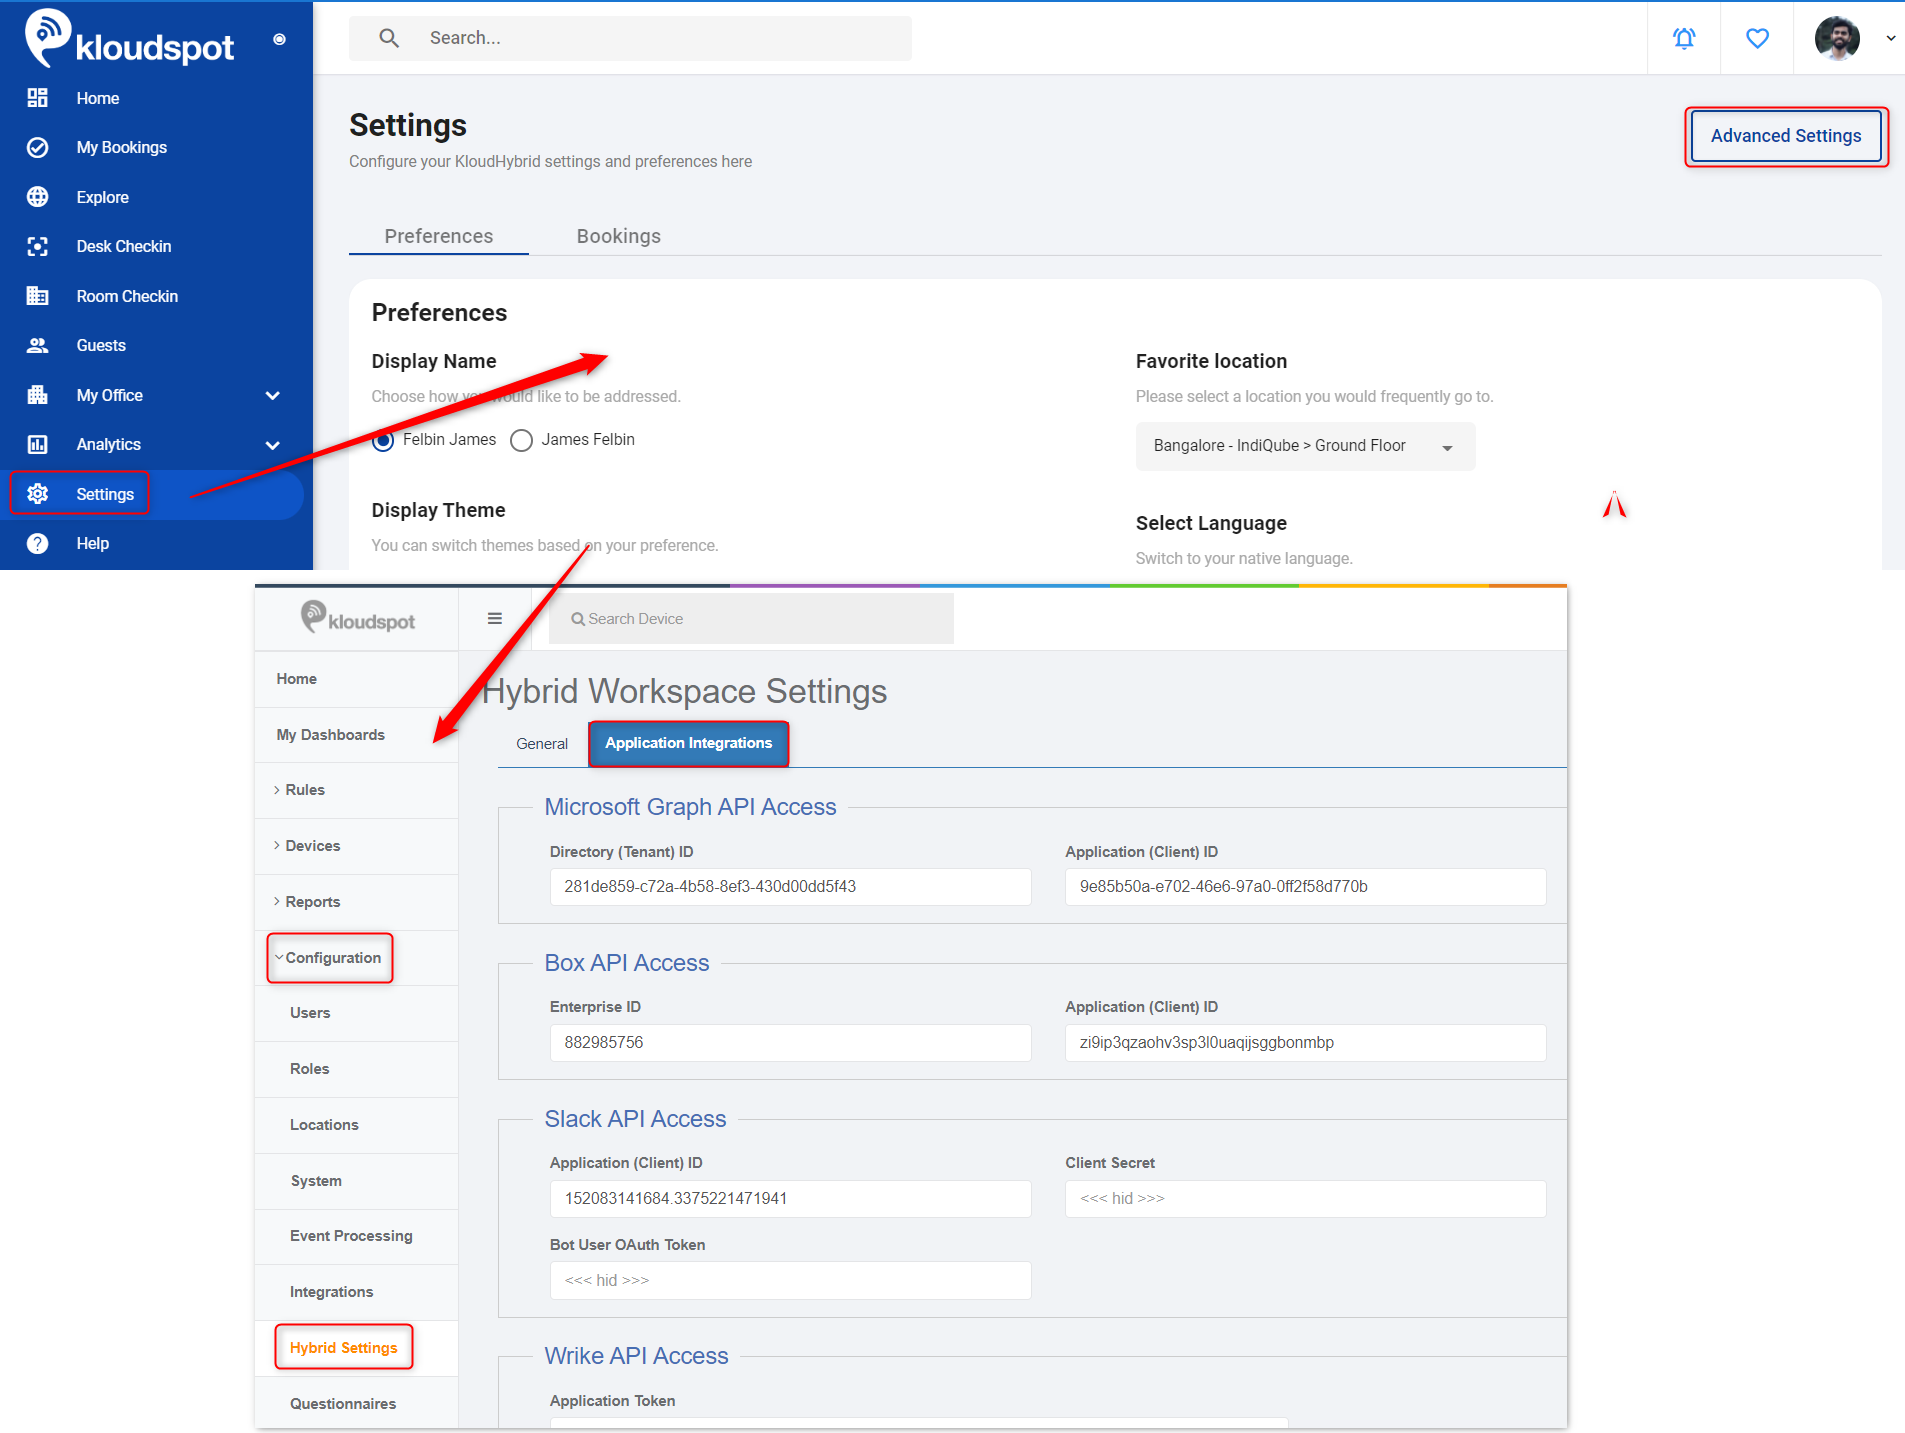
To find the App integration page, navigate to the Advanced Settings Page, then go to Configuration -> Hybrid Settings-> Application Integrations.
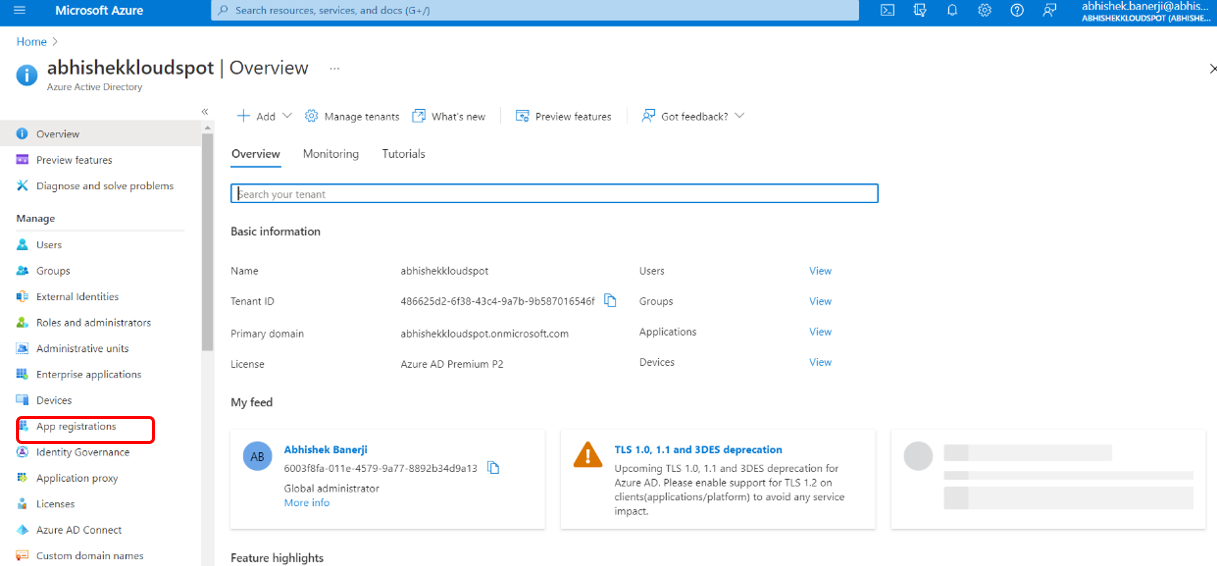
Click on Azure Activity Directory from the Azure services options as shown below.
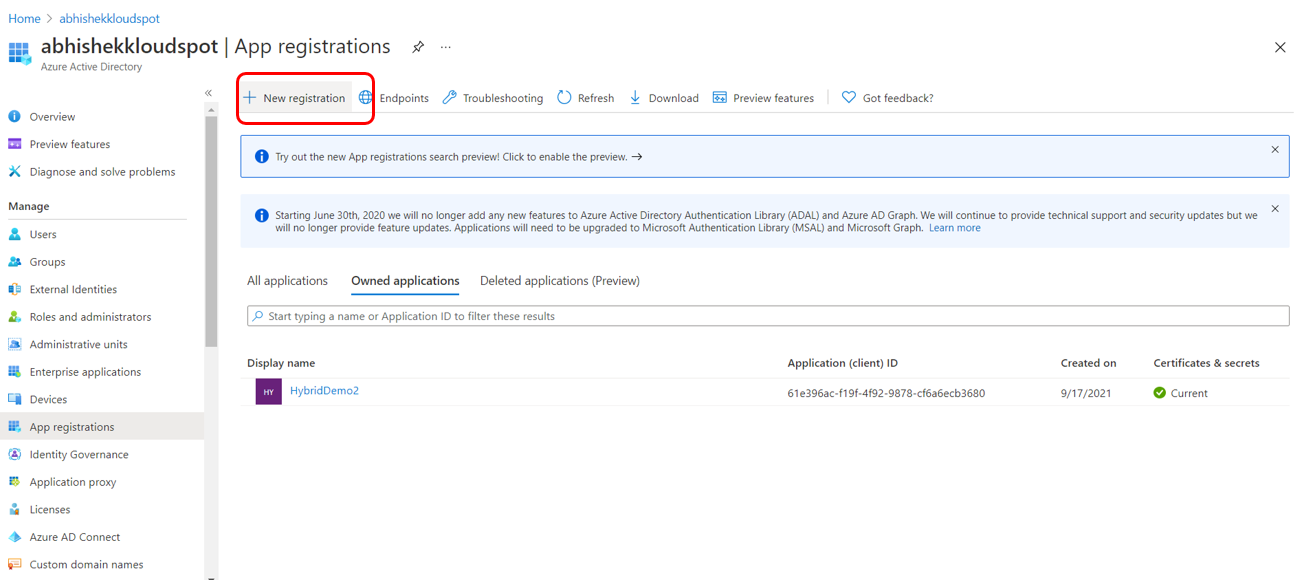
Locate and click on the App Registration on the menu bar.
Click on +New registration on the page.
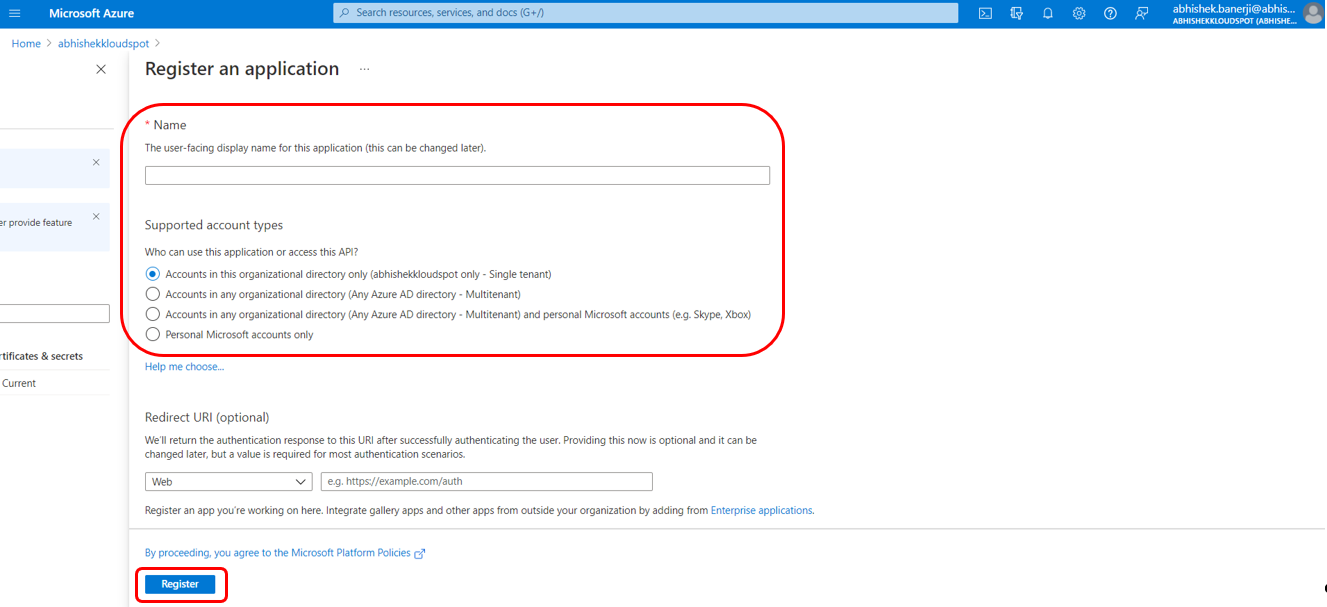
Enter the information in the blanks to create a new registration.
Name: enter a name for the application.
Supported account types: Select the option as shown in the figure below.
Click on Register.
Go back to the home page and click on Overview for login information on the new application created. Copy information from the Essentials and paste it into the KloudHybrid configuration.
The Directory (Tenant ID) and Application (Client) Id in KloudHybrid will be the same as those on the Azure portal.
Next, we will create a client secret in Azure and past that into KloudHybrid.
To create a Client Secret, go to the Azure portal, click on Certificates & secrets and then click on + New client secret.
Enter the description and click on Add.
Copy the Value and paste it into the Client secret section in Microsoft Graph API Access in KloudHybrid.
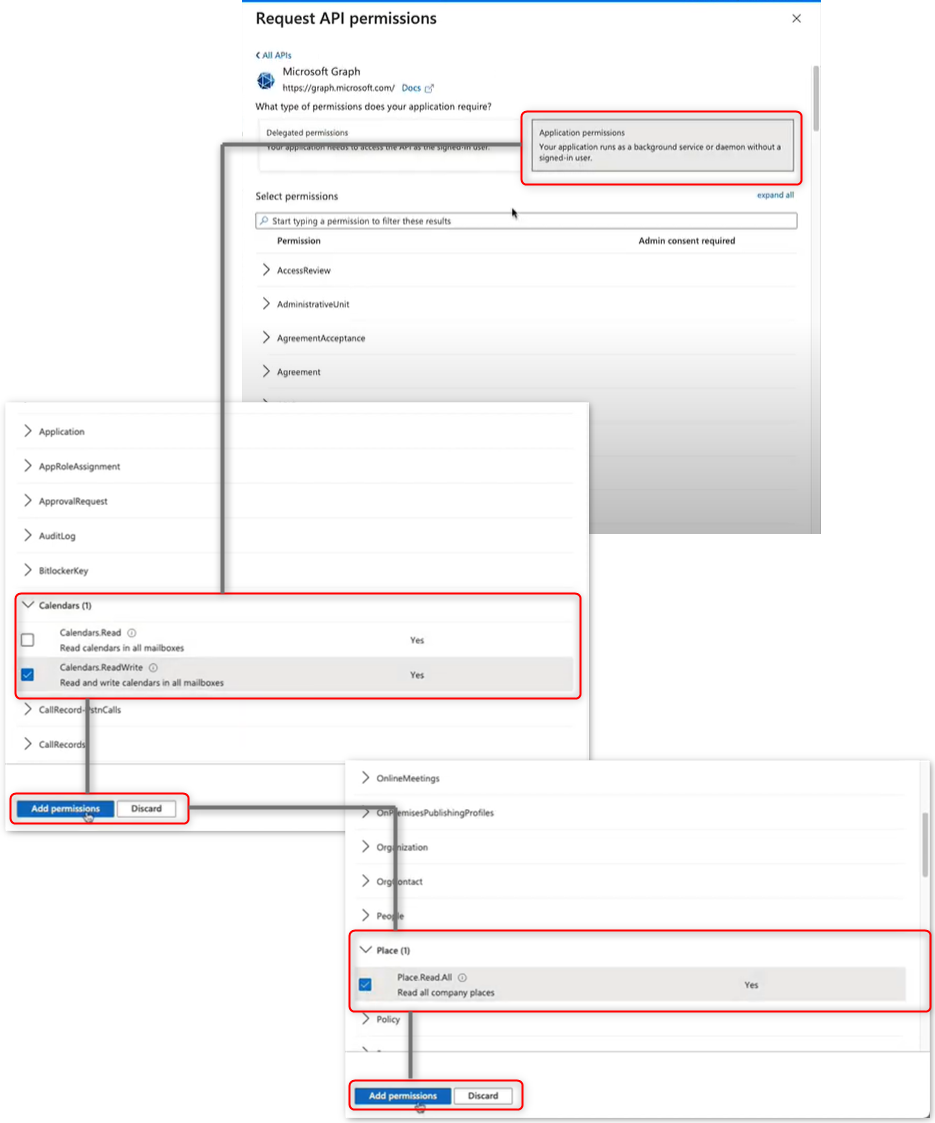
Creating API Permissions
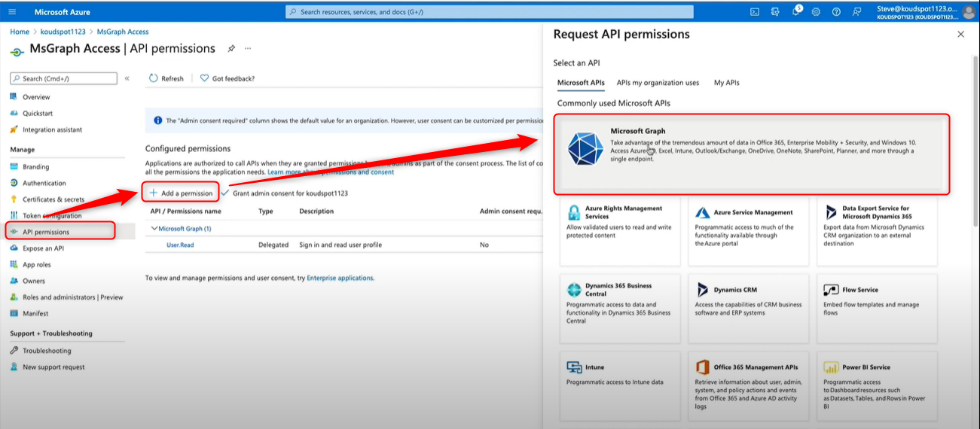
Go to the Azure portal, click on API Permissions and then click on + Add permission.
The Request API permissions tab will open. in that, Click on the Microsoft graph button.
In the window that appears, select the Applications permissions option.
A list of permissions will appear. Scroll down and check the calendar ReadWrite option from the calendars dropdown menu.
Click on Add permissions button to add calendar permission.
Scroll down again and check the Place Read All options in the place dropdown menu.
Click on Add permissions button to add place permission.
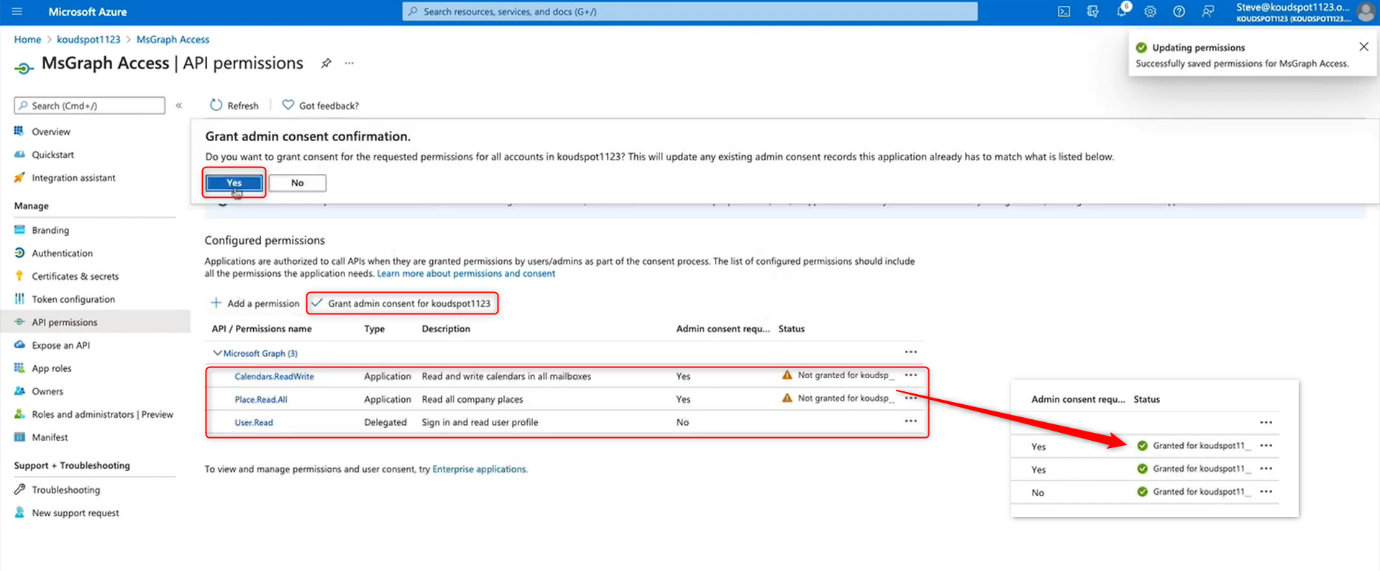
The newly added permissions are visible in the configured permission list. To authorize newly added permissions. Click on the Grant Admin Consent button and click Yes in the popup window that appears.
Then the permission status will be changed from not granted to Granted.
Calendar has been successfully configured.
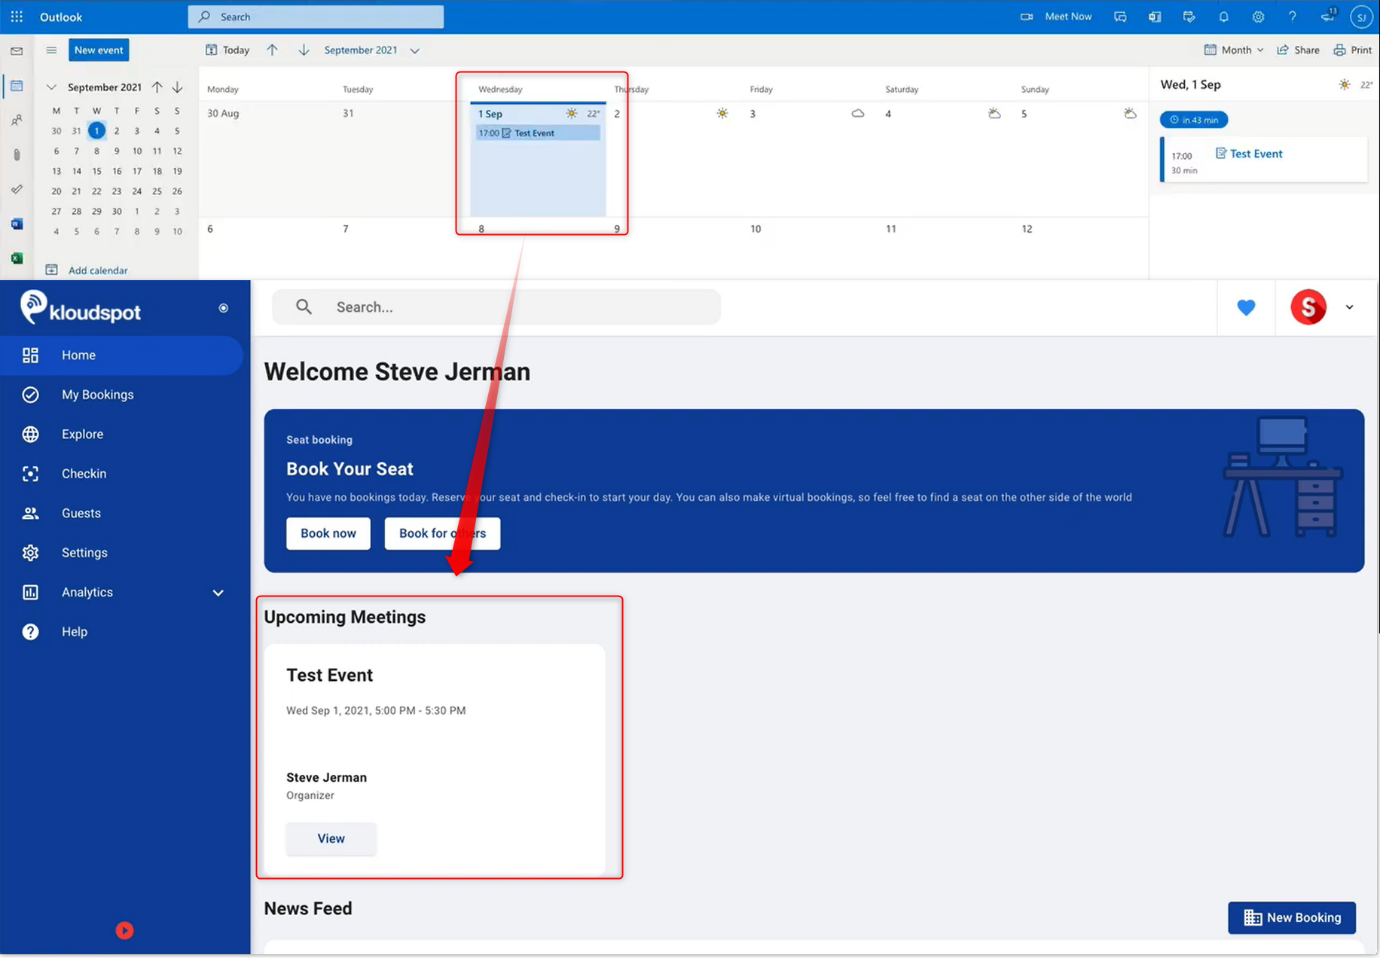
Once the calendar is added. The information that is added to the calendar will be displayed in the KloudHybrid.
Google Calender Integration
Overview:
This comprehensive document serves as a step-by-step guide to seamlessly integrate Google Calendar into the KloudHybrid application. It provides the necessary information on prerequisites and integration steps.
Scope:
The integration focuses on leveraging the powerful features of the Google Calendar API to empower users in accessing, events within the application effortlessly.
Intended Audience:
This documentation is intended for experienced developers and technical personnel who are responsible for integrating the Google Calendar functionality into KloudHybrid. Familiarity with web development and API integration is assumed.
Prerequisites:
Google Workspace Admin Account:
To begin the integration process, you must have administrative access to a Google Workspace account with the necessary permissions to add users and manage settings.
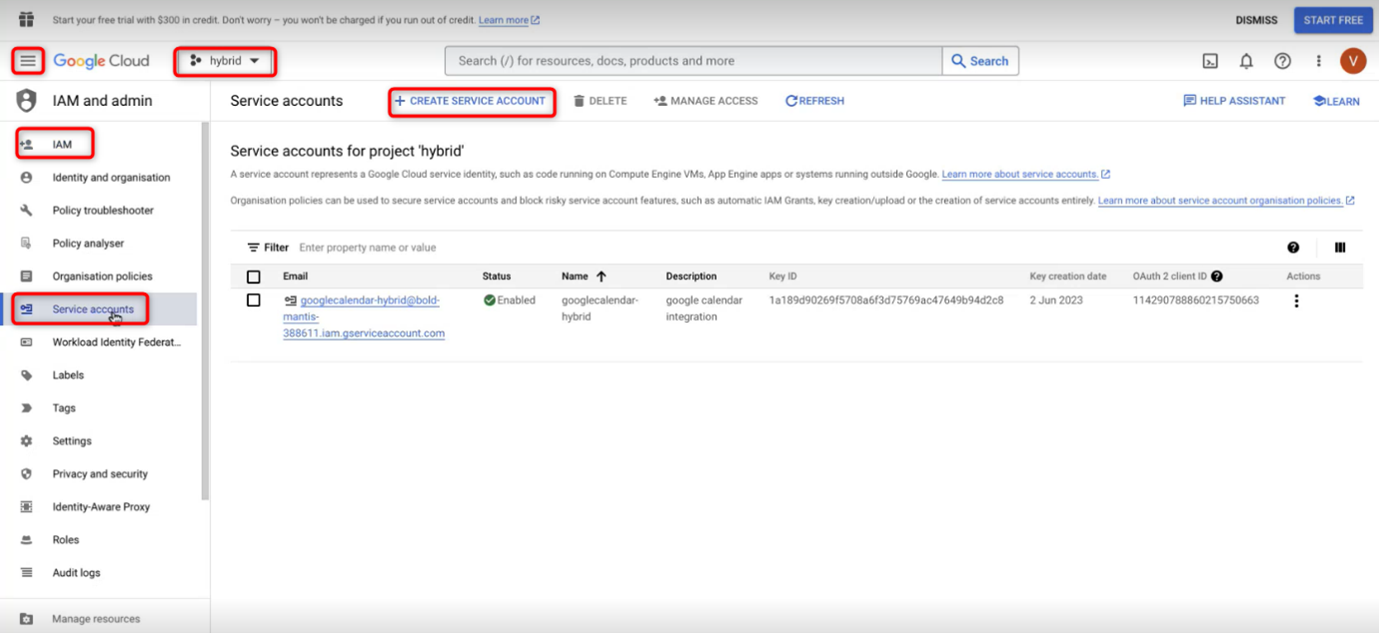
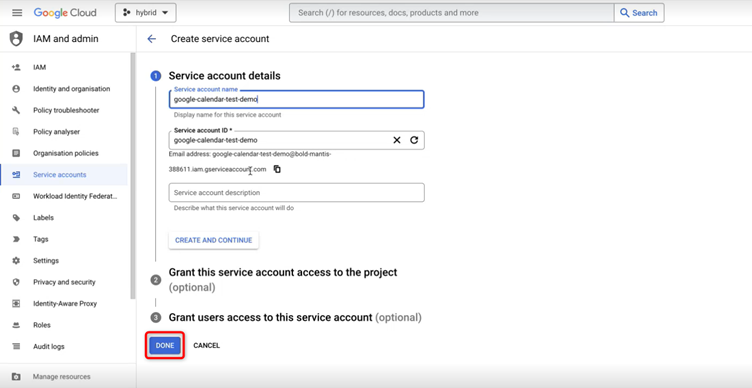
Google Cloud Platform Account:
You will need a Google Cloud Platform account to create a project and a service account for accessing the Google Calendar API.
KloudHybrid Admin Account:
Access to the KloudHybrid admin account is required to configure the integration settings and enable the usage of the Google Calendar API within KloudHybrid.
Integration Steps:
Follow the step-by-step instructions below to successfully integrate Google Calendar into KloudHybrid.
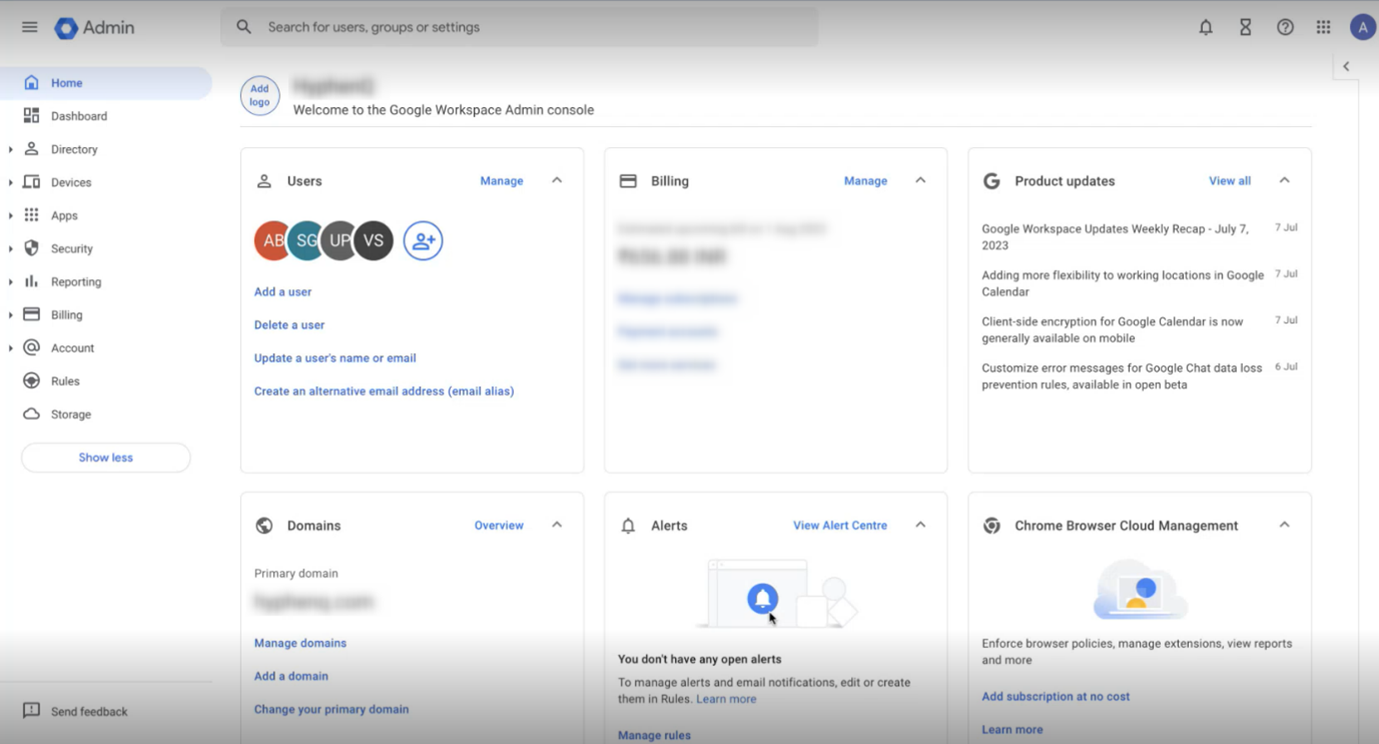
Step 1: Add Users in Google Workspace Admin Console:
To initiate the integration, proceed with adding the required users to the Google Workspace admin console, following these steps:
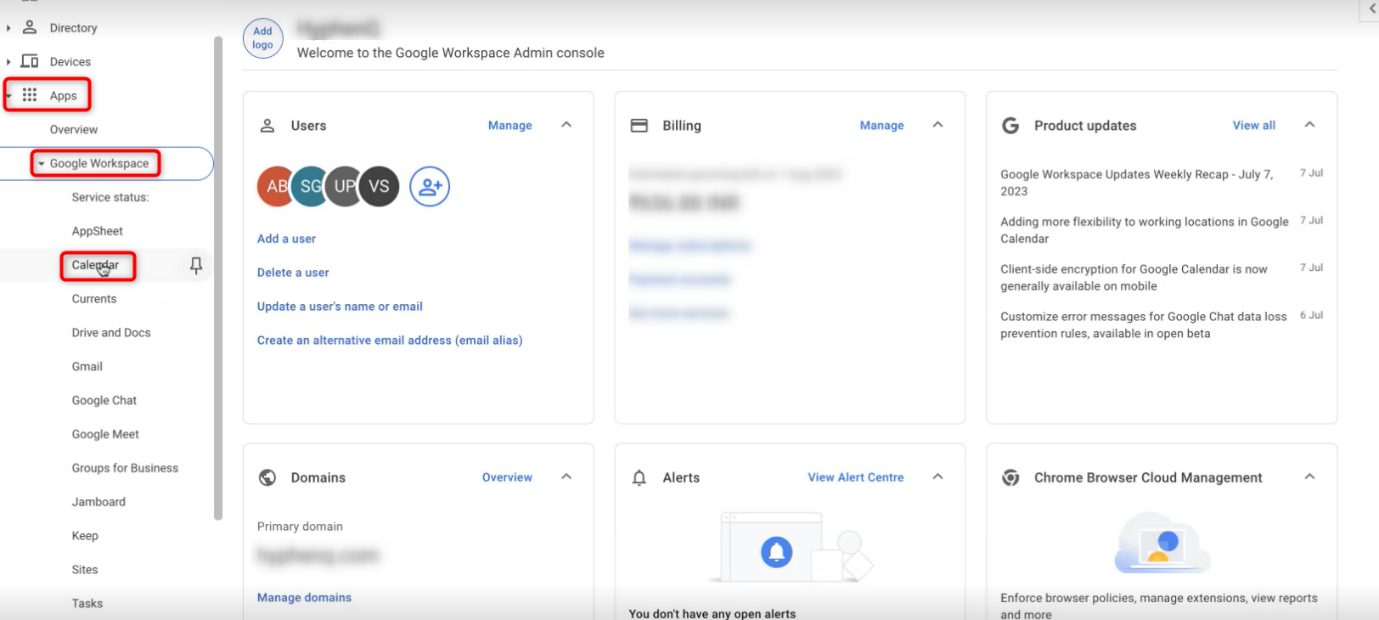
Access the Google Workspace admin console by navigating to admin.google.com.
Utilize administrative privileges to add the designated users who will utilize the Google Calendar functionality within KloudHybrid.
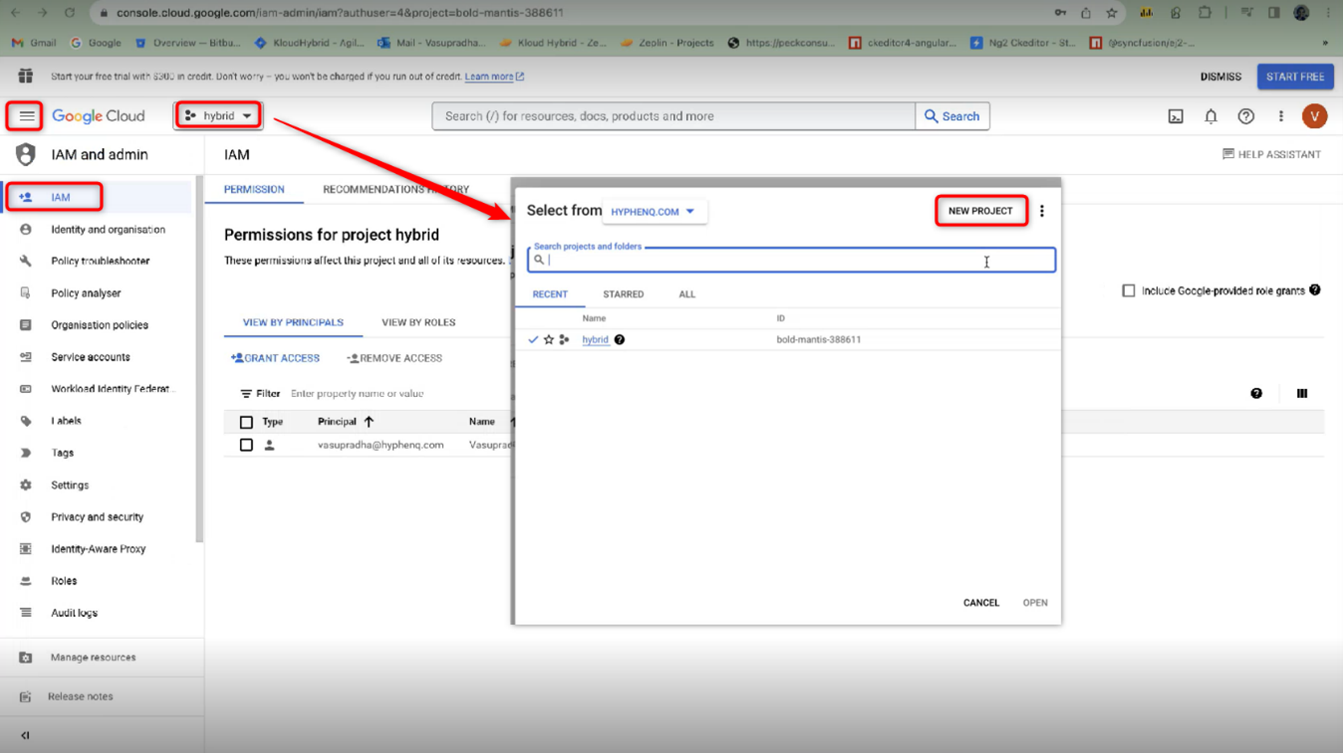
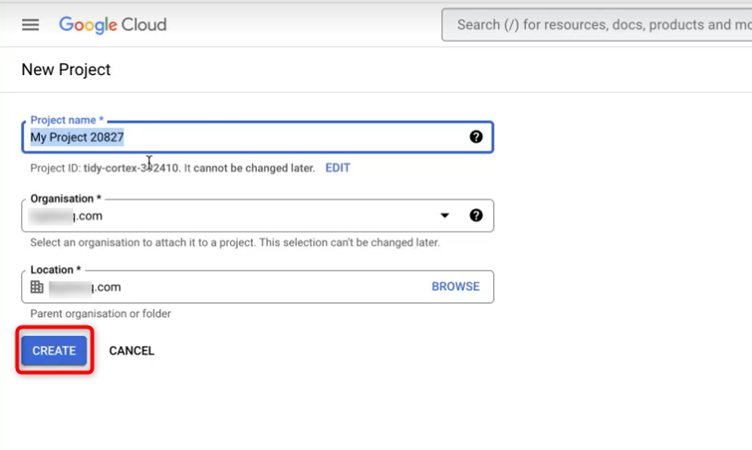
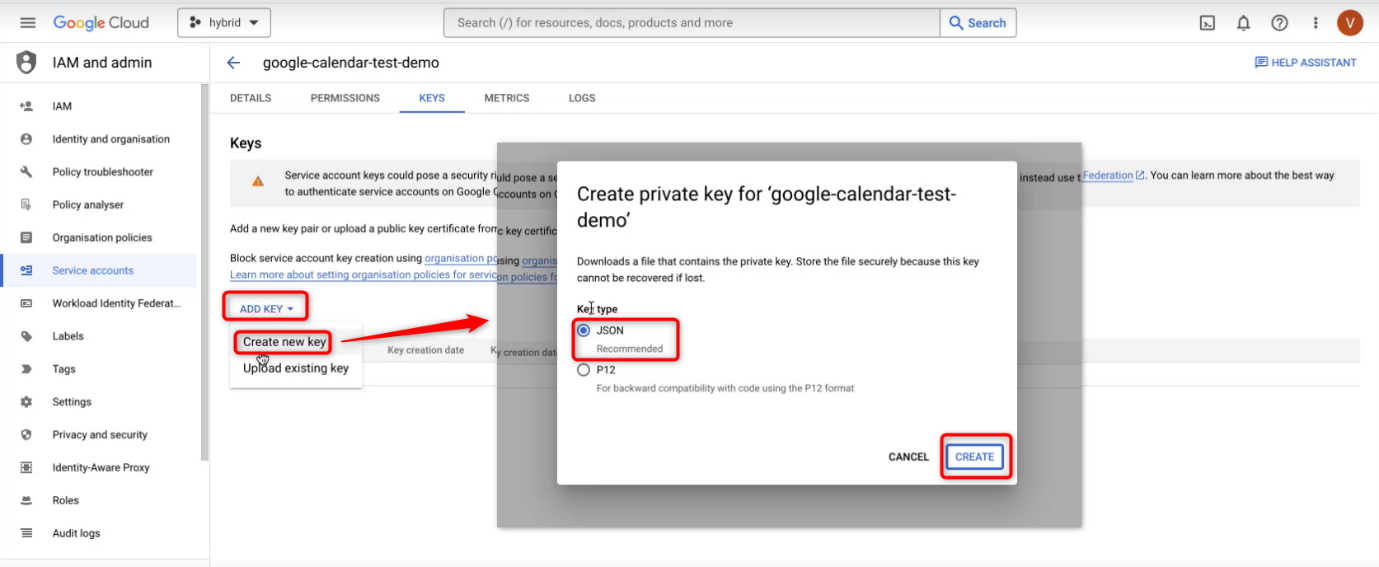
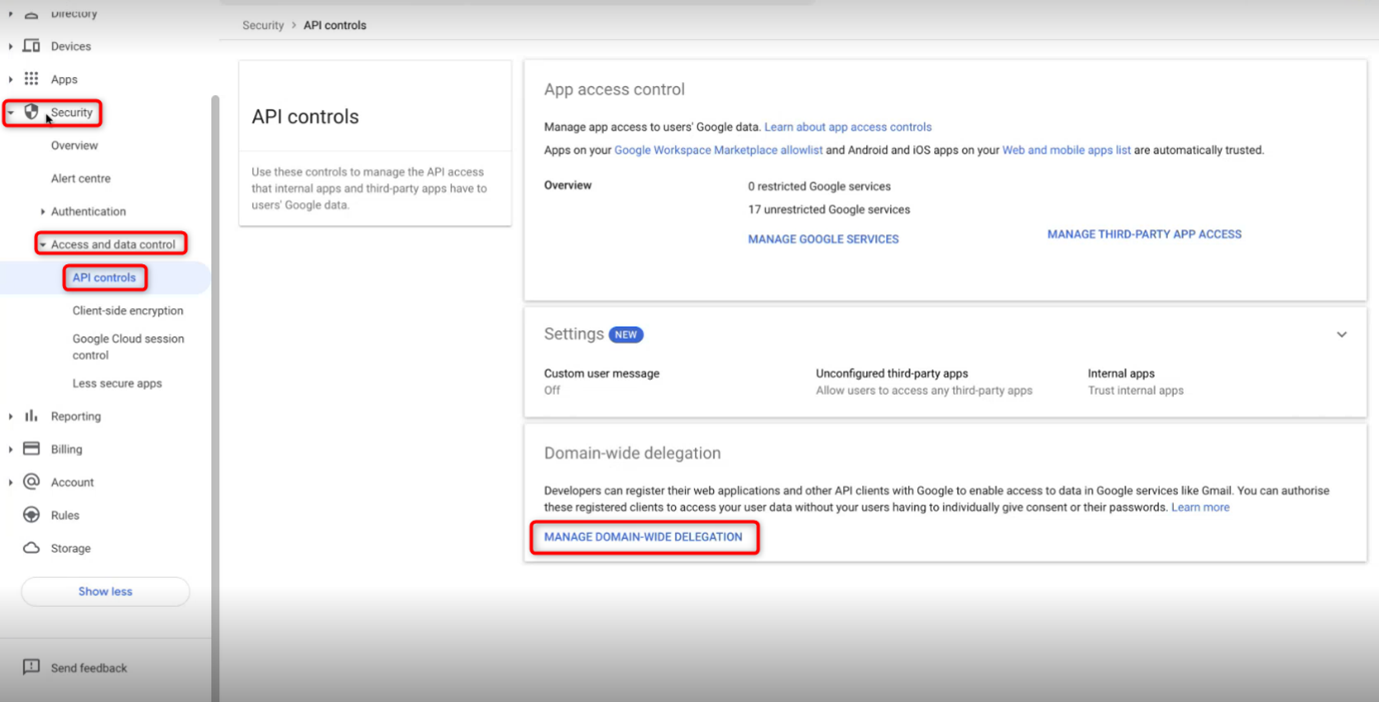
Step 2: Create a Project in Google Cloud Console:
After adding the necessary users, continue with the following steps to create a project in the Google Cloud console:
These steps ensure that the necessary configurations are made on the admin side to enable seamless integration of Google Calendar into KloudHybrid.
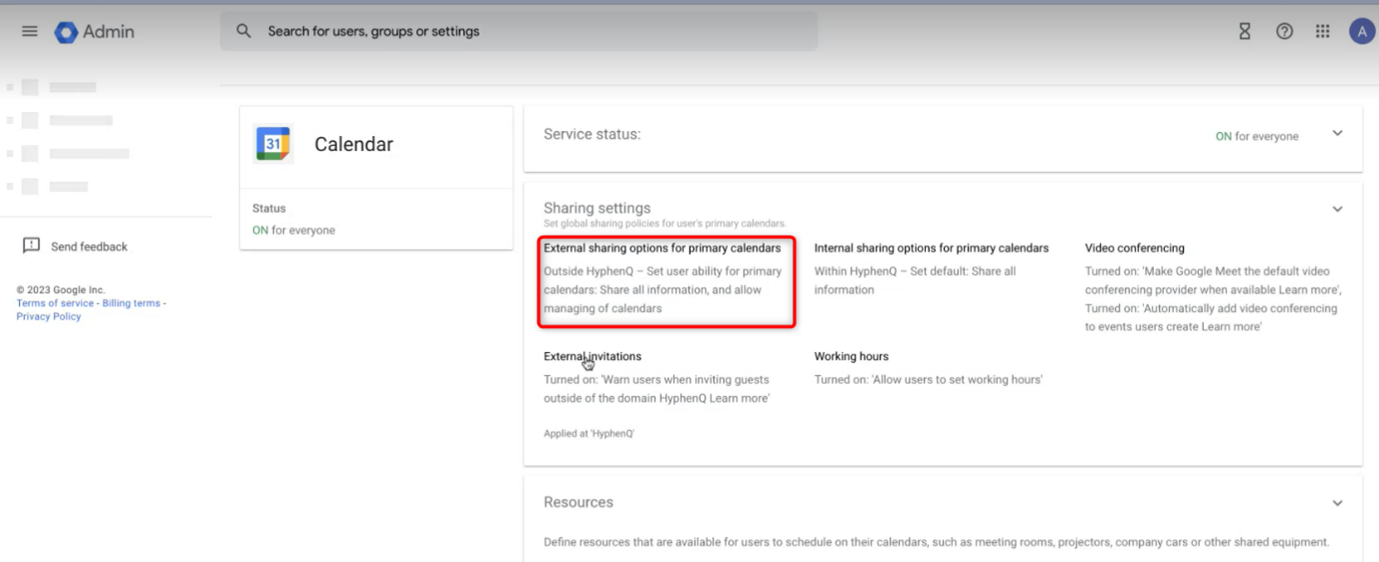
Making a Calendar Available to the Public:
To make a calendar available to the public, follow these steps:
Note: This step is mandatory for all users and admins to complete.
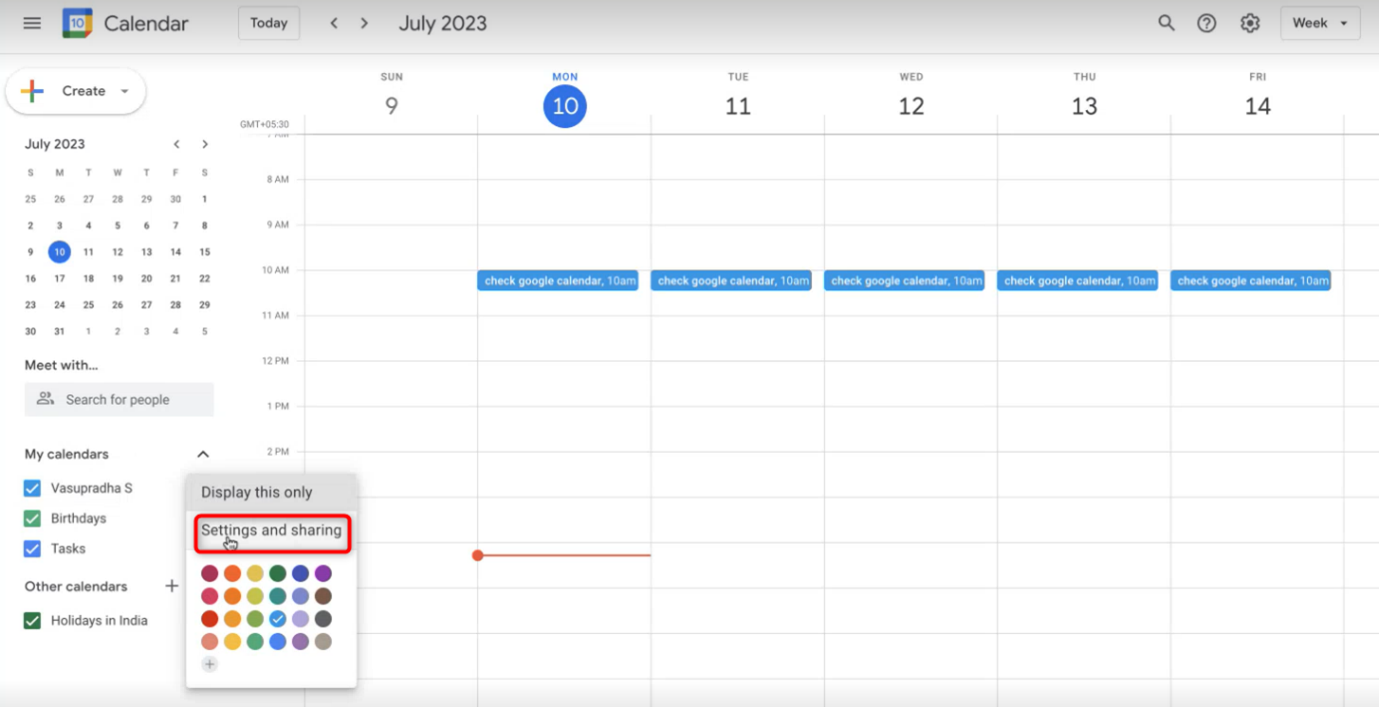
Open the Google Calendar.
Navigate to “Settings and sharing” from “My Calendar”.
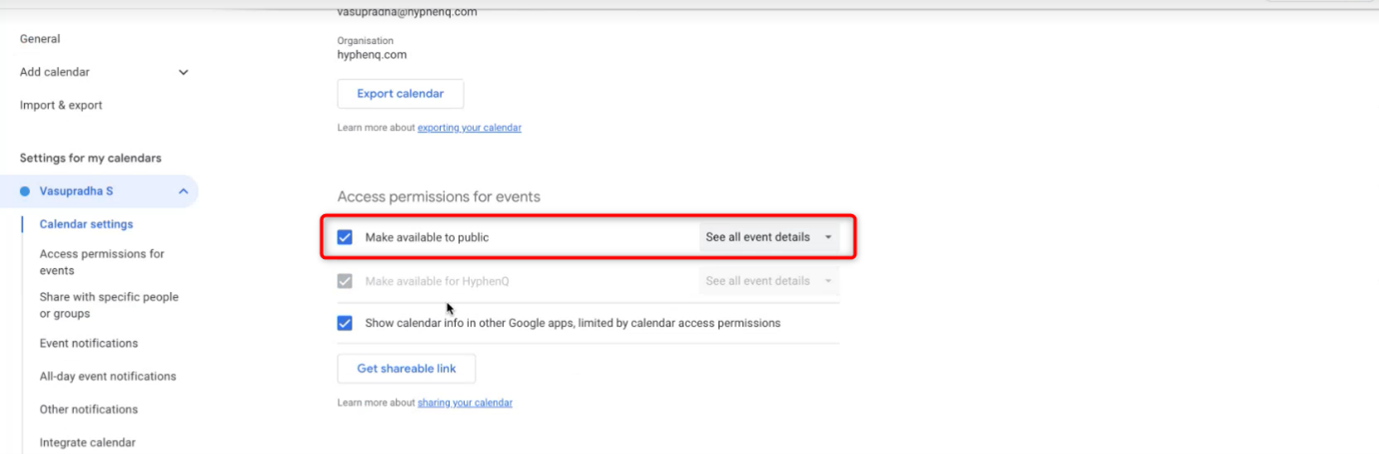
In the opened window, select the “Make available to public” option.
Choose the desired level of access you wish to grant to the public. For example, selecting “See all event details”.
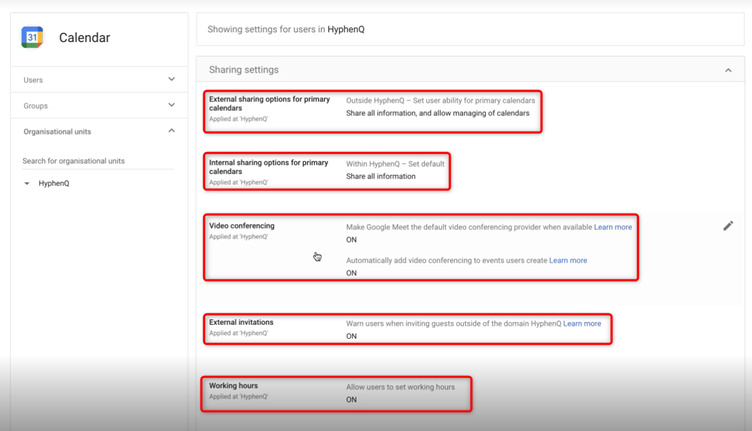
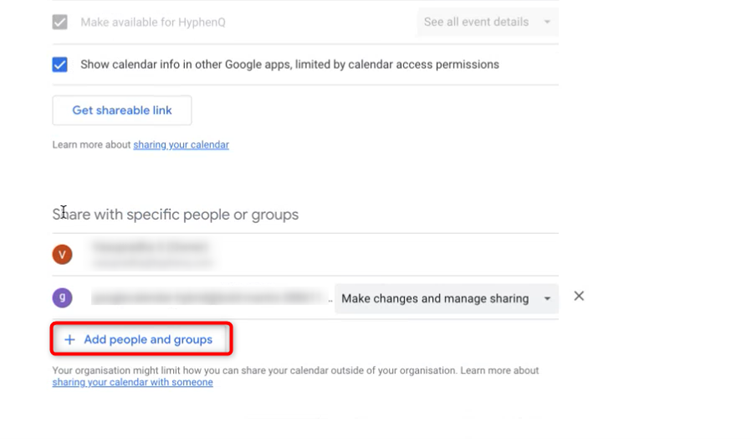
Sharing a Calendar with Specific People or Groups:
To share a calendar with specific individuals or groups, perform the following actions:
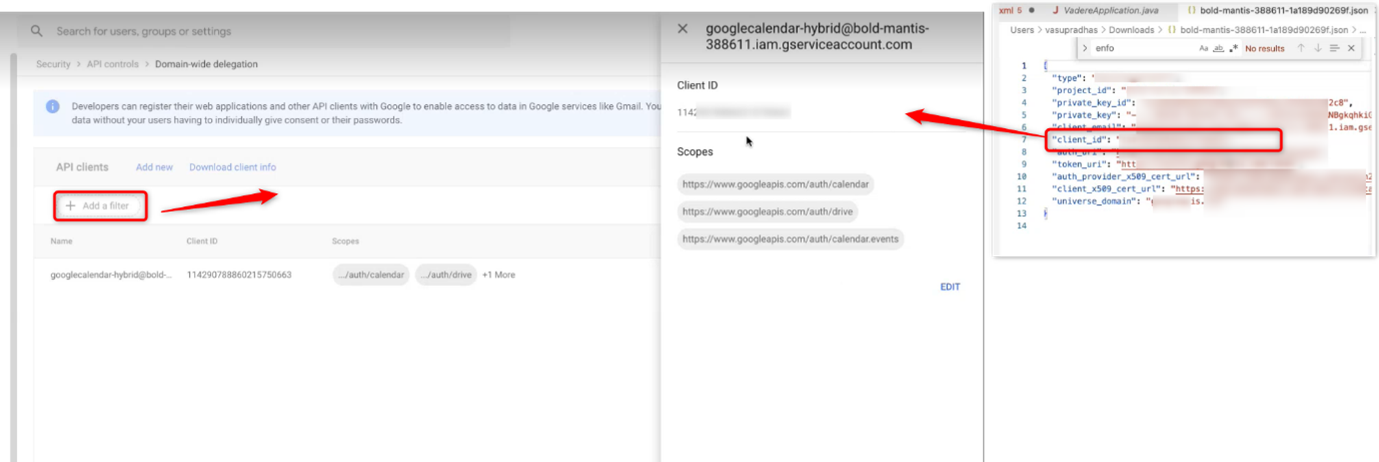
Scroll down and click on the "+ Add people and group" button.
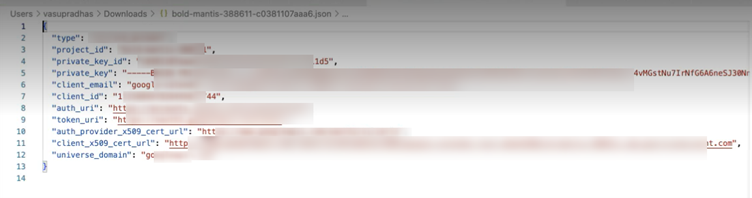
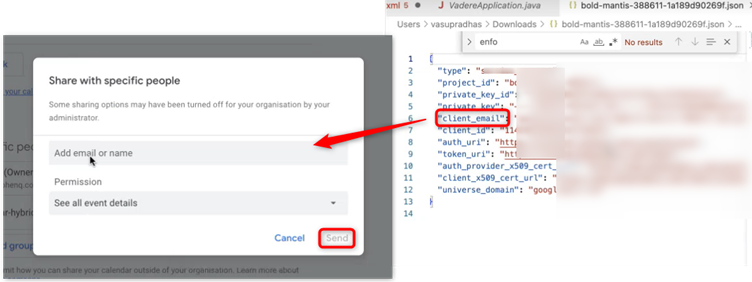
In the popup window, copy and paste the client email obtained from the JSON key file into the email column.
From the permissions dropdown list, select either “See all event details” or “Make changes and manage sharing”.
Click the “Send” button to finalize the sharing process.
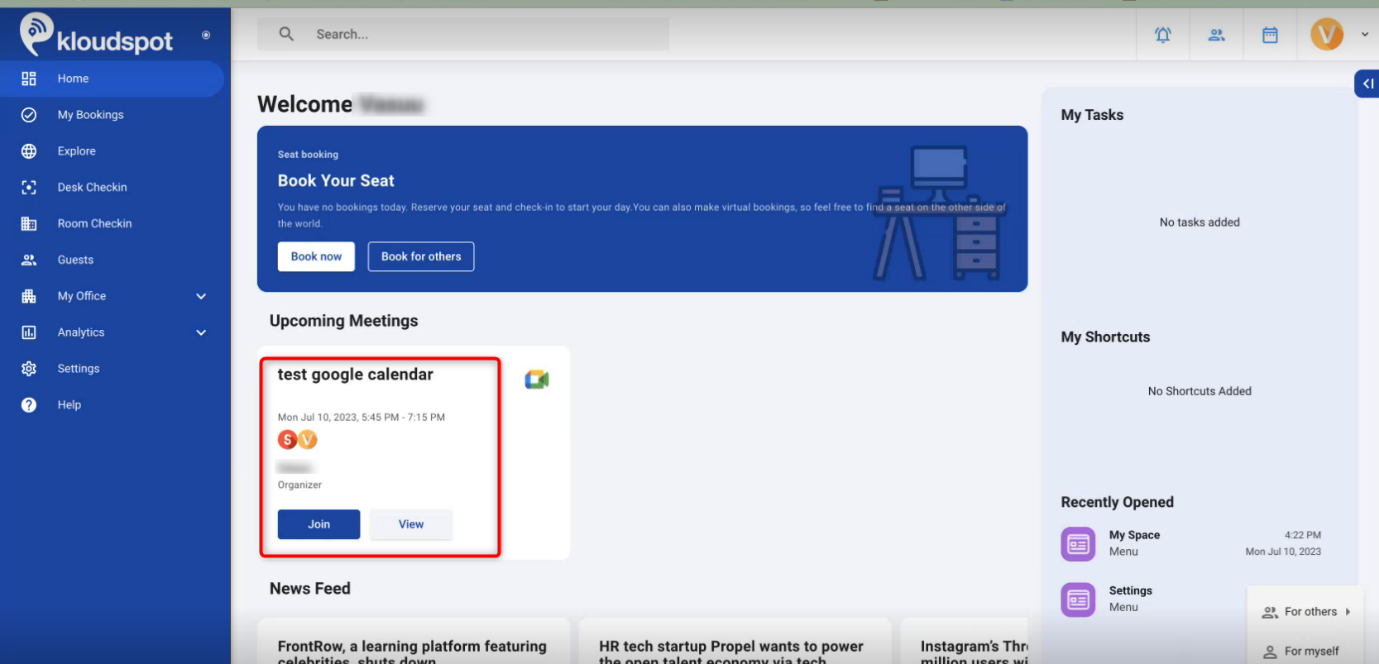
After all these configurations you can see Google calendar events on your Hybrid homepage and calendar page.
Configuring Email and SMS Providers for Notifications
To ensure seamless communication and stay updated with important notifications from the Hybrid application, it is crucial to set up the email and SMS provider information. By configuring your organization’s preferred provider, you can receive timely alerts and stay informed about essential events.
In this step, you will need to enter the necessary details of your organization’s preferred email and SMS provider. These details will be used to establish a connection between KloudHybrid and the chosen provider.
For setting up the email notifications, refer to the comprehensive Email (SMTP) Setup document. This guide provides detailed instructions on how to configure the email provider successfully.
If you also wish to receive SMS notifications, refer to the dedicated SMS Setup document. This guide will walk you through the steps to configure the SMS provider and enable SMS notifications.
Subsections of Configuring Email and SMS Providers for Notifications
Email (SMTP) Setup
To enable email notifications in the system, first an SMTP server must be added. If no SMTP server is added, users will not receive notifications about upcoming bookings, cancellations, or check-in reminders. Guests will not receive instruction emails letting them know how to get on site. Administrators will not receive any reports that are configured to automatically send via email.
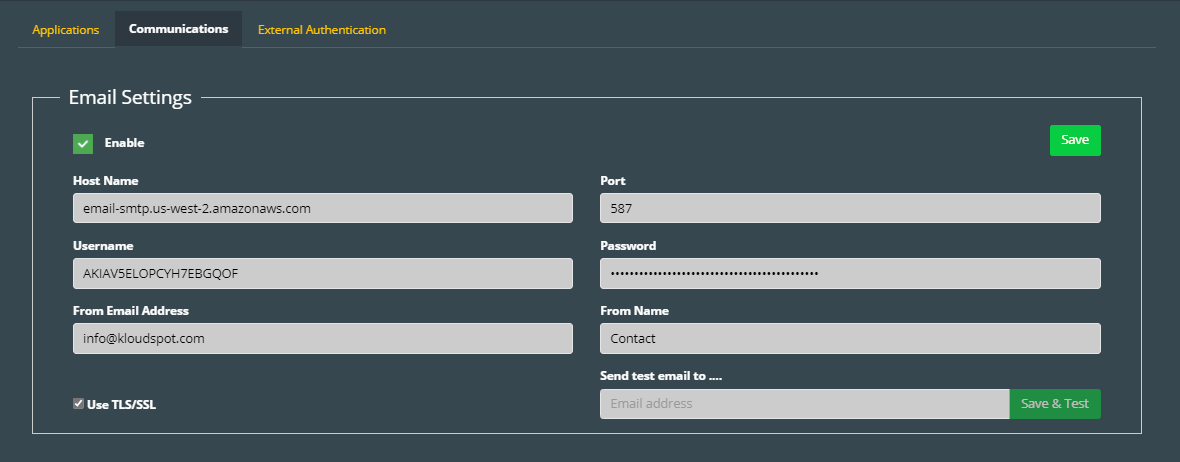
Navigate to the Advanced Settings page, then to Configuration -> Integrations -> Communications. Check the enable check box under Email settings as seen in the figure below.
Obtain the provider’s Host Name, Port, Username, and Password from the SMTP server you are using and enter them in the associated fields below.
Then type “from email” and “from the name” into the appropriate fields. This will be the email address & from the name users see emails coming from when they receive notifications.
Check TLS/SSL if your SMTP server is configured to use these protocols.
Enter your email address into the “Send a test email to ….” Field, and click Save & Test. You should receive an email from the system. If not, check to make sure the values entered in steps 2 – 4 are correct.
SMS Setup
To enable SMS notifications in the system, first an SMS provider must be added. If no SMS provider is added, users will not receive notifications about upcoming bookings, cancellations, or check-in reminders.
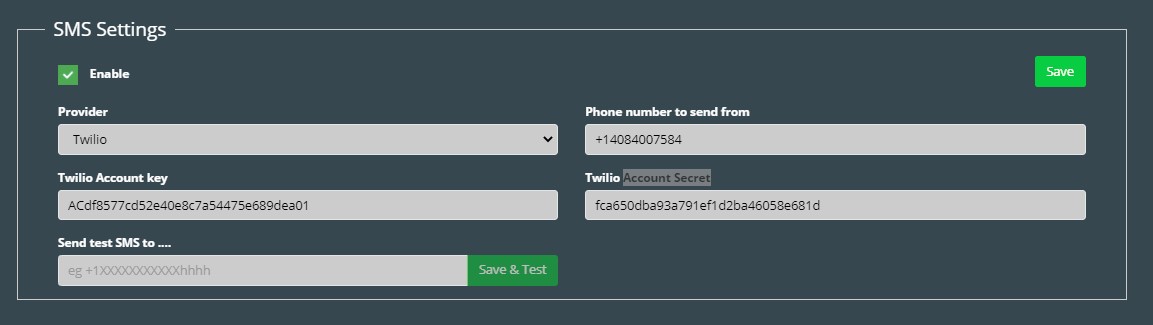
Navigate to the Advanced Settings page, then to Configuration -> Integrations -> Communications. To enable SMS settings, check the enable check box.
Select the provider from the dropdown menu.
Different providers will have different required fields. Get the information from your SMS provider and copy it into the fields in the system.
Enter the sender’s phone number in the “Phone number to send from” text box.
Enter your phone number into the “Send test SMS to ….” Field, and click “Save & Test”. You should receive a SMS from the system. If not, check to make sure the values entered in steps 2 – 4 are correct.
Configuring the Check-in Process
In this section, we will explore how to configure the check-in process for employees or visitors who have booked seats through the KloudHybrid app. By setting up various check-in options, you can offer a seamless and convenient experience for your users. KloudHybrid provides five ways to enable check-in, each tailored to suit different preferences and needs.
To ensure a smooth check-in process, you have the flexibility to choose from five different check-in methods:
a. Self-Check-in
b. QR Code Site Check-in
c. QR Code Desk Check-in
d. Lobby Scan Check-in
e. Badge Check-in
Depending on your organization’s requirements, you can enable one or multiple check-in methods to provide diverse options for users.
To understand how to configure the check-in process effectively, follow the steps given below. This guide will walk you through the steps to set up and customize each check-in method according to your preferences.
The check-in process will define how an employee completes their desk booking process. Confirming that they are using the seat, made it to where they were going, and completed any requisite procedures before continuing.
Kloudspot has multiple check-in processes that can be configured in the system based on your needs. In this section, we will describe all the different options available for the check-in procedure and discuss how to configure and deploy them. The different check-in processes are as follows:
Self-Check-in
QR Code site check-in
QR Code desk check-in
Lobby scan check-in
Badge check-in
Before proceeding it’s important to understand the various stages of the entire booking process.
The first stage of the booking process is for a user to go in and create the actual booking. This is where they will make their site, seat, time, and date selections, and then reserve that seat for the given time.
The next stage of the booking process is the health questionnaire. This is generally completed before an employee has come onto the site to check-in. Employees are notified if they are cleared to head into the site or not based on their responses to the health questionnaire. It’s also important to note that this is an optional step, and administrators can configure the system to skip directly to step #3.
The final step of the booking process is the check-in process, which is what this section discusses. The check-in process you configure has no bearing on steps #1 or #2, and you can configure those stages separately, as discussed in other sections.
Self-Check-in
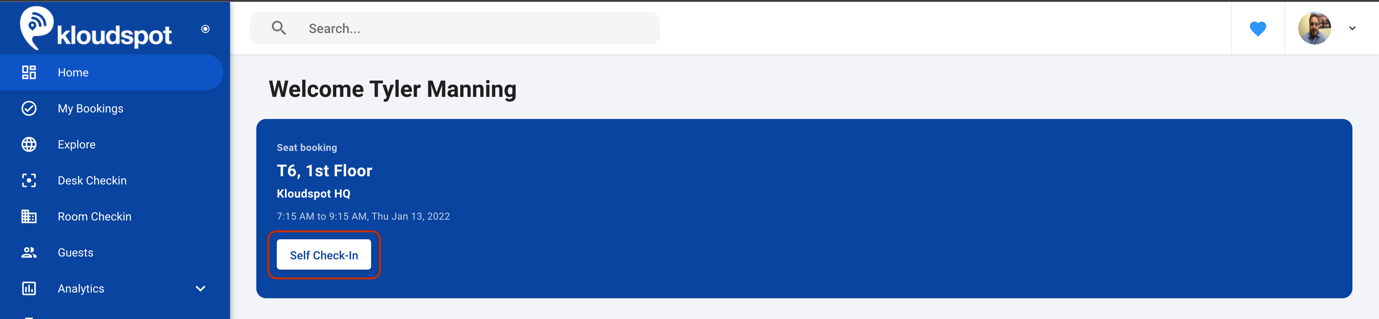
The self-check-in process is the simplest of all check-in procedures, it simply involves the user confirming their booking at the time of check-in. This is done by simply clicking the self-check-in button that appears on the application home screen at the time of check-in, as seen below.
Once the user has clicked the self-check-in button, the process is complete, they will be notified through the application that their check-in process is complete, and they can feel free to exit the application and continue with their day.
To configure self-check in, navigate to the Advanced Settings page, then to Configuration -> Hybrid Settings -> scroll down to Check-in Settings.
Next, if checked, uncheck Kiosk Check-in, and check Check-in without QR code scan, as seen in the below figure.
Finally, click the save button at the top of the Hybrid Settings page as seen below.
QR Code Site Check-in
The site QR code check-in process is where a global site QR code is pasted either in the lobby, or around the office at key entry points. When users enter the site, they pull out their mobile application, proceed to the check-in process, and scan the global site QR code. Once they do this, their check-in process is complete, they will be notified through the application that their check-in process is complete, and they can feel free to exit the application and continue with their day.
From the user perspective, they will click the “Self Check-in” button on the home page at the time of check-in.
The user will then be redirected to a QR code scan in page:
The user will then need to point their camera at the QR code, the QR code will be automatically detected & scanned by the application (when made visible). As soon as the QR code gets scanned by the application, the check-in process is complete.
To set up QR Code Site Check-in:
To configure self-check in, navigate to the Advanced Settings page, then to Configuration -> Hybrid Settings -> scroll down to Check-in Settings.
Next, uncheck Kiosk Check-in, and uncheck Check-in without QR code scan, as seen in the below figure
Next, click the save button at the top of the Hybrid Settings page as seen below.
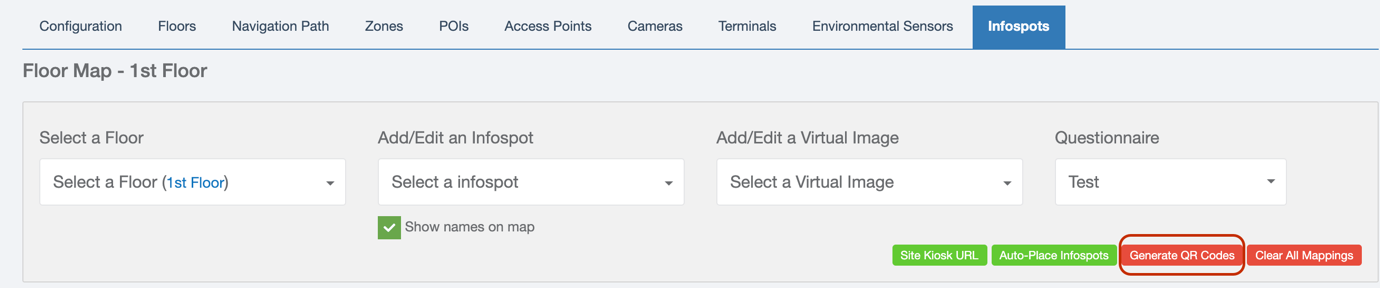
Then, navigate to the Advanced Settings page, then to Configuration -> Locations -> Infospots page.
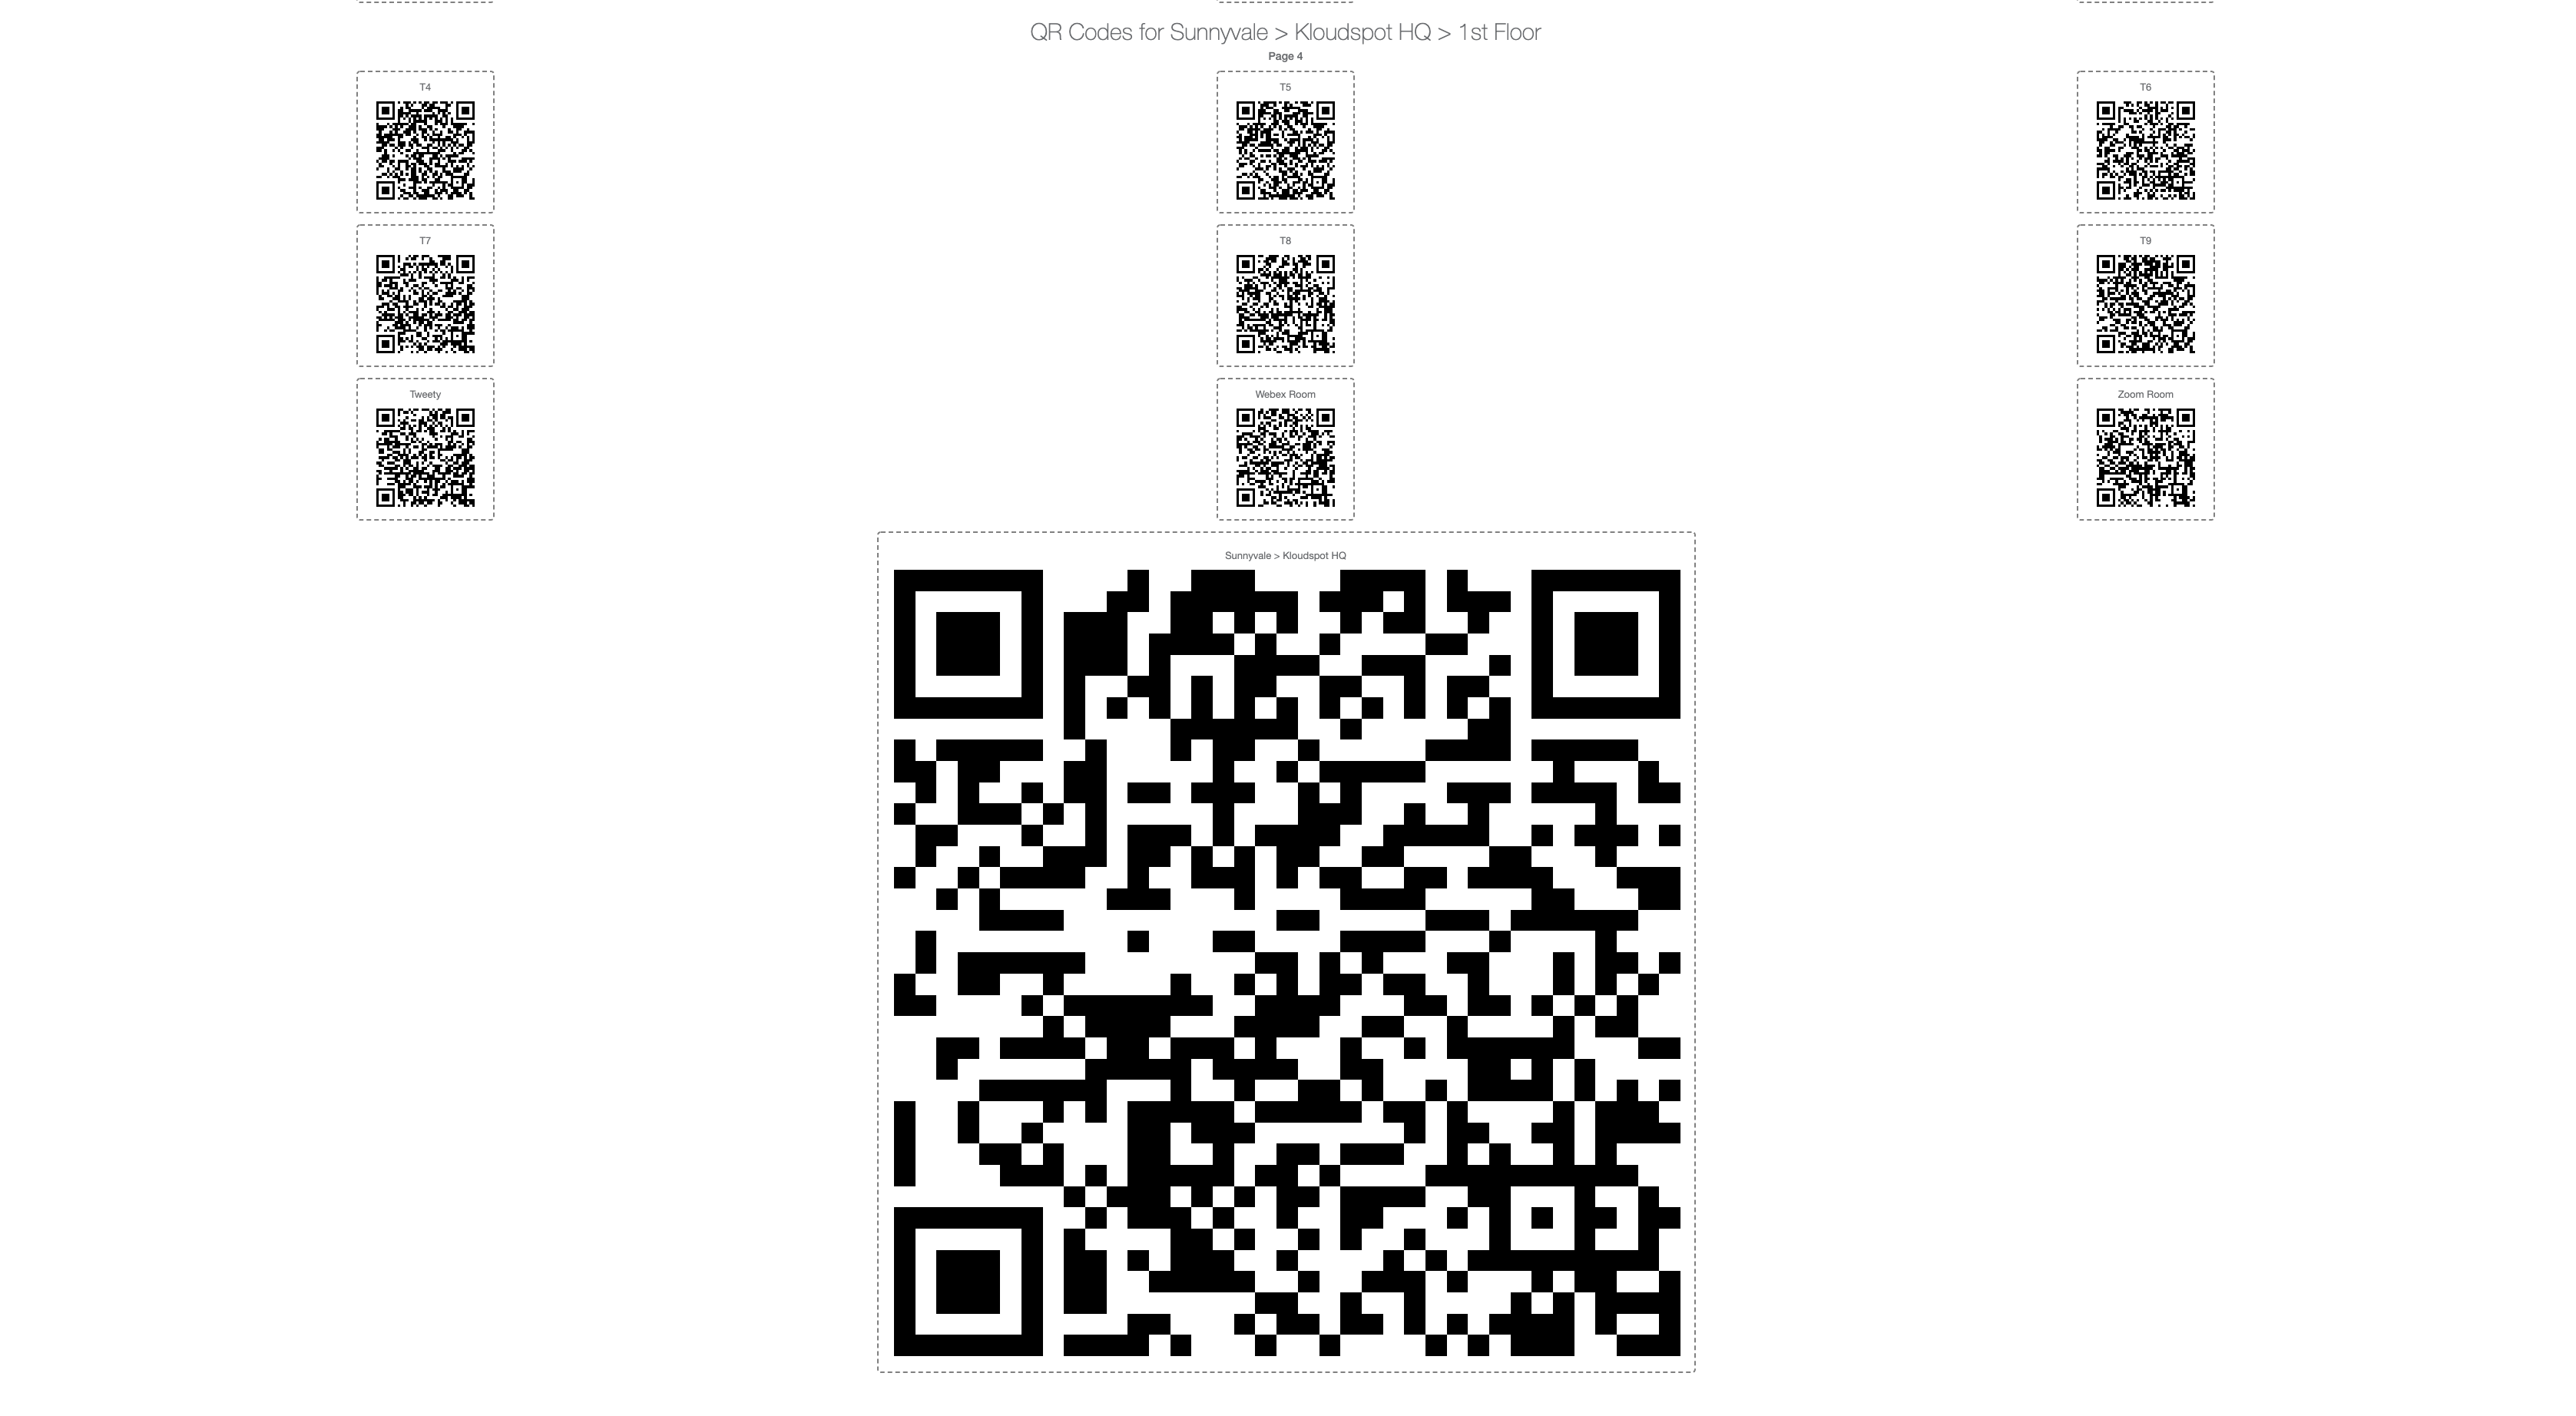
Click the Generate QR Codes button.
This will redirect you to a page with many QR codes. At the top of the web page, there will be smaller QR codes that are marked for specific infospots. At the very bottom of the page, there will be a single large QR code, which is the site QR code. Print this large QR code out and paste it around you site. This will be the QR code that users will need to scan to check-in
QR Code Desk Check-in
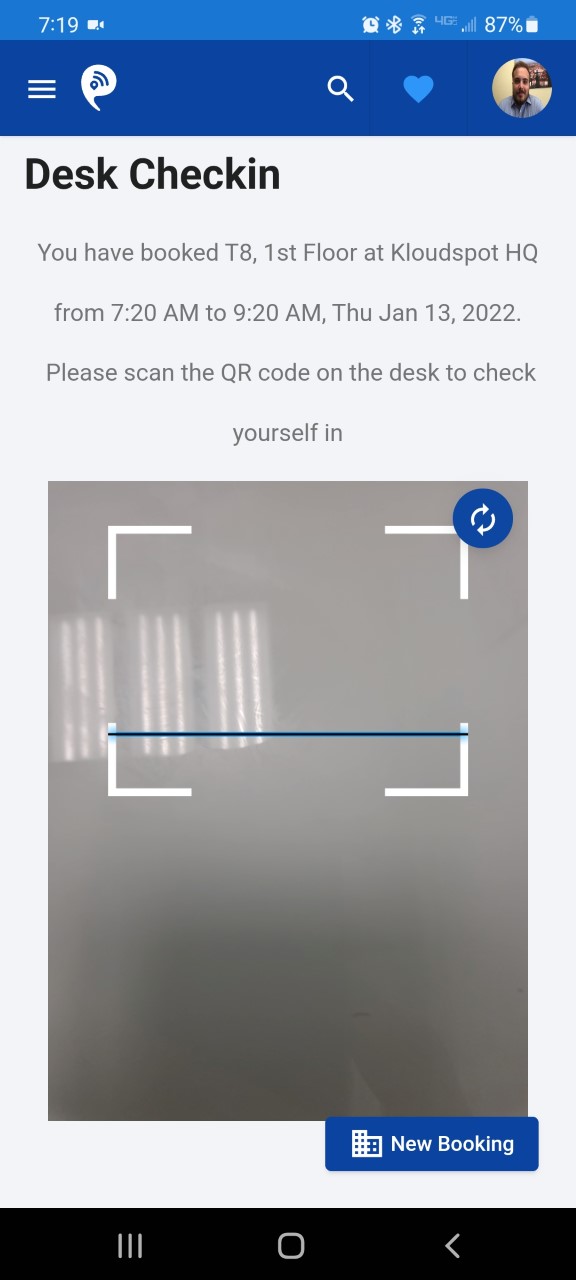
The desk QR code check-in process is where a QR code is pasted in every bookable seat. When users enter the site they head to their reserved seat. Once they are at their seat, they pull out their mobile application, proceed to the check-in process, and scan the desk QR code. Once they do this, their check-in process is complete, they will be notified through the application that their check-in process is complete, and they can feel free to exit the application and continue with their day.
From the user perspective, they will click the “Self Check-in” button on the home page at the time of check-in.
The user will then be redirected to a QR code scan in the page:
The user will then need to point their camera at the QR code, the QR code will be automatically detected & scanned by the application (when made visible). As soon as the QR code gets scanned by the application, the check-in process is complete.
To set up QR Code Desk Check-in:
To configure self-check in, navigate to the Advanced Settings page, then to Configuration -> Hybrid Settings -> scroll down to Check-in Settings.
Next, uncheck Kiosk Check-in, and uncheck Check-in without QR code scan, as seen in the below figure
Next, click the save button at the top of the Hybrid Settings page as seen below.
Then, navigate to the Advanced Settings page, then to Configuration -> Locations -> Infospots page.
Click the Generate QR Codes button.
This will redirect you to a page with many QR codes. At the top of the web page, there will be smaller QR codes that are marked for specific infospots. At the very bottom of the page, there will be a single large QR code, which is the site QR code. Print out the smaller QR codes and paste them on or around their associated desk.
Lobby Scan Check-in
The lobby scan check-in process is where, at the time of check in, the user will open their application, be given a QR code on the application, and then present the QR code to a tablet setup as a scanner in the lobby. This is a very similar process that airlines employ with boarding pass QR codes and at-the-gate scanning.
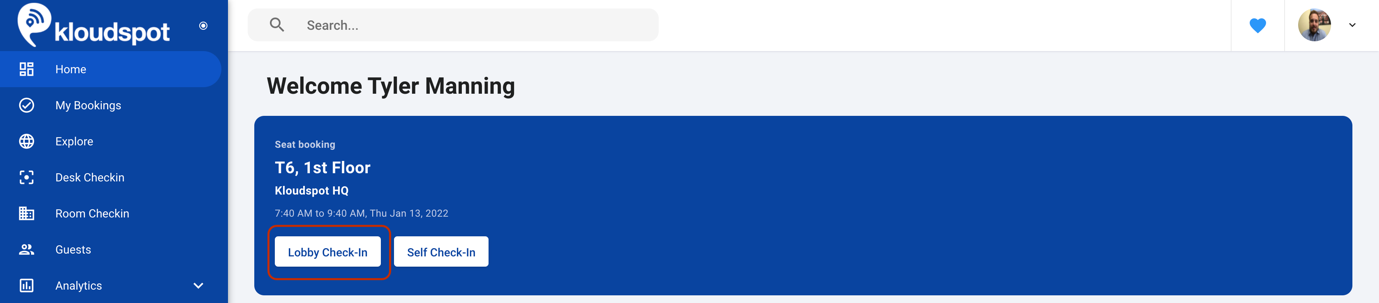
From the user perspective they will open their application, click the Lobby Check-in button.
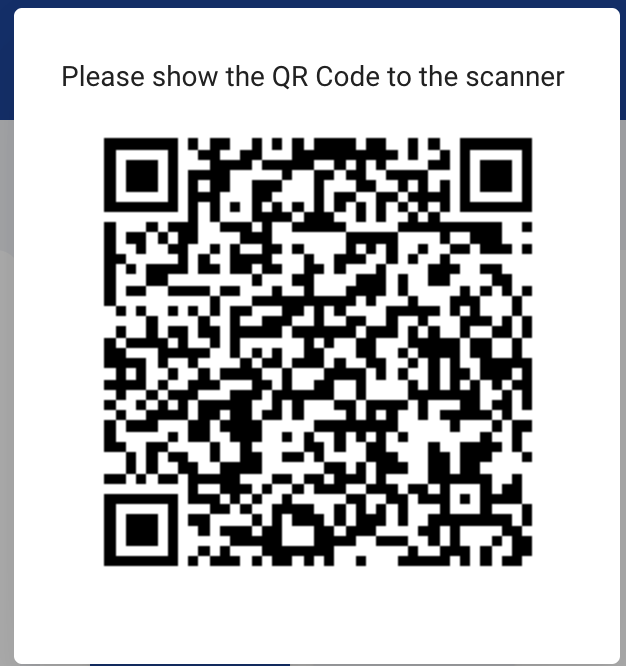
The user will then be presented with a pop-up asking them to present the QR code to the lobby scanner:
They will display this QR code to the tablet in the lobby, the same as you would when you’re in the airport. Once they do this, their check-in process is complete, they will be notified through the application that their check-in process is complete, and they can feel free to exit the application and continue with their day.
To set up Lobby Scan Check-in:
To configure self-check in, navigate to the Advanced Settings page, then to Configuration -> Hybrid Settings -> scroll down to Check-in Settings.
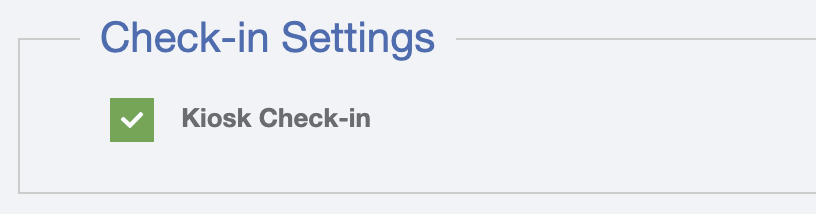
Next, check Kiosk Check-in, as seen in the below figure
Next, click the save button at the top of the Hybrid Settings page as seen below.
Then, navigate to the Advanced Settings page, then to Configuration -> Locations -> Infospots page.
Click Site Kiosk URL, copy the given URL, and paste it into the lobby kiosks browser. It will open a scanning & lobby management application. The web page opened can also function as a progressive web app, that can be downloaded onto the device.
Badge Check-in
Badge check-in is where an employee can complete their check-in process by scanning their employee badge, and by doing this they complete their check-in process. The KloudHybrid system can also in some cases work to deny users entry to the building based on certain conditions such as: working hours, health questionnaire responses, no upcoming bookings, etc.
To setup and configure the badge check-in please contact your Kloudspot representative.
Creating & Assigning Health Questionnaires
After successfully configuring the check-in process, you have the option to create customized health questionnaires.
Health questionnaires are designed to ensure the safety and well-being of your employees and visitors by verifying their health status before accessing the premises.
To create a health questionnaire, refer the following guide. This guide will provide you with step-by-step instructions on how to design and configure questionnaires tailored to your organization’s needs.
Once the questionnaire is created, you can assign it to specific locations within the KloudHybrid app. This enables targeted questioning based on different access points.
Health questionnaires can be a valuable tool in maintaining a safe and secure workplace environment, providing an additional layer of protection for your workforce.
Health questionnaires are the second step of the booking process, with the first step being reserving a space, and the third step being the check-in process. The health questionnaire gives employers an opportunity improves the health and safety of their site by validating the status of their employees before they come on site.
Administrators have several options with the health questionnaire that they will need to consider with their team before proceeding to configure the health questionnaire, such as:
What questions will be asked of the user, and what other information will they have to provide?
Will the system save the user responses to these questions, or simply save a true/false value if the user is allowed on site given what their responses were.
How often will employees need to fill out health questionnaires? Every day they come on site? Once a week? Once every two weeks?
In the case of an invalid response to the health questionnaire questions, who (if anyone) is notified?
Creating a Health Questionnaire
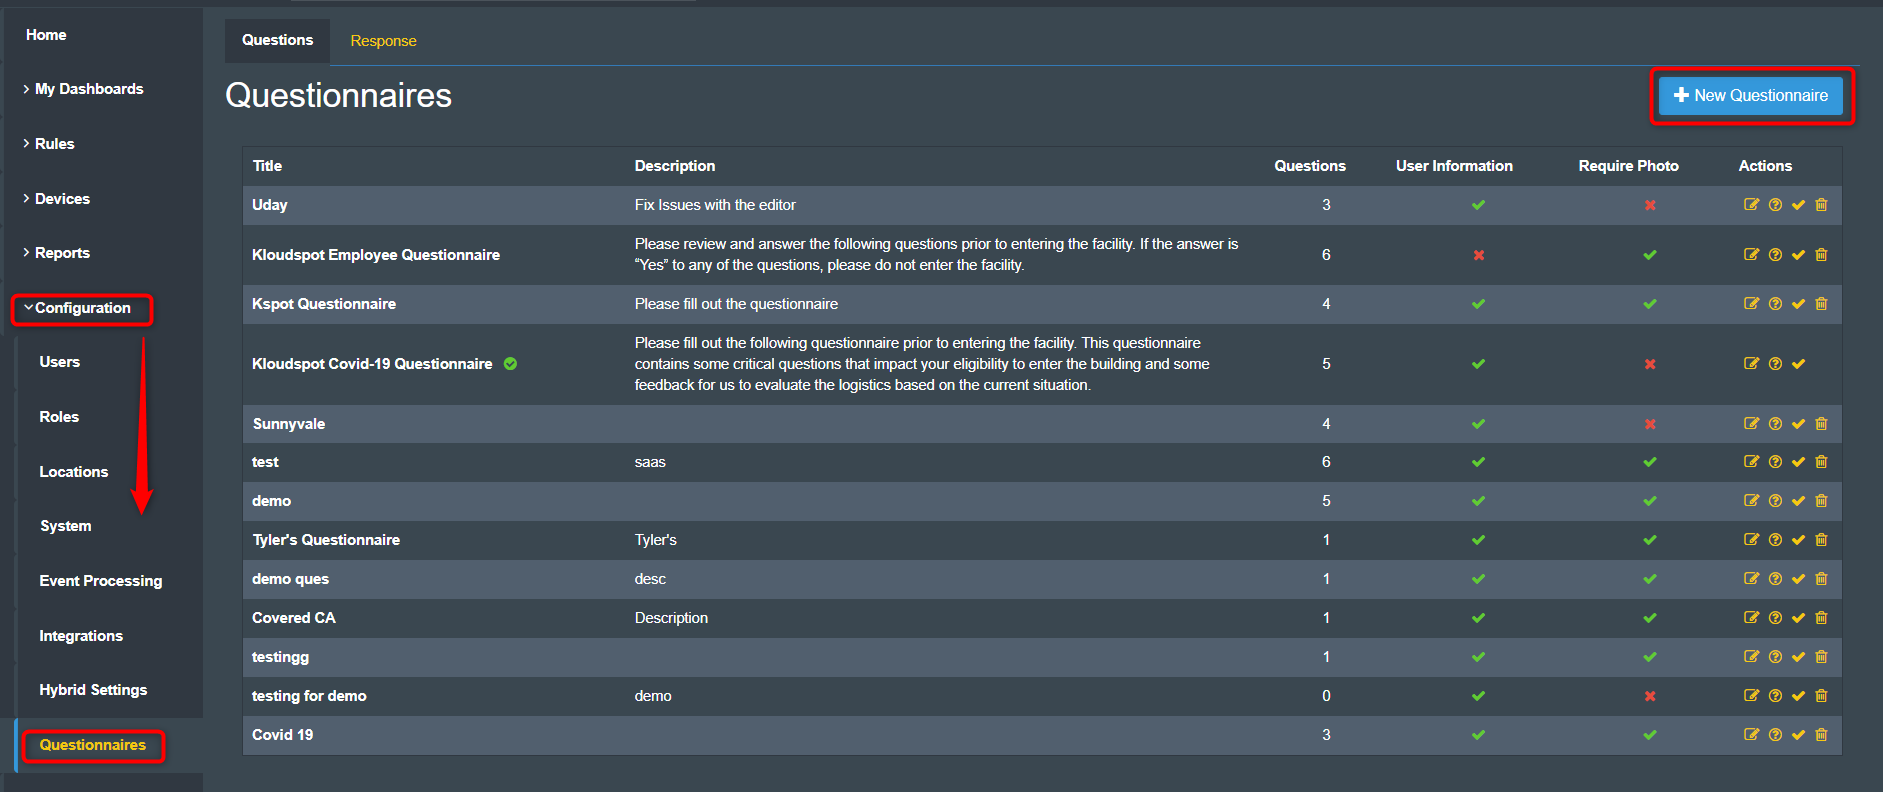
Navigate to the Advanced Settings page, then to Configuration -> Questionnaire’s page.
Click the +New Questionnaire button.
The Add Questionnaire dialog box will be displayed, here there are several fields to fill out:
Specify the title and description for the health questionnaire. The information entered here will be visible to the user when they fill out the health questionnaire.
Check/uncheck require photo, if this option is selected the user will be required to take a picture of themselves during the health questionnaire process.
Check/uncheck require user info, if this option is selected, the user will be required to provide their: email address, phone number, first and last name. If this information is available via the user profile, it will be automatically pulled.
Check/uncheck save user’s answers for all questions, if this option is selected, the users specific answers to the questions you ask in the health questionnaire will be saved. If it is left unchecked, the system will only store a single true/false value that determines if they passed or failed the health questionnaire.
Click Save to add it.
To add questions, click on the questions button on the right-hand side of the questionnaire.
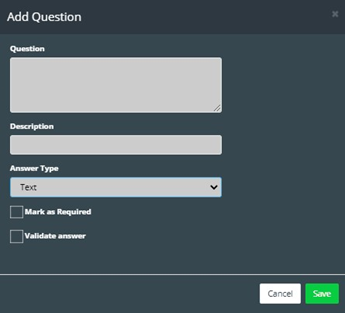
Click on the +New Question button to add questions.
Fill in the question and description in the “Add Question” window that appears.
Select the answer type from the dropdown menu. There are three different question types including: yes/no questions, text question (which are free form responses), and multiple choice questions where a user can select a single answer from multiple options as a response.
If you are creating a multiple-choice question, an additional field will be displayed that asks for you to input all possible answers as comma separated values. Example: answer1, answer2, answer3, answer4, answer5
Check/uncheck Mark as Required, if selected users will be required to answer this question before submitting the health questionnaire. If left unselected users can choose whether or not they fill out the question.
Check/uncheck Validate Answer, if selected you will also be required to fill out the Please provide a valid answer to this question for validation field. Additoinally, if selected, users will be required to fill out the correct response in order to complete their check in, if they fill out an incorrect response they will not be able to check in. If left unchecked, answers will not be validated.
Click Save.
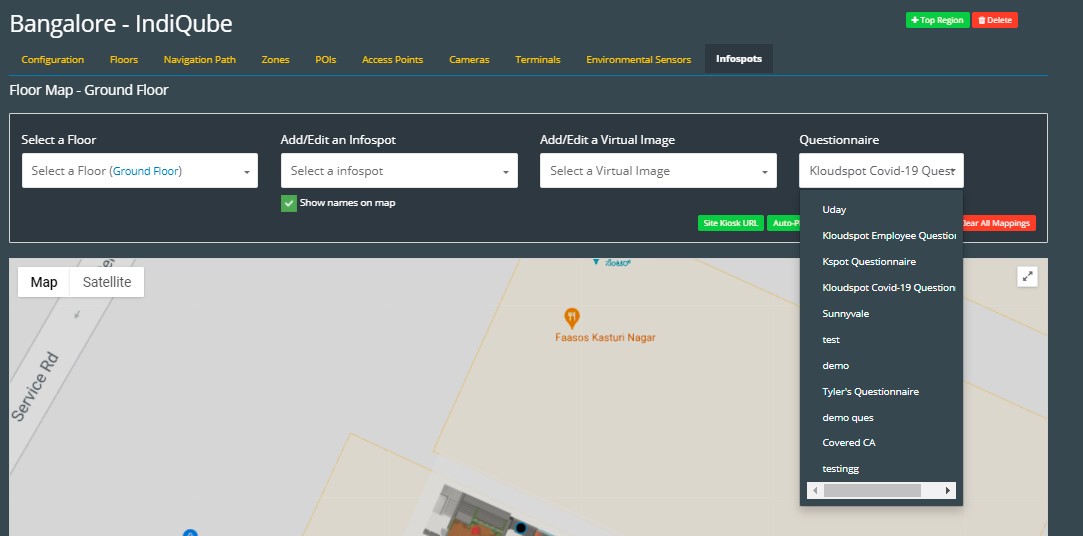
Assigning a Questionnaire to a Site
Navigate to the Advanced Settings page, then to Configuration -> Location page.
Select the site you wish to assign the questionnaire to. Then navigate to the infospot page.
Select the Questionnaire from the dropdown menu as seen in the figure below.
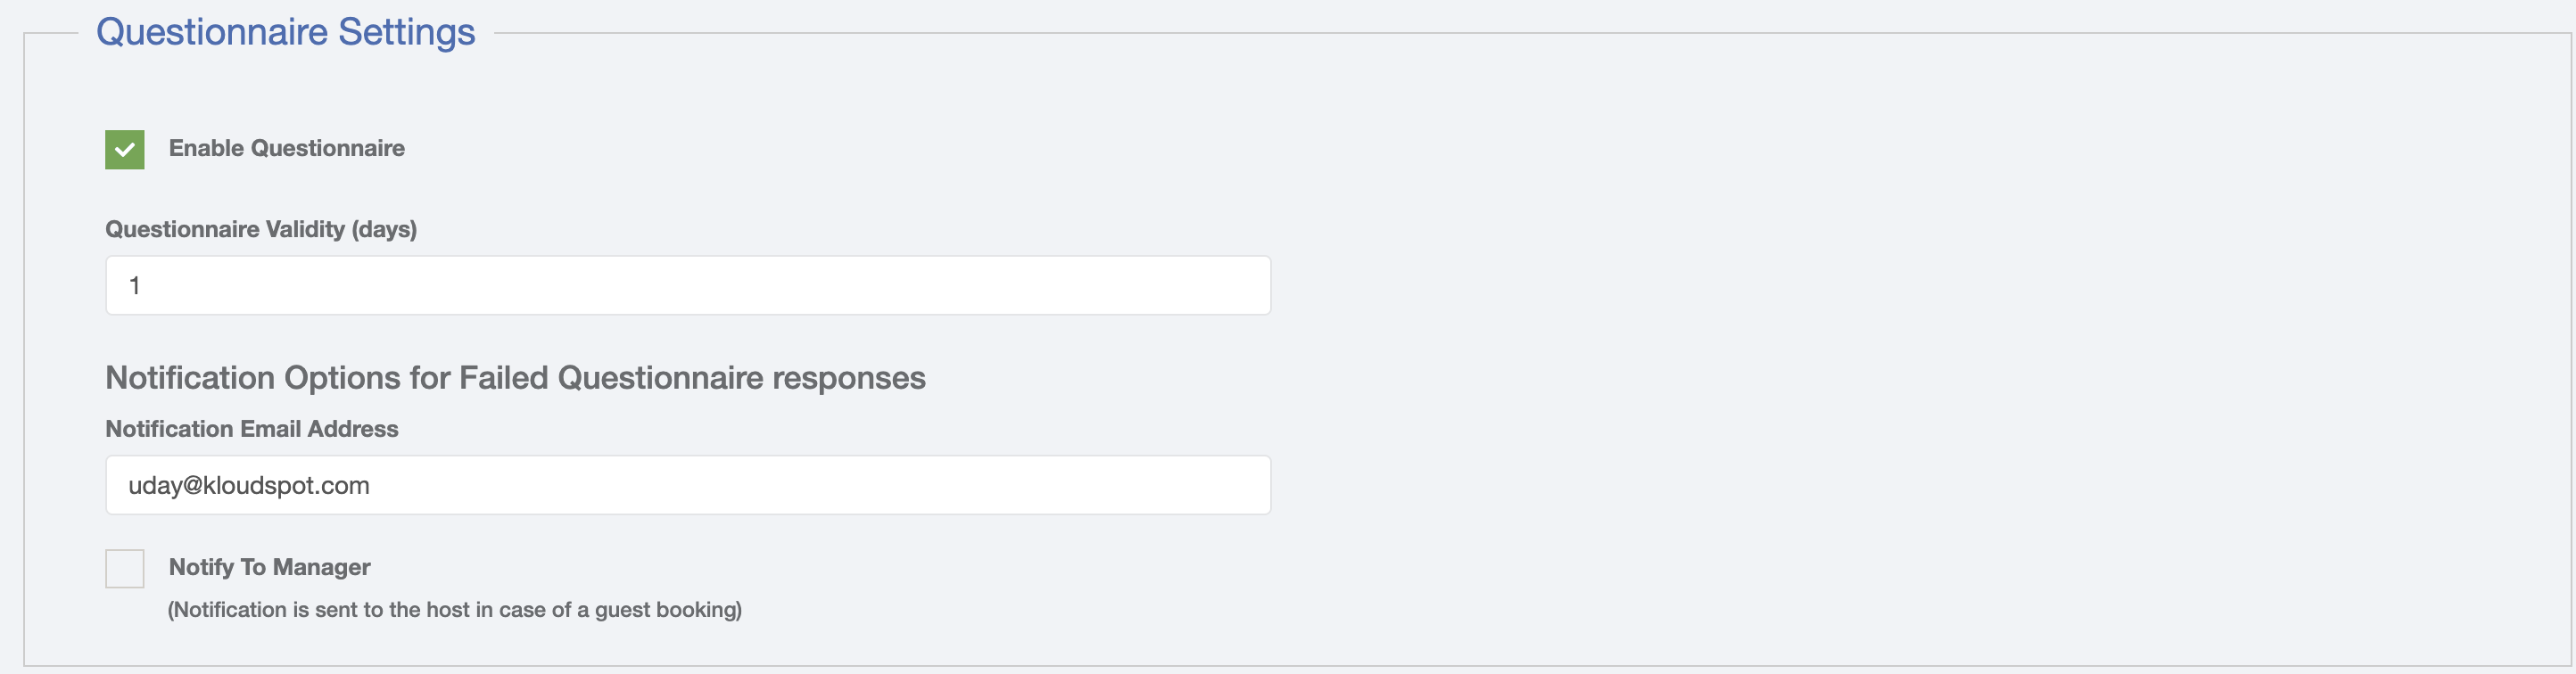
Miscellaneous Health Questionnaire Settings.
There are some additional settings available to help configure the functionality of the health questionnaire located on the Advanced Settings page, then to Configuration -> Hybrid Settings page. Scroll down the to Questionnaire Settings section as seen below.
This section allows you to enable/disable health questionnaires entirely from the system. If you enable the health questionnaire, but don’t want specific sites to fill out a health questionnaire, simply don’t assign a health questionnaire to that site.
Questionnaire Validity is how long the health questionnaire is valid for. So, for example setting 1 day here would require the employee to fill out a health questionnaire every day they wanted to come on site. A setting of 5 day here would require the employee to fill out a health questionnaire once a week.
Notification Email Address is the specific person or mailing list that will receive an email notification from the system if a user fails their health questionnaire. Ensure you have SMTP configured to receive these emails.
Notify To Manager if selected, and a user fails the health questionnaire, their direct manager will also be sent a notification email. Ensure that both SMTP and SCIM are configured.
Conference Room Setup
In this section, we will guide you through the process of setting up a check-in kiosk in front of the conference room that you have created as part of your hybrid office setup. The check-in kiosk is a convenient and efficient way for employees and visitors to check in before accessing the conference room. If you haven’t created a hybrid office yet, please refer to the Creating Your Hybrid Office document for detailed instructions.
Once you have successfully built your conference room and completed the hybrid office construction, it’s time to configure the conference room.
To setup a conference room in the system, first setup your conference room infospots following the instructions in the Adding Infospots section. Once you have done that follow the instructions below.
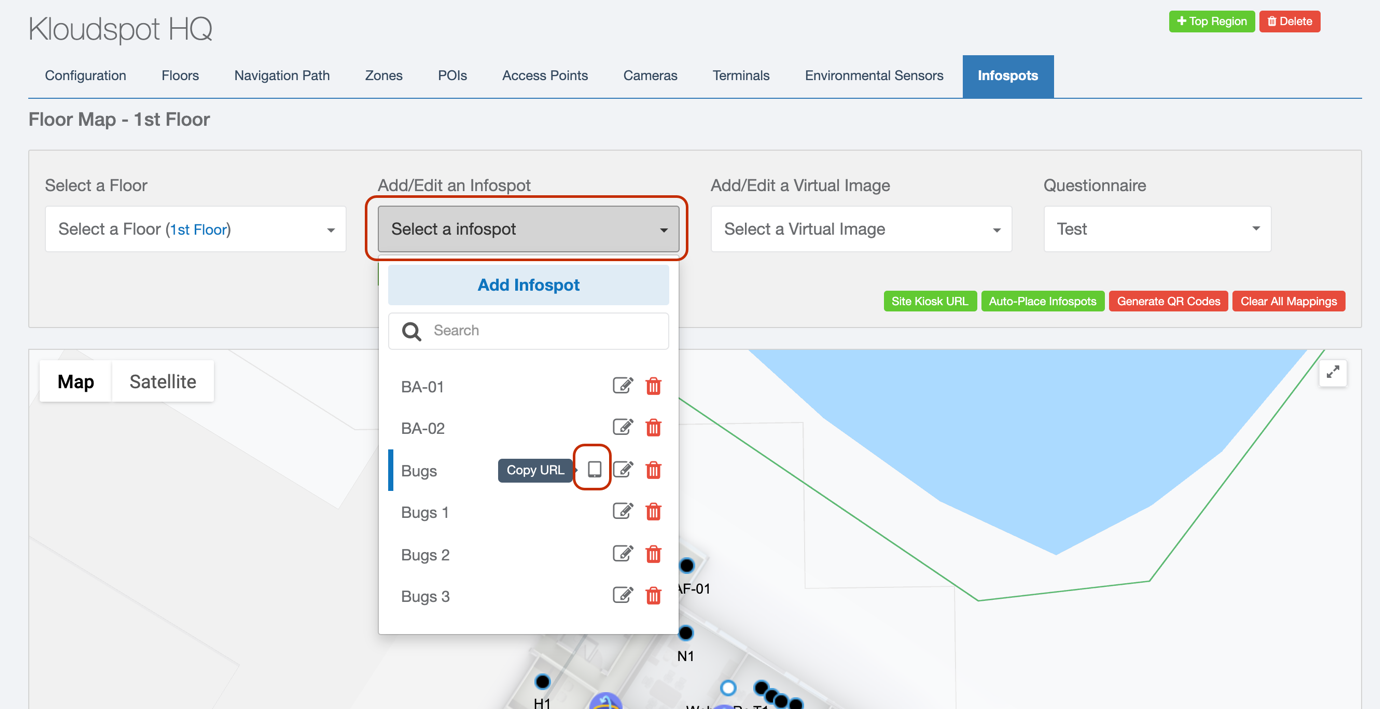
Navigate to the Advanced Settings page, then to Configuration -> Location -> Infospots page.
Click the Add/Edit an Infospot drop down, scroll to find the conference room. Once you find it, click the Copy URL button next to the conference room, as seen in the figure below.
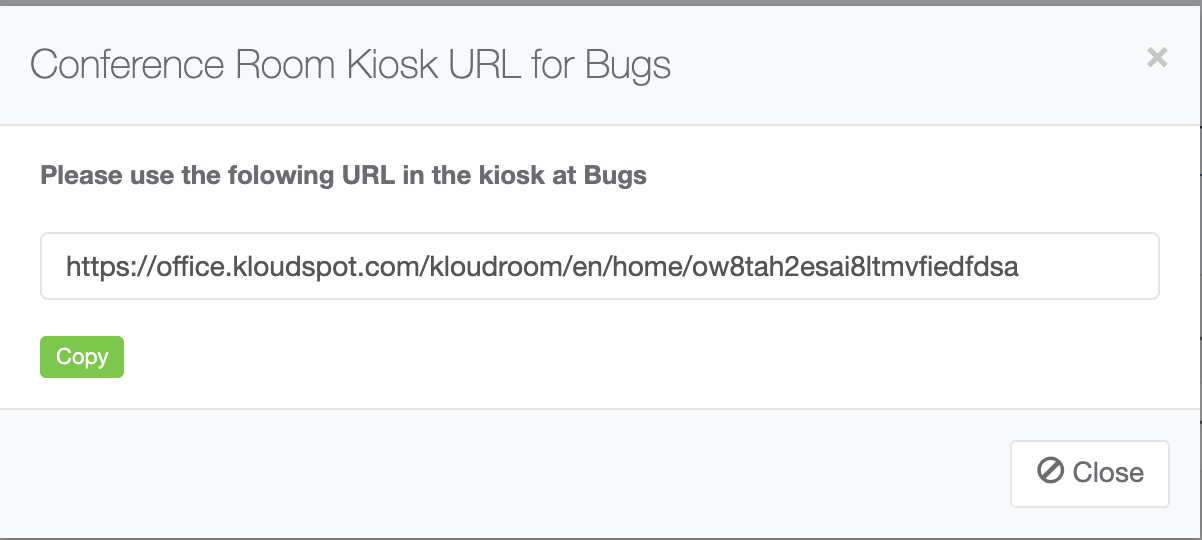
A dialog box will open showing the URL for that specific conference room. Copy the URL.
Paste the URL from the previous step into a browser on the tablet assigned to that conference room. This will open the conference room application, the application is a progressive web application, and thus can be installed on the device.
Finally, navigate to the Advanced Settings page, then to Configuration -> Hybrid Settings -> Conference Room Settings section. Here you can enable/disable auto room cancellation. If you enable auto room cancelation, give a value for No-show cancellation Period (min). If this is enabled, and users do not check into the conference room after X minutes of the meeting starting, the meeting will be cancelled, and the conference room will be released. Click Save once you’ve finished at the top of the page.
Additional Administrative Settings
As you progress in configuring your KloudHybrid application, it’s essential to fine-tune administrative settings to meet your organization’s specific needs. Like controlling booking hours, seat cooling periods, future booking limitations, seating neighborhoods, global notification settings, and more.
In this document, we will guide you through the process of customizing various administrative settings to optimize your hybrid workflow.
In this section we will cover all additional administrative settings not covered in the previous sections, including controlling booking hours, seat cooling periods, future booking limitations, seating neighborhoods, global notification settings, etc.
Configuring Neighborhoods
Neighborhoods are a way to organize where users can and cannot book based on the department set in their profile. To configure neighborhoods, please ensure SCIM is setup.
The system accomplishes neighborhood creation via the use of zones. Tags are added to each zone that describe the departments that are allowed to sit in the zone. Then, any infospots within that zone can only be booked if they are member of an allowed department.
To configure a neighborhood, follow the instructions below:
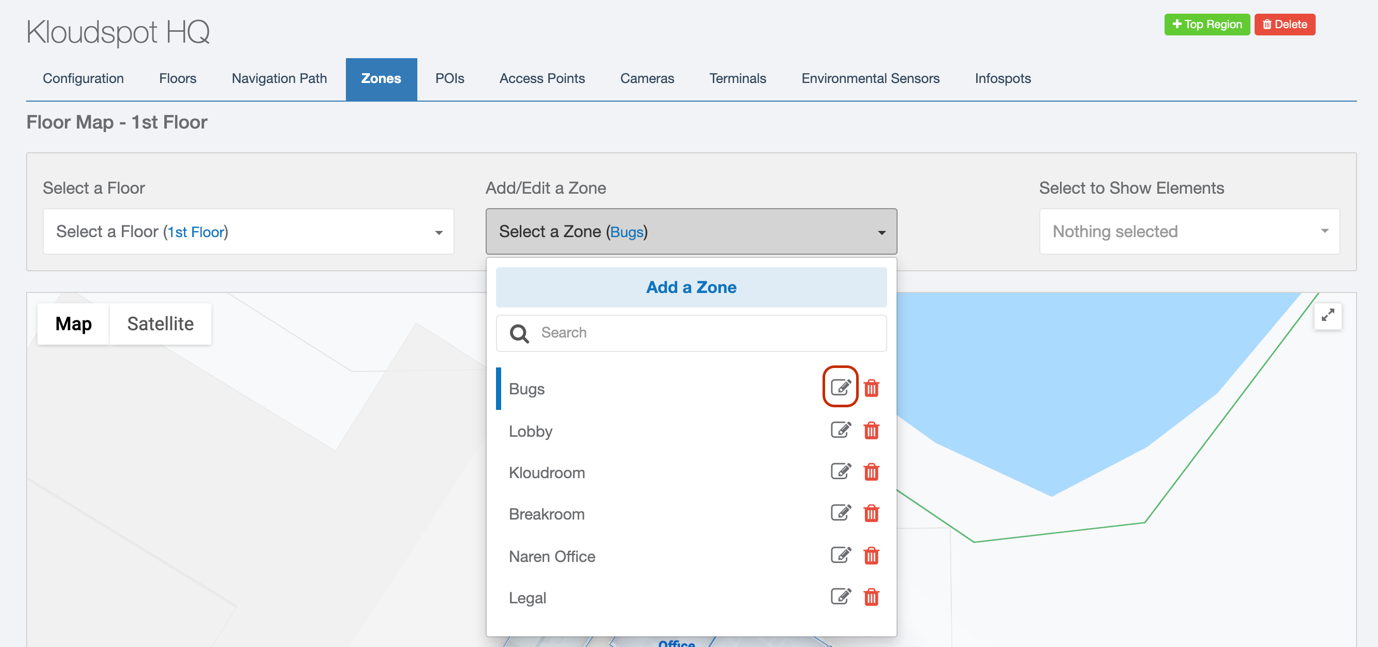
Navigate to the Advanced Settings page, then to Configuration -> Location -> zone page.
Find the desired zone from the Add/Edit a Zone drop-down, and click the edit button.
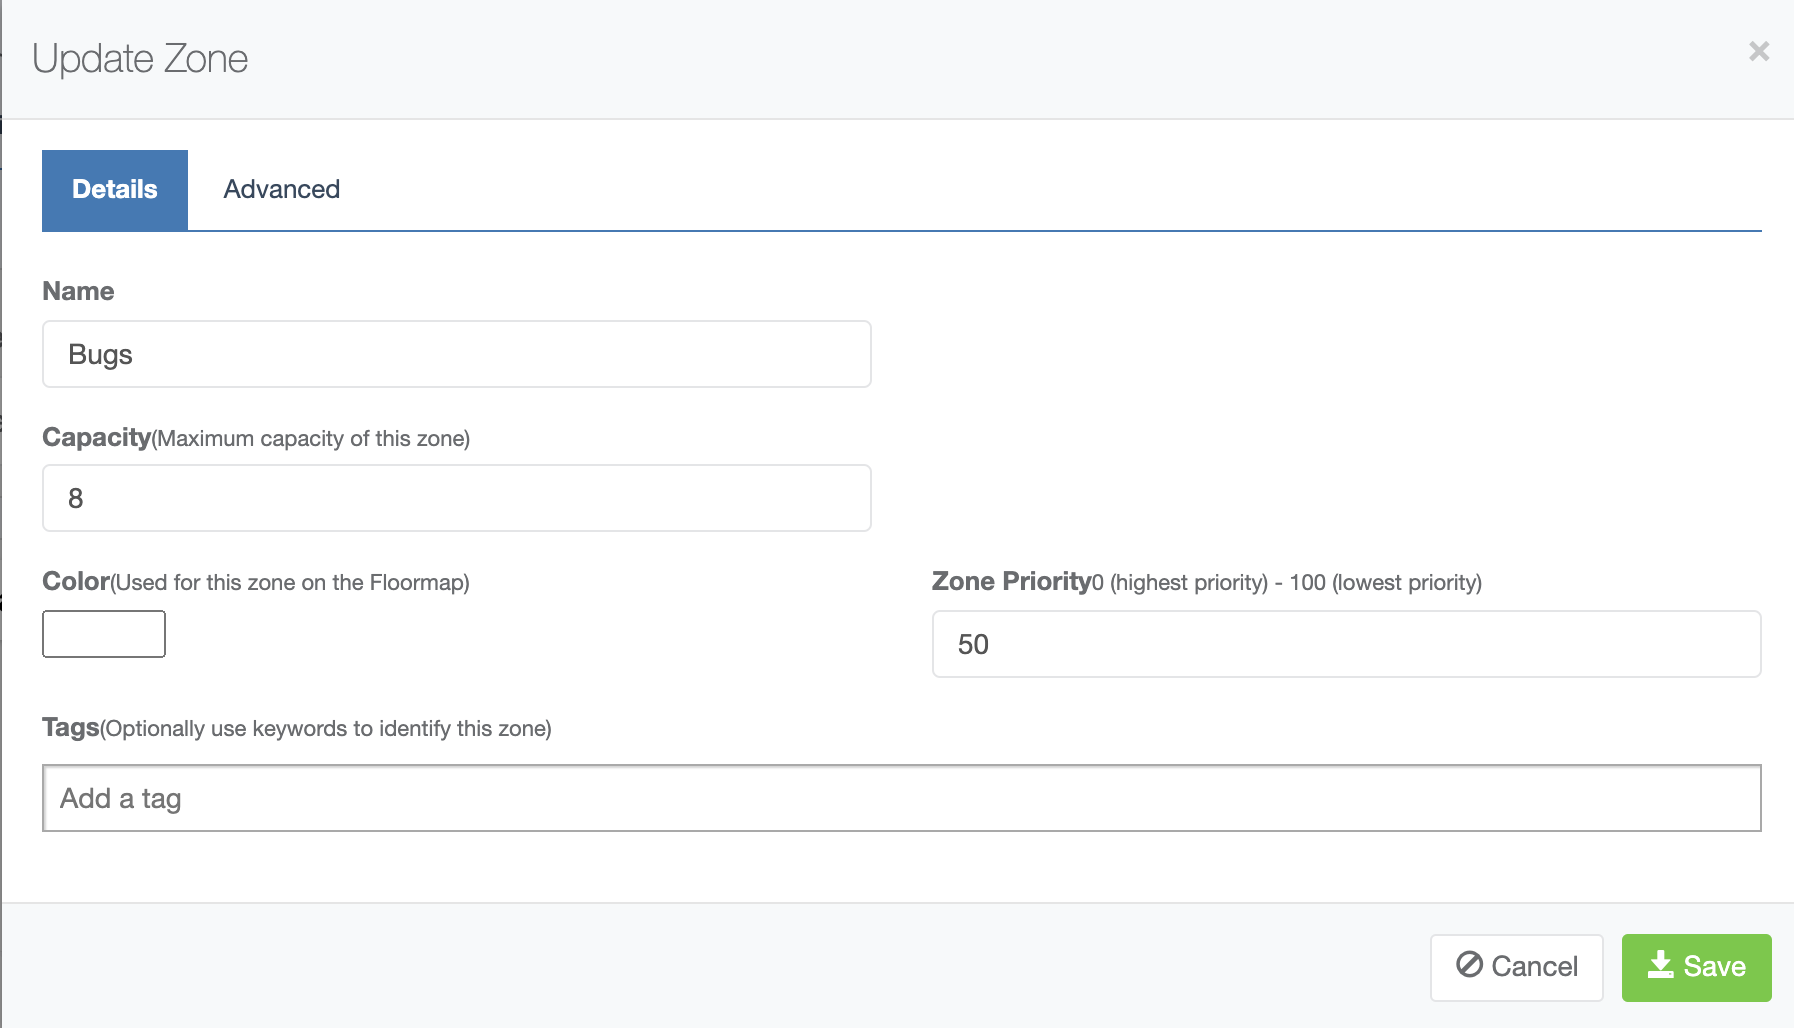
In the Update Zone dialog box, add tags that correspond to employee departments. Examples such as Sales, Engineering, Marketing, etc. Click Save.
Repeat steps 2-3, adding a tag for each department you want to be allowed to sit in a zone. Keep in mind that multiple departments can be allowed to sit in a single zone, simply add one tag for each department.
Navigate to the Advanced Settings page, then to Configuration -> Hybrid Settings.
Under general settings, enable Enforce Booking Restrictions. Click Save.
Booking Parameters
Navigate to the Advanced Settings page, then to Configuration -> Hybrid Settings in this section we will discuss additional booking settings & parameters not previously discussed. Remember to click the save button at the top of the page after changing any settings.
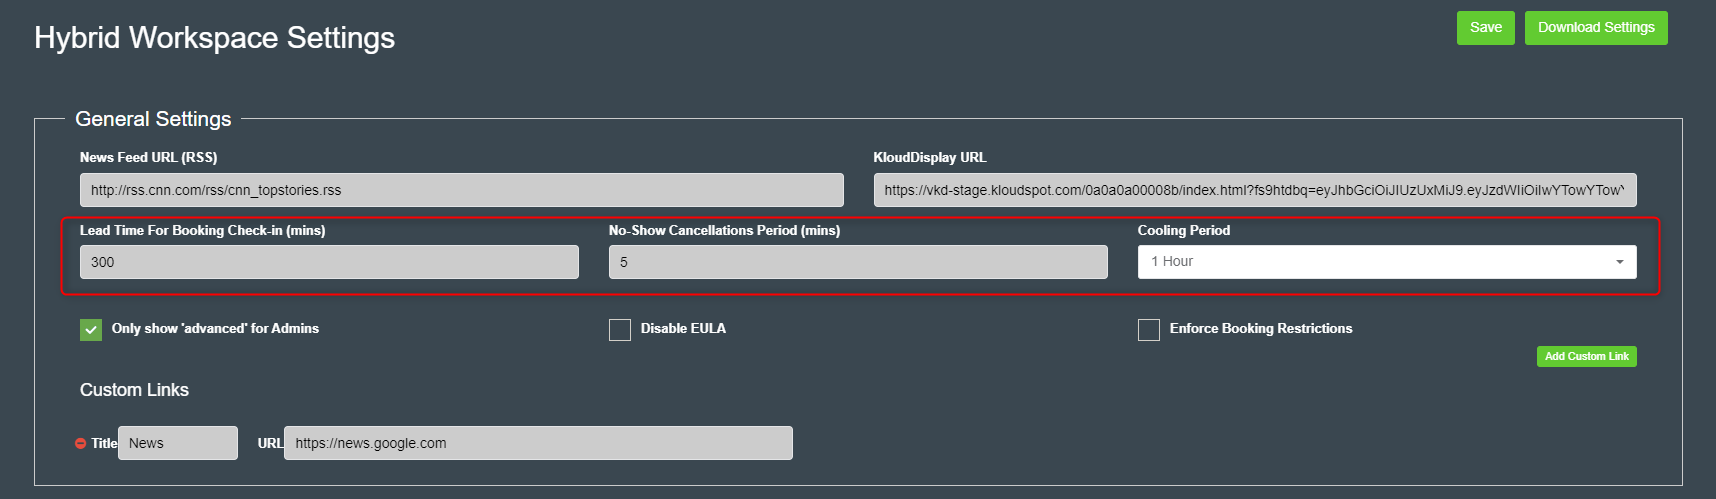
No-Show Cancellations: Cancel a seat booking if a user has not checked in within ‘X’ number of minutes after the start of their reservation.
Lead Time for Check-in: Users can only check in X number of minutes before their booking. So if it is 1pm, and the Lead time for Check-in is 120 minutes, the user will not be able to check in until 11 am.
Cooling Period: The amount of time between two physical bookings at the same seat. For example, if seat ‘A’ is booked by a user at 8am on Thursday, and the cooling period is set to 24 hours, another booking will not be able to be made at seat ‘A’ until 8 am on Friday. This is to allow janitorial staff an adequate amount of time to clean the area before the next booking.
Under booking settings there are three different fields Default booking, Medium Range Booking, and Long Range Booking. These act as different permissions that can be given to users that govern how long into the future they can make a booking. For example, with the settings below a user with default booking permission can only make a booking 7 days into the future. A user with long range booking permissions can make a booking 90 days into the future. By default, users with user permissions can make ‘default bookings’, and users with Manager or Administrator access have ‘medium range booking’ permissions. To assign different permissions to different users, or modify roles, please see the User & Permission Management section.
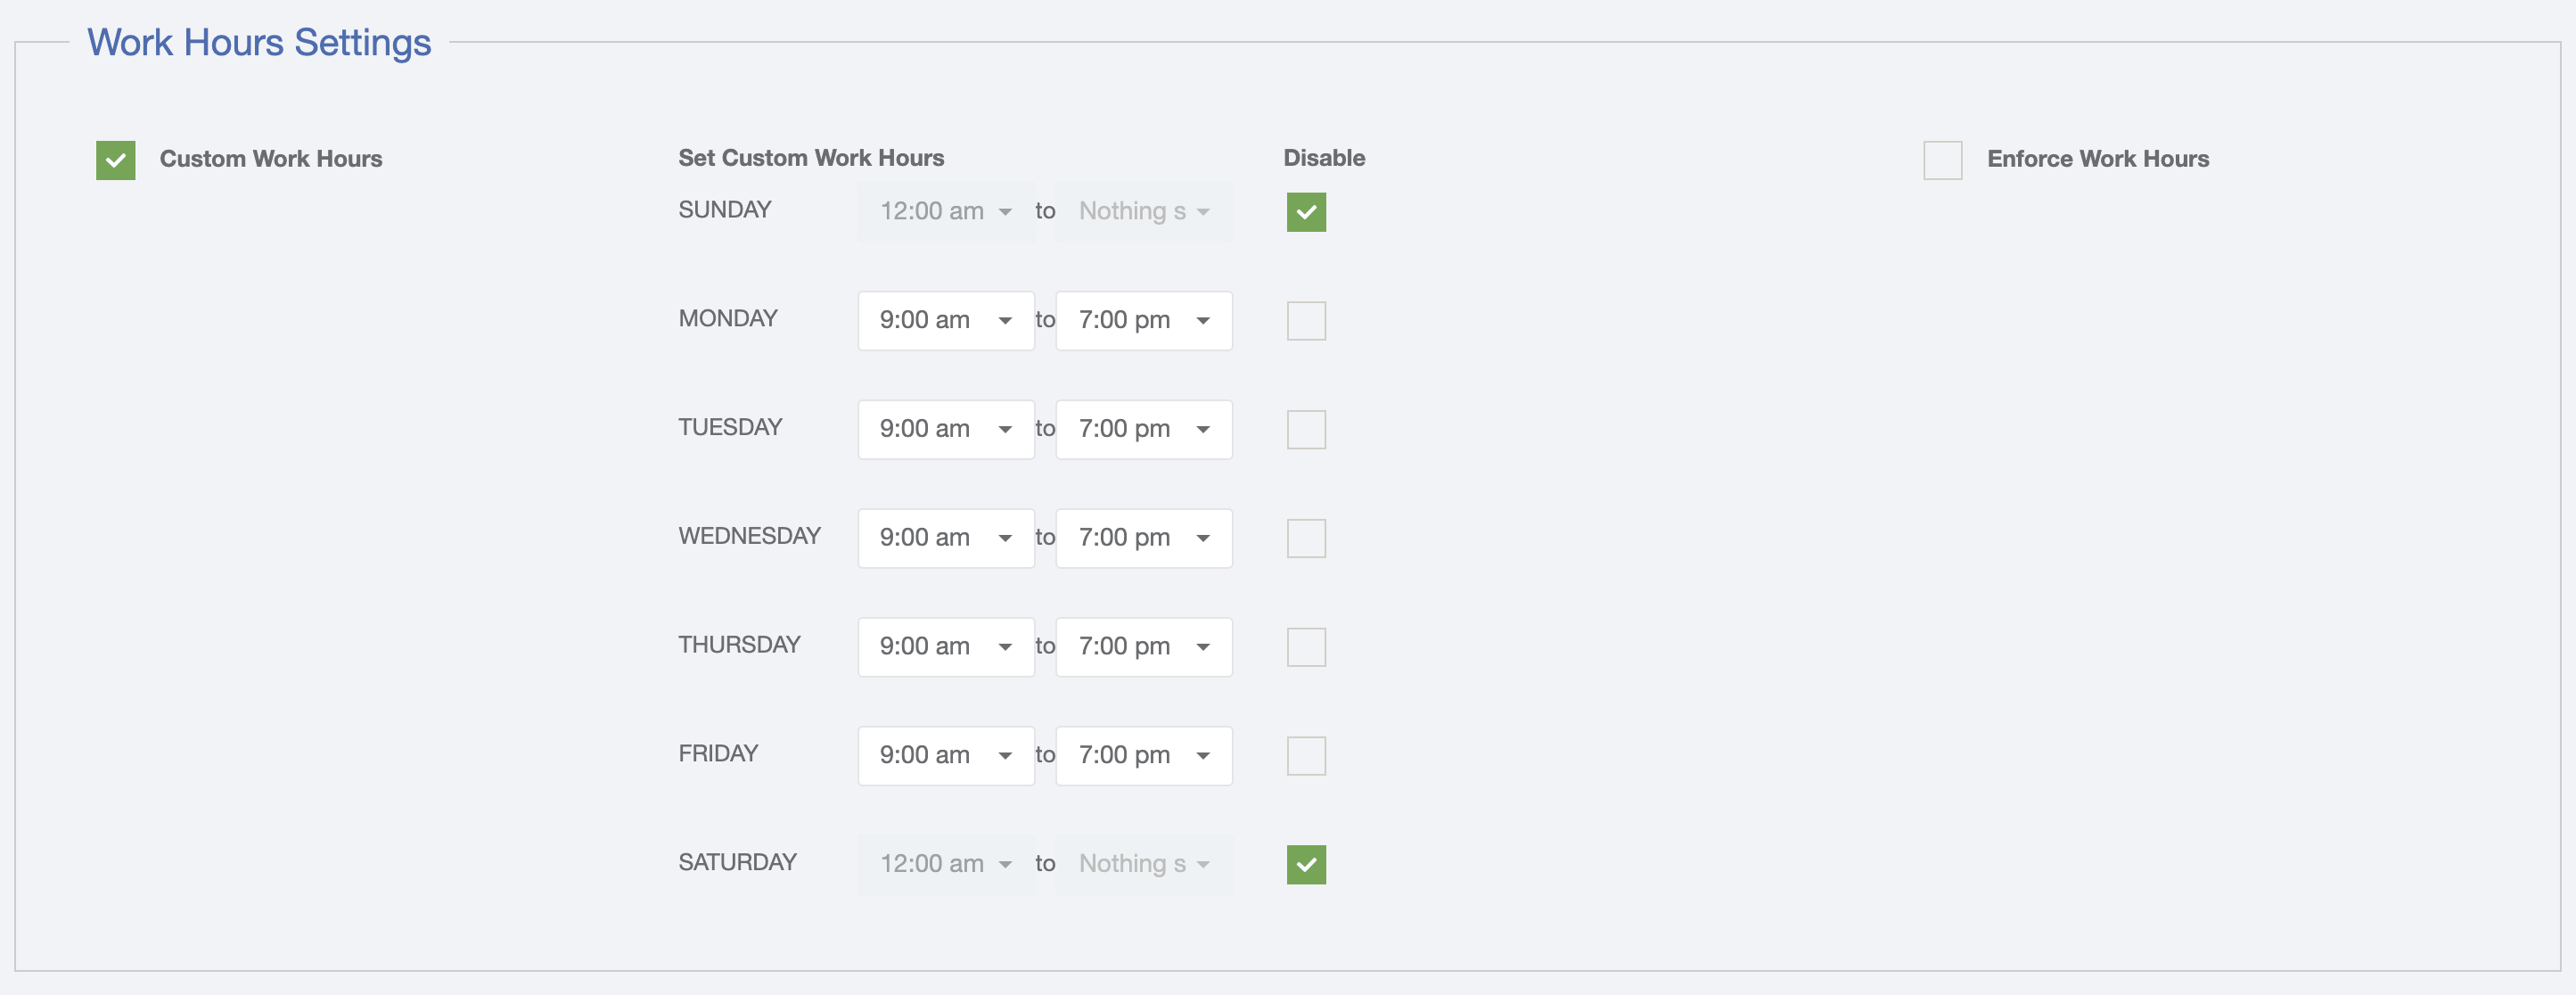
The work settings describe the work hours of the business. You can either set standard work hours for every day or set custom work hours for specific days. Additionally, you can enable Enforce Work Hours which will disallow users from making bookings outside of work hours.
General KloudHybrid Settings
Navigate to the Advanced Settings page, then to Configuration -> Hybrid Settings in this section we will discuss additional general system settings & parameters not previously discussed. Remember to click the save button at the top of the page after changing any settings.
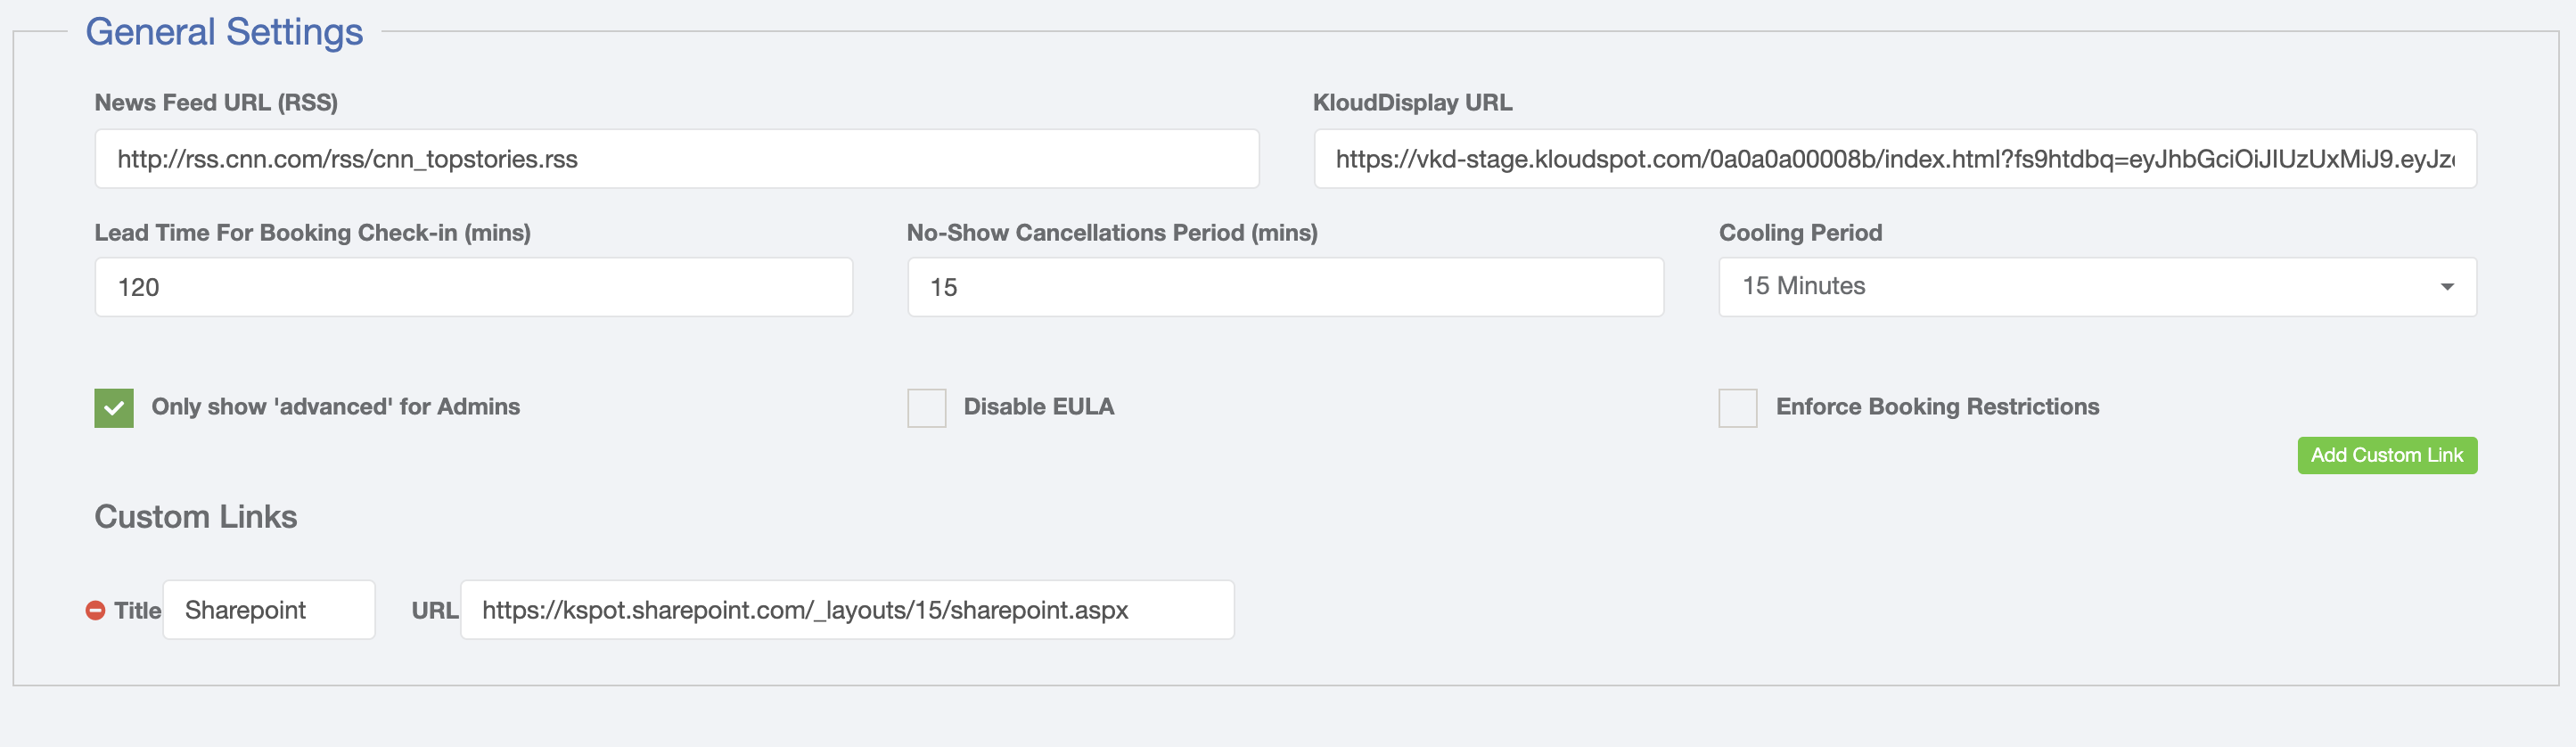
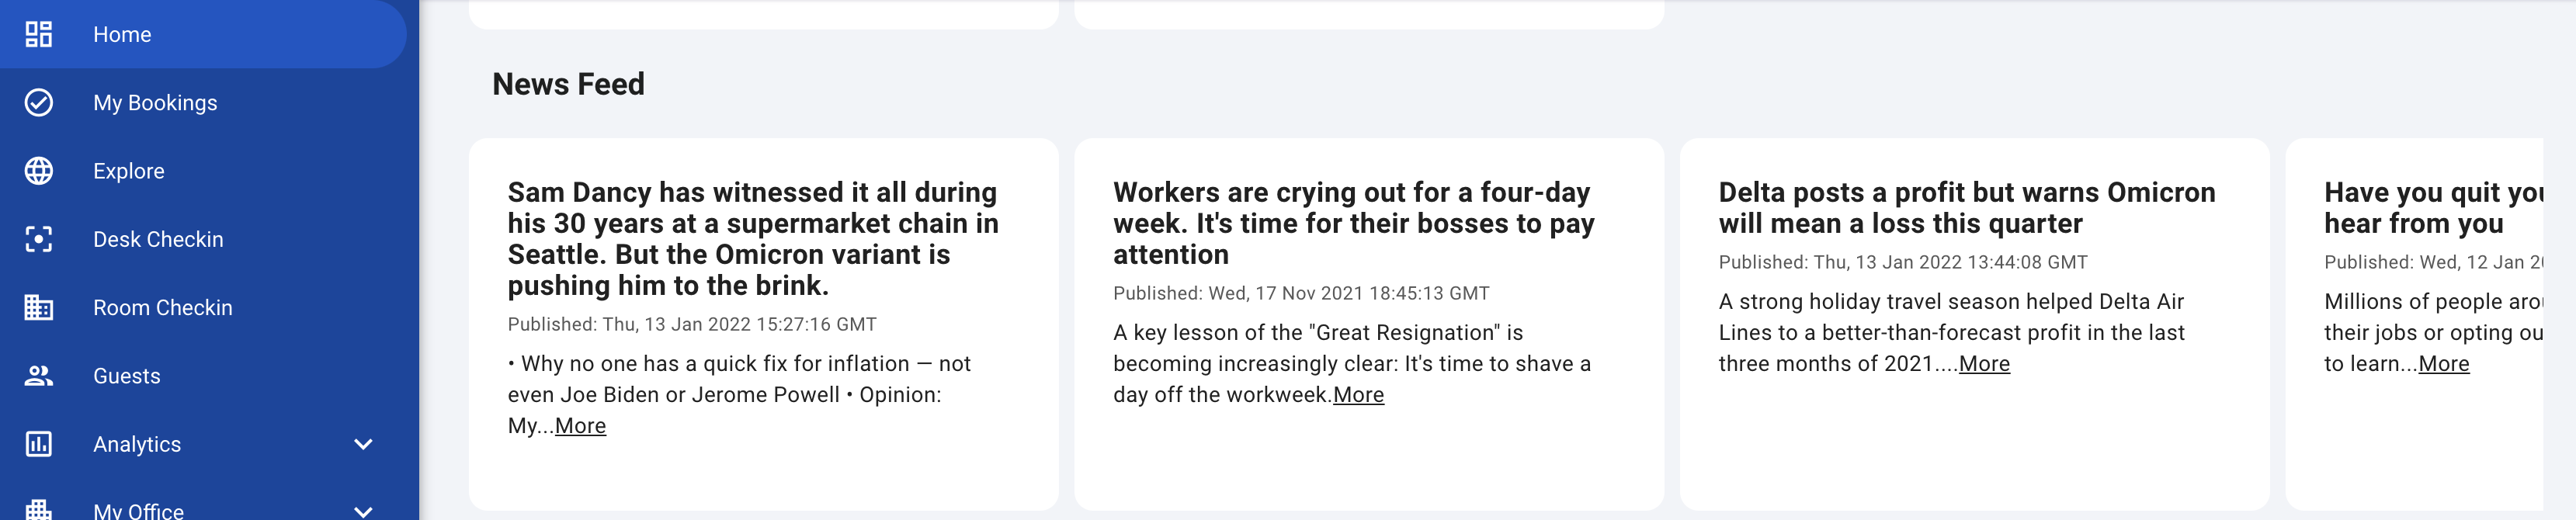
News Feed URL (RSS) here you can configure an RSS news feed that will show up on the user’s homepage and display news articles to them, as seen in the below figure.
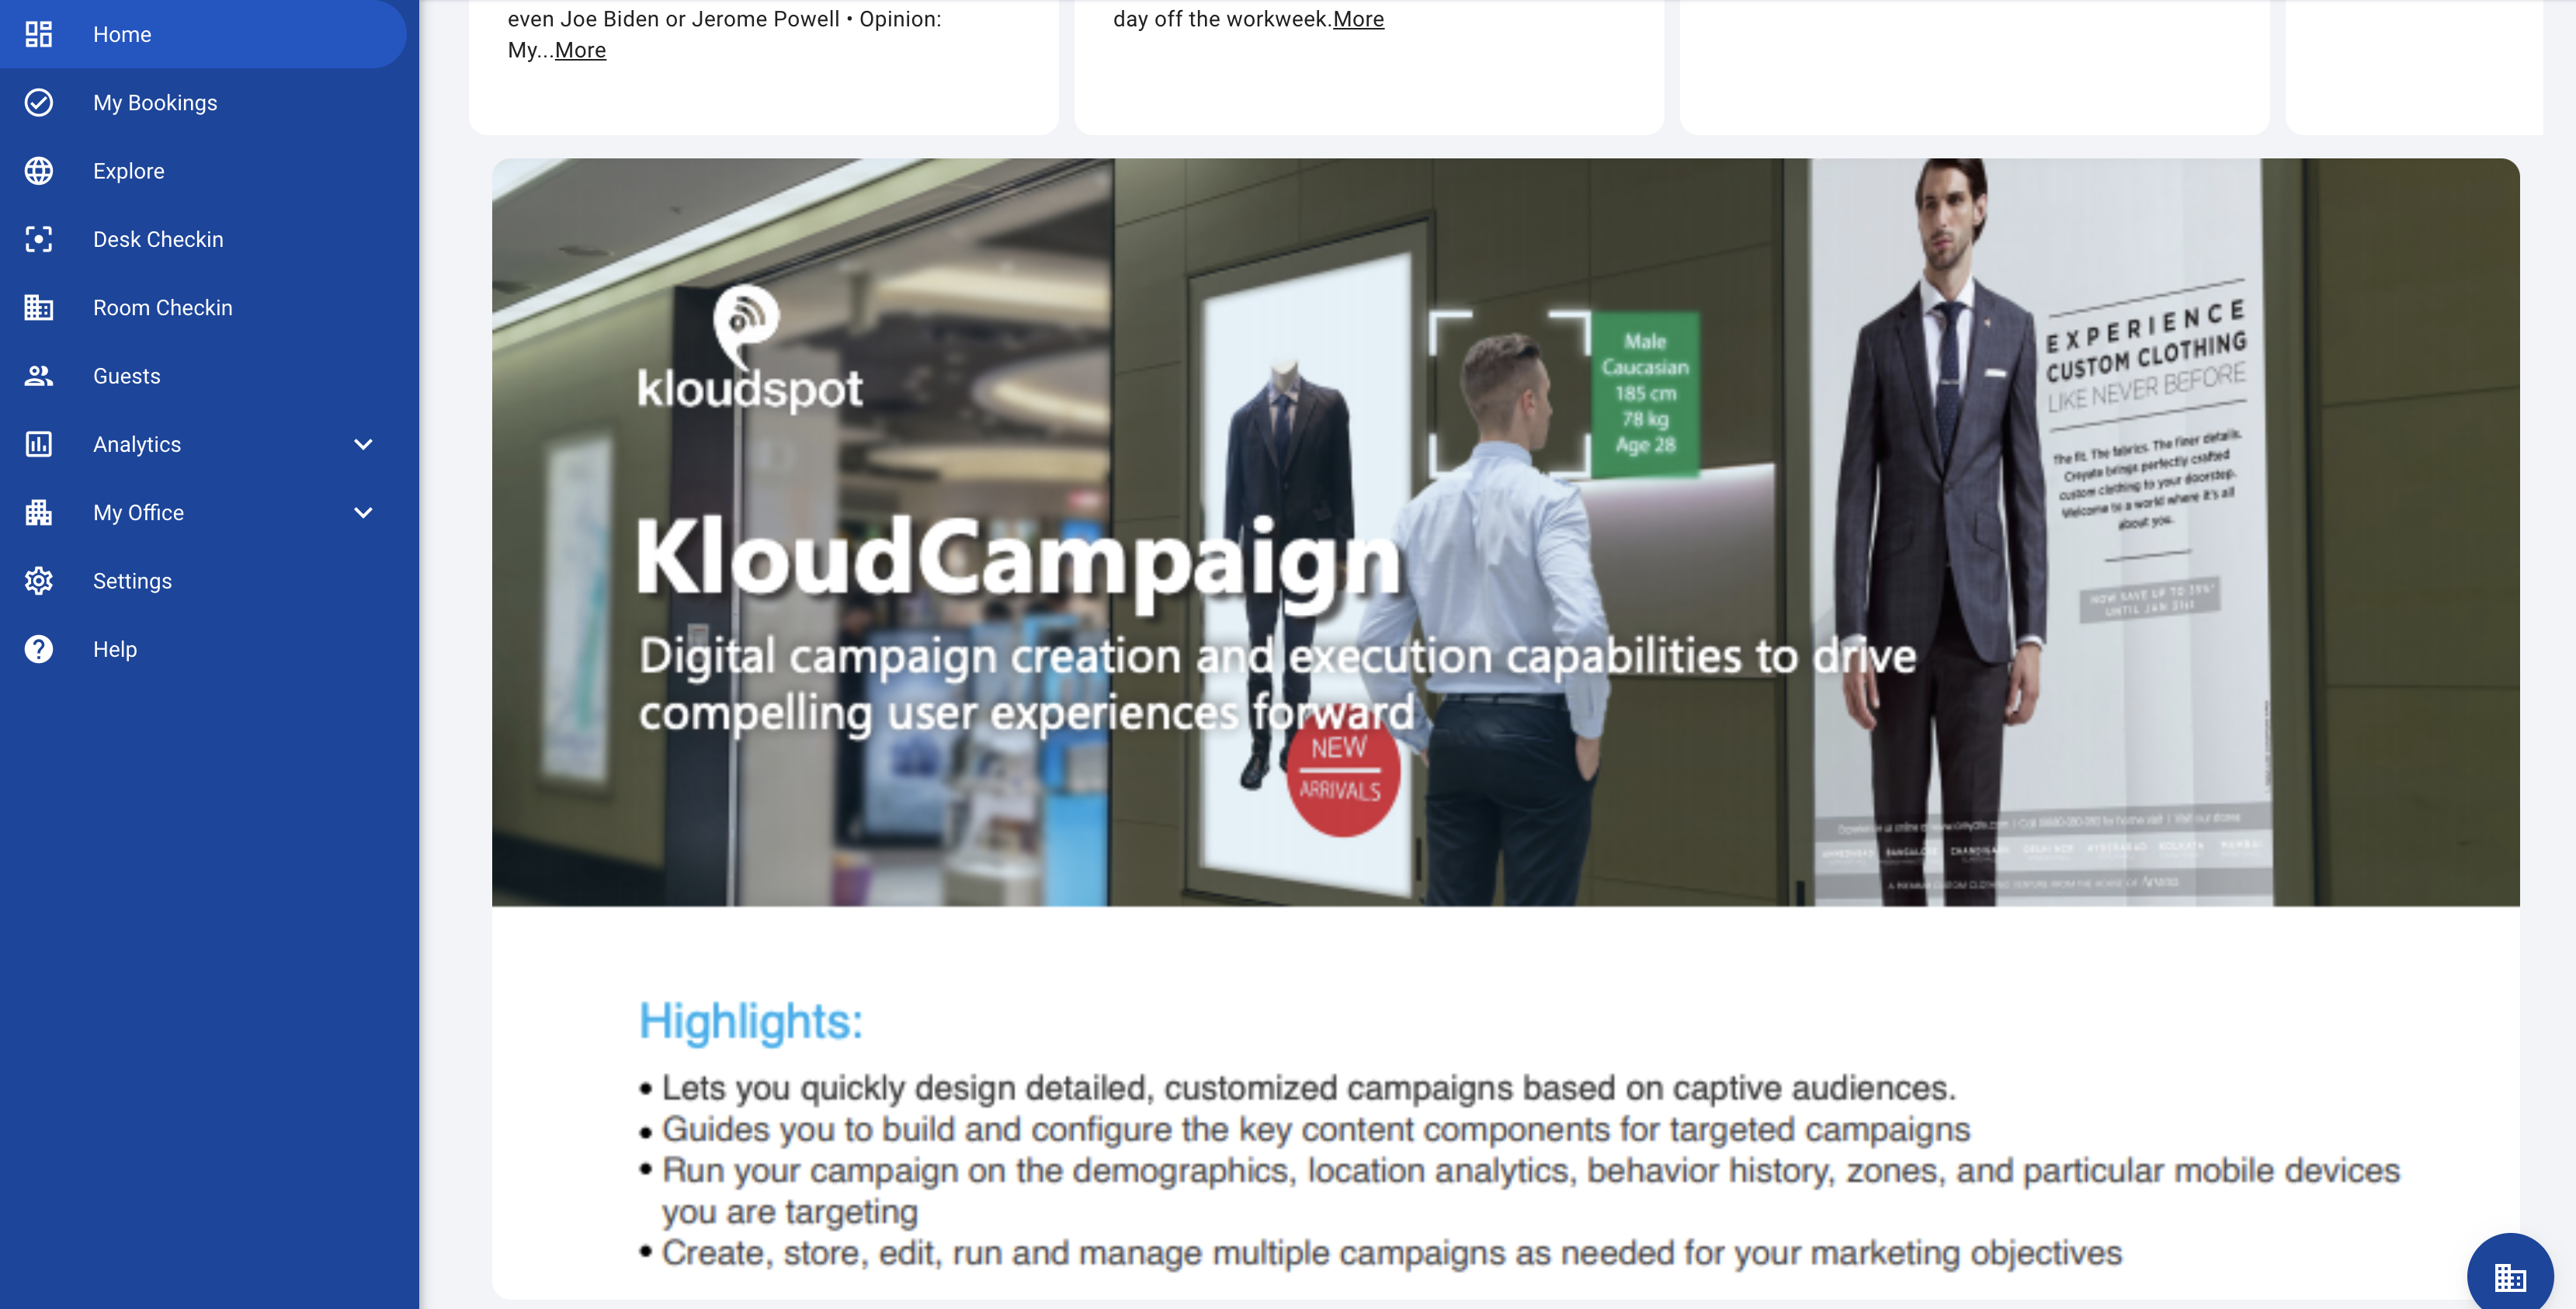
KloudDisplay URL this is the URL for the virtual KloudDisplay that can display on the user’s homepage below the news feed, as pictured below. The full setup of the KloudDisplay is not discussed in this guide, please see the appropriate guide for instructions for KloudDisplay configuration or contact your Kloudspot representative for support.
Only Show ‘Advanced’ for Admins, when this is set, only system administrators will be able to navigate to the advanced settings page.
Disable EULA will disable EULA agreement that pops up on first time user login.
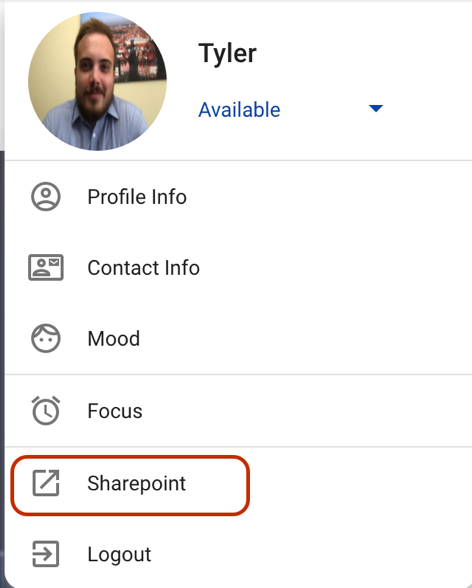
Custom Links can be added into the system and will be visible to end users and navigable from the drop down in the upper right hand of the application as seen in the figure below. This allows other internal applications to be navigable via KloudHybrid, giving users easy access to other applications they might need from one convenient place.
User & Permission Management - Adding Users and Assigning Roles
Once you have completed the initial configuration of KloudHybrid, it’s time to add users from your organization to the system.
In this step, you will learn how to create a new role, which serves as a template for defining different sets of privileges for users.
The role-based approach allows you to control the level of access each user has within the KloudHybrid application.
After creating the role, you can start adding users to the system and assign the appropriate role to each user based on their responsibilities and requirements.
Assigning roles to users ensures that they can perform specific actions and access certain features that align with their job roles and responsibilities.
The following sections provide detailed instructions on how to create new roles, add users, and assign roles to users effectively.
By following this guide, you can confidently manage user permissions, ensuring data security and privacy while empowering your team members with the necessary tools and access.
The system can create and manage local users, as well as integrate users from SSO providers. In either case, users have a defined role, which will give them a set of permissions. By default, there are three roles in the system: User, Manager, Admin. Beyond that, custom roles can be created an assigned.
User Roles
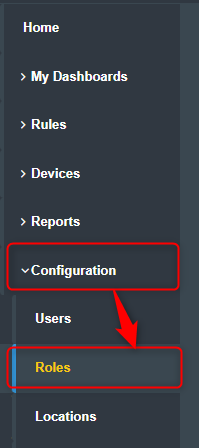
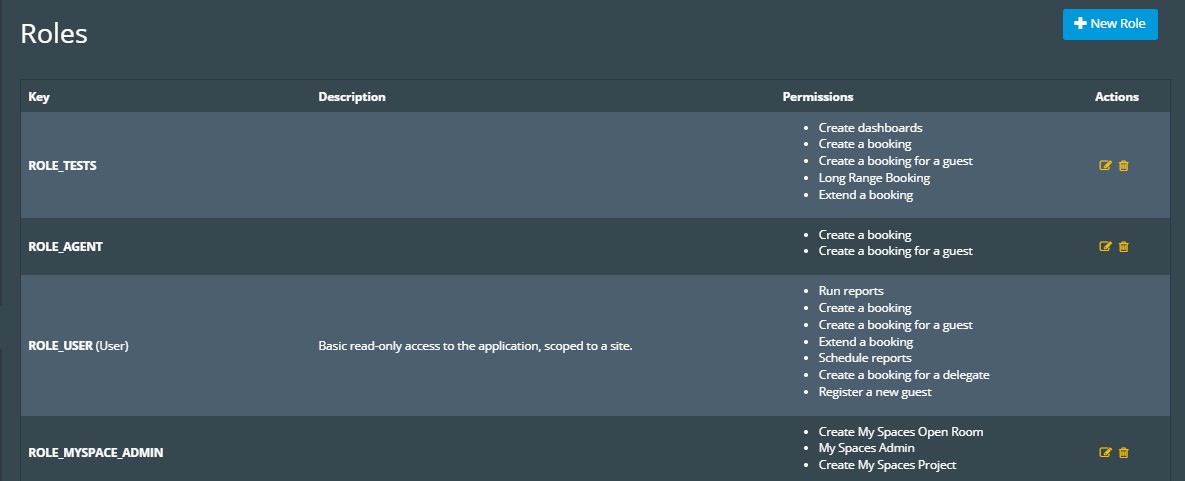
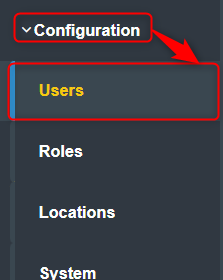
Go to the Roles menu from the Configuration Drop down menu. The “Roles” page displays the existing roles and the assigned permission for each role.
You can edit or delete the existing roles by clicking on the provided icons on each row.
It also allows you to create a new role.
Create a new role:
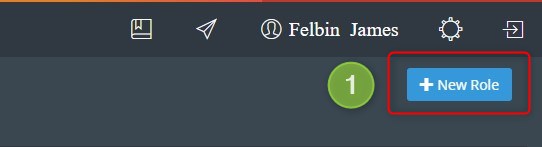
Click +New Role on the top right corner of the page.
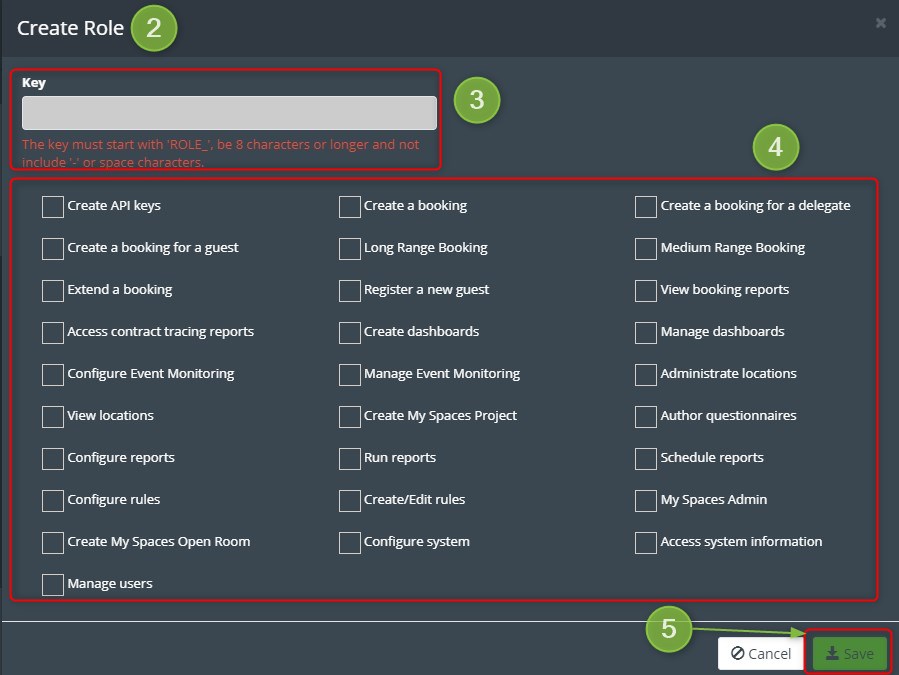
The “Create Role” dialog box is displayed.
Enter the roll key name. Key name should always start with ROLE_.
Check the checkbox to select the permission(s) for a role.
Click Save to create a role.
A new role is created.
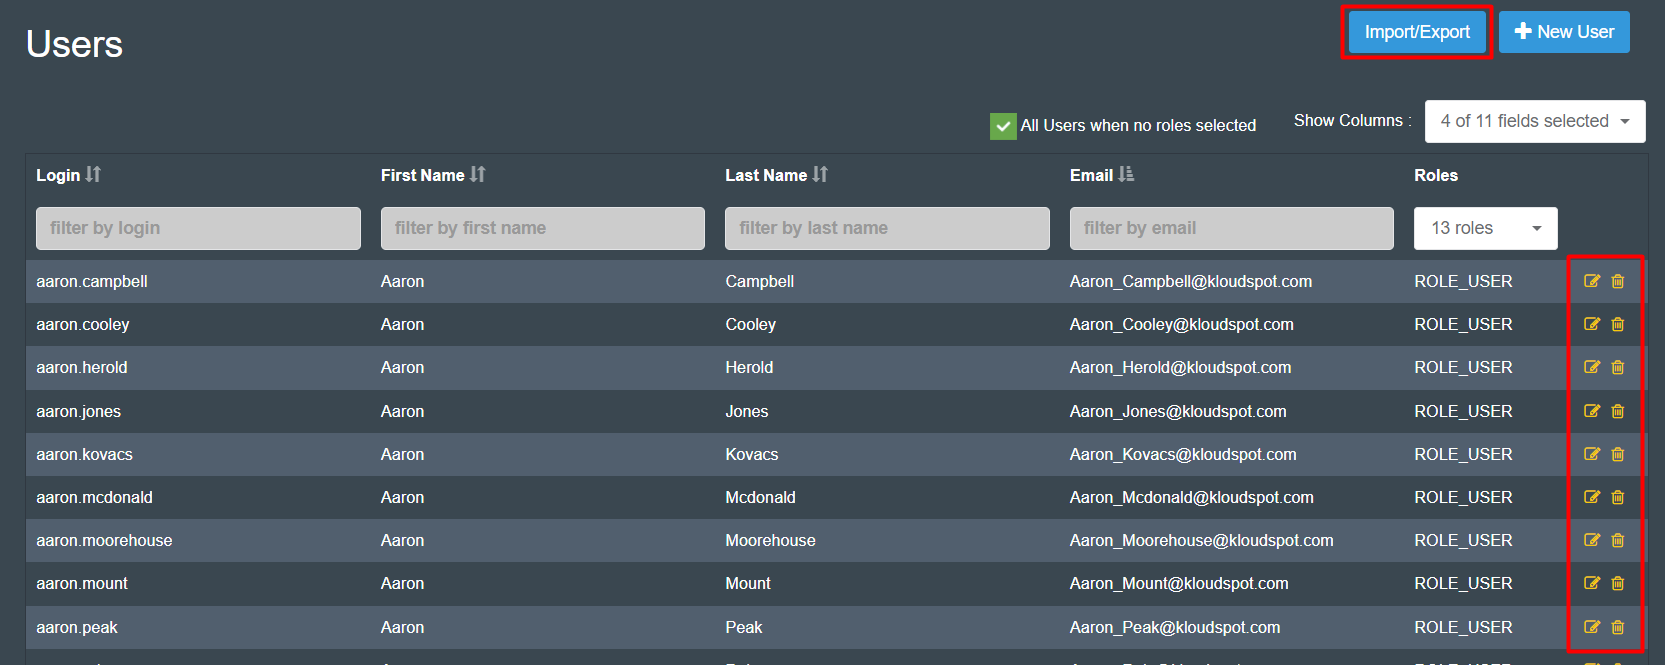
User Management
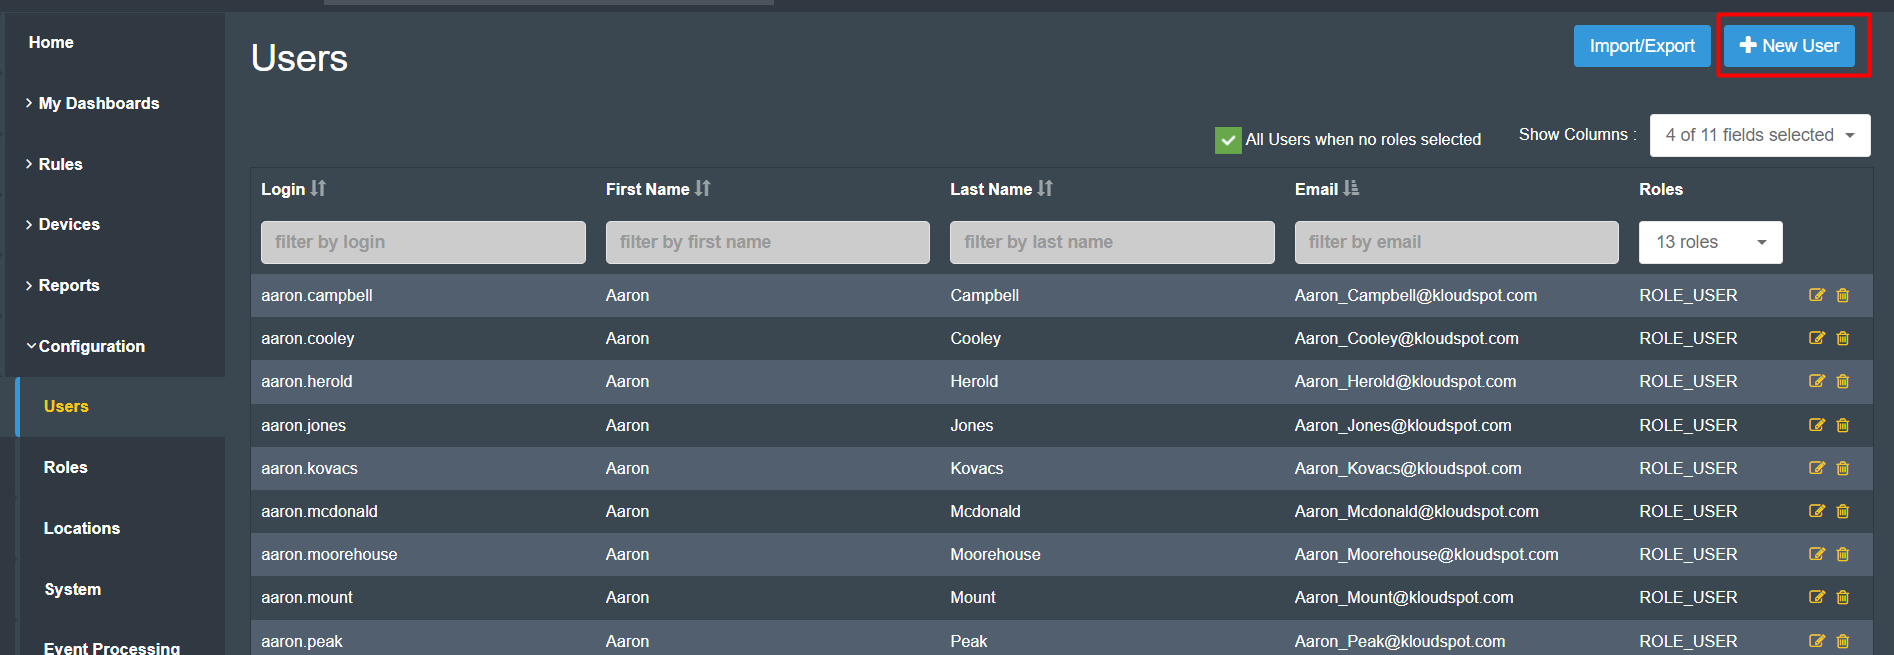
Go to the Users menu from the Configuration Drop-down menu. The Users page displays the existing Kloudspot user details such as details name, email id, roles, etc. It allows you to create a new user.
Create a new user:
Click +New User on the top right corner of the page.
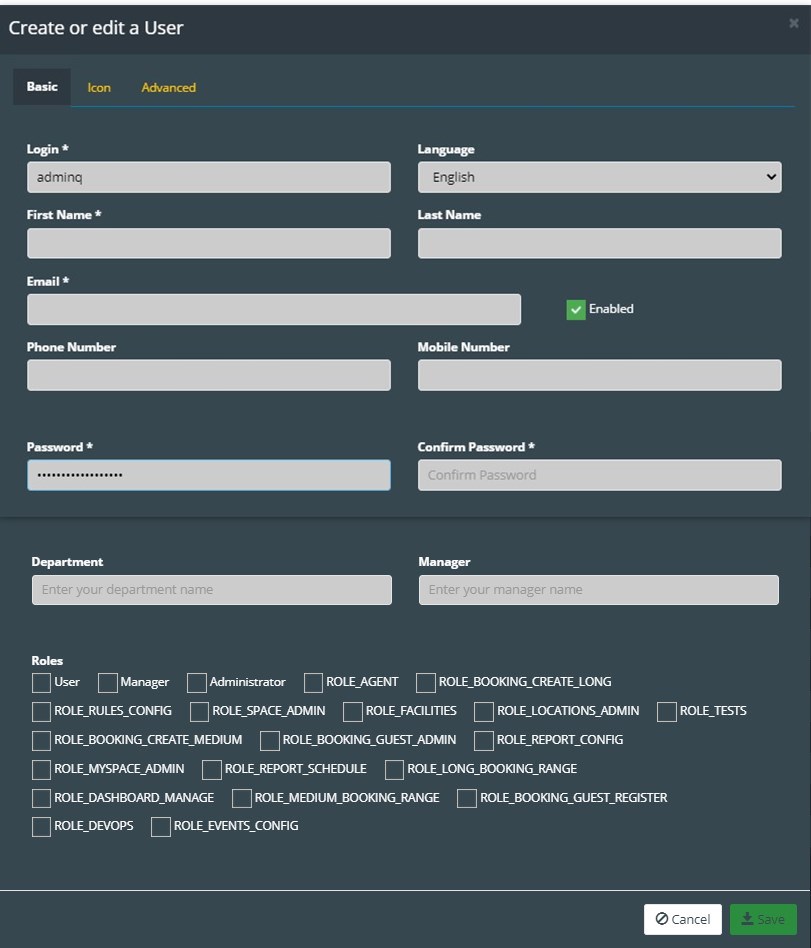
The Create or edit a User dialog box is displayed with the Basic tab.
Make the following changes in the Basic tab. The basic tab is mandatory.
Specify the login name, first and last name of the user, email id, phone, and mobile number.
Select the language from the drop-down menu.
Set the account status as enabled or disabled. By default, it is enabled. Uncheck the checkbox to disable it.
Set the temporary password for the user where the user can change the password later.
Enter the department’s name and the manager’s name.
Check the respective checkbox to select the roles.
Administrator:
The Administrator has the complete right to make all the configurations available in the application.
Manager:
The manager has the appropriate rights to make configurations for the limited features.
User:
The user has only the user rights to access and work on KloudHybrid.
ROLE_XXX:
The XXX stands for specific roles that have specific rights.
Go to the Icon tab to set an icon for a user.
Click on the provided checkbox to select an image of .png and .jpg formats or drag and drop an image inside it.
Go to the Advanced tab to provide the social and official network information.
Enter the social and official network information such as Microsoft Teams Email, Personal Zoom Link, Skype ID, Slack URL, and Univerge Blue Link.
Enter Group name. If the user is a member of a group or department, we can include that information here. It is possible to add more than one group.
Example: Engineering, Testing, Marketing and so on.
Click Save to save the changes.
Note: A field that has an asterisk mark (*) is the mandatory field.
A new user is added with the provided details.
You can edit or delete the existing Users by clicking on the provided icons on each row.
The Bulk Import/Export Button can be used in case you need to add more than one user at a time or download existing user information.
You can download the sample document by clicking on the download sample button. Click the Download existing users button to download full user details.
Multiple users can be added by dragging and dropping the CSV file into dropbox.
Click Save.
Miscellaneous System Configuration/Settings
Refer to the following guide to learn about other configurations included in First Time Setup.
System Health Alerts
Helps to receive system health-related notifications.
Enable email notifications and add the email ID to receive the notification.
Enable webhook notifications to receive notifications and select the desired webhook type.
Then add a webhook Link.
Click the Save button to save the changes.
Connecting and Integrating Applications with KloudHybrid
If you are a user of My Office feature in KloudHybrid, you have the option to connect and integrate apps that are essential for your project’s success.
For example, you can integrate popular apps like Box, Slack, and Wrike to centralize data, facilitate real-time communication, and streamline project workflows.
To learn how to integrate applications with KloudHybrid, just follow these steps. This detailed guide will help you connect and set up apps easily.
Log in to the ‘Hybrid Work’ admin account then navigate to Settings > Advanced Settings >Configuration > Hybrid Settings > Application Integrations.
To learn how to do Box API integration, see the document below.