Adding Infospots
-
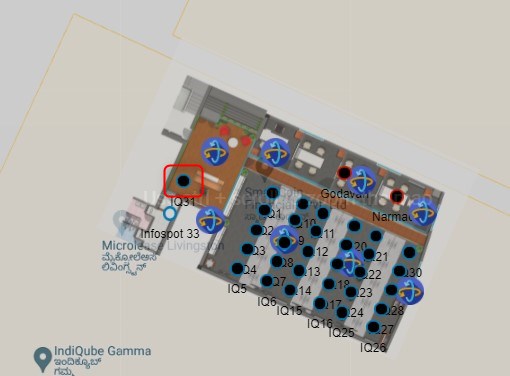
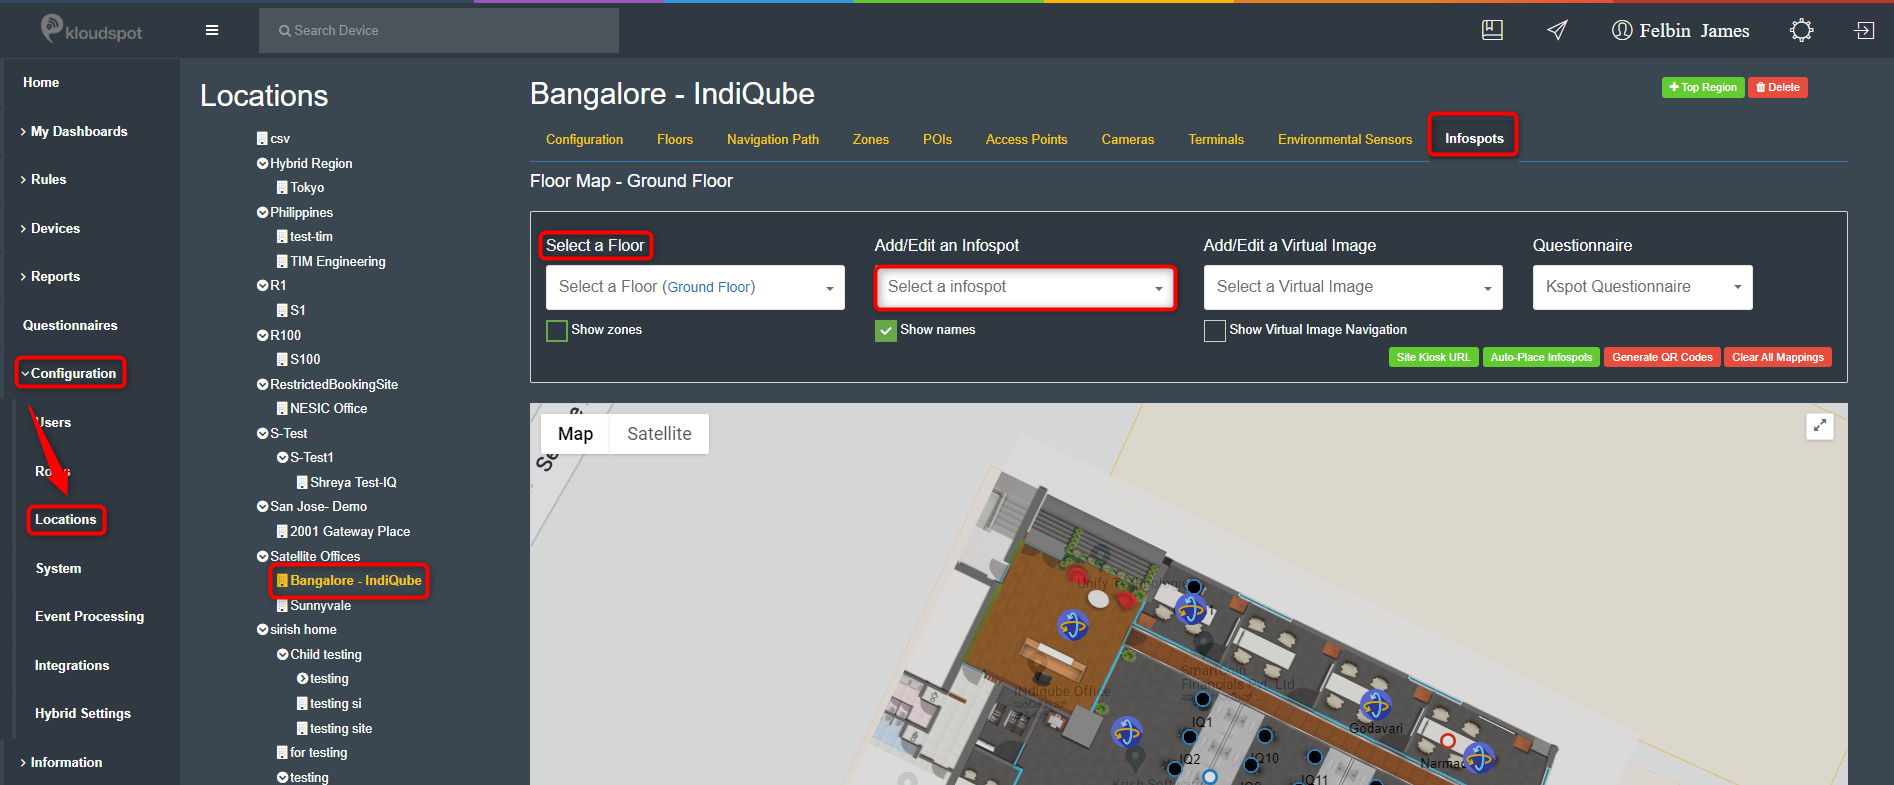
Infospots are bookable spots at your site. To create infospots, navigate to the Location > click on your site > Infospots tab.
-
Select a floor from the drop-down menu.
-
Click Add Infospot from the Select a Infospot drop-down menu.
-
Click on the location on the floor map where you want to put the infospot.
-
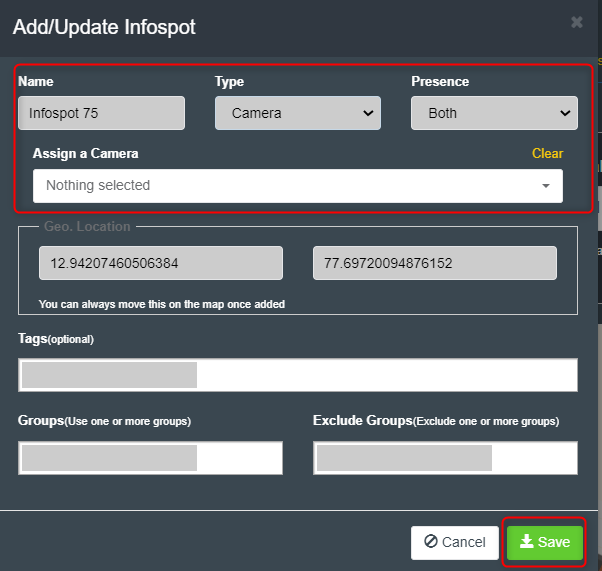
The Add/Update Infospot dialog box is displayed.
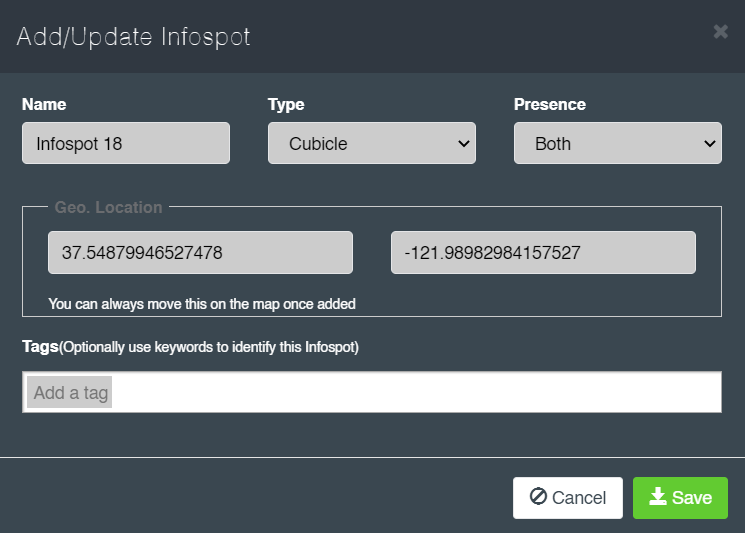
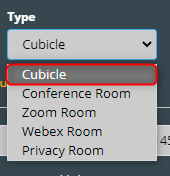
- At this point, there are multiple different types of infospots that can be added, such as Cubicle, Conference Room, Zoom Room, Webex Room, and Privacy Room. Please see the corresponding section below for more information about and how to configure the different types of infospot.
Cubicle
Cubicles are bookable seats configured in the system that are made available to bookable pool for the users.
Once the “Add/Update Infospot” dialog box is displayed follow the instructions below to complete the configuration for a cubicle.
- Enter the Name for the infospot.
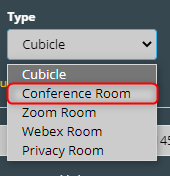
- Specify Cubicle as the type in the drop-down menu.
-
Select the Presence of the infospot. By default, Both is selected. If Both is selected, the seat will be bookable by both physical and remote employees. If Physical is selected the seat will only be bookable to physical employees. If Virtual is selected, the seat will only be bookable to remote employees. If None is selected, the seat will not be bookable but will be input into the system for later use once the seat is returned to the bookable pool of seats.
-
Provide the tags by adding the keywords to identify the infospot. This step is optional.
Note: You can specify a department in Infospot by adding tags. For example, if you add the “Engineering” tag here, this infospot will only be visible to the user who is in engineering department.
Check out the Configuring Neighborhoods section to learn more about the user department.
Note: Tags can also be added to the infospot that describes additional details about the infospot, and make the infospot keyword searchable by the user. For example, you could add the tags, “Disability Accessible”, and “Docking Station”. So if a user searches for seats that are disability accessible or have a docking station, this seat will show up in the search.
- Cubicles can be allocated to specific users by clicking the Allocate this desk for a specific user button. Then enter in the associated email address of the user that this desk will be allocated to.
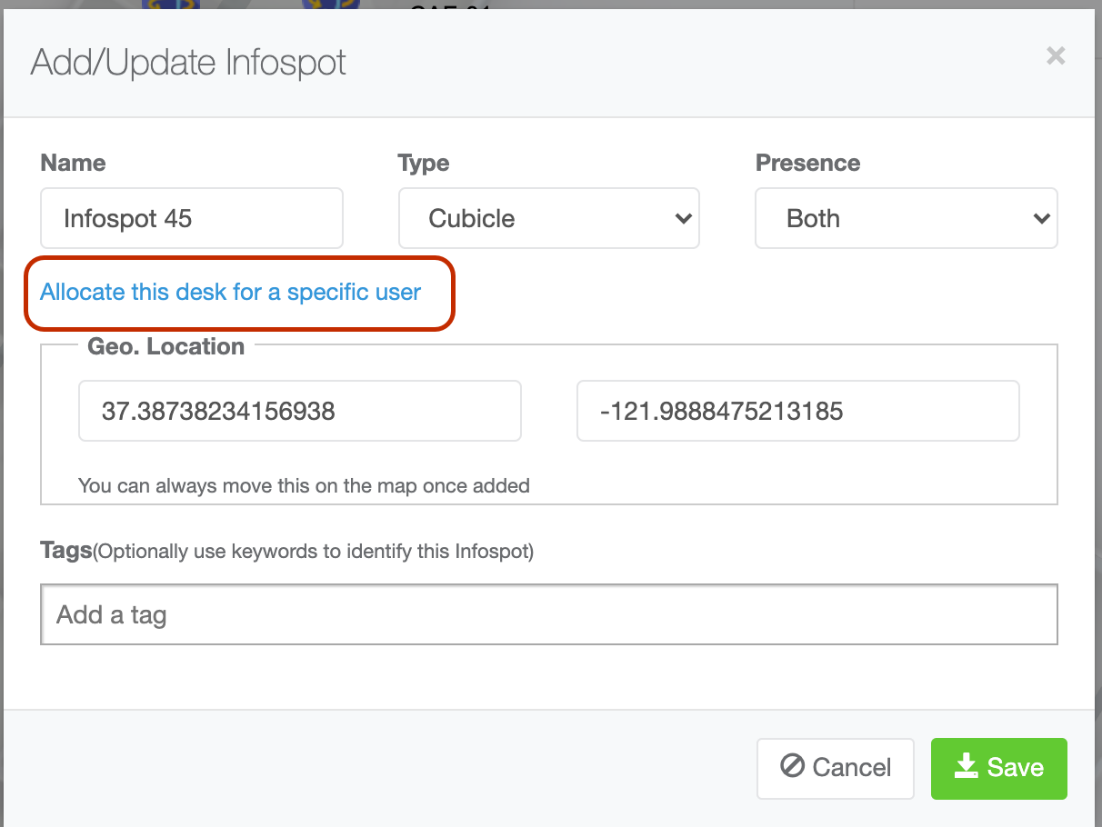
- Click Save to make the changes.
Conference Room
Conference rooms are integrated with conference rooms set up in outlook & azure to make them visible to the KloudHybrid system. The Microsoft Graph API needs to be integrated to use conference rooms. Once you do this, the conference room will be bookable In KloudHybrid, and will have a bidirectional sync with user calendars.
Once the Add/Update Infospot dialog box is displayed follow the instructions below to complete the configuration for a cubicle.
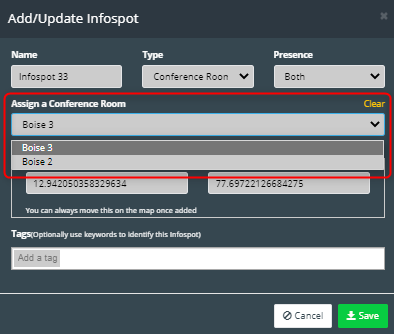
- Enter the Name for the infospot.
- Specify Conference Room as the type in the drop-down menu.
- Assign a Conference Room from the dropdown menu.
-
Leave the Presence as its default Both.
-
Optionally, add tags to the conference room to make the conference room searchable by attributes. Click Save.
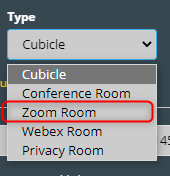
Zoom Room
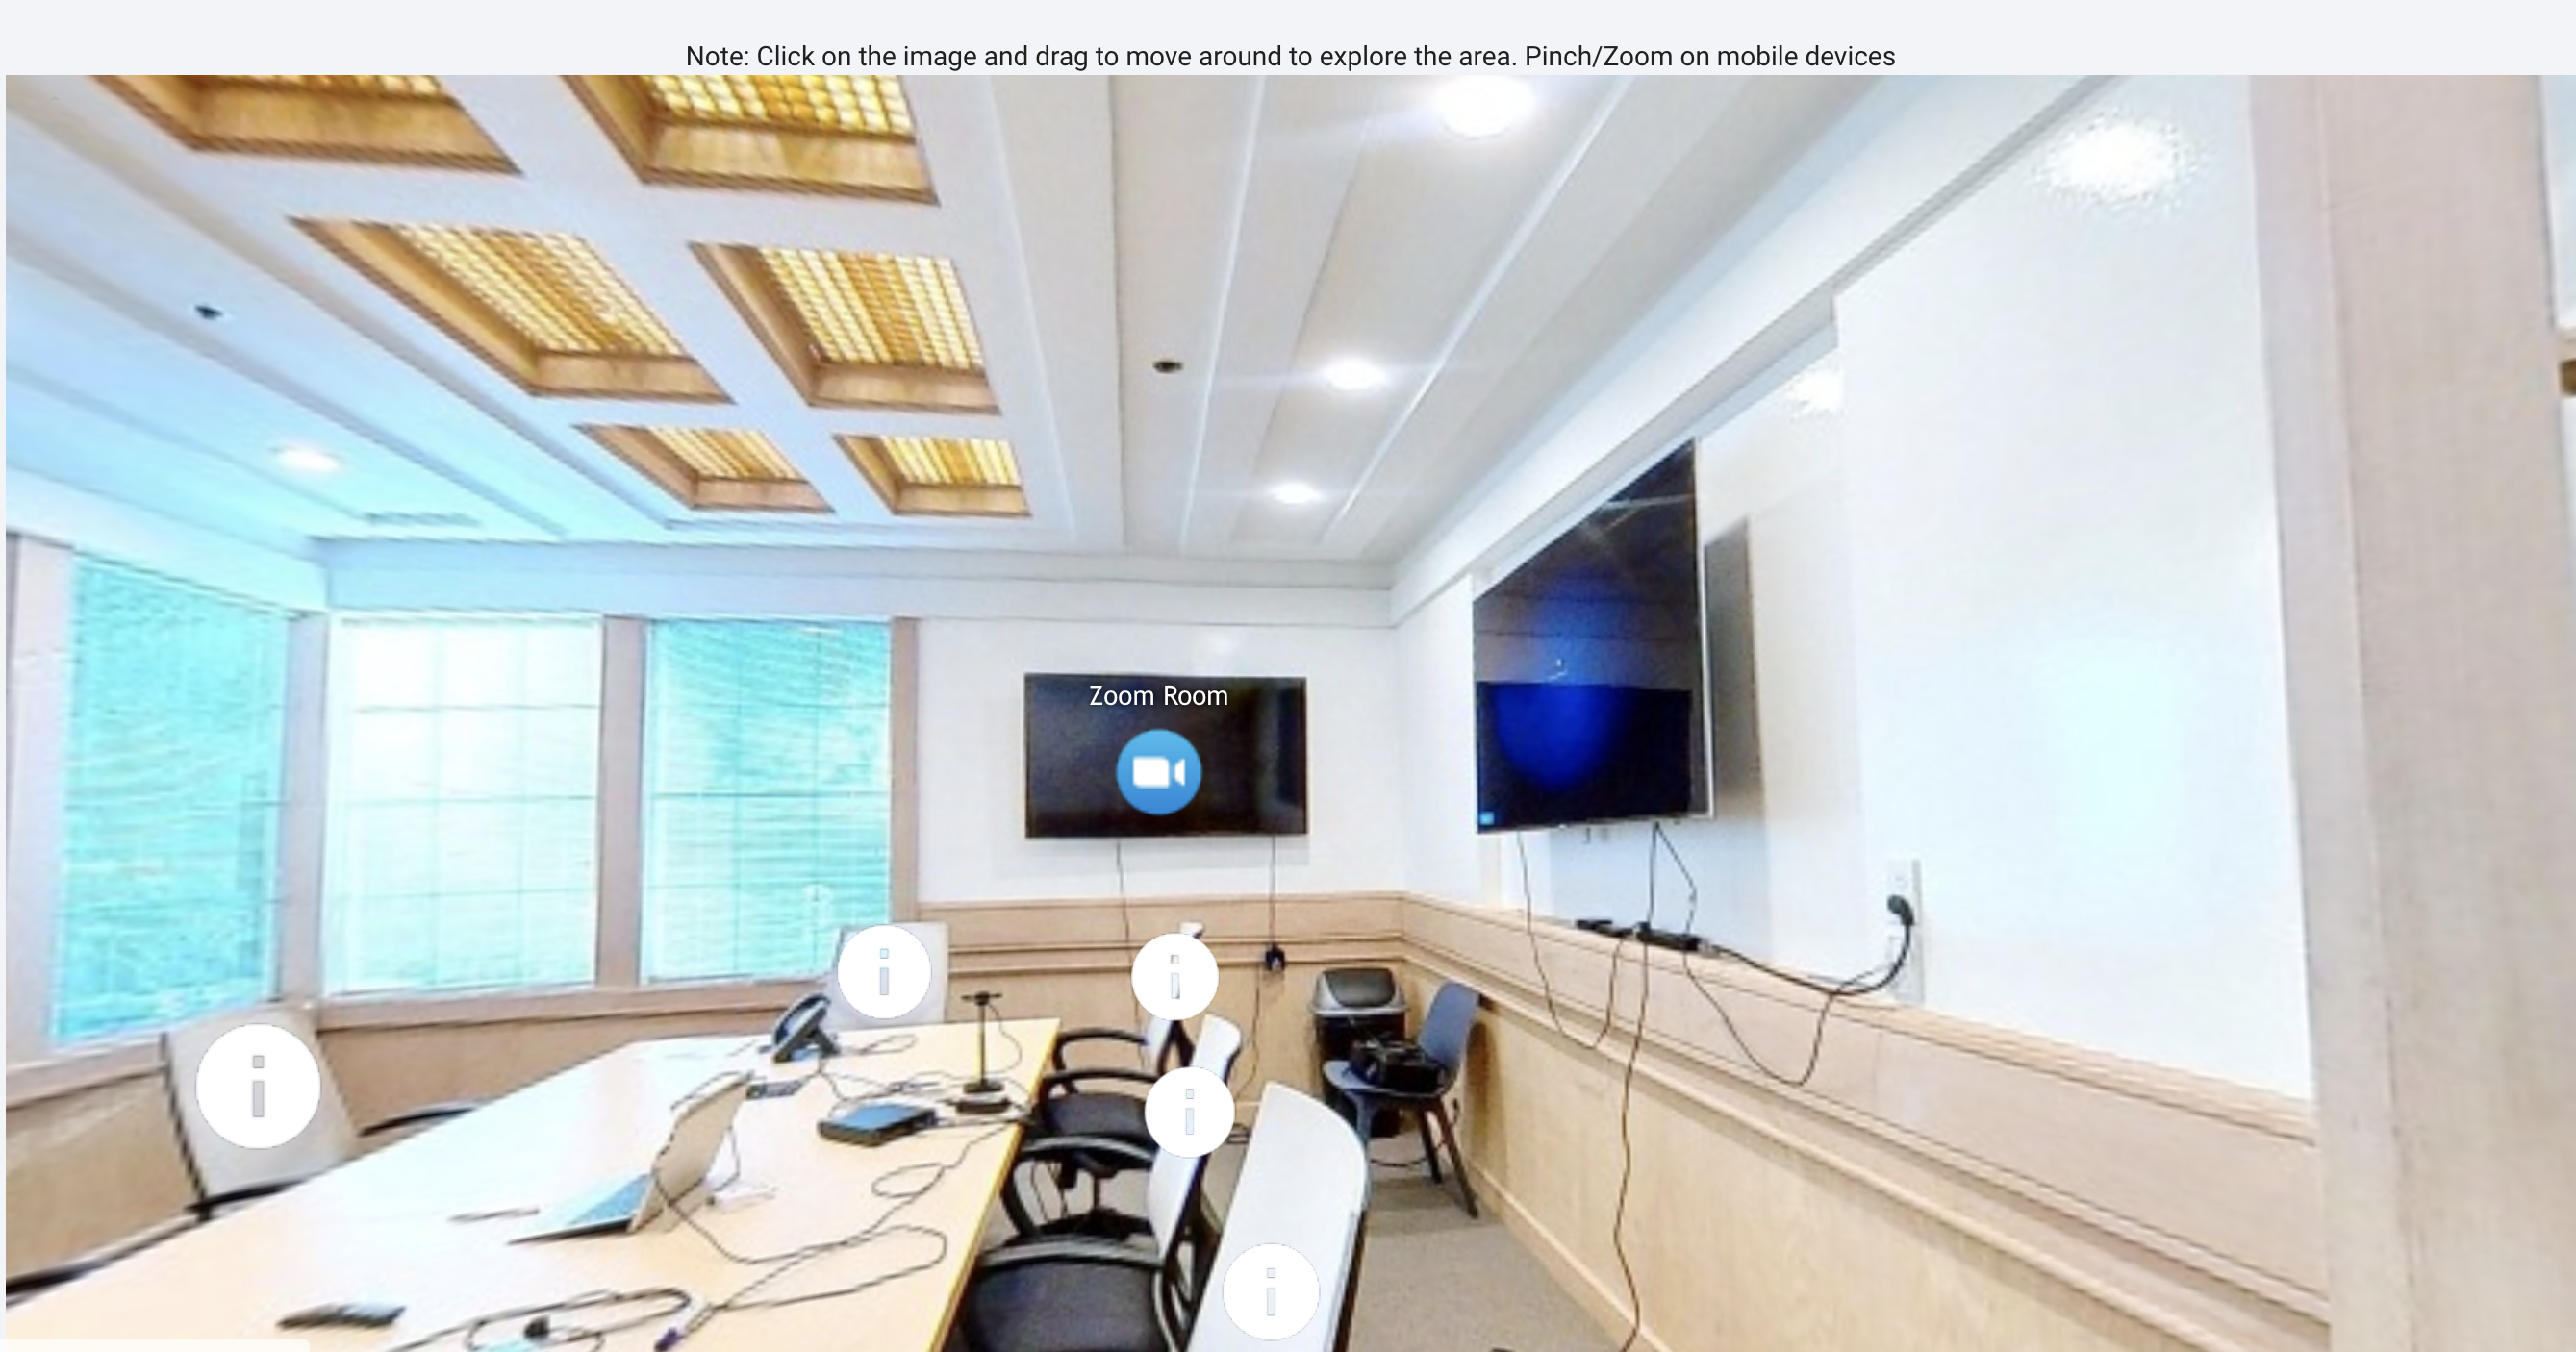
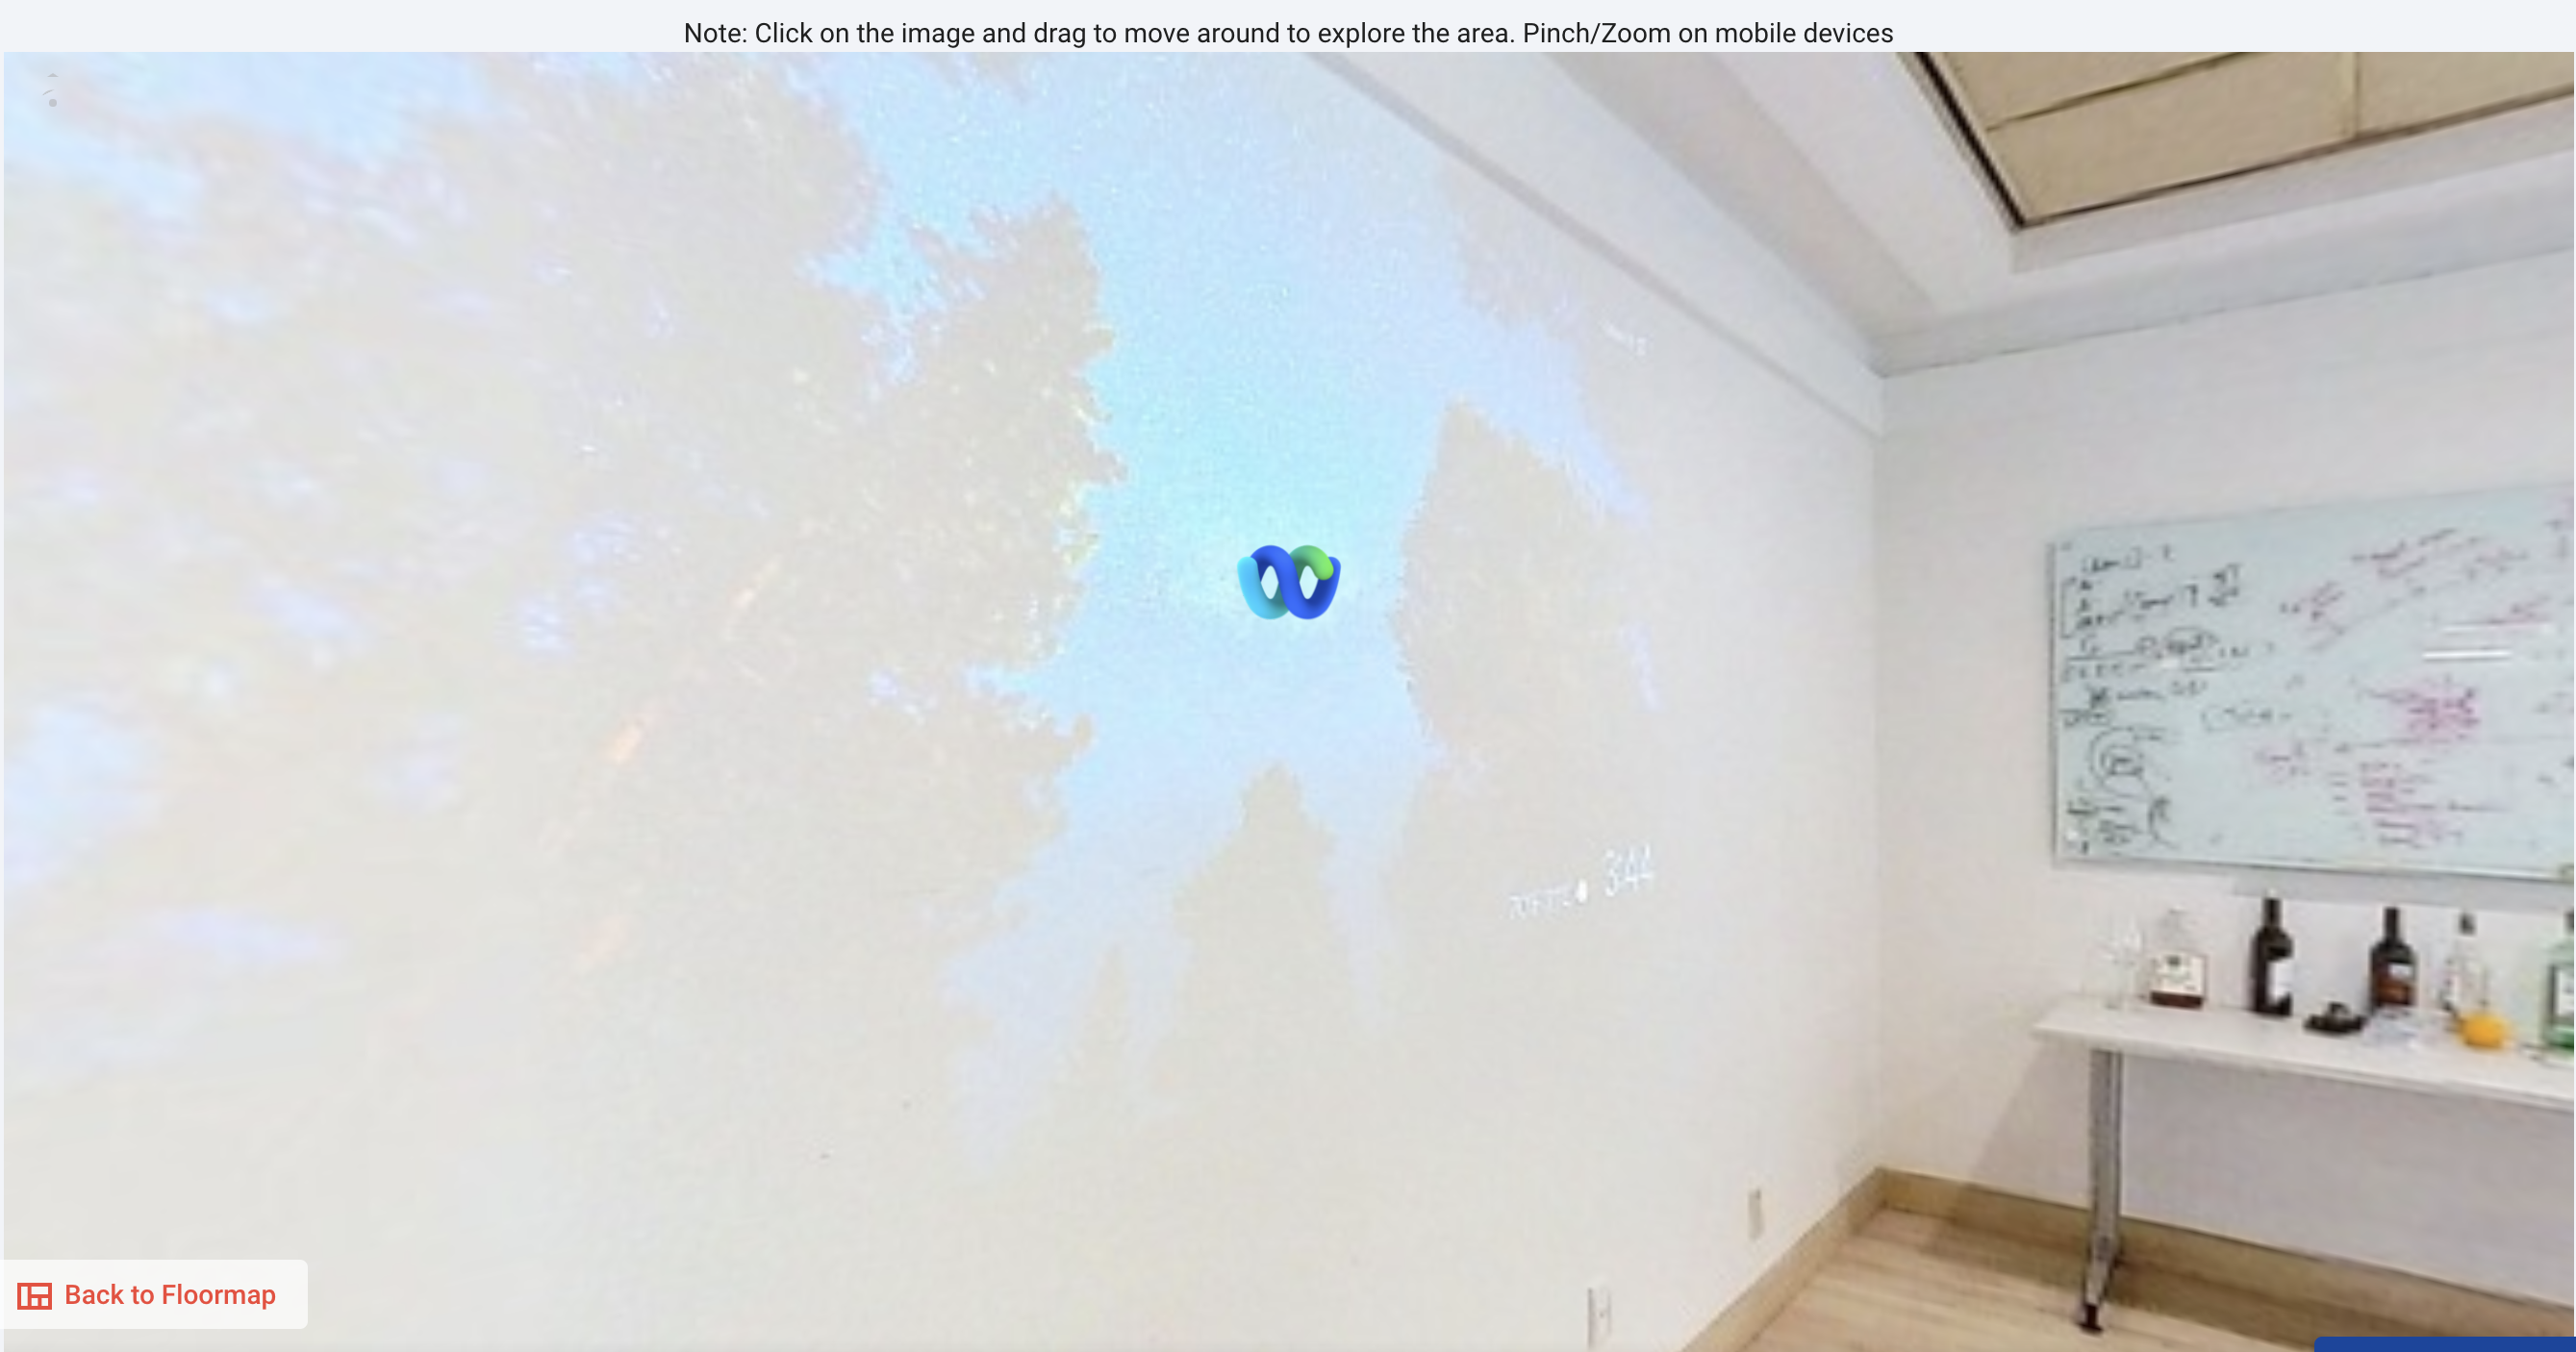
Zoom room infospots can be added so that users can join a zoom room link from the virtual walkthrough mode after booking into a meeting as seen below.
- Enter the Name for the infospot.
- Specify Zoom Room as the type in the drop down menu.
-
Leave the Presence as it’s default Both.
-
Enter zoom Link to the text box.
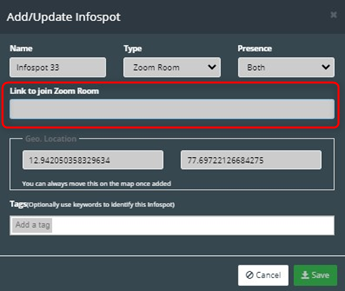
- Optionally, add tags to the conference room to make conference room searchable by attributes. Click Save.
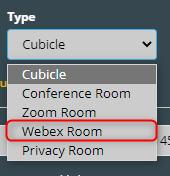
Webex Room
Webex room infospots can be added so that users can join a webex room link from the virtual walkthrough mode after booking into a meeting as seen below.
- Enter the Name for the infospot.
- Specify Webex Room as the type in the drop down menu.
-
Leave the Presence as it’s default Both.
-
Enter Webex Link to the text box.

- Optionally, add tags to the conference room to make conference room searchable by attributes. Click Save.
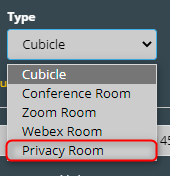
Privacy Room
Privacy rooms are separate rooms build for privacy or focus rooms. These rooms are bookable in the same way cubicles are bookable but allow users to search for more private spaces to book.
Once the Add/Update Infospot dialog box is displayed follow the instructions below to complete the configuration for a cubicle.
- Enter the Name for the infospot.
- Specify Privacy Room as the type in the drop down menu.
-
Select the Presence of the infospot. By default, Both is selected. If Both is selected, the seat will be bookable by both physical and remote employees. If Physical is selected the seat will only be bookable to physical employees. If Virtual is selected, the seat will only be bookable to remote employees. If None is selected, the seat will not be bookable but will be input into the system for later use once the seat is returned to the bookable pool of seats.
-
Provide the tags by adding the keywords to identify the infospot. This step is optional.
Note: You can specify a department in Infospot by adding tags. For example, if you add the Engineering tag here, this infospot will only be visible to the user who is tagged under the engineering department.
Check out the Configuring Neighborhoods section to learn more about the user department.
Note: Tags can also be added to the Infospot that describes additional details about the Infospot, and make the Infospot keyword searchable by the user. For example, you could add the tags, Disability Accessible, and Docking Station. So if a user searches for seats that are disability accessible or have a docking station, this seat will show up in the search.
- Click Save to make the changes.
Camera Infospot
- Cameras can be added as infospots in the same way that cubicles and conference rooms can. This allows the hybrid workspace to view live camera feeds.
- Once the Add/Update Infospot dialog box is displayed follow the instructions below to complete the configuration for a camera Infospot.
- Enter the Name of the infospot.
- Specify the Camera as the type in the drop-down menu.
- Then select the previously added camera from the drop-down list.
- Geo location will take automatically.
- Tags can be added if required. Then click the Save button.
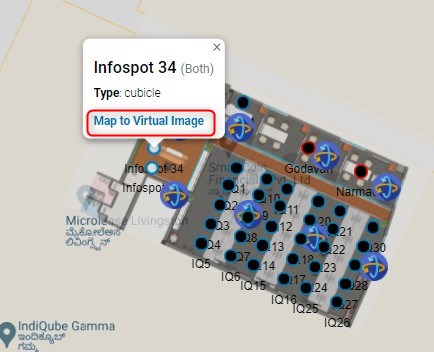
Finally, to complete the setup of the infospots, we need to map them to the virtual images.
- Click on an Infospot. Select Map to the virtual image from the popup window that appears.
-
Then select the correct virtual image from the drop down in the top right corner of the window that opens.
-
Click on the location where you want to place the infospot. Click save.
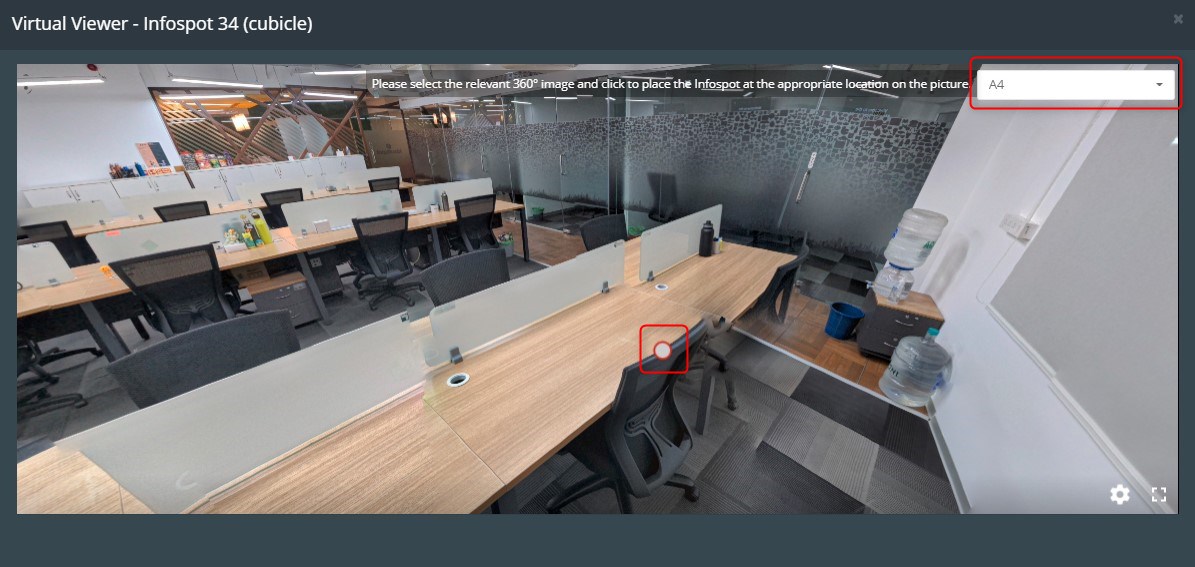
- Once mapped, the infospot will fill in to signify it has been mapped.