Configuring the Check-in Process
-
In this section, we will explore how to configure the check-in process for employees or visitors who have booked seats through the KloudHybrid app. By setting up various check-in options, you can offer a seamless and convenient experience for your users. KloudHybrid provides five ways to enable check-in, each tailored to suit different preferences and needs. To ensure a smooth check-in process, you have the flexibility to choose from five different check-in methods:
a. Self-Check-in
b. QR Code Site Check-in
c. QR Code Desk Check-in
d. Lobby Scan Check-in
e. Badge Check-in
-
Depending on your organization’s requirements, you can enable one or multiple check-in methods to provide diverse options for users.
-
To understand how to configure the check-in process effectively, follow the steps given below. This guide will walk you through the steps to set up and customize each check-in method according to your preferences.
The check-in process will define how an employee completes their desk booking process. Confirming that they are using the seat, made it to where they were going, and completed any requisite procedures before continuing.
Kloudspot has multiple check-in processes that can be configured in the system based on your needs. In this section, we will describe all the different options available for the check-in procedure and discuss how to configure and deploy them. The different check-in processes are as follows:
- Self-Check-in
- QR Code site check-in
- QR Code desk check-in
- Lobby scan check-in
- Badge check-in
Before proceeding it’s important to understand the various stages of the entire booking process.
- The first stage of the booking process is for a user to go in and create the actual booking. This is where they will make their site, seat, time, and date selections, and then reserve that seat for the given time.
- The next stage of the booking process is the health questionnaire. This is generally completed before an employee has come onto the site to check-in. Employees are notified if they are cleared to head into the site or not based on their responses to the health questionnaire. It’s also important to note that this is an optional step, and administrators can configure the system to skip directly to step #3.
- The final step of the booking process is the check-in process, which is what this section discusses. The check-in process you configure has no bearing on steps #1 or #2, and you can configure those stages separately, as discussed in other sections.
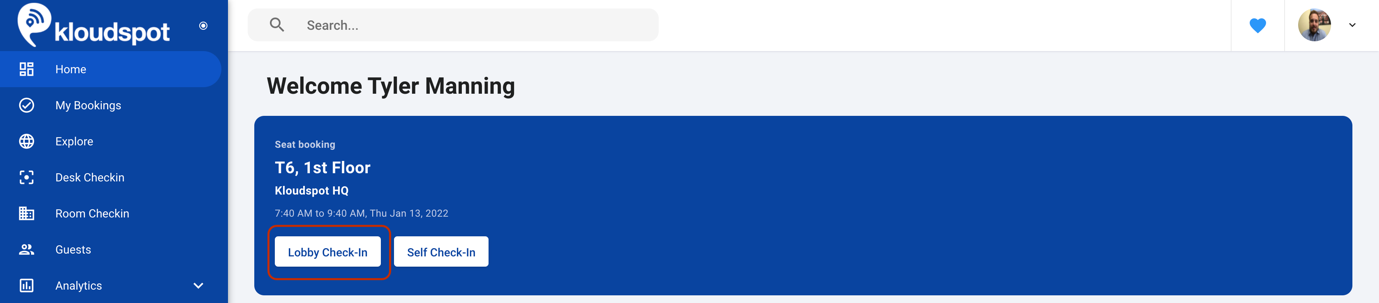
Self-Check-in
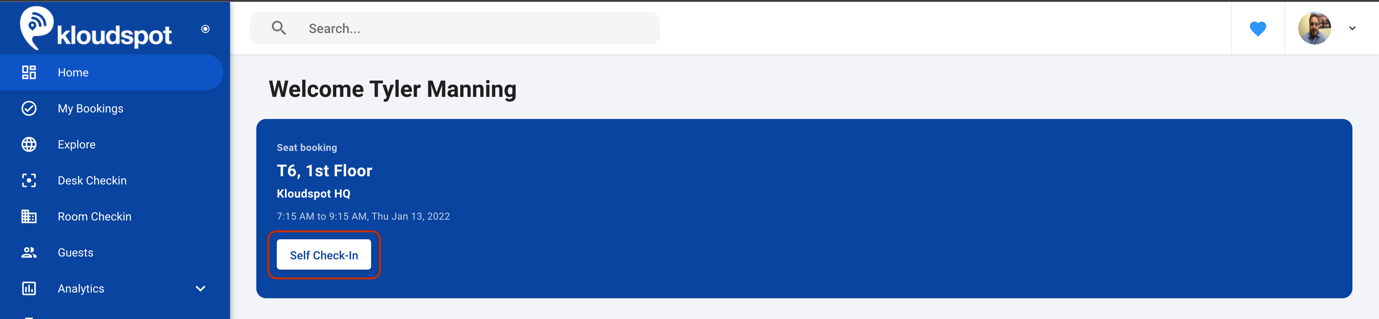
- The self-check-in process is the simplest of all check-in procedures, it simply involves the user confirming their booking at the time of check-in. This is done by simply clicking the self-check-in button that appears on the application home screen at the time of check-in, as seen below.
-
Once the user has clicked the self-check-in button, the process is complete, they will be notified through the application that their check-in process is complete, and they can feel free to exit the application and continue with their day.
-
To configure self-check in, navigate to the Advanced Settings page, then to Configuration -> Hybrid Settings -> scroll down to Check-in Settings.
-
Next, if checked, uncheck Kiosk Check-in, and check Check-in without QR code scan, as seen in the below figure.

- Finally, click the save button at the top of the Hybrid Settings page as seen below.
QR Code Site Check-in
-
The site QR code check-in process is where a global site QR code is pasted either in the lobby, or around the office at key entry points. When users enter the site, they pull out their mobile application, proceed to the check-in process, and scan the global site QR code. Once they do this, their check-in process is complete, they will be notified through the application that their check-in process is complete, and they can feel free to exit the application and continue with their day.
-
From the user perspective, they will click the “Self Check-in” button on the home page at the time of check-in.

- The user will then be redirected to a QR code scan in page:

The user will then need to point their camera at the QR code, the QR code will be automatically detected & scanned by the application (when made visible). As soon as the QR code gets scanned by the application, the check-in process is complete.
To set up QR Code Site Check-in:
- To configure self-check in, navigate to the Advanced Settings page, then to Configuration -> Hybrid Settings -> scroll down to Check-in Settings.
- Next, uncheck Kiosk Check-in, and uncheck Check-in without QR code scan, as seen in the below figure

- Next, click the save button at the top of the Hybrid Settings page as seen below.
-
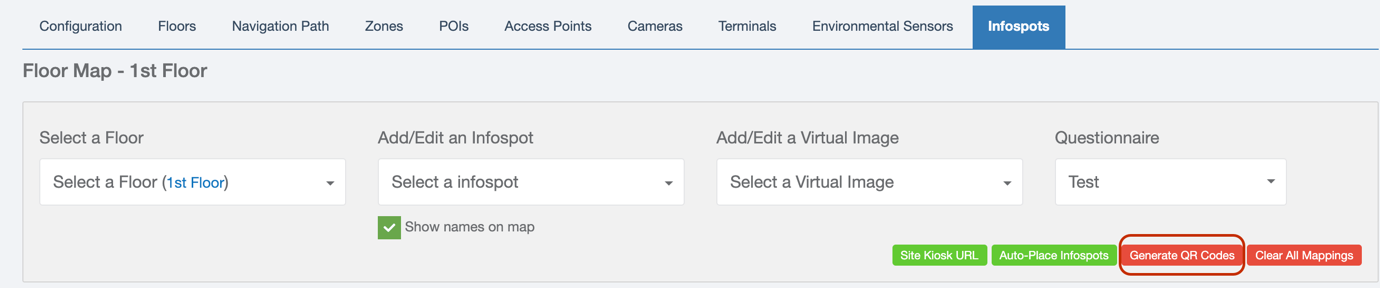
Then, navigate to the Advanced Settings page, then to Configuration -> Locations -> Infospots page.
-
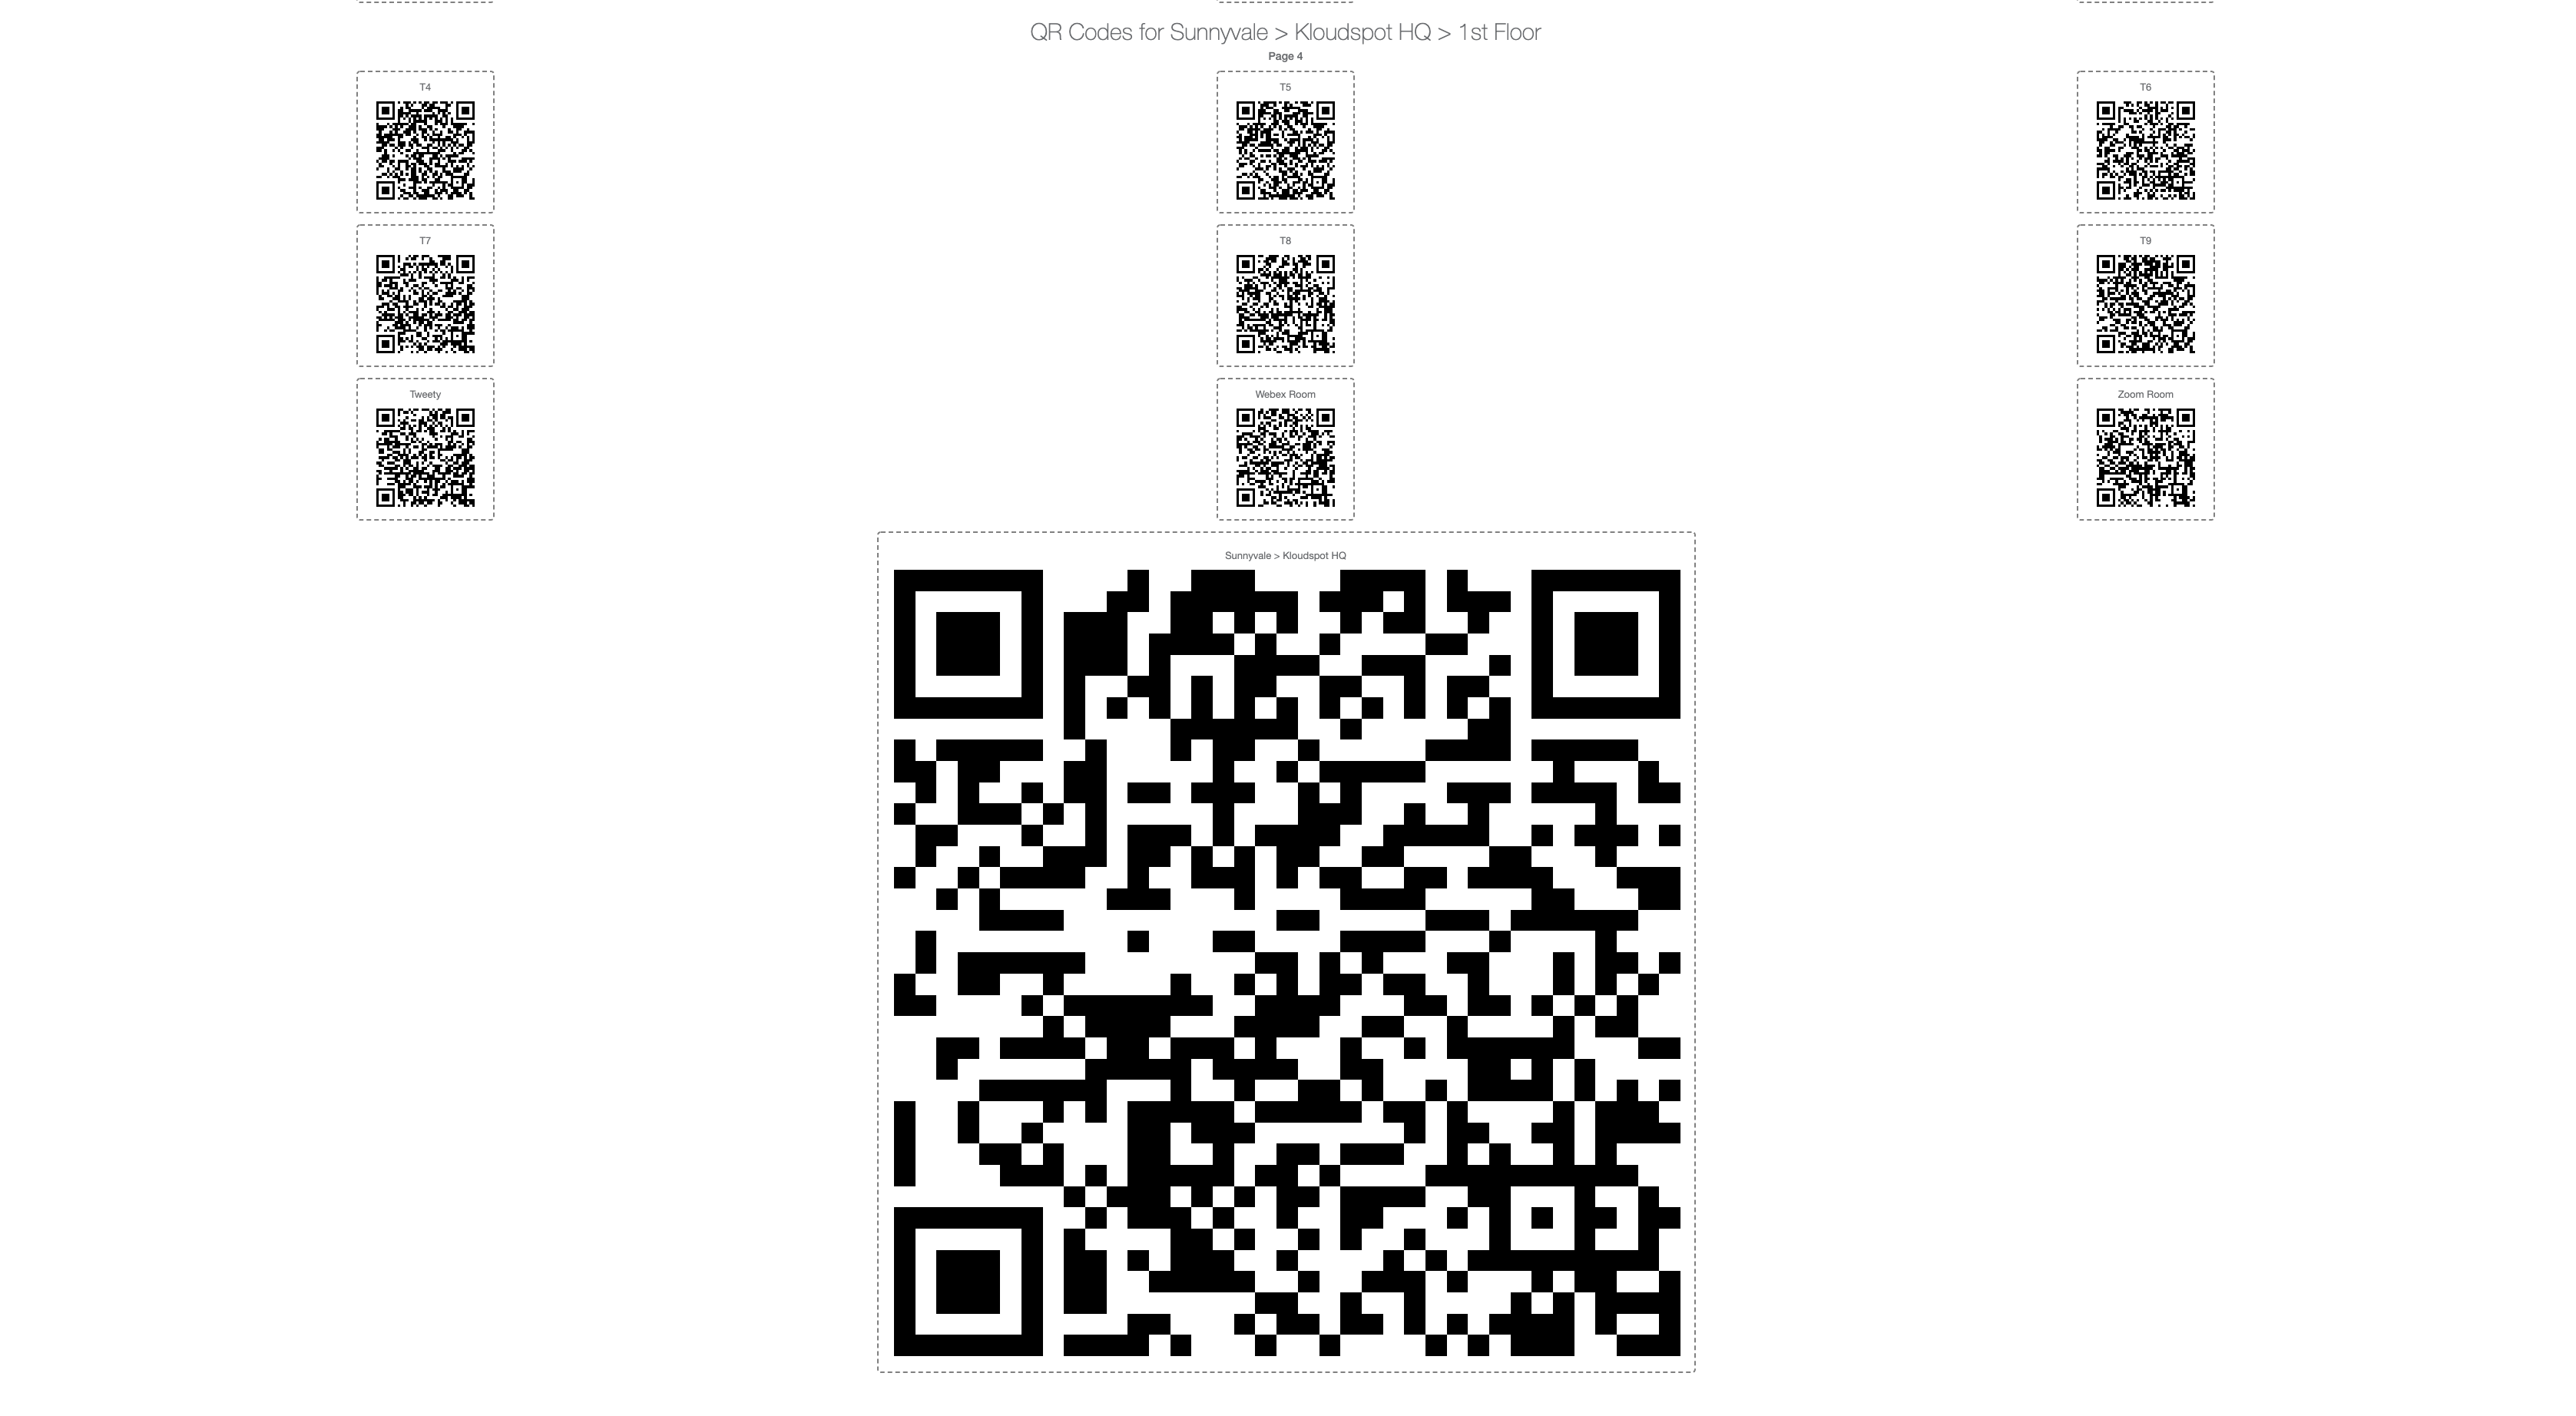
Click the Generate QR Codes button.

- This will redirect you to a page with many QR codes. At the top of the web page, there will be smaller QR codes that are marked for specific infospots. At the very bottom of the page, there will be a single large QR code, which is the site QR code. Print this large QR code out and paste it around you site. This will be the QR code that users will need to scan to check-in
QR Code Desk Check-in
- The desk QR code check-in process is where a QR code is pasted in every bookable seat. When users enter the site they head to their reserved seat. Once they are at their seat, they pull out their mobile application, proceed to the check-in process, and scan the desk QR code. Once they do this, their check-in process is complete, they will be notified through the application that their check-in process is complete, and they can feel free to exit the application and continue with their day.
- From the user perspective, they will click the “Self Check-in” button on the home page at the time of check-in.

- The user will then be redirected to a QR code scan in the page:
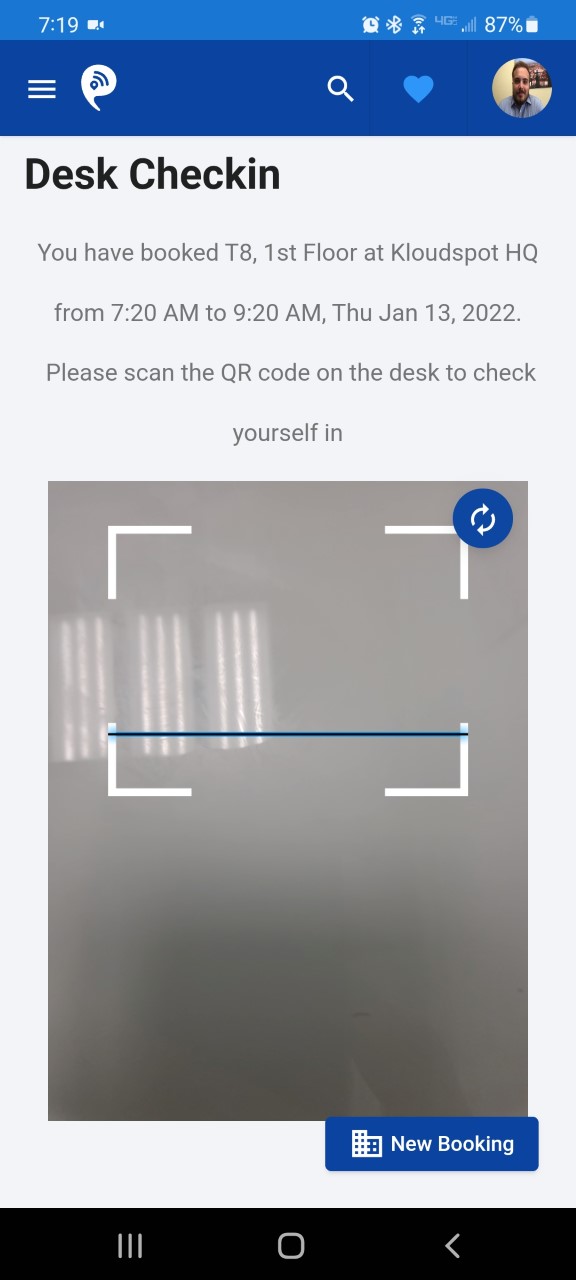
- The user will then need to point their camera at the QR code, the QR code will be automatically detected & scanned by the application (when made visible). As soon as the QR code gets scanned by the application, the check-in process is complete.
To set up QR Code Desk Check-in:
- To configure self-check in, navigate to the Advanced Settings page, then to Configuration -> Hybrid Settings -> scroll down to Check-in Settings.
- Next, uncheck Kiosk Check-in, and uncheck Check-in without QR code scan, as seen in the below figure

- Next, click the save button at the top of the Hybrid Settings page as seen below.
-
Then, navigate to the Advanced Settings page, then to Configuration -> Locations -> Infospots page.
-
Click the Generate QR Codes button.
- This will redirect you to a page with many QR codes. At the top of the web page, there will be smaller QR codes that are marked for specific infospots. At the very bottom of the page, there will be a single large QR code, which is the site QR code. Print out the smaller QR codes and paste them on or around their associated desk.

Lobby Scan Check-in
-
The lobby scan check-in process is where, at the time of check in, the user will open their application, be given a QR code on the application, and then present the QR code to a tablet setup as a scanner in the lobby. This is a very similar process that airlines employ with boarding pass QR codes and at-the-gate scanning.
-
From the user perspective they will open their application, click the Lobby Check-in button.
- The user will then be presented with a pop-up asking them to present the QR code to the lobby scanner:
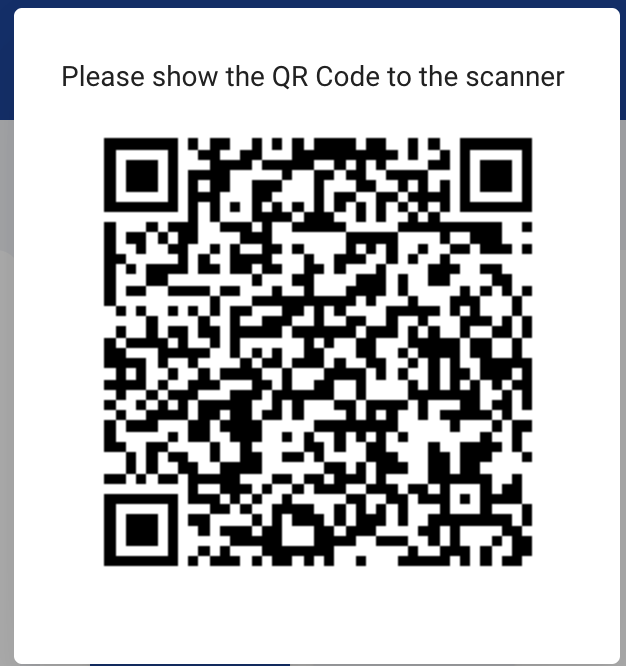
- They will display this QR code to the tablet in the lobby, the same as you would when you’re in the airport. Once they do this, their check-in process is complete, they will be notified through the application that their check-in process is complete, and they can feel free to exit the application and continue with their day.
To set up Lobby Scan Check-in:
- To configure self-check in, navigate to the Advanced Settings page, then to Configuration -> Hybrid Settings -> scroll down to Check-in Settings.
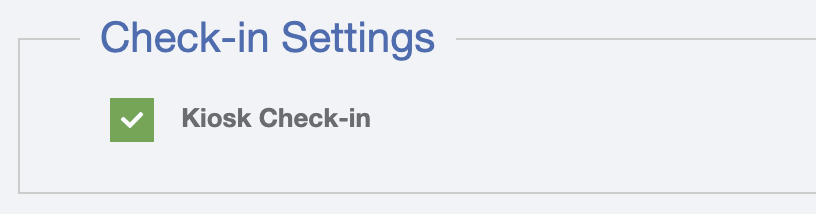
- Next, check Kiosk Check-in, as seen in the below figure
- Next, click the save button at the top of the Hybrid Settings page as seen below.
-
Then, navigate to the Advanced Settings page, then to Configuration -> Locations -> Infospots page.
-
Click Site Kiosk URL, copy the given URL, and paste it into the lobby kiosks browser. It will open a scanning & lobby management application. The web page opened can also function as a progressive web app, that can be downloaded onto the device.

Badge Check-in
- Badge check-in is where an employee can complete their check-in process by scanning their employee badge, and by doing this they complete their check-in process. The KloudHybrid system can also in some cases work to deny users entry to the building based on certain conditions such as: working hours, health questionnaire responses, no upcoming bookings, etc.
- To setup and configure the badge check-in please contact your Kloudspot representative.