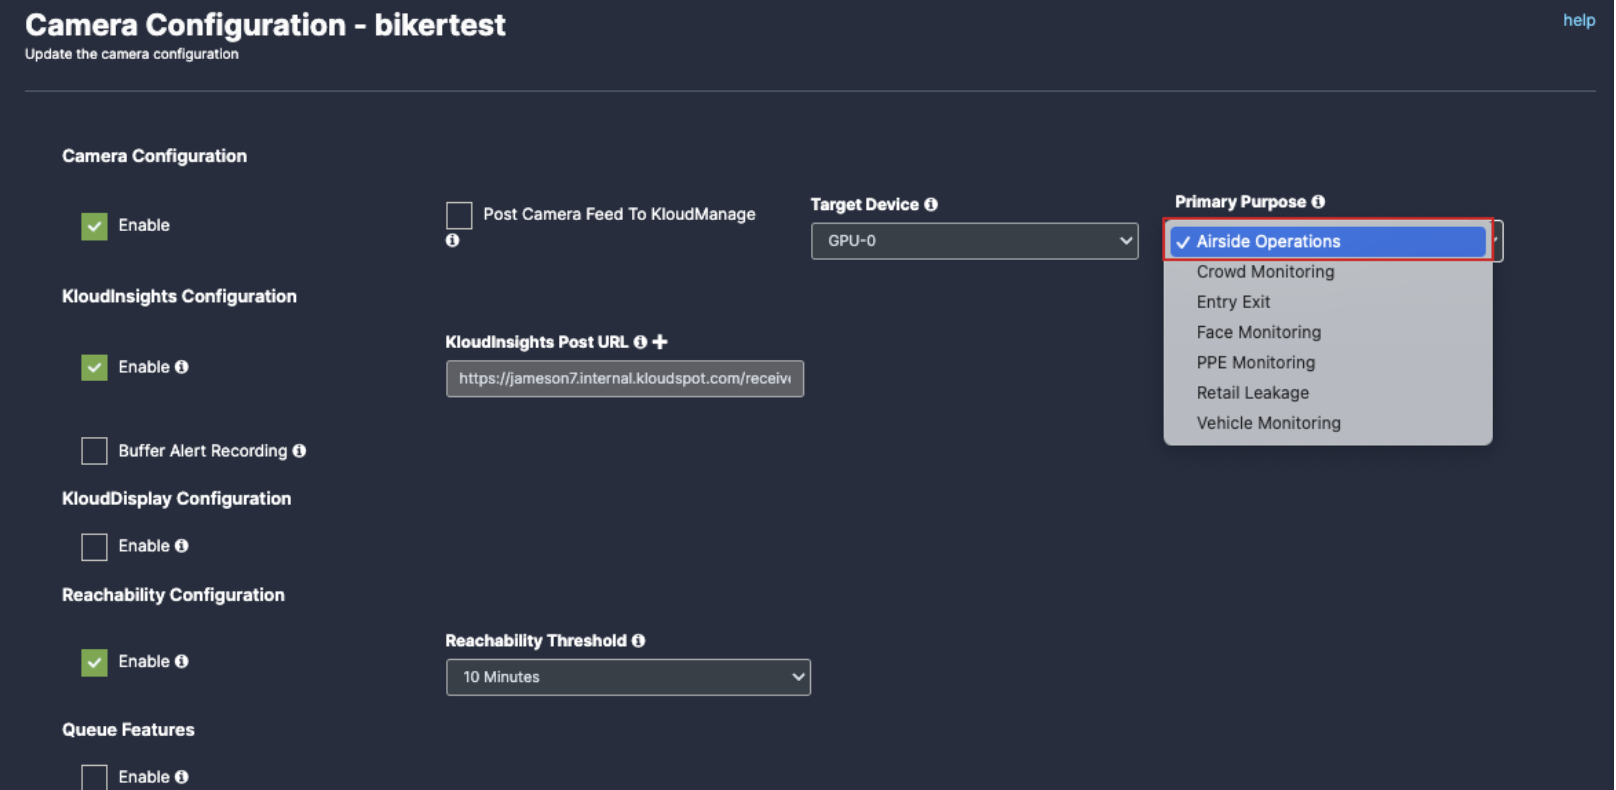
Airside Operations
- Before you begin configuring the use cases, you should first configure the camera’s general configuration. Refer to the General Camera Configuration section for instructions.
- Then, select the Airside operations from the dropdown list
- Scroll down and you will see the 2 type of detection which is:
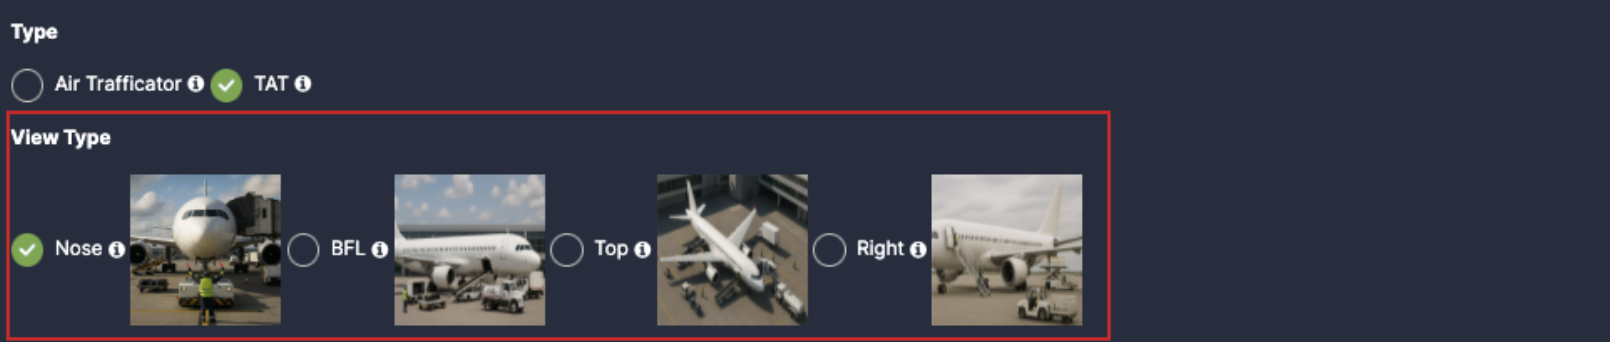
- Air Trafficator
- TAT(Turnaround Time)
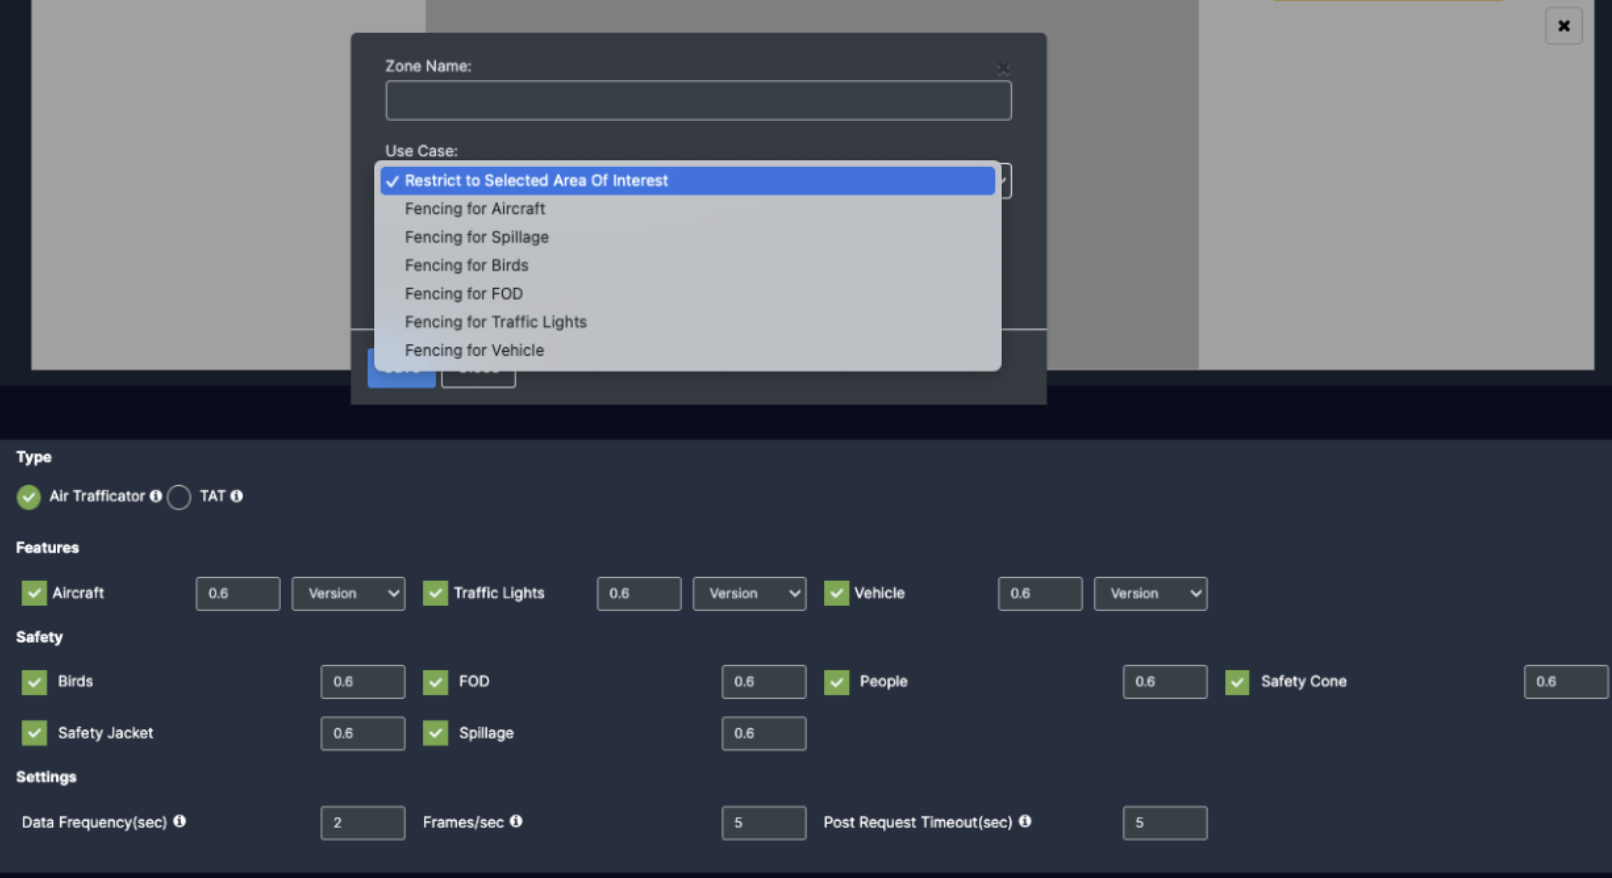
- Select Air trafficator, scroll down and choose your preferred use cases. You can choose multiple Features.
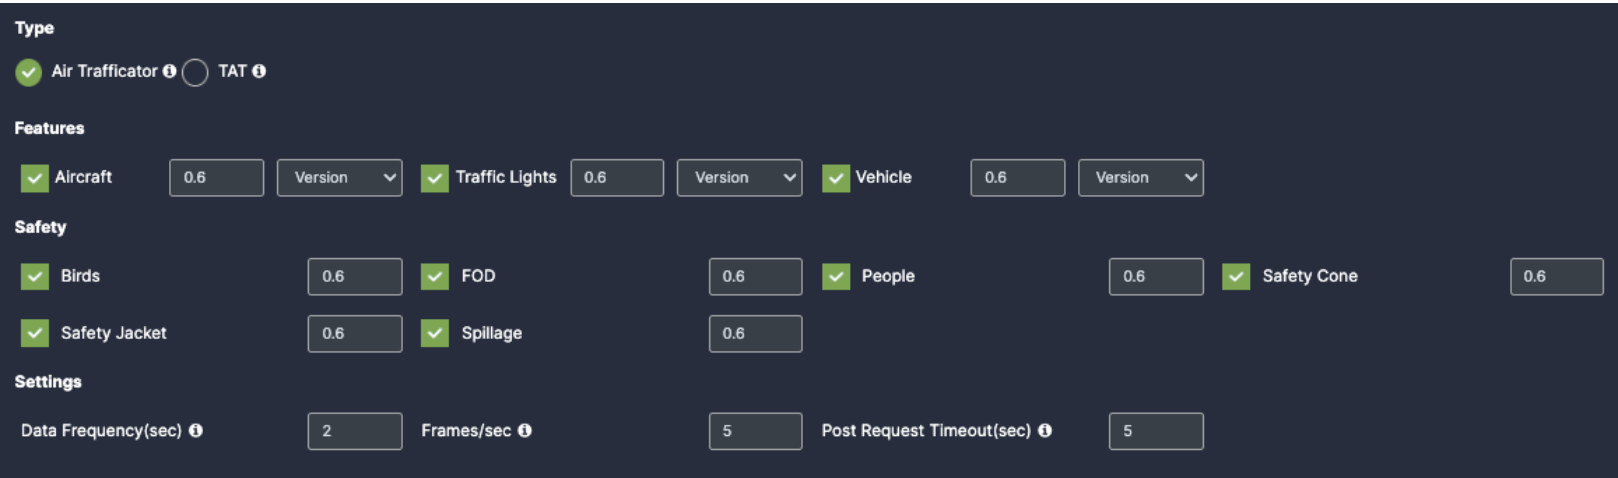
- Aircraft: Once you enable the checkbox of Aircraft, you will get respective confidence and version dropdown.
- Traffic Lights: Once you enable the checkbox of Traffic Lights, you will get respective confidence and version dropdown.
- Vehicle: Once you enable the checkbox of Vehicle, you will get respective confidence and version dropdown.

- Birds: Once you enable the checkbox of Birds, you will get respective confidence.
- FOD: Once you enable the checkbox of FOD, you will get respective confidence.
- People: Once you enable the checkbox of People, you will get respective confidence.
- Safety Jacket: Once you enable the checkbox of Safety Jacket, you will get respective confidence.
- Spillage: Once you enable the checkbox of Spillage, you will get respective confidence.

- Data Frequency(sec): Fill the setting as per your requirements
- Frames/Sec: Fill the setting as per your requirements
- Post Request Timeout(sec): Fill the setting as per your requirements

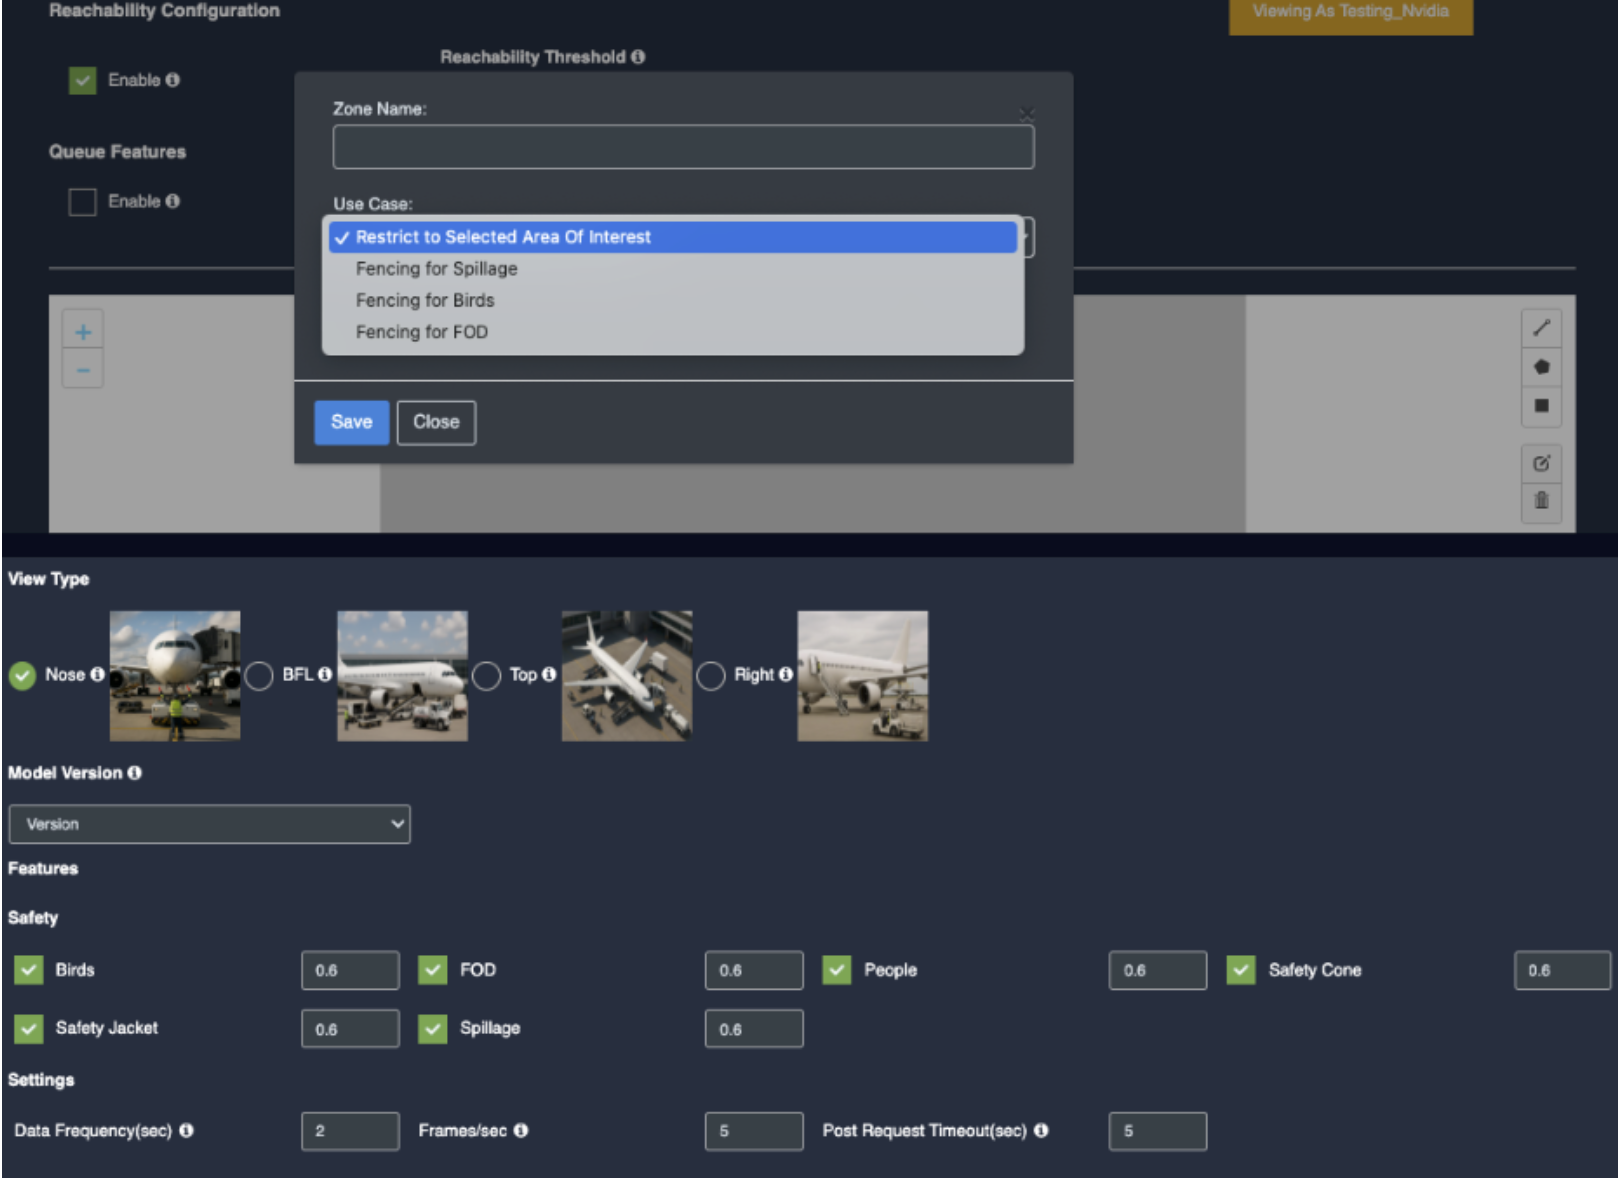
- Now, Select TAT and scroll down to choose your preferred use cases. You can choose multiple Features.
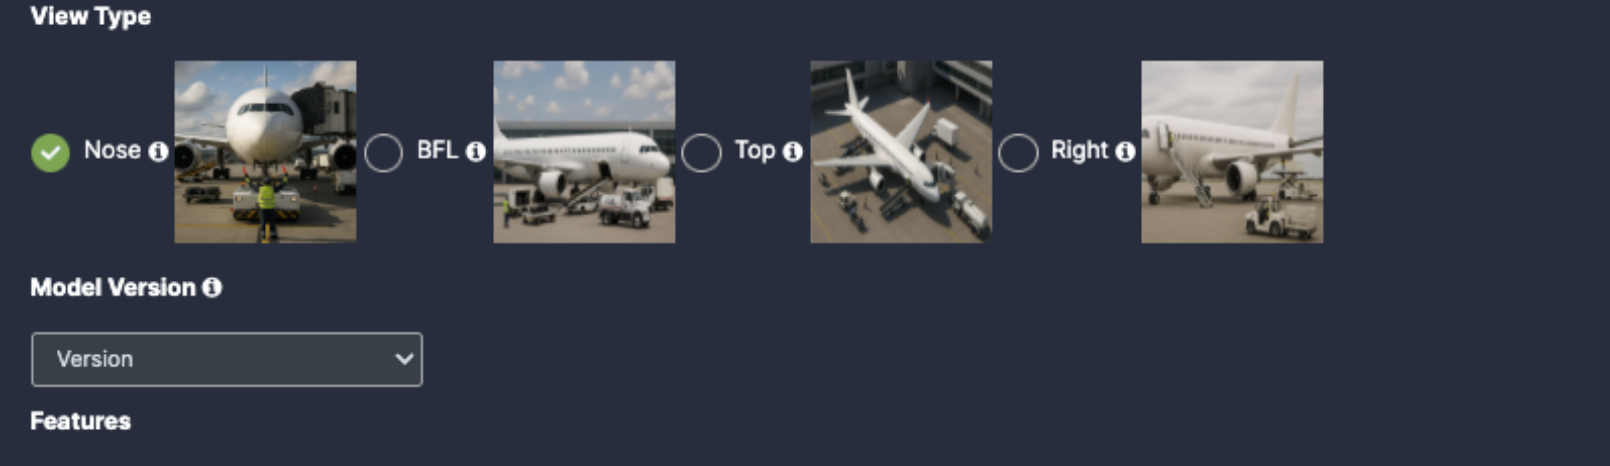
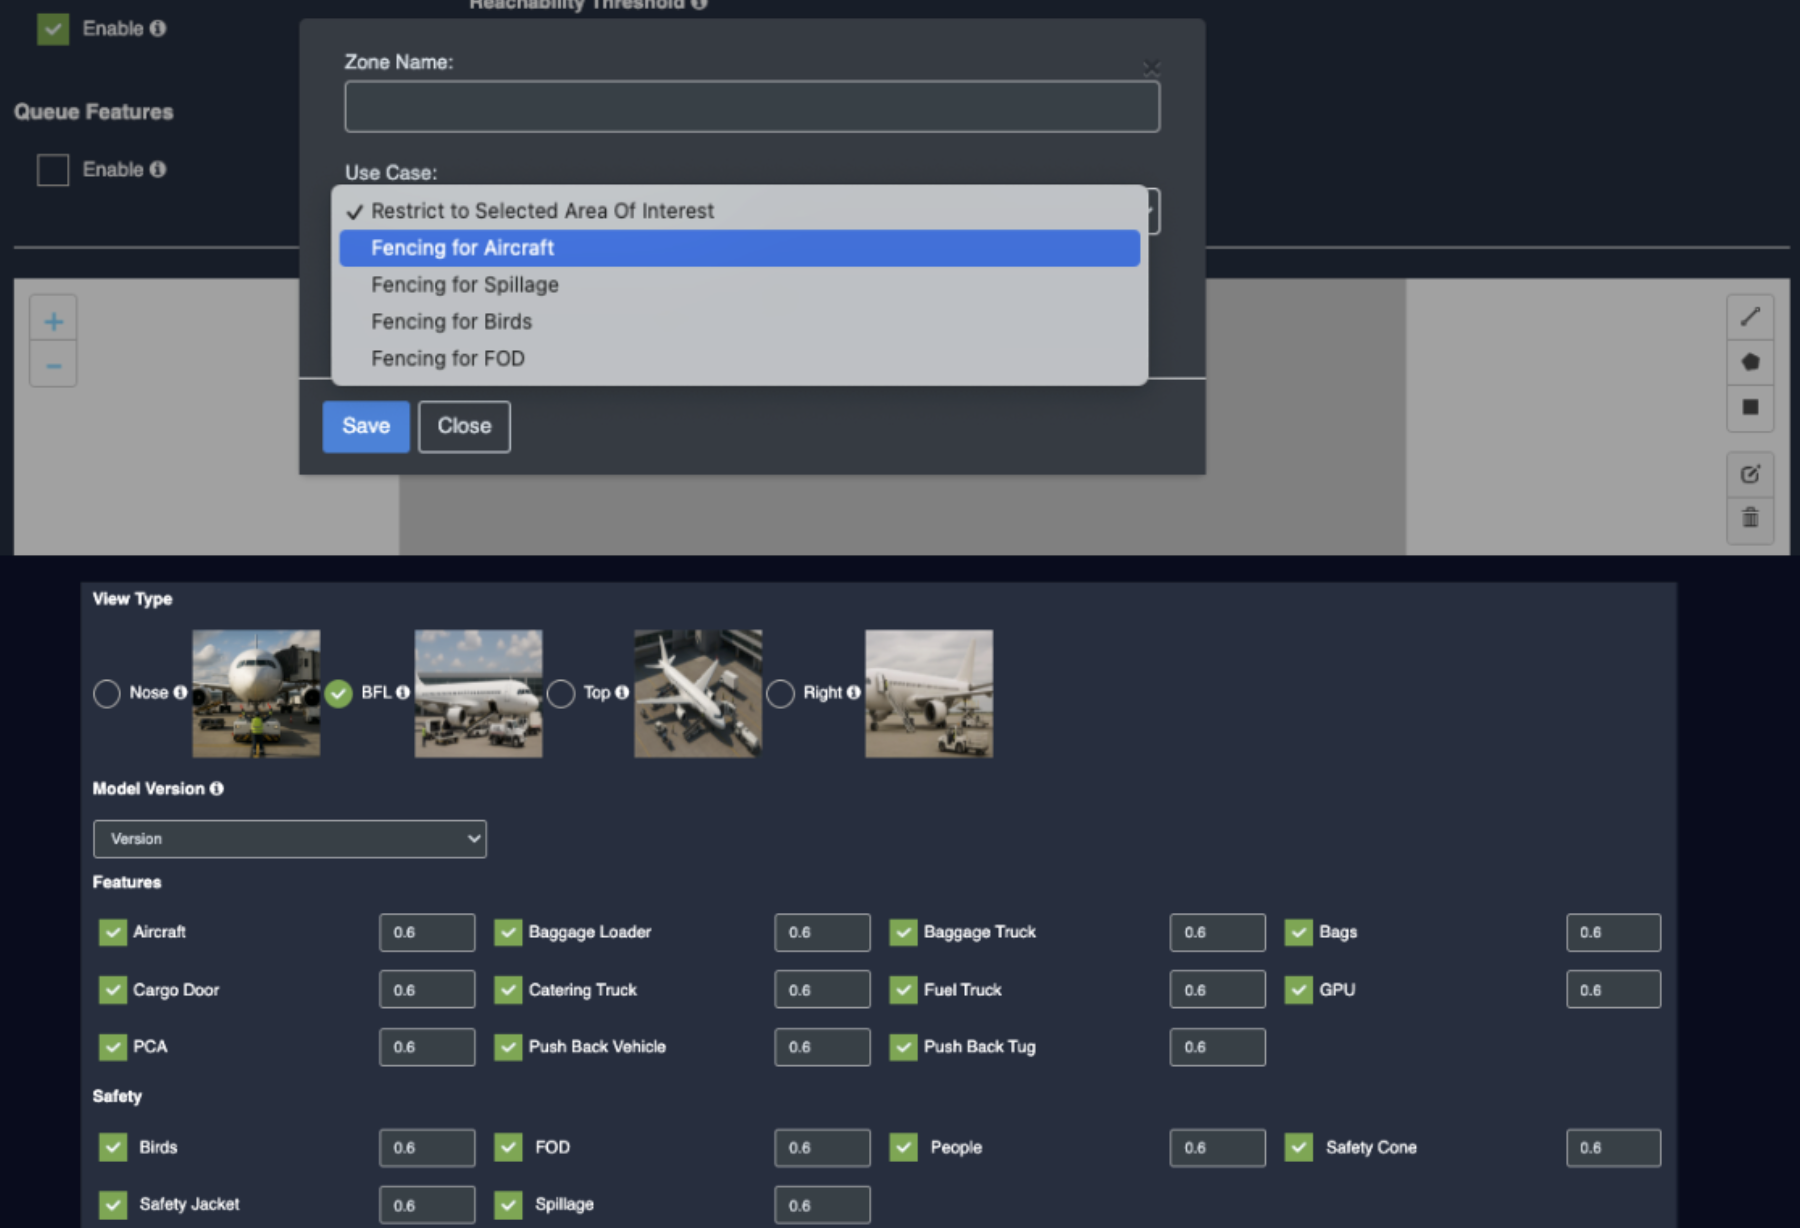
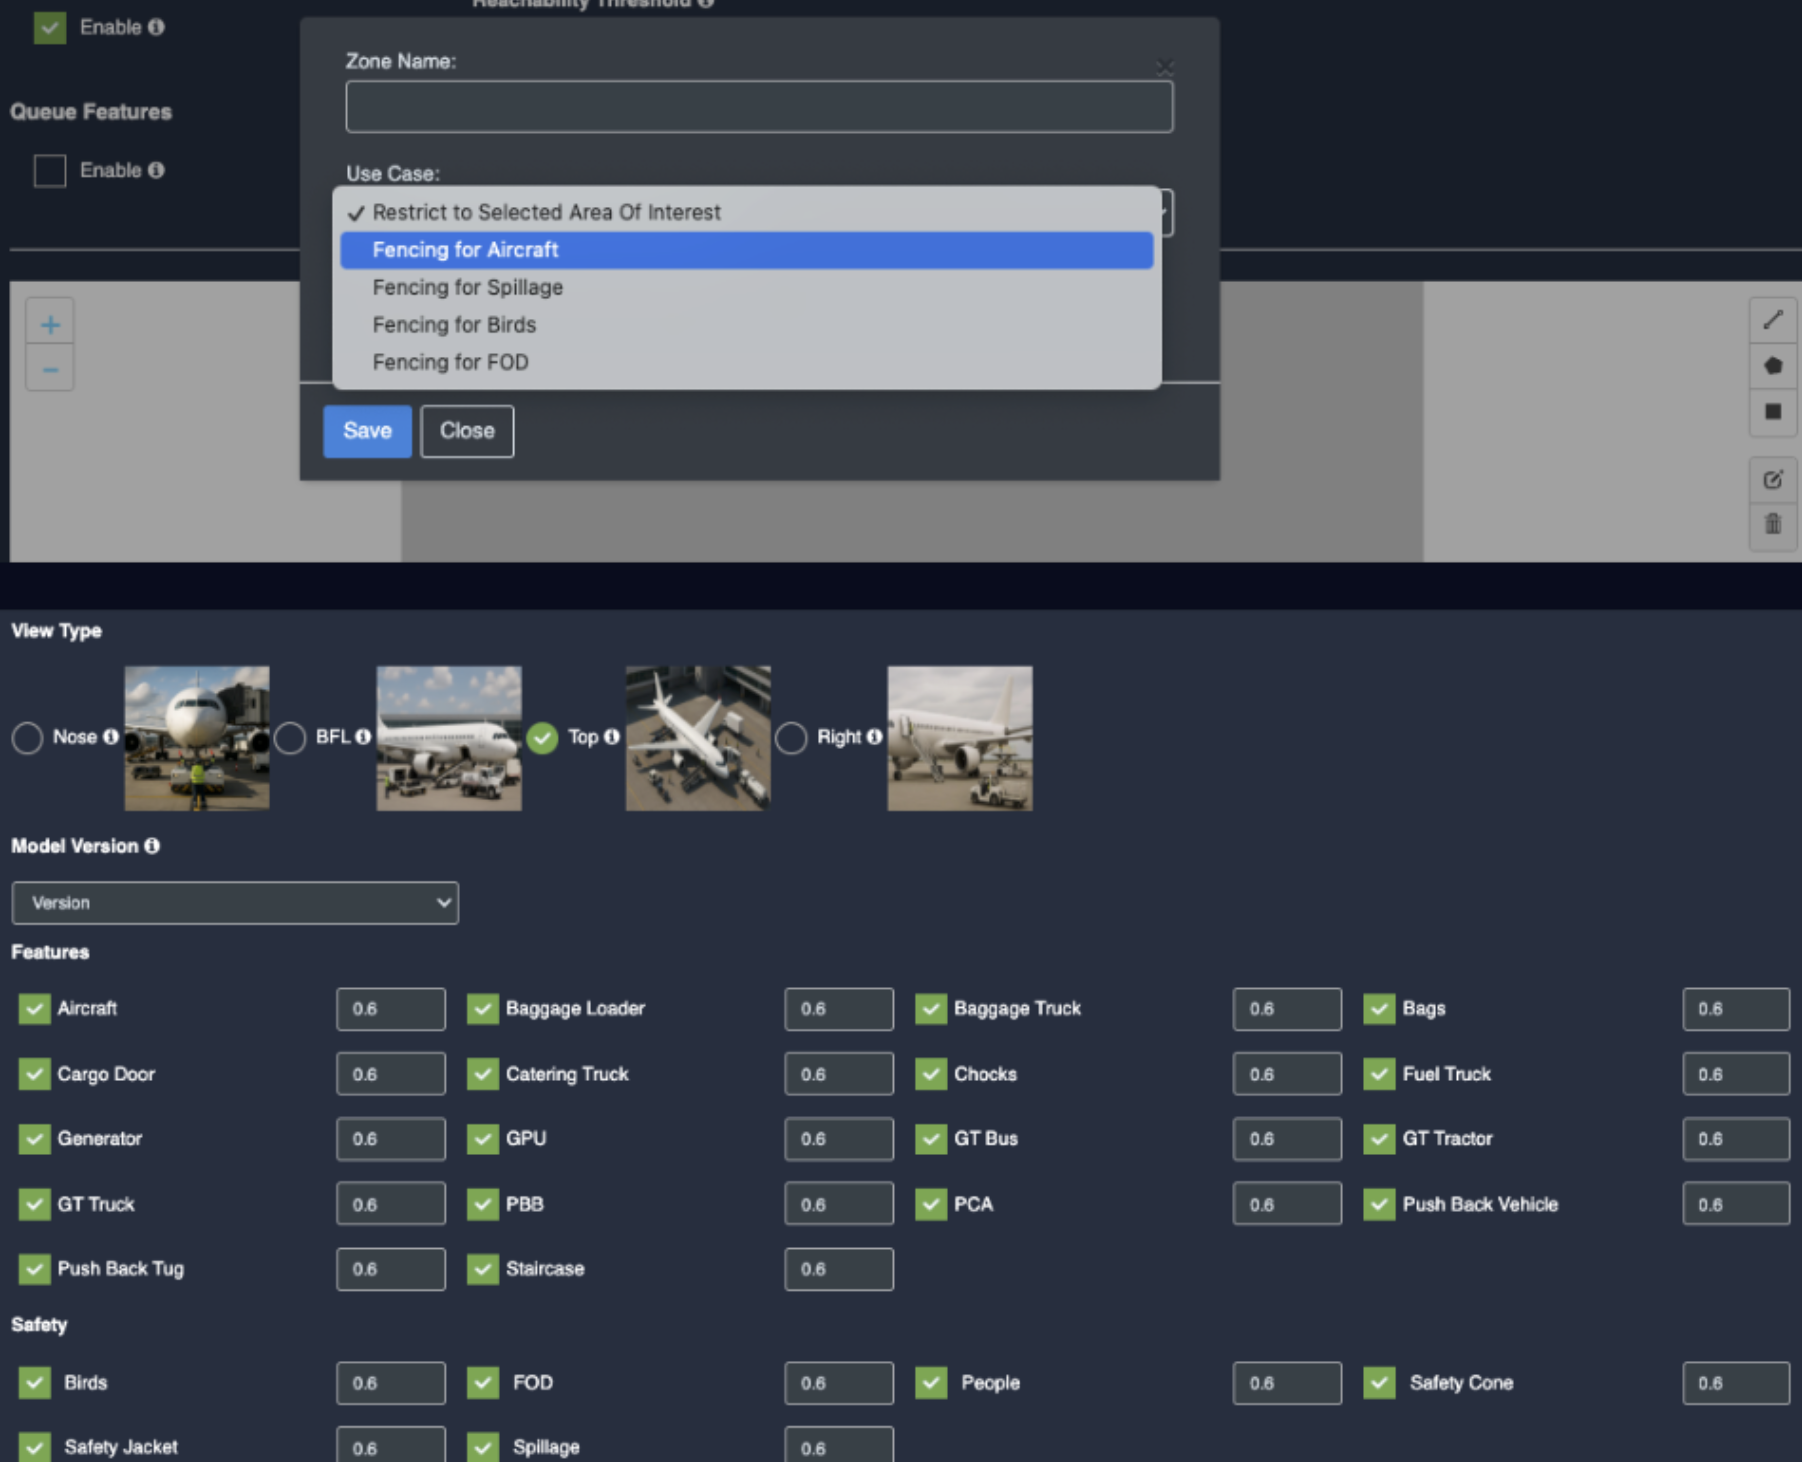
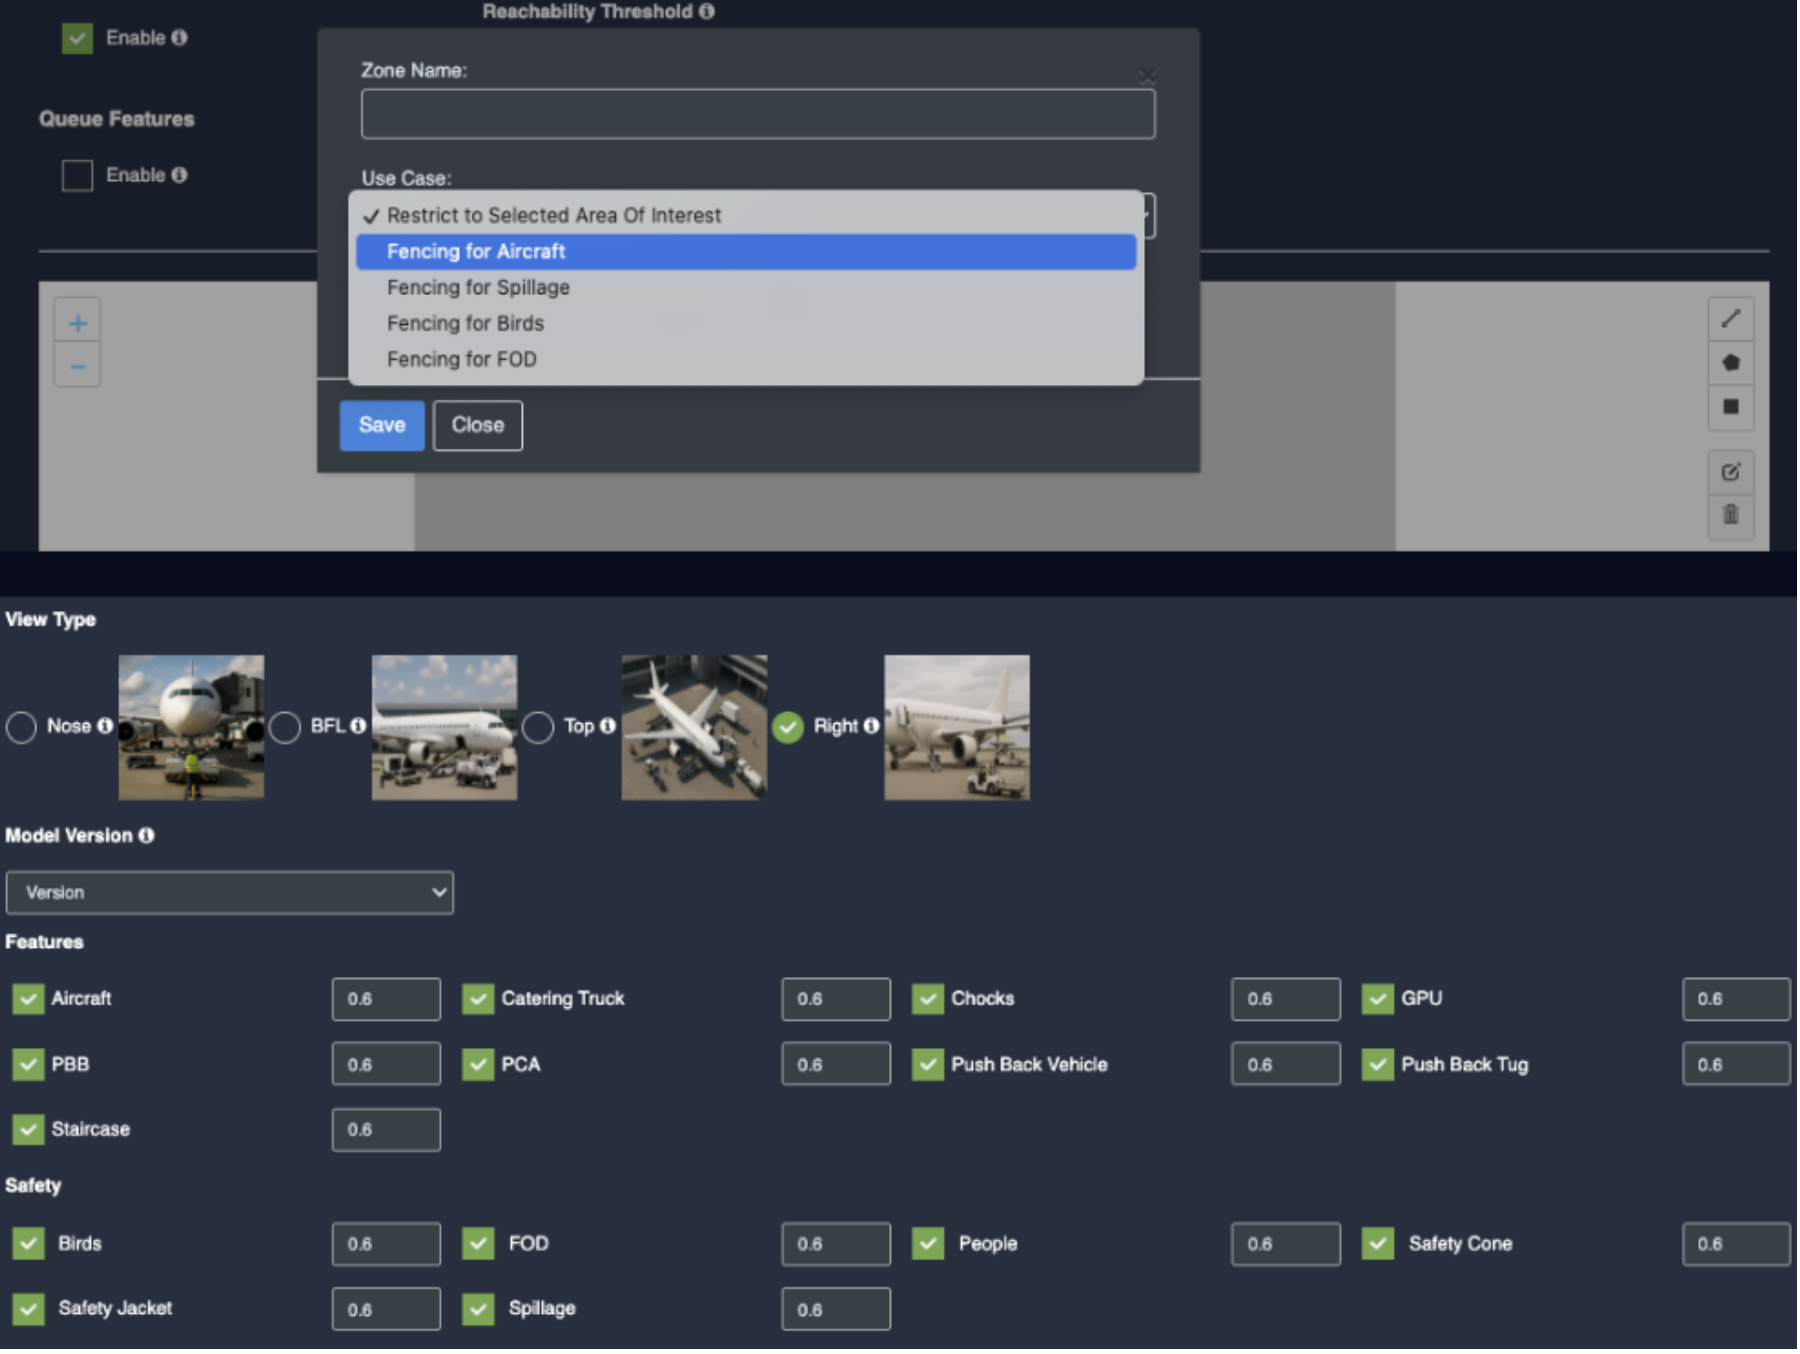
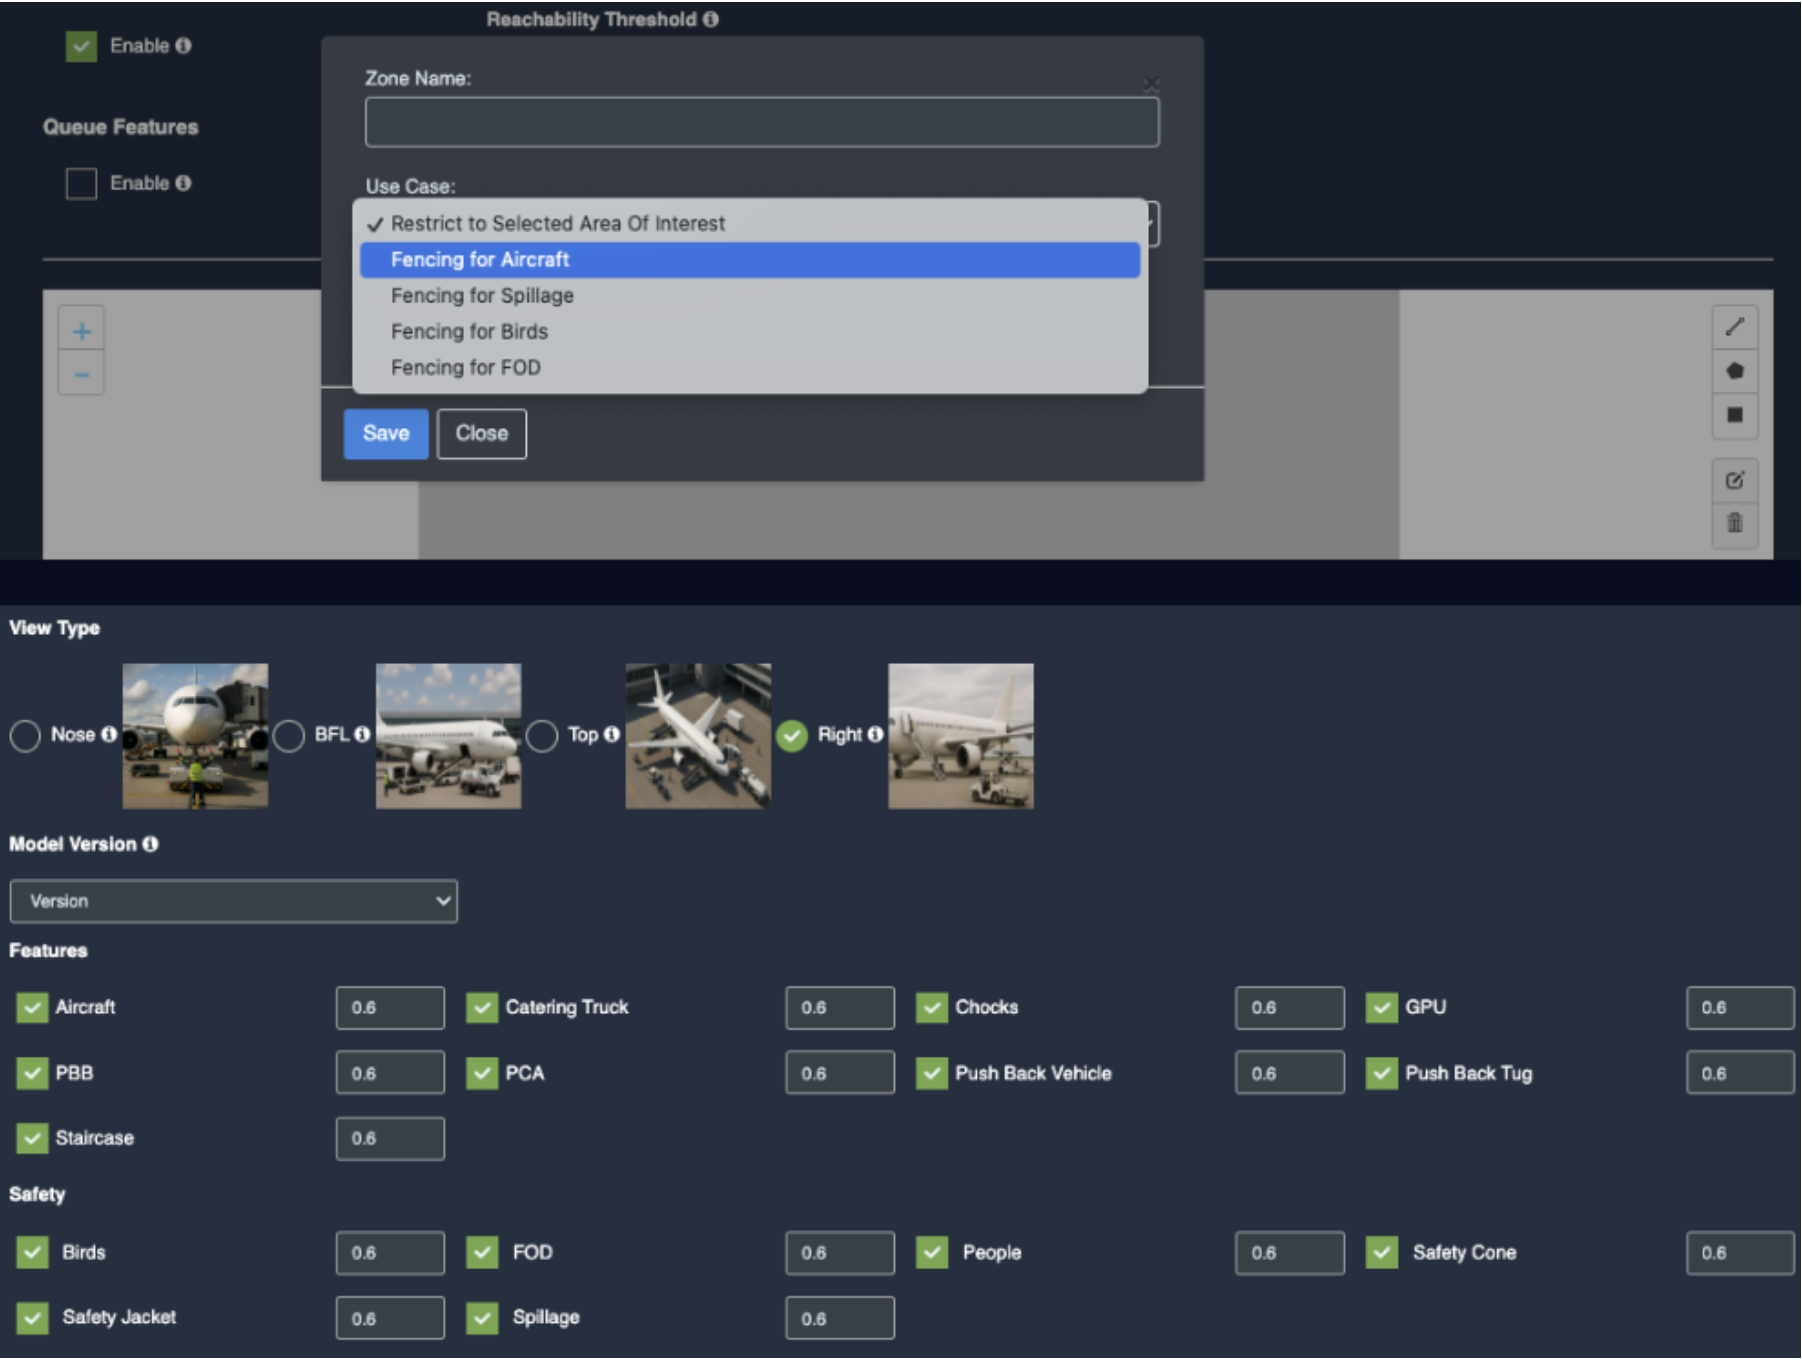
- In TAT there is view type which contains 4 options:
- Nose: The Camera capture the frontal view of the aircraft, primarily focusing on the nose section.
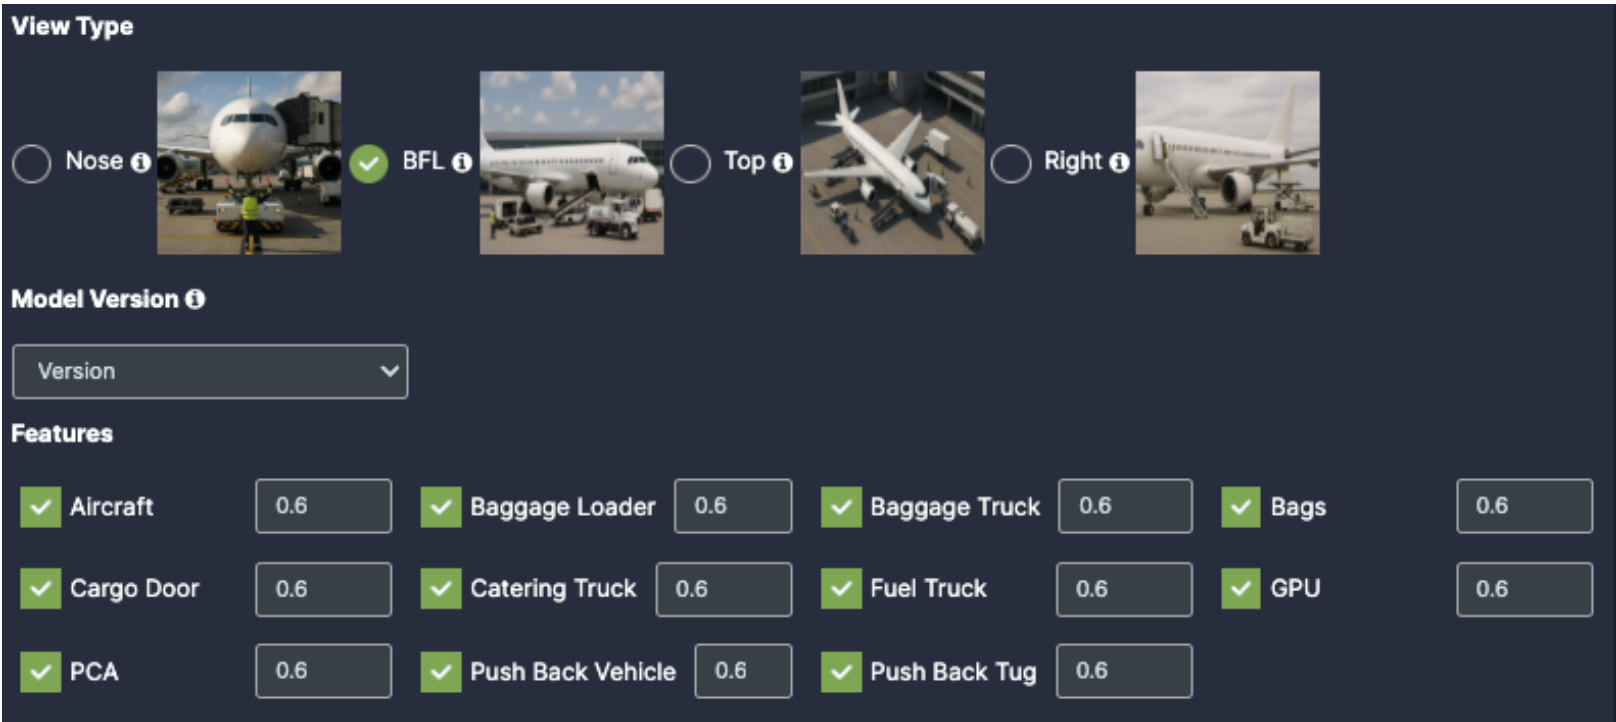
- BFL(Baggage freight loader): The camera provides the clear view of the aircraft’s left side, capturing operations and equipment positioned on this side.
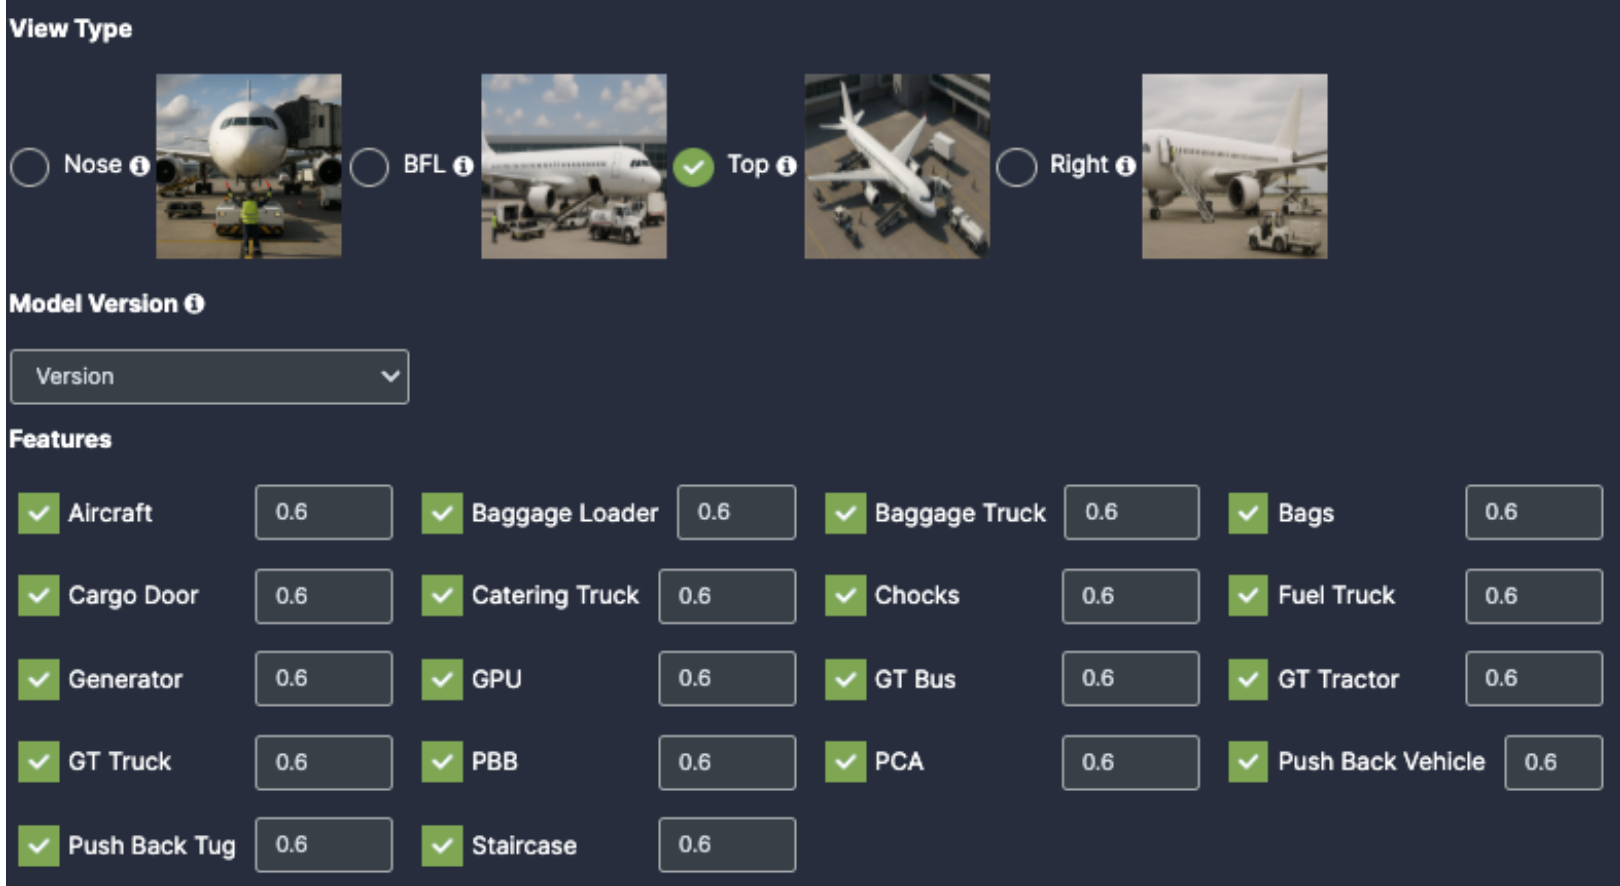
- TOP: The Camera is mounted overhead to provide a bird’s-eye view of the aircraft and its surroundings. This offers comprehensive coverage of all ground activities around the aircraft.
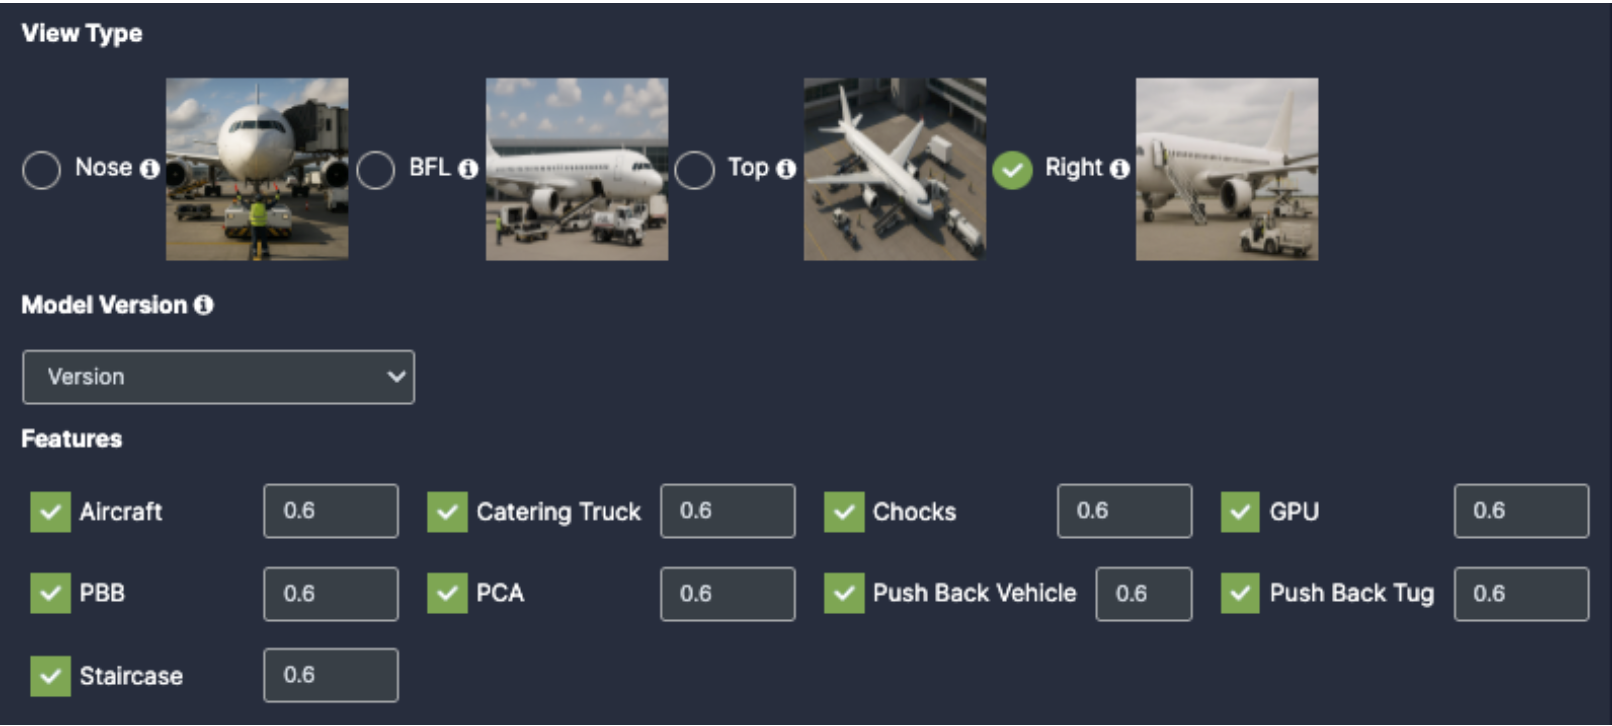
- Right: This perspective covers the right side of the aircraft, suitable for monitoring activities or equipment on that side.
- Selecting each of the view type will provide the respective checkboxes below:
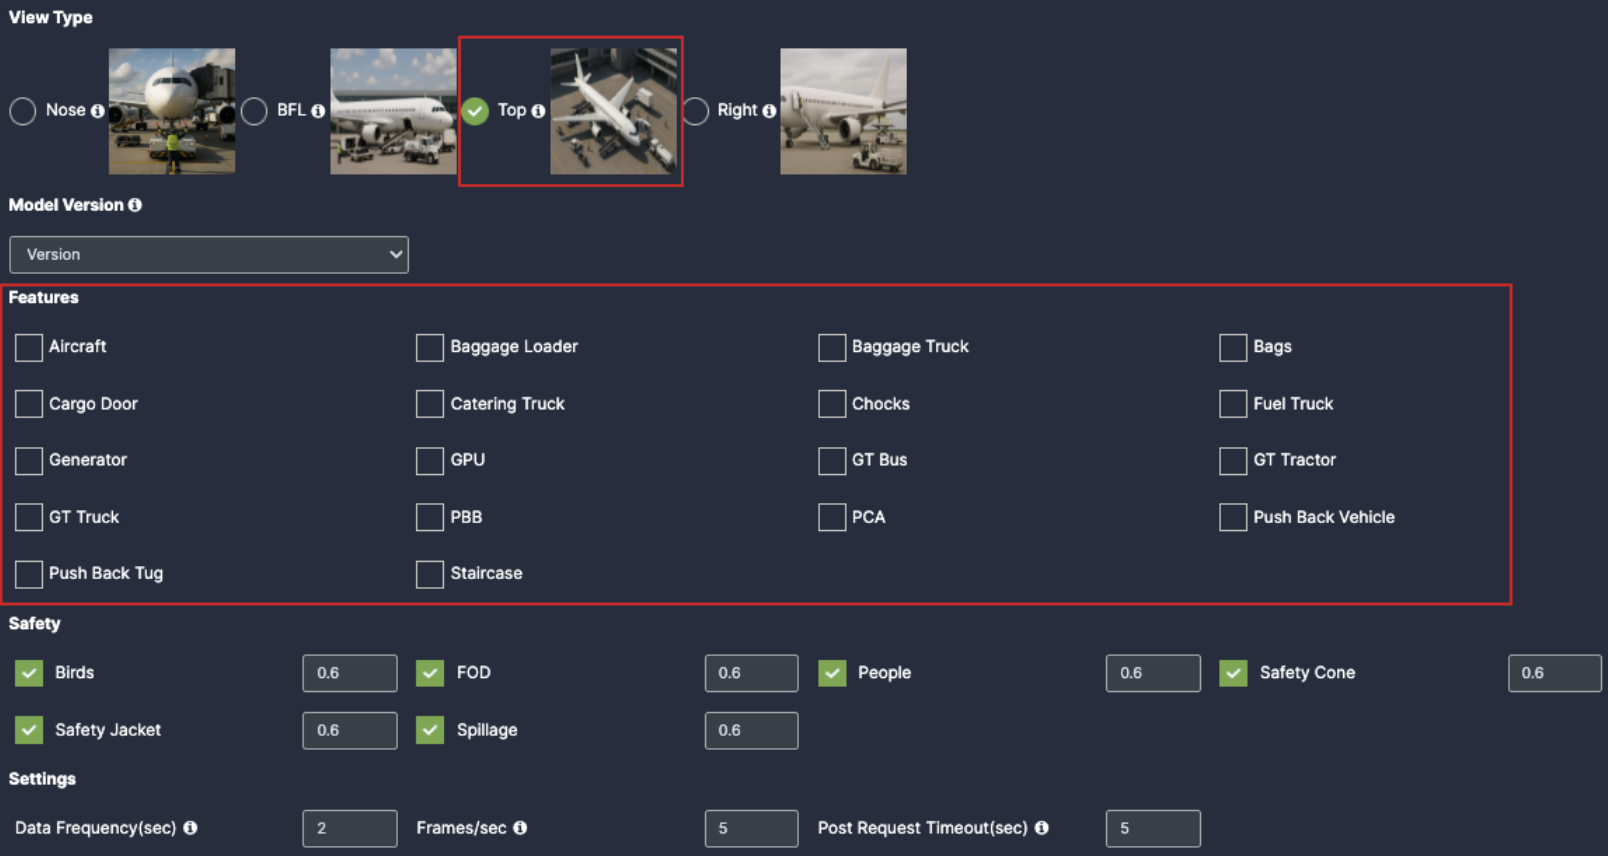
- Model Version: Select the model version as per your requirement.
- Select view type: BFL(Baggage freight loader)
- Aircraft: Once you enable the checkbox of Aircraft, you will get respective confidence to fill
- Baggage Loader: Once you enable the checkbox of Baggage Loader, you will get respective confidence to fill
- Baggage Truck: Once you enable the checkbox of Baggage Truck, you will get respective confidence to fill
- Bags: Once you enable the checkbox of Bags, you will get respective confidence to fill
- Cargo Door: Once you enable the checkbox of Cargo Door, you will get respective confidence to fill
- Catering Truck: Once you enable the checkbox of Catering Truck, you will get respective confidence to fill
- Fuel Truck: Once you enable the checkbox of Fuel Truck, you will get respective confidence to fill
- GPU(Ground Power Unit): Once you enable the checkbox of GPU, you will get respective confidence to fill
- PCA(Pre conditioned air): Once you enable the checkbox of PCA, you will get respective confidence to fill
- Push Back Vehicle: Once you enable the checkbox of Push Back Vehicle, you will get respective confidence to fill
- Push Back Tug: Once you enable the checkbox of Push Back Tug, you will get respective confidence to fill
- Select view type: TOP
- Aircraft: Once you enable the checkbox of Aircraft, you will get respective confidence to fill
- Baggage Loader: Once you enable the checkbox of Baggage Loader, you will get respective confidence to fill
- Baggage Truck: Once you enable the checkbox of Baggage Truck, you will get respective confidence to fill
- Bags: Once you enable the checkbox of Bags, you will get respective confidence to fill
- Cargo Door: Once you enable the checkbox of Cargo Door, you will get respective confidence to fill
- Catering Truck: Once you enable the checkbox of Catering Truck, you will get respective confidence to fill
- Chocks: Once you enable the checkbox of Chocks, you will get respective confidence to fill
- Fuel Truck: Once you enable the checkbox of Fuel Truck, you will get respective confidence to fill
- Generator: Once you enable the checkbox of Generator, you will get respective confidence to fill
- GPU(Ground Power Unit): Once you enable the checkbox of GPU, you will get respective confidence to fill
- GT Bus: Once you enable the checkbox of GT Bus, you will get respective confidence to fill
- GT Tractor: Once you enable the checkbox of GT Tractor, you will get respective confidence to fill
- GT TRUCK: Once you enable the checkbox of GT TRUCK, you will get respective confidence to fill
- PBB(passenger boarding bridge): Once you enable the checkbox of PBB, you will get respective confidence to fill
- PCA(Pre conditioned air): Once you enable the checkbox of PCA, you will get respective confidence to fill
- Push Back Vehicle: Once you enable the checkbox of Push Back Vehicle, you will get respective confidence to fill
- Push Back Tug: Once you enable the checkbox of Push Back Tug, you will get respective confidence to fill
- Staircase: Once you enable the checkbox of Staircase, you will get respective confidence to fill
- Aircraft: Once you enable the checkbox of Aircraft, you will get respective confidence to fill
- Catering Truck: Once you enable the checkbox of Catering Truck, you will get respective confidence to fill
- Chocks: Once you enable the checkbox of Chocks, you will get respective confidence to fill
- GPU(Ground Power Unit): Once you enable the checkbox of GPU, you will get respective confidence to fill
- PBB(passenger boarding bridge): Once you enable the checkbox of PBB, you will get respective confidence to fill
- PCA(Pre conditioned air): Once you enable the checkbox of PCA, you will get respective confidence to fill
- Push Back Vehicle: Once you enable the checkbox of Push Back Vehicle, you will get respective confidence to fill
- Push Back Tug: Once you enable the checkbox of Push Back Tug, you will get respective confidence to fill
- Staircase: Once you enable the checkbox of Staircase, you will get respective confidence to fill
- Birds: Once you enable the checkbox of Birds, you will get respective confidence.
- FOD: Once you enable the checkbox of FOD, you will get respective confidence.
- People: Once you enable the checkbox of People, you will get respective confidence.
- Safety Jacket: Once you enable the checkbox of Safety Jacket, you will get respective confidence.
- Spillage: Once you enable the checkbox of Spillage, you will get respective confidence.

- Setting:
- Data Frequency(sec): Fill the setting as per your requirements
- Frames/Sec: Fill the setting as per your requirements
- Post Request Timeout(sec): Fill the setting as per your requirements

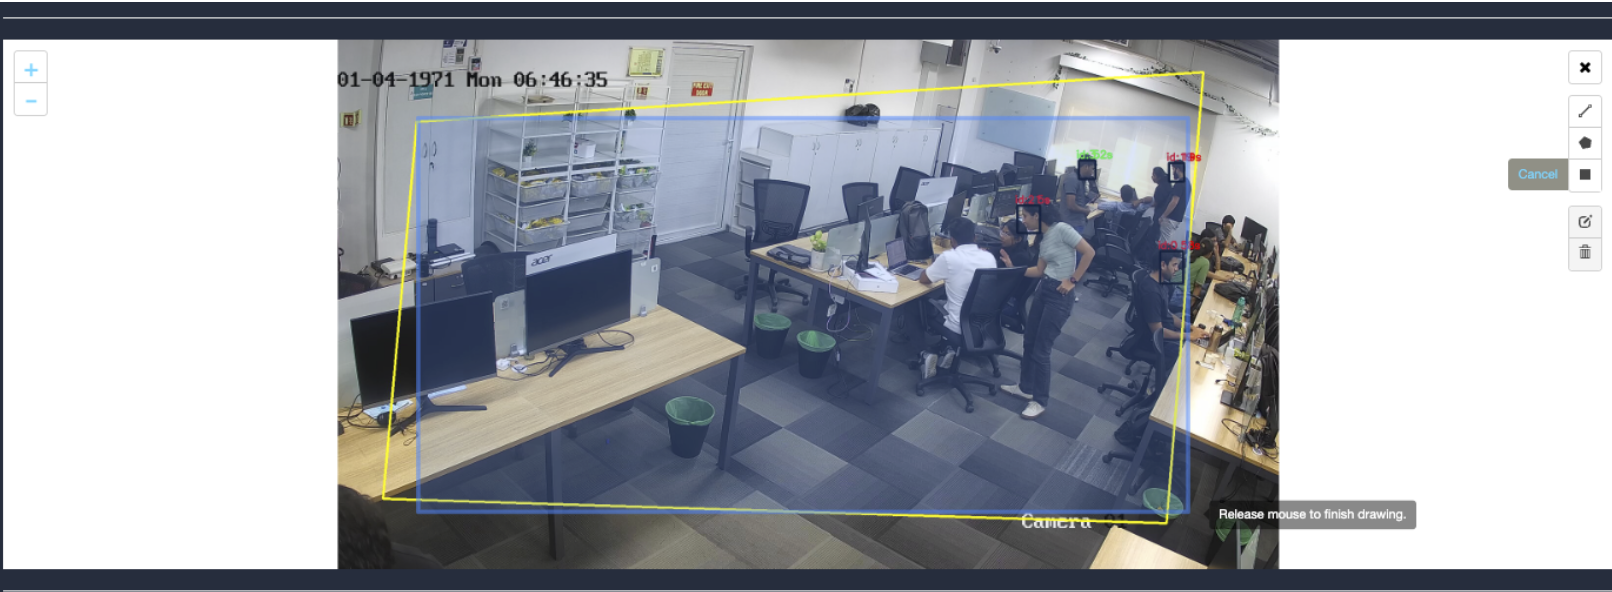
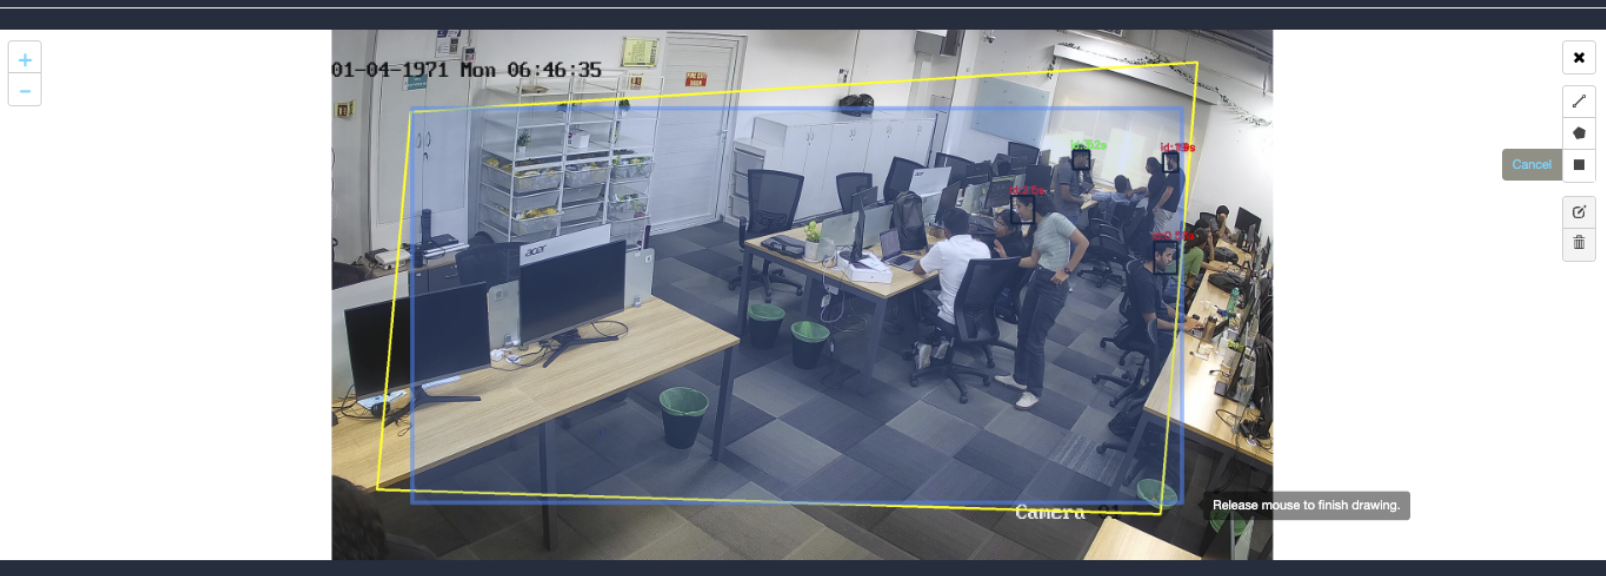
Draw ROI (region of interest) on the camera frame.
ROI in camera frames can help to improve efficiency, accuracy, and reduce storage requirements.
- ROI must be added if kiosk mode is enabled. Otherwise, it is optional. If ROI is not added, the model will detect the entire frame.
- For face detection, ROI can be drawn in two ways.
- Using the polygon tool
- cUsing the rectangle tool.
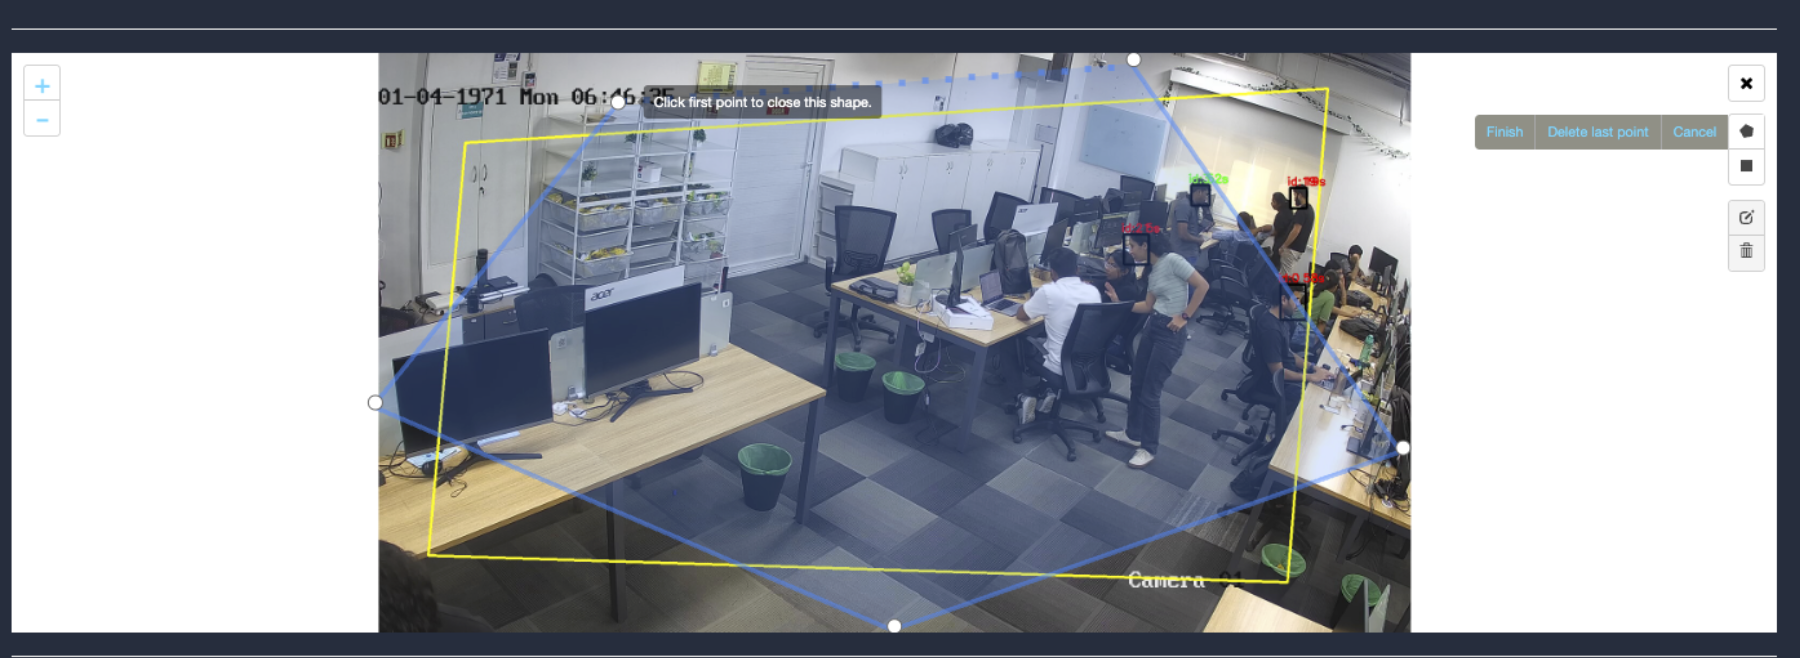
Draw ROI using the Polygon tool (Air Trafficator)
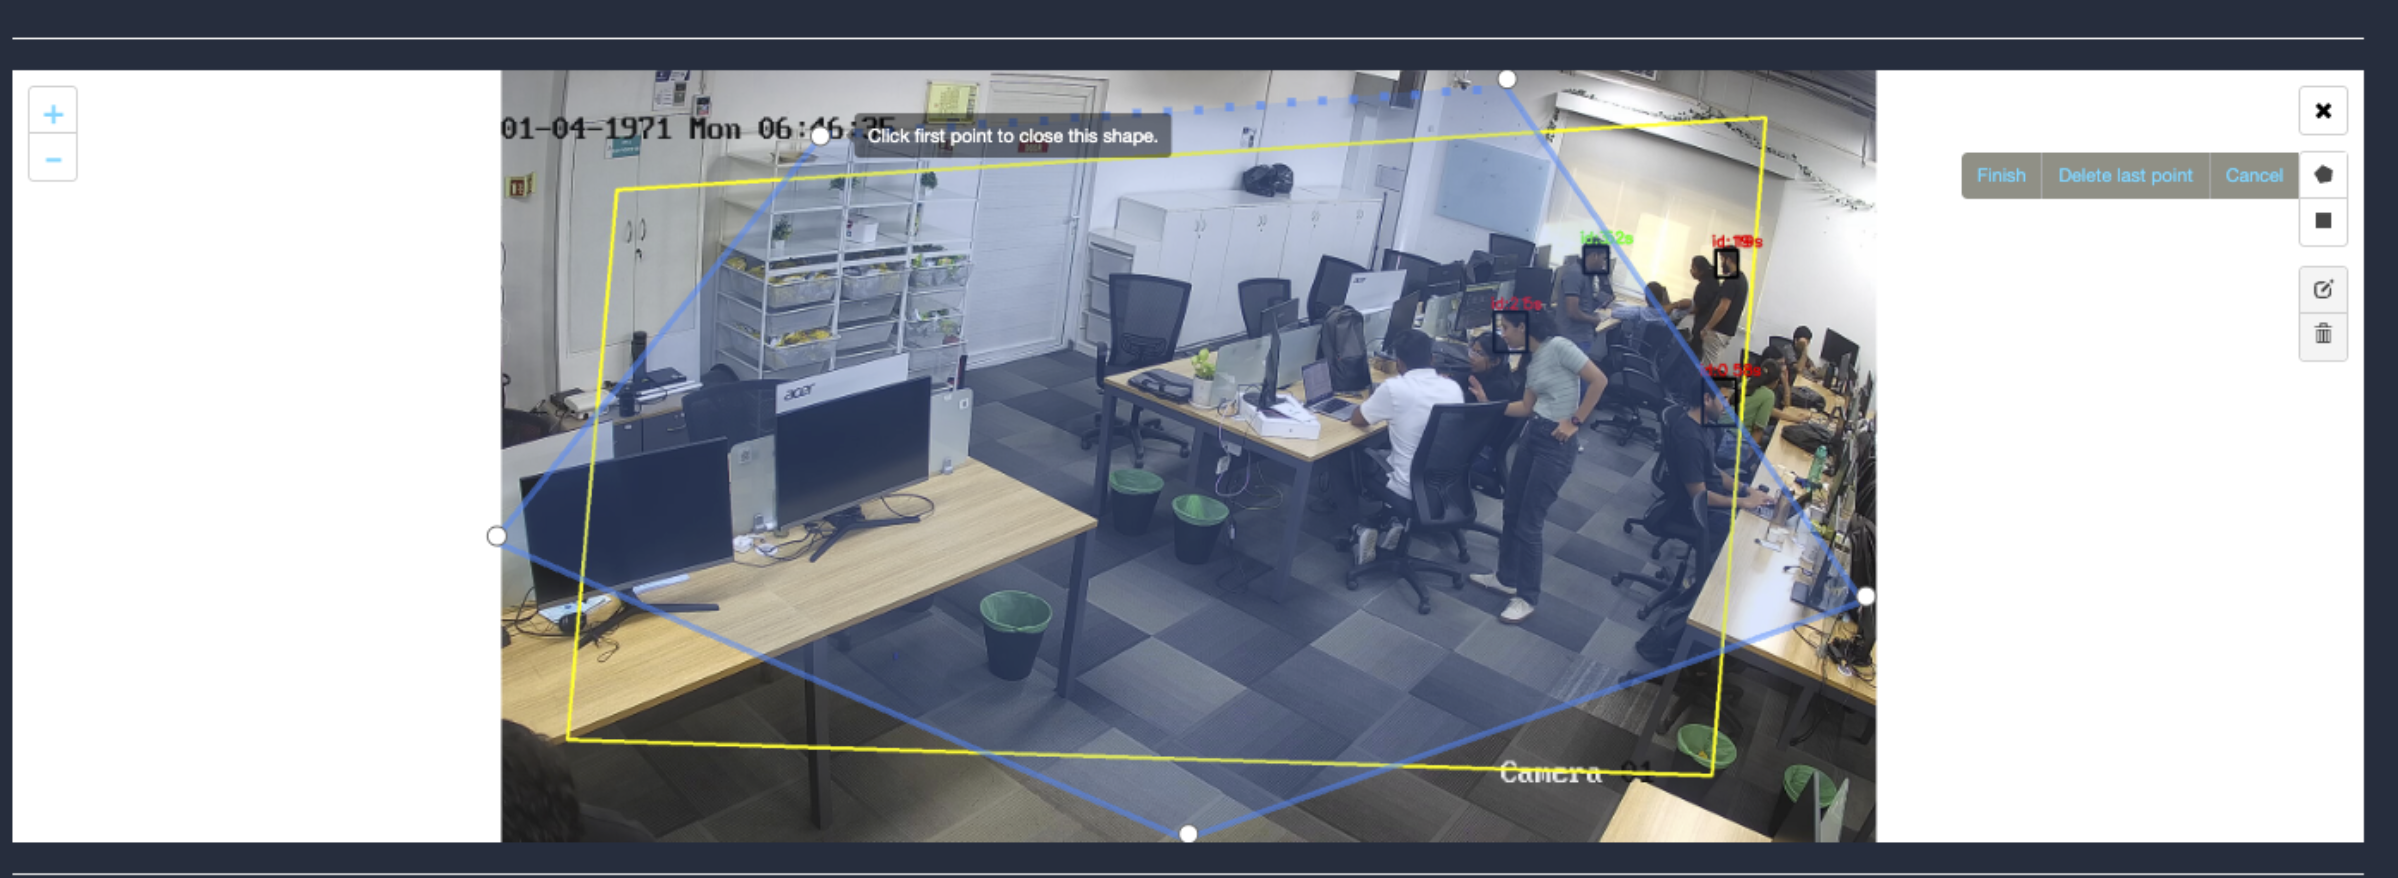
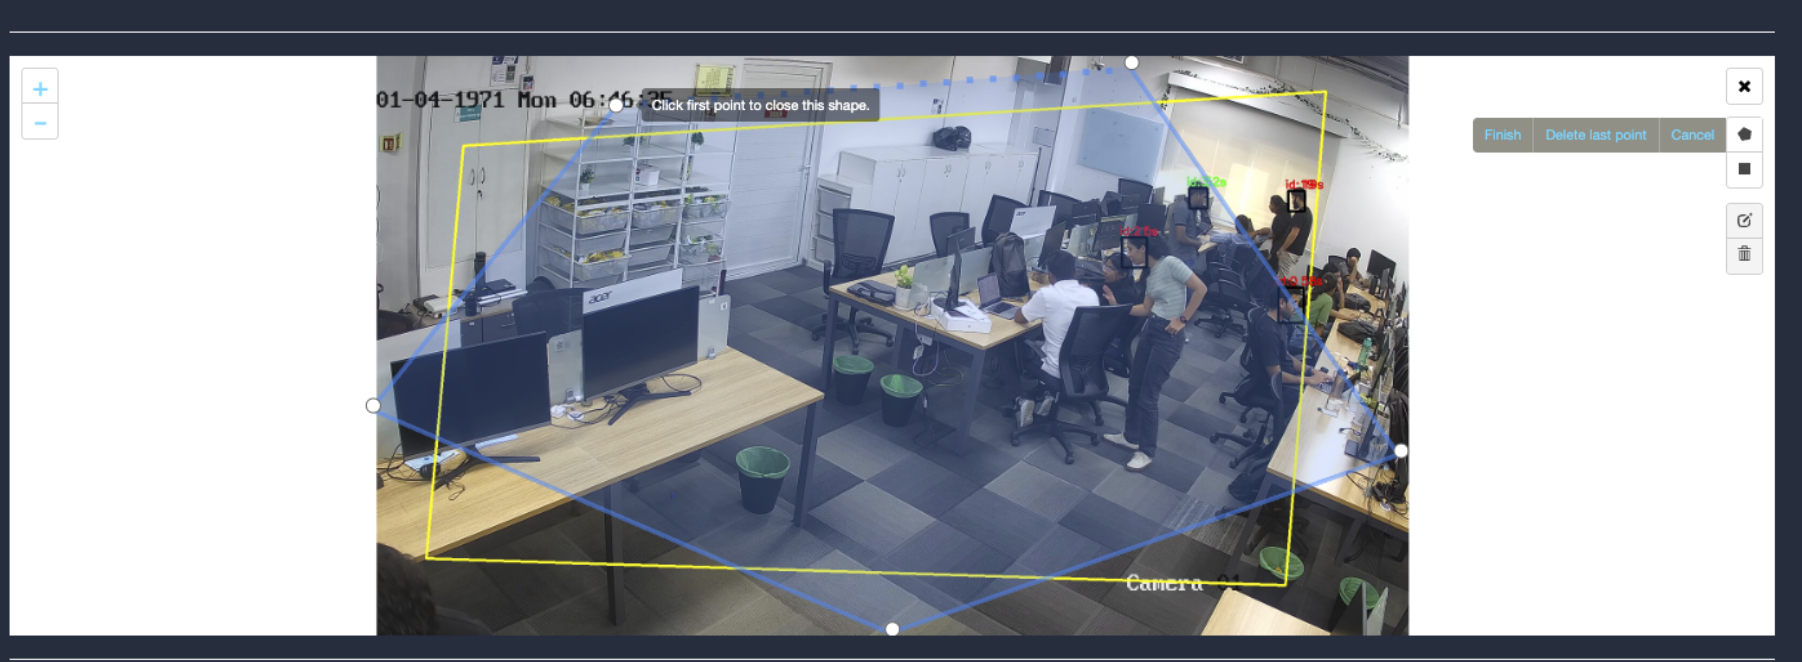
- Click on the Polygon tool button from the camera frame.
- Then connect the dots and draw the polygon in the space where you want to draw the ROI. It should have more than 2 points.

- Enter the zone name in the popup window that opens and click the Save button.
- New ROI zone added successfully.
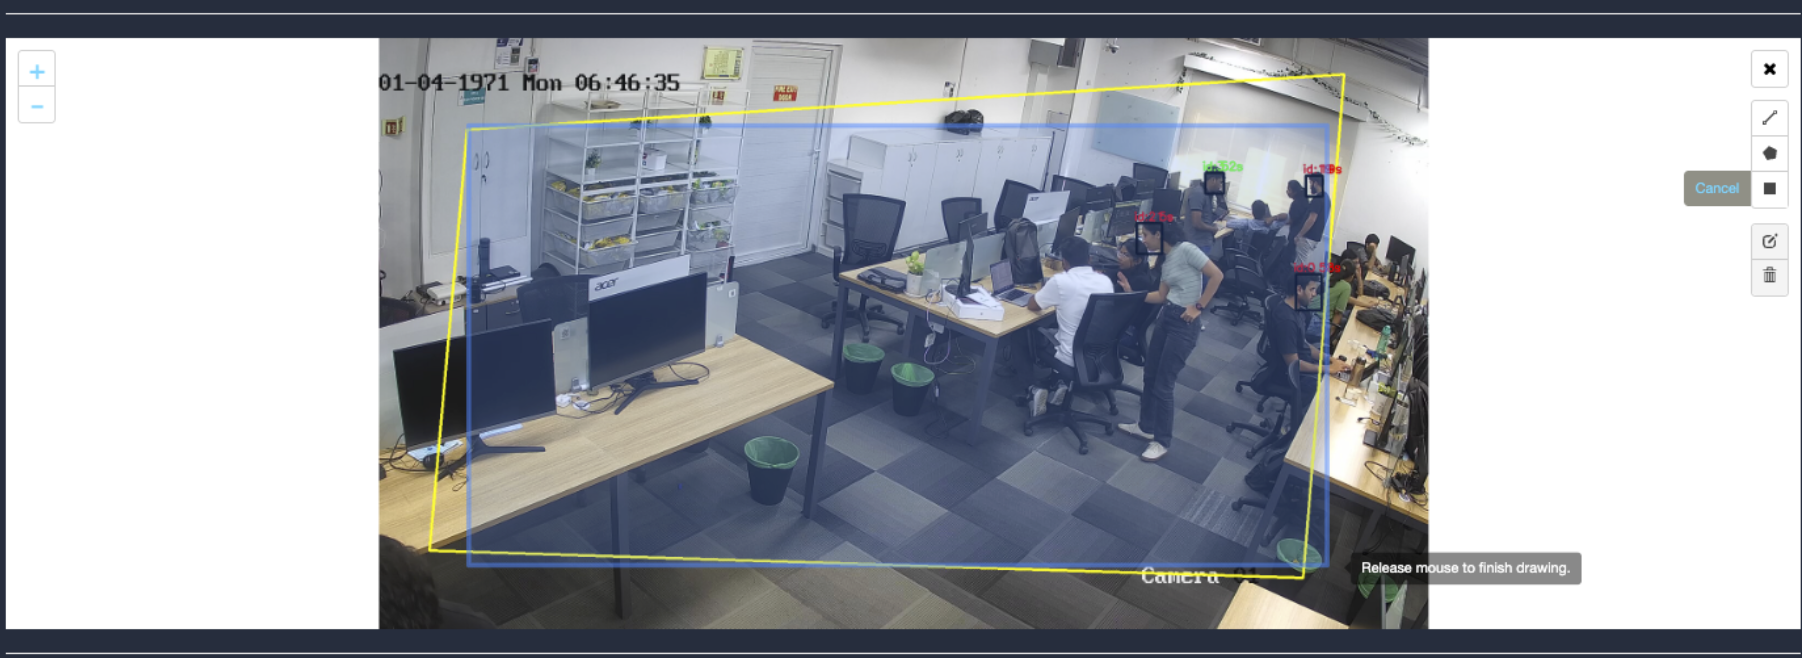
Draw ROI using the rectangle tool(Air Trafficator)
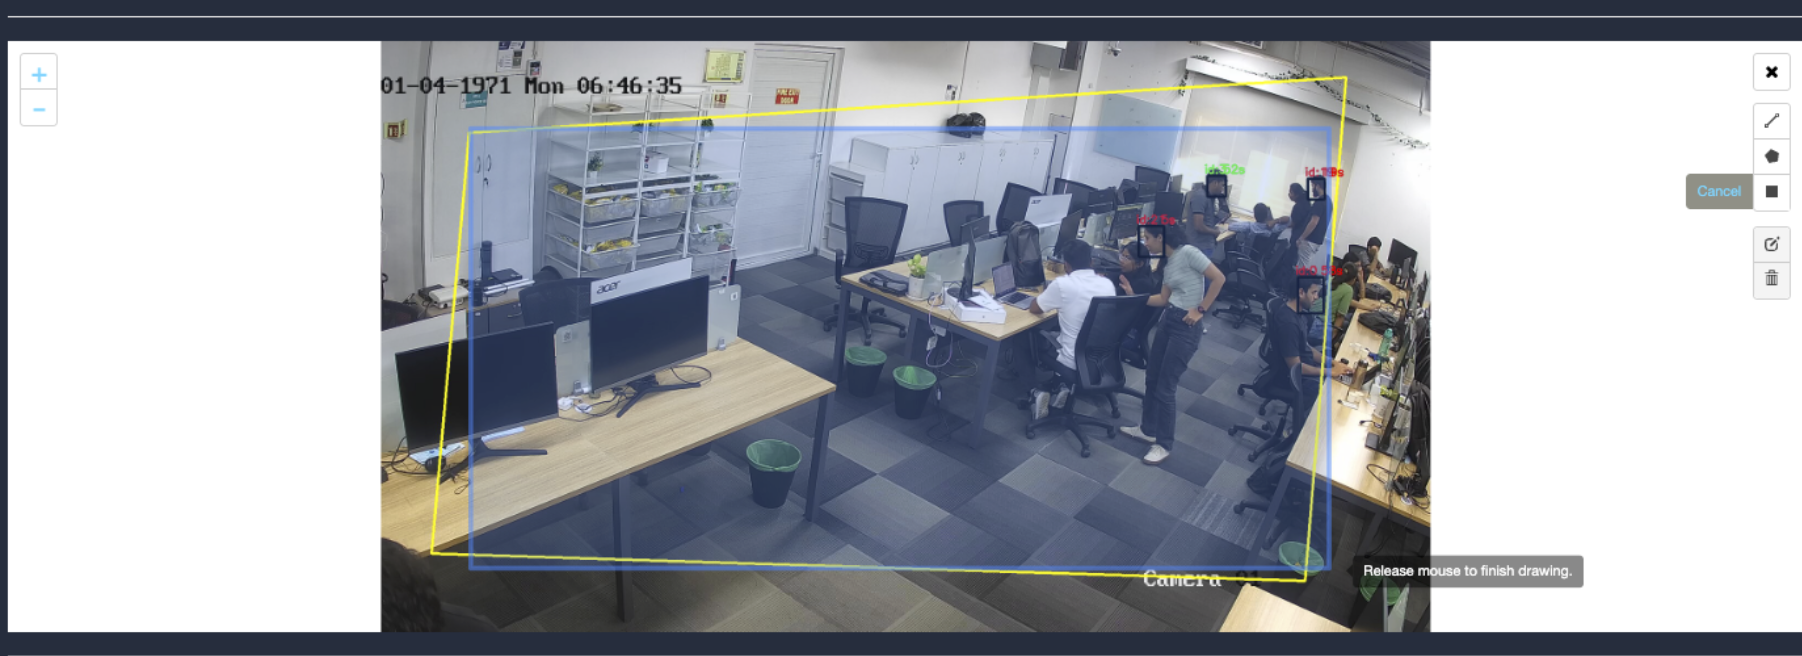
- Click on the Rectangle tool button from the camera frame.
- Then draw the rectangle where you want to focus the camera.
- Then enter the zone name and select Restrict to selected area of interest option from the dropdown list and click the Save button.
- Detection will only happen when people enter this zone.
- With this ROI you can achieve the below Features:
- Countable Objects
- Once the Use case Configuration is done, click on save.
TAT:
Draw ROI using the Polygon tool (TAT: Nose view type)
- Click on the Polygon tool button from the camera frame.
- Then connect the dots and draw the polygon in the space where you want to draw the ROI. It should have more than 2 points.

Draw ROI using the rectangle tool(TAT: Nose view type)
- Click on the Rectangle tool button from the camera frame.
- Then draw the rectangle where you want to focus the camera.
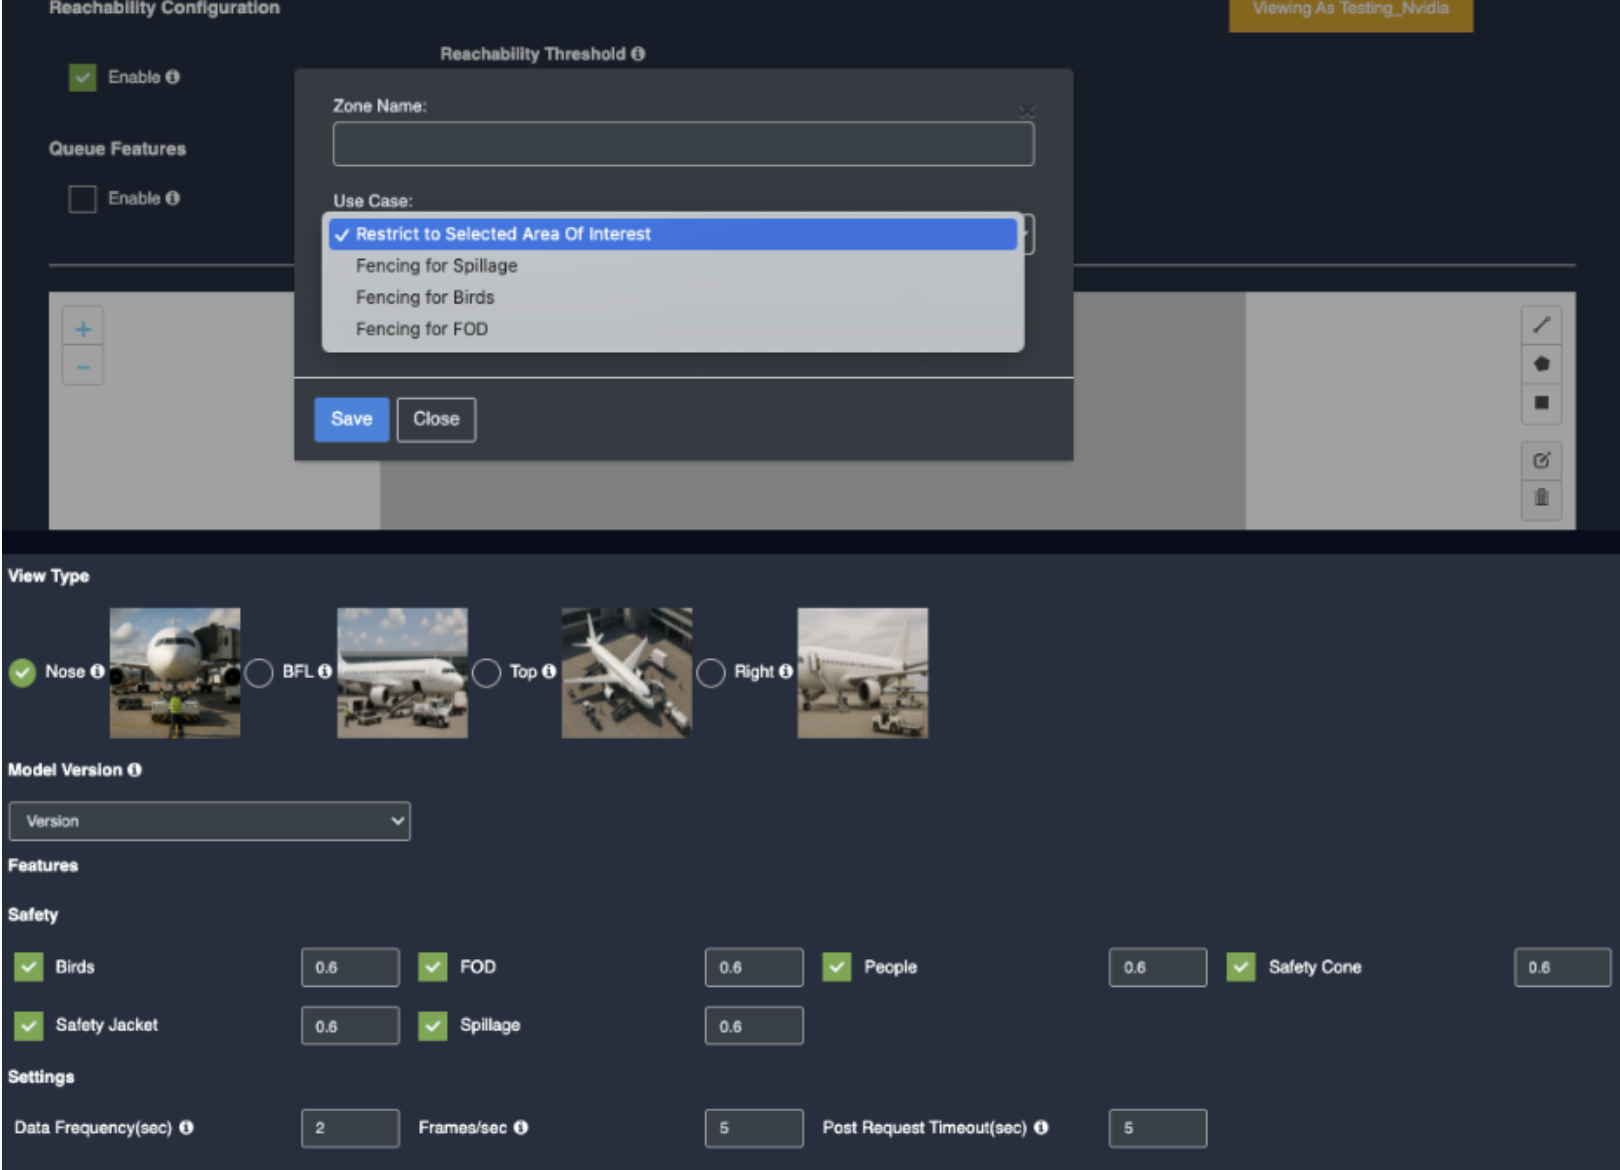
- Detection will only happen when people enter this zone.
- Once the Use case Configuration is done, click on save.
BFL view type:
Draw ROI using the Polygon tool (TAT: BFL view type)
- Click on the Polygon tool button from the camera frame.
- Then connect the dots and draw the polygon in the space where you want to draw the ROI. It should have more than 2 points.
Draw ROI using the rectangle tool(TAT: BFL view type)
- Click on the Rectangle tool button from the camera frame.
- Then draw the rectangle where you want to focus the camera.

- Then enter the zone name and select Restrict to selected area of interest option from the dropdown list and click the Save button.

TOP view type:
Draw ROI using the Polygon tool (TAT: Top view type)
- Click on the Polygon tool button from the camera frame.
- Then connect the dots and draw the polygon in the space where you want to draw the ROI. It should have more than 2 points.
- After drawing, click the Finish button to complete the drawing.
Draw ROI using the rectangle tool(TAT: Top view type)
- Click on the Rectangle tool button from the camera frame.
- Then draw the rectangle where you want to focus the camera.
- Then enter the zone name and select Restrict to selected area of interest option from the dropdown list and click the Save button.
Right view type:
Draw ROI using the Polygon tool (TAT: Right view type)
- Click on the Polygon tool button from the camera frame.
- Then connect the dots and draw the polygon in the space where you want to draw the ROI. It should have more than 2 points.
Draw ROI using the rectangle tool(TAT: Right view type)
- Click on the Rectangle tool button from the camera frame.
- Then draw the rectangle where you want to focus the camera.
- Then enter the zone name and select Restrict to selected area of interest option from the dropdown list and click the Save button.
44. Your Camera is configured for Airside Monitoring.
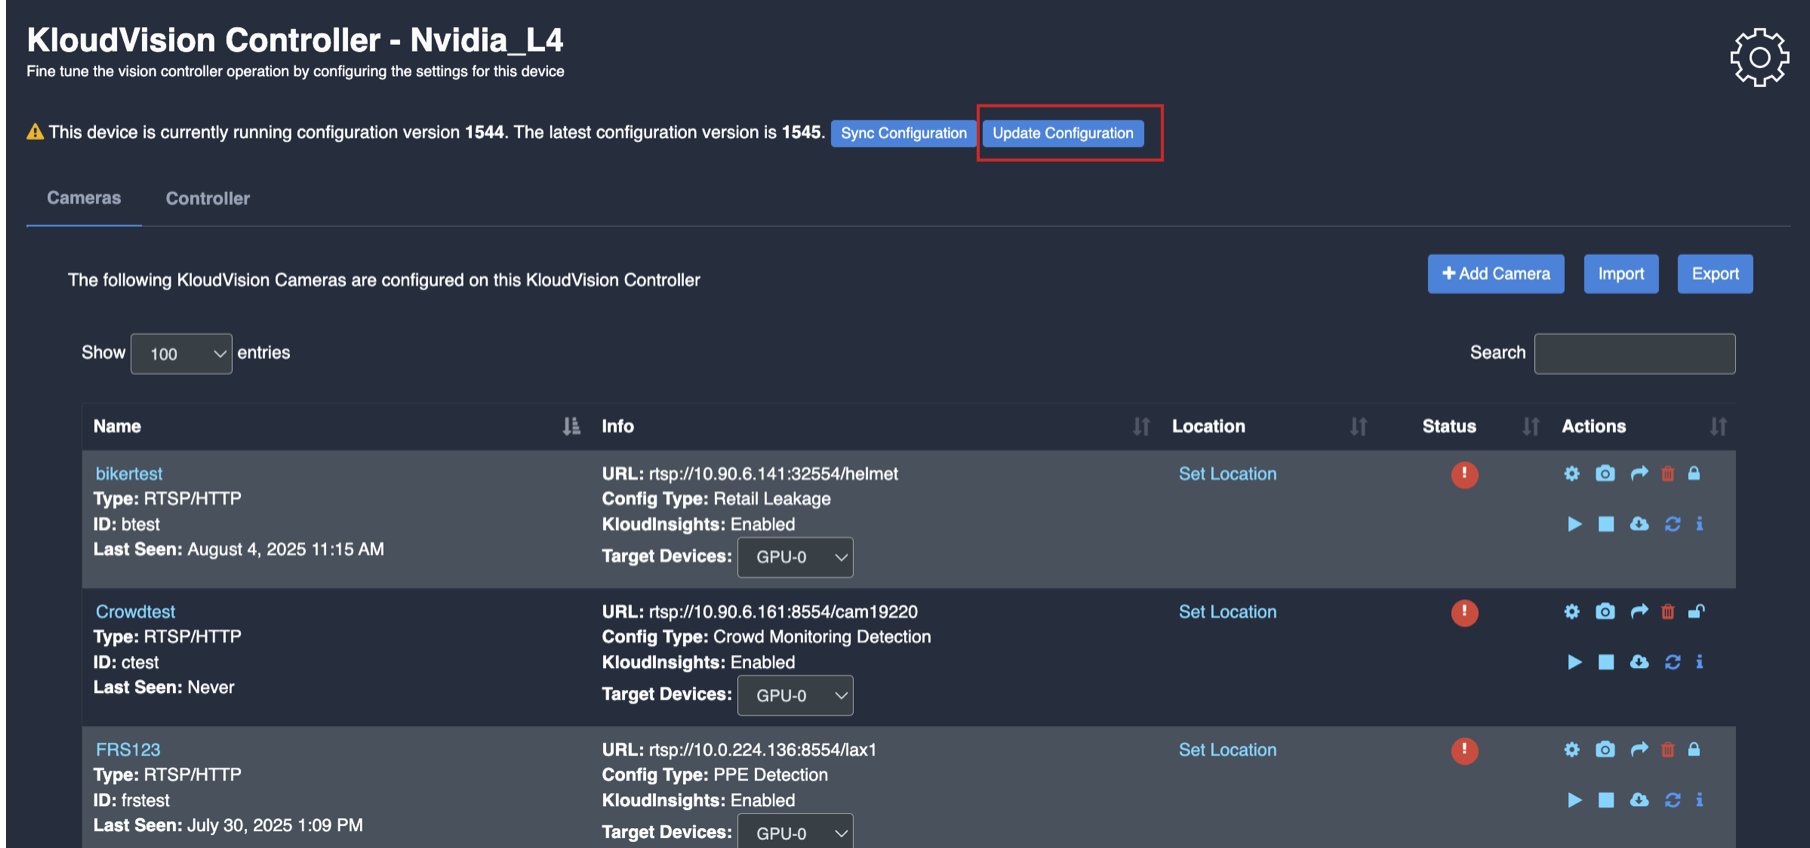
Update/ sync Configuration:
- Once you perform any change in the controller or update any features/ use cases for camera you need to sync it.
- There are 2 types of syncing process:
- Sync the configurations
- Update the Configurations

- Click on sync configuration to restart the complete system syncing process. Basically for the initial camera setup and while any controller configuration update. (It will restart the docker and sync all the performed changes)
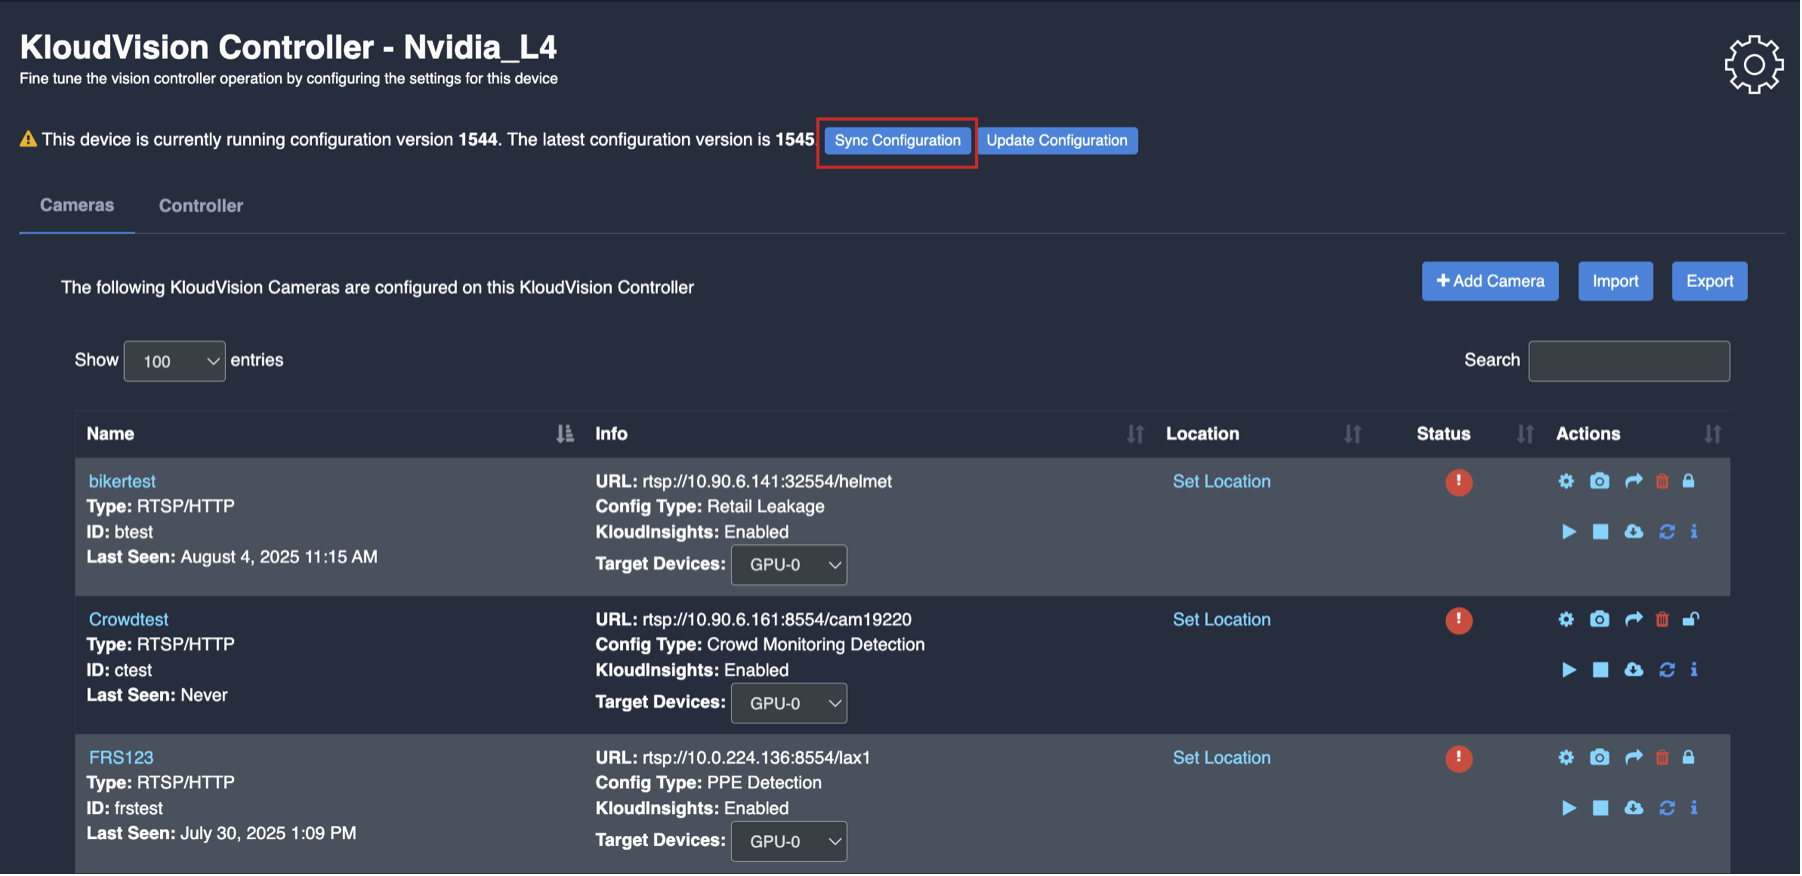
- Click on the update configuration to recent changes in the system without any downtime. (General configuration sync)
Integrating with KloudInsights
Same as before:
Creating Rules and Notifications
Same as before:
Generating Widgets and Insights
Same as before:
Video Gallery and Playback
Same as before:
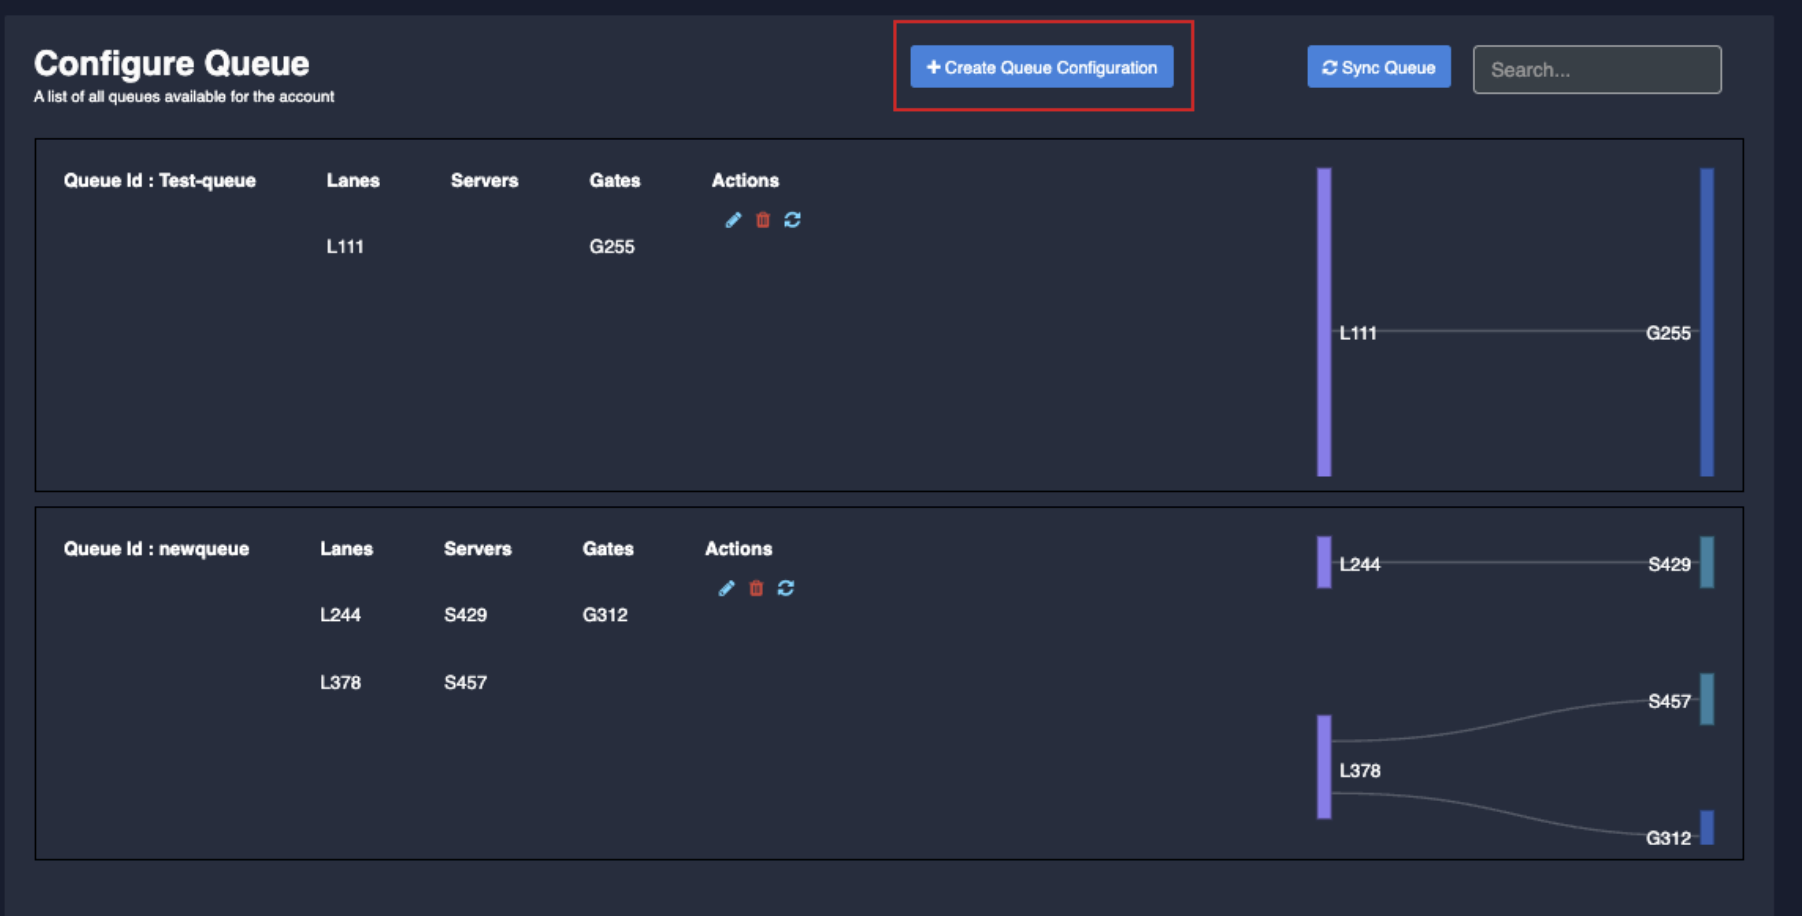
Queue Creation
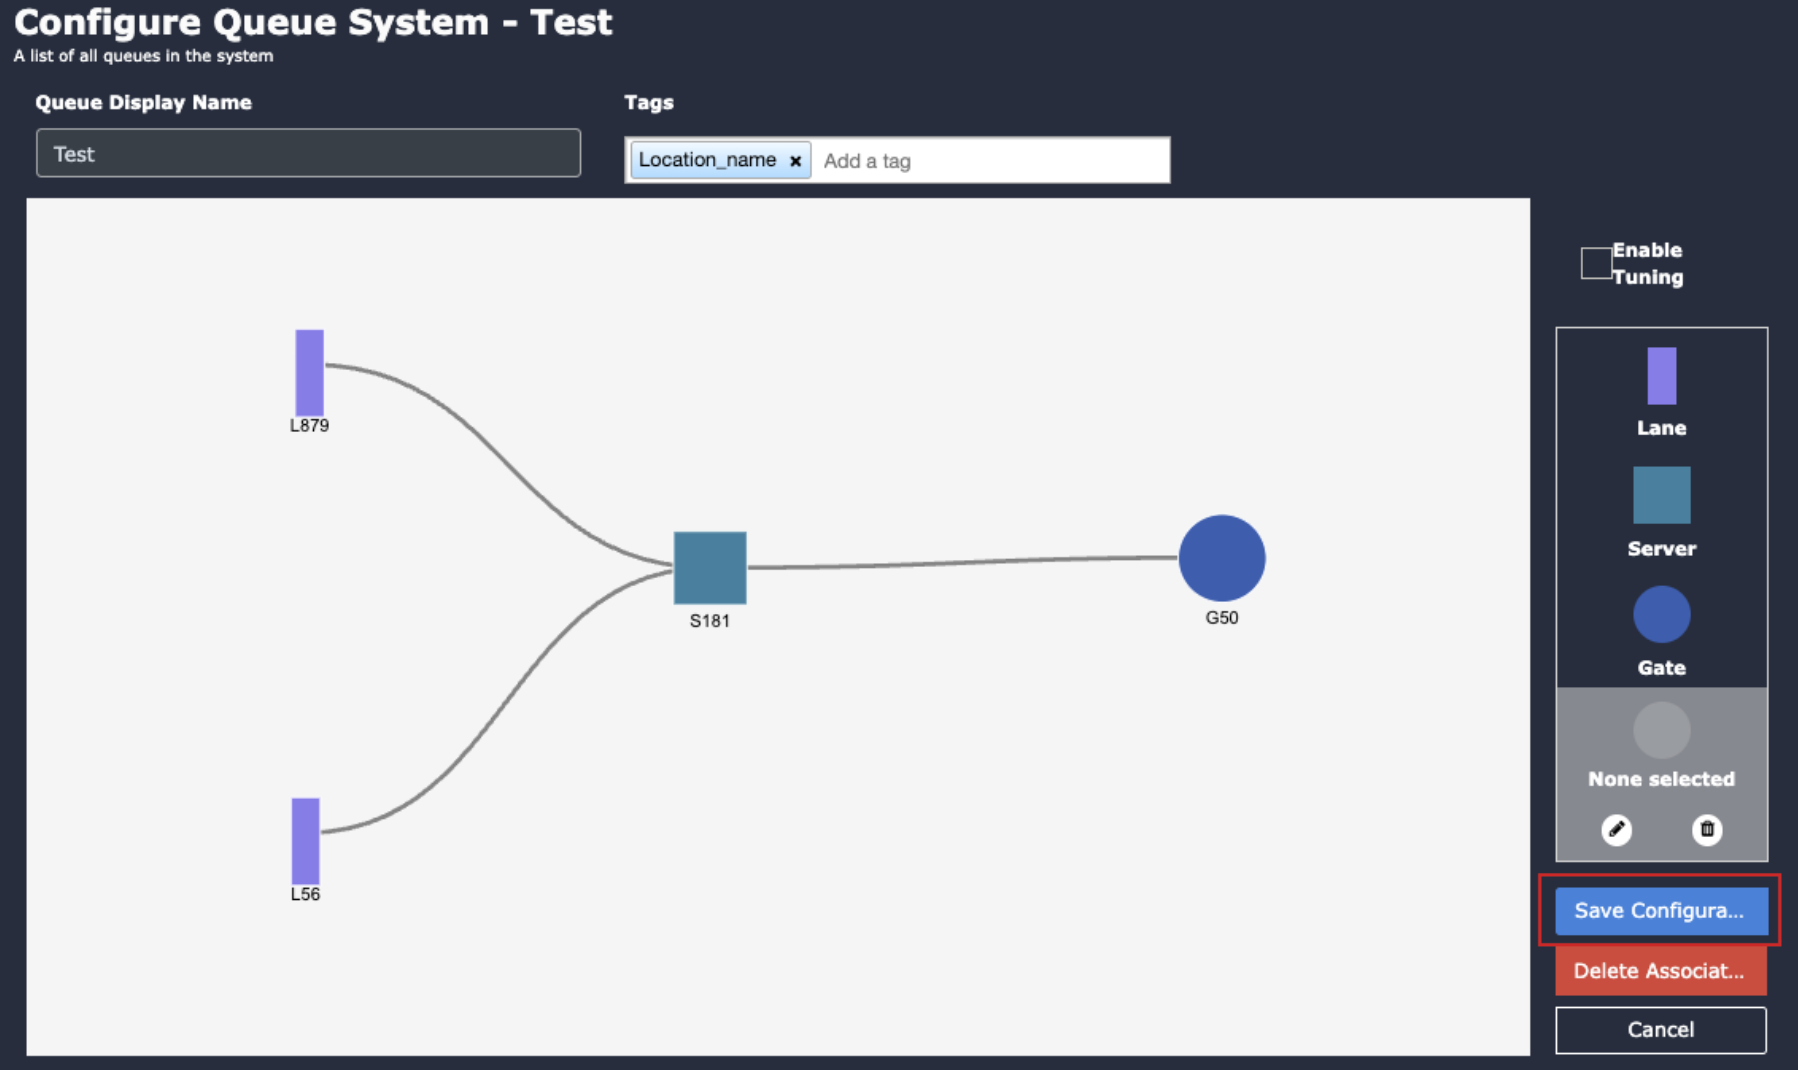
- Go to “Queue configuration” to access the queue management settings.
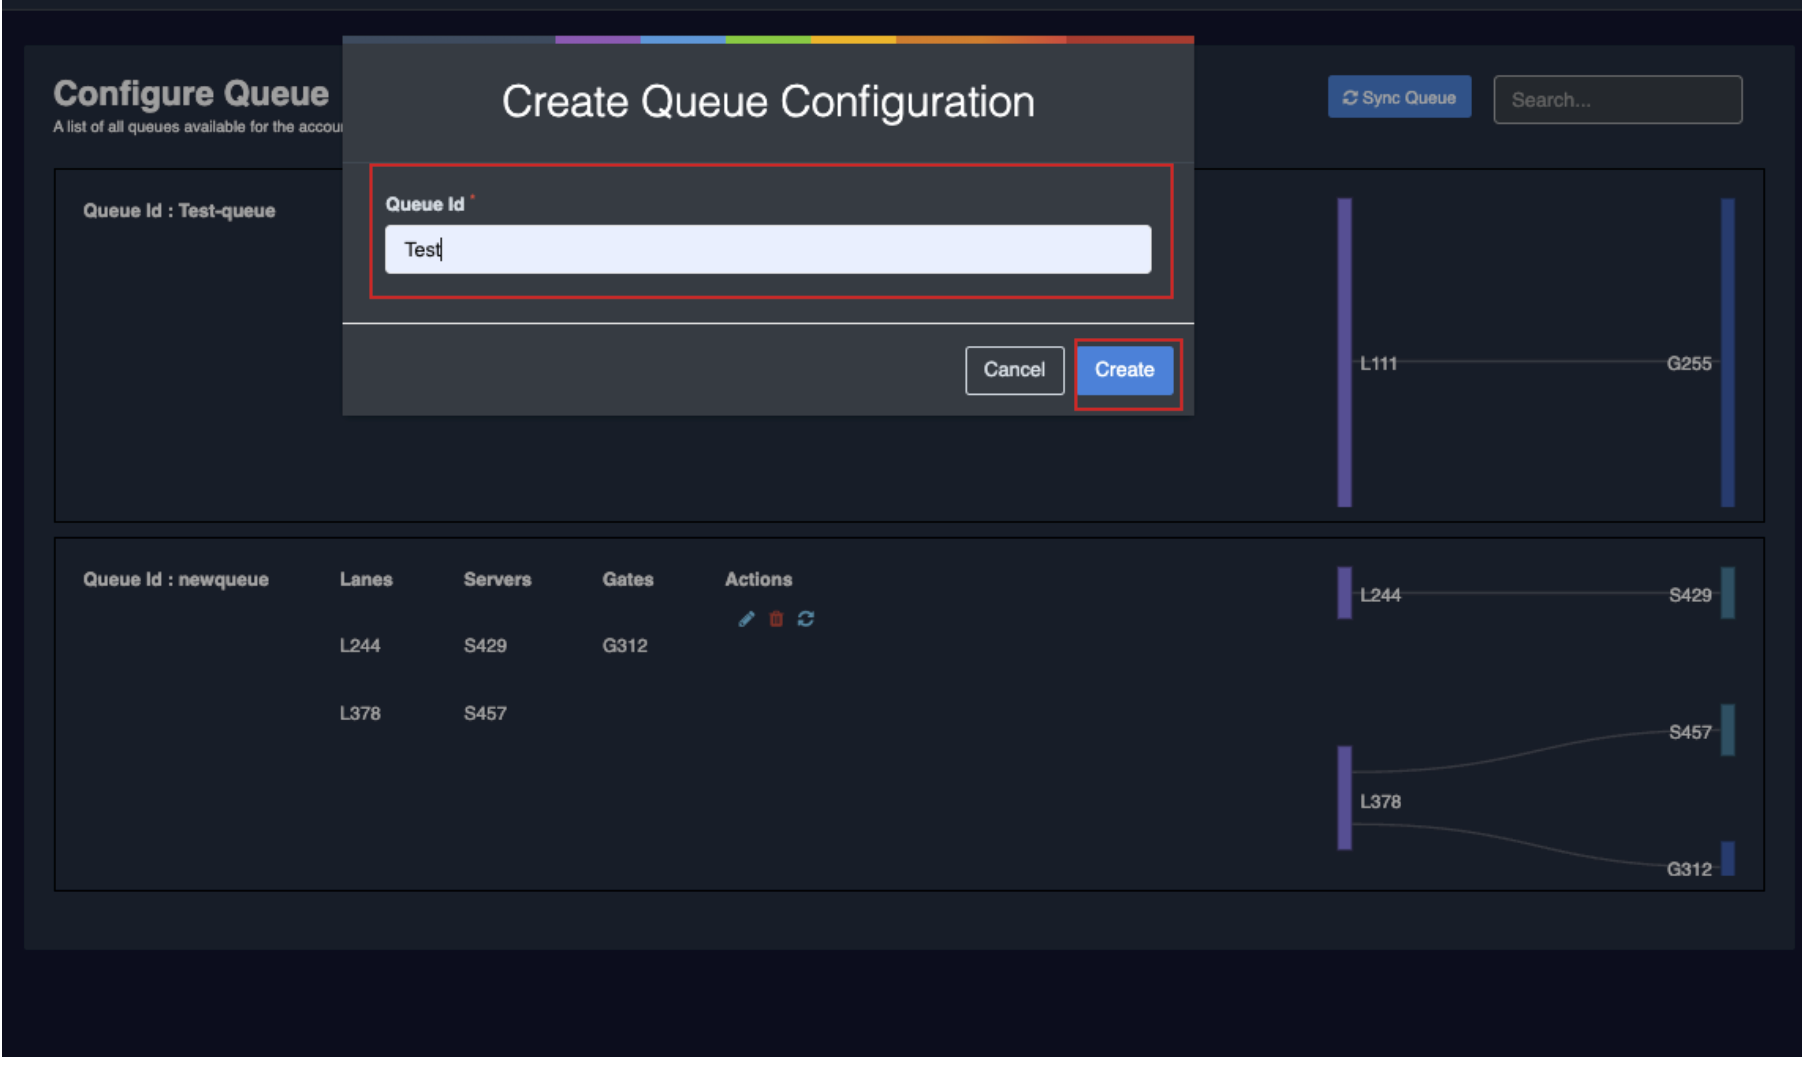
- Click on “Create queue configuration” to initiate the setup process.
- In the opening window, enter the name of the queue.
- Click the “Create” button to proceed.
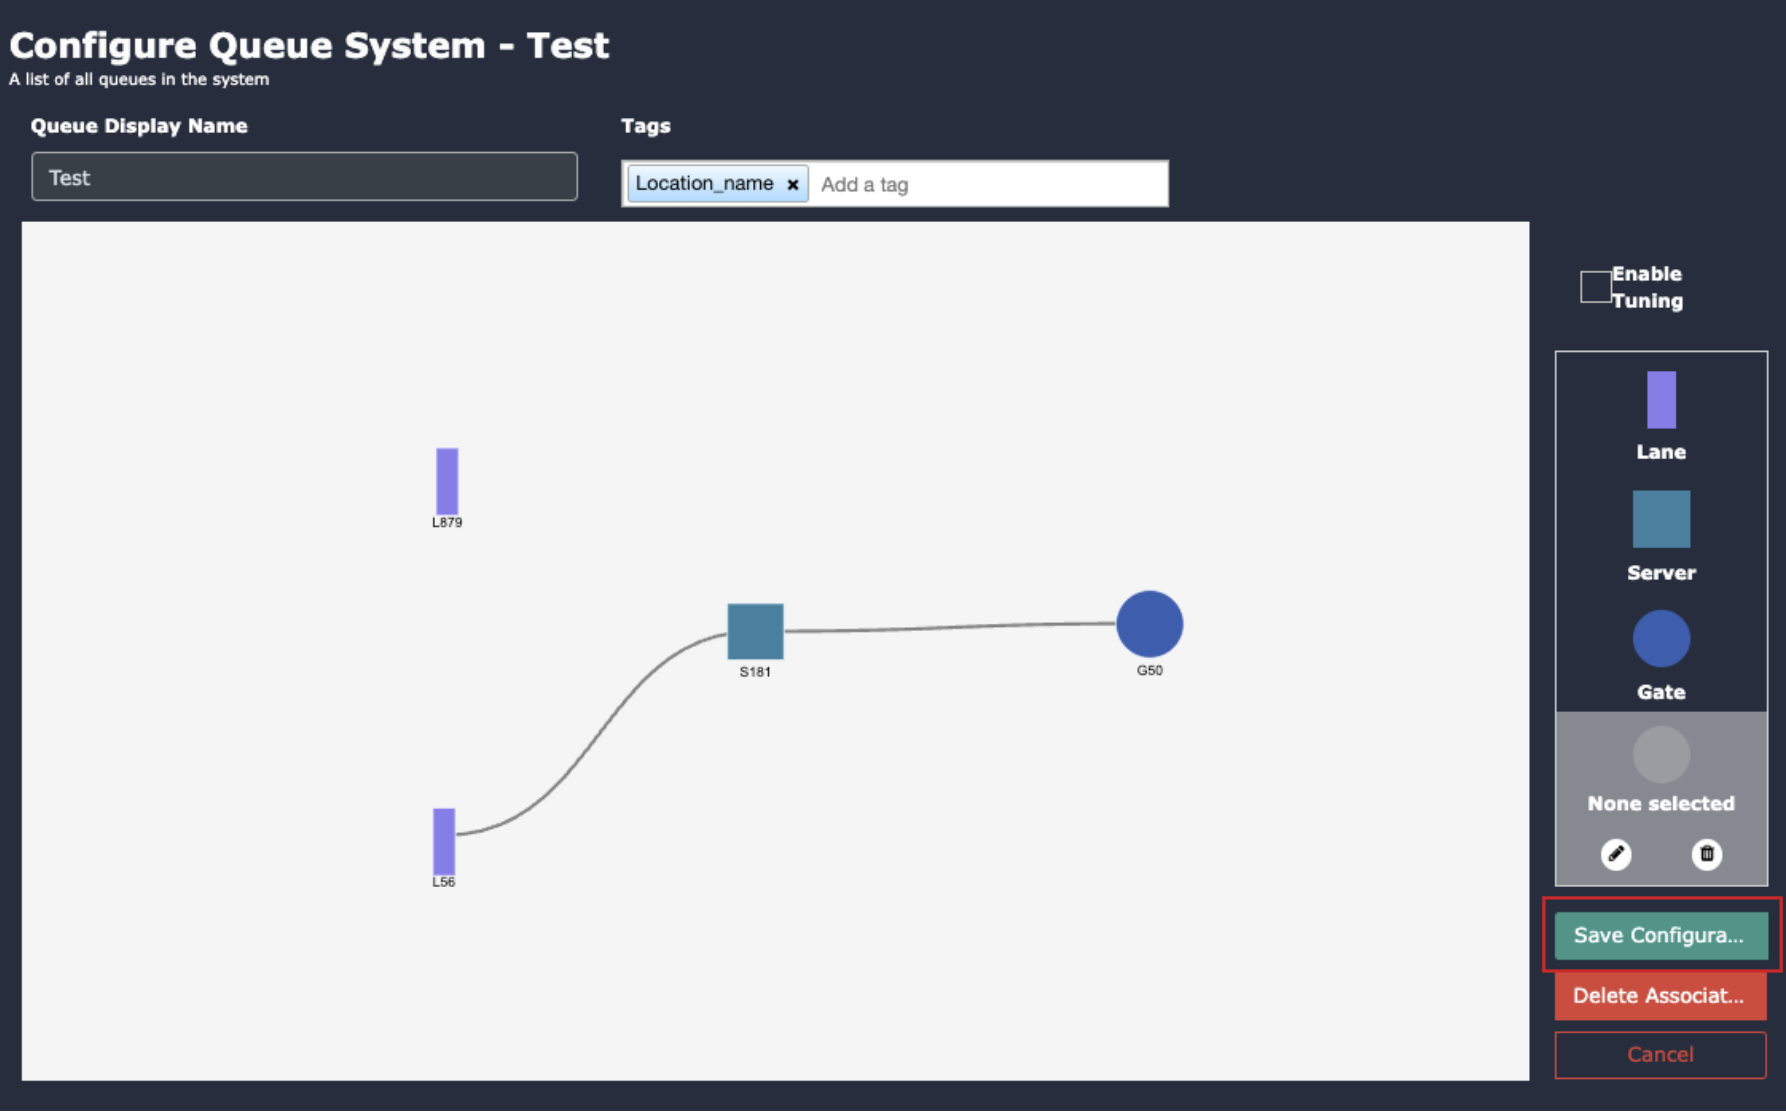
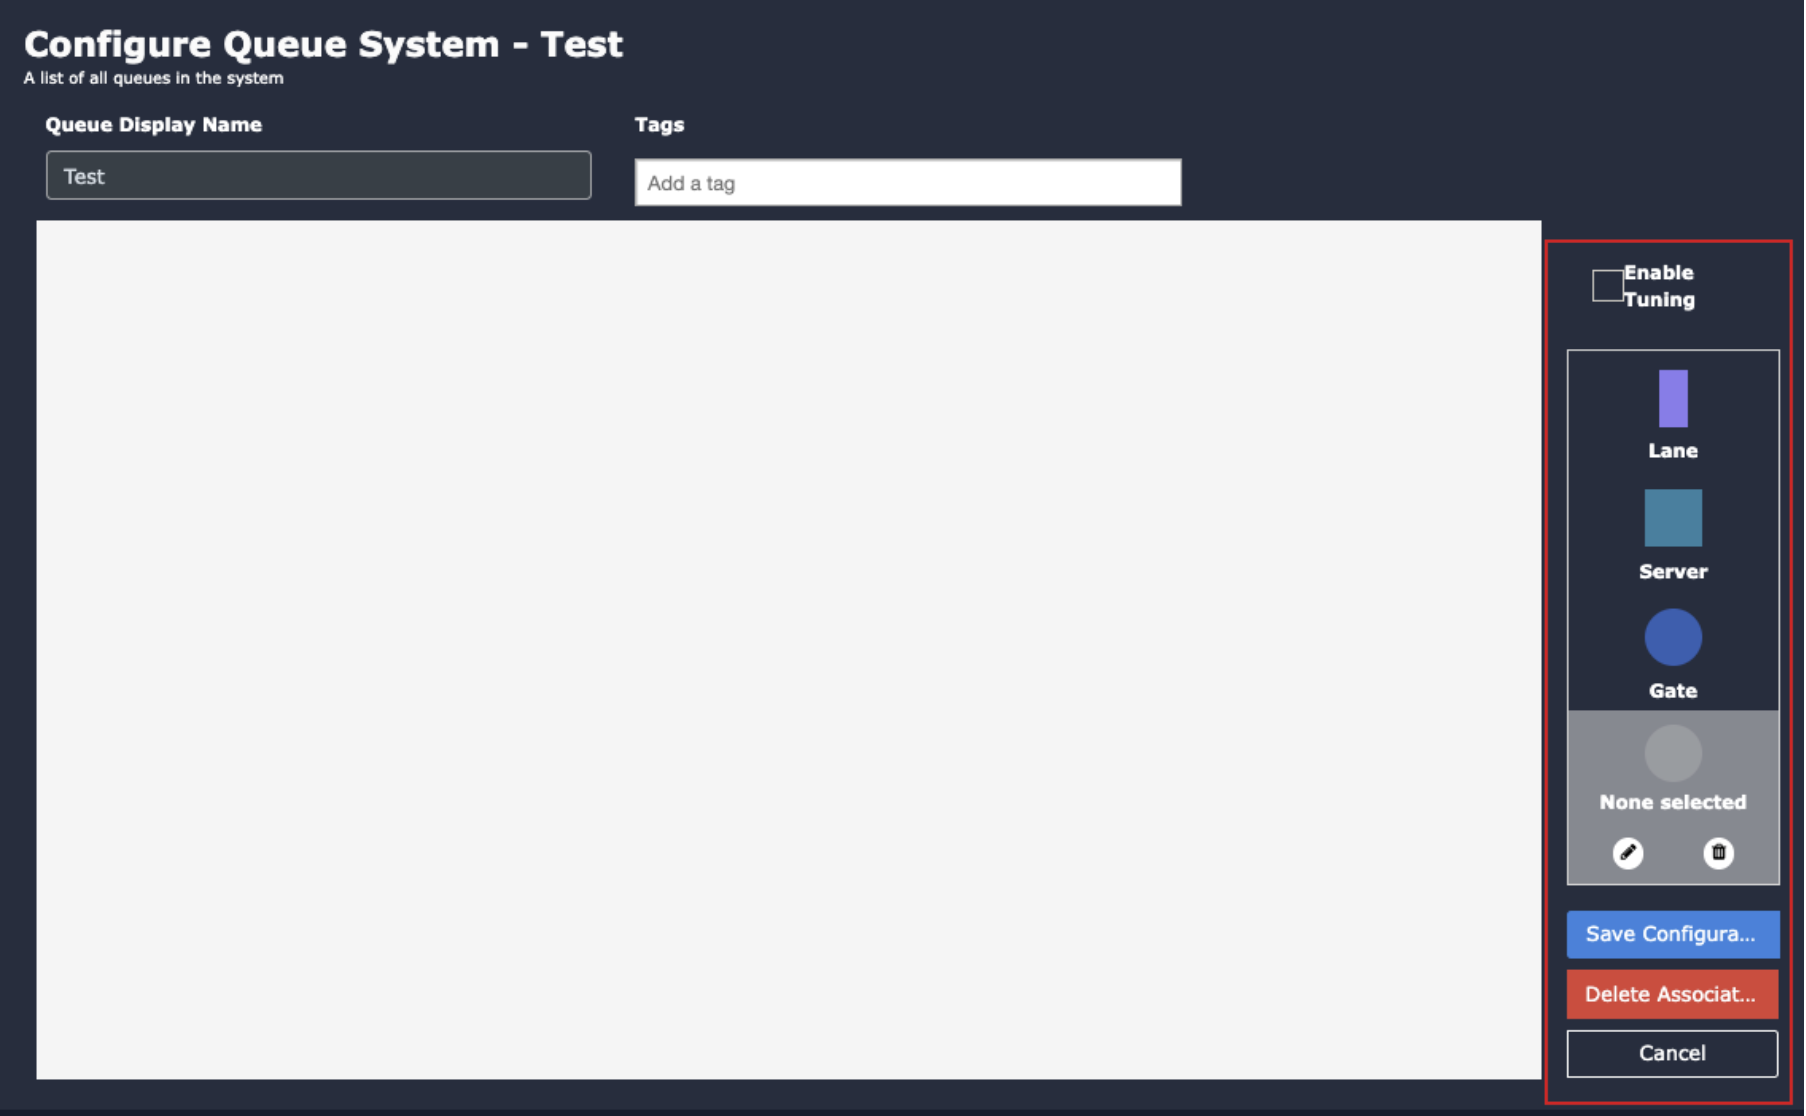
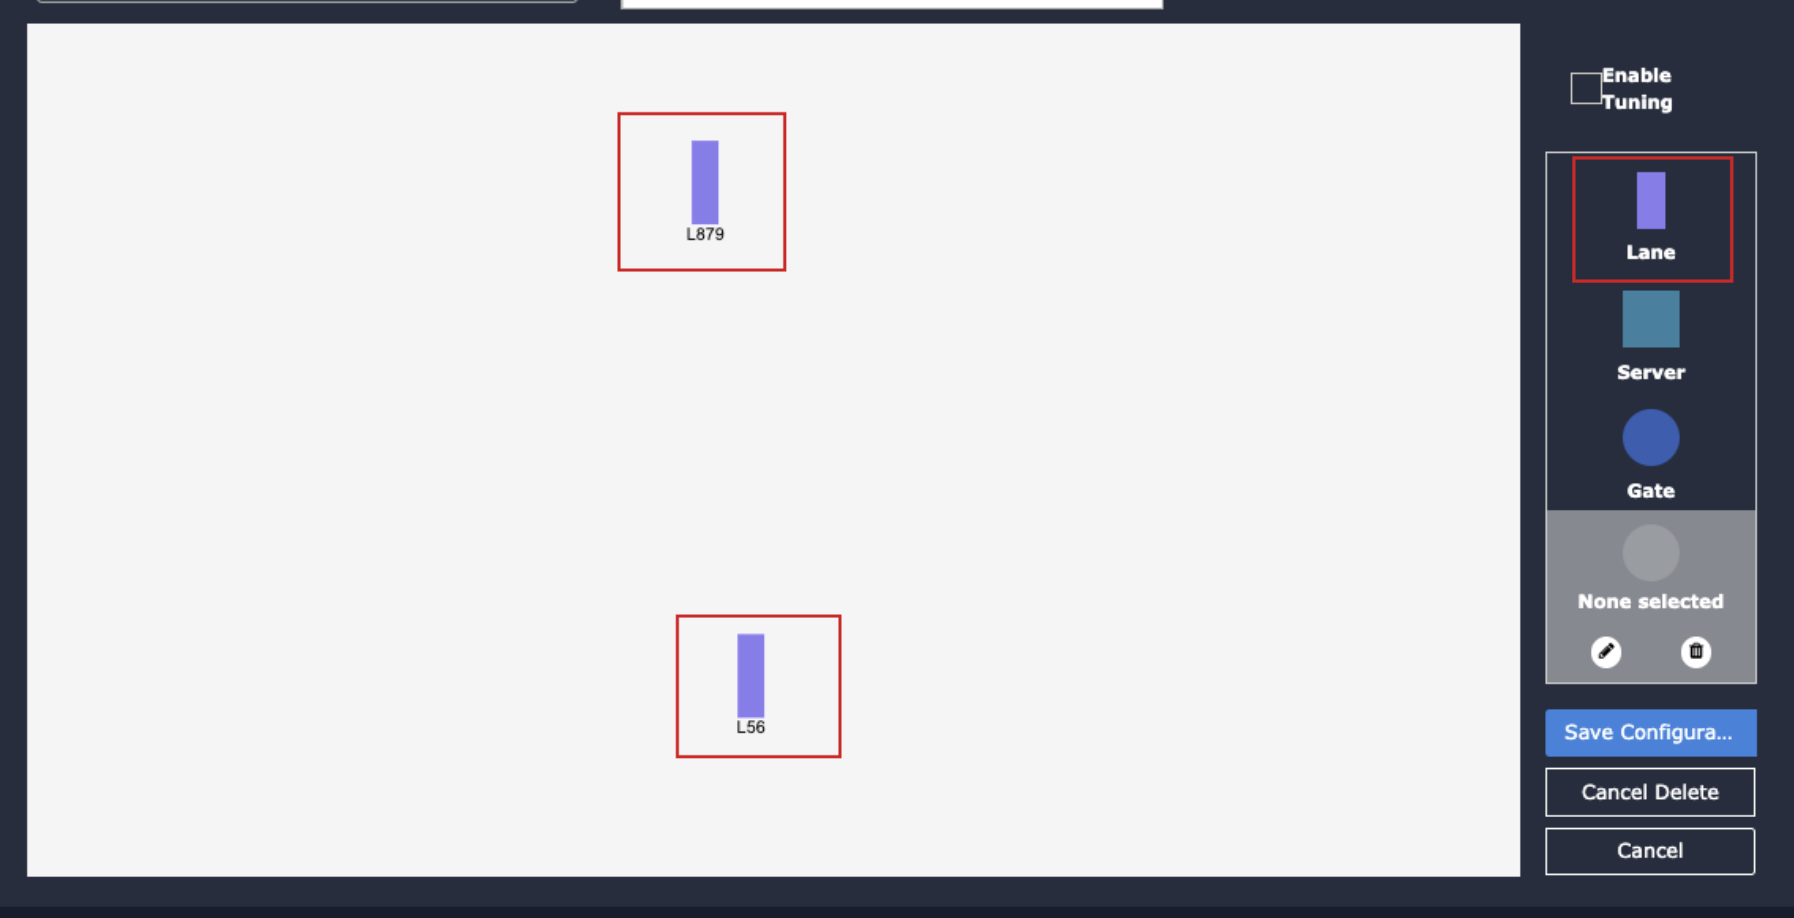
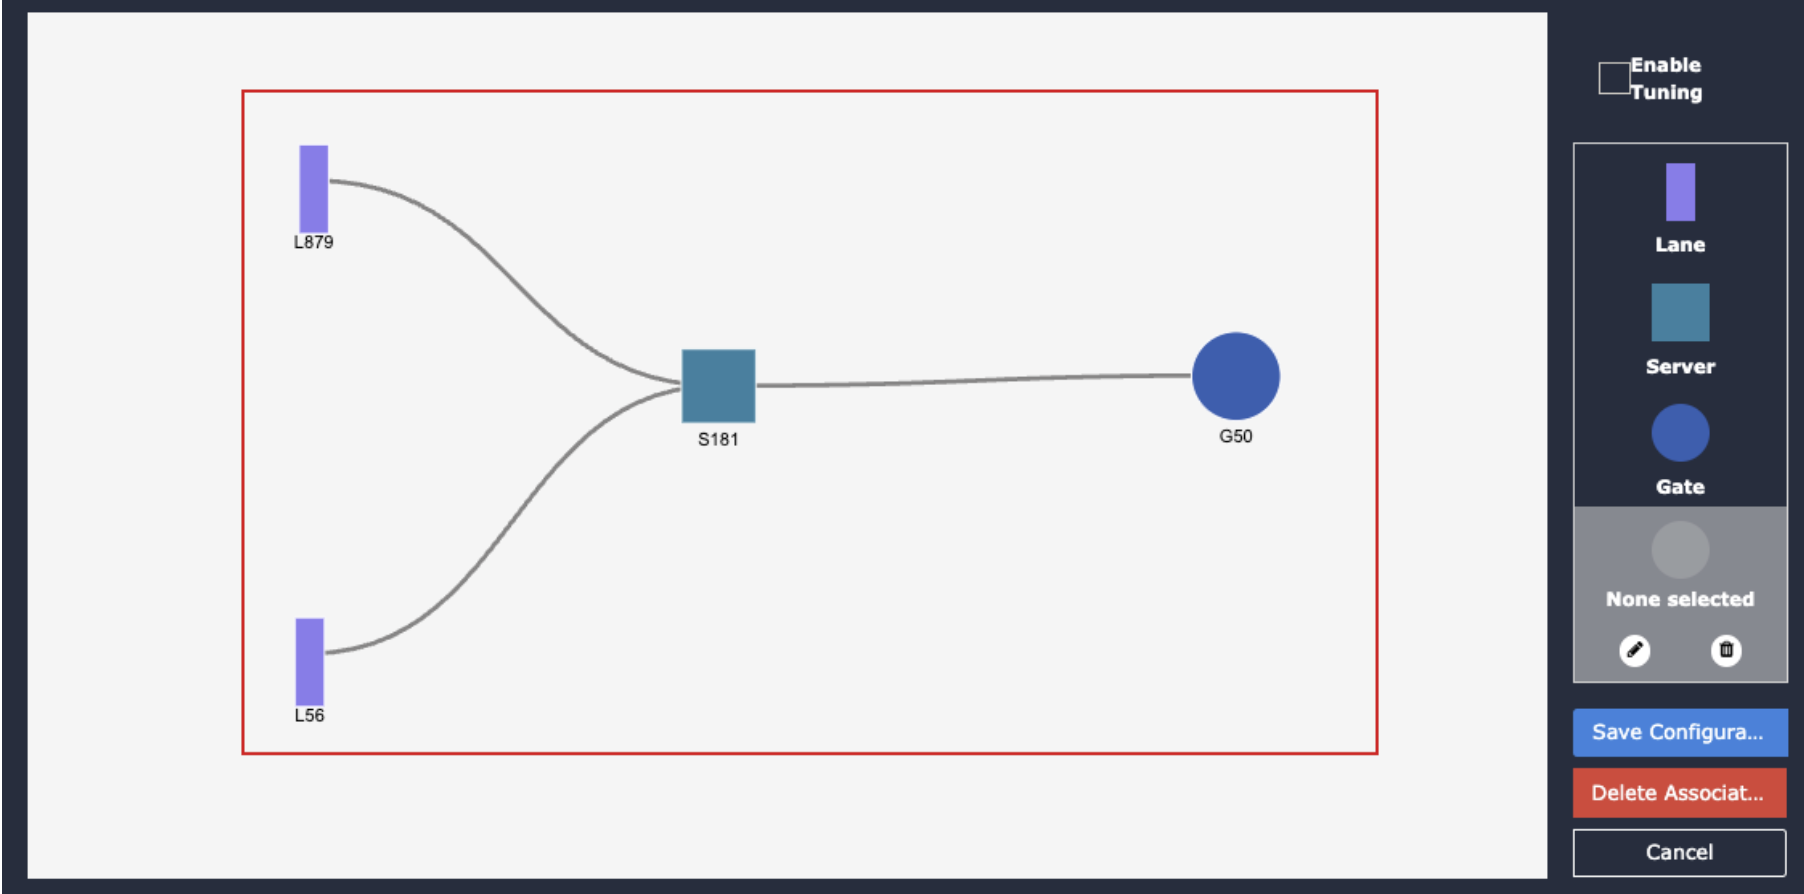
- In the “Configure Queue System” window, you’ll find the Lane, Server, and Gate buttons on the right-hand side.
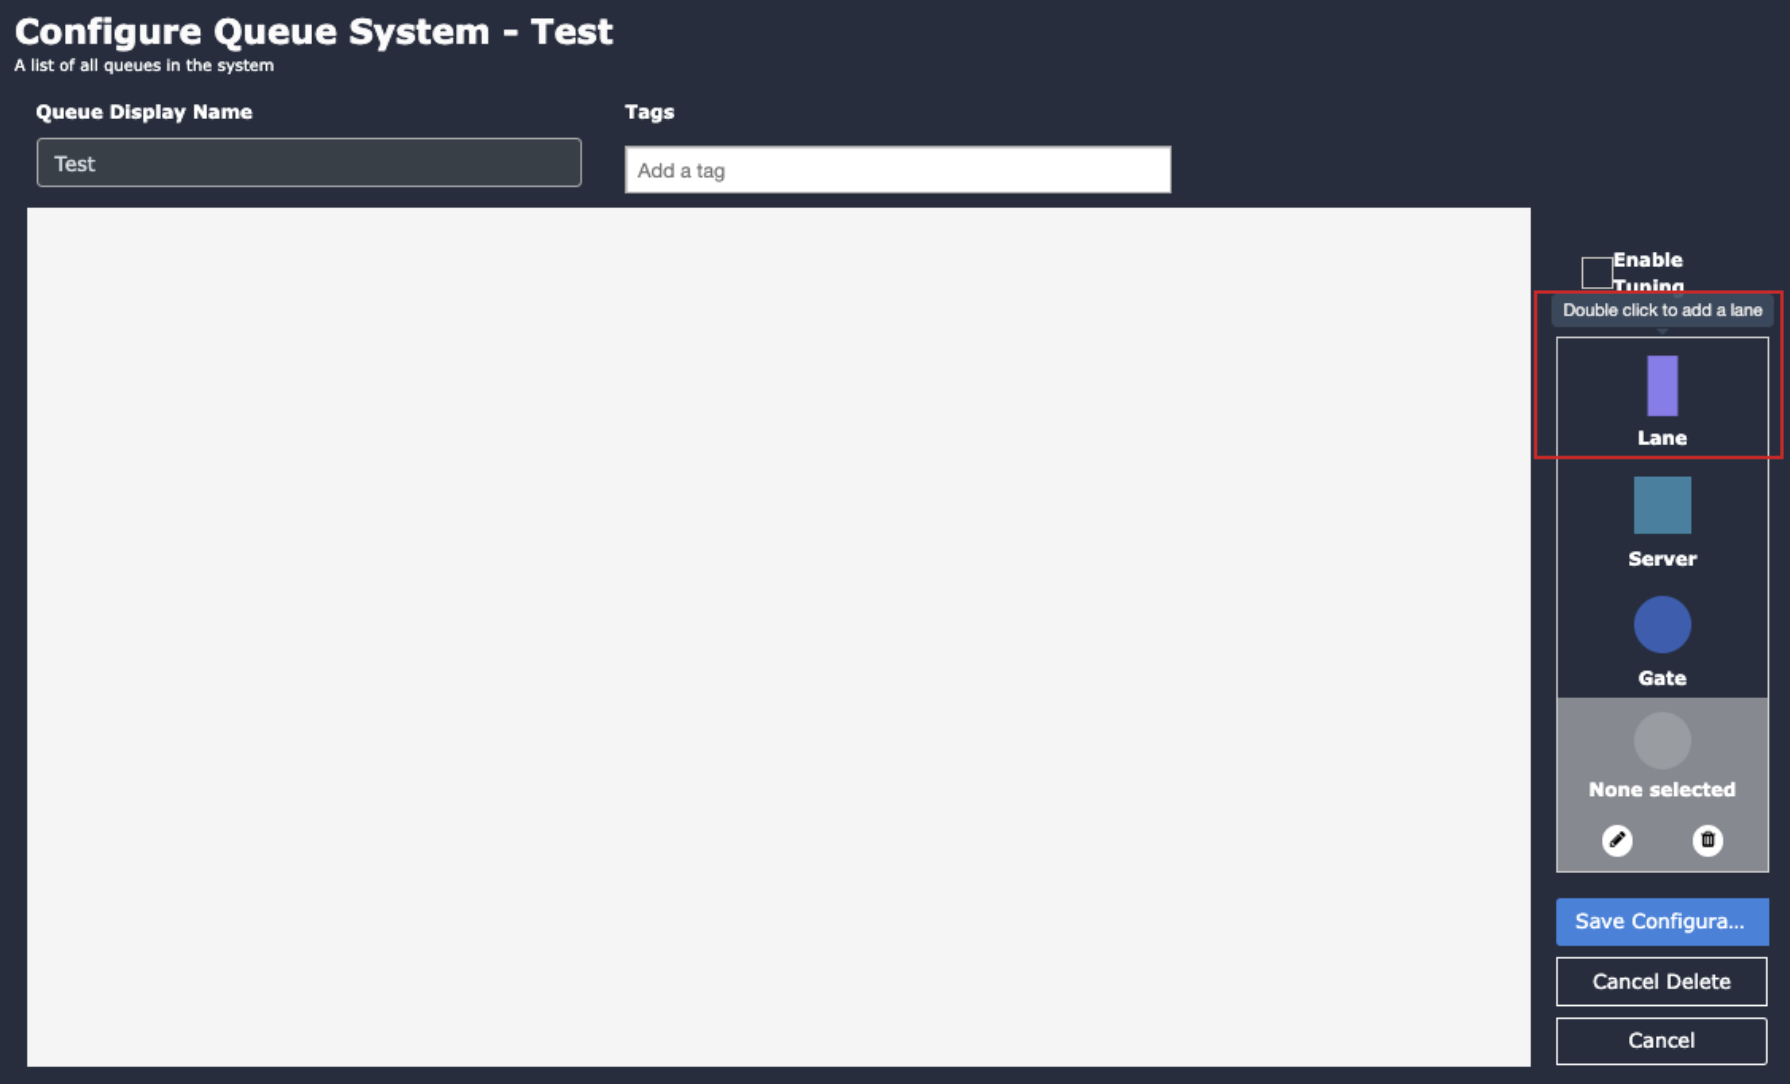
Add Lanes:
- Double-click on the “Lane” button.
- In the popup window, specify the number of lanes.
- Click “Add” to add the lanes to the canvas.
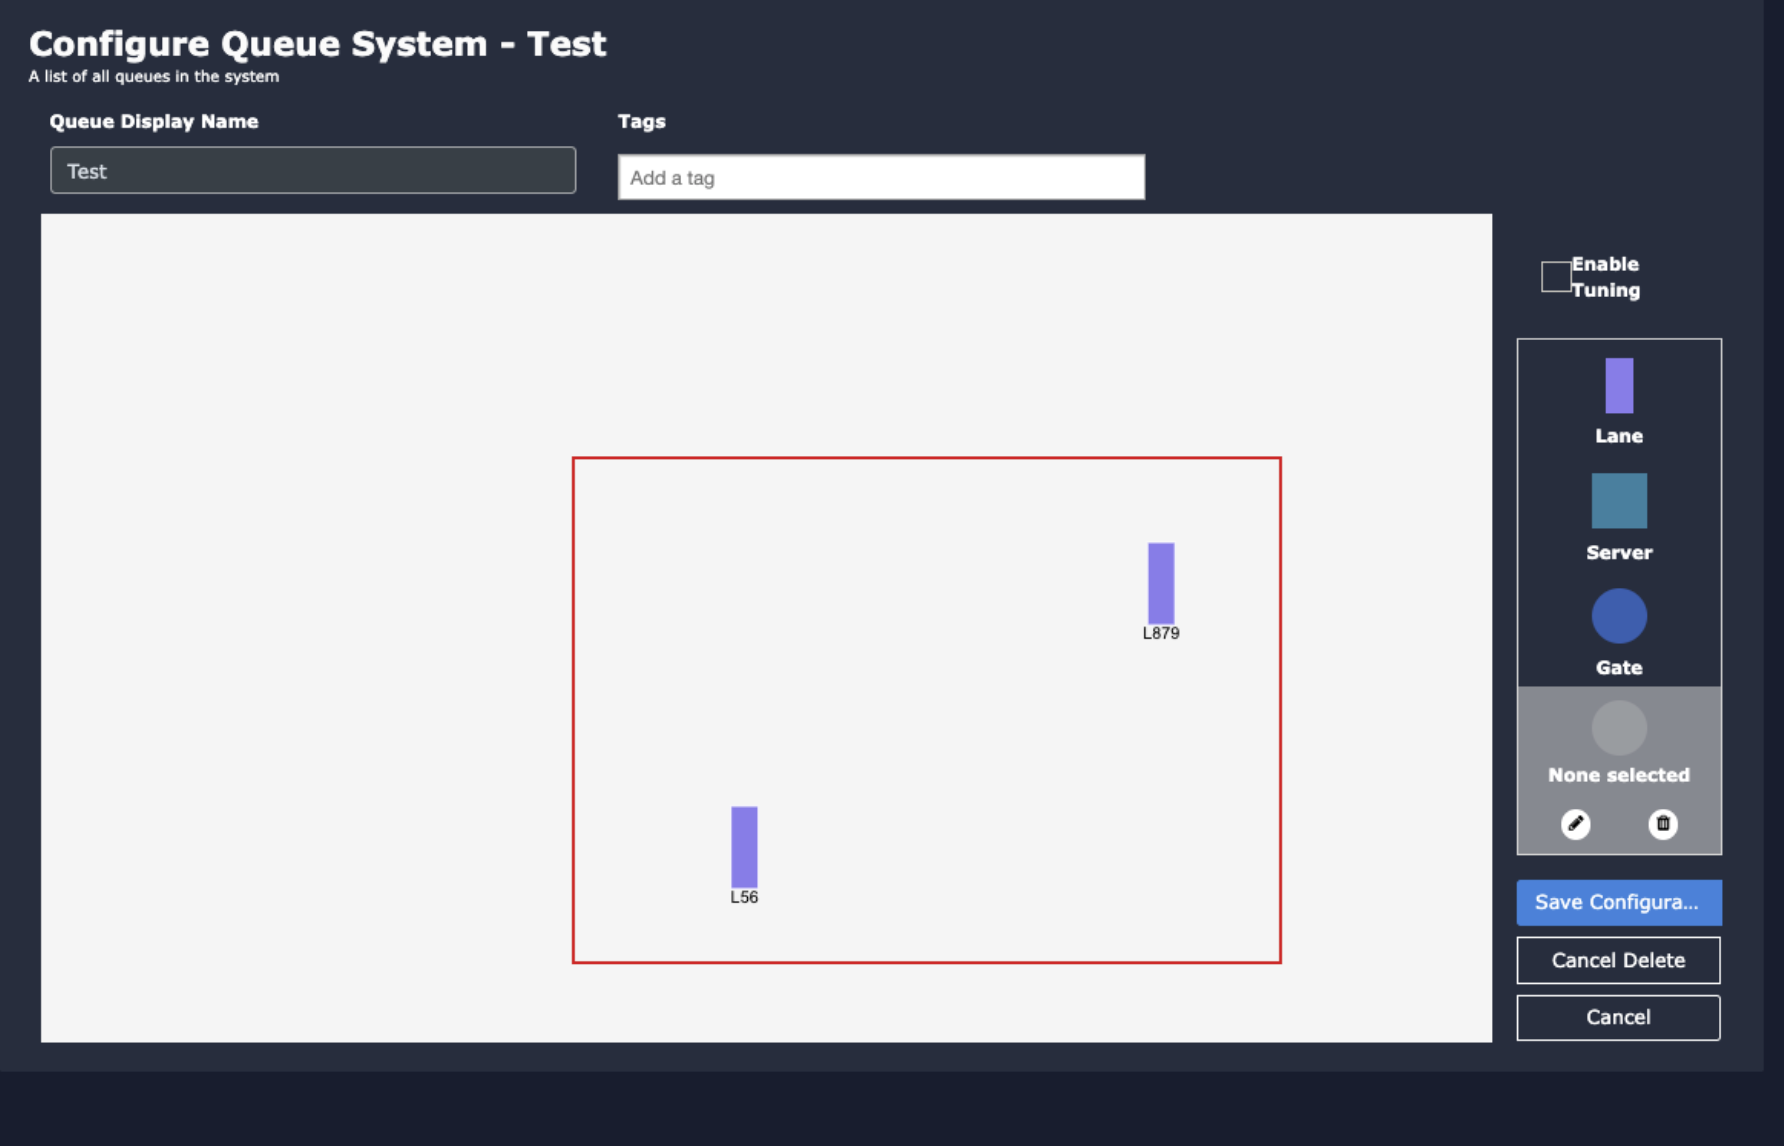
Add Tag:
- You can right the reference location or any unique name as tag.

Add Servers:
- Double-click on the “Server” button.
- In the popup window, select the number of servers.
- Click “Add” to add server gates to the canvas.
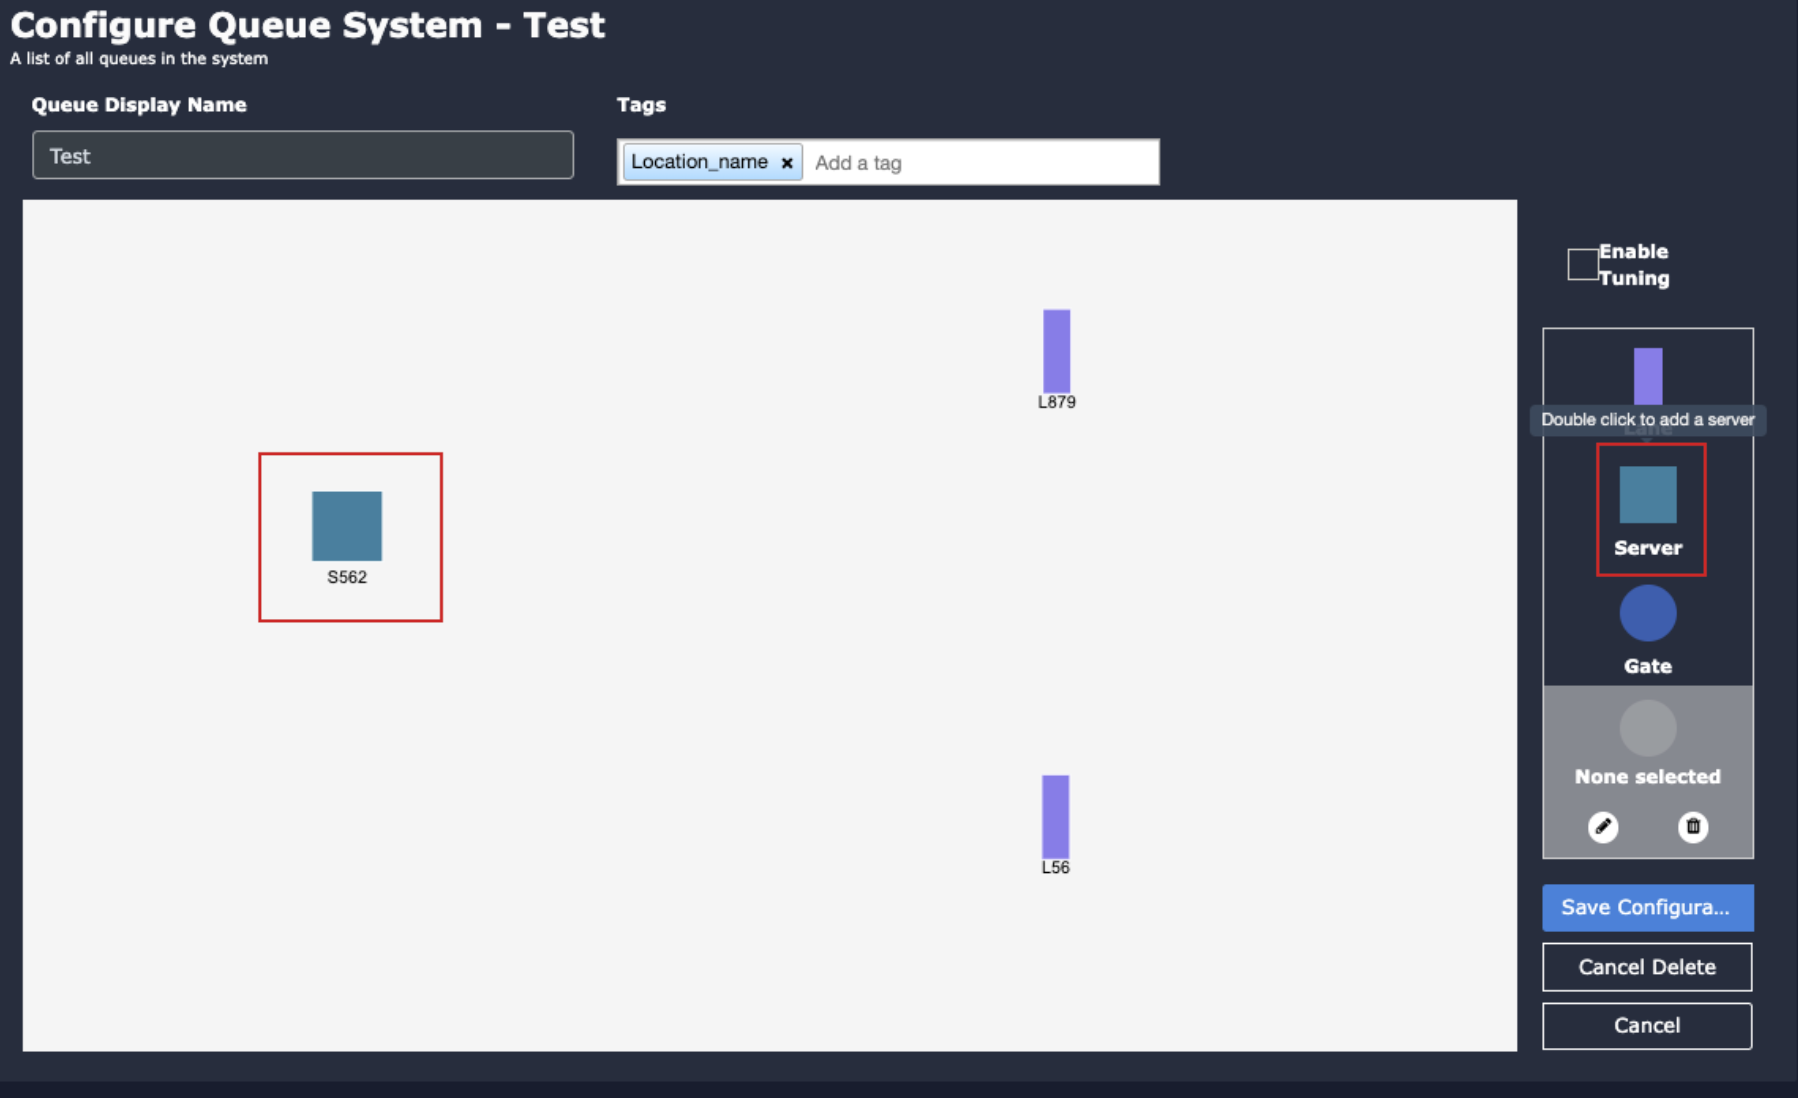
- Adjust the server gate positions as needed.
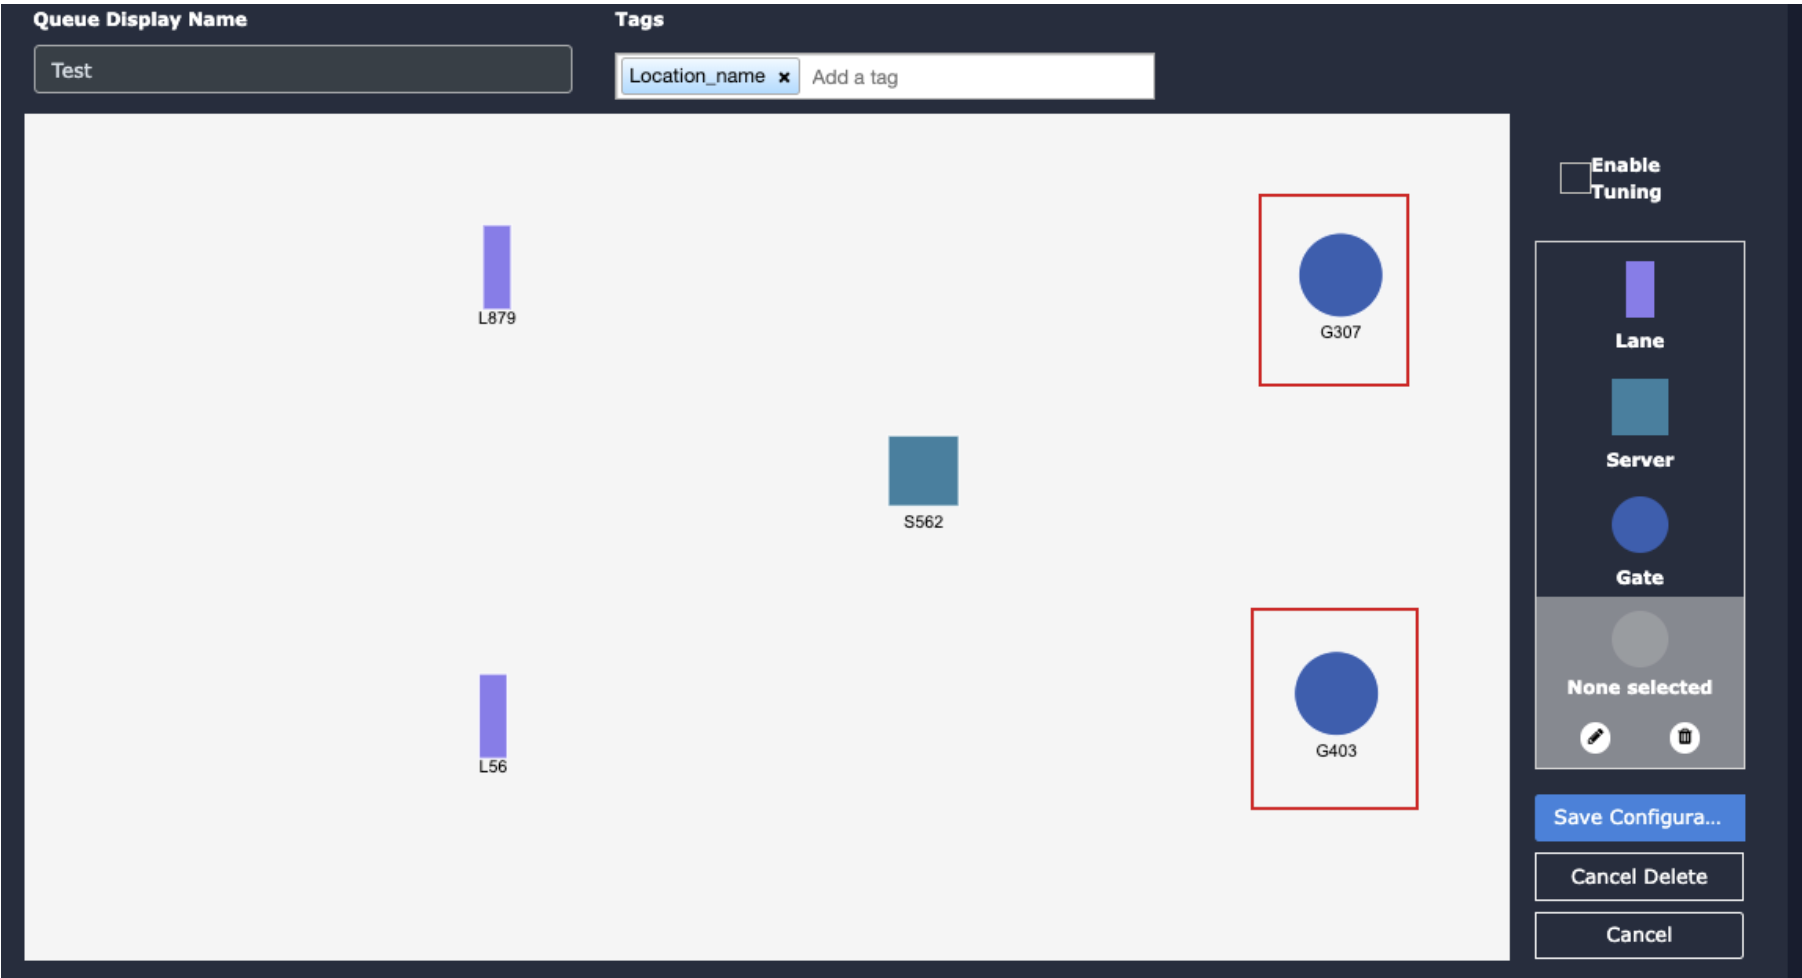
Add Exit Gates:
- Double-click on the “Gate” button to add exit gates.
- In the popup window, specify the number of exit gates.
- Click “Add” to add exit gates to the canvas.
Draw Association Lines:
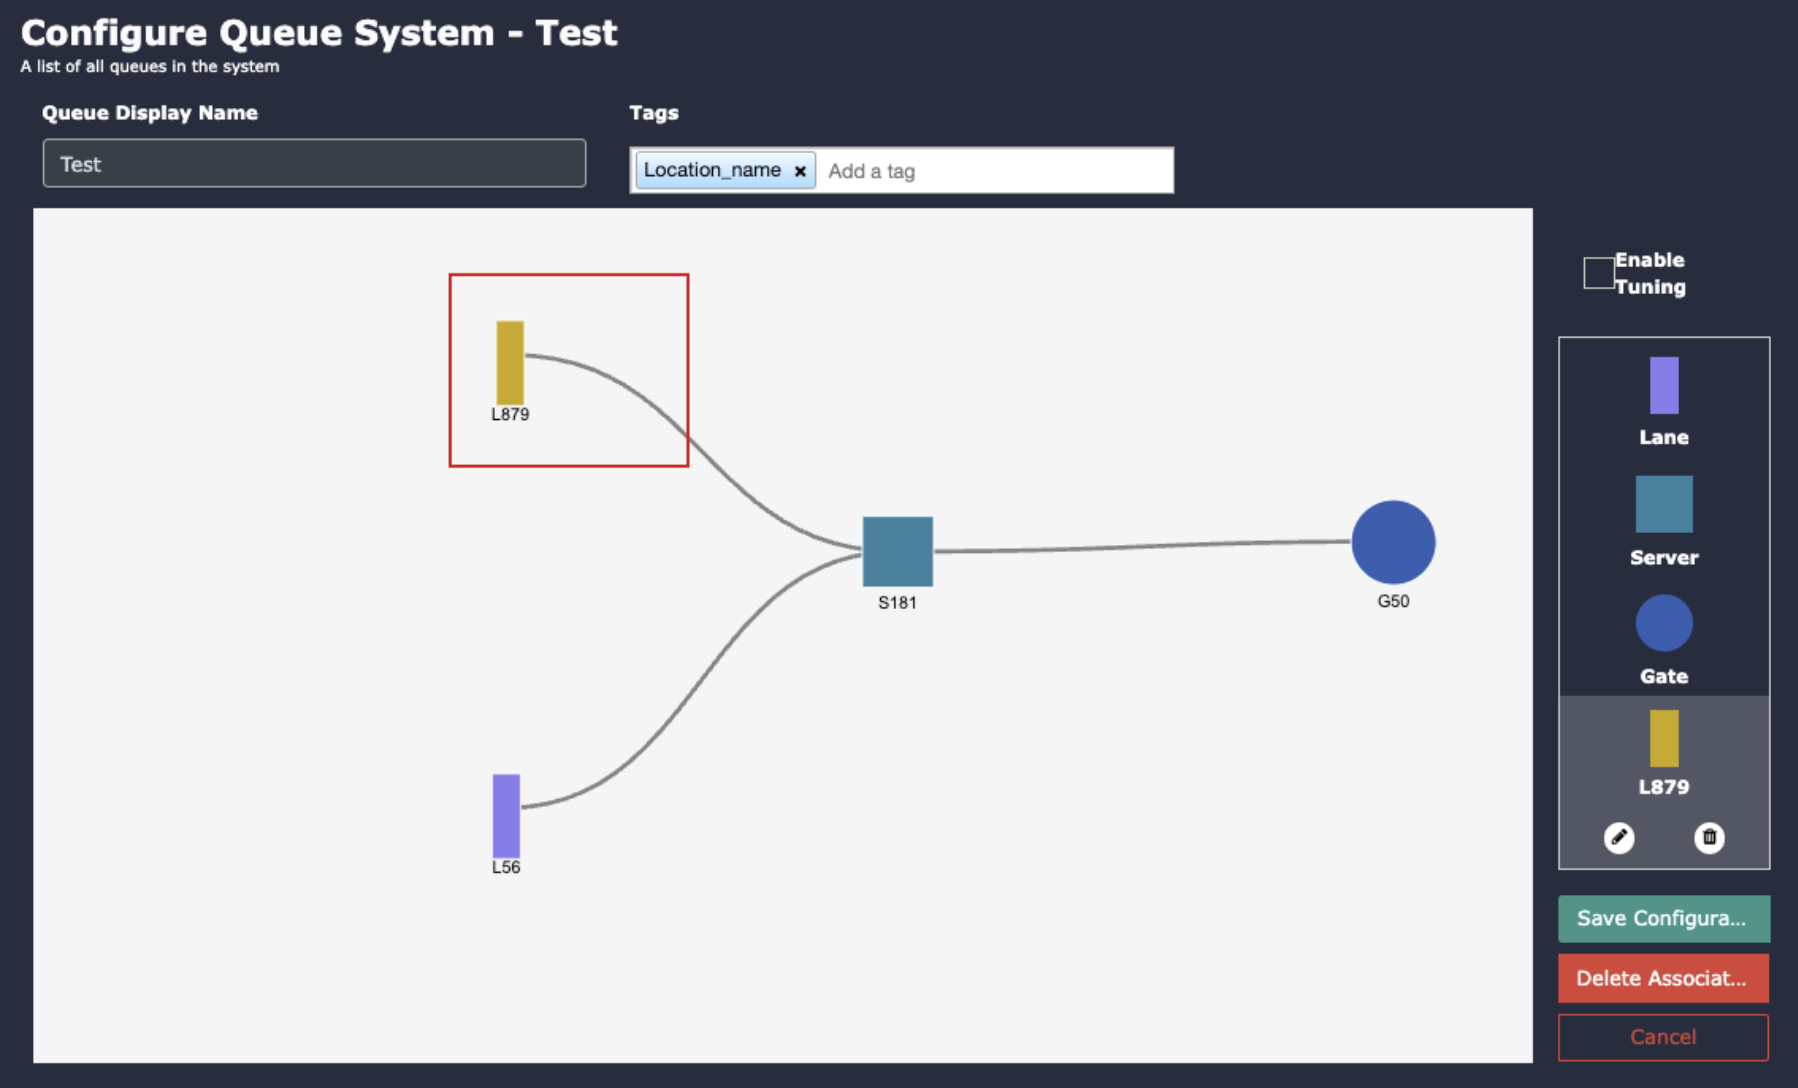
- Click on the icon representing the association you want to create.
- The selected icon’s color will change to yellow.

Save Configuration:
Click the “Save Configuration” button to save the configured queue.
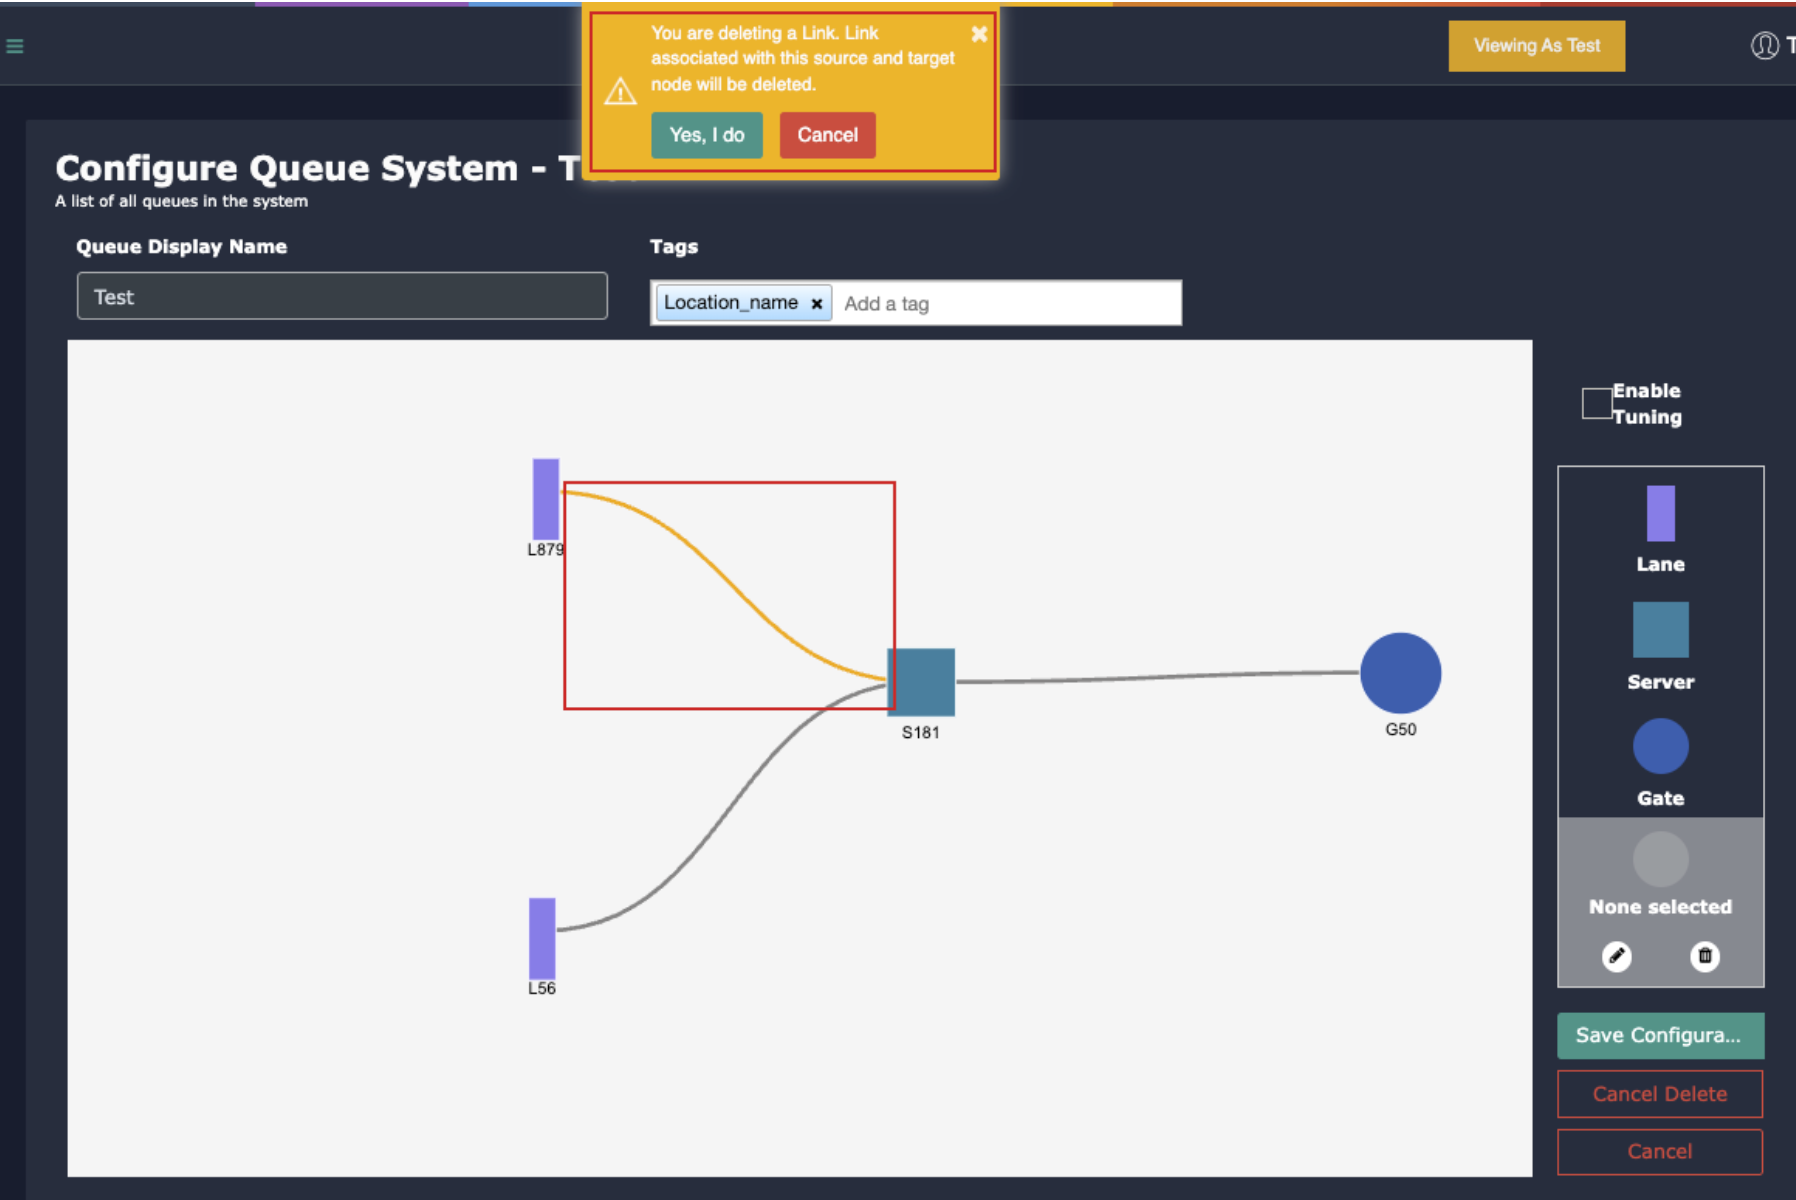
Delete Associations:
- To delete an association, click on the “Delete association” button.
- Select the association lane to be deleted.
- A confirmation window will appear; click “Yes, I do” to confirm the deletion process.