On-Boarding Guide
Newly Procured Devices
Skip this section if you procured the device from Kloudspot: It should already be active. Click here if you want to onboard device after reset.
Once you have your brand new Mikrotik Device, we need to first reset the configuration and remove any default configs.
Prerequisites:
Winbox Software – Download[If you get a Prompt to allow the app through firewall, please select both public and private network from the options]
Connecting to Device for the first time:
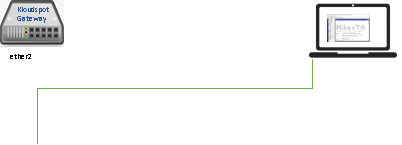
Please connect the device to your PC in the following way –
Connect one end of Ethernet to Router port (ether2) and the other end to your PC. Make sure your Ethernet configuration is set to obtain ip address automatically.
 Once connected, open winbox software and click on the “Neighbours” tab. You
should be able to see a device. Click on the mac address of the device, Enter
username as “admin” and click on connect. The password on a new device is
usually empty.
Once connected, open winbox software and click on the “Neighbours” tab. You
should be able to see a device. Click on the mac address of the device, Enter
username as “admin” and click on connect. The password on a new device is
usually empty.
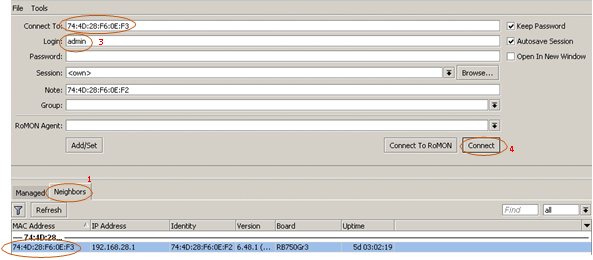
- Click on “Neighbors” Tab.
- You should see the device. Click on the mac address.
- Enter the username as “admin” you should be able to see the mac address on the connect to field.
- Click connect.
This should log you into the fresh Mikrotik Device. Please proceed to section 1.3 for Onboarding instruction.
Recovery of Existing Device
(We are going to reset the device to factory conditions. This will clean the device and make it ready for installing Kloudspot software on the same.)
Please SKIP this section if you already have access to the device via winbox.
It is recommended to have a Kloudspot Engineer on the call while performing the steps as a link will be provided by the Engineer to activate device and onboard to Kloudspot Platform.
Reset Gateway Device to Factory Condition :
- We will now reset the gateway in its factory condition. Please follow the instruction carefully:
- When router is powered on, press the reset button and hold for 30 seconds. (Use a paper clip or something sharp
- While holding the reset button pressed, unplug the power of the router and hold the reset button for 30 seconds
- While still holding the reset button down, turn on the power to the unit again and hold for another 30 seconds.
2. After performing this step, Please go to section 1.1 to see how to get access to device using winbox for the first time.
3. After a reset is performed. The default IP (192.168.88.1) Should be visible on the Winbox “Neighbors” tab and identity of the device should be “Mikrotik”
4. If you see anything else, please try to reset the device once again.
Removing Factory Default Configuration
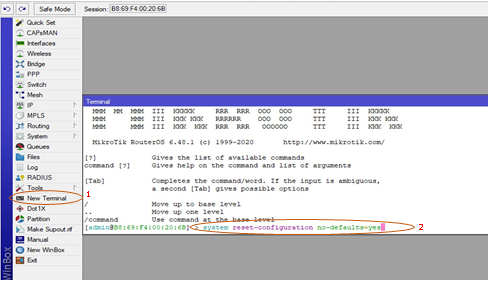
- Once you are logged in through the winbox, please open the terminal window from the left menubar and execute the following command: “system reset-configuration no-default=yes”. It will ask you to confirm whether you are sure to reset. Press ‘y’ and then return/enter the key.
 2. The device will now reboot and remove all the default configuration. Once
device is booted, please log in back to the device using Winbox software.
(Please refer to. Section 1.1 on how to connect to the device via winbox. )
2. The device will now reboot and remove all the default configuration. Once
device is booted, please log in back to the device using Winbox software.
(Please refer to. Section 1.1 on how to connect to the device via winbox. )
Installing Kloudspot Software on Device
- Once the device is rebooted after cleaning and removing all existing configuration, we will now proceed to install the Kloudspot Software for Device management. For this step it is important to have a Kloudspot Support Engineer available so that he can enable the onboarding and help you with registration of the device on the License Server.
- Before Proceeding to this step, it is also recommended to add your device on the Kloudspot NMS with the WAN configuration and a basic LAN configuration. Make sure your device is assigned to a Gateway Configuration before you proceed with the next steps. Kloudspot Support Engineer might have already taken care of the configuration.
- Before we Proceed, we need to configure internet access on the Mikrotik Device for the first time. Please go through the steps below to configure internet access for the first time depending on the type of connection provided by your ISP.
Setting up WAN for the first time
Please use the correct configuration based on type of WAN provided by ISP:
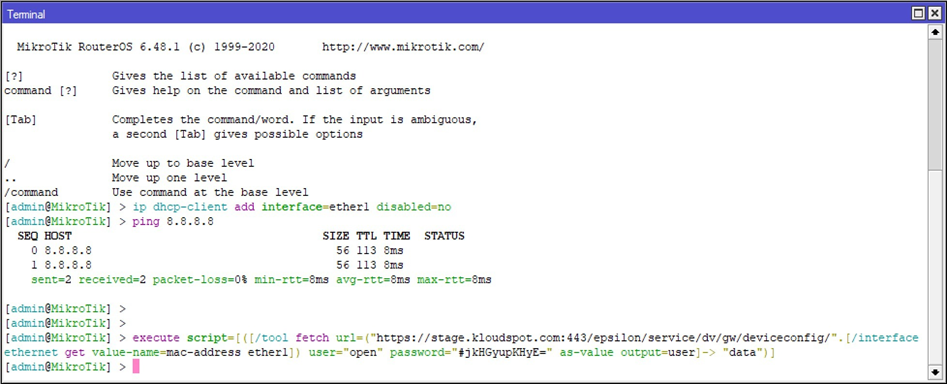
DHCP
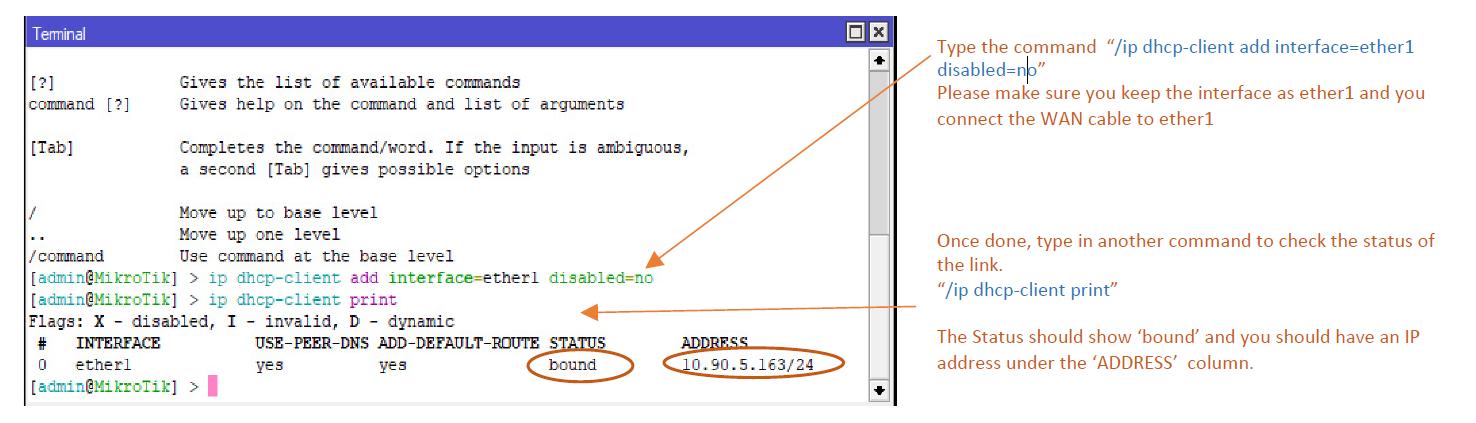
- Use the following steps if your WAN connection type is DHCP.
- Connect to the device using winbox software. Click on ‘New Terminal’ and type the following command to add a dhcp-client.
 3. You can check you have internet connection by typing “ping 8.8.8.8” and
see the reply. If you get replies like the following you should have internet
connectivity. Press ‘ctrl + c’ to stop the ping command.
3. You can check you have internet connection by typing “ping 8.8.8.8” and
see the reply. If you get replies like the following you should have internet
connectivity. Press ‘ctrl + c’ to stop the ping command.
 4. You can now proceed to 1.4.2 (Installing Kloudspot Software) to start
onboarding the device to Kloudspot Platform.
4. You can now proceed to 1.4.2 (Installing Kloudspot Software) to start
onboarding the device to Kloudspot Platform.
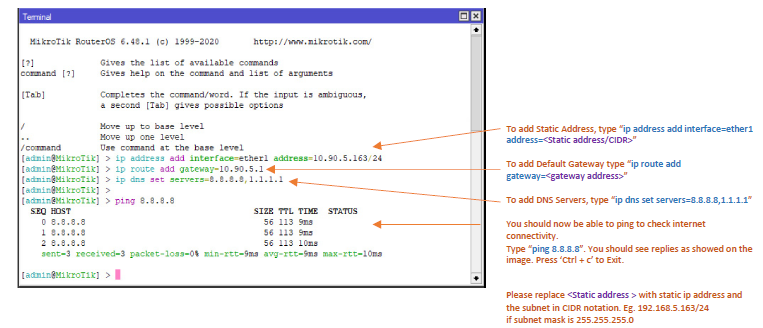
Static IP Address
- Use the following steps if your ISP has provided you with a Static IP Address, gateway and subnet-mask to get connectivity.
- Connect to the device using winbox software. Click on ‘New Terminal’ and type the following commands to add an address to the interface, set the DNS and have the default gateway configured.
 3. You can now proceed to 1.4.2 (Installing Kloudspot Software) to start
onboarding the device to Kloudspot Platform.
3. You can now proceed to 1.4.2 (Installing Kloudspot Software) to start
onboarding the device to Kloudspot Platform.
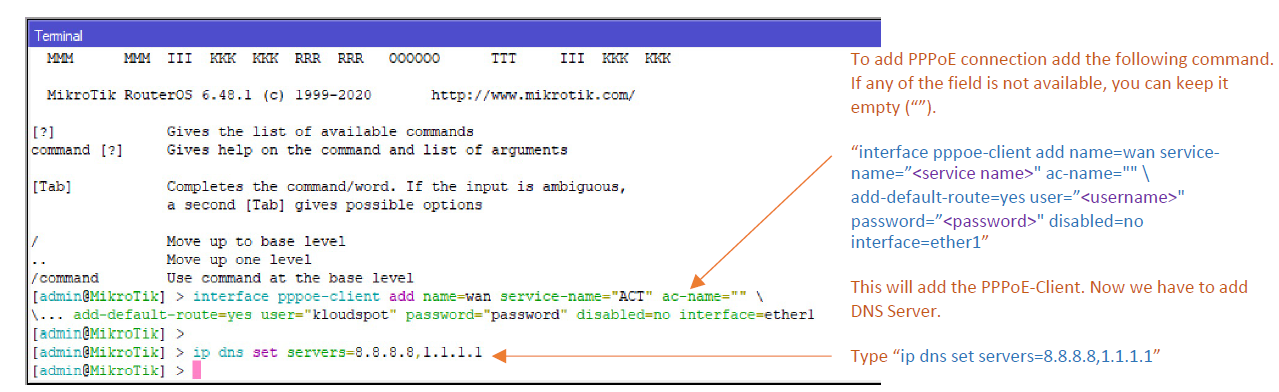
PPPoE Client
- Use the following steps if your ISP has provided you with a Static IP Address, gateway and subnet-mask to get connectivity.
- Connect to the device using winbox software. Click on ‘New Terminal’ and type the following commands to add an address to the interface, set the DNS and have the default gateway configured.
 3. You can check you have internet connection by typing “ping 8.8.8.8” and
see the reply. If you get replies like the following you should have internet
connectivity. Press ‘ctrl + c’ to stop the ping command.
3. You can check you have internet connection by typing “ping 8.8.8.8” and
see the reply. If you get replies like the following you should have internet
connectivity. Press ‘ctrl + c’ to stop the ping command.
 4. You can now proceed to 1.4.2 (Installing Kloudspot Software) to start
onboarding the device to Kloudspot Platform
4. You can now proceed to 1.4.2 (Installing Kloudspot Software) to start
onboarding the device to Kloudspot Platform
Installing Kloudspot Files
- Once you have connectivity on your device, you should be able to start installing the Kloudspot Files on the Device. Please Get Activation Command from Kloudspot Support Engineer. We will use the activation command to start the installation.
- Open the terminal and enter the activation command on the terminal. It is recommended to Paste the command from Email.
 3. It should show nothing on the terminal. To Know the status, you need to
open log window from the left Menu Bar. Please refer to image below
3. It should show nothing on the terminal. To Know the status, you need to
open log window from the left Menu Bar. Please refer to image below
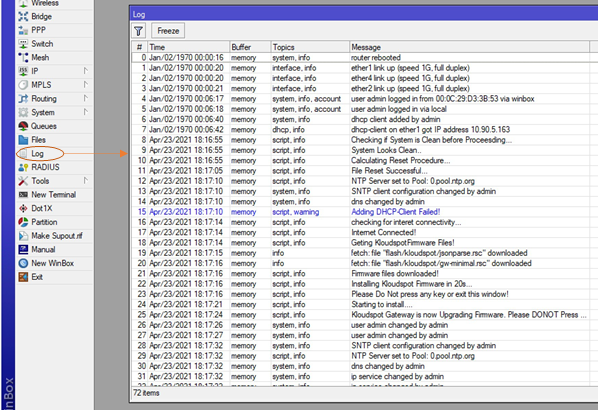 4. Please don’t press any Key. Once the files are downloaded, the device will
reboot automatically. You can then proceed to the NMS to check the device
status. It might take up to 10 Mins for the device to finish onboarding
process.
4. Please don’t press any Key. Once the files are downloaded, the device will
reboot automatically. You can then proceed to the NMS to check the device
status. It might take up to 10 Mins for the device to finish onboarding
process.
Verifying Onboarding
- Once the device reboots, you can go to the NMS and check the status of the added gateway device.
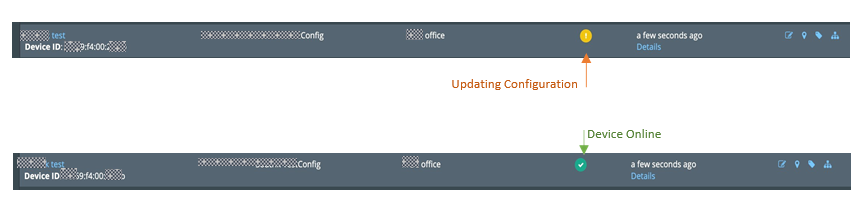 2. Once its green, Device will reboot once more to make sure all the settings
are applied correctly. Please wait for some more time.
2. Once its green, Device will reboot once more to make sure all the settings
are applied correctly. Please wait for some more time.
3. You can go to the device ‘real time‘ information tab to check if the device is back online. Please wait for few seconds and try again in case you get any error.