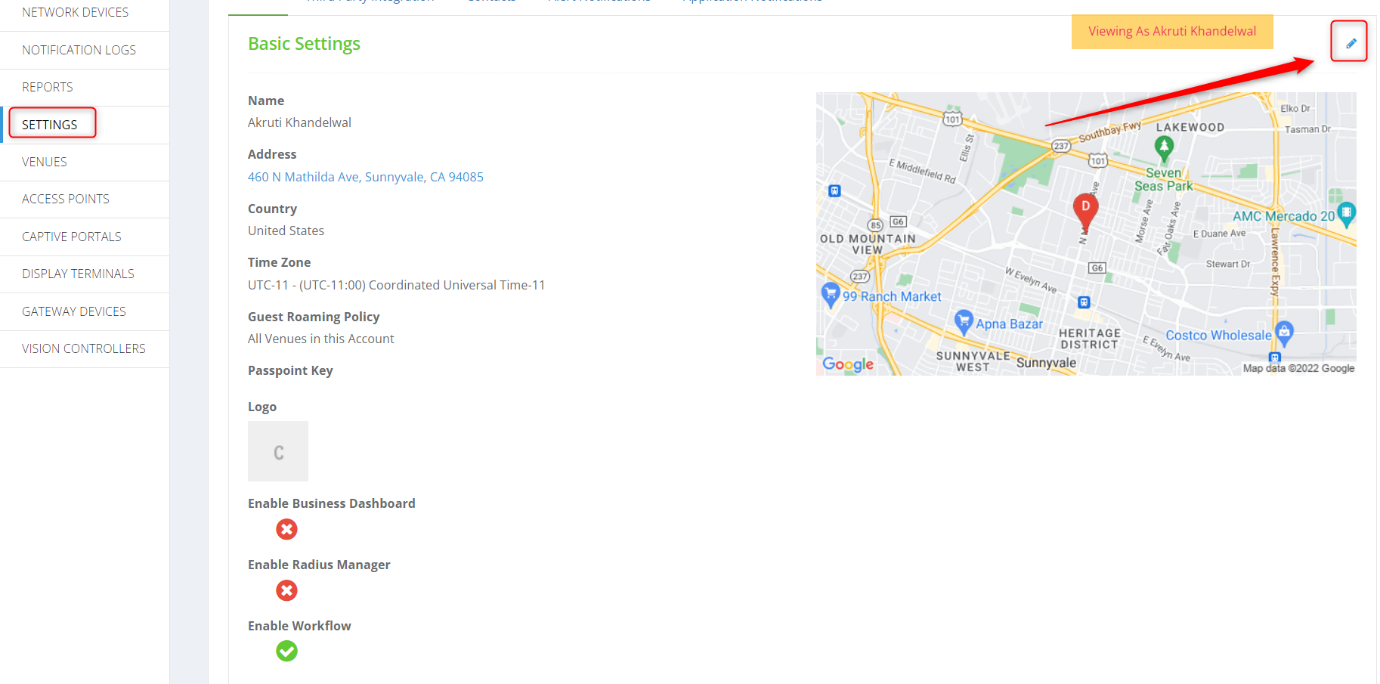
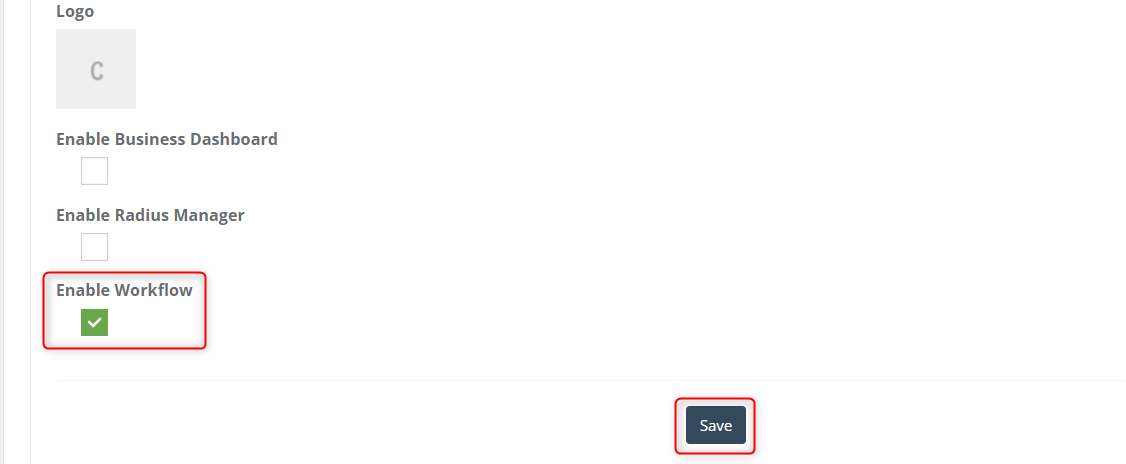
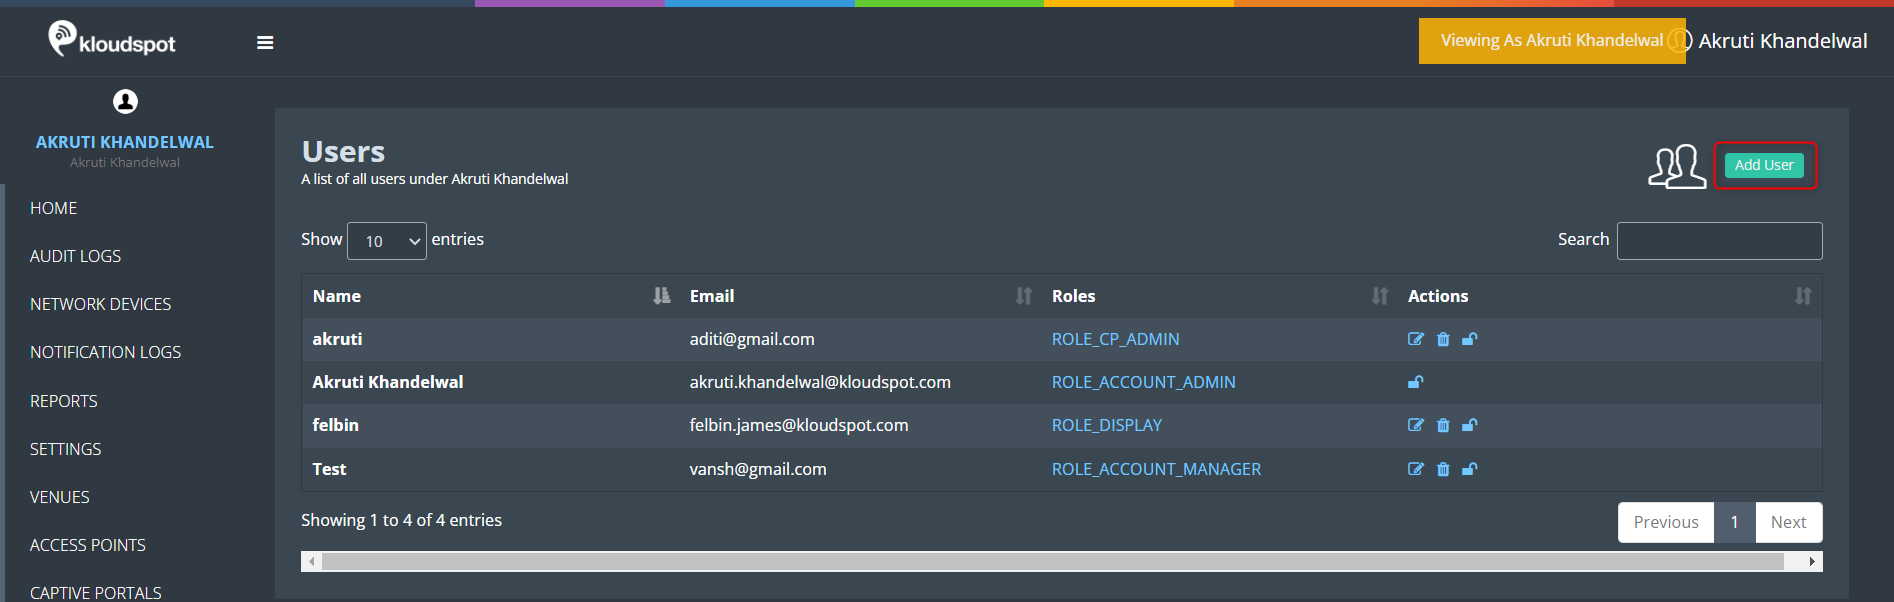
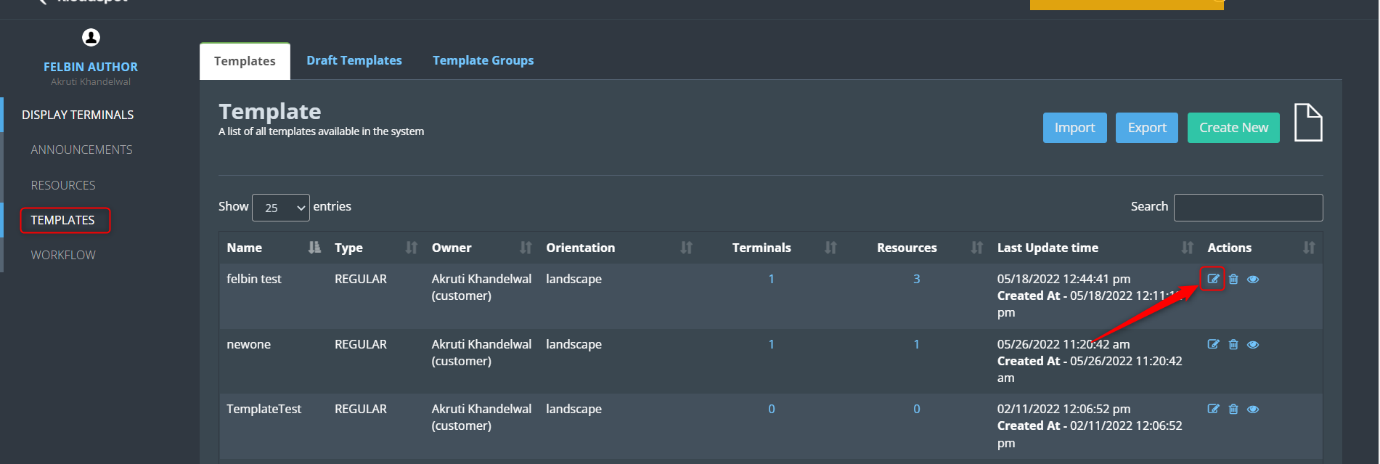
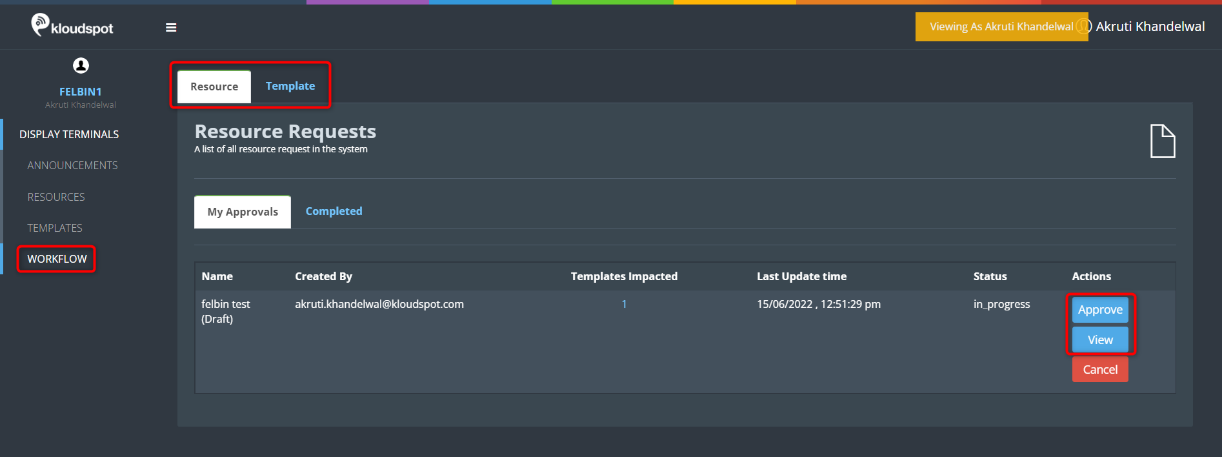
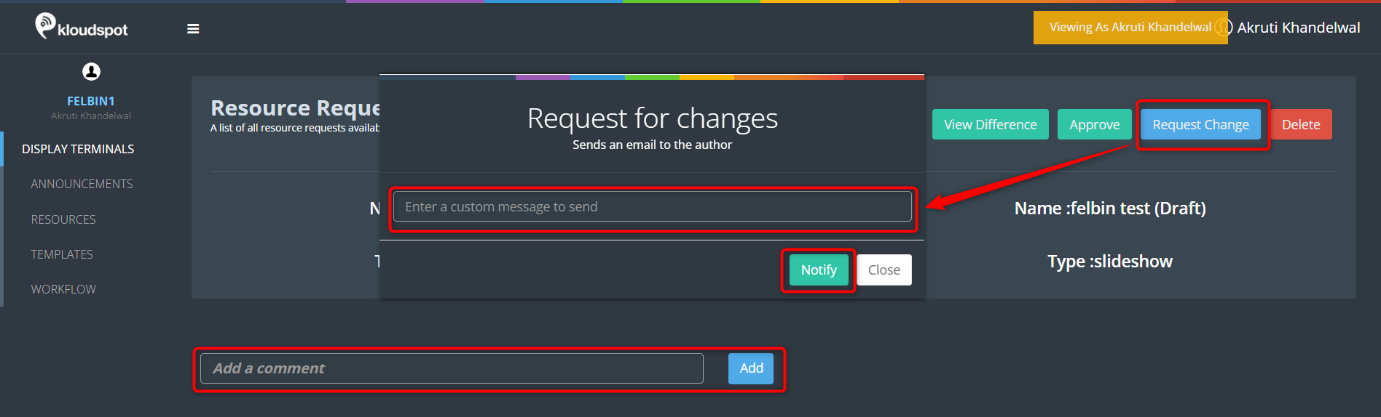
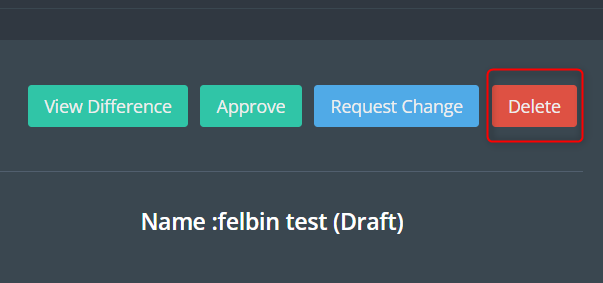
Workflow Management

This comprehensive guide outlines the step-by-step processes involved in enabling and managing workflows, user roles, resources, and templates using the Kloudspot system. Whether you’re an administrator, author, publisher, or approver, this documentation provides clear instructions on how to navigate the Kloudspot manage and monitoring interface to efficiently edit, approve, and collaborate on resources and templates. By following these guidelines, you’ll be able to seamlessly streamline content modifications, ensure accurate approvals, and effectively manage your digital displays."

Table of content

Subsections of Workflow Management

Enable workflow

  1. Log in to Kloud manage interface.

  2. Click on the Settings menu from the home page. In the basic tab that opens click on the edit button.

  1. Then scroll down and check the Enable Workflow check box and click Save.

Add or edit user

  1. If you enable workflow, you must either add a new user or assign a role to an existing user. To do so, follow the steps described below.

  2. Log in to your Kloud manage admin account with your company username and password.

  1. Navigate to Profile > User & Role Management.
  1. Click the Add User button in the Users window that appears.
  1. Enter user information, such as name, email address, and password.

  2. Then choose a role and click Save. Depending on the user’s responsibility, koudDisplay has three roles.

    • ROLE_DISPLAY_AUTHOR- It allows you to access and Edit the display terminal.

    • ROLE_DISPLAY_PUBLISHER- It allows you to authorize changes made by the author.

    • ROLE_DISPLAY_AUTHOR&PUBLISHER- This allows you to play the roles of both author and publisher.

  1. New user is added successfully. If you want to edit the user, click the edit user button in the Actions column

Edit a resource and send it for approval

Introduction

This document provides a step-by-step guide on how to edit a resource and send it for approval in the system. The process involves logging in with the appropriate user roles, accessing the resource edit page, making necessary changes, and finally, sending the edited resource for approval.

Process Steps

  1. To begin the process, login to the system using an account with either the ROLE_DISPLAY_AUTHOR or ROLE_DISPLAY_AUTHOR&PUBLISHER role. These roles grant the required permissions to edit and submit resources for approval.

  2. After successful login, navigate to the main menu of the application. Look for a RESOURCES menu and click on it. This action will take you to the Resources section where you can manage all the available resources. On the resources page, you should see a list of available resources. Locate the resource you wish to modify and find the edit button next to it. Click on the edit button to open the resource’s edit page.

  1. Once the edit page of the resource appears, you can make the desired changes to the resource’s content. Ensure you apply all the required modifications to the resource.

  2. After you have made the necessary changes, look for Send For Approval button on the edit page. Click on this button to initiate the approval process for the edited resource. The resource will be submitted to the relevant approvers for review and approval.

    NOTE: The changes to the resource only need to be approved if it is impacted by any template. Otherwise, it can be edited directly. The template column indicates whether it has been added to the template.

    NOTE: Once submitted for approval, no further changes are permitted unless the publisher approves or deletes it.

  1. After you have sent the resource for approval, a draft copy will be generated. To view this draft copy, navigate to the Draft resource tab. Please note that the draft tab will be visible only if the workflow is enabled in the system. Once the resource is approved, the draft copy will be removed from the draft resource tab.

Handling “Send For Approval” Button Visibility

  1. If you are editing the resource for the first time, you may not see the Send For Approval button on the edit page. In such cases, follow these additional steps:

    • Navigate to the Draft resource tab.
    • Open the Resource: Find the edited resource in the draft tab and open it by clicking on it.
    • Send For Approval: Once the resource is open, you will be able to see the Send For Approval button. Click on it to start the approval process.

Edit a template and send it for approval

Introduction

This technical document provides a step-by-step guide on how to edit a template and send it for approval in the application. Users with the appropriate roles (ROLE_DISPLAY_AUTHOR and ROLE_DISPLAY_AUTHOR&PUBLISHER) can make changes to existing templates and submit them for approval. The document outlines the process of accessing the template edit page, making modifications, and initiating the approval workflow.

Process Steps

  1. Launch the application and enter your credentials. Use an account that has either the ROLE_DISPLAY_AUTHOR or ROLE_DISPLAY_AUTHOR&PUBLISHER role.

  2. After logging in, Look for the TEMPLATE button in the menu bar and click on it.

  3. In the template window that opens, you will see a list of existing templates. Locate the template you wish to modify, and click on the Edit button next to it.

  1. The edit page for the selected template will now appear. Modify the template content as required. And review the changes and ensure they are accurate and complete.

  2. Once you are satisfied with the changes, click on the Send For Approval button. If this is your first time editing the template, Send For Approval button might not be visible at this stage. Proceed to “Handling “Send For Approval” Button Visibility” steps to learn how to access it.

    NOTE: The changes to the template only need to be approved if it is impacted by any terminal. Otherwise, it can be edited directly. The terminals column indicates whether it has been added to the terminal

    NOTE: Once submitted for approval, no further changes are permitted unless the publisher approves or deletes it.

  3. After editing the template, a draft copy will be automatically generated, If the workflow is enabled, you can view the draft template by navigating to the Draft templates tab.

  4. The draft copy will only be visible until it is approved. Once the template is approved, the draft copy will be removed from the draft template tab.

Handling “Send For Approval” Button Visibility

  1. First-time editors might not see the “Send For Approval” button after editing the template directly.

  2. To send the template for approval, you need to access the draft template page.

  3. Open the template associated with the draft template.

  4. Now, you should be able to see Send For Approval button. Click on it to initiate the approval process.

Approve an edited resource or template

  1. Approval requires a ROLE_DISPLAY_PUBLISHER or ROLE_DISPLAY_AUTHOR&PUBLISHER account. Login with it.
  2. Then click on the WORKFLOW button from the menu bar. In the window that opens. You will see a list of requests.
  3. You can then choose the Resource and Template tabs as required.
  4. Requests can be approved by clicking the Approve button. By clicking on the View button, you can learn more about the change.
  1. If you need to add any more to the change, click on the Request Change button, then add a comment in the popup window that appears and click the Notify button, which will be sent to the author as an email.

  2. If you have any additional comments, leave them in the comment box.

  1. If this change is no longer needed, simply delete it by clicking the delete button.