The KloudDisplay user manual tells you everything you need to know about how to use it and all of its features. This manual gives both new and experienced KloudDisplay users clear and simple instructions, suggestions, and information on all of KloudDisplay’s features, from setting it up to Until resources are added to the display.
If you haven’t chosen a KloudDisplay Controller and completed the software installation, please refer to the installation guide before moving forward.
Congratulations on successfully installing the Klouddisplay to your controller! After receiving your controller’s MAC address, Kloudspot’s support team will process the activation of your license. Please consult the section on KloudDisplay software installation for instructions on how to acquire the controller’s MAC address.
Once your license is activated, you will receive your login ID, temporary password, and the URL to access the KloudVision platform.
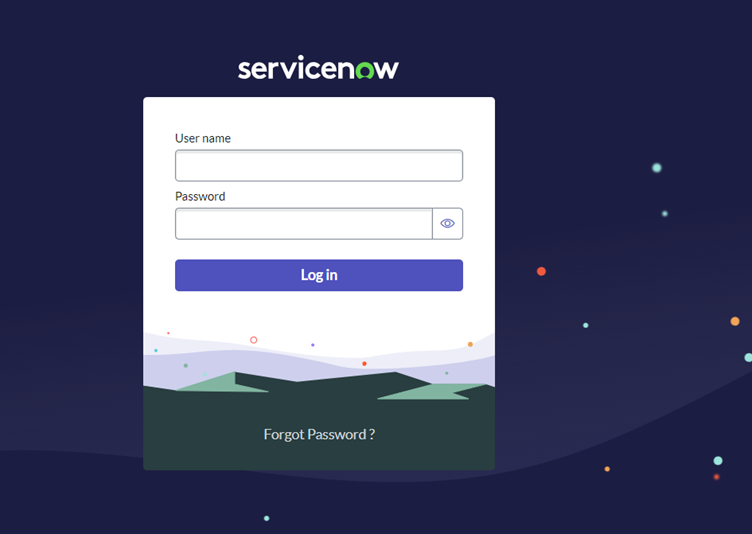
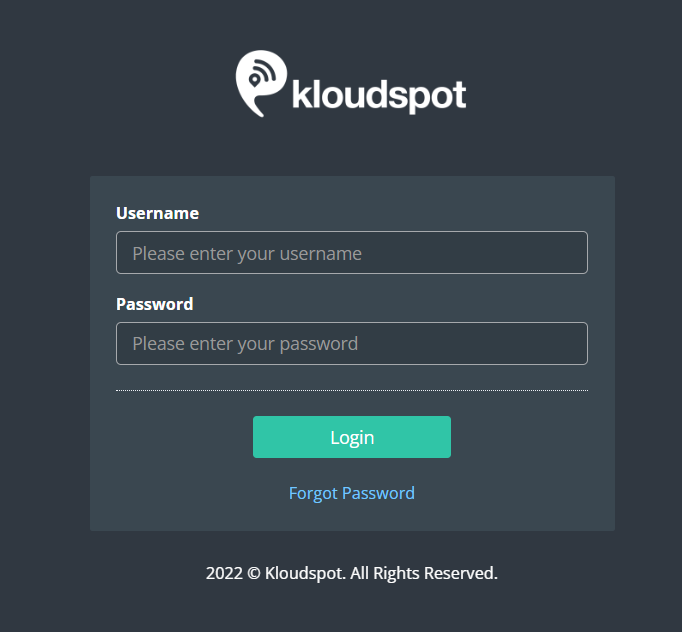
Access the Klouddisplay login page using the provided URL.
Enter your provided login ID and password.
Click the “Login” button to access your Klouddisplay account.
Dashboard Overview
If you’re logging into the Kloud management software for the first time, you won’t see the “Display controllers” menu button initially. This button appears after you’ve added the controller to the KloudManage software. For instructions on how to do this, please consult the “Adding and Managing Display Terminals” section.
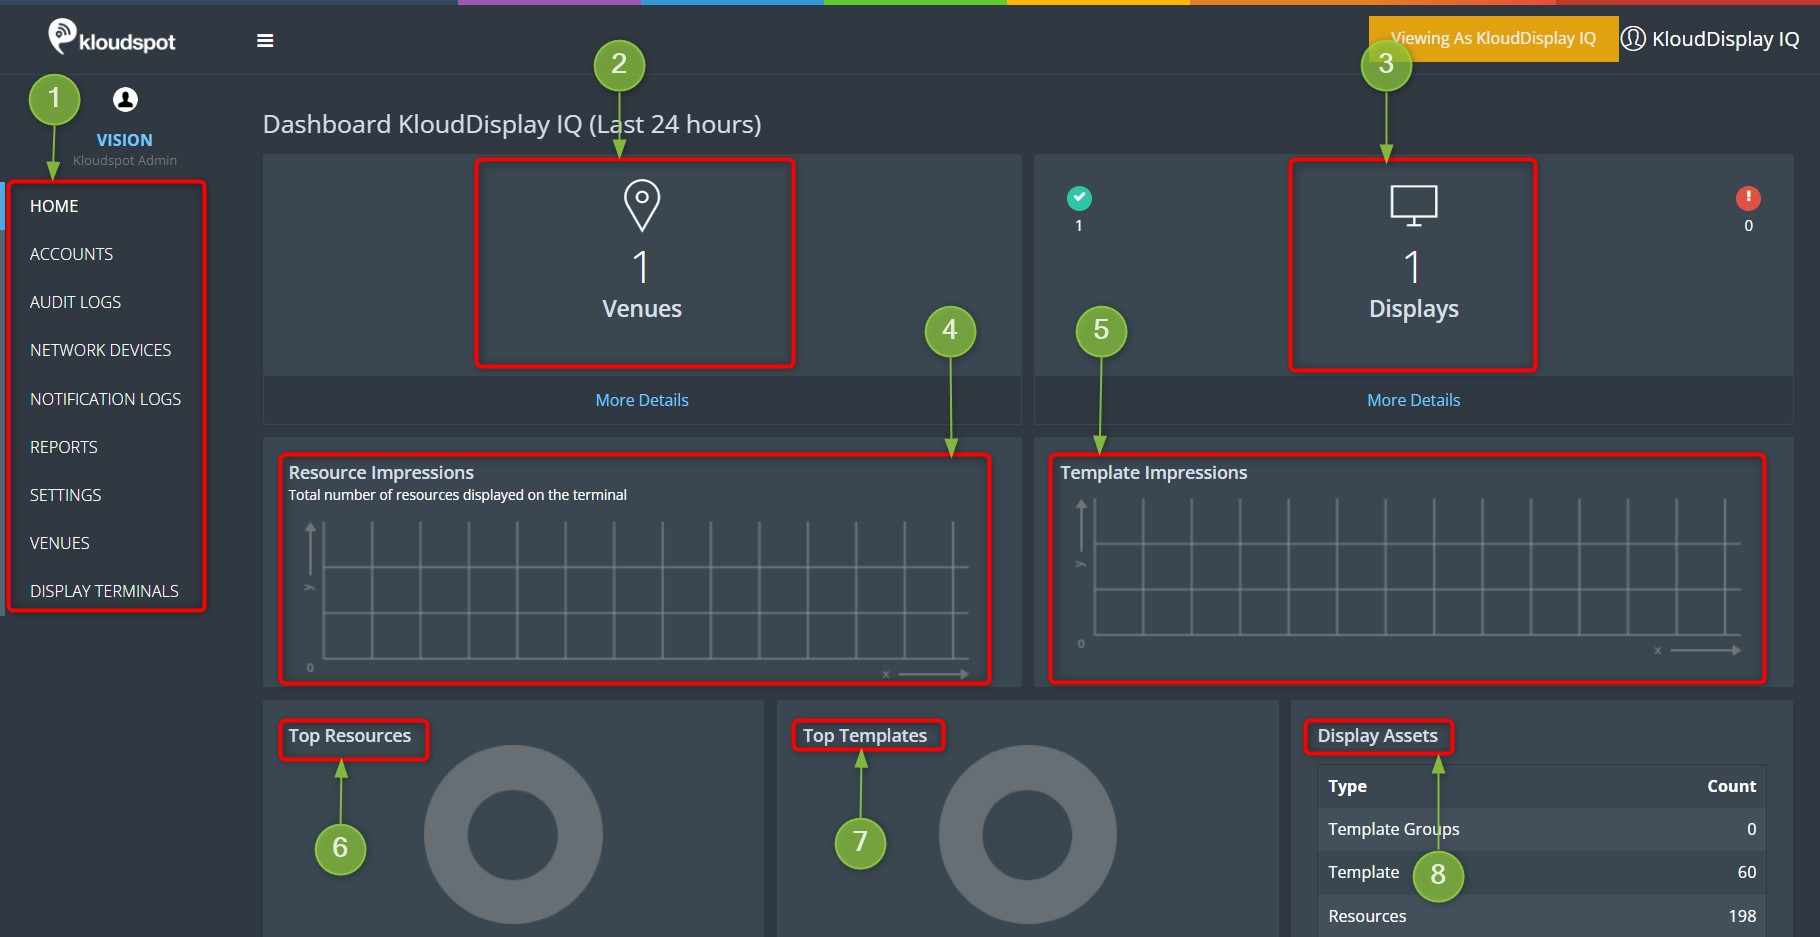
Menu bar: The left side displays the menu bar, where you can access a variety of options for the KloudManage software.
Venues: You can view the list of venues incorporated in the Kloud Manage software here.
Displays: The count of added displays is visible here. To access the Display Terminals window, simply click on the “More details” button.
Resource Impressions: Total number of resources displayed on the termina.
Template Impressions: Total number of templates displayed on the terminal.
Top Resource:
Top Templates:
Display Assets: Indicates the quantity of Template Groups, Templates, and Resources present.
Adding and Managing Display Terminal
Having successfully logged into the KloudManage software, you’re now ready to delve into the realm of adding and managing your display terminals. By seamlessly incorporating display controllers into Kloudmanage software, you’ll have the tools to create impactful presentations and engaging displays.
For that, navigate to NETWORK DEVICES > Add Network Devices.
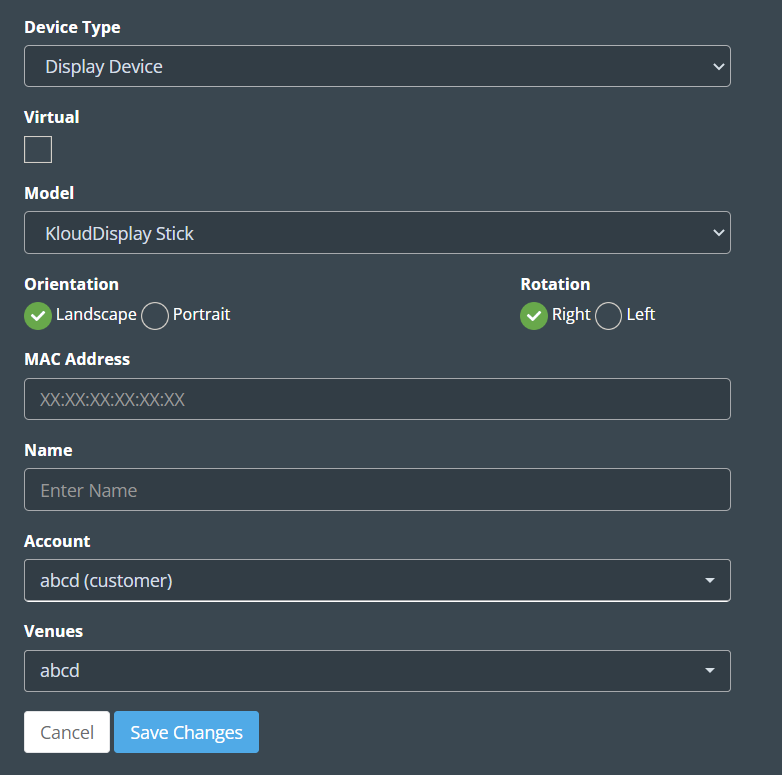
Enter the following in the window that opens and click the Save Changes button.
Device Type: Select Display Controller or Combo device (Display + Vision controller) or virtual display controller from the dropdown list.
Model: Select your controller model from the dropdown list.
Orientation: Select Display Orientation.
Rotation: The rotation parameter in display refers to a feature that allows users to adjust the orientation of their screen or visual content. With this parameter, individuals can easily rotate the display to various angles, such as landscape or portrait mode, depending on their preferences or specific needs.
MAC address: Enter the MAC address of your controller.
Name: Give a name for the controller.
Account: Kloudspot provides this information during account creation and it is advised to keep it as is.
Venues: During the account creation process, Kloudspot provides information about the venue. To add a new venue, you can refer to the Venues section, which provides guidelines and instructions for the process.
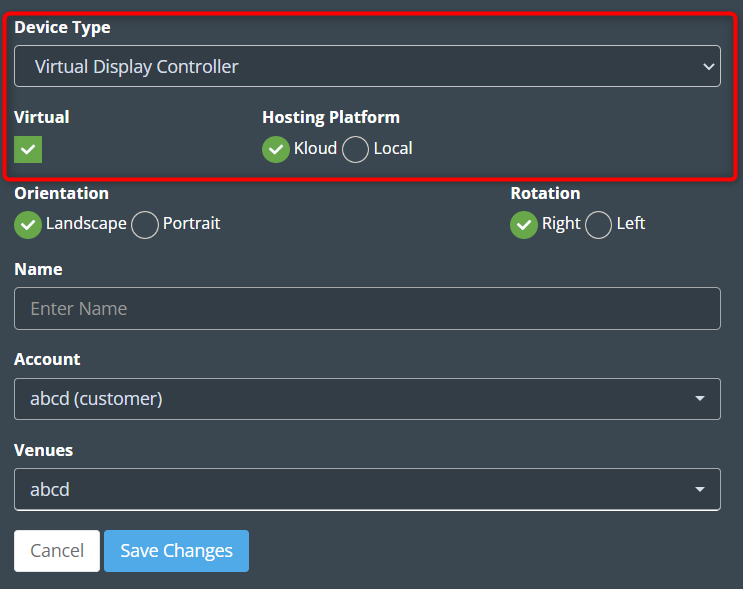
If you are selected Virtual Display Controller. Check the Virtual checkbox and select the hosting platform.
Open Display Terminal
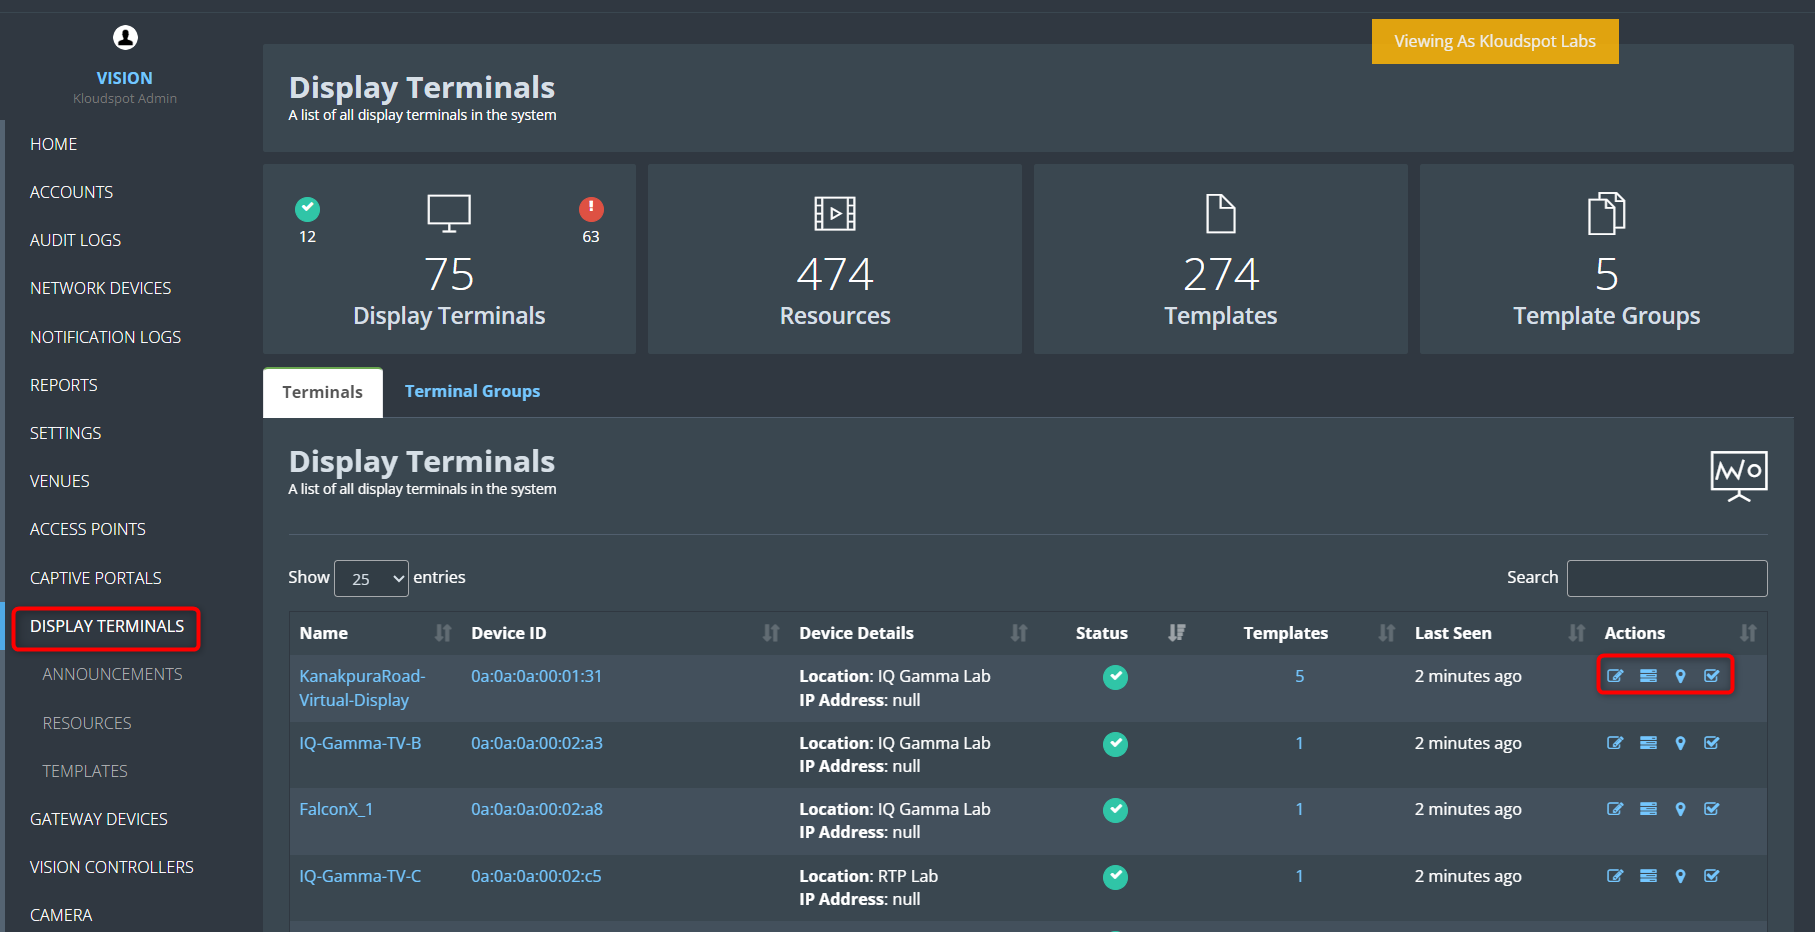
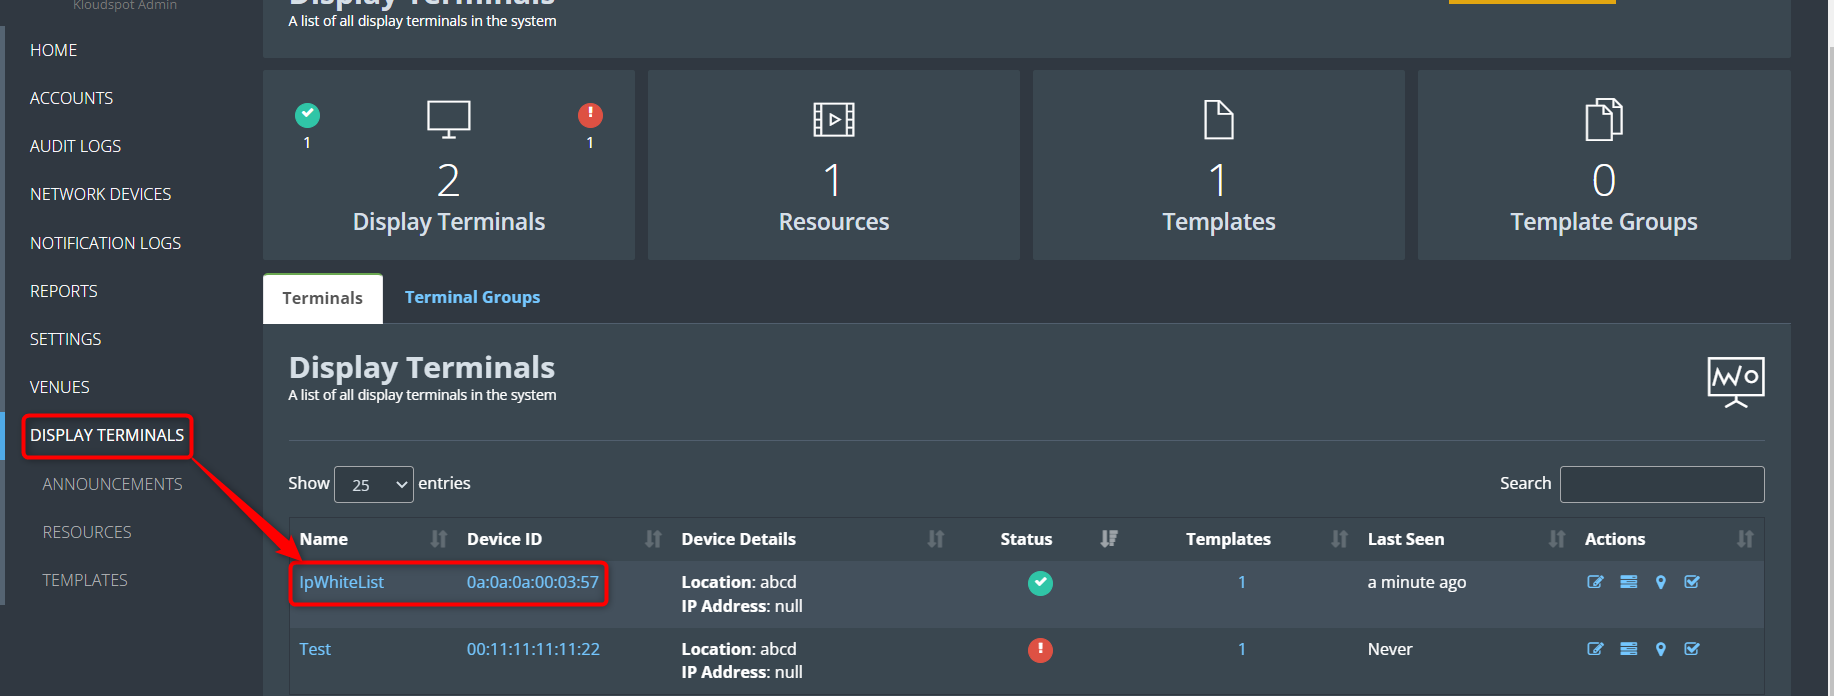
Once the display controller is added, the Display Terminal menu will become accessible. Clicking on this option allows you to view all the display terminals that you have added.
Within this context, you have the option to utilize the buttons found in the actions column. Through these buttons, you can rename the terminal, access the list of added templates, incorporate a location, and apply templates.
If you select one of the terminals, you can see status information and see what is being displayed on the terminal.
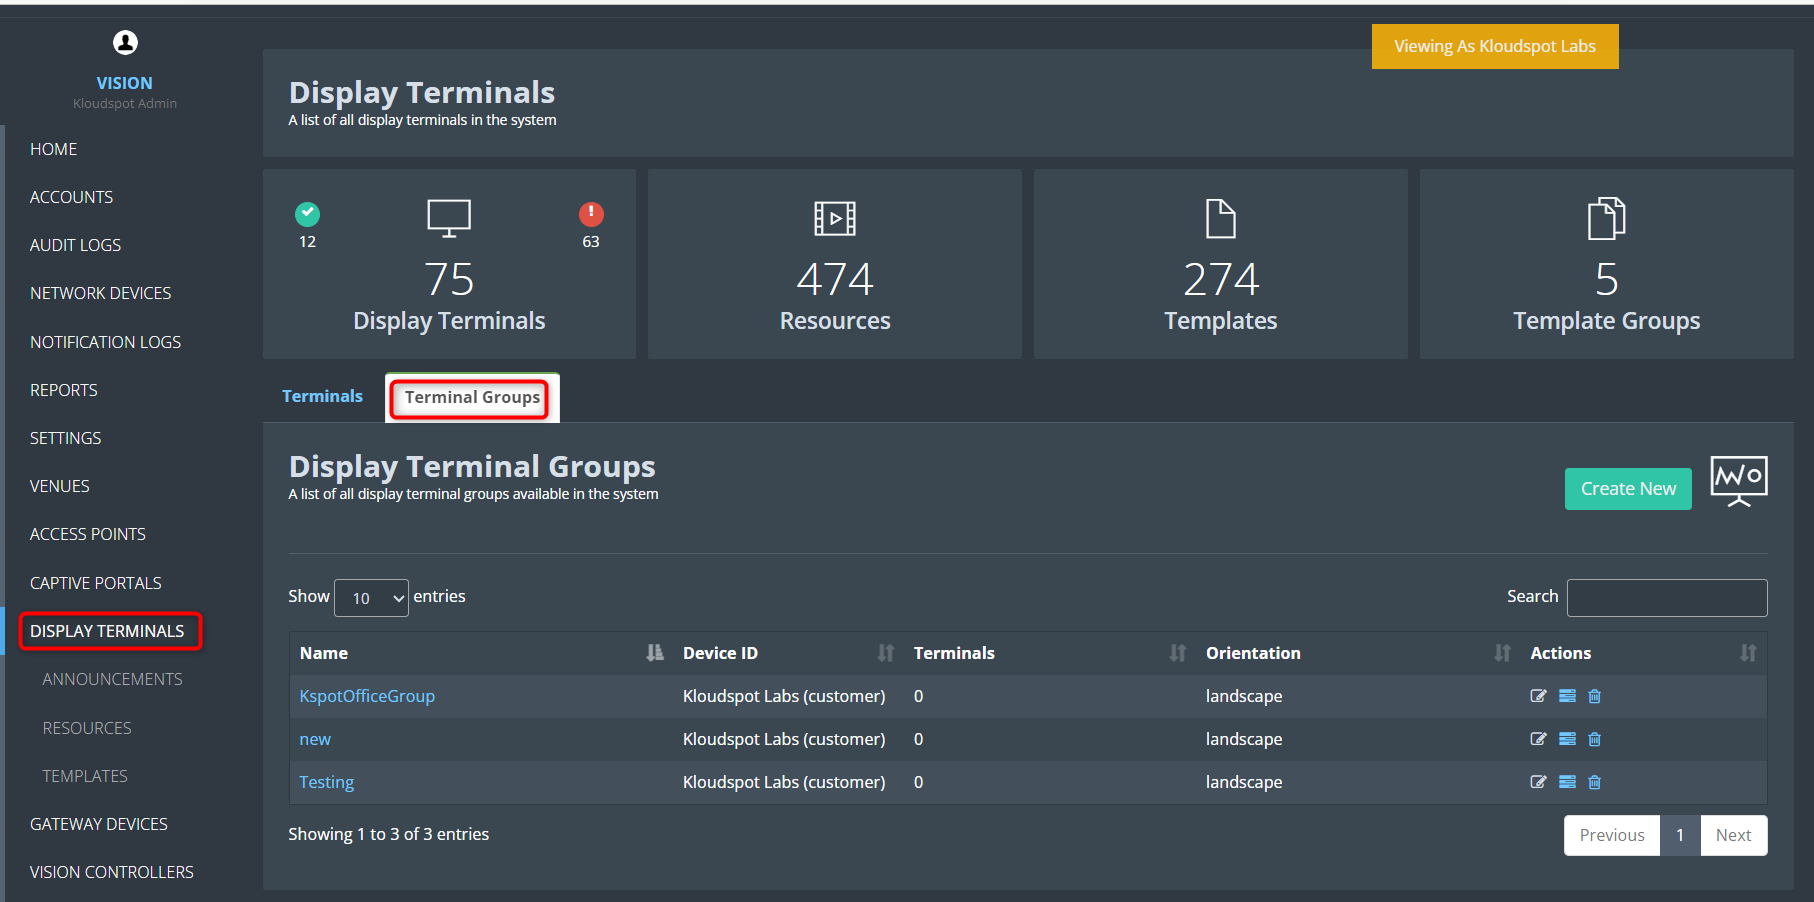
If you click on the terminal group tab, you can view terminal groups and create new ones. Multiple display terminals can be included in a terminal group. This enables the addition of a template to multiple display terminals at the same time.
To populate the display terminal, you’ll need both a resource and a template. For guidance on adding a resource, please consult the Resources section. If you’ve already created a resource, head to the template section to incorporate it into your template. .
Integrate 3rd Party Applications
This section contains comprehensive guidance for integrating third-party applications in order to improve the functionality and performance of KloudDisplay. The integration process can be modified to match your specific requirements, resulting in a personalized and optimized experience.
This document provides a step-by-step guide for integrating TikTok into the KloudManage application. Using this you can display your TikTok videos on KloudDisplay.
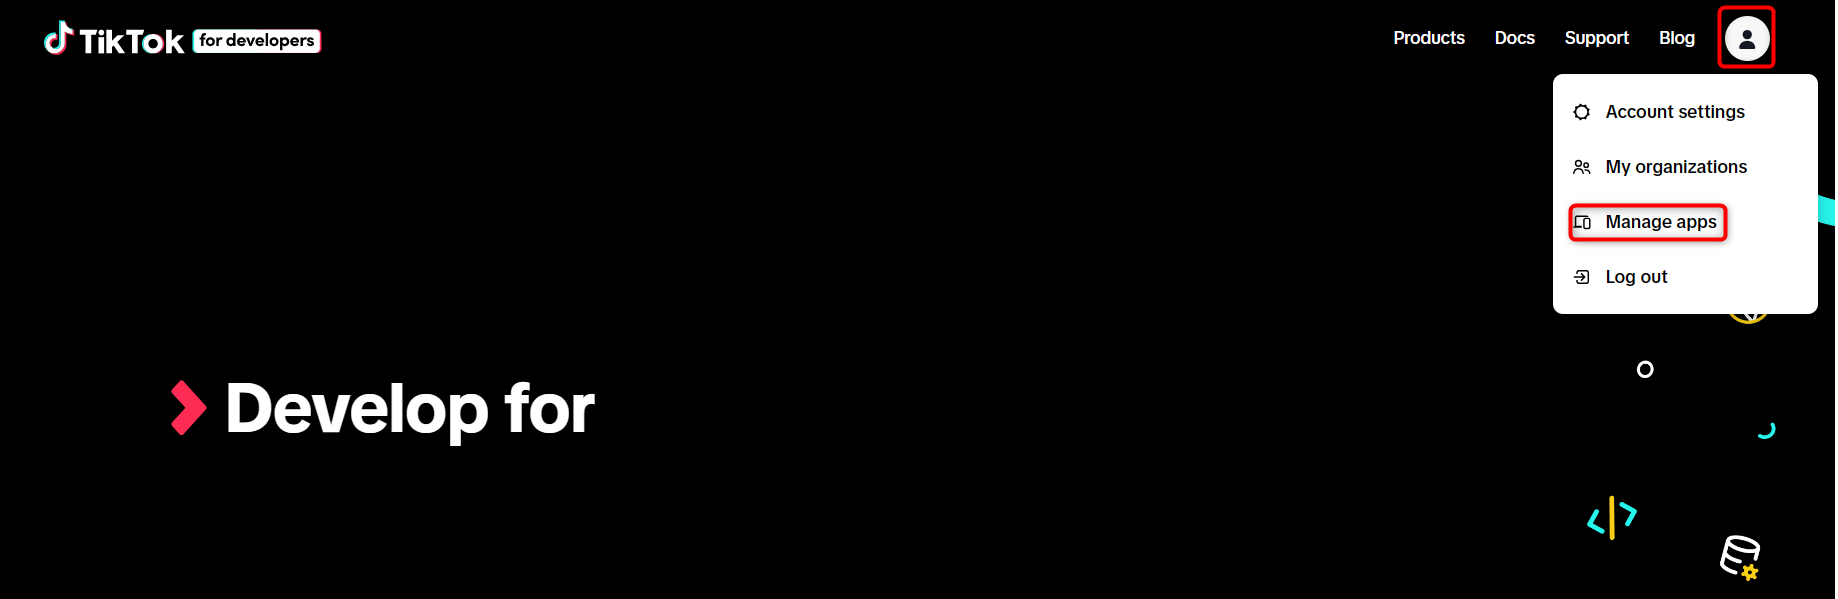
First, Log in to your TikTok developer account.
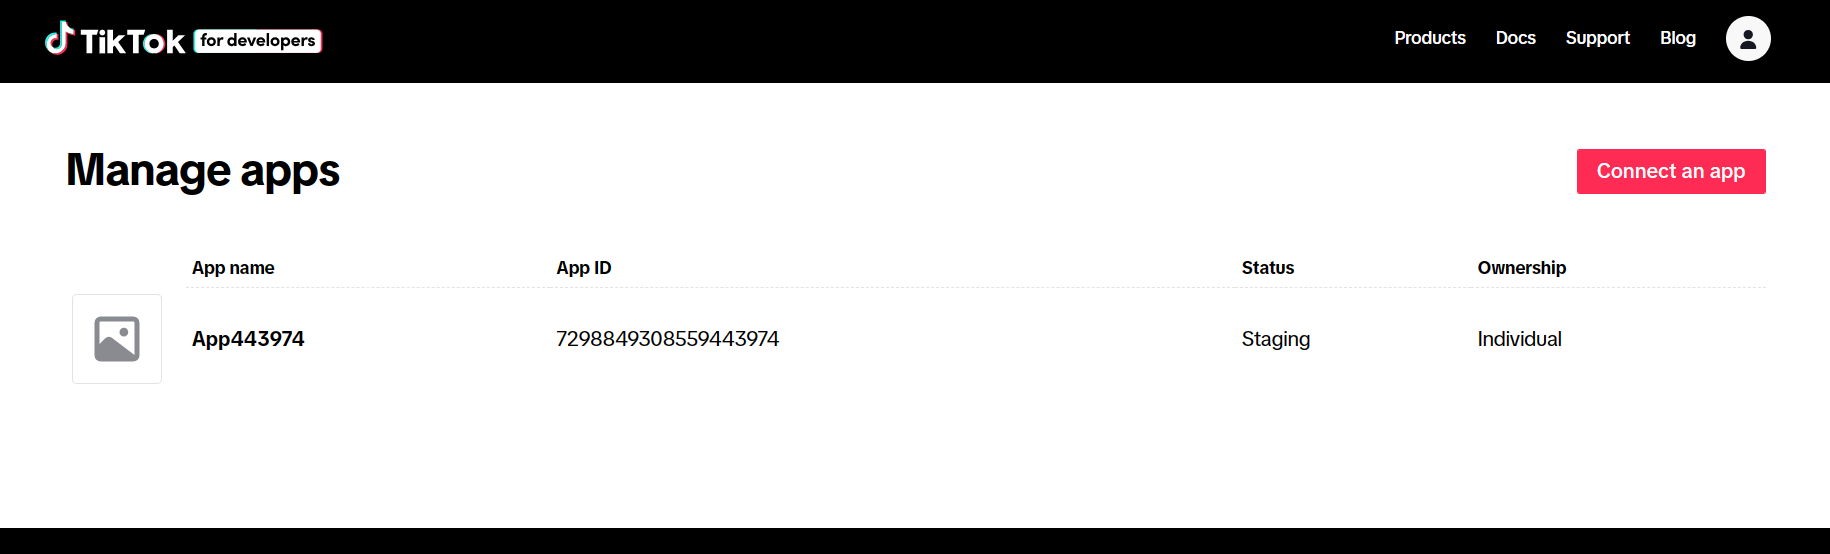
Then, click on the “Manage apps” menu in the profile menu.
In the manage apps window that opens, click on the “Connect an app” button.
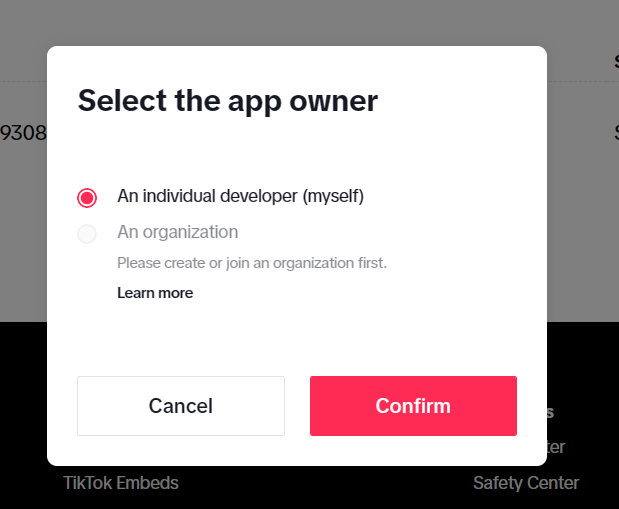
In the popup window that opens, select the “An Individual developer” option, and click Confirm.
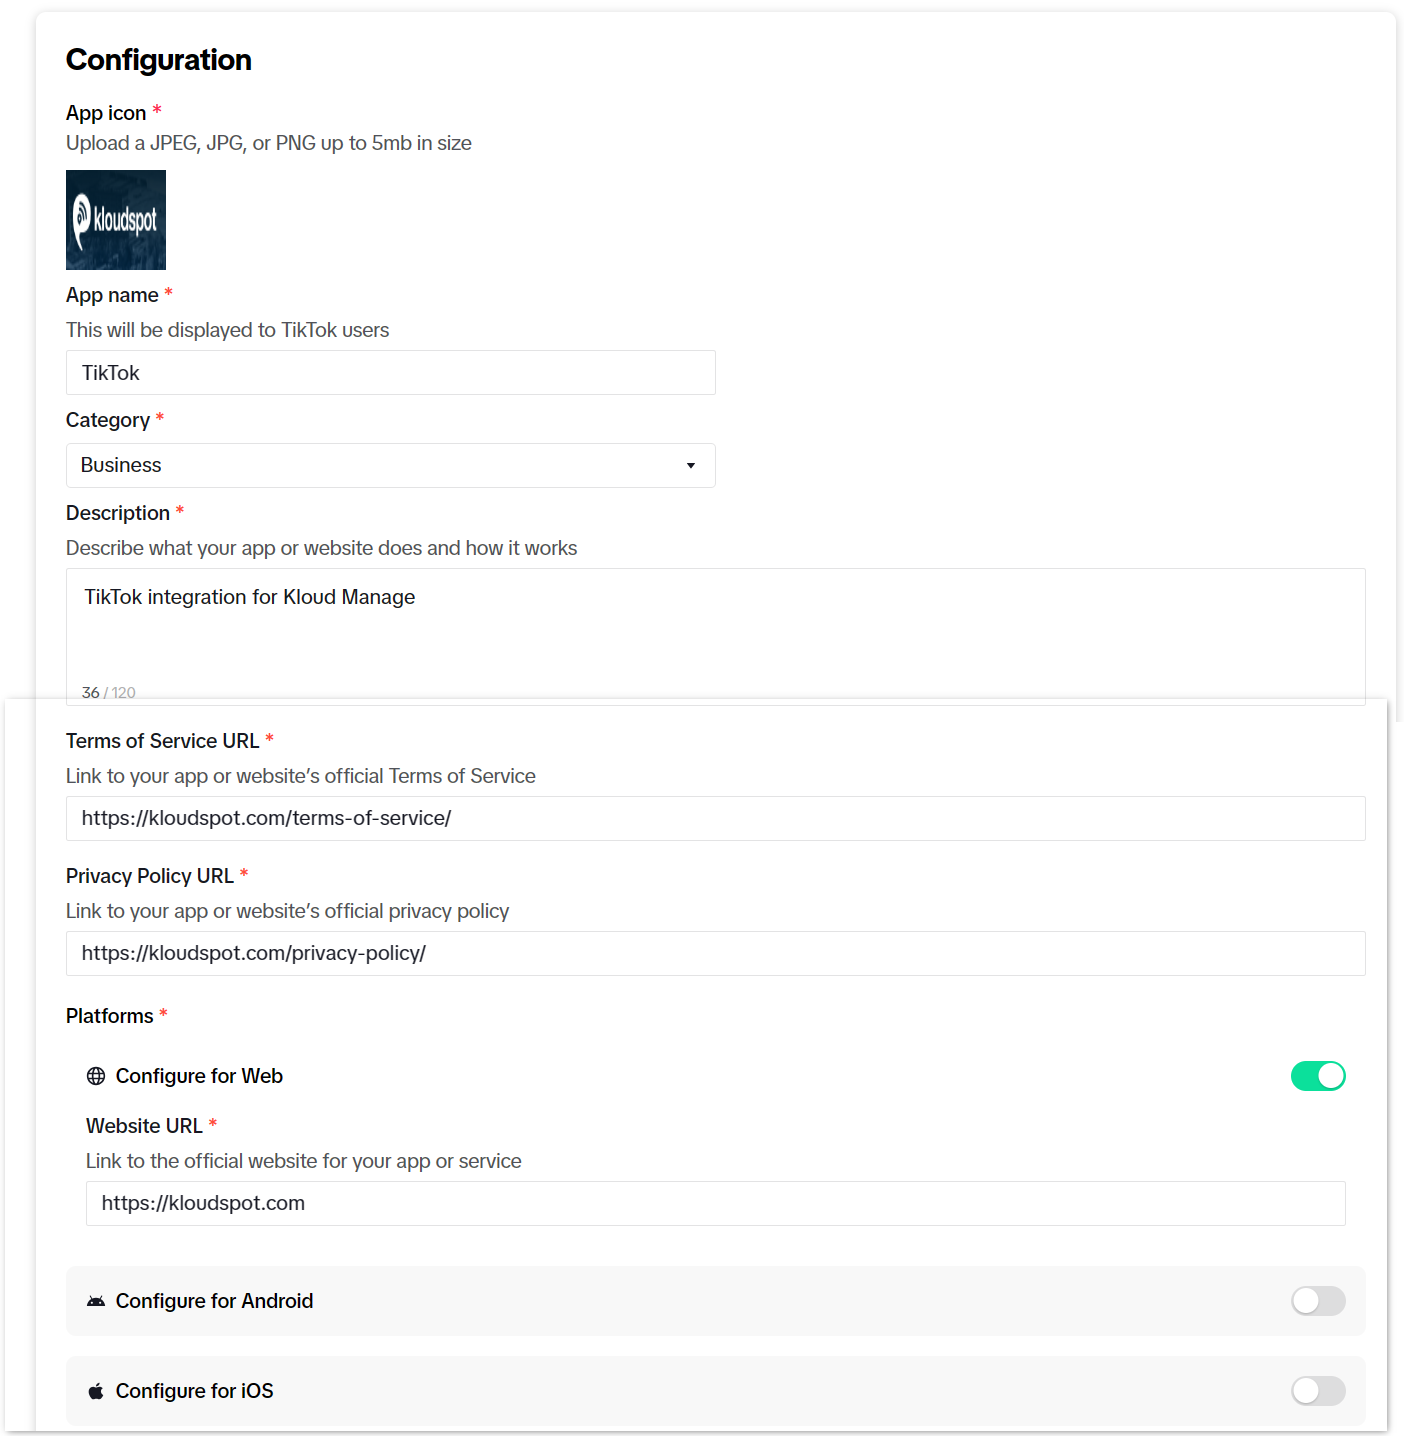
In the “Manage App” window that opens, scroll down and enter the following information in the Configuration section:
App icon: Add your company logo
App name: Enter App Name. It shows TikTok users.
Category: Select the category of your app from the dropdown list.
Description: Describe your App or website.
Terms of Service URL: Add the URL of your website’s official terms of service page.
Privacy Policy URL: Add the URL of your website’s Privacy Policy page.
Enable the “Configure for Web” toggle button.
Enter the URL of your website.
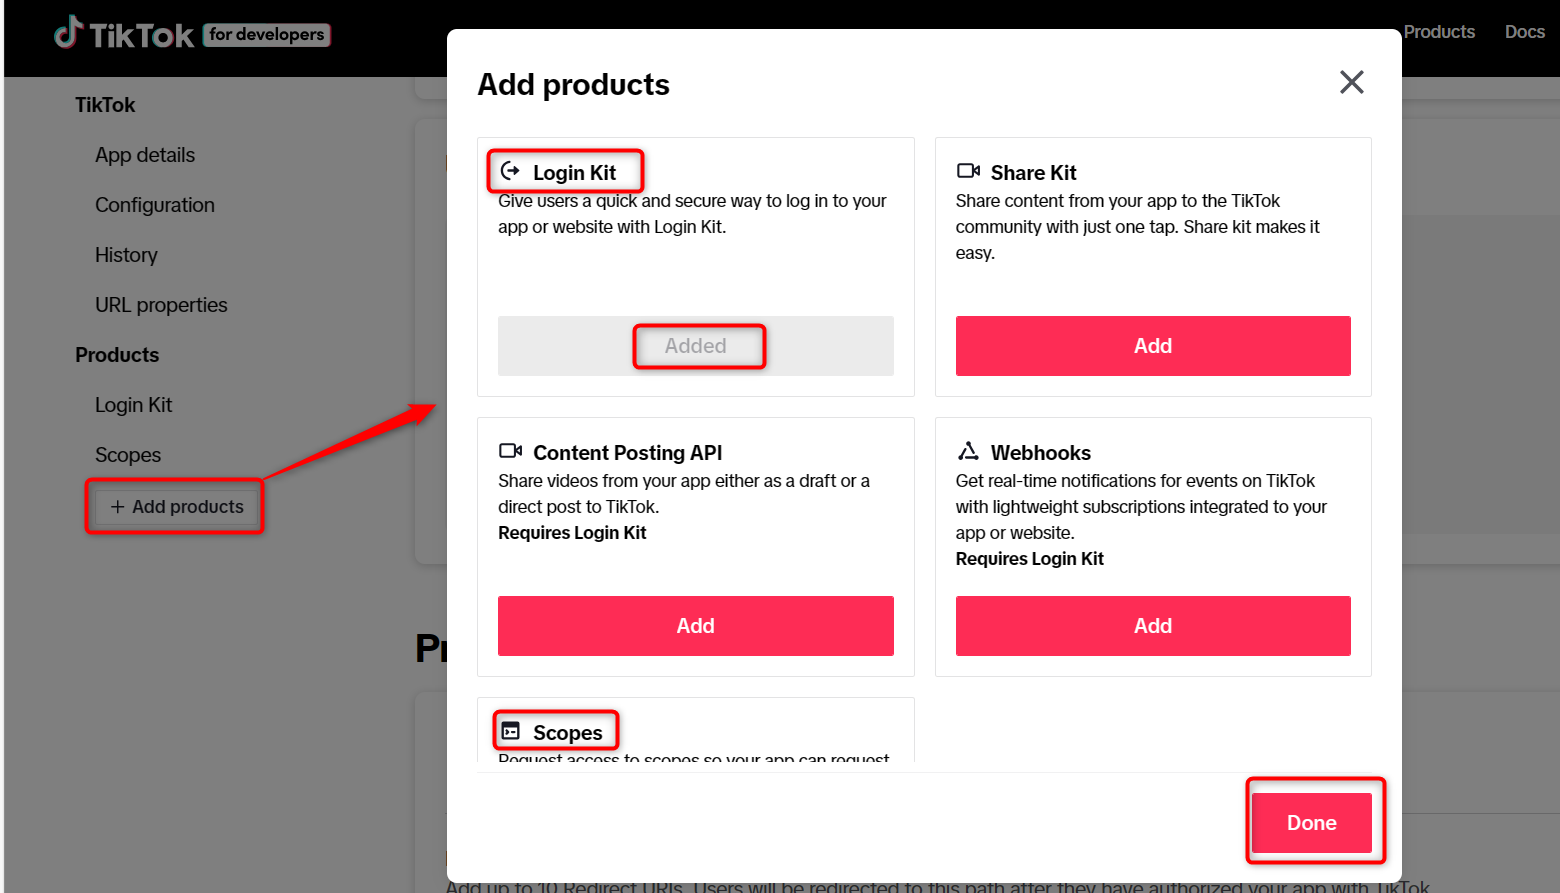
Click on “Add product” in the menu bar.
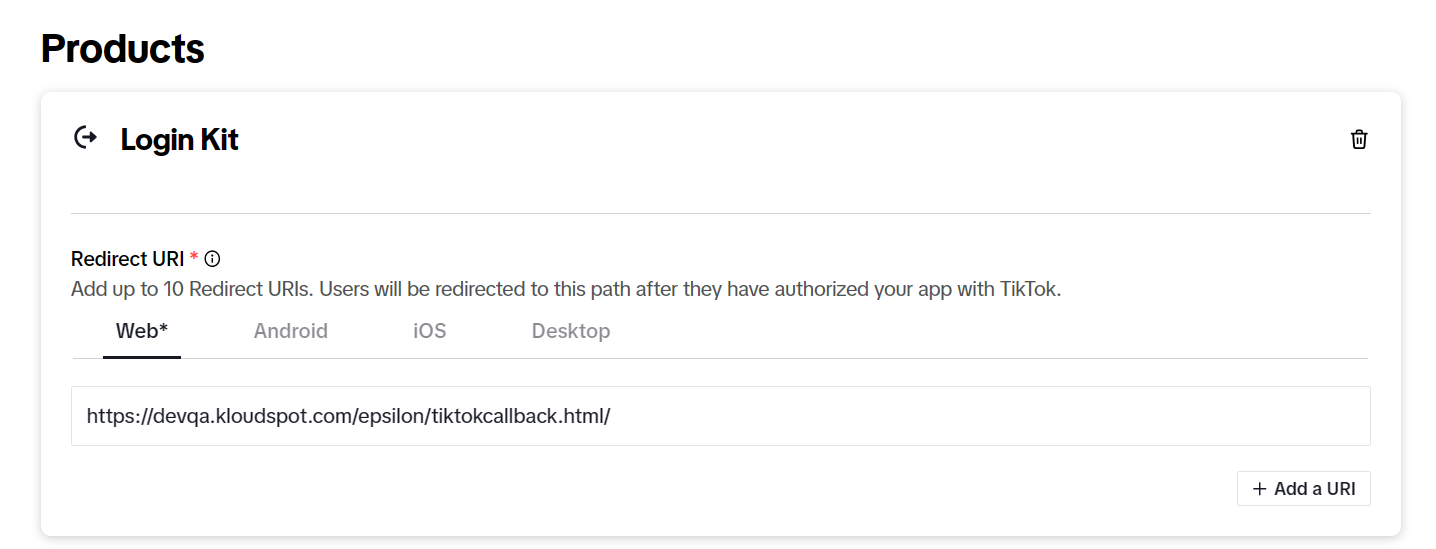
Add products called “Login kit and Scopes” and click “Done”.
Add your KloudManage link on the web tab of the Login Kit.
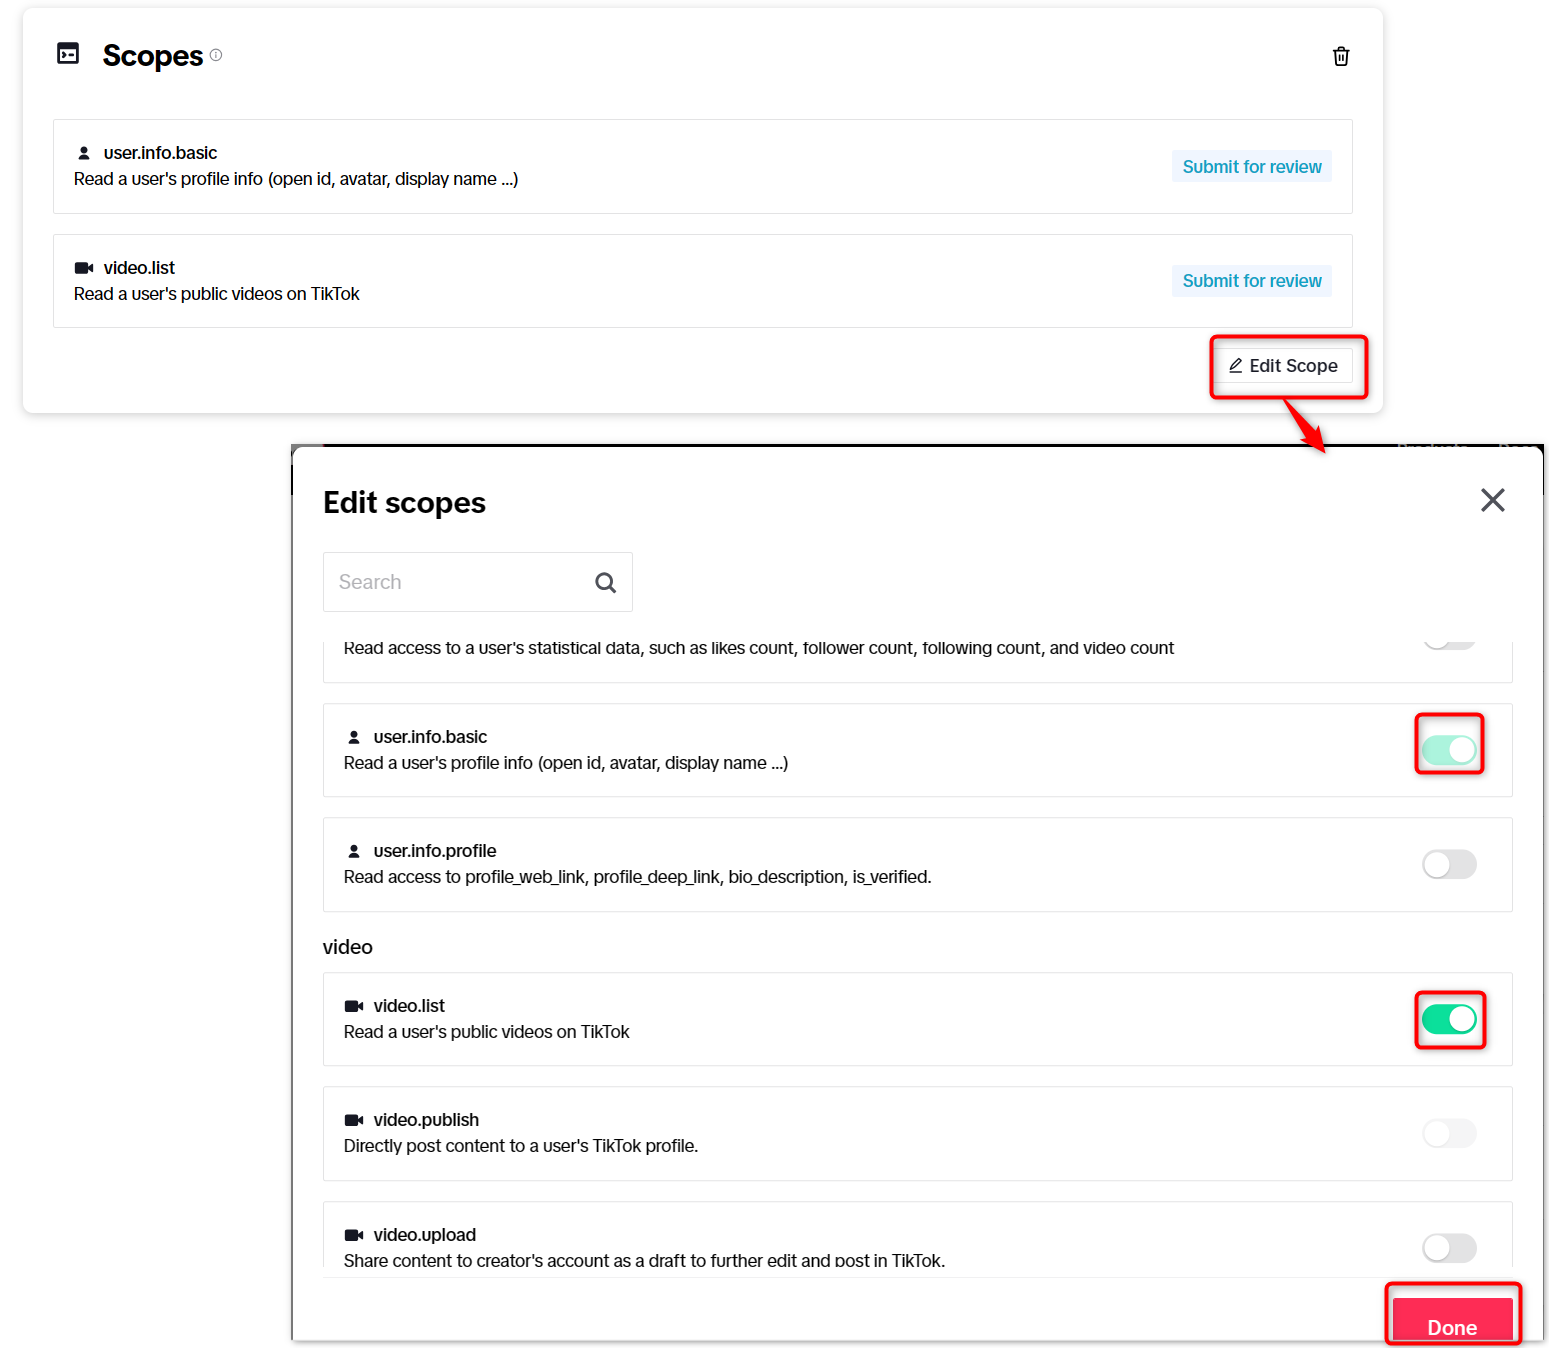
In the scope section, click the Edit Scope button and add the scopes “user.info.basic” and “user.info.profile”.
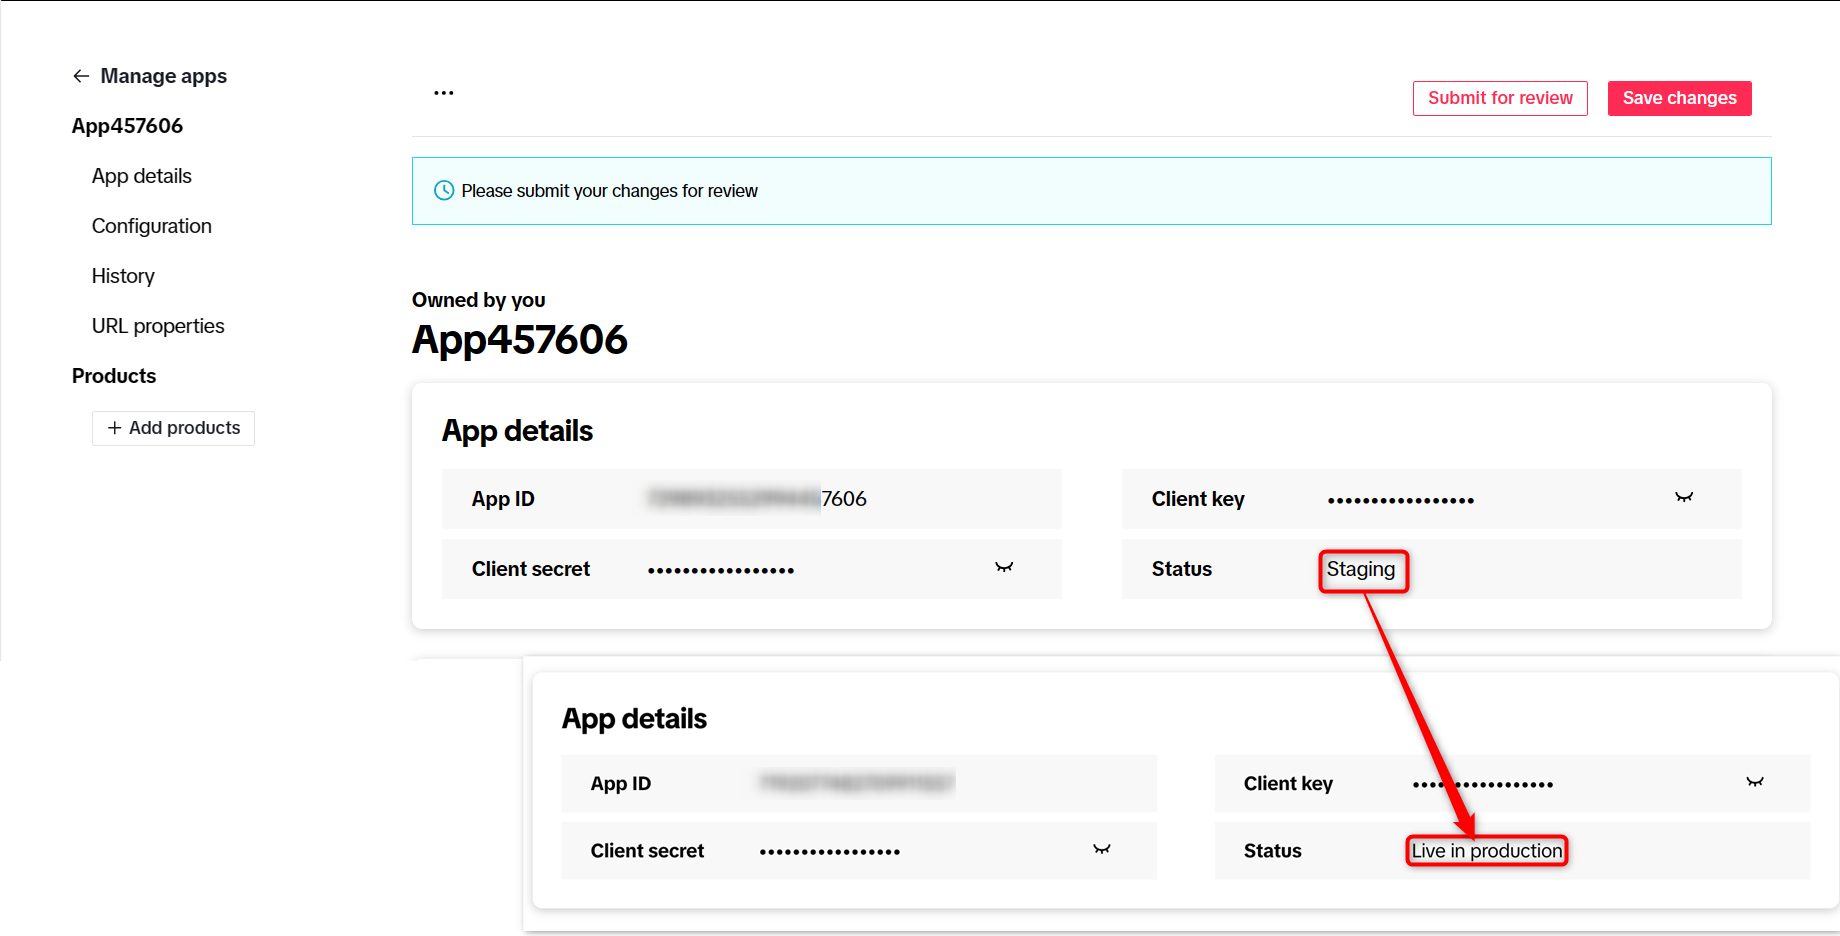
Then scroll up and click on the Save Changes button to save the configuration. Then click on Submit for review button and submit for review.
Once the configuration is approved, the Status will change from “Staging” to “Live in Production”.
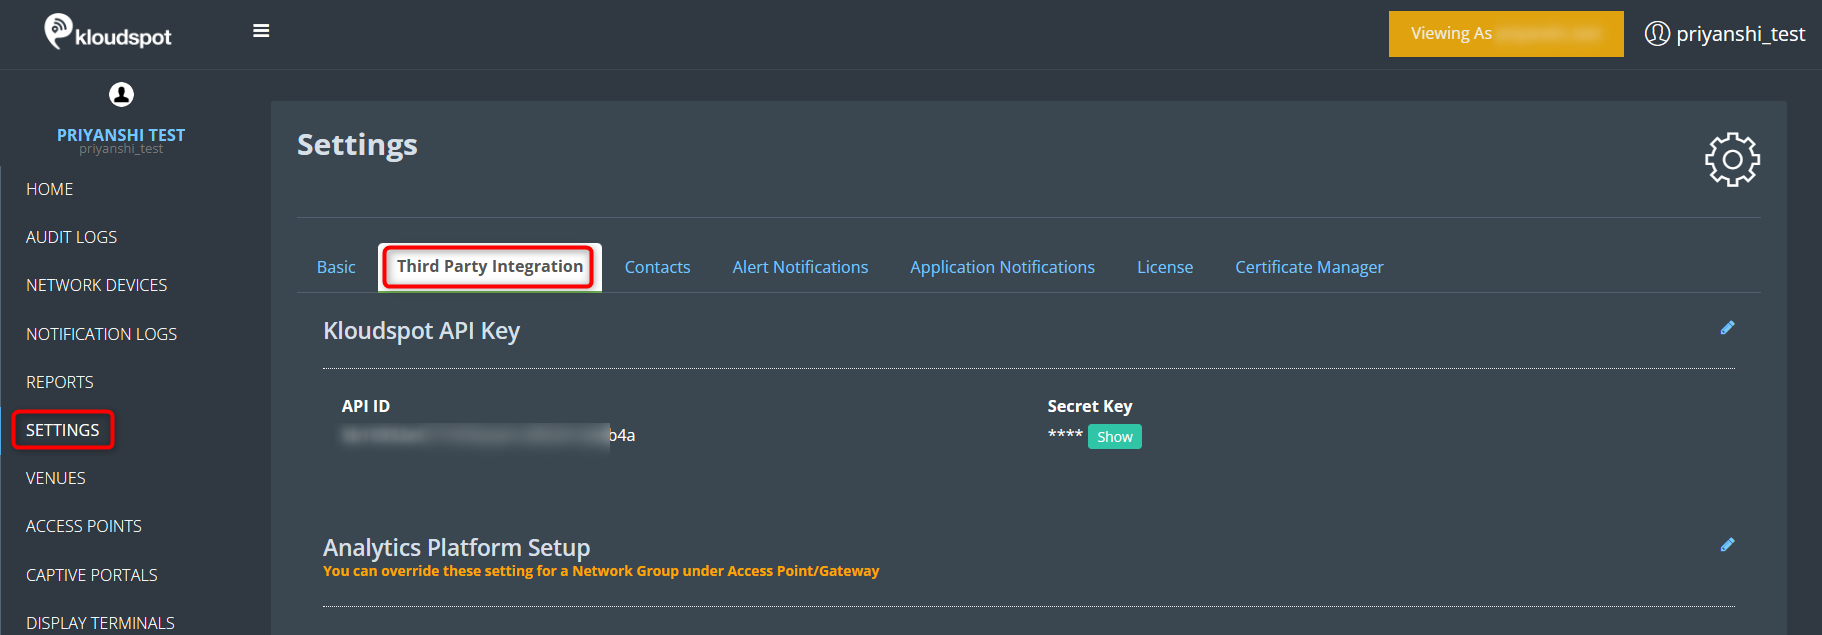
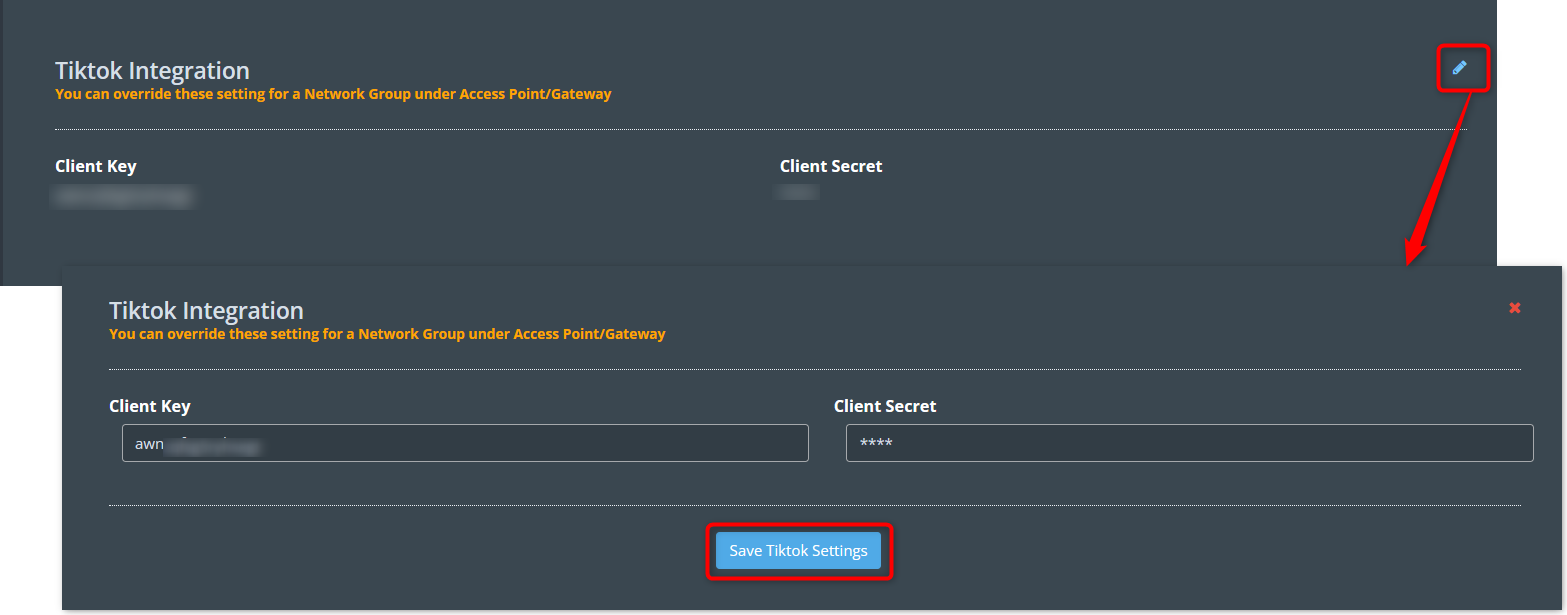
After the above steps are completed, log in to the KloudManage application. Then, navigate to Settings > Third Party Integration.
Scroll down and find the TikTok integration section. Here, click on the edit button. Enter the Client Key and Client secret obtained from the TikTok developer account and click on the Save TikTok settings button.
Your TikTok account has been successfully integrated into KloudManage. Now you can add TikTok in the resource. Refer Resource section to know how to create a Resource.
Resources
Next, you need to add resources to show on your screen. This resource you’re adding fits into the template you’re using. It’s important to know that you can add more than one resource to the template. In this part, we’ll look at different resources you can add, what they do, and how to add them to your setup smoothly.
Resources are the basic building blocks used to create templates. Resources are used to create the content that will be displayed on the display. It can be used to create a wide variety of content. To do so, follow the steps below.
Add Resource
Here, I am generating an image-type resource. You can create various types of resources based on your specific requirements.
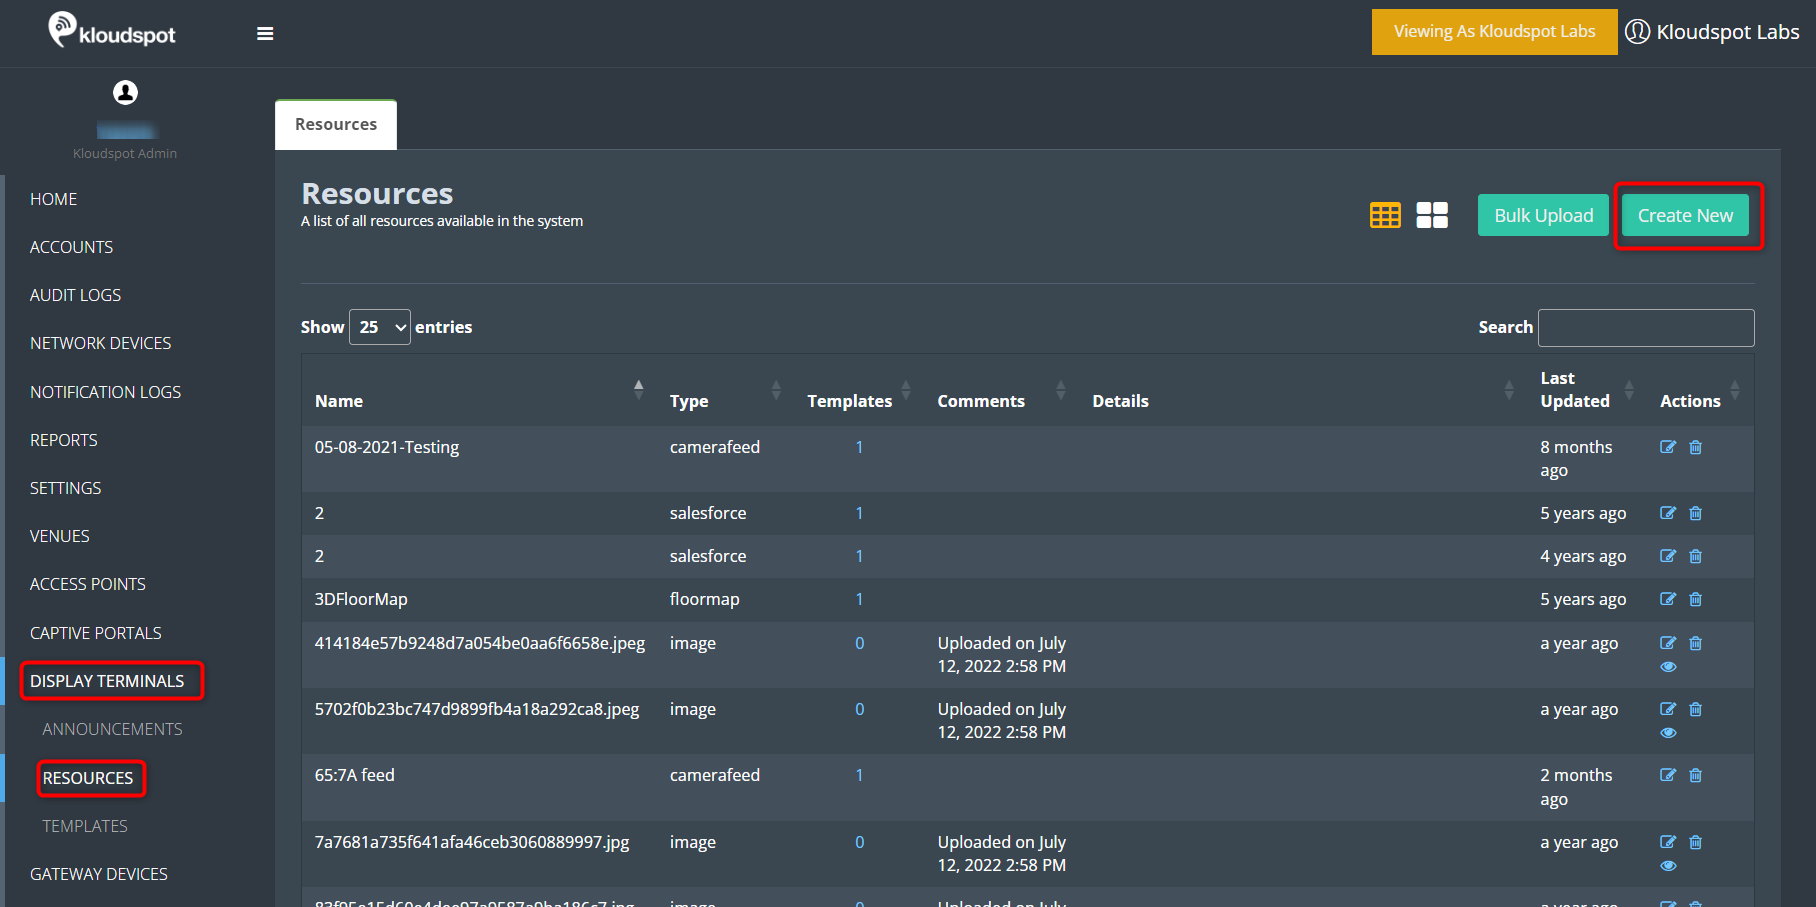
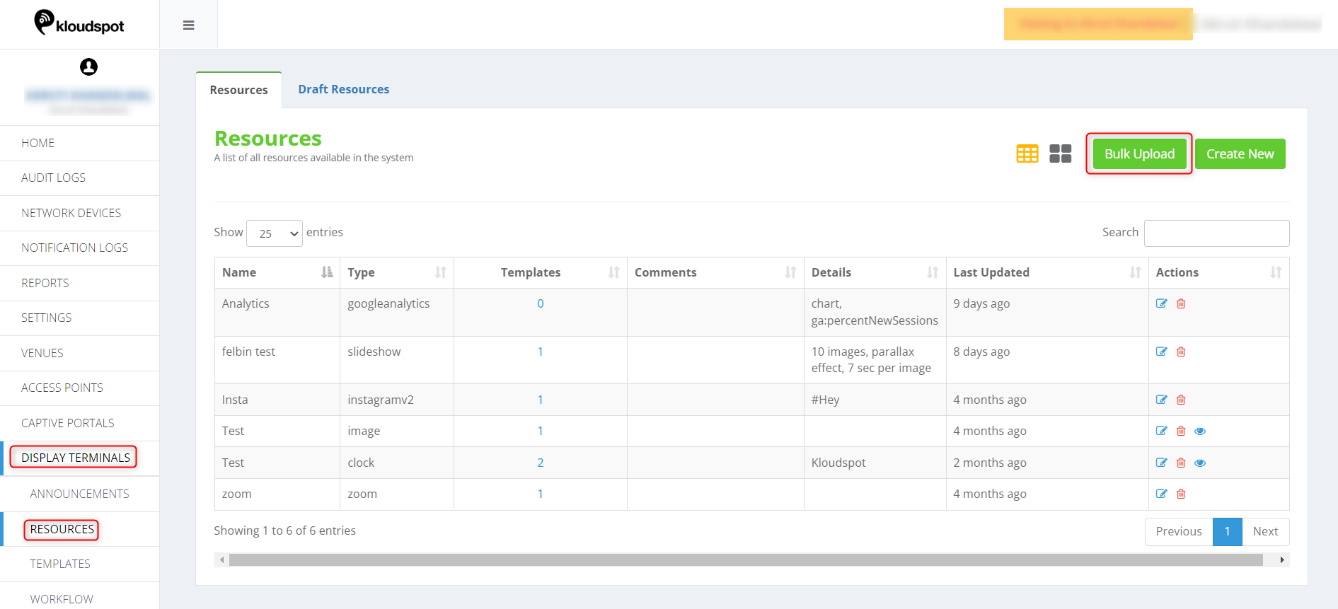
Navigate to DISPLAY TERMINAL > RESOURCES. Then click on Create New button.
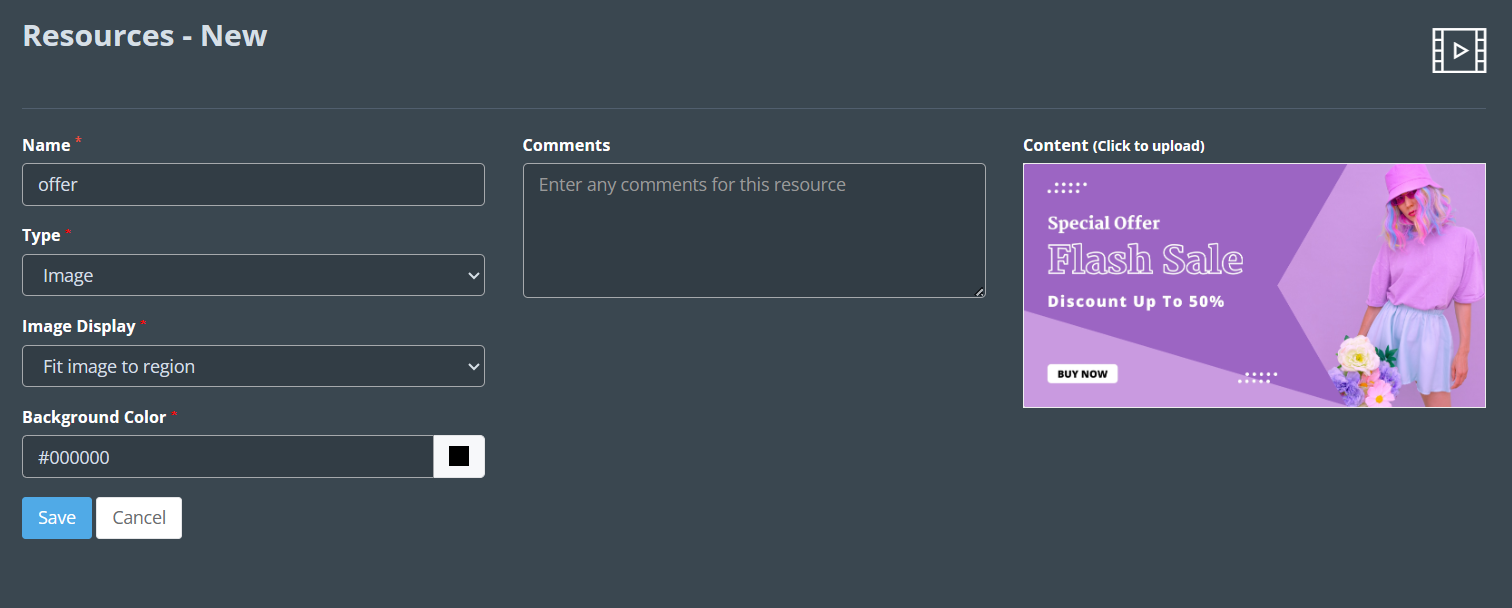
When you click on it, a new resource creation window will appear. Fill out all the required fields.
The primary fields are as follows
Name: Name the resource for future use.
Type: Select the desired type from the dropdown list depending on the nature of the resource you intend to create. See the Resource Types section for more information on what each type is used for.
Background color: Select the background color you want to add.
Comments: If you have any additional information about the resource, please include it in the comments section.
Content: Here I have selected the Image type so you can see the content column which will vary depending on the type selected.
Then finally click on the Save button. Now you have to add the created resource to the template. Refer to Create Template section to know how to do that.
Resource Types
Camera count
Utilizing the advanced capabilities of Kloudvision, this Resource enables real-time tracking and display of entry and exit counts. this system accurately captures and presents the number of individuals entering and exiting a specified area, ensuring up-to-date information on foot traffic.
Camera feed
Harnessing the innovative features of Kloudvision, this Resource offers the ability to showcase live camera feeds in real-time. With this functionality, users can observe a continuous stream of footage captured by connected cameras, providing enhanced security and monitoring capabilities.
Clock
This Resource displays the time in a specific timezone. This can be useful for employees who work in multiple timezones, or for visitors who are not familiar with the local time.
Desk bookings
Designed to streamline workspace management, this Resource presents detailed information about users who are currently logged into the KloudHybrid system. By showcasing relevant user details, such as names or booking statuses, this feature facilitates efficient desk allocation and utilization.
Floor map
This dynamic signage display offers a real-time visualization of floor maps, utilizing data extracted from Kloudspot Analytics. By incorporating live data, users can gain valuable insights into occupancy patterns, movement flows, or resource allocation within the designated area.
Google Analytics
Empowering users with valuable insights, this customizable Resource provides a visual representation of data from Google Analytics. By incorporating a user-provided JSON key file from a Service Account, this feature allows for the customization and display of various metrics, such as website traffic, user engagement, or conversion rates.
Image
With the image Resource, you can easily upload and display PNG or JPG images on the display. This capability allows you to showcase visual content such as photographs, illustrations, or graphics, enhancing the overall visual appeal and engagement of the display.
Instagram Hashtag Feed
The Instagram Hashtag Feed Resource enables you to present a dynamic and constantly updating feed of public posts associated with a specific hashtag on Instagram. This functionality brings the power of social media into your signage display, allowing you to leverage user-generated content and create an interactive experience for viewers.
Instagram User Feed
By utilizing Instagram credentials, the Instagram User Feed Resource allows you to showcase an updating list of posts from a specific user’s account. This feature is ideal for businesses, influencers, or brands that want to highlight their own content or curate a specific user’s posts for promotional or informational purposes.
Kibana Panel
The Kibana Panel Resource enables the integration of a Kibana dashboard panel into your signage display. Kibana is a powerful data visualization tool that allows you to create and display visually appealing charts, graphs, and metrics based on data from various sources. With this feature, you can provide real-time insights and analytics in a visually appealing and easily understandable format.
Kloudspot Widget
The Kloudspot Widget Resource allows you to display a shared widget from Kloudspot Analytics on your signage display. Kloudspot Analytics provides valuable data and insights regarding visitor behavior, foot traffic patterns, and occupancy metrics. By showcasing a Kloudspot Widget, you can offer viewers a glimpse into important analytics and empower them with valuable information for decision-making and optimization purposes.
RSS Feed
The RSS Feed feature allows you to display an RSS feed on your signage display. RSS (Really Simple Syndication) feeds provide a convenient way to aggregate and showcase updates from various sources such as news websites, blogs, or other content platforms. By integrating an RSS feed, you can keep viewers informed and engaged with the latest news, articles, or updates in a visually appealing format.
Salesforce Dashboard
The Salesforce Dashboard Resource enables you to showcase a Salesforce Dashboard directly on your signage display. This functionality requires Salesforce credentials and a security token for authentication. By incorporating a Salesforce Dashboard, you can present key sales, marketing, or customer service metrics in a visually engaging and easily digestible manner. This feature is especially useful for businesses that utilize Salesforce as their CRM (Customer Relationship Management) platform.
Follow the steps given below to know how to add Salesforce Dashboard.
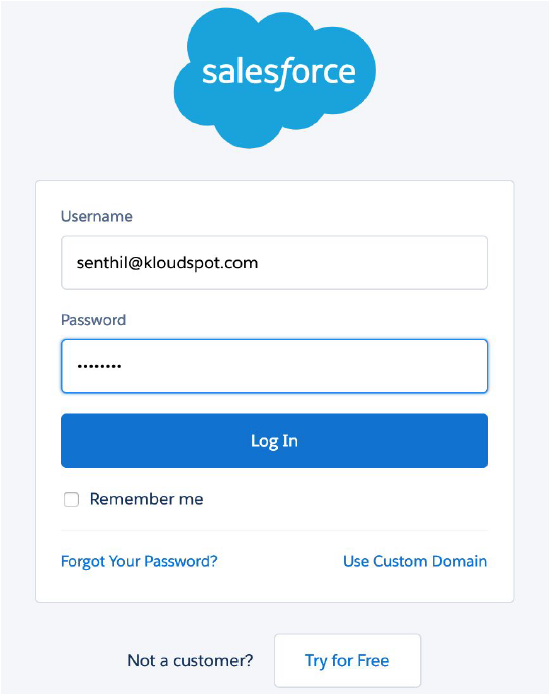
Login to Salesforce.com
Open your web browser and go to the Salesforce login page.
Enter your Salesforce username and password, then click “Login”.
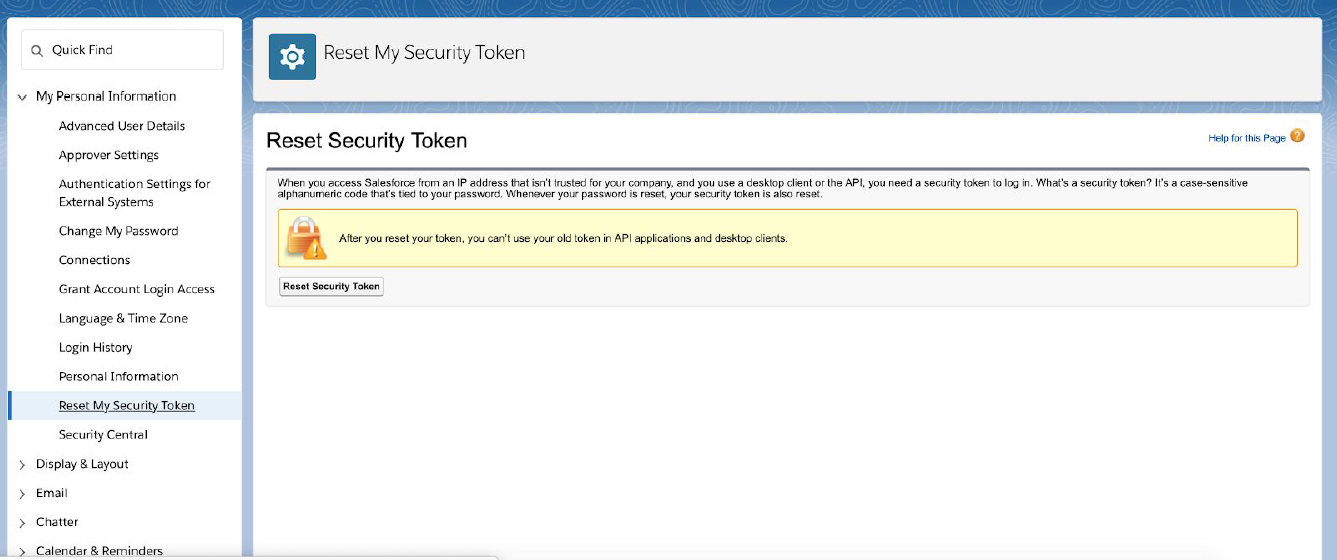
Reset your security token
In Salesforce, Navigate to My personal information > Reset My Security Token.
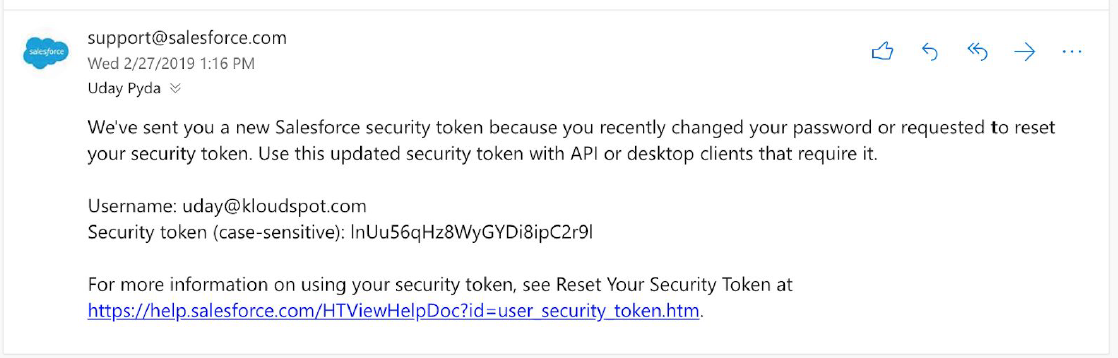
On the Security Reset Token page. Click the “Reset Security Token” button. Salesforce will send an email with your new security token.
Check your email for your security token
Open your email inbox and look for an email from Salesforce.
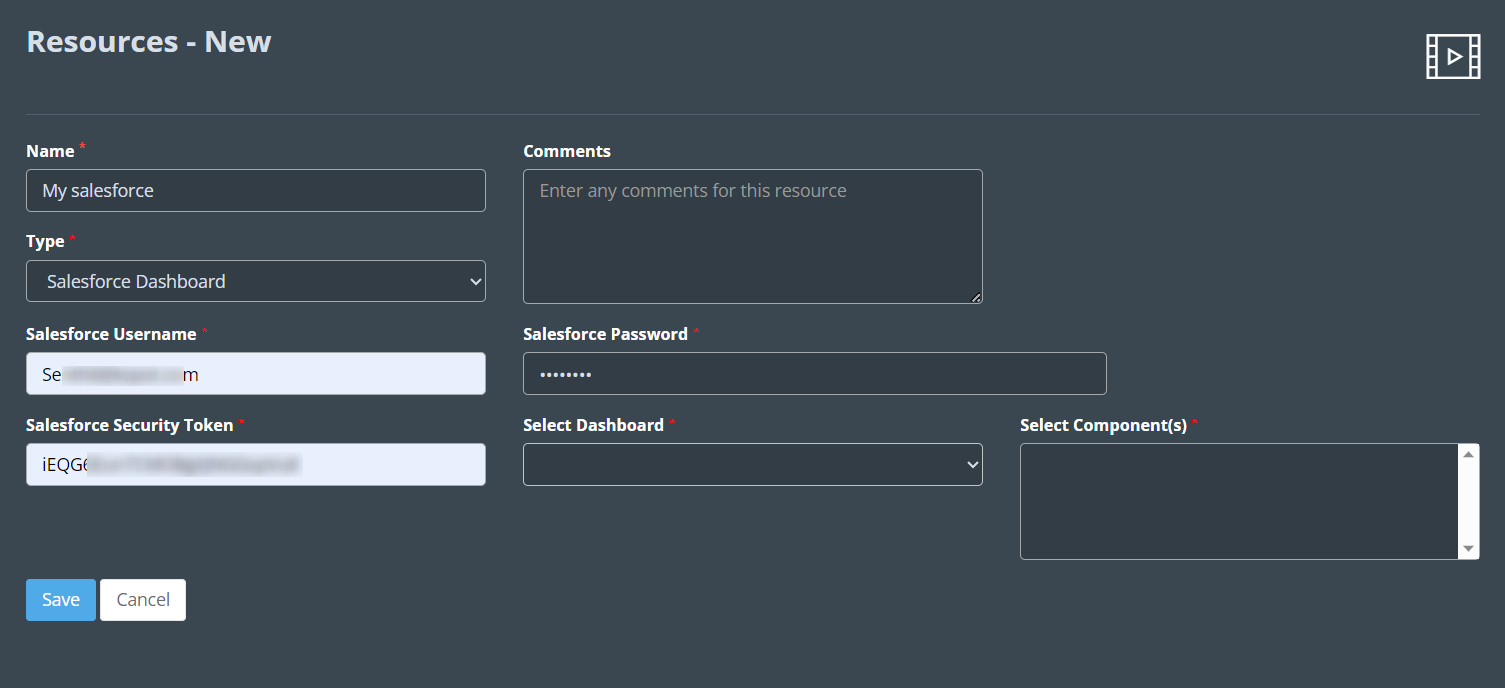
In KloudDisplay, navigate to the “Resources” > “Create New”.
Select the type “Salesforce”.
Enter your login credentials and security token.
KloudDisplay will display a list of available dashboards. Choose the one you want to use.
After selecting a dashboard, you’ll see a list of components associated with it. Choose one or more components you want to include.
Create a Template on KloudDisplay
Create a Template on KloudDisplay and assign the resource.
Refer Templates section to learn how to create a template.
ServiceNow
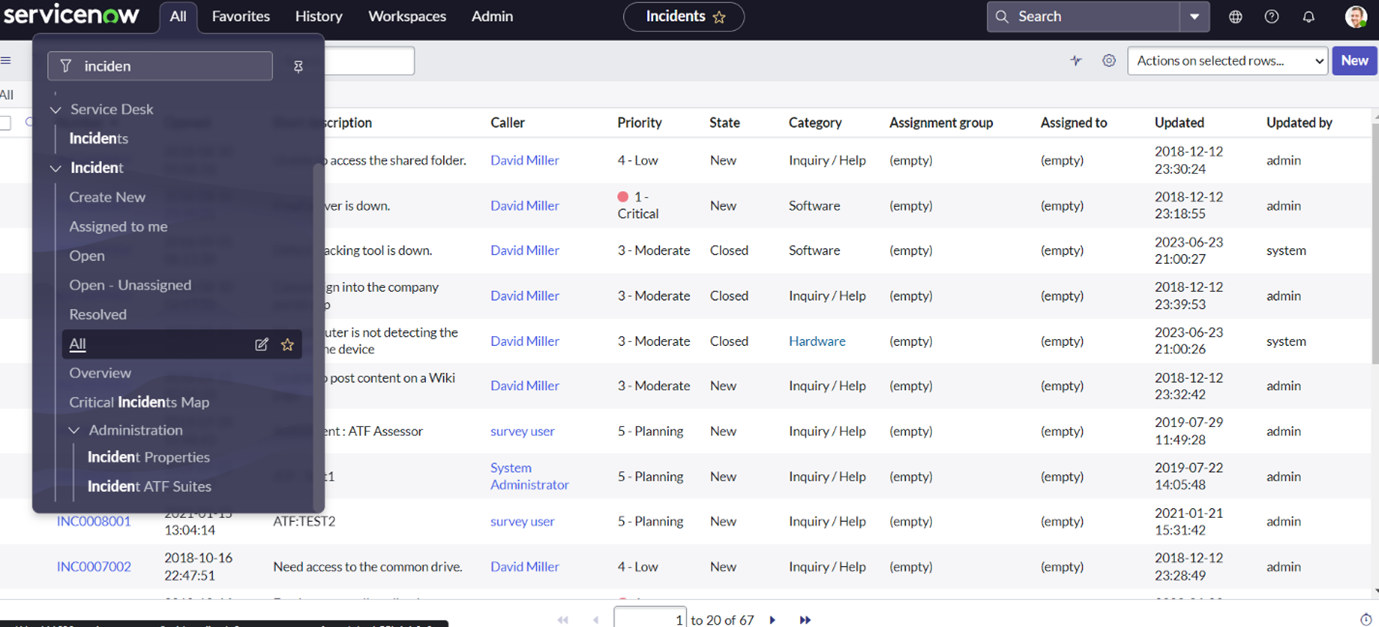
The ServiceNow feature allows you to display ServiceNow data on your signage display. This versatile feature supports any table and metric from your ServiceNow account, providing flexibility in the type of data you can showcase.
Follow the steps given below to know how to add ServiceNow Dashboard.
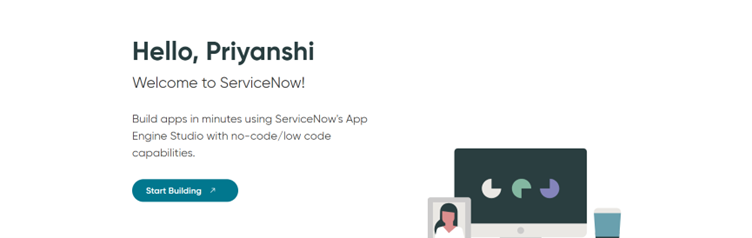
Once logged in, navigate to the option for creating/building a new app.
Follow the prompts to create or build your app.
After the instance is created or built, the instance information will be displayed on the screen. Make sure to copy these details for future reference.
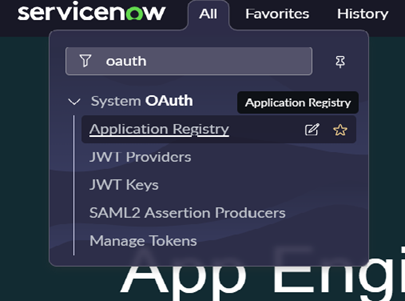
Set Up OAuth in ServiceNow
In your ServiceNow account, go to OAuth and then to Application Registry.
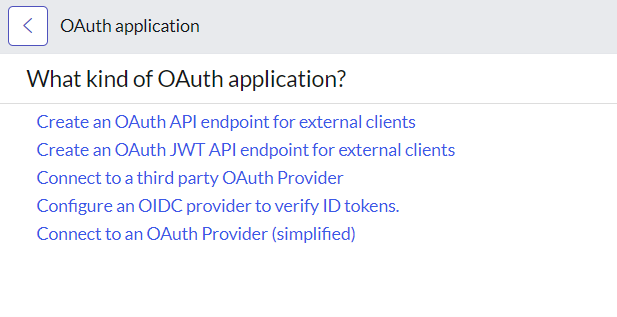
Create a new OAuth application.
Choose the type of OAuth application you want to create.
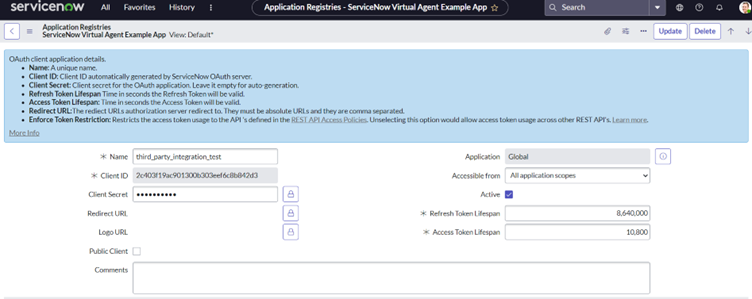
Provide the necessary details and make sure to copy the Client ID and Client Secret.
In KloudDisplay, navigate to “Display Terminal” > “Resources” > “Create new”.
From the “Type” drop-down menu, select “ServiceNow”.
Fill in all the required details. You can choose the collection and metric that will be fetched from your ServiceNow account.
Save the resource.
Refer to the Template section to know how to add this resource to the template.
Slideshow
The Slideshow Resource allows you to create an engaging and visually appealing display by showcasing a rotating set of images. With this functionality, you can curate a collection of images and configure the display to smoothly transition between them, capturing viewers’ attention and delivering a dynamic visual experience.
Stock Feed
The Stock Feed Resource enables you to present a live feed of stock tickers on your signage display. By providing a list of stock tickers, this feature displays real-time stock market data, including stock prices, changes, and other relevant information. This functionality is ideal for financial institutions, investors, or anyone interested in keeping track of stock market trends and updates.
Tableau Workbook
With the Tableau Workbook Resource, you can display a Tableau workbook directly from a specified URL. Tableau is a powerful data visualization tool that allows you to create interactive and insightful dashboards, charts, and graphs. By integrating Tableau workbooks into your signage display, you can present complex data in a visually compelling and easily digestible format, empowering viewers with valuable insights and analytics.
Text
The Text Resource allows you to display text directly on the signage display, providing a versatile way to convey information. Whether it’s displaying a user’s name, important announcements, or any other textual content, this feature allows you to communicate directly with viewers in a clear and concise manner.
TikTok Feed
The TikTok Feed feature enables you to showcase your TikTok videos on Kloud Display. For this, you need to connect your TikTok account with kloudManage. To learn how to do this, refer to the TikTok Integration section. This is a one-time setup. If you have already integrated TikTok then follow the steps given below.
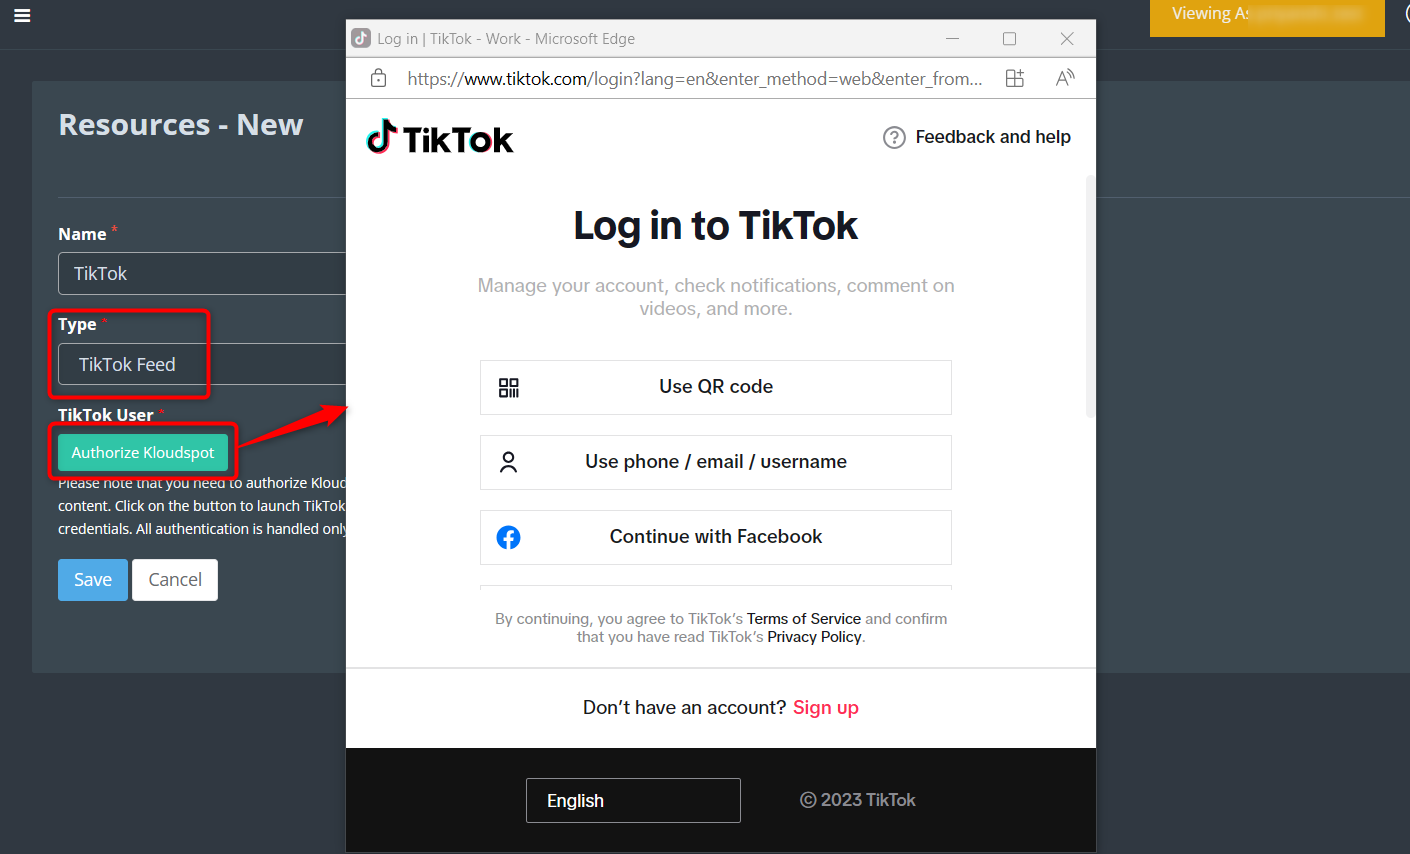
To do this, choose “TikTok Feed” as the resource type.
Next, click the “Authorize Kloudspot” button to authenticate your TikTok account.
Log in to your TikTok account through the popup window that appears.
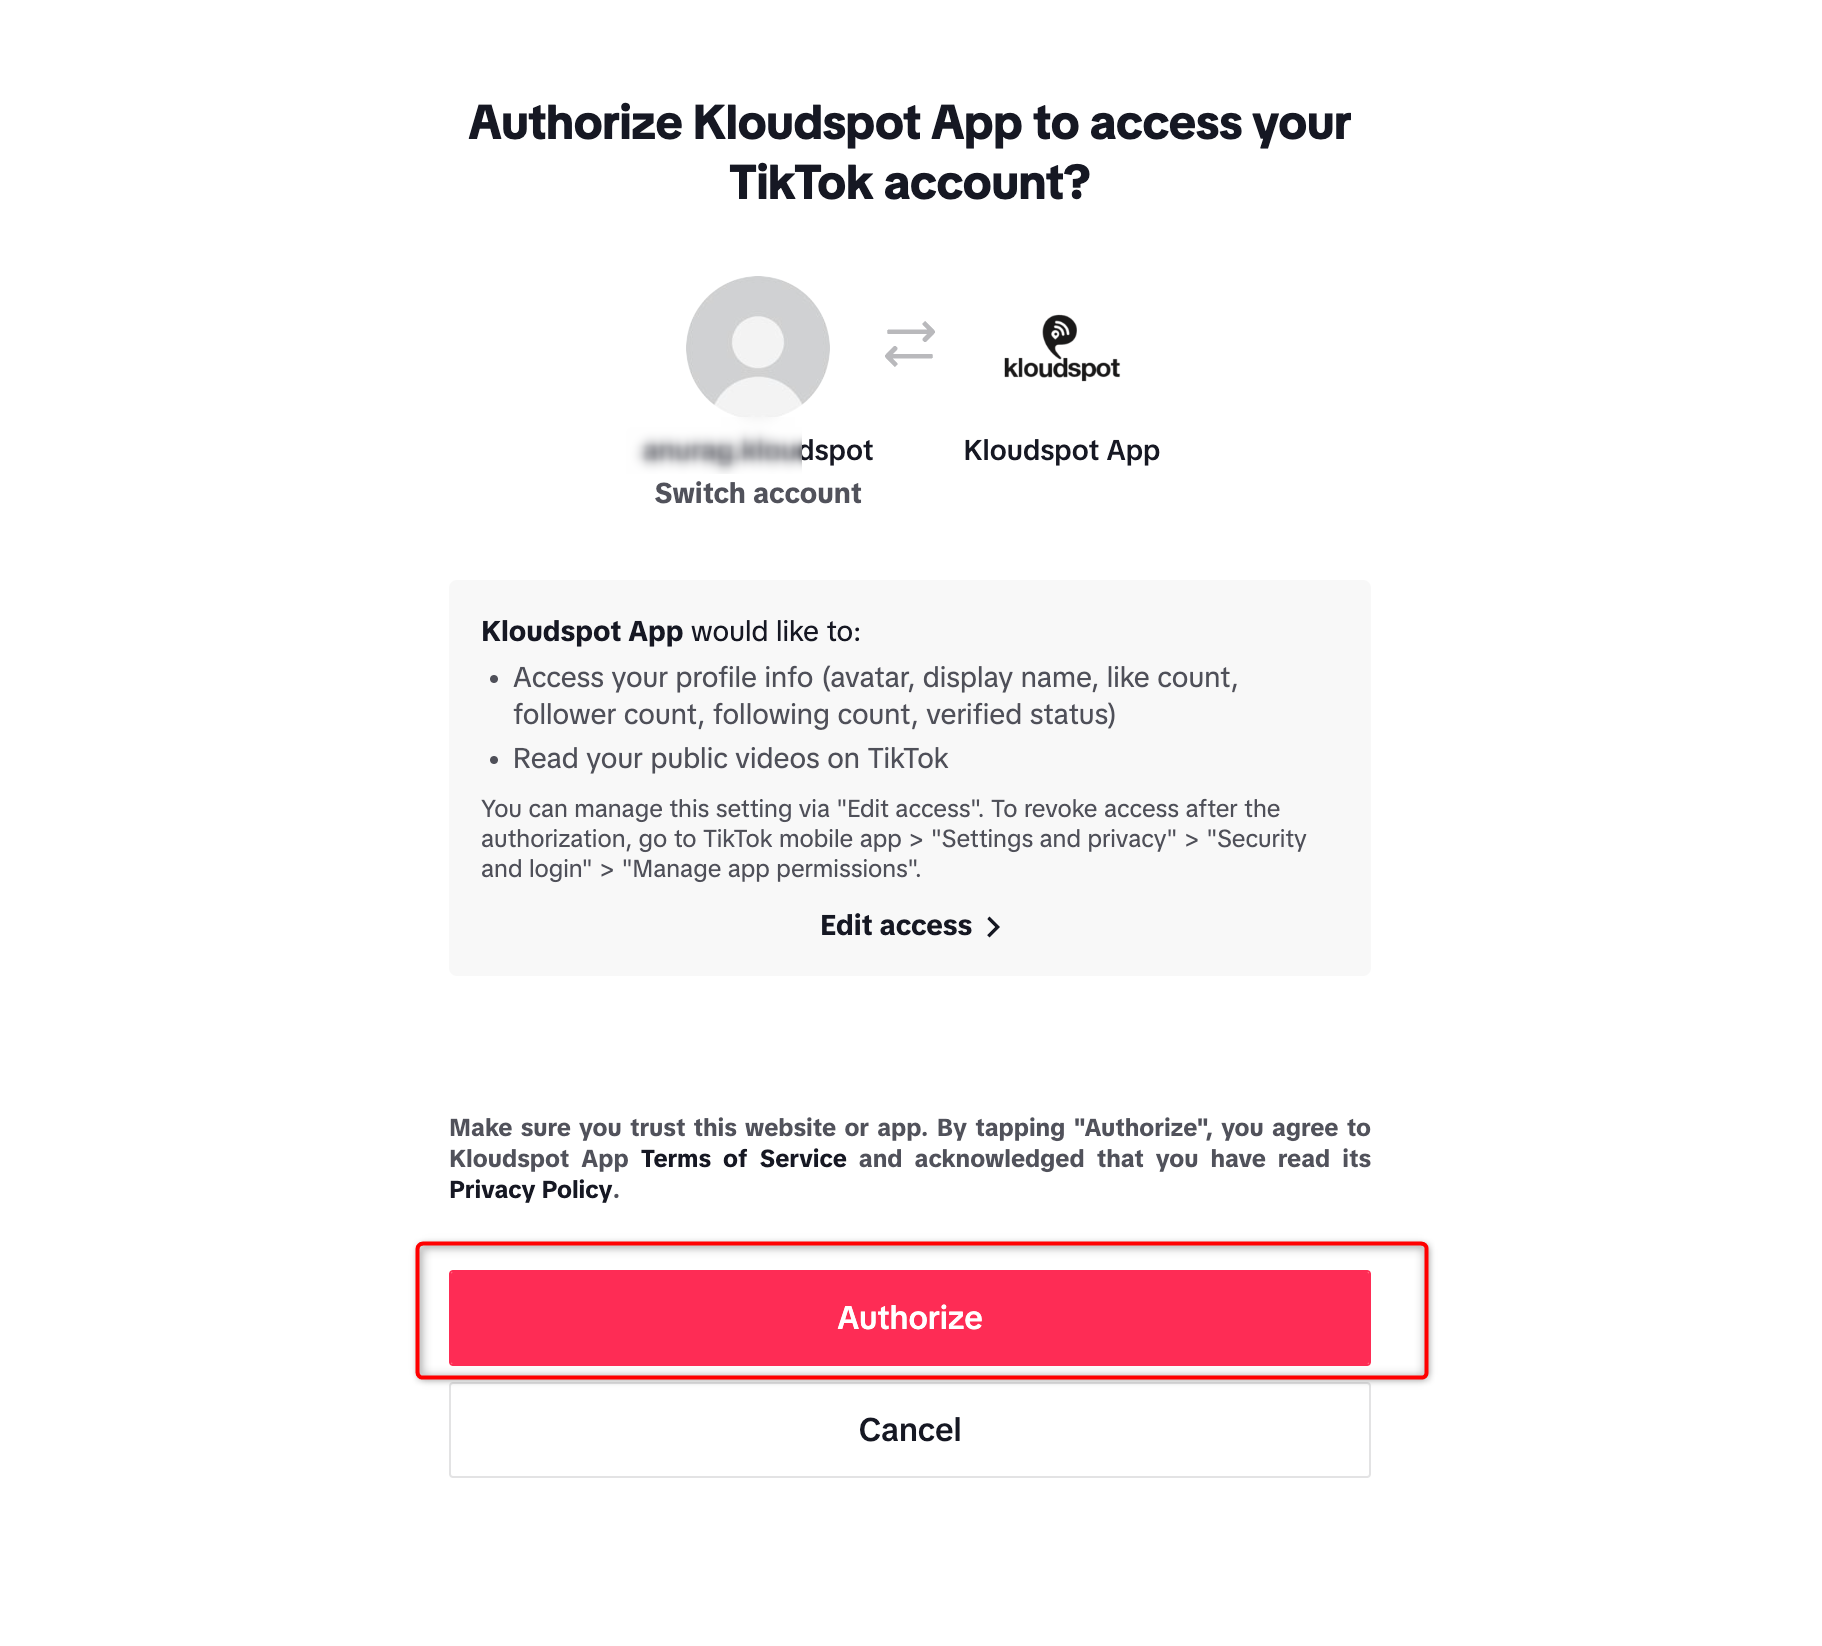
After logging in, an authentication message will open, and you can click the Authorize button here.
Afterward, click on the Save button to save the resource. Your TikTok resource has been successfully created.
Twitter Hashtag Feed
The Twitter Hashtag Feed Resource enables you to showcase an updating feed of public posts associated with a specific hashtag on Twitter. By integrating this functionality into your signage display, you can harness the power of social media and curate a dynamic stream of user-generated content, keeping viewers engaged and informed with real-time updates and discussions.
Twitter User Feed
With the Twitter User Feed Resource, you can display an updating list of posts from a specific user’s Twitter account. This feature is ideal for highlighting a particular user’s tweets, whether it’s your own account or someone else’s. By showcasing a continuous stream of posts, you can keep viewers up-to-date with the latest tweets, news, or updates from the specified user.
Twitter Wall
The Twitter Wall feature allows you to create a visually captivating display of posts with a specific hashtag from Twitter. By curating and presenting a ‘wall’ of posts, you can showcase a collection of tweets related to a specific topic or event, encouraging viewer engagement and participation in the conversation.
Uber Wait Times
With the Uber Wait Times feature, you can display wait times for a specific address. This functionality provides valuable information to viewers, allowing them to estimate wait times for Uber rides in a particular location. By presenting real-time wait times, you can enhance the convenience and planning capabilities for viewers who rely on Uber services.
Video
The Video feature enables you to upload and showcase videos on your signage display. Whether it’s promotional videos, informative content, or any other video material, this feature allows you to engage viewers with dynamic visual content, delivering a rich and immersive viewing experience.
Weather
The Weather feature allows you to display weather information for a specified location on your signage display. By integrating real-time weather updates, such as temperature, humidity, precipitation, and forecasts, you can provide viewers with valuable weather insights, helping them plan their activities accordingly.
Webpage
The Webpage feature allows you to embed a web page directly onto your signage display. This functionality is particularly useful for showcasing websites, online content, or interactive applications. Please note that the embedded webpage needs to allow this type of display for proper integration.
Youtube
The YouTube feature enables you to showcase a video directly from YouTube on your signage display. By integrating YouTube videos, you can engage viewers with a wide range of content, including tutorials, entertainment, presentations, or any other video material available on the platform.
Zoom Meeting
The Zoom Meeting feature allows you to display a Zoom meeting with a specific ID on your signage display. This feature can be configured to show either video-only or both audio and video elements. Please note that accessing the Zoom meeting may require a password, depending on the meeting’s settings. With this feature, you can facilitate virtual meetings, webinars, or conferences directly on the signage display, enhancing communication and collaboration capabilities.
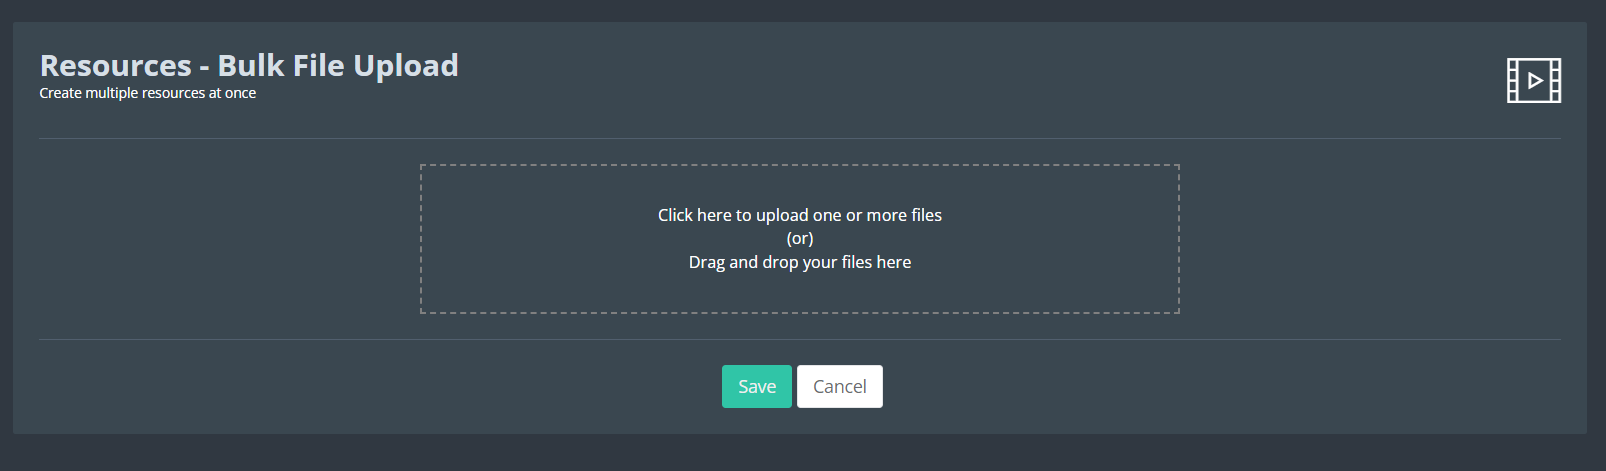
Bulk upload
KloudDisplay also supports the bulk creation of media files. Users can use the Bulk Upload button to launch a screen where one or more files can be uploaded. This functionality is applicable for image and video files.
Alternatively, files can just be dragged and dropped on the hot region. Each file results in a resource created.
The name and type of the file are derived from the uploaded file. In addition, a comment is added on the resource denoting the upload date.
Templates
After you’ve created the resources you want to use, your next task is to place them within the template. This is where you assemble everything together to create the final display. In this section, we’ll guide you through the process of adding these resources to the template, showing you the steps to seamlessly integrate them. This way, you’ll have a clear understanding of how to bring all the elements together for your setup.
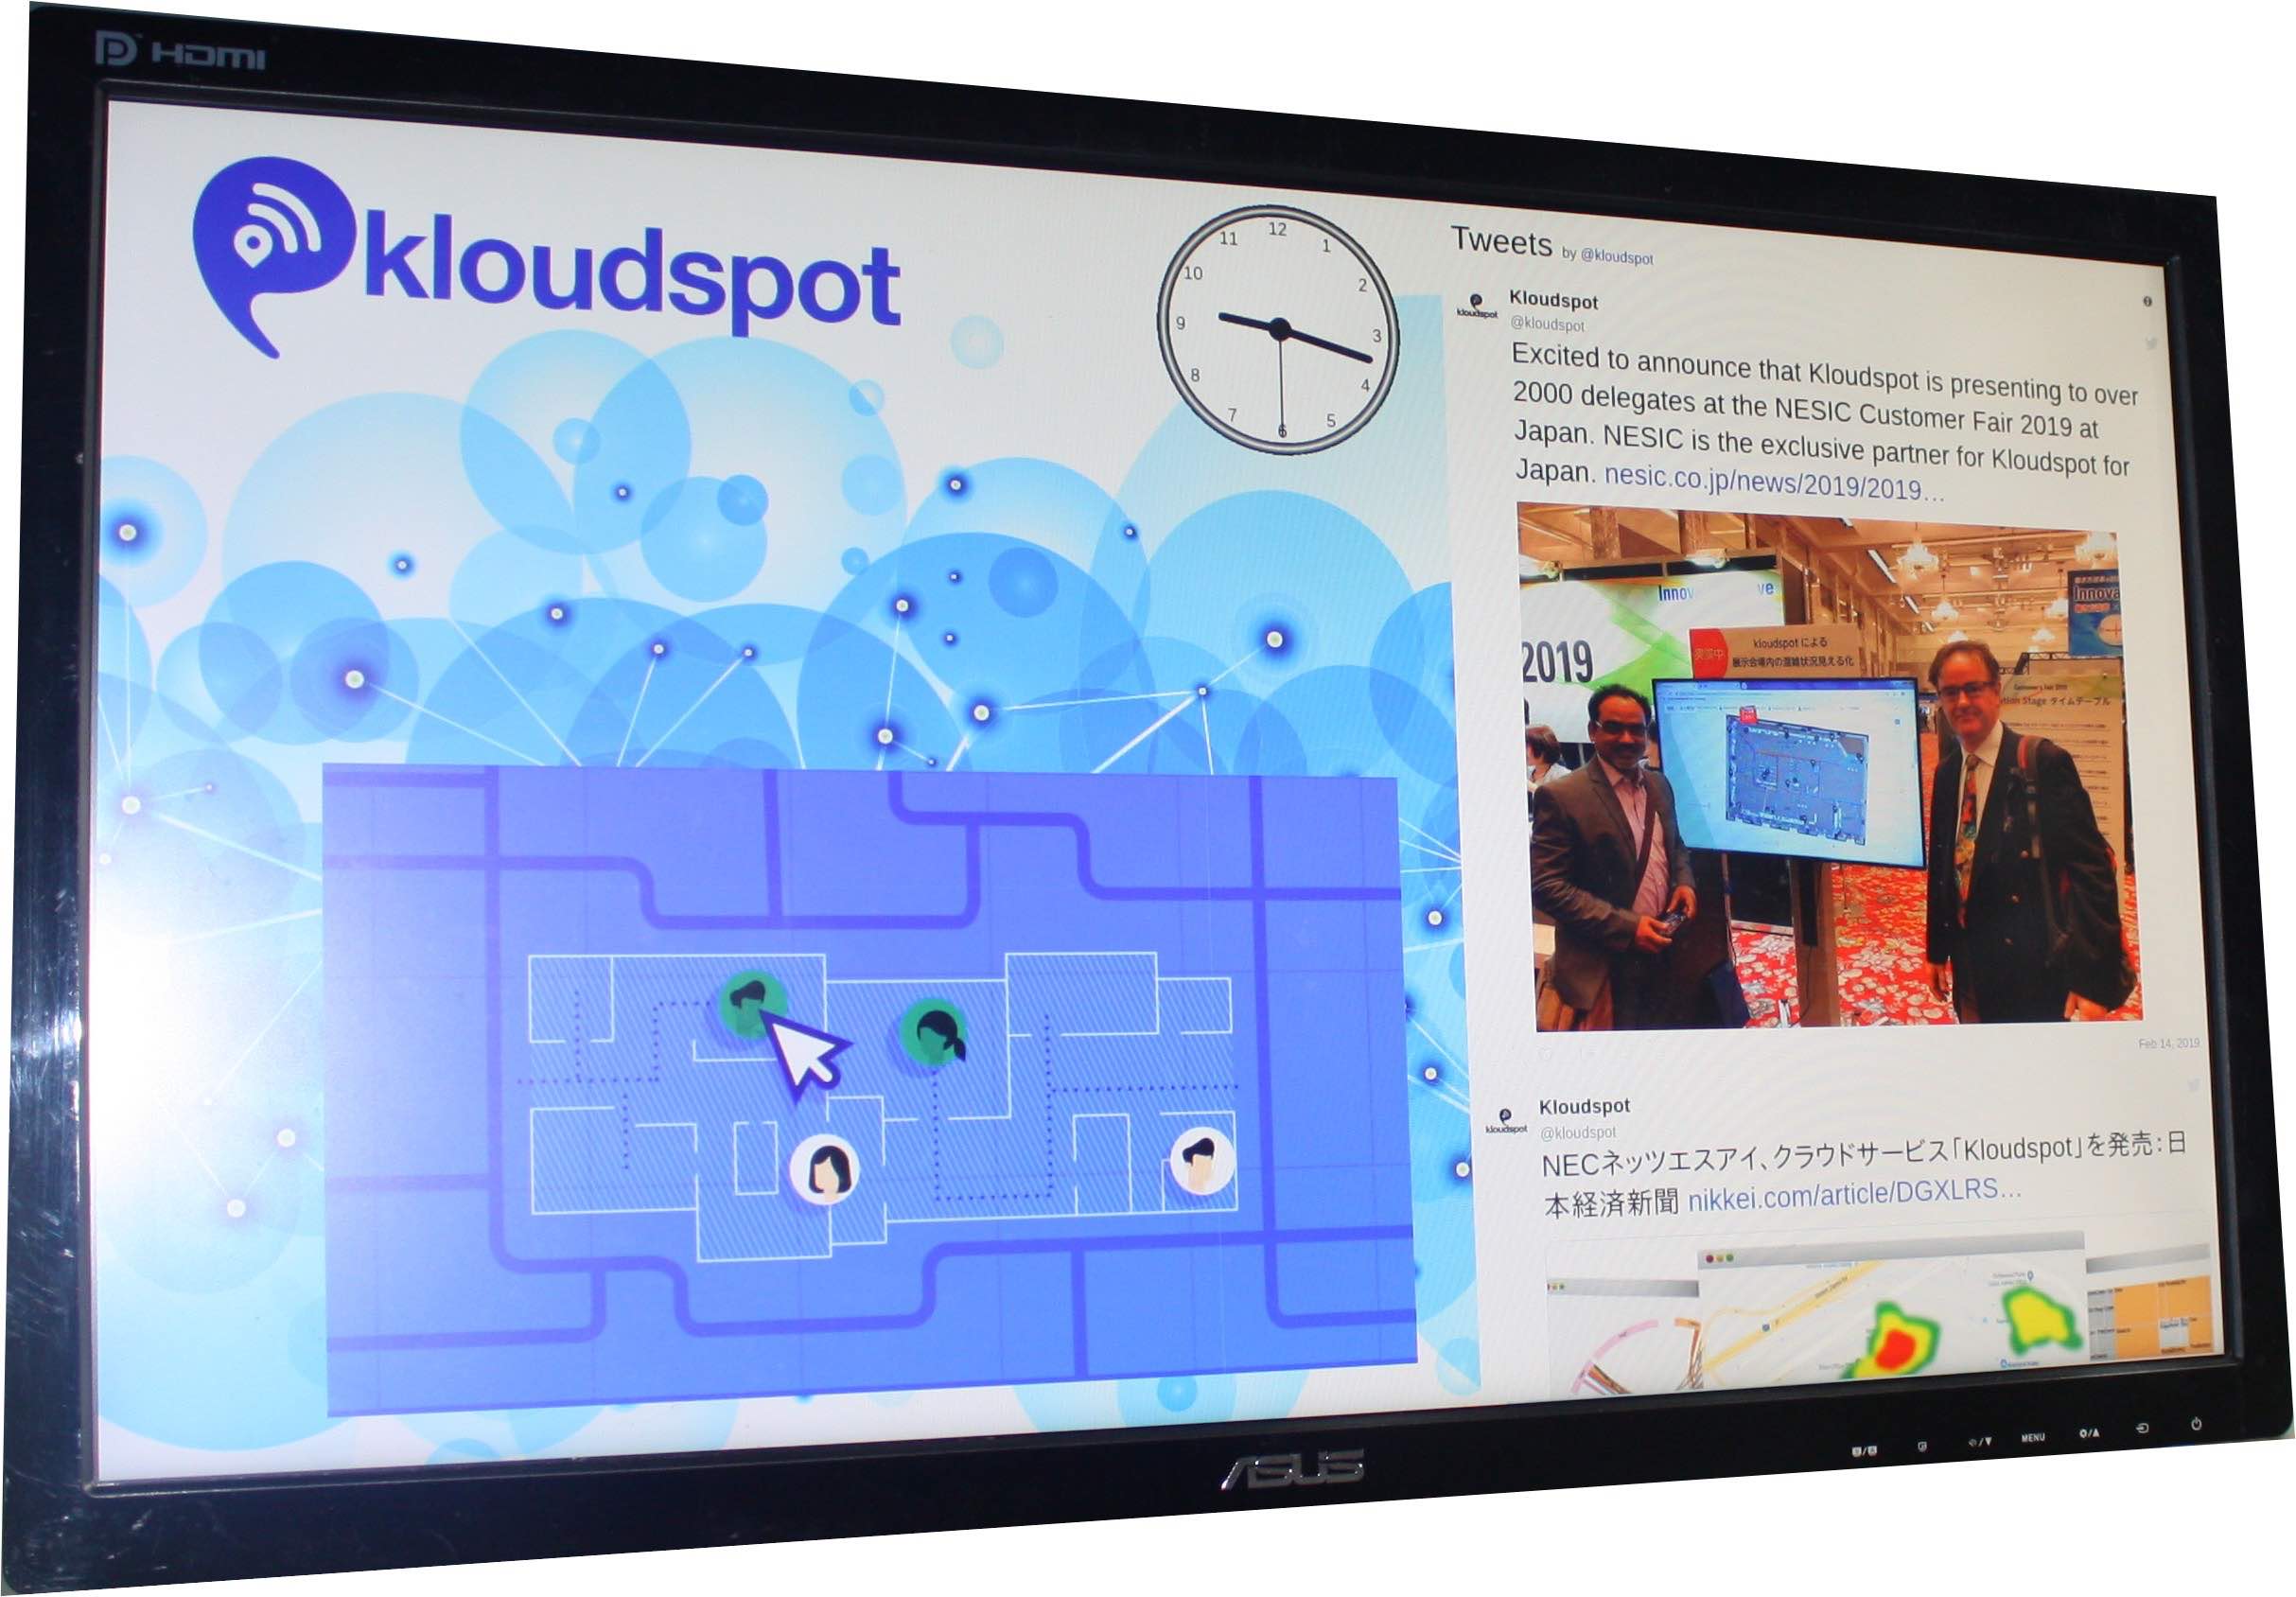
Template Structure in Display Terminals
A template serves as a framework for organizing and displaying resources on display terminals. It consists of multiple regions, each capable of accommodating one or more resources.
Refer Create Template section to know how to create a templete.
Note: Before utilizing templates, it is essential to create the necessary resources.
Types of Templates
There are two types of templates available:
Regular Type Templates:
These templates are either consistently displayed or shown according to a predefined schedule.
When multiple templates are assigned to a terminal, they are displayed in a sequential manner, appearing one after another.
Event Type Templates:
These templates are triggered based on external events.
They can be activated through the API or triggered by Rules within the Analytics platform.
By utilizing templates, display terminals can effectively organize and present resources, providing a structured and visually appealing experience for viewers.
A template defines how resources are displayed on display terminals. A template consists of a number of regions each containing one or more resources.
You must create resources before they can be used in templates.
Create template and add resource
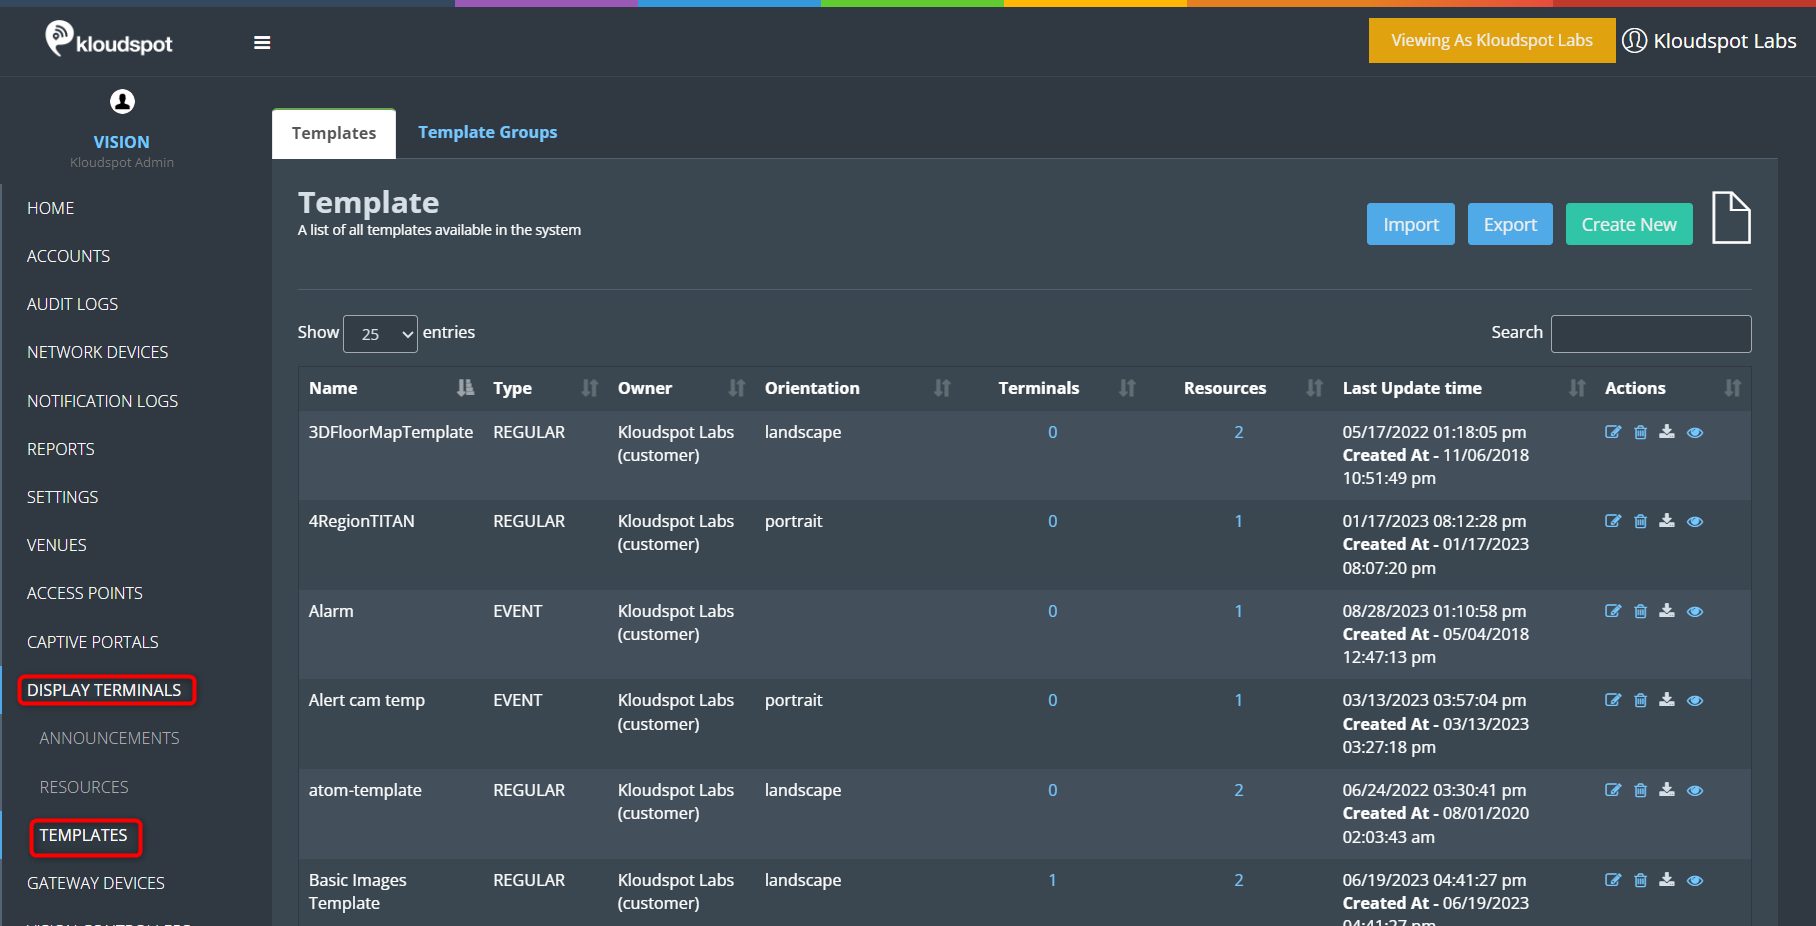
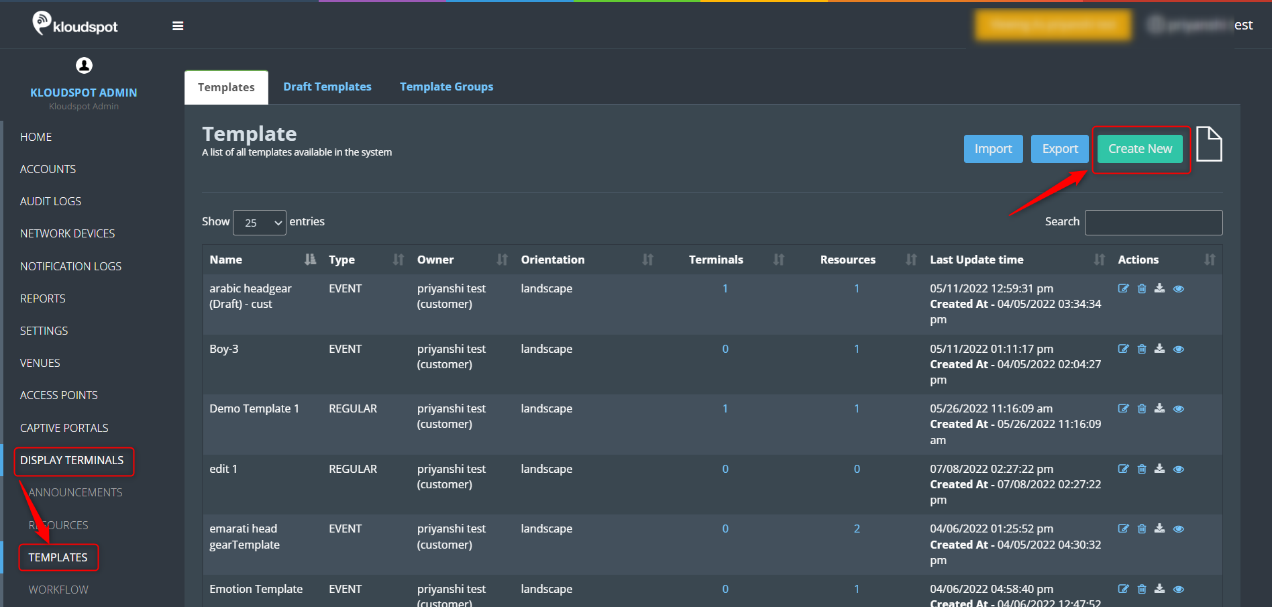
Navigate to DISPLAY TERMINALS > TEMPLATE > Create New.
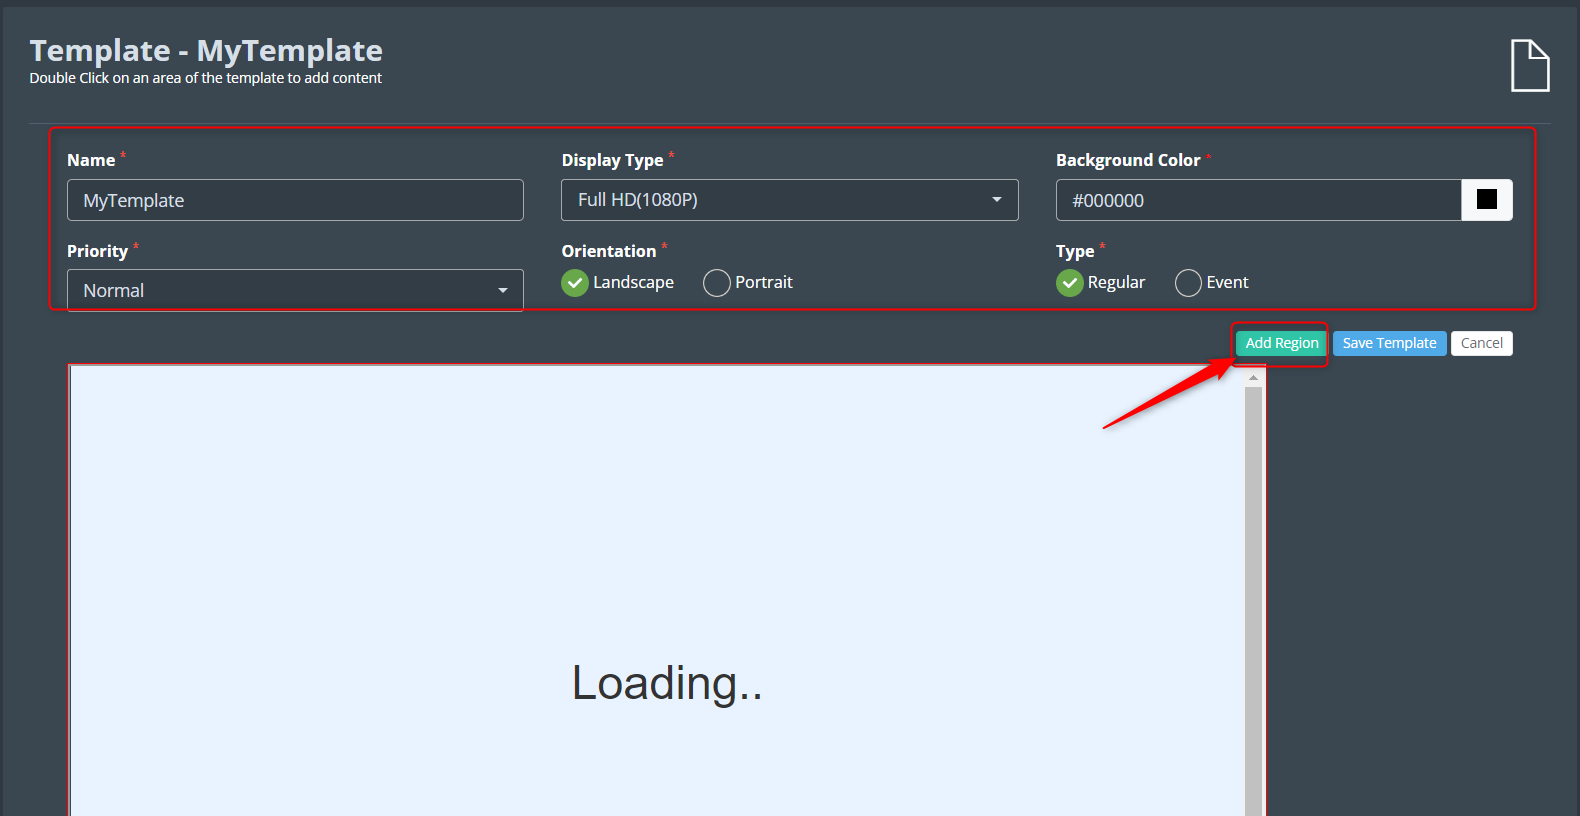
Then, in the template window that appears, fill in all the fields.
Name: Enter template name
Display Type: Select the display type from the dropdown list. 3 types are available. Ultra HD(4K), Full HD(1080P), HD Ready(720P)
Background Color: Select Background color for terminal.
Priority: Select the priority from the dropdown list.
Orientation: According to the terminal direction of the displayed screen,
Select the orientation. you cannot assign a vertical orientation template to a horizontal orientation display.
Type: Two types are available Regular and Event. To gain a deeper understanding of these two types, refer to the Types of Template section.
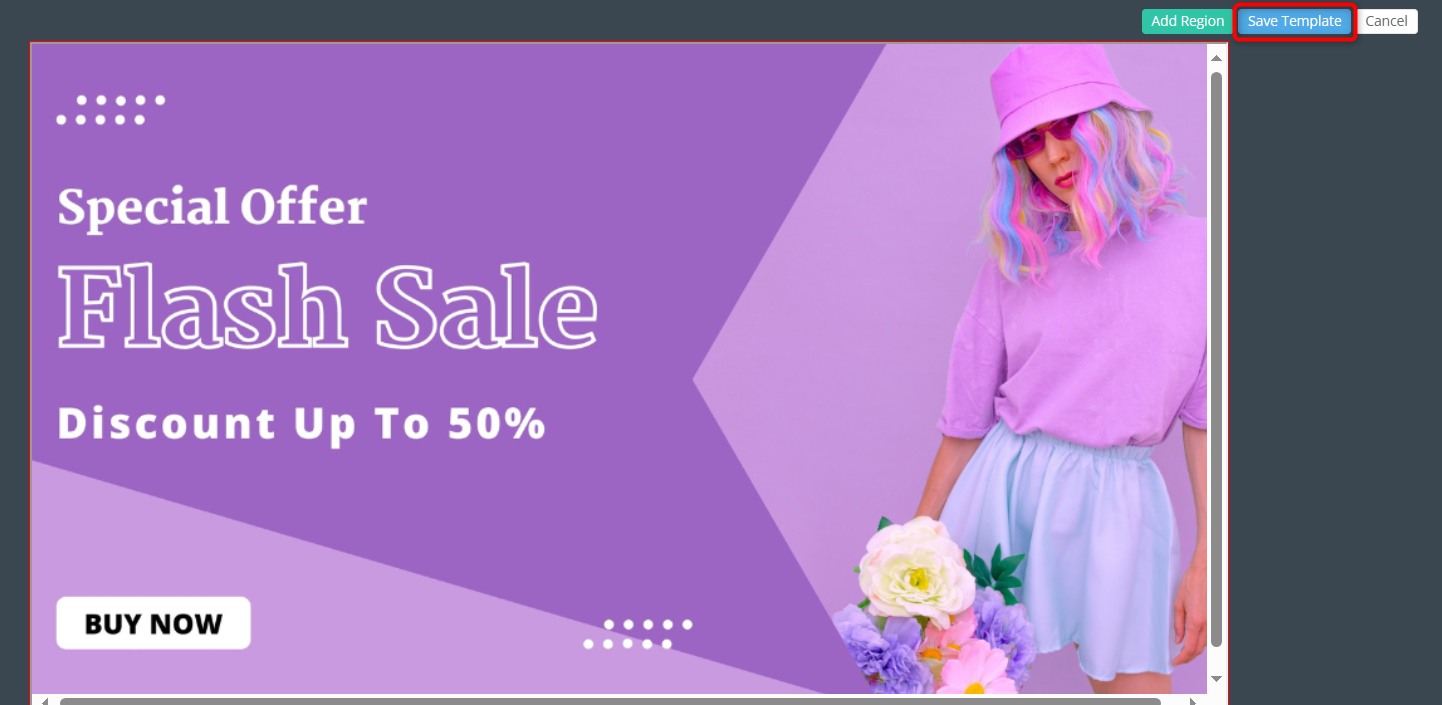
3. The next step is to add the region to the template. For that click on
Add Region button.
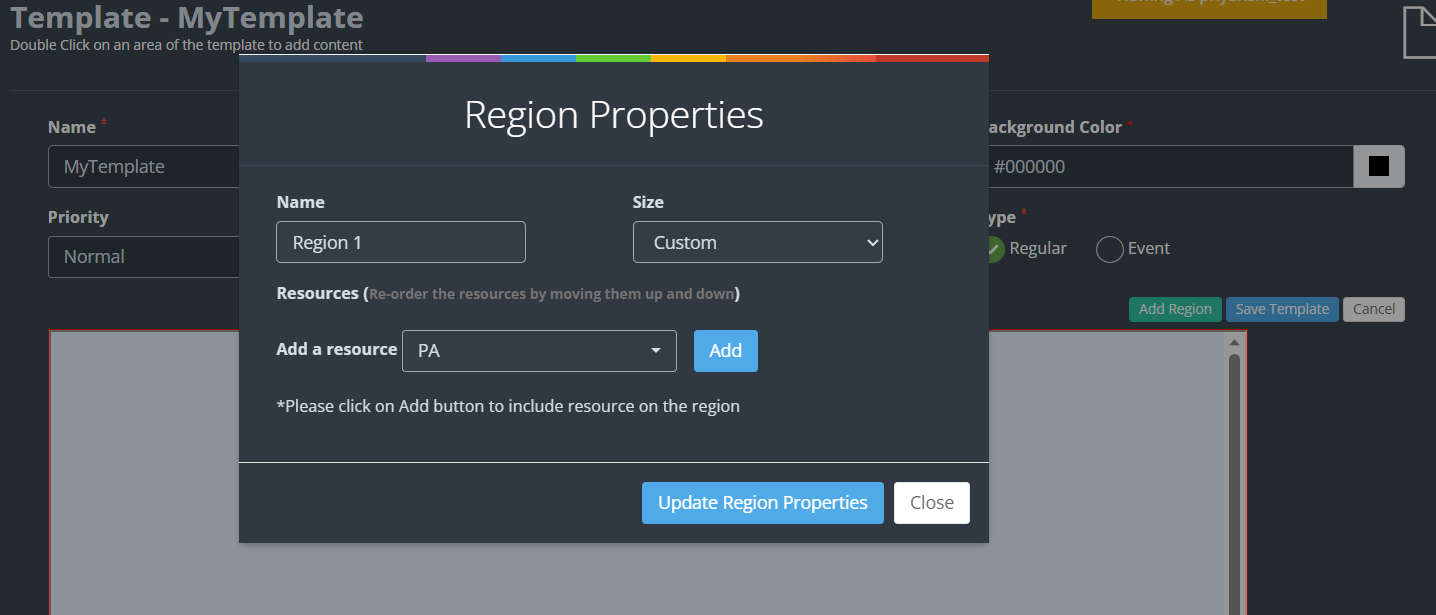
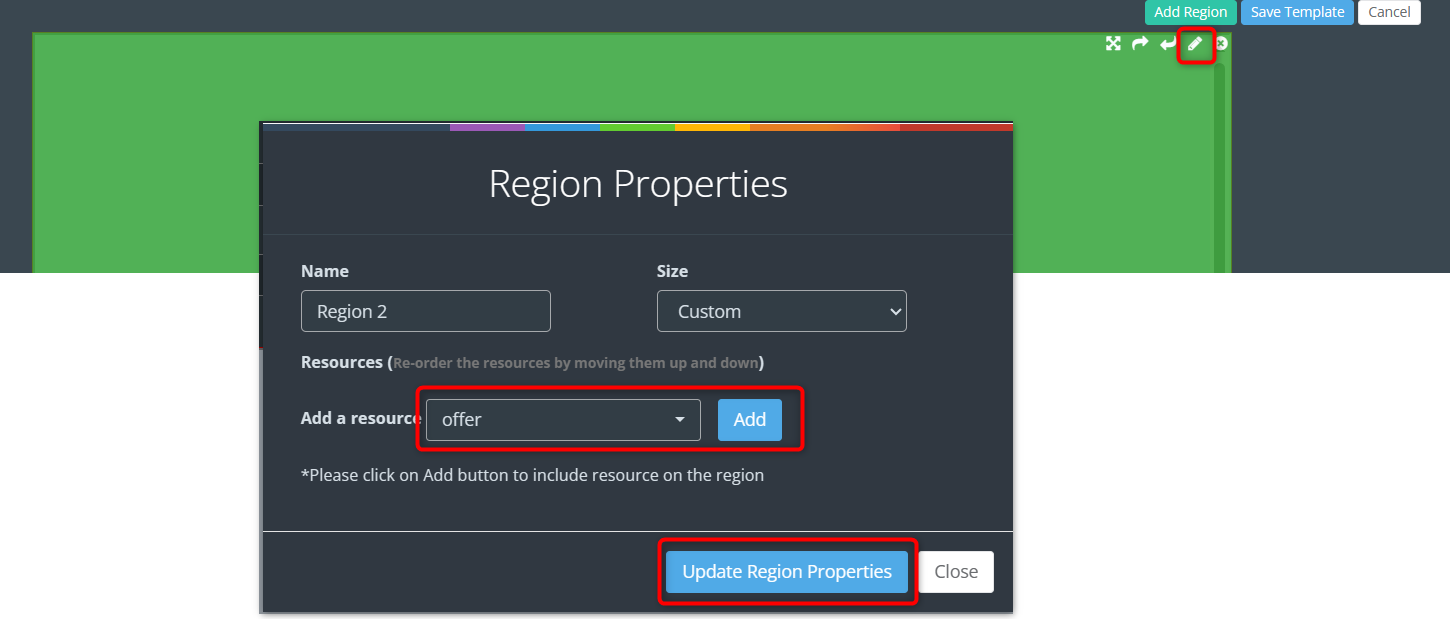
4. You can control the size, background color, and order for each region. You can also define how long each resource is shown in a region.
5. To add resources to the region click on the Edit button. Then, in the region property window that appears, select the resource to be added and click the Add button. If necessary, you can add things such as how long each resource should be displayed and how many times it should be displayed. Otherwise, it will show system default settings.
6. After adding enough resources, you can click on the Update Region Properties button.
7. You can drag and change the location of the region as needed.
8. Then Click on the Save Template button. The template is added
Successfully. Now you have to add this template to your display terminal for that refer Add Template to Display Terminal section.
9. If you want to create a template group by including multiple templates, refer to the Template Groups section.
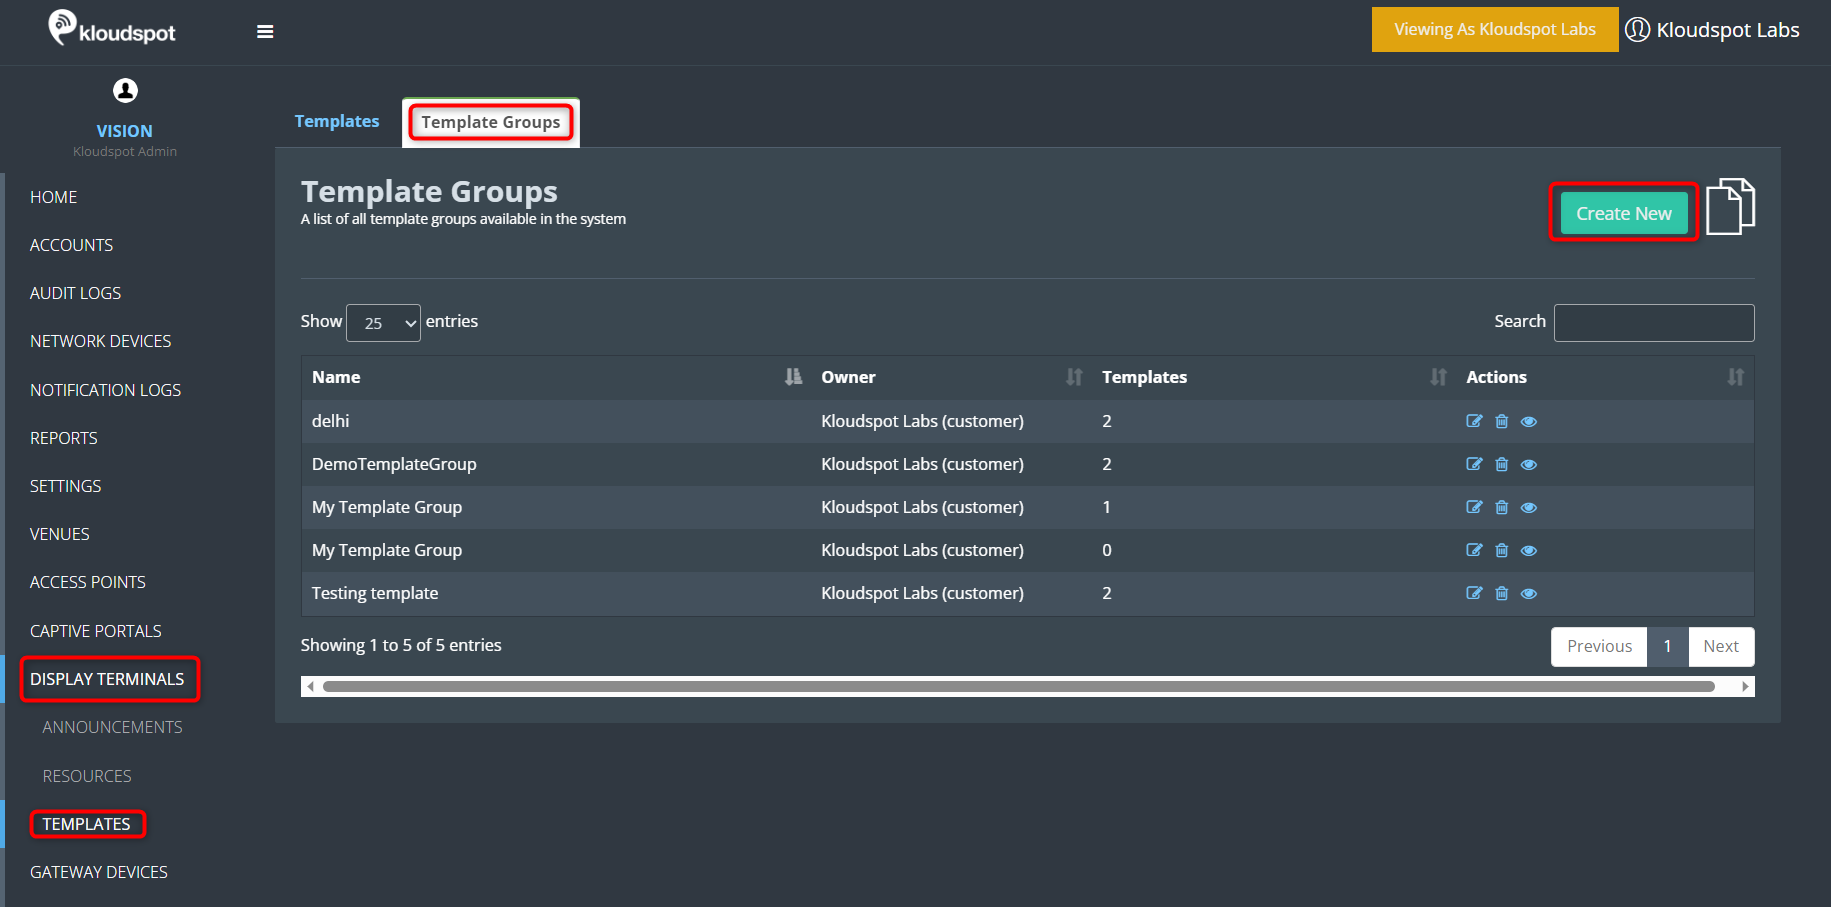
Template Groups
A Template Group is a collection of one or more Templates. Templates within a Template Group can be ordered to see the sequence in which the content of each template is displayed.
To create a template group, navigate to DISPLAY TERMINAL > TEMPLATES > Templates Groups > Create New.
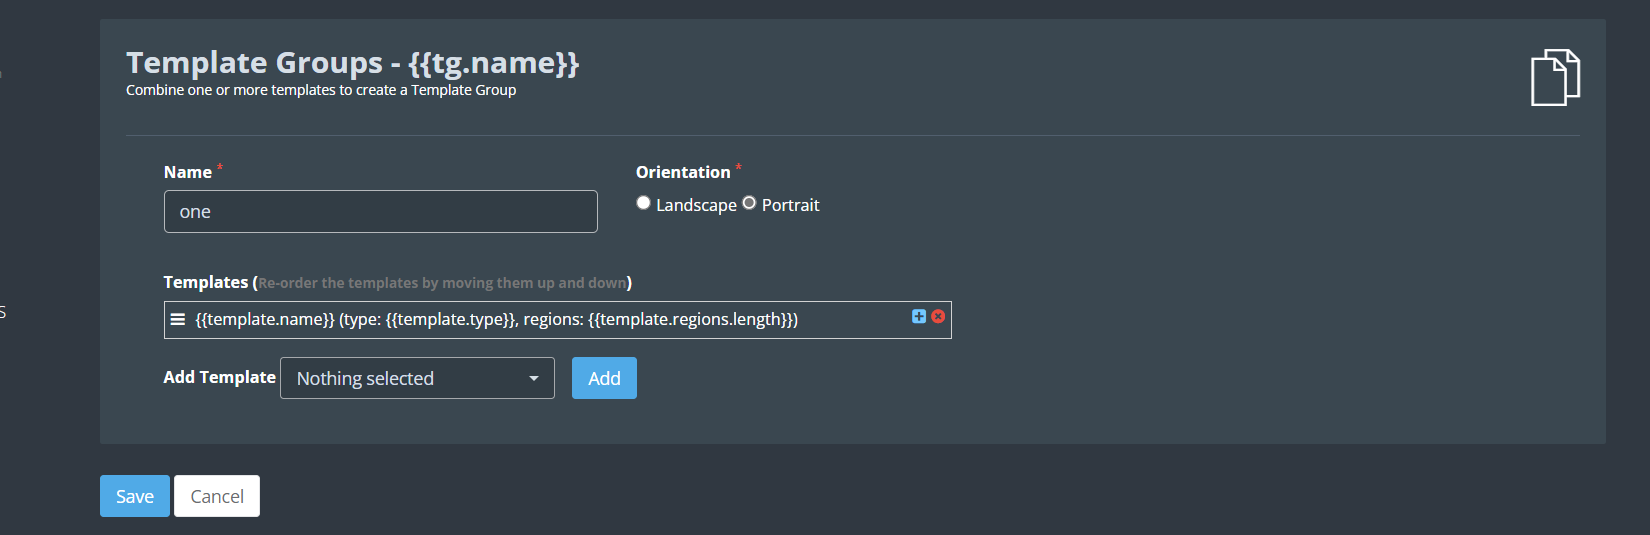
3. Then, from the dropdown list, select the templates to add and click
Save.
Note: All the Templates within a Template Group must be of the same
Orientation as that of the Template Group.
Add template to display terminal
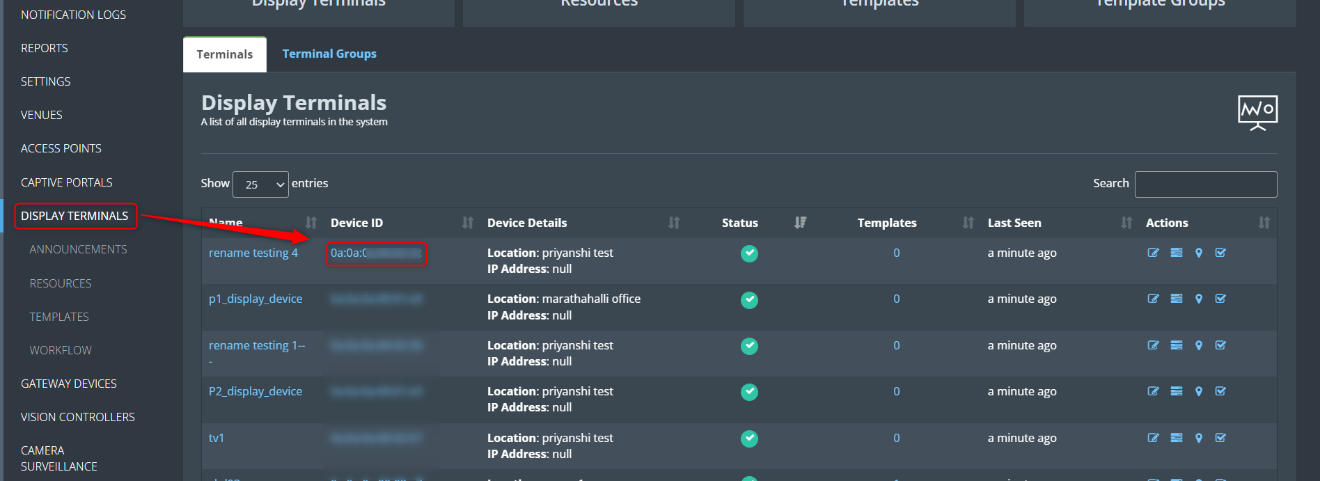
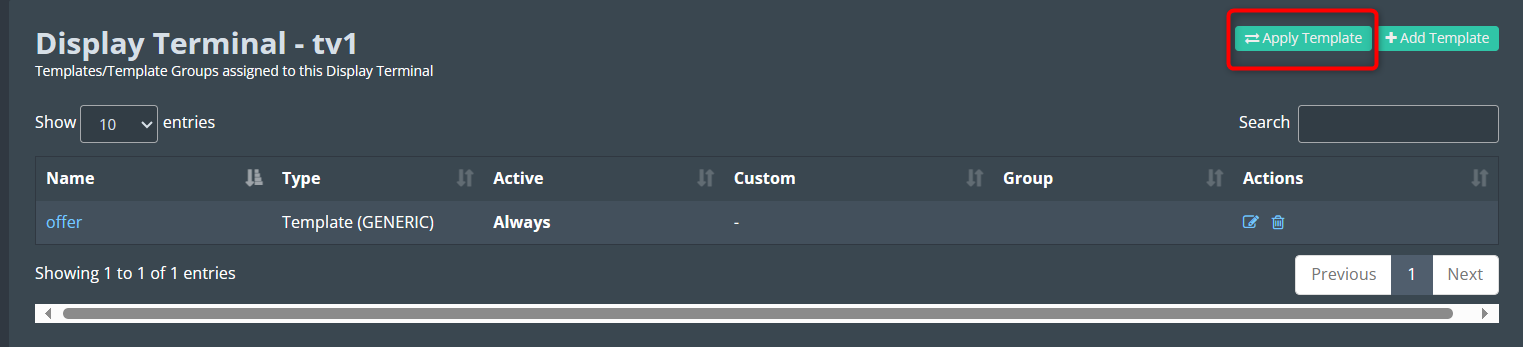
Finally, the created template needs to be added to the display terminal. For that, navigate to DISPLAY TERMINAL.
There you will see a list of terminals. From there click on the Device ID of the terminal to which the template is to be added.
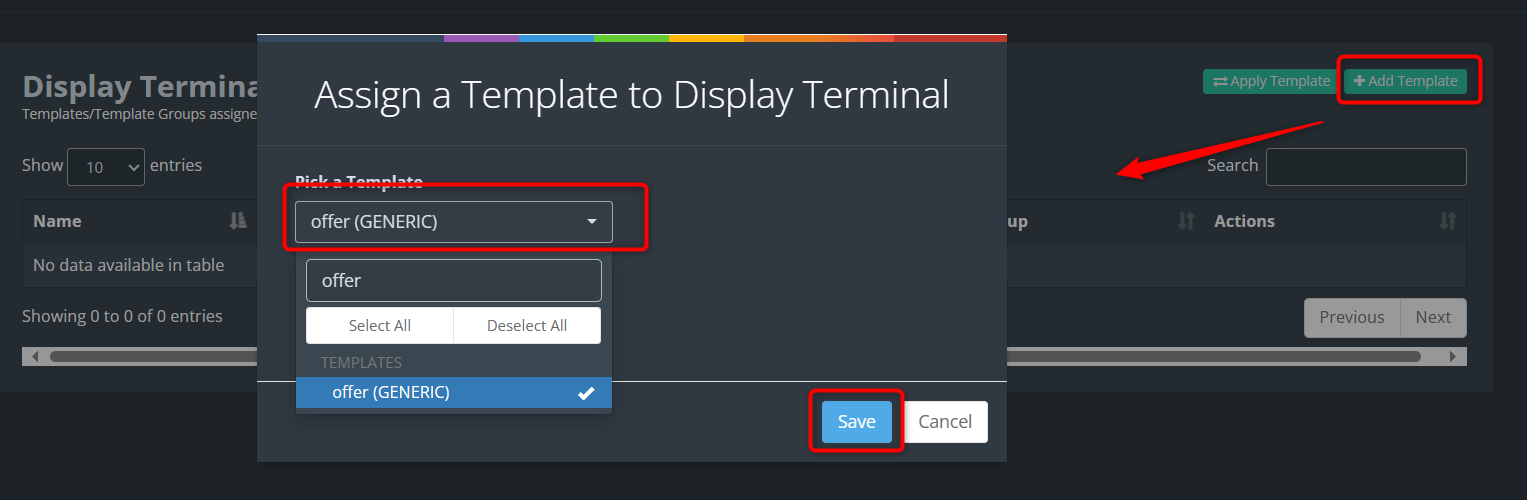
3. Then, in the top right corner of the window, click the Add Template
button.
4. Then, from the pop-up window that appears, select the template and time to
be added and click the Save button.
Note: Time can be added in two ways. Always and Custom. The
Always option allows you to always keep that template visible on the
screen. Custom option helps to show only on specific days.
5. After assigning the template, click the Apply Template button in the
terminal window.
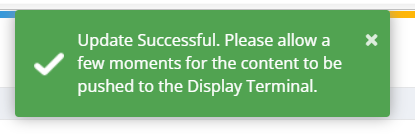
6. It takes 5-10 seconds to apply. Then you will get a successful
notification.
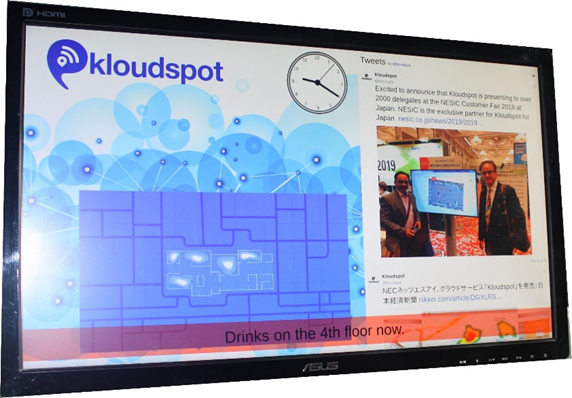
7. The template is successfully added to the terminal.
Announcements
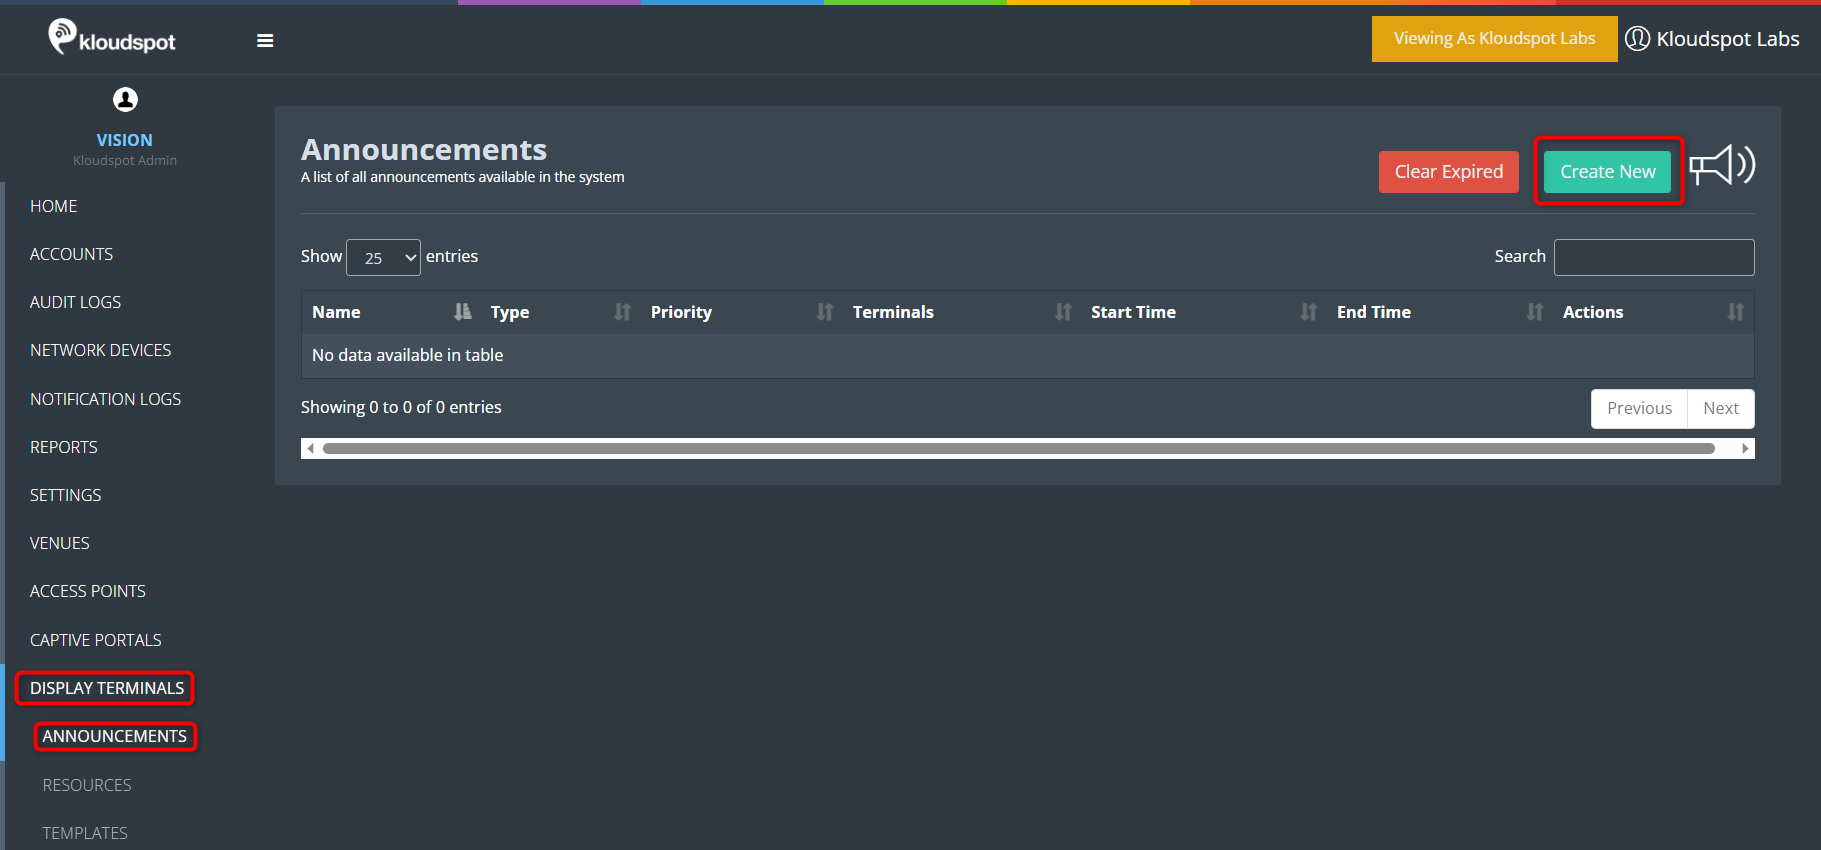
Announcements are a quick and eye-catching way to temporarily overlay text onto a KloudDisplay. It could be a warning or a piece of information. It can be found at the bottom of the display terminal.
To see an audit log of existing and expired announcements, click on the Announcements menu item.
To create a new announcement, Navigate to DISPLAY TERMINAL > ANNOUNCEMENTS.
Then click on the Create New button.
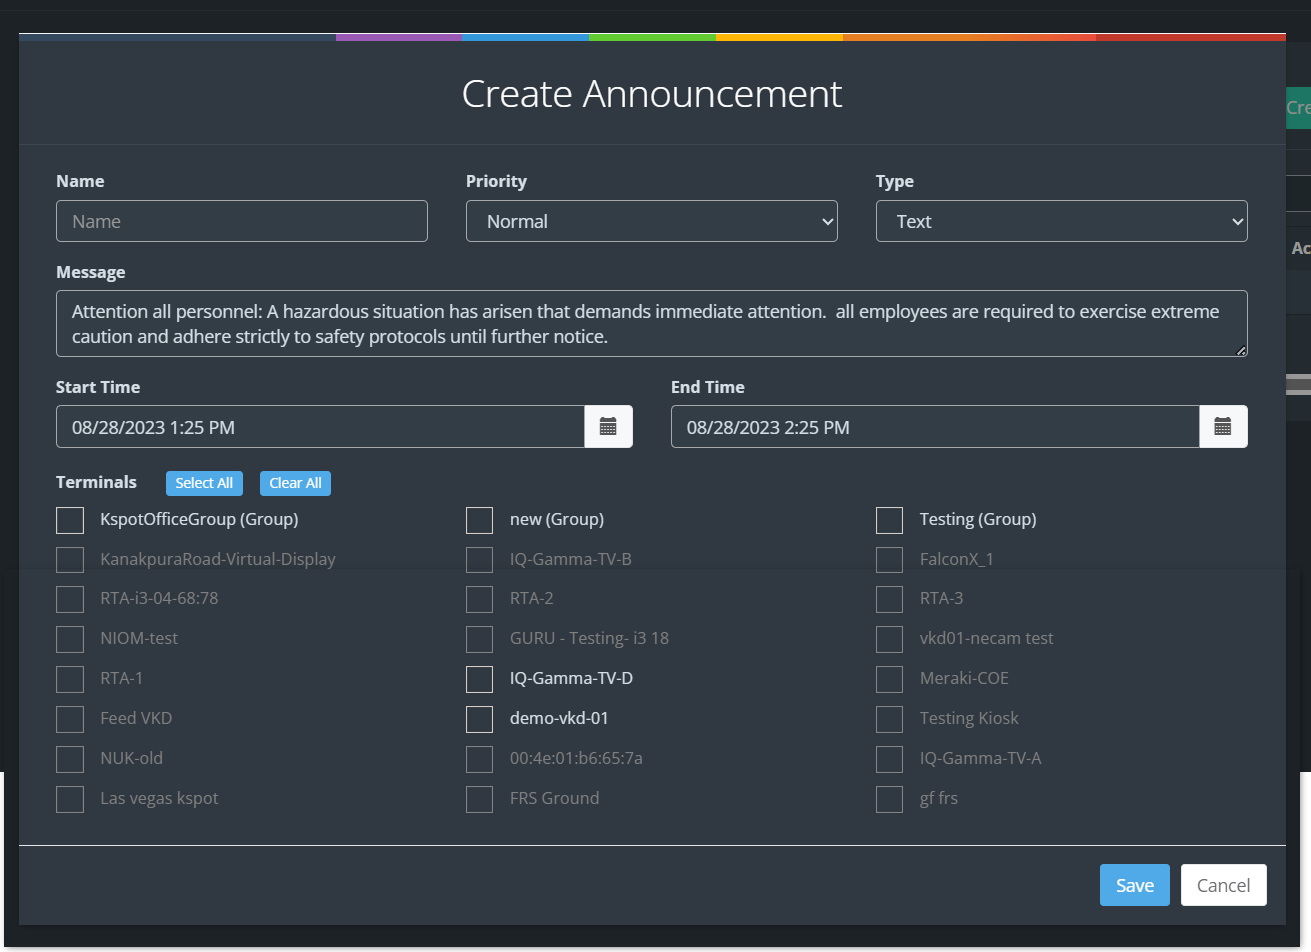
Fill in the following details on the popup window that opens.
Name: Enter the name for the announcement.
Priority: Select the priority from the dropdown list. Two types of priorities are there Normal and Critical. If you are choosing Normal priority, this will be indicated by a yellow label at the bottom of the screen. In critical it is the red label
Type: Currently only Text type is available.
Message: Enter your message here. This message will display on the screen.
Start time: It helps to determine from what time the announcement should show.
End Time: It helps to determine at what time the announcement should stop.
Terminals: Select on which terminal the announcement should be shown. It is possible to select multiple terminals.
After entering all the above information click the Save button.
In addition to this editor, it is possible to set announcements using the action templates in Kloudspot Analytics.
Display Groups
Groups are a solution to separate users into different departments within an organization. Classifying users into Groups in KloudDisplay enables the following
Resources & Templates created by users of a Group can only be edited or deleted by users belonging to that Group
Resources & Templates created by users of a Group can be previewed by users belonging to any Group
Resources created by users of a Group can be used by users of any Group to create Templates
Templates created by users of a Group can be used by users of any Group to create Template Groups
Note that a Template Group consisting of Templates created by members of any group can be edited or deleted by members of any other Group.
Workflow Management
This comprehensive guide outlines the step-by-step processes involved in enabling and managing workflows, user roles, resources, and templates using the Kloudspot system. Whether you’re an administrator, author, publisher, or approver, this documentation provides clear instructions on how to navigate the Kloudspot manage and monitoring interface to efficiently edit, approve, and collaborate on resources and templates. By following these guidelines, you’ll be able to seamlessly streamline content modifications, ensure accurate approvals, and effectively manage your digital displays."
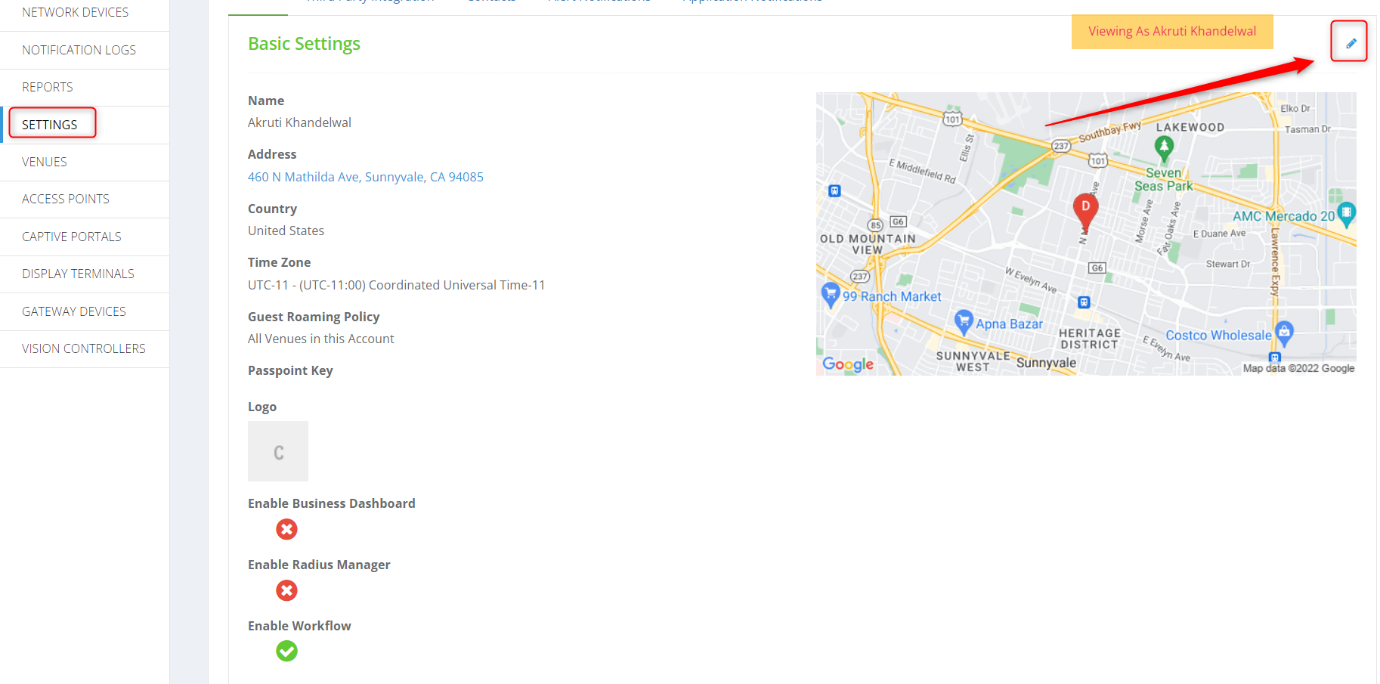
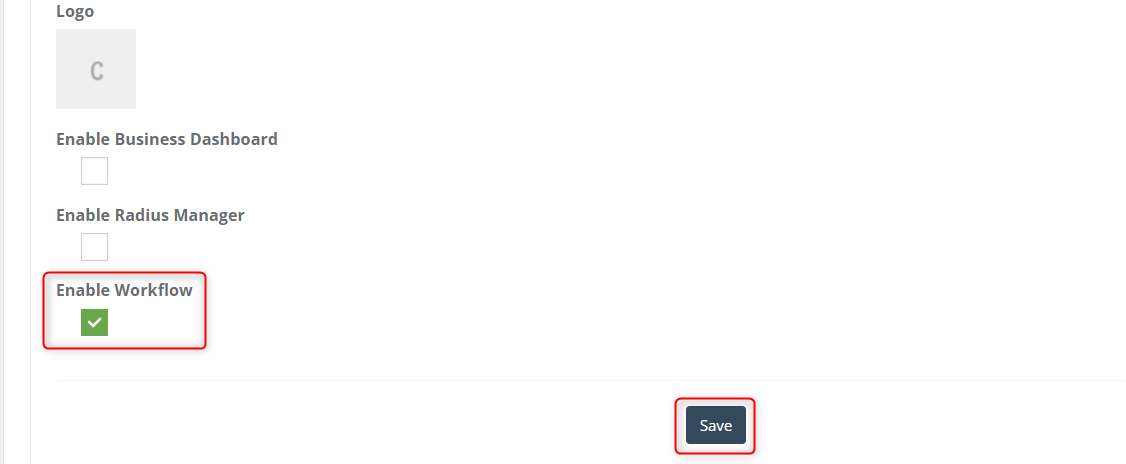
Click on the Settings menu from the home page. In the basic tab that opens click on the edit button.
Then scroll down and check the Enable Workflow check box and click Save.
Add or edit user
If you enable workflow, you must either add a new user or assign a role to an existing user. To do so, follow the steps described below.
Log in to your Kloud manage admin account with your company username and password.
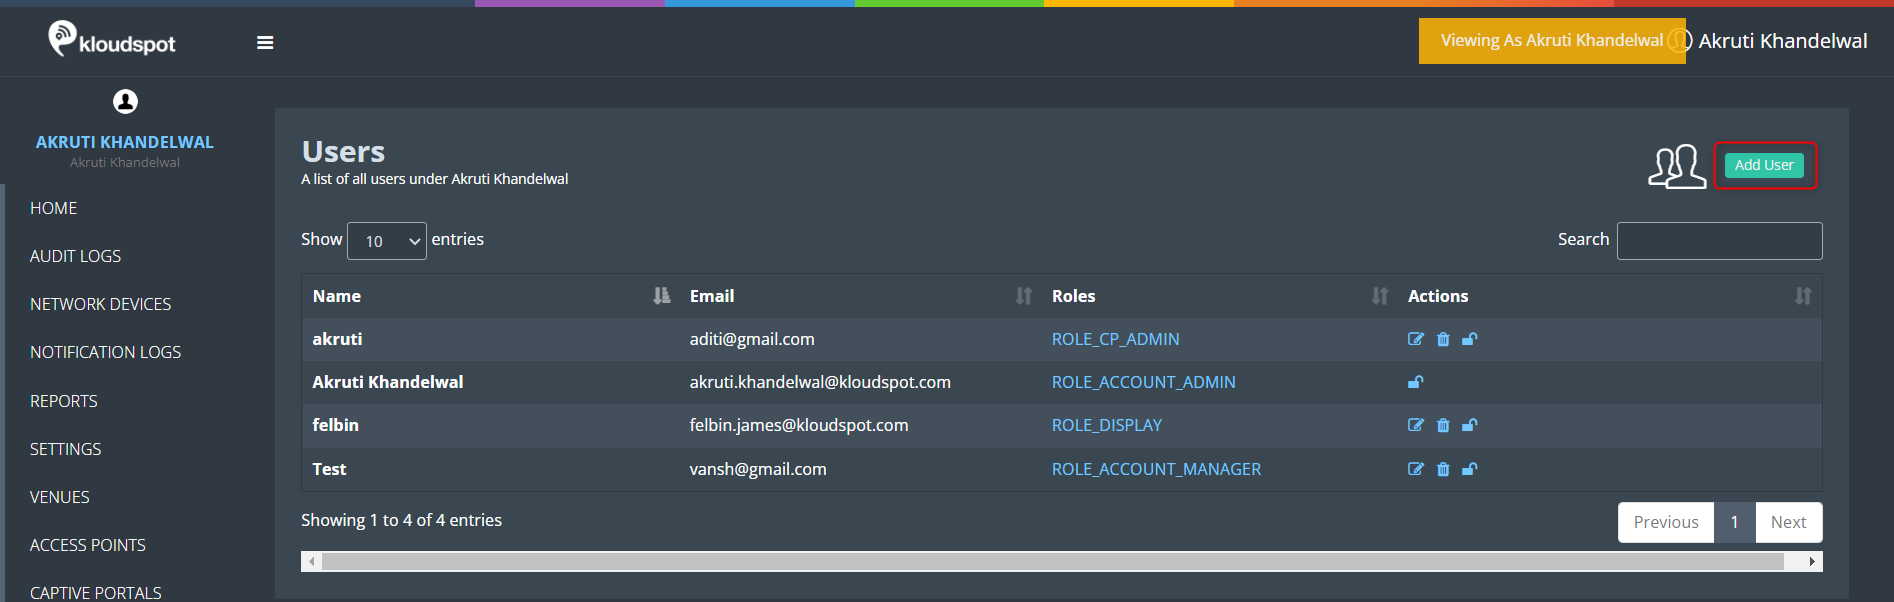
Navigate to Profile > User & Role Management.
Click the Add User button in the Users window that appears.
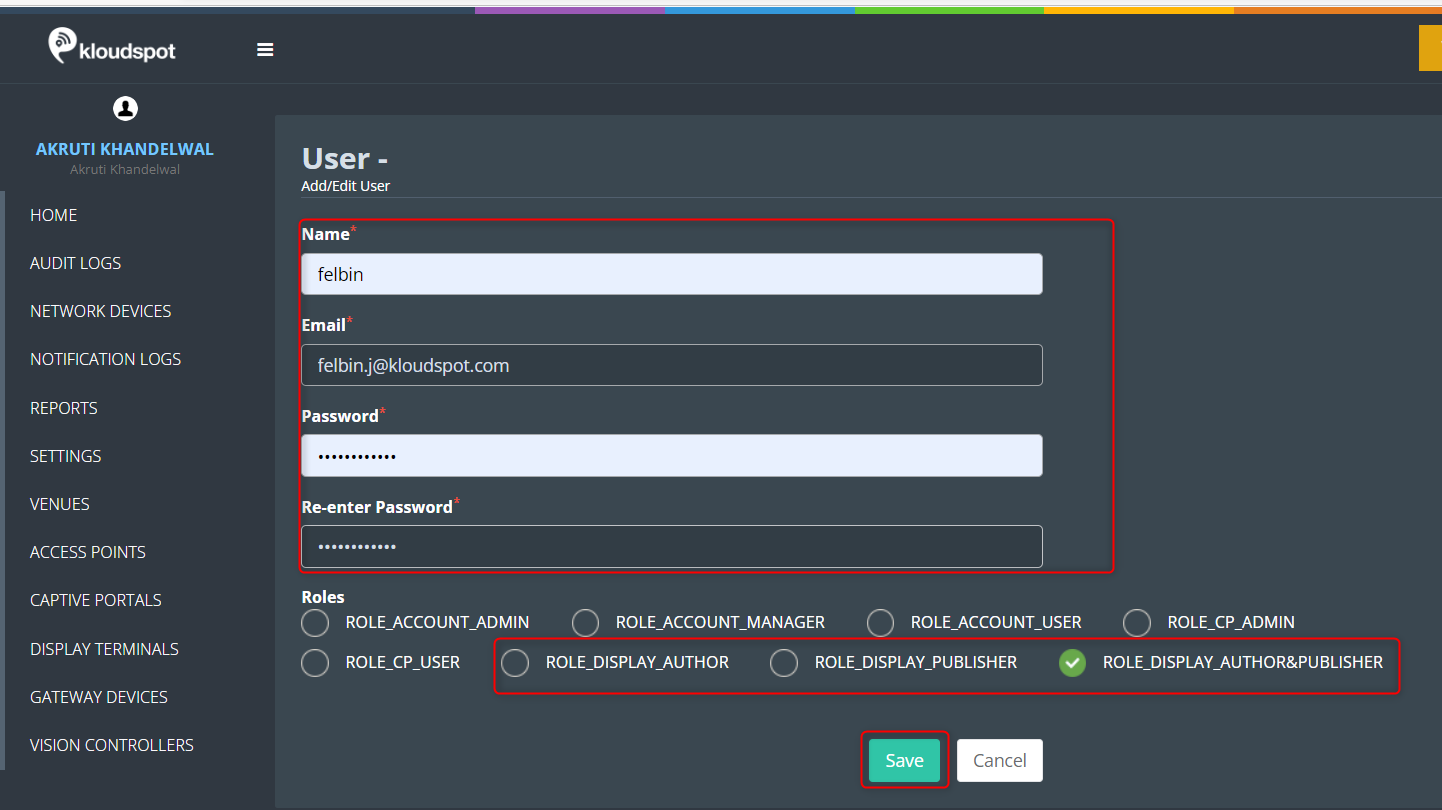
Enter user information, such as name, email address, and password.
Then choose a role and click Save. Depending on the user’s responsibility, koudDisplay has three roles.
ROLE_DISPLAY_AUTHOR- It allows you to access and Edit the display terminal.
ROLE_DISPLAY_PUBLISHER- It allows you to authorize changes made by the author.
ROLE_DISPLAY_AUTHOR&PUBLISHER- This allows you to play the roles of both author and publisher.
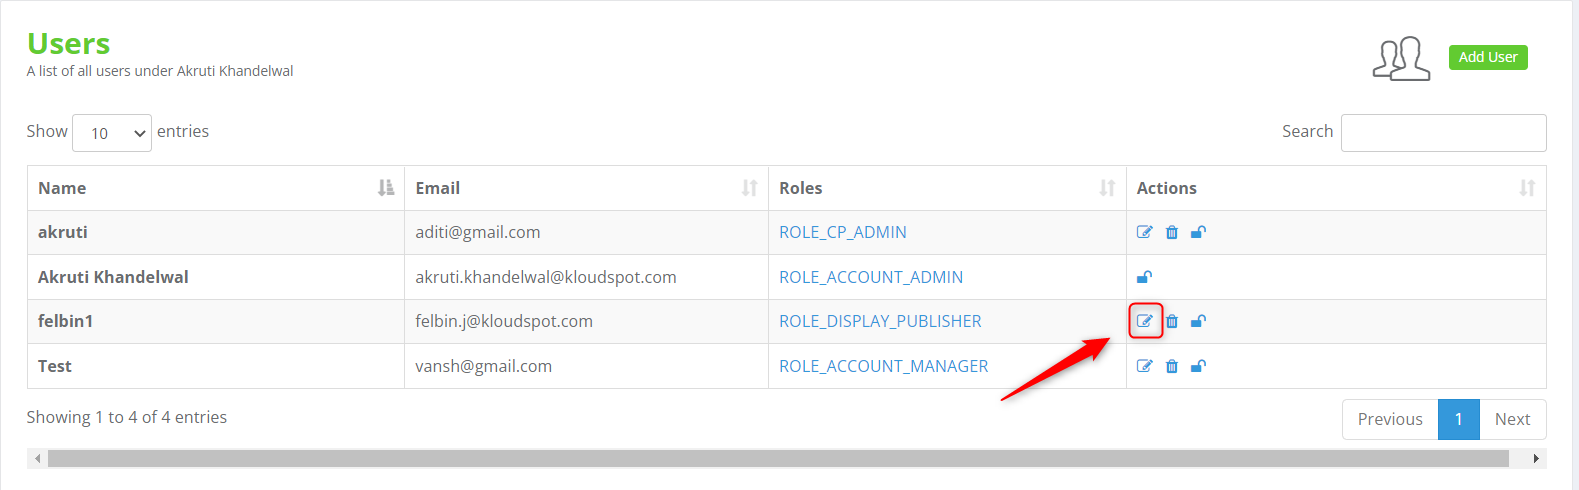
New user is added successfully. If you want to edit the user, click the edit user button in the Actions column
Edit a resource and send it for approval
Introduction
This document provides a step-by-step guide on how to edit a resource and send it for approval in the system. The process involves logging in with the appropriate user roles, accessing the resource edit page, making necessary changes, and finally, sending the edited resource for approval.
Process Steps
To begin the process, login to the system using an account with either the ROLE_DISPLAY_AUTHOR or ROLE_DISPLAY_AUTHOR&PUBLISHER role. These roles grant the required permissions to edit and submit resources for approval.
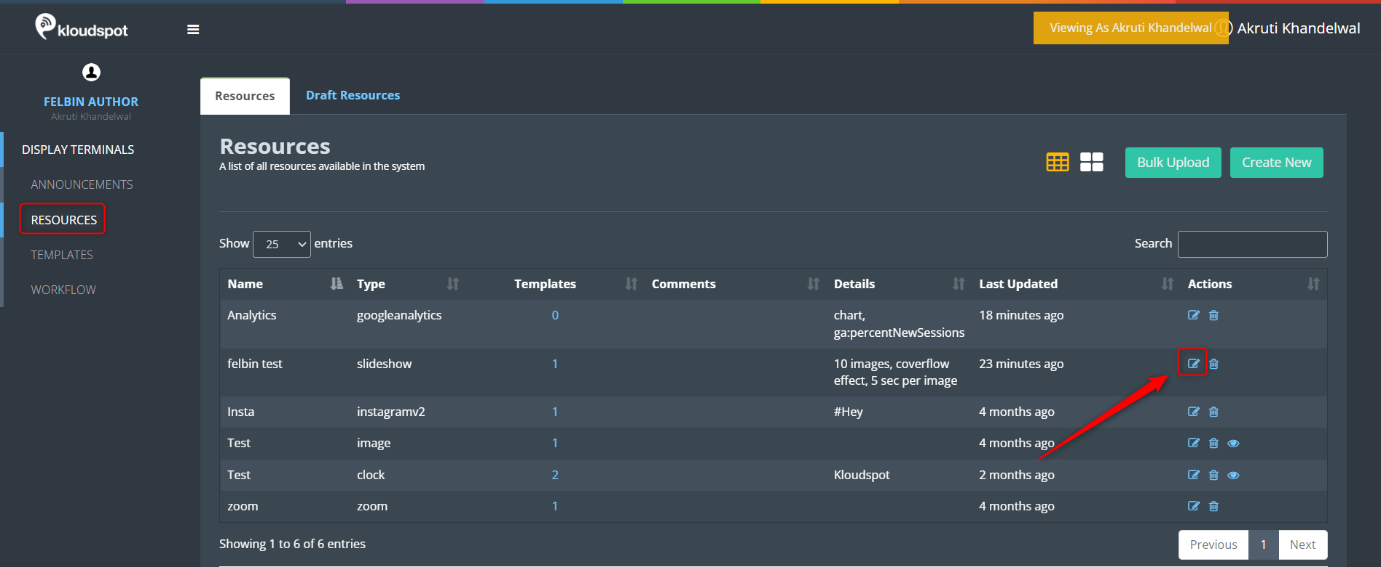
After successful login, navigate to the main menu of the application. Look for a RESOURCES menu and click on it. This action will take you to the Resources section where you can manage all the available resources. On the resources page, you should see a list of available resources. Locate the resource you wish to modify and find the edit button next to it. Click on the edit button to open the resource’s edit page.
Once the edit page of the resource appears, you can make the desired changes to the resource’s content. Ensure you apply all the required modifications to the resource.
After you have made the necessary changes, look for Send For Approval button on the edit page. Click on this button to initiate the approval process for the edited resource. The resource will be submitted to the relevant approvers for review and approval.
NOTE: The changes to the resource only need to be approved if it is impacted by any template. Otherwise, it can be edited directly. The template column indicates whether it has been added to the template.
NOTE: Once submitted for approval, no further changes are permitted unless the publisher approves or deletes it.
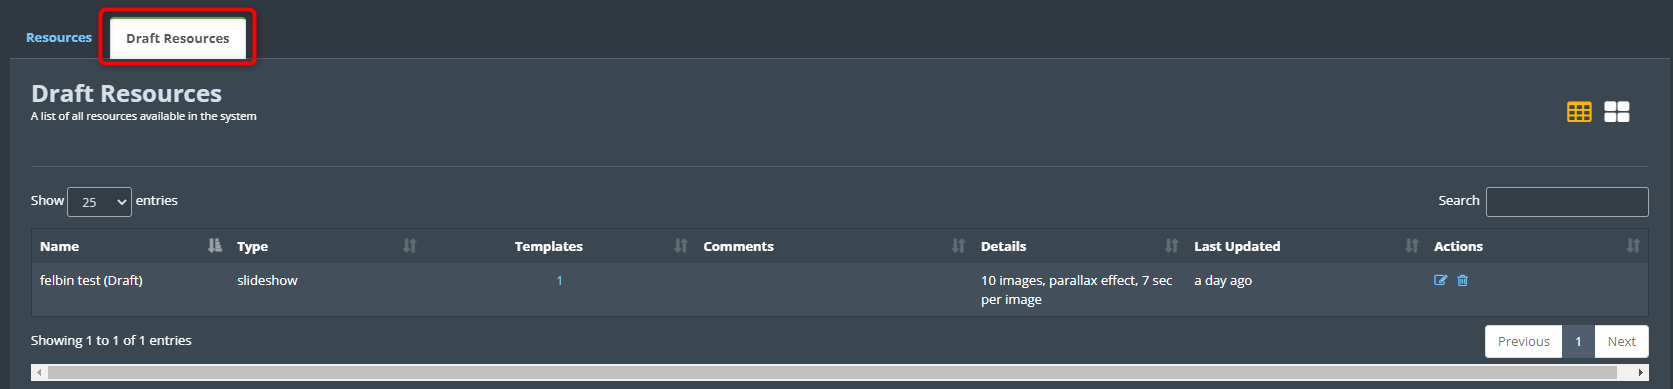
After you have sent the resource for approval, a draft copy will be generated. To view this draft copy, navigate to the Draft resource tab. Please note that the draft tab will be visible only if the workflow is enabled in the system. Once the resource is approved, the draft copy will be removed from the draft resource tab.
Handling “Send For Approval” Button Visibility
If you are editing the resource for the first time, you may not see the Send For Approval button on the edit page. In such cases, follow these additional steps:
Navigate to the Draft resource tab.
Open the Resource: Find the edited resource in the draft tab and open it by clicking on it.
Send For Approval: Once the resource is open, you will be able to see the Send For Approval button. Click on it to start the approval process.
Edit a template and send it for approval
Introduction
This technical document provides a step-by-step guide on how to edit a template and send it for approval in the application. Users with the appropriate roles (ROLE_DISPLAY_AUTHOR and ROLE_DISPLAY_AUTHOR&PUBLISHER) can make changes to existing templates and submit them for approval. The document outlines the process of accessing the template edit page, making modifications, and initiating the approval workflow.
Process Steps
Launch the application and enter your credentials. Use an account that has either the ROLE_DISPLAY_AUTHOR or ROLE_DISPLAY_AUTHOR&PUBLISHER role.
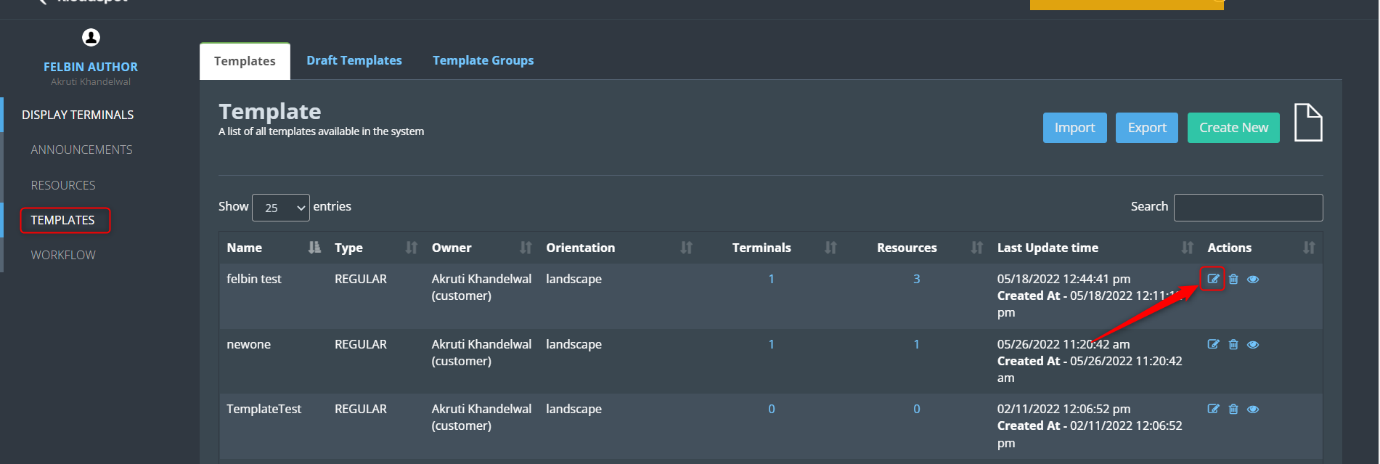
After logging in, Look for the TEMPLATE button in the menu bar and click on it.
In the template window that opens, you will see a list of existing templates. Locate the template you wish to modify, and click on the Edit button next to it.
The edit page for the selected template will now appear. Modify the template content as required. And review the changes and ensure they are accurate and complete.
Once you are satisfied with the changes, click on the Send For Approval button. If this is your first time editing the template, Send For Approval button might not be visible at this stage. Proceed to “Handling “Send For Approval” Button Visibility” steps to learn how to access it.
NOTE: The changes to the template only need to be approved if it is impacted by any terminal. Otherwise, it can be edited directly. The terminals column indicates whether it has been added to the terminal
NOTE: Once submitted for approval, no further changes are permitted unless the publisher approves or deletes it.
After editing the template, a draft copy will be automatically generated, If the workflow is enabled, you can view the draft template by navigating to the Draft templates tab.
The draft copy will only be visible until it is approved. Once the template is approved, the draft copy will be removed from the draft template tab.
Handling “Send For Approval” Button Visibility
First-time editors might not see the “Send For Approval” button after editing the template directly.
To send the template for approval, you need to access the draft template page.
Open the template associated with the draft template.
Now, you should be able to see Send For Approval button. Click on it to initiate the approval process.
Approve an edited resource or template
Approval requires a ROLE_DISPLAY_PUBLISHER or ROLE_DISPLAY_AUTHOR&PUBLISHER account. Login with it.
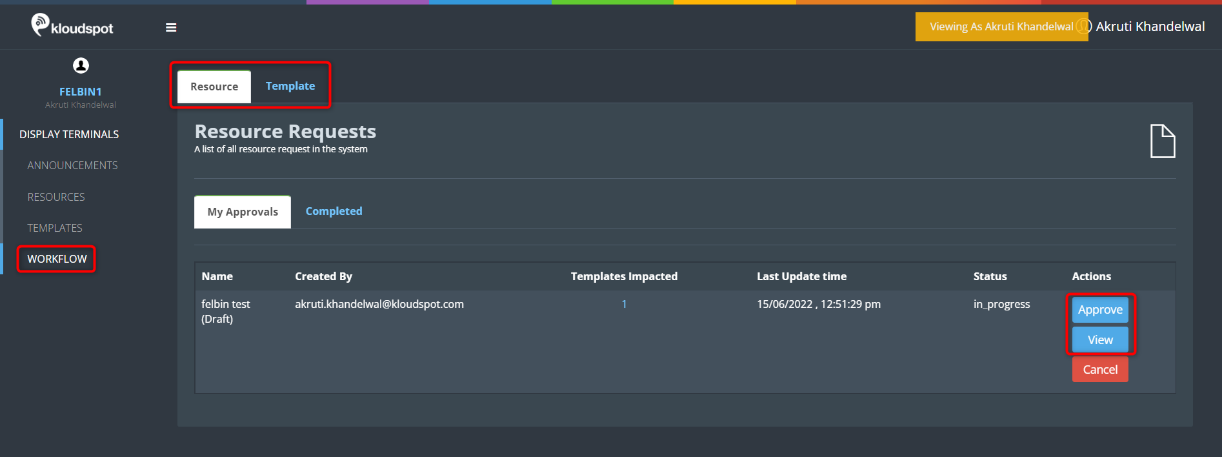
Then click on the WORKFLOW button from the menu bar. In the window that opens. You will see a list of requests.
You can then choose the Resource and Template tabs as required.
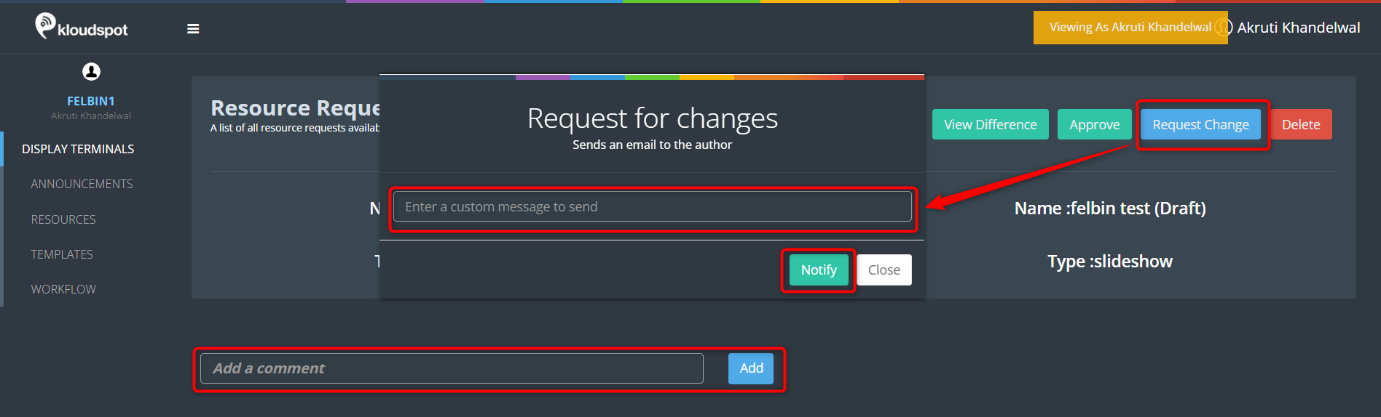
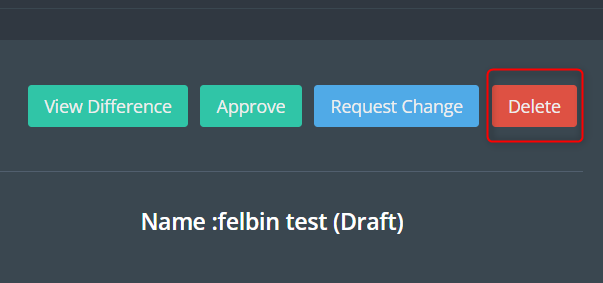
Requests can be approved by clicking the Approve button. By clicking on the View button, you can learn more about the change.
If you need to add any more to the change, click on the Request Change button, then add a comment in the popup window that appears and click the Notify button, which will be sent to the author as an email.
If you have any additional comments, leave them in the comment box.
If this change is no longer needed, simply delete it by clicking the delete button.
Analytics Integration
It is possible to trigger display template changes and announcements using rules in the Kloudspot Analytics platform. In order to do this follow the following steps to create an Action Template and then you can use that within a Rule Definition.
Announcement
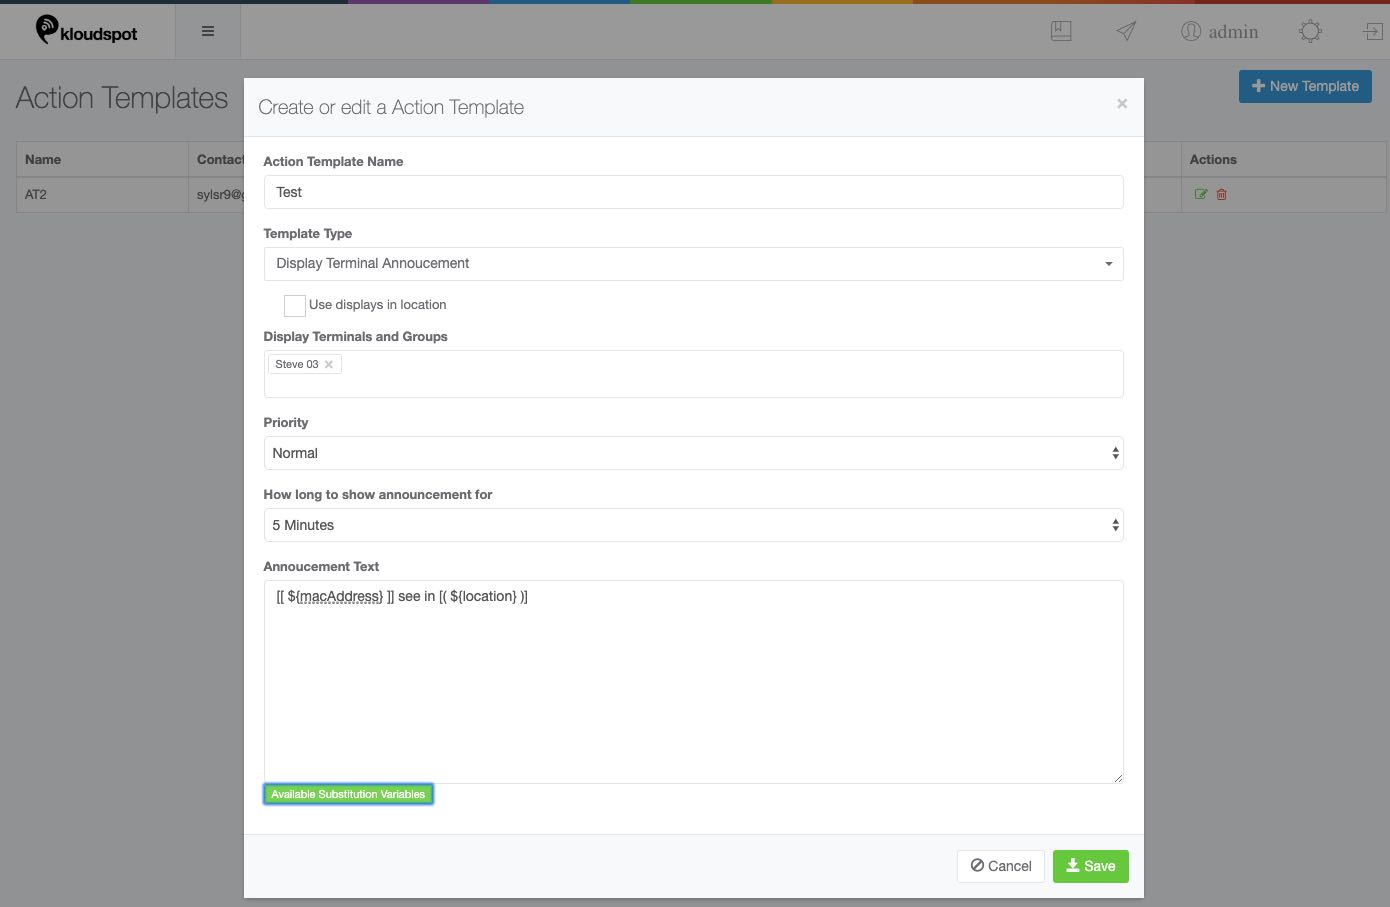
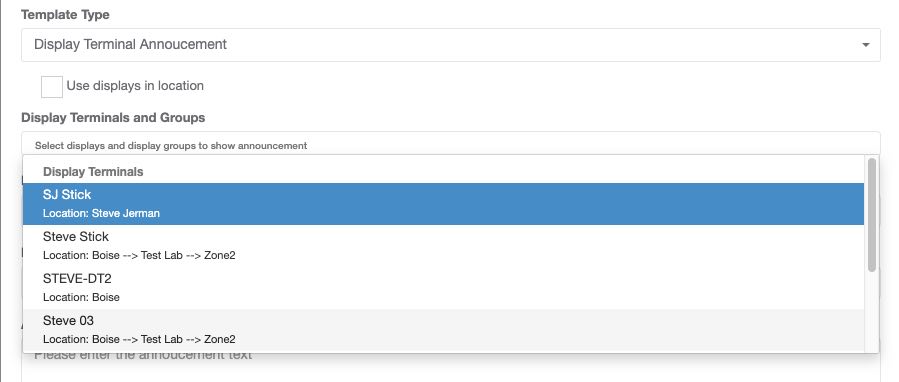
Go to the Action Templates under ‘Rules’ in Kloudspot Analytics and create a new Action Template with the Display Terminal Announcement type.
It has the following parameters similar to using the Announcement UI :
Use display from location.
If set, then the displays configured for the location which triggered the rule will be used.
If not set, the a drop down will allow the user to select terminal to show the announcement.
Priority: Normal or Critical
Duration for announcement. Note that the announcement will be displayed immediately and then shown for the specified time.
Announcement Text: The message to show. Note that substitution variables (for example ’location’ can be used.)
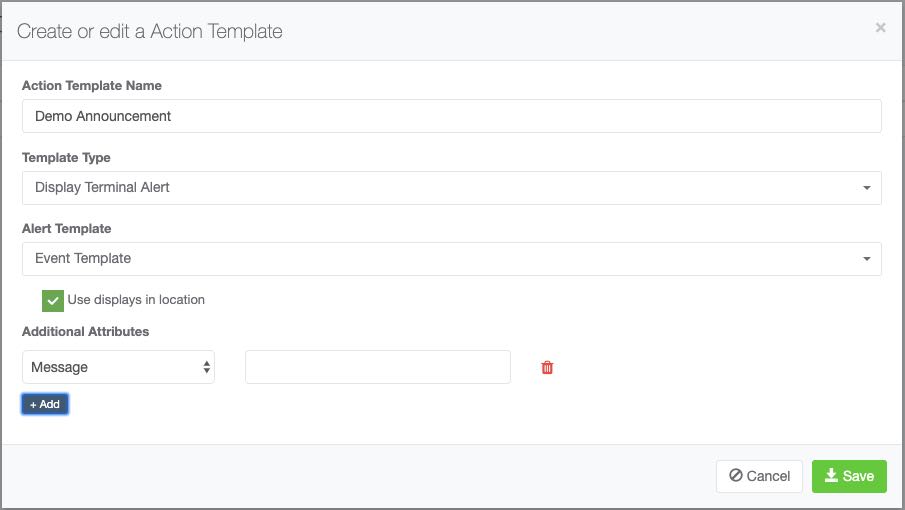
Event Template
Event templates can only be triggered for a KloudDisplay if they have been assigned to that KloudDisplay
Create an Event Template with the content you want to display.
Assign the template to the displays you want to show it.
Go to the Action Templates under ‘Rules’ in Kloudspot Analytics and create a new Action Template with the __Display Terminal Alert type.
Select the template you created above.
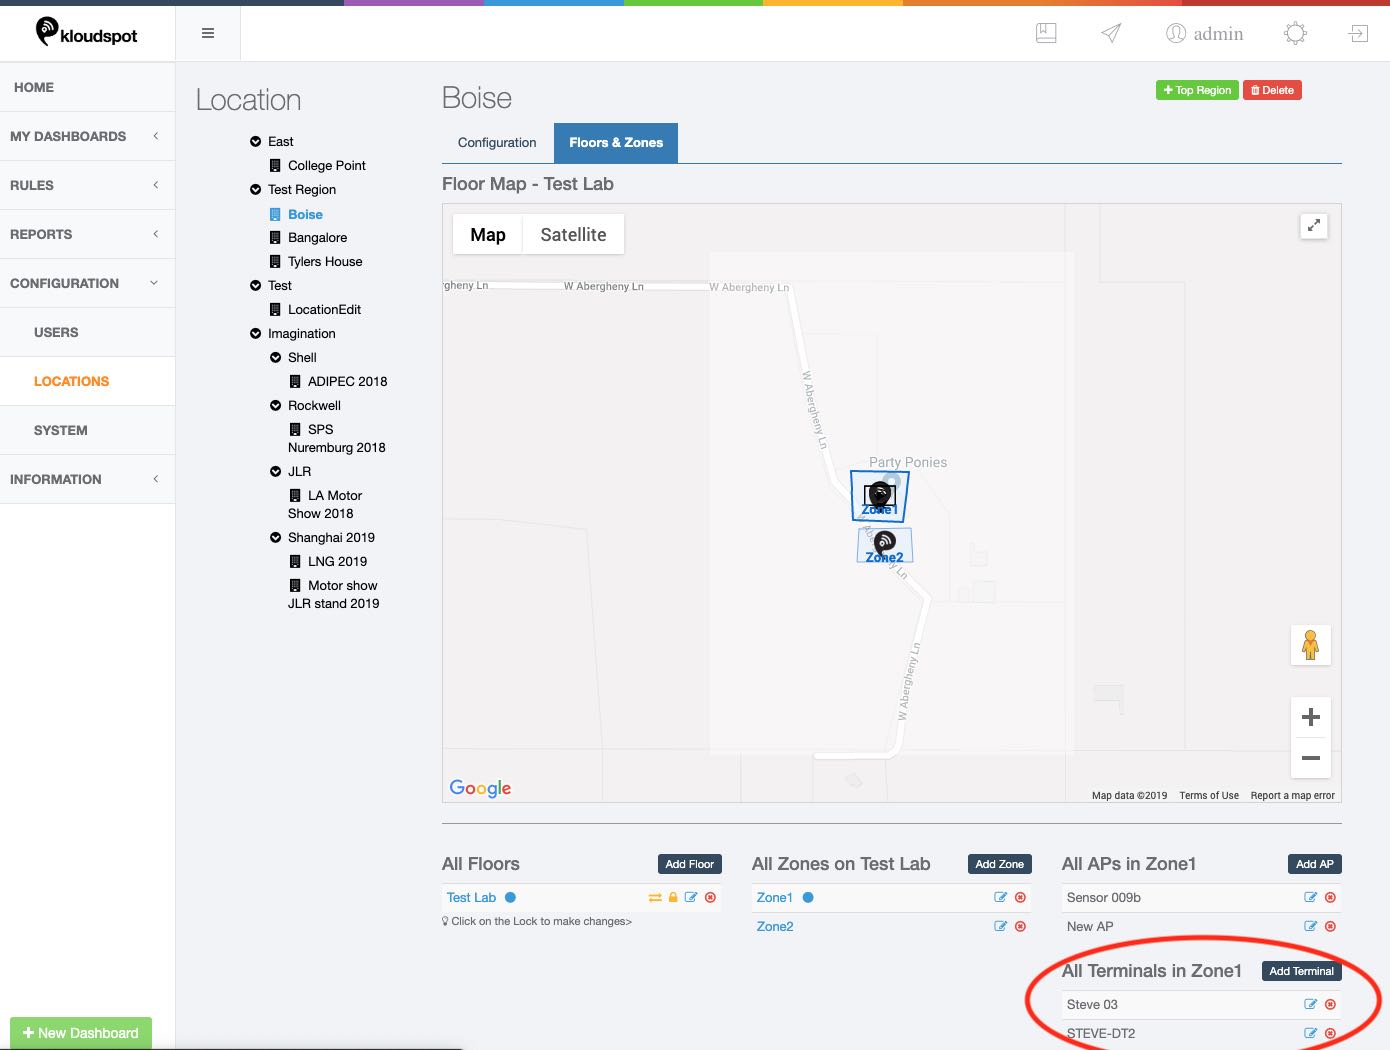
Select the terminals to show the Alert.
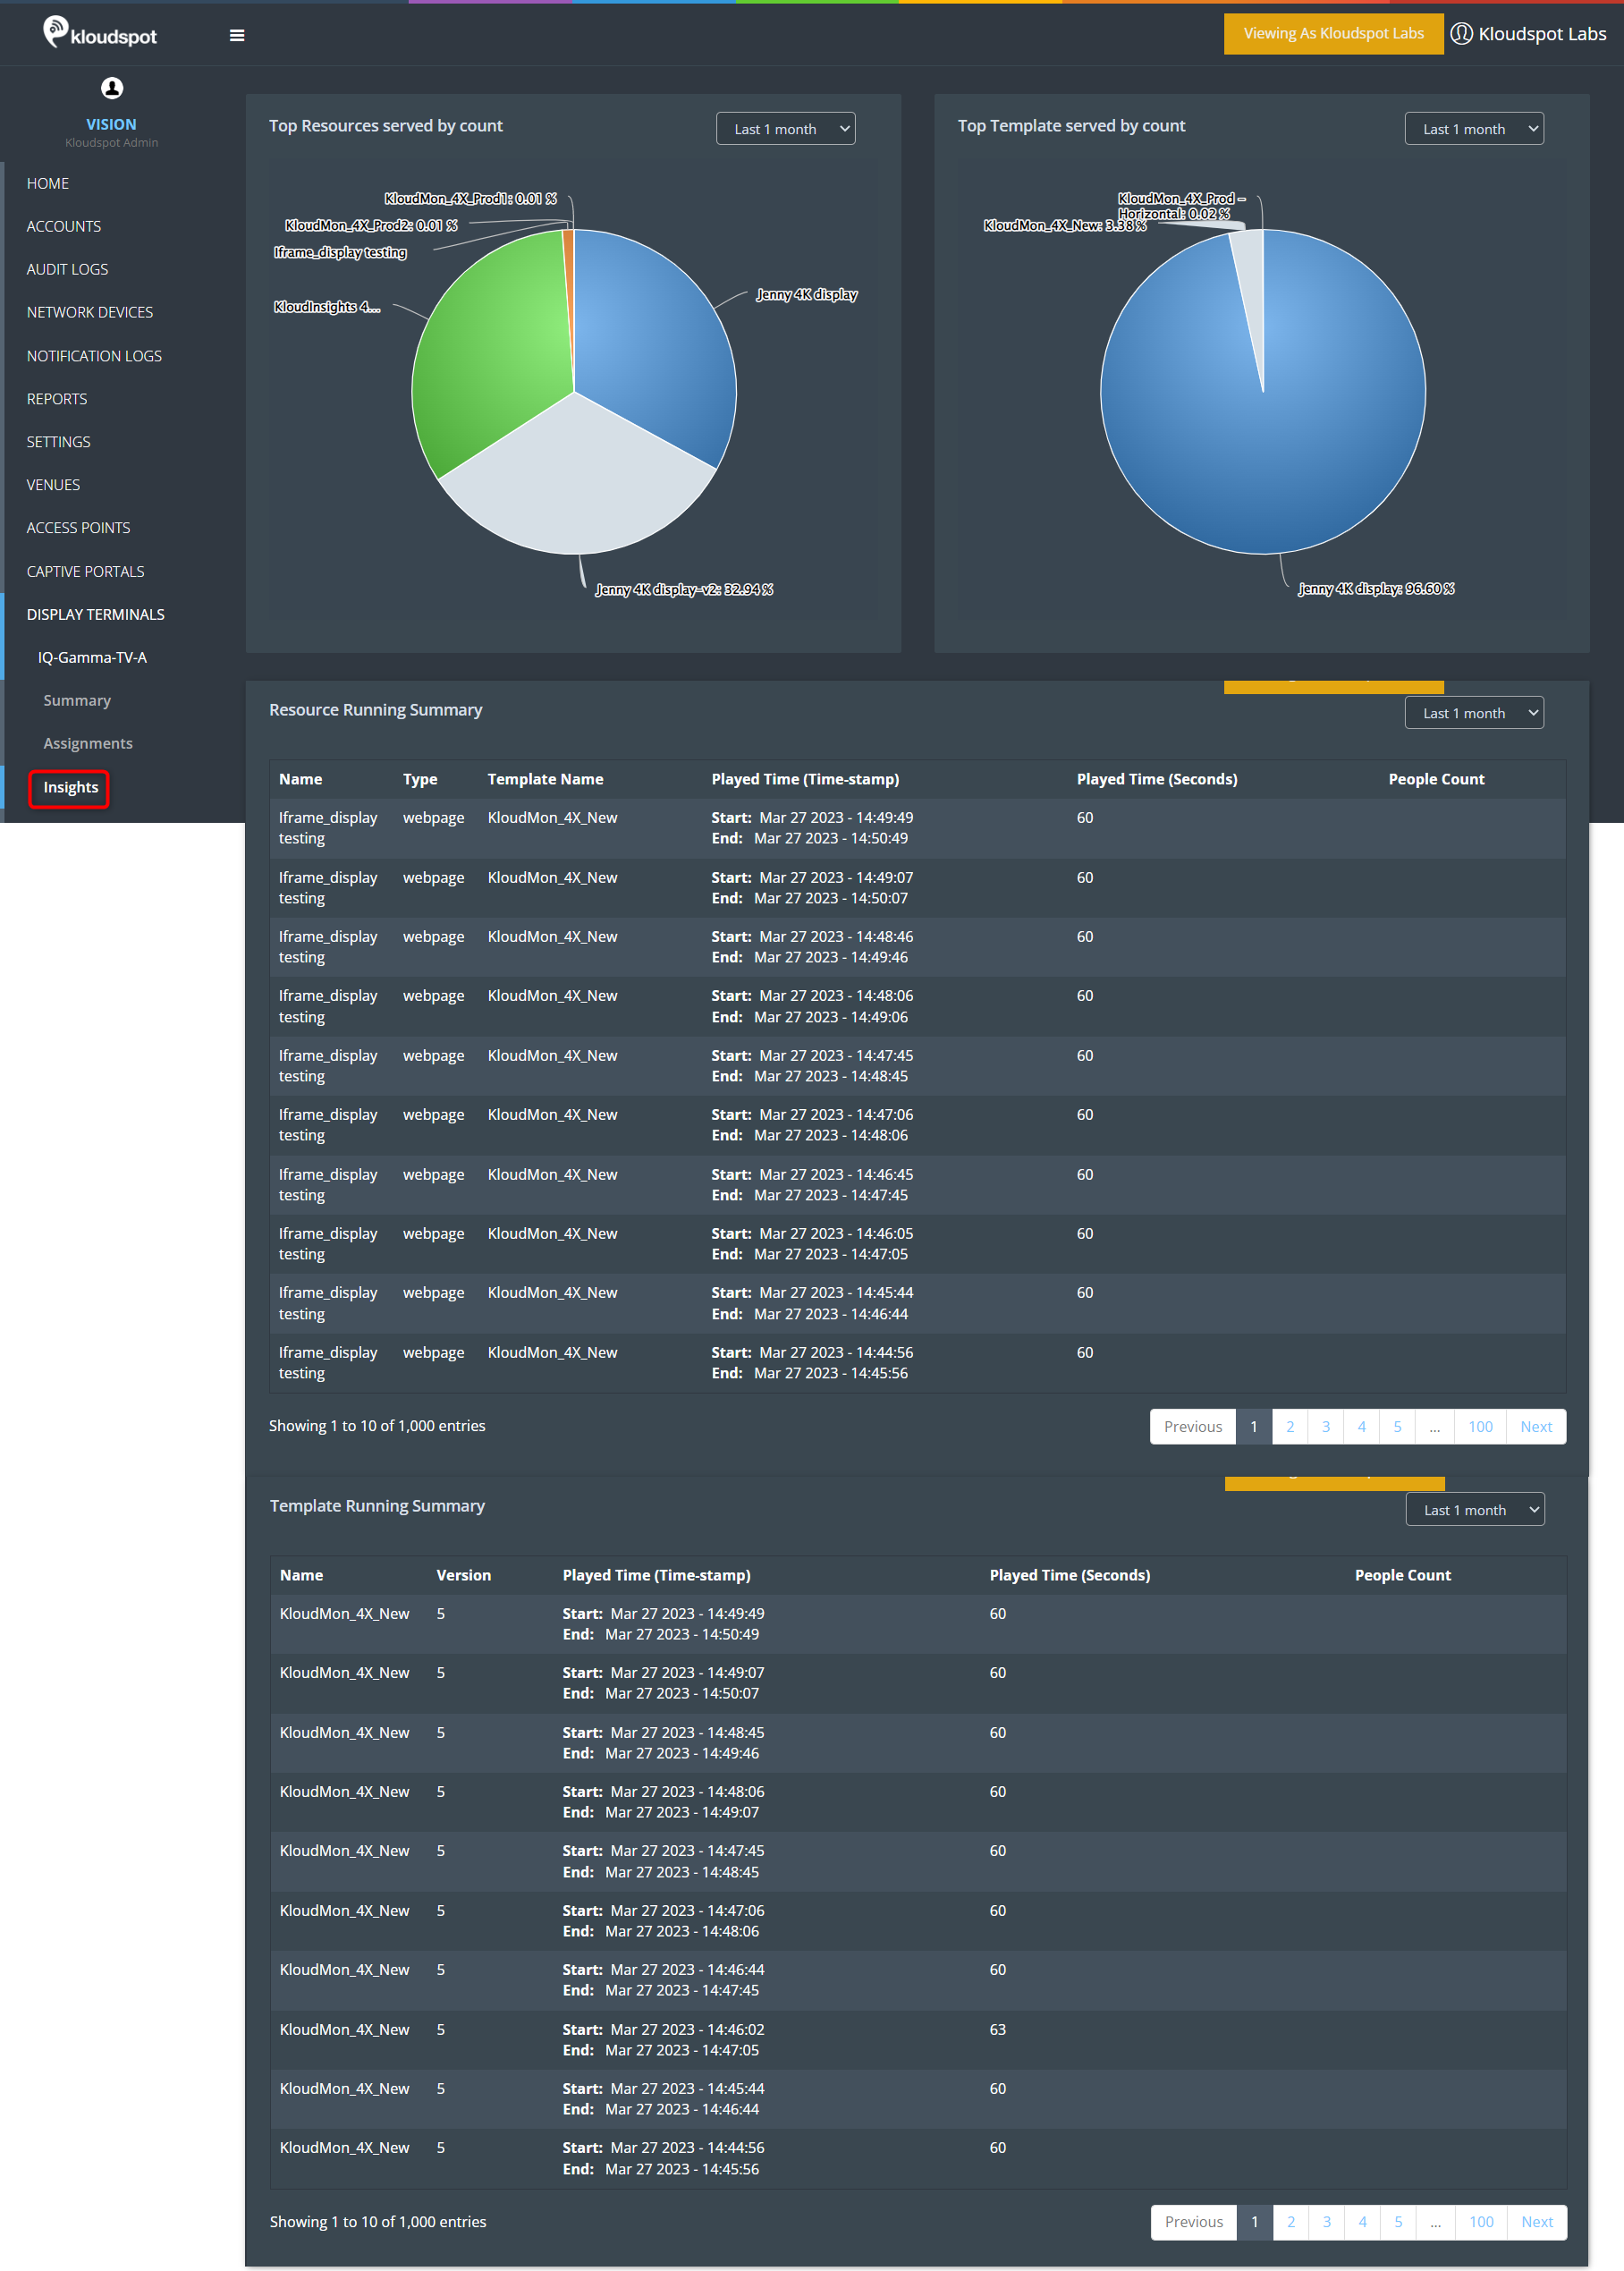
Get Insights about a terminal
It helps to get more insights about a terminal.
Top Resources served by count.
Top Template served by count.
Resource Running Summary.
Template Running Summary.
Navigate to DISPLAY TERMINALS and open your desired terminal from the displayed terminal list.
Then click on the Insights button from the menu bar. Immediately the insights of that terminal will open.
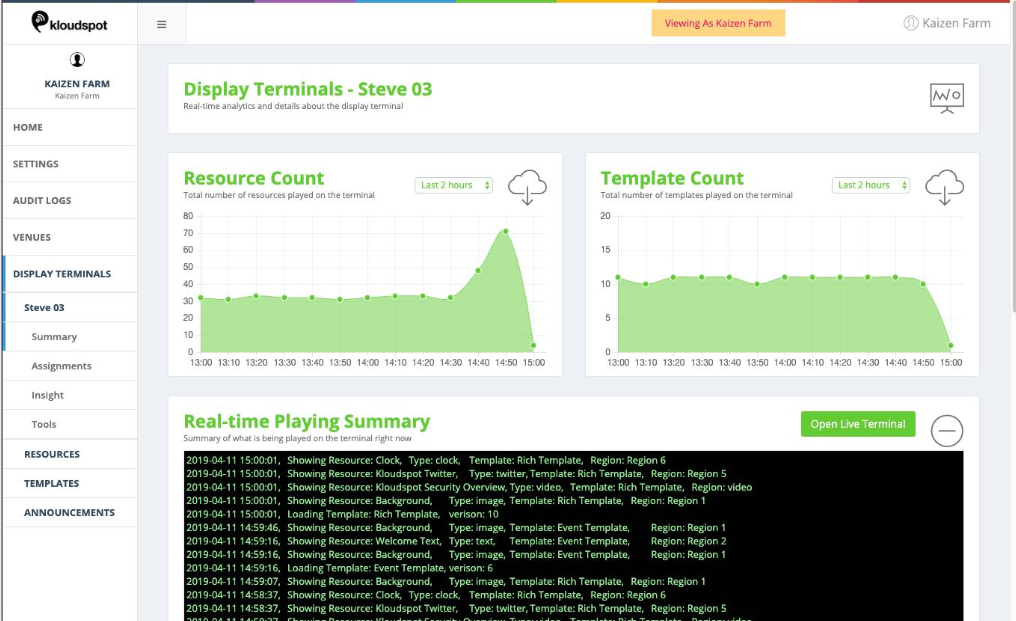
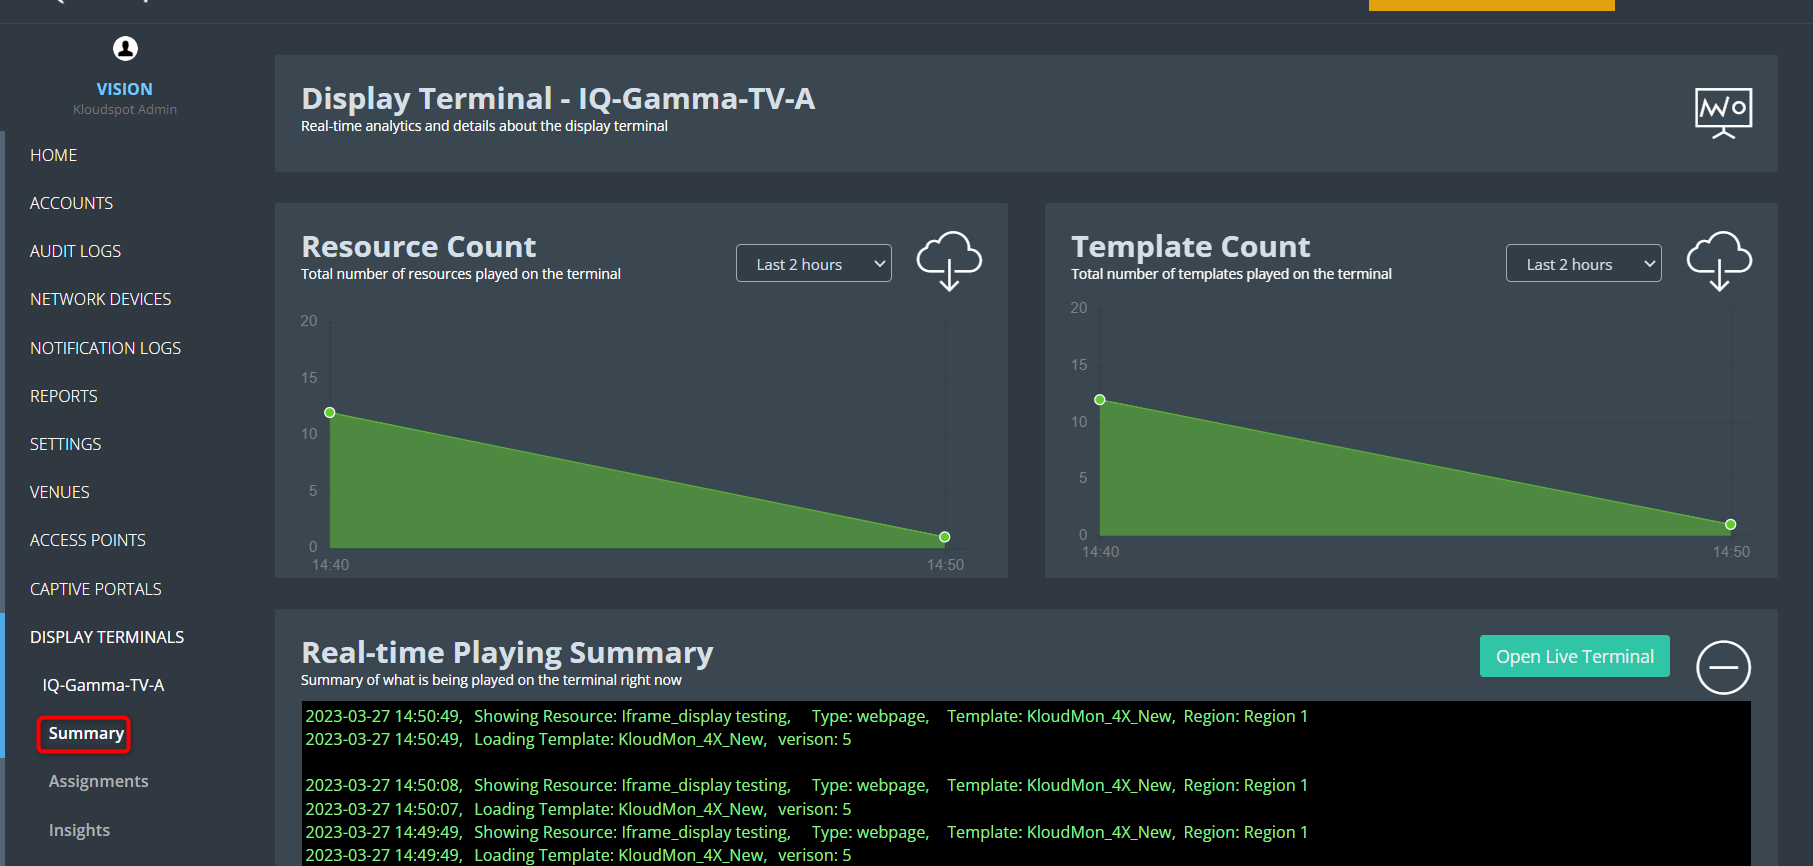
Get the terminal summary.
It helps to get Resource Count, Template Count, and Real-time Playing Summary about a display.
Navigate to DISPLAY TERMINALS and open your desired terminal from the displayed terminal list.
Then click on the Summary button from the menu bar. Immediately the Realtime summery of that terminal will open.