Network Profile
The Network Profile tab provides configuration for the different interfaces of the Access Point. Some of the Network Profile configurations are automatically set based on the Access Point hardware and cannot be changed while others can be configured as desired.
Below is a brief description of various configurations under the Network Profile menu.
-
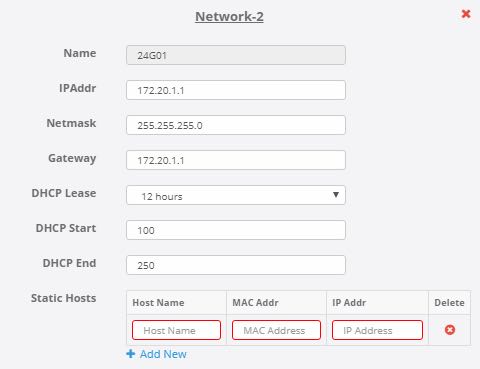
Name: This is a unique name for the network interface. This is automatically set, disabled and cannot be modified.
-
IP Addr: This is the IP address to be assigned for the network interface. This is pre-populated but can be changed as desired.
-
Netmask: This is the network mask of the network interface. This is defaulted to 255.255.255.0 but can be changed as desired.
-
Gateway: This is the Default Gateway for the network interace. This is defaulted to the IP address of the network interface but can be changed as desired.
-
DCHP Lease: This is the period of Time for which the DHCP Server leases IP addresses to devices. This is defaulted to 12 hours but can be changed to any value available in the dropdown.
-
DHCP Start: This is the offset from the network (IP) address of the underlying interface and detrermines the start range of the IP addresses for the devices. This is defaulted to 100 but can be changed as desired. For example, DHCP Start = 100 will mean that for IP address 192.168.1.x, the starting IP address will be 192.168.1.100
-
DHCP End: This indicates the last IP address that can be assigned to a device connected to this network interface. It also helps to determine the size of the IP address pool. This is defaulted to 250 but can be changed as desired. For example, DHCP End = 250 will mean that for IP address 192.168.1.x, the last IP address will be 192.168.1.250
-
Static Hosts: Devices whose IP addresses should not change (for example network printers) can be assigned static IP addresses so that their IP address is not reset. To assign static IP address for a device, click on + Add New link and then enter the Host Name, MAC address and the desired static IP address.
-
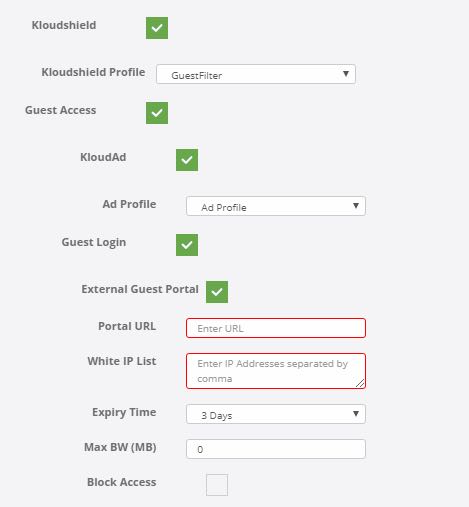
Kloudshield: To enable Kloudshield content filtering service on the network interface, select the Kloudshield check box and choose the desired Kloushield Profile from the dropdown.
-
Guest Access: Enabling Guest Access check box allows to configure the desired settings for this network interface with respect to the advertisements to run and the guest portal behavior.
-
KloudAd: To render advertisements on devices connected to this network interface, select the KloudAd check box and then select the desired advertisment profile from the AdProfile dropdown
-
Guest Login: To render guest captive portal on devices connected to this network interface, select the Guest Login check box. Kloudspot supports both internal & external guest captive portals.
-
To set the internal guest captive portal, follow the below steps:
- Ensure that the External Guest Portal check box is Not selected
- Select the desired Guest Template from the Guest Template dropdown
- Set the desired Expiry Time from the Expiry Time dropdown ( Expiry Time is the Time after which the device will be logged-off automatically. Options for Expiry Time range from from 30 minutes to 7 days. Never option will not logoff the device automatically, but can be invalidated manually from the user list)
- Max BW (MB): Set the Max BW in Mega Bytes after which the device will be logged off automatically ( Max BW (MB) is the maximum allowed badnwidth in Mega Bytes that a device can utilise before getting logged off automatically. For unlimited bandwidth, set it to 0).
-
Note that when both the Expiry Time and the Max BW(MB) are set, the device gets logged off automatically after any one those 2 conditions are met.
-
Select the Block Access check box if the device needs to be blocked for the rest of the day(till midnight) once the device has exceeded the set Expiry Time or the Maximum Bandwidth allowed. (If the Block Access check box is not selected, then the device is permitted to again access the network after being automatically logged off).
-
To set the external guest captive portal, follow the below steps:
- Select the External Guest Portal check box
- Specify the URL of the external guest page in the Portal URL field
- Specify the comma separated list of IP addresses to be white walled
- Set the desired Expiry Time from the Expiry Time dropdown ( Expiry Time is the Time after which the device will be logged-off automatically. Options for Expiry Time range from from 30 minutes to 7 days. Never option will not logoff the device automatically, but can be invalidated manually from the user list)
- Max BW (MB): Set the Max BW in Mega Bytes after which the device will be logged off automatically ( Max BW (MB) is the maximum allowed badnwidth in Mega Bytes that a device can utilise before getting logged off automatically. For unlimited bandwidth, set it to 0).
-
Note that when both the Expiry Time and the Max BW(MB) are set, the device gets logged off automatically after any one those 2 conditions are met.
-
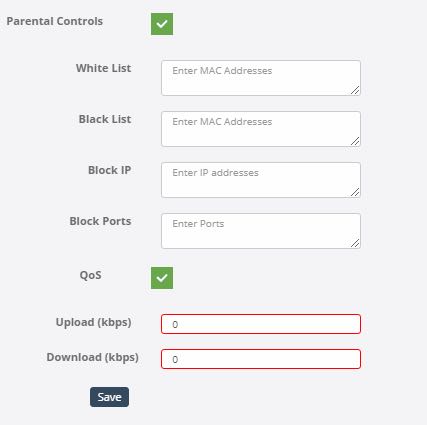
Parental Controls: Selecting the Parental Controls check box provides a set of options that allow/deny network access to devices, block traffic to & from specified IP addresses and block specified ports.
-
White List: Any device that needs to access the network without going through any guest portal restrictions must have its MAC addresses specified in this field. Multiple MAC addresses can be entered by using commas.
-
Black List: Any device that needs to be denied access to the network must have its MAC addresses specified in this field. Multiple MAC addresses can be entered by using commas.
-
Block IP: If traffic to any IP addresses are to be blocked, specify those IP addresses in this field. Multiple IP addresses can be entered by using commas.
-
Block Ports: If outgoing traffic through any ports are to be blocked, specify those ports in this field. Multiple ports can be entered by using commas.
-
QOS: Select this check box to specify upload and download data speeds in Kilobits per Second.